Showing posts with label lights. Show all posts

Thursday, December 28, 2023

Dashing Thru the Smoke

After returning Hapy to service, I have not driven him much. As has been true for most of the time we have been together, he doesn't have heat. So it's like driving in an ice fishing shed... which probably brings some appeal to some folks, but it's not my favorite. Still, if I had to get somewhere and I could get there without using freeways, I would and have drive(n) Hapy. Why not freeways? This time of year, as I am sure you have noticed, drivers are especially distracted and others are driving specially, uh... nasty. This old bus needs more braking space than modern cars but other drivers don't always recognize that. When you add those factors together, it is tough sledding in the bus. Add in wet or slick roads and it gets scary. Regular roads are bad enough, but freeway speeds are too scary in the winter for me and the bus. With this backdrop, I start today's post.

Smoked Again
can you spot the loose wire?
A few years ago, on the return drive from 4Peaks, we were greeted with smoke billowing out from under the dash (See 4Peaks 2018 - Road Report). Somehow the ignition sub-harness had fried, leaving us stranded, riding home on a flatbed again. There's a song lyric in there somewhere. Anyway, I fixed that once and then again in a not-to-my-best-liking way with now 2 keys to operate the bus: one to unlock the steering and one to start/run the engine. This is working well enough so I leave it alone.

The other night, I had to drive out to Hillsboro for a final recording session with the band I'm playing in (shameless plug: Sunkicks), and Boo had not returned from work. So, I pressed Hapy into service. With the new starter and better glow-plugs, he fired right up and hummed like he was ready for some fun. It was damp out, so the lack of heat meant drying the inside of the windscreen with a towel, but for the ride out, it only needed that one wipe down. Even the driver door closed without too much trouble. It was like Hapy was really trying his best to show he was a real car and could be used reliably. We stopped for some home repair parts at the big box home repair store and he started right up afterwards. Again, "I'm a real car".

After the recording session concluded, the temperature had continued to drop, while the moisture held steady so the interior glass was quite foggy. Hapy fired right up and I flipped on the running lights while I refamiliarized myself with the controls in the dark. I thought I had the switch for the fans in my hand, but it was actually the headlight control... I turned hard it to the right (the fan control switch has always been a little resistant), and rather than turn on the fans, I caused something to ground, causing a wire to release it's smoke. When I saw the smoke, I turned the switch back left (anti-clockwise) but the damage had been done. All that was left was to figure out how widespread it was, and to apologize to Hapy; this wasn't his fault, it was all mine. The smoke was pretty bad though, considering the windows were closed, the bus wasn't moving and the fan wasn't on. The next day, my throat was still sore from it. When I opened the driver window, it must have looked like a scene from Fast Times at Ridgemont High with the billowing smoke rolling out.

dripping blue
Starting with the positive... the engine was still running. The cooling fans were on and could be turned on and off. The defogger (doesn't defrost, hardly de-fogs) fan could be turned on and off. As to the negative, the driving lights were out, I think the tail lights were out and there was an annoying buzzer like a seatbelt warning was on. When I flipped the turn signal or hazards, the front lights flashed correctly and the buzzing went away. I was still sitting, idling in front of my bandmate's house, so I decided that I would just drive home and deal with it later.

The drive home was quite uneventful other than the constant buzz noise and concern that drivers behind me could not see us nor tell when we were braking. When I got home, the engine and fans shut off without issue. It was too late and too dark to diagnose, but my hunch was that it's the wire that sends a signal to the running lights.

Wire Still a Puzzler
A few days later, when I could go out to the bus in daylight, I went out and removed the headlight switch from the dash. I could see one of the wires had become detached, but I was unable to see any truly fried wires. Puzzled, I plugged the wire into the open pin on the back of the switch, and tried the lights. Yep, headlights still turn on, dash lights still turn on.... running lights turn on. All of them, including the tail lights. So, I pulled on the hazard switch. Dash directionals flash, front directionals flash, rear directionals flash. At this point, I don't know what's fried, but the engine starts and runs, the cooling fans fire, the dash lights, switches and gauges work and all the lights work. In the middle picture, just above, there's a light blue orb thing on the lower left side of the image. That is a blue drip that I cannot account for, but I think something melted and that's the result. Neat.

I think it is time for me to determine which of the original circuits no longer need to be served and at the very least remove the fuses. After the cleanup I did in the back for running the engine, I think it would be wise to plan to do something very similar up front. I mean, in the end, the only things the "main" fuse box is running now are the dash, and the lights. That's like, 4 fuses tops? Regardless, this exercise should lead me to the smoked wire and reduce the electrical gremlins.

Furnace Update
furnace control board
Our electrician is semi-retired. He used to run a HVAC company and has installed literally hundreds of furnaces before focusing on general residential electrical instead. Now, as he is slowly divesting of his electrical business, he has observed my work on our furnace. In a fit of holiday fever (he swore off furnace work years ago), he popped by for a couple of hours, got the gas line hooked up and leak tested as well as the 110V electrical feed completed, with a worker shut-off switch. He even got most of the exhaust venting put in. He hit a wall when he was unable to connect the control cable because the access screws are hidden behind a panel that you can't get to once the first piece of exhaust venting is attached to the furnace. That's some poor design.

Still, I saw the furnace project as 7 big individual efforts: demo/move/mount, conditioned air distribution, cold air return, gas, electric, exhaust vent and the thermostat/control cable. I had completed the first 2. He knocked down 2 more (gas and electric) and set me up to get the next 2: thermostat control and exhaust vent. Once I have that done, he will confirm things, and test the system. Then, I just need to get the cold air to pull from inside the house and we have a complete system. For testing purposes, I may simply smack a filter on the plenum.

Since I started this thread, I caught a cold, celebrated Christmas and installed the thermostat control cable. As I indicated, I had to remove the exhaust venting all the way to the firebox before I could remove the panel which covers the control board. I ran a new wire from beneath the furnace (where the old one entered) and connected the control wires. Before putting everything back together, I took the opportunity to spray the snot out of the control board with a can of computer-cleaning compressed air. I figured that panel won't be coming off anytime soon, so may as well get the board as clean as I can. After that, it was simple replacing that which was removed, re-using the same fasteners.

That's about where things are today. Hapy appears operational, and I will be test driving him here in the next couple of days. The furnace is almost ready to test. I need to complete the assembly of the exhaust vent and properly suspend it from the floor to retain the correct exit angle, but I think that is a couple of hours effort at most.

Thanks as always, for following along. Have a peaceful, pleasant, hapy new year-

Tuesday, May 31, 2022

Luxury Electrical Restored

As I work through the interior of the 1972 bus, I am learning that there are many layers to the electrical re-visit. I posted about the re-wire of the ceiling circuits (see Ceiling Wiring Rough-In). Today, I go over some of the other modifications I have been doing in the electrical space. I had the interior torn apart, so it seemed like a good opportunity to get after things before I put it all back together again. For example, the cushions have been removed from the rock-n-roll bed, and the cabinets have been emptied. 

Changing Tack
I am absolutely feeling time pressure, as the days get longer and camping season looms. So, I am shifting to getting things good 'nuf for Summer. What does that mean? I am setting aside the headliner. I am setting aside the carpet and the door card stuff. Instead, I am going to focus on getting Hapy operational enough for us to enjoy the Summer. The new reduced scope for the Spring includes the finish electrical (this post), completing the sound deadening (slider door and a few little bits here and there) and getting everything else that was pulled apart put back together. If I have any time opportunities pop up, I will do a little thing here or there so long as it doesn't impact our ability to take Hapy out for a spin or a camping trip.

Furnace Control Moved
Afterburner control
Recall the diesel furnace I added a couple years ago. When I did it, I added a custom computer-based thermostat, called Afterburner, hand-built by a guy in Australia. I had mounted the control unit to the side wall about where the 1979 Westfalia control panel traditionally sat. I decided that I did not need to see the thermostat all the time, and would prefer the less-cluttered look. Also, the LED panel glows whenever there is power (it doesn't have a sleep concept), so at night, it acts like a potentially unwelcome nightlight. I moved that control panel right next to that 1979 control panel: inside the rear cabinet. The wiring was readily available, and simply required another hole to be bored in the wood panel. The temperature probe, of course, needs to be in open space. I had previously routed it up along the C-pillar (between the mid-window and the rear window) and set it sort of hanging on the window frame. Obviously, that was temporary. I am not sure where I will put it now, but according to Ray, Mr. Afterburner, the sensor wire can be extended with CAT5 cable. The extension should work, but if I can avoid adding another variable, I will. Ultimately, I will solve this later. I did, however, run a CAT5 cable from the bottom of the B-pillar back to the furnace control so I could make the modification later, if I so choose.

I discovered during testing, however, that a couple of things are not working properly with the furnace. First, it test-fired okay, and it really pulled the voltage down on the luxury battery. I had forgotten about that, and the fact that I cut off the furnace wire back to the drive battery during the interior tear-out. I will need to upgrade the wiring to thicker gauge to see if that stops the heavy voltage drop, and then maybe re-plumb the wiring to the drive battery. Second, during the test run, it became obvious that the exhaust had become disconnected as exhaust started to appear inside the bus. That's bad. I will need to completely exhume the furnace and re-do the install to make sure there are no leaks. Last, there is something not right with the Afterburner controller. It no longer supports a web access point. So, it has all the other great stuff, but I can't start it remotely. In the end, the furnace will sit unused until I fix the exhaust... and the voltage drop. Maybe I'll figure out what's up with the Afterburner access point after that. Of course, it may be next spring by then.

New Fuse Box
new fuse box
I had been wrestling with a decision about the luxury fuse box for a while. I had been using a spare bay window bus fuse box. It worked well enough, but it was not perfect. It lacked a common positive post, some of the fuses had a common supply side and others did not, and there was a whole relay section that I didn't use. The fuses were the old-style fuses, not the newer bladed ones, and those old-style ones are becoming harder to source, and more expensive. Last, it is kind of big, almost 50 years old and the way I was using it was a hack that would fail. So, I bought a smaller 12-slot fuse box and a master circuit breaker / switch to put between the battery and the fuse box. Since many of the wires were being replaced, and the remaining were going to get at least touched as part of the routing, changing the fuse box was a small incremental increase in scope. I needed to remove the prior box for the noise contain efforts anyway, so I was halfway there already.

Doing the Doing
wire up in process
In the Ceiling Wiring Rough-In post, I described what color wire was going to be used for what. I ran or strung the wires to their destinations, and routed the other end down the driver-side (left) B-pillar, along the front edge of the middle window, under that window around the fridge-cabinet and left things pretty much in a heap right there. I started by completing the routing of the wires along the route that the solar collector wiring ran (See Hapy Gets Solar). I zip-tied the wires together and against the side of the bus and then solar wiring inside the fridge cabinet to hold them secure. Once I determined which fuse spots were to be used for which wire (see below), I mounted the new fuse-box onto the top of the wood box under the rock-n-roll bed which covers the old Westy rectifier.... basically in the same spot as the old one was before.

With the fuse-box in a fixed location, I could determine wire lengths and mount them up. In an ideal world, I would have used ring terminal wire-connectors on the wires. I could not find enough of them on hand, so I just used the bare wires. In classic Paulie Axiom form (See Light a Cigarette, Attract a Bus), I found them after I did this work so I will be slowly retrofitting them onto the wires. Anyway, once the wires were routed, trimmed and connected, I wrapped the bundle in one of those plastic wire tube things.

Fuse Layout
fuse wire color purpose
1 Grey Cab 12V Accessory Plug
2 Purple Cab Dome Light
3 Yellow Stereo
4 White 3-switch Dome Light
5 Pink PopTop Light / 1-switch Dome Light
6 Blue 3-position Westy Light
7 Yellow Furnace
8 Green Rock-n-Roll 12V Accessory Plug
9 Green Sleeping Area Dome Light
10 Orange Sleeping Area USB Chargers
11 OPEN OPEN
12 OPEN OPEN
 
Wait a Second...
wired up
The keen eye will notice that circuit #3 is wired up in the picture on the right, but isn't in the picture above it. Fuse #3 is the stereo. This is interesting only because of the gymnastics I executed to get it there. Before I started the noise project, the power lead for the stereo ran on the floor under the carpet. Yeah, that was not ideal, but it worked short-term. I ran a new power lead behind the dash and through the original wiring harness pass-thru hole in front of the accelerator pedal. From there, it runs along the inner edge of the passenger side frame rail and passes up under the rock-n-roll bed through what looks like a factory drain hole. A closer look at the rear edge of the wood floor will show the yellow wire running along behind / underneath. I didn't stop there, but that's another post I'll write up and post later.

Battery and Ground
Finishing up the circuit, I first confirmed that none of the wires I just hooked up to the fuse-box effectively ran to ground with the multi-meter. I returned the luxury battery to it's old location, and hooked up the ground cable to the same grounding bolt near the fridge cabinet under the seat. With the sound killer installed, it was a little harder to find.

ugly (for now) but functional
My last step was connecting the B+ or positive side. My old set up had many smaller gauge wires all wound together at the battery post. I used a very short stretch of 8 or 10ga wire to bridge from the positive post to a master switch, and then some more of it to bridge from the switch to the fuse-box. The wire was the thickest I had around. I will mind the overall amp usage, but this should not be an issue except for when the furnace first starts up. Even then, I do not expect much system stress. The master switch is a battery/fire-saver, basically, that will prevent more than 100A draw. I don't see this switch ever popping, but it is better to be safe than on fire. Based on the length of the wire, and my uncertainty about it's thickness, it is very possible that the wire will fail before the switch pops. Ultimately, I would need to have every circuit in use and have the furnace kick on to get close to even 50A. So, the switch becomes little more than a means to turn the whole system off.

Completing the Circuits
I had very little in terms of electricity consumers actually connected at this point. So, my ability to test was fairly limited and I only put fuses in the circuits as they were completed. Still, I was able to turn on the light by the front seats, and test the accessory plugs up front and by the rock-n-roll bed. All good. I checked continuity on the circuits which did not yet have a consumer, but I did not really expect any negative findings, and didn't have any. So, I started down the path of hooking up lights.

not as ugly. functional
I started with the light fixture over the sleeping area (pictured above). I used the mounting bolt for my ground, attaching a ring connector to the white wire, and leaving it inside the fixture. To the black and red wires, I connected female wire connectors. My method has been that the power-supply side wire would get a male connector, and continued that throughout. To the green (to fuse 8) and white (to the switch over the slider) supply-side wires I attached male wire connectors. I discovered, as I attempted to install the light fixture, that that 1/2" thick Mega Zorbe sound absorber was too thick for my bolts to reach the riv-nuts. I considered finding longer bolts, but concluded that the heat produced by the light fixture could have a negative impact on the foam, and chose instead to remove the foam where the fixture went. The fixture effectively recessed into the foam, which, I think will actually look better once the headliner goes in. It admittedly looks pretty trash right now. Once the fixture was mounted, I plugged in the wires, and Immediately, the red LED on the fuse-box next to fuse holder 8 lit. This told me that the circuit was good, and just needed a fuse. I popped in the fuse, and the light came on. Sweetness.

so many lighting choices
I followed this same path for the 3-position light over the window behind the driver seat (pictured above)... mounting bolt for ground, male female orientation, even plugging it all in to see the red LED. I needed to add a mounting plate behind the Mega Zorbe, but that was barely post-worthy. I cut out a small section, cut a rectangle of HVAC and screwed it to the bus. I set the fixture where I wanted it, marked and bored the holes. Easy-peasy.

I verified the pop top light at this point, and then shifted to the modified dome light (See Dome Light Mod to Trigger Other Lights). I had tried to mount this light earlier, and the mod wire broke off. I mentioned that in a comment on that original post, but I simply duplicated the effort with a thinner multi-stranded wire. On my repair version, I super glued the wire end down like before, but also added a 1-inch long stretch of superglue to adhere the insulation to the light housing. That bugger was not moving. I wrapped every bit of exposed metal (chair adapters, bits of relay, etc) with electrical tape so nothing would short out after I popped a couple of fuses. Once they were wrapped, and I could get the relay tucked in deep enough, I was able to settle the light fixture into place.

Testing the Lights
Once all of these circuits were completed, I cleaned up Hapy's interior and then hit it with the shop vac. Clean, and de-cluttered, Boo and I tested / played with the lights. The lights up front will work for checking a map or even reading a book. The original dome light, when turned on as a single creates plenty of light in the main cabin to see things on the floor, and even on top of the fridge cabinet. When the modified light circuit is turned on, the entire bus is well lit, from dash to tail gate. Since the rock-n-roll bed is not together, we could not test the reading lights for reading, but that test/play will be very soon.

With the new plan of just getting Hapy ready for the road, I do not feel the same pressure I did before. The lighting is functional, and I learned along the way that I needed to make modifications which would have been unpleasant after the headliner went in. Removing these fixtures for the headliner install will not be difficult either.

Thanks, as always, for following along-

Tuesday, February 9, 2021

Hapy Daily Driving

Well, that title might be overstating it a little bit. To clarify: Hapy is now capable of driving on a moment's notice. With the CoViD safer-at-home, I haven't been going anywhere. I may not have had an operable car for most of the last couple of months, but the lockdown has meant I haven't really needed one either. Today, I'll cover the little things that needed to be buttoned up after the big re-wire.

Reverse Lights
I mentioned the reverse lights at the end of the Electrical Gremlins saga. I had it wired up to a somewhat mystery switched 12V source before. When I tore the old wiring rats nest apart, it was left out of the new wiring. This resolution was fairly easy. Back when I set the mystery wire-up aside, I left the plastic-snap-shut fused wire in tact. So, there was just a plain bare wire to deal with. I fished it up into the spare tire well / wiring compartment from the engine bay. I spliced the wire into the switched source splice coming from relay 109 so the reverse lights will only come on when the computer thinks we are in "RUN". Since it already had an integrated fuse, this was a simple splice effort.

Headlight Flasher
When I was chasing the cause for my lack of amps during P0121 testing, I tore into the dash. I thought I had bumped something loose, and there are a bunch of things in there that could have shaken apart. Well, I didn't bump anything loose causing that issue, but I did bump something during that exploratory. Haha. During the Summer of 2020, I finally got my high-beam / low-beam flasher relay to work. It was because the replacement relay requires a source of 12V to pin 30. This pin wasn't on the old relay, and there is no wire leading to that pin in the original fuse box. I solved that before, but when I was looking for the buzzing noise during the P0121 effort, I pulled that relay and the wire heading to that pin fell out of the fuse box. I didn't notice that then. During post-testing, I discovered that the flasher no longer flashed. I found the wire, re-oriented it so it would not fall out, and returned things back to their prior cleaned-up state (zip-tied fuse-box). Hi-beam flash/relay works.

Defroster
Also in the Summer of 2020, I installed a defroster. Sort of. The defroster solution was moving the Vanagon rear heater under the belly, routing coolant along the driver side main beam and plumbing into the old air channel from just behind the front crossbeam. The air source was an experiment pulling from the old rear floor vent. The mechanical connection of the hoses to the heater was poor, and the experiment fell apart. This source needed to be remedied. Also, the switch was not operating the fan settings correctly. This was caused by poor quality wire connectors, so once the 3 at the switch and the 2 near the heater were replaced, we have a 3 speed fan again.

I decided that rather than solve for a cabin-source of air for the defroster, I would just remove the experiment for now. I have an idea for a source, but other cars need my focus. So, I removed the air supply hoses and called it good enough for now.

Mop Up
During all of the wiring work, the inside of the bus became considerably disheveled. It was one part shed, one part tool box and no part looking like a vehicle. This was easy to resolve, but made a huge difference in declaring the end of the work. The lot couch is back installed as a middle-row bench seat, for example. The rear speakers are hooked up and placed for sound again. After a quick trip with the shop-vac to get the wire-strippings and other fallout from all the work vacuumed up, he looked nearly ready.

I ran a test of the furnace, confirming that it would run on either the accessory battery or the main. It will, but the current draw for the glow-plug is so significant that I'm not sure I will want to start that heater if I am not running at least a float charger to the sourcing battery. Still, it moved the internal temperature of the bus from 43*F to 68*F (6*C to 20*C) in about 15 minutes. For the fuel-minded, it took about 500ml (or ~0.13US gallons or about 2 cups). As I understand it, maintaining the temperature requires far less fuel, so the consumption at that point dropped way off. I left it running for about an hour and the total consumed ml was about 530ml or 30ml (1/8 cup) for the remaining 45 minutes of keeping the bus warm.

I took one last step: I installed plastic kick panels I ordered like a year ago against the rear of the nose of the bus. Just like that, the cab looks like it is not an active project. It looks fairly clean now, actually. They install and remove easily, and once snapped in they really do not appear to need much more to hold them in place. The guy who makes them suggests poking holes through and screwing them into your bus. I might use Velcro, but I'll withhold decision-making until after we have had a few drives to see if they rattle or not.

Getting Legal
This last thing was actually one of the first things I did for Hapy after I set Zed aside. In fact, I think it was the registration that got me thinking about Hapy in the first place. His registration came due, and because of CoViD-19, I had to do it remotely. Since he is too old for smog and Oregon does not have inspections, I have been renewing his registration online for a few years. Still, this time I did the online steps in October 2020, but did not receive the stickers for his tag until January 2021. This used to take a couple of weeks at most. It sure felt good getting those stickers on his plates, though.

Test Drive
With the tags updated, the wiring fresh, the defroster responding, furnace functioning, etc... Hapy appeared nearly ready to be pressed into service. We just needed a test drive. For that, I did my usual neighborhood lap through a series of side streets out to the main drag, a quick 1-mile straight shot on that major street and then turning back into the side streets for home. As expected, Hapy was fairly peppy and responsive. He sounds great, and did not suffer any P0121 issues. There were a few stutters, but no codes, so I chalked that up to old diesel. That will solve with some snake oil and a fill-up. Considering that Hapy had not left the driveway in over a year, this drive was significant, albeit short.

Alt-Light
The battery light came on when the engine was revving low during the test drive, leading me to think that the unsettling "pop" noise I heard when the wiring was wrong (See Chasing the Hapy Electrical Gremlins - Part 6) was the sound of my alternator frying. This light had been popping on during testing, so the fact that it returned during the road-test honestly just reminded me. Before I jumped into anything, I in-bus tested the alternator: I alligator-clipped a fused wire to the alternator output and ran that wire on the ground up to the cab. There, I electrical-taped the bare wire to the positive probe of my multi-meter to free a hand. I set the negative probe into a small bolt-hole in the driver door frame for a good ground. First, a good base reading: 13.5V. Cool. I started the engine and it dropped down to 12.4V. Solid. With my hand on the go pedal, I revved the engine and watched the voltage climb up and down peaking above 14V. So, the alternator is fine. Since I have been running without an ALT/GEN light for 10 years, I could just ignore that light... Nah, I just can't do that. I figured that the bulb must simply be connected to the wrong wire of the 2 in the ALT plug.

I had spliced into the wire heading to the computer (DFM - or Digital Field Monitoring), and it needs to hit the one that routes to the cluster (L - Lamp). Simple fix: I cut the splice from the donor main harness to the 6-wire cable, and tied it into the other wire from the plug just upstream from the 4-pin plug. While I was back there, I added ring terminals to the sensor wires for the oil pressure and oil idiot light. There remains some wiring tidying I need to do on the driver's side, so I'll cut out the rest of the DFM-sourcing wire when I'm in there. 

As much as I'd like to say that once I completed, I took another test drive... I can't. I did test start and engine-rev in-place, however, just to see that ALT light wink out (which it did). Why did I not drive him? Well, remember Gramps (1996 VW Jetta 2-dot-slow from my folks that we gave to K2)? He re-appeared with a failed throw-out bearing after the first test drive, but before I'd solved the ALT light. So, I will have to juggle the herd to get Hapy free for a drive. And, you can probably guess what I'll be working on next.

That's it for today. While I may not need to go out much due to CoViD restrictions, I now have my beloved turbo-diesel powered microbus available-ish for whenever the need arises. While there are lots of little things I could tweak on Hapy, none of those things would prevent me from taking a drive. Sweet, sweet success. Thanks, as always, for following along.

Tuesday, March 10, 2020

Reverse Lights

Quick post today. After not having operational reverse lights for pretty much the entire time I have owned Hapy, they are now operating.

Bus Reverse Lights - stock
reverse switch
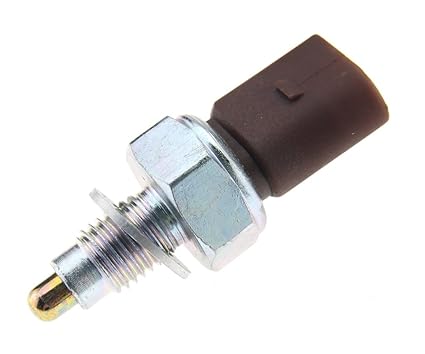
Let's start with how these lights are supposed to work. On the transaxle, there is a small switch threaded into the case. It has a small pick-up inside the transaxle that is depressed when the reverse gear is selected. My original transmission had gummed up the switch, so it didn't work. Or, maybe it was just old and failed. It doesn't matter. While I could have replaced it, I was focused on other stuff... and then that engine swap thing happened... Anyway, that switch receives 12V from the positive side of the coil through a black wire. The wire, obviously, goes to one side of the switch, and the signal is sent from the other, down another black wire, to the driver side reverse light. These 2 wires are bundled together for about half of their travel, separating near the low-point of the spare-tire well. The source wire goes to the coil. The signal wire goes to the light, and a second wire, which is part of the rear wiring bundle, takes the light signal to the passenger side. So simple.

Bus Reverse Lights - after engine swap
Like I mentioned above, the original source of the 12V is the coil. If you are running an engine that had a coil, that works great. The TDI, of course, doesn't, so I have to find an alternative source. Fortunately, since the 12V source wire split off from the bundle at the low-point of the spare tire well, AND all of my electronics are in the spare tire well, this turned out to be quite simple. I located a switched source among the wire bundle and wired an in-line fuse into it. To the other end of the now-fused circuit, I connected the black wire from the reverse switch. I didn't mention before, but I installed a new reverse switch into the rebuilt transaxle when I installed it into Hapy.

Testing
To test, I put Hapy into reverse and turned the ignition to "run". The driver-side reverse light lit up. It was actually pretty bright. Nothing from the passenger side. Now, before immediately assuming something in the wiring was all jacked, I figured I'd look at the bulb first. 3 Phillips screws later, and... the passenger side didn't even have a bulb. Hahaha. I guess when I replaced the light fixtures all those years ago, I ran out of bulbs. Fortunately, I had a single-filament bulb, so with a quick twist, I tested again. This time, I had both bulbs light up.

At this point, I realized how fortunate I was and called it a day. Yes, I could have gotten into all kinds of other things, but it was already 4:PM, dark was approaching and I knew that when you have a win, take it and don't be greedy.

So, that's it for today.

Tuesday, February 5, 2019

Flash fixes continued

I left off my last post about Flash with a summary of fixes stemming from replacing my 3 seasons tires with studded snows. Today, I finish the work by repairing the not-operating wipers and getting the reverse lights to work again.

Wipers No Wiping
The RainX held us for the handful of days while we waited for the new linkage to arrive. I got new wipers and a wiper-arm puller as well. Everything arrived on a Friday night, so the next (Saturday) afternoon I tore into the job.

Before you start, make note of where your wipers are. Similar to getting your engine into TDC (Top Dead Center) firing position for cylinder #1 before you start removing things, move your wipers into the rest position (all the way down) before you start or getting things to line up at the end will take much longer. The arms remove with a 13mm socket, hidden under a small plastic cap. Save that cap and the nuts. Once the nuts are off, the arm puller popped the arms right off. Next, the plastic cowl needs to be pulled away. The rubber seal along the front edge should remove easily, leaving just the 4 snap-on bits along the rear. These pull away by getting your fingers under the plastic along the windscreen and pulling more towards the front than straight up. I have seen others post about using a pry-bar; I found that excessive and introduced more risk to breaking that plastic cowl or scratching the glass. I removed and re-installed this cowl a few times while trying out various parts, so I can say for certain that a pry bar should not be necessary.

nicked from VWVortex
With the cowl out of the way, you should see the unpainted metal linkage connected to the wiper arm bolts. It is held to the car by 3 10mm bolts. Remove the bolts, and the washers underneath and save them. The linkage should now be free, but it can't be removed until you unplug the electrical plug from the motor. It is a flat 6-pin plug with a little catch on the underside. Press the catch and pull it away from the motor. Now you can wiggle the whole operation free from under the windscreen. Note how the motor connects to the linkage. There are 3 10mm bolts holding them together and a central 13mm nut holding the business end of the motor to the operational part of the linkage. Consider the orientation of that "operational part". If the wipers were in their resting position before you started tearing things apart, the short arm is pointing directly to the right (front is front), making it difficult to get the 13mm wrench in there to remove the nut. Remember this when you're putting it all back together.

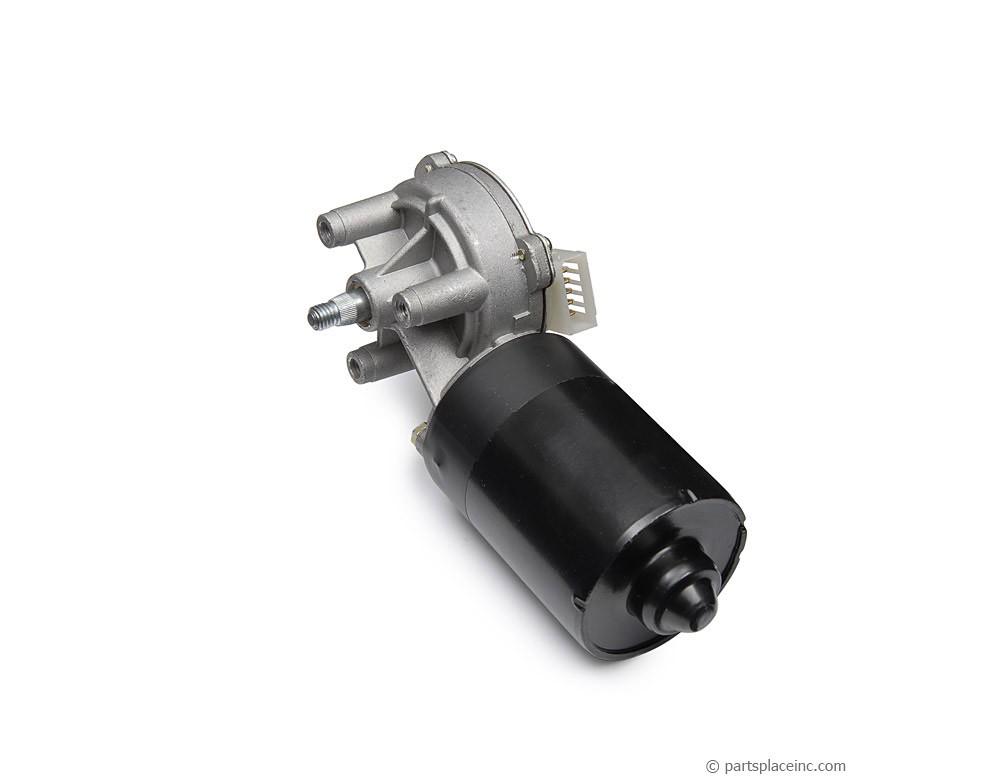
I took the opportunity to clean out the little wiper controls bay at this point. There was all kinds of organic debris in there from years of parking outside. I dug around with a stick and used my shop-vac to get it clear. I also started testing things. First, I compared the new linkage with the original. I noticed that the new and old operated the same. In fact, the old one moved more freely. So, I concluded that the linkage was not the problem. So, I plugged the motor back in, and tested its operation with the wiper switch. The motor made noise, but did not turn the threaded end. So, the motor was the bad item. I needed a new one today or we were going another week, this time a projected-stormy one, without wipers. Eek.
wiper motor

Local Auto Parts
With Discount Import Parts now 1-1/2 hours away round-trip (no, I just can't let that go), I started looking around at the common local places. NAPA reportedly had one just down the street, according to their website, but after ordering one for pickup, I was called by the store and told that they actually didn't have one, but they could have one to me by Tuesday. Hmm.. this is why Amazon is crushing typical retail; I could have one in-hand tomorrow from Amazon. I want one now. Today. Next, I tried O'Reilly's about 30 blocks away, who also claimed to have one. They did. I failed to test it before I left the store, and it failed to work, right out of the box, when I tried to install it. No motor movement; no motor sounds. By the time I got it returned, it was getting into Saturday evening, so I aborted for the day, knowing that the Hillsboro location (20 minutes away) had 2. One of them would probably work.

Sunday morning, I hit the Hillsboro store, swapped a $100US bill for a motor and tested it in the parking lot. Bad the same way as mine: motor hums but the threaded end didn't turn. I've come to the conclusion that this transition part (I refer to as a transmission) is a fail point that is not looked at during rebuilds, or at least not often enough to prevent bad parts going to stores. For reference, it's the silver section of the motor in the picture on the right, here. Anyway, the other motor they had looked much better. The transmission looked new, the paint on the motor was not all over the transmission (like the others were), and best of all, it passed my driveway test of plugging the motor in while it was resting on the hood/windscreen and flipping the wiper switch.

I had brought my old linkage and the fasteners so I re-assembled the wiper motor and linkage, re-installed them and attached it all to the car right there in the O'Reilly's driveway. That's one more plus for them over NAPA: NAPA has a big sign on the side of the building forbidding patrons from doing spot repairs in their parking lot. O'Reilly's guys will come out and help you do it. Anyway, with everything under-cowl put together, I tested the switch and watched the wiper bolts rotate. Regretting that I had not brought at least the driver-side wiper arm and blade with me, I nosed the car east and back home.

Clear Screen
Bosch ICON wipers
The finish-up of the job was very simple. Between the linkage and the cowl resides small rubber boots that I had not mentioned earlier. I think these protect the linkage from rusting, so I re-installed them. Considering how rust-free and genuinely operational the original linkage is, I think this a fair assumption. Then, I wrestled the cowling back under the hood (bonnet for my non-US friends), setting it tight along the front edge before snugging the 4 snaps along the rear edge. I re-set the seal along the front edge, and then put the wiper arms back on, snugging them down with the 13mm socket and finally pressed the plastic caps into the arms. Like all things, test before you call it done. I had been doing all this in a steady Pacific NorthWest rain, so there was plenty of water on the windscreen for a valid test. The new Bosch ICON wipers ran smoothly from park to post and back again.... and completely cleared the glass in one pass. So sweet.

Reverse Lights
The last thing I needed to fix on the old Jetta was the not-operating reverse lights. Start with the simple, obvious things first: the bulbs. While they do not fail at the same time very often, I find coincidences like that happen more often with this car than many others I have owned. Not this time, though. Next, test the switch. The switch sits under the battery tray, behind and to the left of the starter motor. If you unplug it and then jumper across the 2 pin holes in the harness, you simply turn the ignition to "run" and you should see reverse lights. If you do, the switch is bad. If you do not, the issue may lie elsewhere.

Remove and Replace Switch
reverse switch: do not use the washer
I read a few how-to's on the reverse switch, and they all sounded very involved, including removing the battery and tray, removing the air box or both. Yikes. I looked at the location and considered that I could see the hex edges of the switch, so I could probably get a spanner in there. Sure enough, a 7/8" spanner fits the switch perfectly and can thread behind the battery box, but far enough ahead of the transmission to gain purchase on the switch. Unplug the switch first. Then, just pop the spanner on that switch so it can move. I didn't have to move my spanner more than 30*. Facing the engine from the front, reach along the rear of the radiator (under the upper hose) and under the battery box until your fingers reach the switch. I had my elbow brushing the driver-side radiator fan. The switch removes fairly easily (lefty-loosey). The install is the reverse, seriously, and then snug it tight with the 7/8" spanner..

I applied some thread seal on the switch, dropped on the included washer, reached around and under the battery box and threaded it home. I plugged it in and... nothing. Huh? I backed out the switch, and tested the switch by plugging it in, holding it depressed with my new wiper arm puller and saw the reverse light illuminate. Yes, I could have asked someone inside to come out, but it was raining... and raining hard, so why get everyone wet? I concluded that the included washer is NOT for the Jetta TDI engine, but may be used in one of the switch's other applications. Great. So, I pulled the washer, re-installed, plugged it back in and... it worked. Hapy dance.

So, now, the only thing that is still broken on old Flash is the hazard switch. I have bought multiple new ones and they all arrive failed. I think it stems from manufacturing moving away from Germany and Brazil to China, lowering the quality of the soldering along the way. I will just get one from the junkyard the next time I go. I still need to solve for the heated seats one of these days, but I am content to have all of the lights and wipers working for today.

Thanks for following along, and I will be getting back to Oliver's interior now that the daily-driver is safe again.

Tuesday, January 29, 2019

Flash fixes

I realized that I hadn't posted on a collection of things that broke all around the same time on Flash, the Jetta, so today I'll cover what went wrong and what I did to fix them.

Snow Shoes Grow
With a plan to hit the mountain for a taste of snow over the Christmas holiday, I pulled out the snow tires I got for Flash last Thanksgiving (Nov 2017). I got them new off of craigslist for $400 already mounted on universal steel rims. I say universal because they fit the 2 standard VW 5-bolt patterns. In looking back on my old posts, I don't think I ever posted on this purchase. Anyway, they are i-Pike tires and hold firm in ice and snow like no tires I have ever owned. Since we were down to one car, I had to swap the tires after Boo got home from work, so, on the night of December 23rd I set to swapping out tires in some nasty weather. I found, however, that the brakes were in pretty shabby shape and needed to be done as soon as possible. I found some locally-sourced pads (Adaptive One brand) and on Christmas Eve I did a brake job before we left for the mountain.

Lights? Who Needs Lights?
The pads fit well, and have performed extremely well, considering I'd never heard of them, and I didn't go with one of the usual VW-friendly brands. If Discount Import was still on the West Side, I would have gotten pads there. Anyway, while I was digging around the driver front wheel, I noticed a light bulb dangling by a wire. I concluded that it had fallen out of it's holder on the front bumper on one of the many times the bumper got ripped off by a parking curb. Yes, this happens often, and apparently happens to anyone owning a Jetta MK4. The TDI engine is an engineering marvel; the body it was delivered in, however, is not. Anyway, I put the bulb into the little hole, and finished the brake job. When I went to take a test drive, though, the brakes were great... but I lost my dash lights. That is, I lost all of the lights on the dash except the idiot light telling me I needed to replace my brake pads. Suddenly that light was on now. Love you, Flash.

Mountain Fun
We drove to the mountain anyway, having no idea how fast we were going. While we were still near the city, this was not much of an issue. We just stayed with the speed of traffic. Once we got onto US26 east of Sandy, though, we were alone. So, I checked speed periodically with a flashlight. We arrived in Welches after the local grocery closed for the holiday, so we just hit the cabin for the night. Christmas morning, we (me, Boo and T) drove up to Timberline Lodge, and we rode snow until sunset. We drove down, again without the benefit of dash lights, but the traffic was so heavy it didn't matter. By the time we hit the Damascus turn-off, the traffic was so crazy it really didn't matter how fast we were going; someone else was going to come racing up from behind anyway.

Dash Light Fix
As you may have surmised, the cause of the dashlight failure was that otherwise uninteresting bulb I found hanging. A small section of bare wire had become exposed, probably when it was force-ably removed from the bumper. When any one of your running lights creates a short, it blows a fuse... which also routes 12V to the lights on your dashboard. Either side can cause this. I find it so hard to understand how a fuse box with so many fuses doesn't isolate the dashboard from the running lights. Engineering marvel. So, I taped up the bare wire, replaced the fuse and the dashboard lights returned.

Brake Warning Light Fix
When I did the brakes, I plugged in the sensor in the new pads. Apparently, the sensor doesn't work. Maybe there is not enough metal material in the pad to conduct electricity or maybe these AdaptiveOne pads are NOT that great. Regardless, I check the condition of my car often enough that an idiot light should not be necessary. So, I cut the wire from the "sensor" in the brake pad and removed it from the car. I stripped and spliced the two wires together and plugged it back in. Warning light off: but also will never light up. So, I will be sure to check my brakes when I switch over to regular tires in March, and may just add that check to my oil-change routine.

Wipers Not Wiping
No sooner were we back to having an operational car than the wipers stopped working. Seriously, I fixed the lights on a Sunday night and on Monday morning the wipers stopped working. If you turned them on, the wiper would move a few inches and then stop. You could hear the motor, and since they tried to move, but failed, I thought the problem was in the linkage between the wiper arms and the motor. While waiting for linkage to arrive, I applied Rain-X water repellent. That stuff is magic. The following morning, we were greeted by ice on our windows. While letting the car warm up, I set to scraping. The windscreen was the only glass to which I had applied the Rain-X, and it was also the window which was freed of ice the easiest. Also, as we drove down the road, the little bits of left-behind ice quickly melted and beaded away.

I'll post on the wiper repair and the other fix (reverse lights) next time. Both of those jobs have more tale to tell than I can put in one post. Thanks, as always, for following along-

Tuesday, January 8, 2019

MGB now in service

Just in time for the snowy winter months, Oliver, the convertible MGB, is now ready to be pressed into service. Today's post highlights the final touches: tires, brake bleeding, preparing the windshield for rain and the dash lights. oh, Hapy New Year.

New Shoes
I had lamented the body roll during the last test drive when I did the alignment (See MGB Alignment). I knew the tires were old, and wanted to remove that variable first. So, on a day when I had to miss work for a routine dental cleaning, I bopped past the local Les Schwab Tire Center and got Oliver some all-season tires. I haven't forgiven the other Schwab for not tightening down the boots on the steering of Flash (Jetta TDI), but I thought a different Schwab might be okay. I hit the Schwab on Lower Boones Ferry, which was under construction. For a mid-week, mid-morning, the place was buzzing. They were able to serve the need though, and had a new set of 195/65R15 tires on within an hour. I asked them to give the brakes a bleed while they had it on the rack, but they didn't. They checked the brakes and indicated that they might need a bleed, but didn't do anything about it. Les Schwab, you are just not the same tire shop that you were 10 years ago. This may be the last of our business together.

The tires are nice, though a little louder than I expected. Perhaps that will shift as they age, though I've found tires usually get louder, not quieter. The drive from Beavo to the dentist, then the tire shop and then back home was a great test. Morning rush hour meant lots of rubber-band driving, so lots of clutch, brake, low gear driving. Oliver did that in stride. On the way home, the morning rush was over, so the highway was fairly clear. So, I could get Oliver up to a much higher speed. That was super fun, but the brakes still were a little softer than I'd like. I made a plan to bleed the brakes the following weekend.

Brake Bleed
I have tried to get the last air bubble out of the brake system a few times. I bled the master cylinder (see MGB Sponge Brakes) and thought I had the air out of the system then. I was wrong. And, after having that belief confirmed by the Les Schwab folks, I knew I needed to get it right this time. I started on the rear wheel furthest from the master brake cylinder. I put the rear end up in the air, removed the rim and got out the MityVac. The bleed screw is a 5/16", and I think my prior challenges before came from a combination of little errors that I corrected this time:

First, rather than use the box-end of the spanner, I used the open end this time. I found this did not encourage the vacuum line to lift off the bleed screw.
Second, never let the vacuum drop below a few pounds of vacuum in the line. In fact, I made sure I had no less than 5 pounds of vacuum in the line when I closed the bleed screw.
Third, I started with brake fluid in the vacuum bleeder canister, and made sure it always had some. I think this prevented air from working it's way back up the bleed line.
Fourth, and perhaps most importantly, I never let the master cylinder reservoir fall below half-full. By doing all these things, no air was introduced into the system.

So, I was able to follow all the other good practices: monitor the fluid coming out of the bleeder for bubbles, minding that tiny and/or large bubbles mean the seal of the vacuum bleeder is not perfect. You are looking for a small bubble. Also, bleed far more than you think you really need to. There is nothing wrong with completely replacing the fluid in the line from the reservoir to the bleed screw.

Windscreen and Wipers
While driving Oliver late last Summer, I found that seeing through the windshield was virtually impossible when I turned into the sunset. This is a fairly common problem in Oregon because so many of the roads run due east-west, and the low-hanging sun finds its way directly in your face in the weeks nearest to the equinox. I think this is why the US-26 west of Portland is called the Sunset Highway. To remedy, I used the Rain-X Xtreme Clean. I'm sure there are other and arguably better products out there, but I had it in the garage. Like the directions said, I cleaned the windshield with glass cleaner, then applied a small amount of the RainX stuff onto a damp clean cloth. I rubbed it a bunch in a circular motion and then wiped it clean. Except for a few deeper gouges from bad wiper scratches, the windshield looks considerably better. I failed to take a picture before I started. Honestly, I just jumped in and did it before thinking about taking pictures. To complete the rain-readiness, I replaced the 2 nasty stiff crumbly old wipers with a pair of new ones I got in one of my other orders from Victoria British.

Dash Lights
I had one last thing that I needed to solve before Oliver was road-ready: his dash lights didn't really work. I tested them in a dark garage and found that the tach and the cigar lighter were the only things that lit up when I turned on the headlights. That won't do. The rheostat that controls the brightness of the dash lights is a common failure part, and finding a replacement for the late-model (read: rubber-bumper) MGB is pretty difficult. Many of the usual part places don't carry it. Many owners simply wire around the switch so the dash lights are full-bright when the running or headlights are on. I did this on Oliver (leveraging a 10amp fuse from the feed line to a wire-splitter which I then wrapped with electrical tape), but I may still replace the switch.. Getting the old switch out was a real bear, since the nuts had frozen in place and the set-screw for the knob had as well. I effectively destroyed both, so I'll need new for both if I decide to install a dimmer. Still, with the hack in place, all of the lights come on so no bulbs needed to be replaced. Winner! I had been thinking about adding some fog lights, so if I don't replace the dimmer, that hole in the dash would be perfect for a fog light switch. Hmm..

So, now with the number of cars available meaningfully reduced (See Herd Thinning), Oliver will be seeing some road time. We really only have one regular-driver car: Flash. Flash will continue to see 95% of the drives through winter, but when we have those rare needs to be in two places at once, and mass-transit can't abide, we can safely drive Oliver. I intend to slowly work through the interior replacement work, but won't be officially taking Oliver off the road to do it. This will make for an interesting few months.

Thanks, as always, for following along.

Tuesday, July 31, 2018

4Peaks 2018 - Road Report

In my last post, I talked through the festival experience, omitting everything and anything that might have happened to Hapy. I decided that I would leave all of that for the road report: keep the road report about the bus and festival report about the festival. So, today's post is all about what happened on the way there, what befell the bus while we were there and what happened on the way home.

Getting Out of Dodge
view out the window the morning
after Vagabonding.
That's the Santiam River.
After last year's late-night drive to ChinookFest in Central Washington, Boo and I thought we should do it again. The drive itself was pleasant and fun (except for the emergency room part). The roads are empty at that time of night and the air temps are cool to help keep the bus cool. We work regular jobs, too, so we aren't ready to start packing until 7:PM or later so we have a choice of either waking up at home trying to motivate out early and hope to get to the festival early-ish -OR- leave crazy late and crash somewhere along the way, knowing that we'll wake and drive to the gate. I like option 2. This departure was similar to the ChinookFest exit in that we were leaving by 10. Just as we were pulling away from the house a freak thunderstorm hit, drenching us at the corner Safeway where we got ice and a few last minute things. We could hear the thunder deep inside the store, it was hitting so hard. For folks who don't live in the PacNW, this is very unusual. Storms like this don't even make the news in the MidWest, but here in the mild Pacific NorthWest it was all the locals were talking about when we got home 4 days later. We hit the road, and Hapy settled into the drive.

To Salem
We stopped in Wilsonville to grab some dinner, but the Black Bear was closed. So, we moved on until we saw a Denny's sign. Neither Boo nor I have been in a Denny's in years and hadn't realized they had a new budget menu. We both ate well and had a $14 total tab (plus tip). That's nuts. I don't know how they stay open with prices like that. Anyway, the engine temps had been climbing steadily since the Black Bear pull-over, and I discovered that one of the fan wires had shaken loose. Yep, that seems to happen every trip. A quick bit of fiddling and the fans were running, and we were back on our way. No sooner were we back on the road than we saw the OR-22 sign, and we were able to pull off the freeway onto the slower, easier state route. Though Hapy's temps still climbed on long uphills, they would settle back down when we hit a straight-away or downhill. I'd like to try to solve for the uphill temps by lowering the radiator an inch or two, but as you'll see by the end, I have bigger things to solve. I noticed that if I rotated the headlight switch to increase or decrease the dashboard backlight, the headlights would flicker a little bit. I made a mental note to replace the switch.

Vagabonding
It didn't take long before the late nights and early mornings of a typical work-week started catching up with us. Hapy, unlike his occupants, was doing great. We saw signs for Silver Falls State Park, and Boo exclaimed that she had never seen Silver Falls. Well, that's an Oregon icon that everyone should see when they visit, much less live here. So, we nosed off the highway and followed signs to the park. 30 minutes later, we arrived at a "campground full" sign. Too bad they don't post that, say, at the freeway turnoff. We found our way back to OR-22 another 30 minutes later, feeling all the more tired. We chased a few other signs before pulling over along the side of the road where there was a very deep shoulder (at 44.7673810N, -122.5331920W) just west of Mill City, OR.

After the original vagabonding during Almost Frog Lake (see part 2), we have this pretty well down. Well, Boo does. We free the bed by moving stuff into the front seats, cover the windows and crash for a few hours. In Oregon, the cops don't hassle you. We've talked to a few folks about this, and in the more remote areas, it is totally acceptable. I wouldn't suggest it in the cities and towns, but for places where OSP patrols. We awoke needing a restroom and coffee. We found both at a small roadside coffee cart on the north side of the highway just east of the Maples Rest Area. Coffee'd and with breakfast from the cooler, we were back on our way. We made great time past the reservoirs, over the pass, through Sisters and Bend to the venue. We arrived at 11:AM, an hour before the gate was supposed to open, but they waved us in anyway. Within a few minutes, we had our wristbands and were puttering up the hillside to the GoWesty camp zone.

No Charge Battery
When we were roadside, setting up for a night's vagabonding, I noticed that the cabin lights weren't terribly bright. I had put the accessory battery on the charger, but the battery acted like there wasn't a charge to take, so I removed the charger. I was starting to have second thoughts about that. After getting Hapy nice and flat, we set up and I tried to charge our phones. No dice. Then, the power converter would just beep at us, refusing even to light a very low amperage string of holiday lights. I checked the battery level and it was down to 8V. Huh? I figured that we could run cabin lights for a little while, but by the second night, we were on lantern lighting only. With all that solar energy coming from the sky, its a shame we don't have a collector. Something for the list, I guess. Fortunately, the 4Peaks folks have a vendor who provides a solar charging station, so we would spend an hour there in the morning, soaking up some sun ourselves while our phones charged up. It was because of the battery that these festival posts have virtually no pictures: I had no phone (and, therefore no camera) most of the time.

While we didn't have much electricity, Boo completed her camp shower vision at 4Peaks. I'll post independently about that since this post is already pretty long and we haven't gotten to the adventure part yet.

Where There's Smoke
With our stuff stowed and good-bye's shared, we left the festival grounds, filled up with diesel and headed towards OR97 and OR22 towards home. By now, it was mid-afternoon, and the hottest part of the day. The radiator kept up, though, keeping the engine temps under 196*F even on the longest uphill runs. Somewhere between Tumalo and Sisters I noted a whiff of smoke. I looked down and smoke started first as a wisp and then as a billow from between my knees. If this were a typical front-engine'd car, you would start thinking about engine fires. The only thing that far forward is the fuse box and the spare tire. Anyway, we were fortunate to have a small road intersecting with the highway, so we dodged onto the shoulder at the corner, turned off the ignition and flipped on the hazard lights. I jumped out to make sure the hazards were on and saw the headlights were lit even though that switch was off. I went around back and removed the positive battery cable, thinking that the electrical was completely borked. While I was around the back of Hapy, Boo headed off down the side street.

On The Tow Again
I paused for a minute, considering the heat of the sun, and what could I fix on the roadside. Then, Boo came around to me and pointed to a shady spot on the side of the road where we could push Hapy. And so we did. While Boo made peanut butter and jelly (PBJ) sandwiches, I pulled out the Bentley book and started looking at the wires. One wire had it's plastic completely burned off and a couple of others had swollen marks indicating they had been touched by heat as well. All of them fed from one side of the fuse box into the steering column. I figured the ignition wires were toasted, but to repair I would need to remove the steering wheel to get at the wire bundle. Removing the steering wheel requires a 27mm socket, which I don't carry in the bus, so we were stuck and contacted AAA. We sat in the shade eating PBJ sandwiches while we waited for the flatbed. It arrived about 2 hours after the first puff of smoke and we arrived home 3 hours after that.

Resolving to Repair
Years ago, I bought a replacement ignition switch. The original switch has been tempermental, not wanting to turn without considerable coaxing. I didn't want to go through the hassle of the install back then, so the switch has sat on my parts shelf. I ordered a replacement ignition harness from BusDepot. I will post about the replacement of the switch and harness effort once it's completed. In the meantime, we are in the heart of festival season and it looks like we may have to go to our first summer music event without Hapy since 2011. I sincerely hope I can get this fixed before the one after that. I'm looking forward to turning the key without challenge, and having all the smoke stay inside the plastic tubes.

Thanks, as always, for following along.

Tuesday, April 17, 2018

Vinegar and Baking Soda

Quick post today. C, T and I have been looking for a cheap and viable cleaner for our car projects. This mini-post looks at using a vinegar and baking soda combo as an all-purpose deep cleaner.

Starting Point
So much of our time working on our projects isn't the fun sexy part of removing parts or putting new parts in, or even really fun stuff like welding. At least half of our time is cleaning stuff. Those car-fix TV shows don't film or broadcast that, because it's really not interesting. And viewers would change the channel. But, cleaning is so important and so central to everything we do. In retrospect, I've done a horrible job of highlighting this along the way, falling into the same trap of "not interesting" for readers. So, today, I'm doing a tiny post on the topic.

We usually go the route of dish-soap, glass cleaner, de-greaser, goof-off or brake cleaner depending on what we're cleaning. Ultimately, the real work is scrubbing or rubbing by hand with shop towels, sponges, paper towels and maybe steel wool. Our first priority is to not damage the part, and so that sometimes means we leave it not quite as clean as we would want it to be. We are always looking for new cleansers that do the job, do it well and preferably do it without a big negative impact on the environment (which is why we try to avoid brake cleaner).

The Impetus
before. at night w/flash camera
The new A4 had been parked for at least a year when we picked it up. The PO said it was much shorter, but unless he was just driving it up and down his driveway, he was driving it without tags. So, we're pretty sure it sat longer. Anyway, the Pacific Northwest has lots of things it is famous for. Not on the list is the amount of moss that grows here on pretty much anything that sits still during the rainy season. Even pure and perfect paint will have a dull green haze come summer, if it hasn't been cleaned or even just moved during the rains. Putting the A4 non-movement with that non-published reality nets us an A4 that had itself some green haze. This green haze was especially bad on the headlights, reducing their usefulness. T thought they were scratched. Having no money and no special headlight de-scratcher tooling, we hit the internet for cheap home-grown alternatives.

Headlight de-Hazing
We came upon a YouTube of a guy fixing his headlights with vinegar and baking soda. I had heard of this combination as a recommendation for cleaning carpets, and intended to attack the keeperZed carpets once we got that far. But I hadn't heard of using vinegar/soda for getting scratches out of glass. Feeling unconvinced, T mixed up a small paste in a glass dish and grabbed a microfiber cloth. First, he shot the headlight with window cleaner and wiped it "clean" with a paper towel. Then, he dipped the microfiber cloth into the paste, wiped it on and rubbed it off. Seriously, that's all he did. Then, he rinsed with another window cleaner spray and wipe to make sure there wasn't any paste residue left.

after. next day no flash
The results are pretty amazing. We aren't entirely sure if the headlights were really scratched up or just covered in mossy haze or just hazey from age. They look much better now and the light shines through them much better than before. Total cost: virtually $0. I had leftover dollar-store apple vinegar from when I cleaned the radiator in the MGB (See that MGB Coolant Pump Replacement (Part 2)). We had an open box of baking soda in the fridge. Put together with about 10 minutes of clock start-to-end, and the A4 went from hazey, ineffective and unattractive headlights to clear and bright headlights.

During the radiator experiment, I used baking soda and vinegar separately: one to neutralize the other. When used together, they froth like mad. Based on my reading, it is this frothing / oxidizing action that does the cleaning. I've read that you can mix in some lemon or orange dish soap into the mixture to leave a fresh smell (not vinegar) behind. C experimented with that when he started looking at the carpets in the 280ZX.

Carpet Deum
C arrived with a great energy and interest in getting his carpets cleaned on the 280ZX. We had finished pulling parts off the donor, but hadn't yet dealt with the carcass. The renewed energy was very welcomed, and he wanted to focus it on the parts pile that was now overwhelming the keeper Zed. On the top of the heap was the carpet. In the ZX, the carpet is extremely simple: there are 2 pieces, one for the cockpit from the back of the seats to under the dash and one piece for the trunk space. With the newly learned lessons with the headlights, he grabbed the dollar-store vinegar and the commercial-grade soda from the blasting and started in on the rear carpet.

All in, he spent about 30 minutes working on it. He poured soda onto a section of carpet, spreading it around with his hands. Then, he spread lemon dishsoap in a wavy thin line across the same area. Last, he took a bottle of tonic water in one hand and a bottle of vinegar in the other and poured fluids on top, creating a thin lather. Once the lathering action started to slow, he attacked the area with a plastic scrub-brush. Once scrubbed, he let it sit and moved on to another area. Each section got no more than 5 minutes of attention. When he had done enough of the carpet for his experiment, he let it sit for an hour while we ate dinner. After dinner, he grabbed the garden hose, put a standard tip on it and hosed off the carpet.

The results were pretty amazing. While it didn't come clean like it was factory-new, it does look like it was a very well cared for carpet. He will be doing the rest of that section as well as the front carpet so he can re-use them in his keeper Zed. Now that we've proven it works, I'll be trying it on the interior hard plastic in the MGB... maybe the tail lights.. who knows?

That's it for today. Thanks, as always, for following along-

Tuesday, November 28, 2017

The 80-20 Rule

I'm sure you've heard the phrase 80/20. If not, its a theory that the last 20% of the project takes 80% of your time. No where is that more true than working on old cars. In one of my last posts about the MG, I detailed all of the various things I had done, and how close it was to road-worthiness. Since that fateful drive, I have spent many many hours trying to diagnose the small electrical issues that remain (See Ug-letrical). Today runs through some more of that fun.

Seeing Green
The MGB has 4 major circuits running through 4 fuses. The brown circuit is "always hot". It basically runs from the Alternator to the Battery, providing juice to the headlight switch and power to the hazard relay. Red is for the courtesy lights: side marker, running lights, and license plate. Purple runs the horns, the clock, cigarette lighter and "dome" light. There are 2 lesser circuits: blue-stripped between the headlights and the headlight switch and red-stripped for illuminating the gauges. Everything else is on the Green circuit. Seriously everything else: gauges, wipers, turn/hazard signals, even the reverse lights and radiator fans. So, when there is a break in the green circuit, lots of weird things start to happen. It was odd behavior in this circuit which drove me to replacing the fusebox last fall. On my recent test drive (See MGB - Test Start, Test Drive), most of the things on the green circuit didn't work: wipers, turn signals, tachometer.

Following my own advice, I started with the fuse, and demonstrated to myself that electricity was making it past the fuseblock to the next step in the wiring. Fiddling with the fuse and testing wires must have shaken something free, though, because after simply testing voltage and wiggling wires, the wiper motor started working. So did the cooling fans. So, I started to focus on the turn signals and hazard flashers, recognizing that wire shaking could just as easily cause those things to suddenly stop working too.
taken from MG experience posting

Hazard
The hazard switch is one of the more complicated bits in the MGB electrical system. I covered the early diagnosis of this circuit earlier (see MGB - Ug-lectrical). It has 6 pins coming out of the back, with 4 clustered at one end and 2 at the other. The 2 pins allow voltage through when the switch is in the hazards-are-not-on position. This permits the turn signals to work. The 4 pins clustered together map a brown circuit wire from the hazard relay (into pin #3) to light up the "hazard" light in the center of the dash (pin 4) as well as fire both left and right turn signals (pins 1 and 2).

The Interweb says these switches get crusty and need to be flipped up and down a bunch of times to get them to work again. I tried that, but it didn't work. So, I moved back to testing wires and electrical bits. I thought I'd proven that it was the brown wire which led to the relay, by routing a new wire around it, but I actually proved that the original brown wire wasn't seating. Once I pulled the wire off and onto the relay a few times, the hazards started working.... on just the driver side. I concluded that the switch was faulty. Be forewarned: the new made-in-China switches fail often, and can be short-lived. In fact, the replacement that I got from Moss appeared to have failed right out of the box. Neat.

I shot DeOxit into the plug in which the hazard switch is attached. I took a short stretch of wire and tested the plug, to prove that it was indeed the switch and not the plug. One at a time, I jumpered from pin-hole #3 to holes 1, 2 and 4. The jumpers worked, and I was able to get the dash light and one side and then the other to act properly. This confirmed my suspicions: bad hazard switches, even out of the box. I plugged the originally-on-the-car hazard back in, and tried the turn signals. Now, they worked. So, the DeOxit cleared whatever was wrong on that side, but the hazard part of the switch didn't work. To remedy, I bought a New Old Stock (NOS) part off of eBarf. While expensive at $45, having a hazard switch is a safety item I should not be driving without. Even with the new, proven functional hazard switch, the lights wouldn't flash. The hazard relay, though, made the tick-tick-ticking sound. Now, I've read that the original Lucas hazard flasher relays are a bit touchy. So, I dug around in my electrical stuff and found a bunch of relays from the TDI swap on the bus. One of them matched the pin pattern from my MGB - Ug-lectrical post. With a basic black (black for grounds in British cars) wire grounding pin #31, I connected the wire from the ignition relay and the wire heading for the hazard switch. Viola! We have hazards and directionals!

Stopped
Once I solved the hazards, I moved on to the brake lights. I'd solved these before (See MGB fuse box), but with the work on the pedals and master cylinders, they stopped working again. Knowing what worked last time, I went straight to the brake light switch on the pedal box. With it in-hand, and the ignition turned to run, I pressed the little nub on the end (that lightly rests on the brake pedal arm), and the brake lights lit up. Perfect. This is a basic adjustment issue. I turned the adjustment nut further up the switch. Then, I fit the switch through the side hole and threaded it into the pedal box. I think I got some paint into the threaded hole as the switch started to bind. I cleared the holes with a bolt and re-threaded the switch. I had to employ needle-nose pliers to fully set the switch, but now, when the pedal is depressed about a 1/2 inch, the brake lights fire. I set the adjustment nut down against the pedal box, and one more little nagging issue is solved.

That's it for today. I'm still working through other 80-20 issues and hope to have the MGB ready to put to bed until the rains stop (and my money replenishes) so I can drive it to get a top put on. While I wait for that, I have a radiator replacement I need to do on the bus and C will need a second pair of hands getting the 280ZX road-worthy. And then, there's that broken daily-driver I mentioned last time... its a true target-rich environment.

Thanks, as always, for following along.