This is my first post since CoVid-19 completely took over the international conversation with cancelled professional leagues, concert tours and pretty much every other social outing. Boo hit the grocery for our usual restock and what she saw was out of a zombie apocalypse movie: partially filled carts strewn all over the place, shelves stripped to nothing in some areas (toilet paper?) and virtually untouched in others (fresh produce). And, of course, tons of people, having lost all sense of public-face calm, filling their carts with strange things like cases of Gatorade. People are weird when they're scared, or maybe they don't usually cook at home. Either way, the world is very odd today.
My employer has directed all of us to stay home and work remotely thru 3-April, so I expect I will be getting cabin fever stir-crazy quite soon. Since today is St. Patrick's Day, may we all have a little touch of the Irish luck and see this pandemic pass quickly. Anyway, where was I? Oh yeah. Side Marker Lights.
Side Markers - Original
When I first got Hapy, the side lights didn't work. I didn't think much of it since they were cracked and had nasty looking moss growing inside them anyway. Later, I removed them when I thought I was going to paint him. I got as far as priming him. I figure when I finally do get to painting him, I don't want to wrestle with the side markers. I figured I could do that now.
On the early bay-window bus, there is a single side marker light, located rear-ward of the rear tire, fairly low on the body. Each one is wired into the respective tail light for juice courtesy of the wiring loom. Or at least that's how they're supposed to be set up. Once I got into it, I discovered why my side markers didn't work: the wiring was gone. Just cut away. Oh well. No judging. I have done some things on this bus that will scratch some heads, but this left me with a puzzle.
Side Marker - Passenger Side
Without wiring, I decided that I would tap into the tail light, so I spliced off of both the housing ground and the running-light signal. This was fairly straight-forward with some female dis-connectors and some 16ga wire. Mounting the light was far more interesting. The old set up was falling apart when I took it off, and it was so long ago, I don't have a clear picture of how it was on there. If memory serves, the outer lens was held on with long screws run through the bulb-holder and into the side of the bus. When I tried to align the new holder, with the correct snap-in plastic buttons, there were no holes in the bus to pop them through. They had been filled with bondo prior to my getting Hapy. Sweet. I chose to drill holes where the holes should have been and then attach the holder with a pair of short screws through those holes. That mostly worked, and once the bulb was set I was able to successfully test that the wiring was good (see picture),
Side Marker - Driver Side
While pushing and shoving on the wiring harness near the driver side (looking for the side marker wires), I managed to cause a failure in the driver-side running light. I looked at the wiring diagram, and it looks like that bulb has it's own fuse and circuit from the fuse box. Since the fuse box only has, like, 12 fuses, I thought this was super weird. I was not going to run a new wire from the fuse box and this was not going to be the watershed moment where I decide to replace the whole harness (which, if you remember, I got when the ignition fried, and cannot return). Instead, I did a classic DPO move. I changed the wiring for the passenger-side side marker into a 2-wire splice, running a long wire along the original harness over the engine hatch to the driver-side tail light. At this point, I made a second 2-wire splice, sending one into the running light in the tail light housing and one to the side-marker.
Unlike the passenger side, the driver side had all of the correct holes. Unfortunately, this install showed that the replacement parts do not have a "pop-in" plastic nub that is long enough to actually snap the housing into place. Since the nubs are easily removed, I simply pushed a bolt through the housing and the side of the bus and threaded on a washer and nut from inside the engine compartment. I popped in a bulb, tested and then shifted to the lens. The lens set on easily enough, though they do not ship with screws/bolts so you're on your own for those. Once all assembled, I re-confirmed the running lights work all-around (again, see picture).
K'Lack Came Back
I intend to continue doing these low-risk things
until I am ready to tackle 2 big projects on Hapy: (1) re-wiring the
front-to-rear using a cable and (2) implementing a defroster. Both of those
will be big, and I'd like some dry weather before I start them. But first, we finally got K'Lack (our TDI wagon) back
from the transmission shop. Recall that K'Lack was suffering a form of morning sickness, being unwilling to shift out of first on cold mornings. I thought it was from old activators inside the transmission, so we took it back to the rebuilder to swap them out. That wasn't it. After 2 months of trying to
figure out the mystery,
they discovered that the rebuild kit they were sent for the rebuild a year ago was for a 01P not a
01M transmission. After trying everything else, they pulled the
transmission, rebuilt it again and compared the servos to the ones they removed
and learned that they are different sizes, but barely noticeably.
Anyway, with K'Lack back in service, I can pull Oliver (the MGB) off the road and fit him with a catalytic converter before he is due
for Oregon DEQ in May.
Remember how at the end of the TDI retrospectives (here) I said that there would be a gap in postings for a while as my projects got spun back up? Well, I think that's finally going to happen now that K'Lack is back. With 2 operational cars, K'Lack and Flash, I can comfortably take Oliver and Hapy out of service. So, the project fun is about to begin, but that means that the blog silence is as well.
Thanks, as always, for following along. There will be more when something I haven't started yet is close to completion. Wash your hands, for 20 seconds, many times a day, my friends --
This blog is dedicated to the work that I perform on my VW Bus, the trips we take with him, and the things we see and learn about cars, people and ourselves along the way. That said, I am working on other cars a lot lately. So, I post on that too.
Showing posts with label transmission. Show all posts
Tuesday, March 17, 2020
Tuesday, February 5, 2019
Flash fixes continued
I left off my last post about Flash with a summary of fixes stemming from replacing my 3 seasons tires with studded snows. Today, I finish the work by repairing the not-operating wipers and getting the reverse lights to work again.
Wipers No Wiping
The RainX held us for the handful of days while we waited for the new linkage to arrive. I got new wipers and a wiper-arm puller as well. Everything arrived on a Friday night, so the next (Saturday) afternoon I tore into the job.
Before you start, make note of where your wipers are. Similar to getting your engine into TDC (Top Dead Center) firing position for cylinder #1 before you start removing things, move your wipers into the rest position (all the way down) before you start or getting things to line up at the end will take much longer. The arms remove with a 13mm socket, hidden under a small plastic cap. Save that cap and the nuts. Once the nuts are off, the arm puller popped the arms right off. Next, the plastic cowl needs to be pulled away. The rubber seal along the front edge should remove easily, leaving just the 4 snap-on bits along the rear. These pull away by getting your fingers under the plastic along the windscreen and pulling more towards the front than straight up. I have seen others post about using a pry-bar; I found that excessive and introduced more risk to breaking that plastic cowl or scratching the glass. I removed and re-installed this cowl a few times while trying out various parts, so I can say for certain that a pry bar should not be necessary.
With the cowl out of the way, you should see the unpainted metal linkage connected to the wiper arm bolts. It is held to the car by 3 10mm bolts. Remove the bolts, and the washers underneath and save them. The linkage should now be free, but it can't be removed until you unplug the electrical plug from the motor. It is a flat 6-pin plug with a little catch on the underside. Press the catch and pull it away from the motor. Now you can wiggle the whole operation free from under the windscreen. Note how the motor connects to the linkage. There are 3 10mm bolts holding them together and a central 13mm nut holding the business end of the motor to the operational part of the linkage. Consider the orientation of that "operational part". If the wipers were in their resting position before you started tearing things apart, the short arm is pointing directly to the right (front is front), making it difficult to get the 13mm wrench in there to remove the nut. Remember this when you're putting it all back together.
I took the opportunity to clean out the little wiper controls bay at this point. There was all kinds of organic debris in there from years of parking outside. I dug around with a stick and used my shop-vac to get it clear. I also started testing things. First, I compared the new linkage with the original. I noticed that the new and old operated the same. In fact, the old one moved more freely. So, I concluded that the linkage was not the problem. So, I plugged the motor back in, and tested its operation with the wiper switch. The motor made noise, but did not turn the threaded end. So, the motor was the bad item. I needed a new one today or we were going another week, this time a projected-stormy one, without wipers. Eek.
Local Auto Parts
With Discount Import Parts now 1-1/2 hours away round-trip (no, I just can't let that go), I started looking around at the common local places. NAPA reportedly had one just down the street, according to their website, but after ordering one for pickup, I was called by the store and told that they actually didn't have one, but they could have one to me by Tuesday. Hmm.. this is why Amazon is crushing typical retail; I could have one in-hand tomorrow from Amazon. I want one now. Today. Next, I tried O'Reilly's about 30 blocks away, who also claimed to have one. They did. I failed to test it before I left the store, and it failed to work, right out of the box, when I tried to install it. No motor movement; no motor sounds. By the time I got it returned, it was getting into Saturday evening, so I aborted for the day, knowing that the Hillsboro location (20 minutes away) had 2. One of them would probably work.
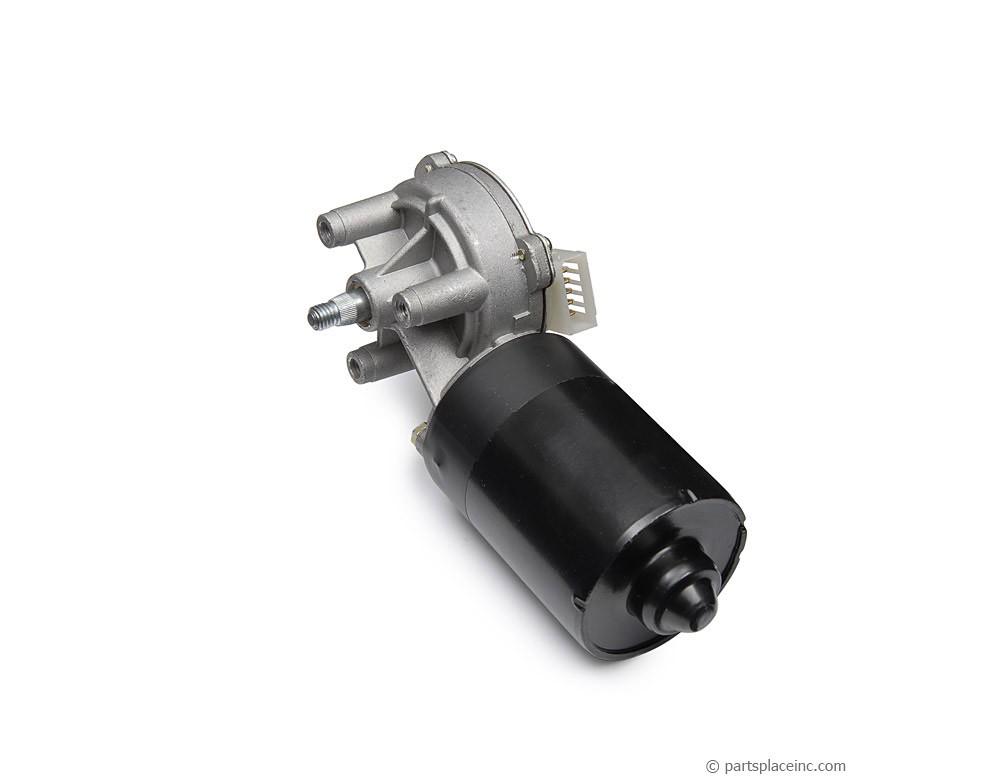
Sunday morning, I hit the Hillsboro store, swapped a $100US bill for a motor and tested it in the parking lot. Bad the same way as mine: motor hums but the threaded end didn't turn. I've come to the conclusion that this transition part (I refer to as a transmission) is a fail point that is not looked at during rebuilds, or at least not often enough to prevent bad parts going to stores. For reference, it's the silver section of the motor in the picture on the right, here. Anyway, the other motor they had looked much better. The transmission looked new, the paint on the motor was not all over the transmission (like the others were), and best of all, it passed my driveway test of plugging the motor in while it was resting on the hood/windscreen and flipping the wiper switch.
I had brought my old linkage and the fasteners so I re-assembled the wiper motor and linkage, re-installed them and attached it all to the car right there in the O'Reilly's driveway. That's one more plus for them over NAPA: NAPA has a big sign on the side of the building forbidding patrons from doing spot repairs in their parking lot. O'Reilly's guys will come out and help you do it. Anyway, with everything under-cowl put together, I tested the switch and watched the wiper bolts rotate. Regretting that I had not brought at least the driver-side wiper arm and blade with me, I nosed the car east and back home.
Clear Screen
The finish-up of the job was very simple. Between the linkage and the cowl resides small rubber boots that I had not mentioned earlier. I think these protect the linkage from rusting, so I re-installed them. Considering how rust-free and genuinely operational the original linkage is, I think this a fair assumption. Then, I wrestled the cowling back under the hood (bonnet for my non-US friends), setting it tight along the front edge before snugging the 4 snaps along the rear edge. I re-set the seal along the front edge, and then put the wiper arms back on, snugging them down with the 13mm socket and finally pressed the plastic caps into the arms. Like all things, test before you call it done. I had been doing all this in a steady Pacific NorthWest rain, so there was plenty of water on the windscreen for a valid test. The new Bosch ICON wipers ran smoothly from park to post and back again.... and completely cleared the glass in one pass. So sweet.
Reverse Lights
The last thing I needed to fix on the old Jetta was the not-operating reverse lights. Start with the simple, obvious things first: the bulbs. While they do not fail at the same time very often, I find coincidences like that happen more often with this car than many others I have owned. Not this time, though. Next, test the switch. The switch sits under the battery tray, behind and to the left of the starter motor. If you unplug it and then jumper across the 2 pin holes in the harness, you simply turn the ignition to "run" and you should see reverse lights. If you do, the switch is bad. If you do not, the issue may lie elsewhere.
Remove and Replace Switch
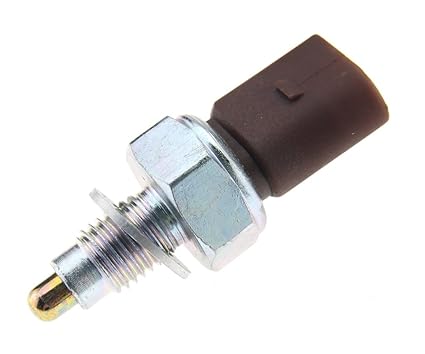
I read a few how-to's on the reverse switch, and they all sounded very involved, including removing the battery and tray, removing the air box or both. Yikes. I looked at the location and considered that I could see the hex edges of the switch, so I could probably get a spanner in there. Sure enough, a 7/8" spanner fits the switch perfectly and can thread behind the battery box, but far enough ahead of the transmission to gain purchase on the switch. Unplug the switch first. Then, just pop the spanner on that switch so it can move. I didn't have to move my spanner more than 30*. Facing the engine from the front, reach along the rear of the radiator (under the upper hose) and under the battery box until your fingers reach the switch. I had my elbow brushing the driver-side radiator fan. The switch removes fairly easily (lefty-loosey). The install is the reverse, seriously, and then snug it tight with the 7/8" spanner..
I applied some thread seal on the switch, dropped on the included washer, reached around and under the battery box and threaded it home. I plugged it in and... nothing. Huh? I backed out the switch, and tested the switch by plugging it in, holding it depressed with my new wiper arm puller and saw the reverse light illuminate. Yes, I could have asked someone inside to come out, but it was raining... and raining hard, so why get everyone wet? I concluded that the included washer is NOT for the Jetta TDI engine, but may be used in one of the switch's other applications. Great. So, I pulled the washer, re-installed, plugged it back in and... it worked. Hapy dance.
So, now, the only thing that is still broken on old Flash is the hazard switch. I have bought multiple new ones and they all arrive failed. I think it stems from manufacturing moving away from Germany and Brazil to China, lowering the quality of the soldering along the way. I will just get one from the junkyard the next time I go. I still need to solve for the heated seats one of these days, but I am content to have all of the lights and wipers working for today.
Thanks for following along, and I will be getting back to Oliver's interior now that the daily-driver is safe again.
Wipers No Wiping
The RainX held us for the handful of days while we waited for the new linkage to arrive. I got new wipers and a wiper-arm puller as well. Everything arrived on a Friday night, so the next (Saturday) afternoon I tore into the job.
Before you start, make note of where your wipers are. Similar to getting your engine into TDC (Top Dead Center) firing position for cylinder #1 before you start removing things, move your wipers into the rest position (all the way down) before you start or getting things to line up at the end will take much longer. The arms remove with a 13mm socket, hidden under a small plastic cap. Save that cap and the nuts. Once the nuts are off, the arm puller popped the arms right off. Next, the plastic cowl needs to be pulled away. The rubber seal along the front edge should remove easily, leaving just the 4 snap-on bits along the rear. These pull away by getting your fingers under the plastic along the windscreen and pulling more towards the front than straight up. I have seen others post about using a pry-bar; I found that excessive and introduced more risk to breaking that plastic cowl or scratching the glass. I removed and re-installed this cowl a few times while trying out various parts, so I can say for certain that a pry bar should not be necessary.
| nicked from VWVortex |
I took the opportunity to clean out the little wiper controls bay at this point. There was all kinds of organic debris in there from years of parking outside. I dug around with a stick and used my shop-vac to get it clear. I also started testing things. First, I compared the new linkage with the original. I noticed that the new and old operated the same. In fact, the old one moved more freely. So, I concluded that the linkage was not the problem. So, I plugged the motor back in, and tested its operation with the wiper switch. The motor made noise, but did not turn the threaded end. So, the motor was the bad item. I needed a new one today or we were going another week, this time a projected-stormy one, without wipers. Eek.
![]() |
| wiper motor |
Local Auto Parts
With Discount Import Parts now 1-1/2 hours away round-trip (no, I just can't let that go), I started looking around at the common local places. NAPA reportedly had one just down the street, according to their website, but after ordering one for pickup, I was called by the store and told that they actually didn't have one, but they could have one to me by Tuesday. Hmm.. this is why Amazon is crushing typical retail; I could have one in-hand tomorrow from Amazon. I want one now. Today. Next, I tried O'Reilly's about 30 blocks away, who also claimed to have one. They did. I failed to test it before I left the store, and it failed to work, right out of the box, when I tried to install it. No motor movement; no motor sounds. By the time I got it returned, it was getting into Saturday evening, so I aborted for the day, knowing that the Hillsboro location (20 minutes away) had 2. One of them would probably work.
Sunday morning, I hit the Hillsboro store, swapped a $100US bill for a motor and tested it in the parking lot. Bad the same way as mine: motor hums but the threaded end didn't turn. I've come to the conclusion that this transition part (I refer to as a transmission) is a fail point that is not looked at during rebuilds, or at least not often enough to prevent bad parts going to stores. For reference, it's the silver section of the motor in the picture on the right, here. Anyway, the other motor they had looked much better. The transmission looked new, the paint on the motor was not all over the transmission (like the others were), and best of all, it passed my driveway test of plugging the motor in while it was resting on the hood/windscreen and flipping the wiper switch.
I had brought my old linkage and the fasteners so I re-assembled the wiper motor and linkage, re-installed them and attached it all to the car right there in the O'Reilly's driveway. That's one more plus for them over NAPA: NAPA has a big sign on the side of the building forbidding patrons from doing spot repairs in their parking lot. O'Reilly's guys will come out and help you do it. Anyway, with everything under-cowl put together, I tested the switch and watched the wiper bolts rotate. Regretting that I had not brought at least the driver-side wiper arm and blade with me, I nosed the car east and back home.
Clear Screen
| Bosch ICON wipers |
Reverse Lights
The last thing I needed to fix on the old Jetta was the not-operating reverse lights. Start with the simple, obvious things first: the bulbs. While they do not fail at the same time very often, I find coincidences like that happen more often with this car than many others I have owned. Not this time, though. Next, test the switch. The switch sits under the battery tray, behind and to the left of the starter motor. If you unplug it and then jumper across the 2 pin holes in the harness, you simply turn the ignition to "run" and you should see reverse lights. If you do, the switch is bad. If you do not, the issue may lie elsewhere.
Remove and Replace Switch
![]() |
| reverse switch: do not use the washer |
I applied some thread seal on the switch, dropped on the included washer, reached around and under the battery box and threaded it home. I plugged it in and... nothing. Huh? I backed out the switch, and tested the switch by plugging it in, holding it depressed with my new wiper arm puller and saw the reverse light illuminate. Yes, I could have asked someone inside to come out, but it was raining... and raining hard, so why get everyone wet? I concluded that the included washer is NOT for the Jetta TDI engine, but may be used in one of the switch's other applications. Great. So, I pulled the washer, re-installed, plugged it back in and... it worked. Hapy dance.
So, now, the only thing that is still broken on old Flash is the hazard switch. I have bought multiple new ones and they all arrive failed. I think it stems from manufacturing moving away from Germany and Brazil to China, lowering the quality of the soldering along the way. I will just get one from the junkyard the next time I go. I still need to solve for the heated seats one of these days, but I am content to have all of the lights and wipers working for today.
Thanks for following along, and I will be getting back to Oliver's interior now that the daily-driver is safe again.
Labels:
Jetta,
lights,
linkage,
motor,
reverse,
transmission,
view from a bus,
VW,
wiper
Tuesday, October 7, 2014
This End Up
When I first constructed the engine cradle, it wasn't really designed to be used a bunch of times. I never thought that far ahead. Today's post covers what happened when a hot and bothered shade-tree mechanic experiences a failure with a critical tool... after first losing his patience. I got so caught up in solving the problems that I failed to take any pictures. So sorry!
Engine Husbandry
A couple of years ago, I mated the transaxle to the engine under cover of the bus in my real estate agent's drive way (See Transaxle Transition). I figured, "if I could do it in MS' drive way, I can certainly do it in mine." Sure. Like before, I removed the mating studs first. Unlike before, I had the pilot bearing in the flywheel, so the mating was much harder. With a small wheeled 2-ton jack holding the transaxle up, I was not able to maneuver the input shaft through the pressure-plate, clutch and flywheel. Instead, I did what my old wrestling coach once described to me. I put the transaxle on my belly/chest and heaved it on, twisting it until the splines of the clutch fit into the input shaft, and then slid it home. I slid myself out from under the transaxle and slid the jack into my place to hold it together. I don't want to do that again. One more reason to cut a removal valence into the rear apron.
Studly
With the transaxle and engine mostly mated, I rotated the transaxle such that the stud holes lined up, and slid the bolts in. At the time, I'd forgotten that the adapter plate had 3 settings: 0*, 15* and 50*. I nutted the studs down, and rather than take my winnings and going home, I doubled down and tried to get the bell-housing mounts set before calling it a day. The driver side is easier to get to, so I started there, and after 10 minutes of up/down with the jack, I was able to slide it through the hole, the mickey-mouse mounting ear and against the nut. Then the trouble started. I couldn't get it all the way through to the nut, nor could I get the other bolt started at all. Jack up, jack down. Shake engine. Repeat. 30 minutes. 40 minutes Nothing worked. On one of my attempts, the engine shifted on the cradle. Instead of leaning over to the left, it was leaning over to the right, and partway off the cradle. The cradle was also showing signs of weakness, with it separating in a few places.
Is It Bleeding?
At this point, I kind of freaked out, but it got worse. I reached in through my home-made top-side engine hatch to pull on the driver side mounting bolt. Rather than grab the bolt, my head hit the hinge. Hard. Sudden pain and blood ensued. Instinctively, I slapped my hand against the gash. Ordinarily, that would have been good; pressure on the wound and all that. My hand, though, was wrapped in a grease/oil covered glove, so the cut now had oil and grease in it. Fortunately, Boo was gardening near by, heard my curses and came over to see what was going on. She snapped into nurse-mode, cleaning it out with various potions and butterfly taping the gash closed. Once calmed back down, I went back out to survey the wreckage. The engine was shifted clockwise by a couple hours, and from underneath, it was clear the transaxle wan't in-line with the centerline of the bus anymore. I resolved to simply get the one bolt out and call it a day. 20 minutes later, the whole operation was sitting on the ATV jack and cradle, though woefully mis-aligned and partly rolled over. I cracked a beer and left it for the night.
Ship-Righting
Getting the engine/transaxle upright was a series of "how about this?" ideas. I had the cradle and jack somewhat square under the engine, but simply tugging on the engine didn't really budge it. I tried nutting-down the nose of the transaxle, but that didn't work. I placed a steel bar across the top of the engine hatch and used load-lock webbed hooks to attach the engine to the bar. I then slowly lowered the jack. The engine shifted. I moved the jack, supporting it in its new orientation. I used the other jack under the cooling fins on the right side of the transaxle to help it rotate. I changed the ATV jack so it was perpendicular to the engine. This proved to be most effective: leveraging the steel bar/hook and the secondary jack, I settled the engine onto the ATV jack. Then, while pushing the base of the oil pan with my foot, I pushed down on the turbo. The engine rotated while the ATV jack moved to the right.
After a series of similar moves, the mickey-mouse ears seemed aligned with the holes in the mount.
Engine, Meet Hatch Lid
Once the engine was upright, I slid under the bus and got the passenger-side bolt in. Note for my future self: always start on this (passenger, right) side. If the engine flops over again, better that it flop onto the turbo-side: you can put a jack there. There's no good spot to set a jack on the right side. After about 15 minutes, I had the bolts in, and tightened down. Probably a personal record. Once in, I thought the engine looked a little funny. The intake felt high and the oil pan appeared to be pointed at the ground instead of slightly to the right. My fears were confirmed when I set the engine hatch on top of the intake. Drat. now we know that the 0* adapter plate configuration would not have fit.
Re-Studly
After all that, I wasn't going to start all over again. Instead, I thought I'd try rotating the engine 15* by removing the transaxle mounting studs. Since I'd already installed the starter, that had to come out first. Then, I re-supported the engine with the cradle/ATV jack, set the steel bar with the hooks and removed the 4 studs. I repeated the pushing on the oil pan, intake and turbo like I did before. The engine shifted somewhat quickly into an almost-there position. I had to do the final little bit while laying alongside the left side of the engine. This was arguably pretty hazardous. I slipped the lower left stud through the transaxle and pulled down on the turbo while wiggling the stud. The engine needed to shift about 1/4", but it sure felt dicey. Once the first one was in, I knew it was aligned, so I slid the upper left stud in and dashed around the right side and did the starter-stud and lower right studs. Once nutted and torqued, I dropped the ATV jack, and re-set it with the cradle.
It was a crazy couple of days getting the transaxle and engine roughed back in. I still had the transaxle nose-mount, CV joints, rear engine mount and all of the accessories to do. I'll post on that later. Fortunately, there was virtually no more drama after I got the central mount done.
Thanks for following along,
Engine Husbandry
A couple of years ago, I mated the transaxle to the engine under cover of the bus in my real estate agent's drive way (See Transaxle Transition). I figured, "if I could do it in MS' drive way, I can certainly do it in mine." Sure. Like before, I removed the mating studs first. Unlike before, I had the pilot bearing in the flywheel, so the mating was much harder. With a small wheeled 2-ton jack holding the transaxle up, I was not able to maneuver the input shaft through the pressure-plate, clutch and flywheel. Instead, I did what my old wrestling coach once described to me. I put the transaxle on my belly/chest and heaved it on, twisting it until the splines of the clutch fit into the input shaft, and then slid it home. I slid myself out from under the transaxle and slid the jack into my place to hold it together. I don't want to do that again. One more reason to cut a removal valence into the rear apron.
Studly
With the transaxle and engine mostly mated, I rotated the transaxle such that the stud holes lined up, and slid the bolts in. At the time, I'd forgotten that the adapter plate had 3 settings: 0*, 15* and 50*. I nutted the studs down, and rather than take my winnings and going home, I doubled down and tried to get the bell-housing mounts set before calling it a day. The driver side is easier to get to, so I started there, and after 10 minutes of up/down with the jack, I was able to slide it through the hole, the mickey-mouse mounting ear and against the nut. Then the trouble started. I couldn't get it all the way through to the nut, nor could I get the other bolt started at all. Jack up, jack down. Shake engine. Repeat. 30 minutes. 40 minutes Nothing worked. On one of my attempts, the engine shifted on the cradle. Instead of leaning over to the left, it was leaning over to the right, and partway off the cradle. The cradle was also showing signs of weakness, with it separating in a few places.
Is It Bleeding?
At this point, I kind of freaked out, but it got worse. I reached in through my home-made top-side engine hatch to pull on the driver side mounting bolt. Rather than grab the bolt, my head hit the hinge. Hard. Sudden pain and blood ensued. Instinctively, I slapped my hand against the gash. Ordinarily, that would have been good; pressure on the wound and all that. My hand, though, was wrapped in a grease/oil covered glove, so the cut now had oil and grease in it. Fortunately, Boo was gardening near by, heard my curses and came over to see what was going on. She snapped into nurse-mode, cleaning it out with various potions and butterfly taping the gash closed. Once calmed back down, I went back out to survey the wreckage. The engine was shifted clockwise by a couple hours, and from underneath, it was clear the transaxle wan't in-line with the centerline of the bus anymore. I resolved to simply get the one bolt out and call it a day. 20 minutes later, the whole operation was sitting on the ATV jack and cradle, though woefully mis-aligned and partly rolled over. I cracked a beer and left it for the night.
Ship-Righting
Getting the engine/transaxle upright was a series of "how about this?" ideas. I had the cradle and jack somewhat square under the engine, but simply tugging on the engine didn't really budge it. I tried nutting-down the nose of the transaxle, but that didn't work. I placed a steel bar across the top of the engine hatch and used load-lock webbed hooks to attach the engine to the bar. I then slowly lowered the jack. The engine shifted. I moved the jack, supporting it in its new orientation. I used the other jack under the cooling fins on the right side of the transaxle to help it rotate. I changed the ATV jack so it was perpendicular to the engine. This proved to be most effective: leveraging the steel bar/hook and the secondary jack, I settled the engine onto the ATV jack. Then, while pushing the base of the oil pan with my foot, I pushed down on the turbo. The engine rotated while the ATV jack moved to the right.
After a series of similar moves, the mickey-mouse ears seemed aligned with the holes in the mount.
Engine, Meet Hatch Lid
Once the engine was upright, I slid under the bus and got the passenger-side bolt in. Note for my future self: always start on this (passenger, right) side. If the engine flops over again, better that it flop onto the turbo-side: you can put a jack there. There's no good spot to set a jack on the right side. After about 15 minutes, I had the bolts in, and tightened down. Probably a personal record. Once in, I thought the engine looked a little funny. The intake felt high and the oil pan appeared to be pointed at the ground instead of slightly to the right. My fears were confirmed when I set the engine hatch on top of the intake. Drat. now we know that the 0* adapter plate configuration would not have fit.
Re-Studly
After all that, I wasn't going to start all over again. Instead, I thought I'd try rotating the engine 15* by removing the transaxle mounting studs. Since I'd already installed the starter, that had to come out first. Then, I re-supported the engine with the cradle/ATV jack, set the steel bar with the hooks and removed the 4 studs. I repeated the pushing on the oil pan, intake and turbo like I did before. The engine shifted somewhat quickly into an almost-there position. I had to do the final little bit while laying alongside the left side of the engine. This was arguably pretty hazardous. I slipped the lower left stud through the transaxle and pulled down on the turbo while wiggling the stud. The engine needed to shift about 1/4", but it sure felt dicey. Once the first one was in, I knew it was aligned, so I slid the upper left stud in and dashed around the right side and did the starter-stud and lower right studs. Once nutted and torqued, I dropped the ATV jack, and re-set it with the cradle.
It was a crazy couple of days getting the transaxle and engine roughed back in. I still had the transaxle nose-mount, CV joints, rear engine mount and all of the accessories to do. I'll post on that later. Fortunately, there was virtually no more drama after I got the central mount done.
Thanks for following along,
Labels:
002,
091,
ATV jack,
bearing,
Boo,
diesel,
engine,
engine drop,
engine mount,
kennedy,
KEP,
TDI,
transaxle,
transmission
Wednesday, October 1, 2014
Snap Ring Pliers review
I don't usually review tools. Usually, I research a bunch and then pick whatever the interweb tells me to buy. I wasn't able to get a good direction from the web for Snap Ring Pliers, so I bought a couple pairs and experimented. Today's brief post summarizes those experiments.
Why Bother?
In my previous post, I talked about solving a leaking oil seal. Some of my research on that issue pointed me to believe that the input shaft was loose and needed to be removed and re-installed. To do that, a circlip needs to be backed off so a thick lock-ring can be pulled back (see picture to the right. The input shaft rises from the center of the picture to the left). Then, the input shaft can be threaded off the reverse gear. First step in that process requires a pair of Snap Ring Pliers.
Size
Some things about the old Volksies are very well documented on the web. Arguably, some are over documented. If you want to know what kind of oil to run, for example, you can go through literally hundreds of opinions. Tires are equally well-opinion'd. Getting something as simple as the size of the tip needed to remove the circlip on the input shaft, however, can sometimes prove impossible. Hours of searching netted no useful information. The size is 0.07 (US), by the way. This is the largest size available in the standard multi-tip Snap Ring Pliers sets, and individual pliers with fixed-size tips can be found.
NAPA
Off to the friendly local auto parts store (FLAPS), I went to find a pair that would work. Since I'm only really doing this once, I didn't want a spendy pair, just some that would do the job. So, I tried the tip-adjustable set available at NAPA. Using the largest tip (0.07), I was unable to open the circlip wide enough to get the circlip out of its seating channel without the tip failing. The tips are held on with small Phillips head bolts pressing a removable plate against the plier arm. The removable plate is slightly bent, presumably to best fit the tip on, but the engineering is flawed such that the final bit of torque needed to hold the tip is robbed from you by the curve of the plate. Neat. I tried to undermine that torque-robbery by jamming a finish nail under the plate on the opposite side of the bolt, increasing the torque on the tip. That didn't work either.
Net-result: not good for this job. Maybe, if the circlip you need to remove requires less than 10 foot-pounds of torque it would suffice, but for real automotive situations, its junk.
Husky
After setting the NAPA pliers aside, I hit Home Depot looking for a pair of Husky one-size-only 0.07 Snap Ring Pliers. While their web site showed that they were in stock at the store (for $13), neither I nor the clerk could find them. I'd love to review them, but instead I offer just a head-shaking at Home Depot. Either offer the product or don't; don't post it on your web site if you don't have it. Boo.
Channel Lock
Home Depot did have Channel Lock 927 Snap Ring Pliers (for, like $23). These are multi-tip pliers like the NAPA ones, but are clearly better made. They are much heavier. They have a flip-switch to set inner or outer ring direction. Oh, they're made in the US, so somewhere my countryman benefited from my buying them, so that's nice. But do they work for this? Why, yes, they do. Unlike the NAPA pair, the ring easily opened up enough to slip out of the channel and out of the way. Like the NAPA, Channel Lock 927's are sold with a collection of smaller tips, and are delivered with the largest (0.07) already installed. This made the test easy, removing the possibility of me putting the tips in wrong. I didn't bother removing and re-installing to see how bad it was, but the engineering is very different. Unlike the NAPA which has a plate screwed on, leveraging the friction created to hold the tip in place, the Channel Lock has a hole in the plier arm to slide the tip into. The securing bolt simply prevents the tip from falling out, so the arms need to be able to support far less torque. The arms are much thicker too, implying that they can handle far more pressure than the NAPA tool could.
In the end, I didn't need to remove and re-install my input shaft. After I installed the oil slinger and input shaft seal (see: Transaxle Re-Assembled), I re-tested the wiggle in the input shaft. It barely moved. I concluded that the input shaft was appropriately loose, and some additional digging into theSamba verified that conclusion. I'm keeping the Channel Lock's with the car tools, and returning the NAPA's.
That's it for today. I'm working on a post summarizing the engine-trans re-mating as well as the adventure of raising the engine-tranny unit back into the bus.
Why Bother?
In my previous post, I talked about solving a leaking oil seal. Some of my research on that issue pointed me to believe that the input shaft was loose and needed to be removed and re-installed. To do that, a circlip needs to be backed off so a thick lock-ring can be pulled back (see picture to the right. The input shaft rises from the center of the picture to the left). Then, the input shaft can be threaded off the reverse gear. First step in that process requires a pair of Snap Ring Pliers.
Size
Some things about the old Volksies are very well documented on the web. Arguably, some are over documented. If you want to know what kind of oil to run, for example, you can go through literally hundreds of opinions. Tires are equally well-opinion'd. Getting something as simple as the size of the tip needed to remove the circlip on the input shaft, however, can sometimes prove impossible. Hours of searching netted no useful information. The size is 0.07 (US), by the way. This is the largest size available in the standard multi-tip Snap Ring Pliers sets, and individual pliers with fixed-size tips can be found.
NAPA
![]() |
| boink! tip fail. |
![]() |
| mod no worky |
Husky
After setting the NAPA pliers aside, I hit Home Depot looking for a pair of Husky one-size-only 0.07 Snap Ring Pliers. While their web site showed that they were in stock at the store (for $13), neither I nor the clerk could find them. I'd love to review them, but instead I offer just a head-shaking at Home Depot. Either offer the product or don't; don't post it on your web site if you don't have it. Boo.
Channel Lock
![]() |
| Channel Lock works! |
In the end, I didn't need to remove and re-install my input shaft. After I installed the oil slinger and input shaft seal (see: Transaxle Re-Assembled), I re-tested the wiggle in the input shaft. It barely moved. I concluded that the input shaft was appropriately loose, and some additional digging into theSamba verified that conclusion. I'm keeping the Channel Lock's with the car tools, and returning the NAPA's.
That's it for today. I'm working on a post summarizing the engine-trans re-mating as well as the adventure of raising the engine-tranny unit back into the bus.
Monday, September 29, 2014
Transaxle Re-assembled
Last weekend, I got the transaxle put back together and back into the bus. Fast sentence to write. Lots of effort to do. Today covers the first half of that 'effort to do': getting the transaxle ready.
Slinging Oil
The bellhousing for the 002 and 091 transaxles are supposed to have this ringed collar around the input shaft to help guide the hypoid oil away from the input shaft seal and back towards the gears. There are a few names for this bit, but the boards call it an "Oil Slinger". According to the Bentley, this was supposed to be a non-repair item that was pressed into the bellhousing with a 4-ton press. If it separates, you get a new bellhousing or re-press it in. Well, the VW world has discovered that's not exactly right anymore. Instead, you create a rough edge on the inner edge and along the rear (engine side) of the bellhousing. I used a chisel and a file for this. Then, rough up the lip and outside of the slinger near the lip. Peanut butter the edge with JB Weld and press it into place by hand. I treated the excess like caulking, and ran a gloved finger along the edges, pressing it in and making the edge clean. Last, hold it firm with a simple weight and gravity. Once its cured (18 hours), its ready.
Install Input Shaft Seal
This was actually quite simple. Lightly brush the inner and outer edge with hypoid oil. Set into place by hand, and press it enough by hand so it sits still. Find a short section of 3/4" PVC pipe (I used a 3/4" - 1/2" T from Home Depot). With a rubber mallet, smack the seal until it seats flush with the face of the bellhousing.
Into One Piece
When the transaxle was built by AA Transaxle in Seattle, the bellhousing was sealed to the transaxle body with what looked like clear silicone caulking. Not a fan. I scraped all that out and instead ran hi-temp form-a-gasket along all of the mating surfaces. Once it becomes tacky, set the 2 sides together and set the bolts in. Rubber mallet the bellhousing into place and finger-tighten the bolts. Following the jump-the-center torquing process, set them to 18ft-pounds (if memory serves. check the Bentley).
Topped Off and Ready
Before I put the bellhousing on, I made sure the oil drain plug could be loosened. I had vaguely remembered that it was frozen in-place. I was right. After some hard torquing, I got the nut out. I cleaned off the tiny metal filings off the attached magnetized rod, cleaned the threads and re-seated it.
Once the transaxle and bellhousing were one piece again, you need to give the form-a-gasket time to cure. I gave it 24 hours and then opened up the fill hole. It took all the gear oil I had on hand, and was still a touch low. I'll need a fresh bottle to top it off before I take much of a test drive. Remember, the tranny is full when oil spills out of the fill-hole when the tranny is on level ground.
That's it for today. The tranny looks good, the input shaft has almost 0 wiggle to it and the seal / form-a-gasket are holding oil. Hazah!
Slinging Oil
![]() |
| slinger by hole in bell housing where it's supposed to be attached |
Install Input Shaft Seal
![]() |
| roughed up edges |
Into One Piece
When the transaxle was built by AA Transaxle in Seattle, the bellhousing was sealed to the transaxle body with what looked like clear silicone caulking. Not a fan. I scraped all that out and instead ran hi-temp form-a-gasket along all of the mating surfaces. Once it becomes tacky, set the 2 sides together and set the bolts in. Rubber mallet the bellhousing into place and finger-tighten the bolts. Following the jump-the-center torquing process, set them to 18ft-pounds (if memory serves. check the Bentley).
Topped Off and Ready
![]() |
| slinger with JB Weld |
Once the transaxle and bellhousing were one piece again, you need to give the form-a-gasket time to cure. I gave it 24 hours and then opened up the fill hole. It took all the gear oil I had on hand, and was still a touch low. I'll need a fresh bottle to top it off before I take much of a test drive. Remember, the tranny is full when oil spills out of the fill-hole when the tranny is on level ground.
That's it for today. The tranny looks good, the input shaft has almost 0 wiggle to it and the seal / form-a-gasket are holding oil. Hazah!
Wednesday, September 10, 2014
Removing an Input Shaft Seal
I have a bigger post in the works for the engine drop, transaxle input shaft seal replacement, etc. For now, I have the engine lowered onto an ATV jack, and the transaxle in pieces on my garage floor. I removed the old input shaft seal in a unique way. Everywhere I looked, the advice was to get a seal removal tool, hammer it into the rubber seal and pry away. I did something else, and that's what I cover in today's post.
Identify the Seal as the Problem
After separating the engine from the transaxle, and before moving the transaxle into a clean location, look at the inside of your bellhousing. Does it have a bunch of oil residue lining it? Maybe a small pool of oil? Dip your finger in it and sniff it. Does it smell like your engine oil? Does it look like engine oil? Lighter color? Maybe slightly different smell too? Yep, you have a leaking input shaft seal. Now, remove the throw-out bearing like everyone says. If you have the sleeve behind it, remove that too, exposing the input shaft seal. Look at the seal. Wiggle the input shaft a little bit. Does the seal cling to the shaft or do gaps appear? Is the seal smooth or does it have a pinch in it? Mine had 2 small pinches along the outer edge and the shaft did not cling to the seal.
Removing an Input Shaft Seal
This is the point where everyone else says to remove the seal the brute-force way. For some transaxles (those without a seal housing), it may be the right method. I took a different tack. Remove the bellhousing. Its held on with 13mm bolts. 3 on each side inside the bellhousing and 2 on the bottom. With a rubber mallet, lightly smack the bellhousing to free it from the transaxle body. Mine had been silicone sealed but the seal didn't hold up much. Place the bellhousing engine-side down on top of a shop towel. Pointing up, you will see the seal housing. Smack it with the rubber mallet and out pops the input shaft seal. Easy peasey. EDIT: Through further research, I believe the housing should not separate from the bell housing. If you were able to get your seal out this way, by lightly tapping on the housing (like I did), you have a new problem: how to get the "housing" (some call it an oil-slinger) re-attached to the bell housing so that it doesn't re-free itself. I'll post a picture of what my driveshaft looks like after less than 2 thousand miles like this. I am assuming it wasn't like this when I got the transaxle from AA. End EDIT.
New Seal, Torn Seal
I have been unable to successfully get a seal back into the transaxle, to the point where I tore the only replacement I had. All of the advice on the interweb seems to exclude transaxles with a seal housing, making their "slip it over the input shaft and drive it in by alternating sides" unusable. I have tried setting the housing first, but that hasn't worked. I got close, though, using a 13mm socket to press the seal. I made the mistake of trying a larger socket and tore the seal. I need to hit Discount Import Parts (DIP) for another one. Once I get the seal onto the housing and into the transaxle, I'll close the loop on how I did it.
That's it for today. I picked up a pilot bearing and a replacement mounting stud for transaxle re-install at the local FLAPS during lunch today. They didn't have a suitable input shaft seal. Off to DIP when the next opportunity presents itself. Thanks for following along, and Hapy Birthday, C!
Identify the Seal as the Problem
After separating the engine from the transaxle, and before moving the transaxle into a clean location, look at the inside of your bellhousing. Does it have a bunch of oil residue lining it? Maybe a small pool of oil? Dip your finger in it and sniff it. Does it smell like your engine oil? Does it look like engine oil? Lighter color? Maybe slightly different smell too? Yep, you have a leaking input shaft seal. Now, remove the throw-out bearing like everyone says. If you have the sleeve behind it, remove that too, exposing the input shaft seal. Look at the seal. Wiggle the input shaft a little bit. Does the seal cling to the shaft or do gaps appear? Is the seal smooth or does it have a pinch in it? Mine had 2 small pinches along the outer edge and the shaft did not cling to the seal.
Removing an Input Shaft Seal
This is the point where everyone else says to remove the seal the brute-force way. For some transaxles (those without a seal housing), it may be the right method. I took a different tack. Remove the bellhousing. Its held on with 13mm bolts. 3 on each side inside the bellhousing and 2 on the bottom. With a rubber mallet, lightly smack the bellhousing to free it from the transaxle body. Mine had been silicone sealed but the seal didn't hold up much. Place the bellhousing engine-side down on top of a shop towel. Pointing up, you will see the seal housing. Smack it with the rubber mallet and out pops the input shaft seal. Easy peasey. EDIT: Through further research, I believe the housing should not separate from the bell housing. If you were able to get your seal out this way, by lightly tapping on the housing (like I did), you have a new problem: how to get the "housing" (some call it an oil-slinger) re-attached to the bell housing so that it doesn't re-free itself. I'll post a picture of what my driveshaft looks like after less than 2 thousand miles like this. I am assuming it wasn't like this when I got the transaxle from AA. End EDIT.
New Seal, Torn Seal
I have been unable to successfully get a seal back into the transaxle, to the point where I tore the only replacement I had. All of the advice on the interweb seems to exclude transaxles with a seal housing, making their "slip it over the input shaft and drive it in by alternating sides" unusable. I have tried setting the housing first, but that hasn't worked. I got close, though, using a 13mm socket to press the seal. I made the mistake of trying a larger socket and tore the seal. I need to hit Discount Import Parts (DIP) for another one. Once I get the seal onto the housing and into the transaxle, I'll close the loop on how I did it.
That's it for today. I picked up a pilot bearing and a replacement mounting stud for transaxle re-install at the local FLAPS during lunch today. They didn't have a suitable input shaft seal. Off to DIP when the next opportunity presents itself. Thanks for following along, and Hapy Birthday, C!
Monday, July 14, 2014
Fun Family Functions
We all have family functions. For lots of families, these are not exactly fun. There are expectations and history that create stress. We're pretty lucky. My brothers, sisters, in-laws and parents all get along, for the most part. In my last post, I mentioned the road trip to Nye Beach, but failed to mention that my younger brother and sister (as well as their families) and my parents were meeting us there. I'll touch on some of the family fun today and wrap it up with home-garage stuff.
Who's Who
My sister, M, moved to Austin a few years back. She and her husband, S, have since bought and sold a house, bought and performed construction on a second, had a couple of kids, etc. They are very much Texans. I hadn't seen their daughter (I) for a couple of years and had never met their 2-year-old (K3). K3 is a pistol. OMG, he is such a joy. We played soccer, and laughed. What a sweetie.
My brother, R, has been living in the greater Portland area since the late 90's, met and married a local (KG) and has a girl (A) and boy (N) of his own. They are both very articulate for their ages, and can engage conversationally with adults with little difficulty. A and I are great friends who Skype when they're apart. Unfortunately, we're apart more than we'd all care for. N and K3 became buddies too, though, playing toys together. So, with that backdrop, we add 3 beach-side condo's and Newport's offerings.
Watching Whales, not the Temperature
Unlike the Oregon inland, once you cross the Coast Range, the temperature remains much closer to the 40*F-60*F range. In Winter, while we're looking at snow temperatures, the coast rarely gets that cold (though the wind is brutal). In Summer, we may be sweating 80*+ days while the coast is a mild 65*. The 5 days we were in Newport were incredible weather-wise. High's in the mid 70's and overnight lows in the 50's.
As the title suggests, we saw whales. There's a pod of about 40 grey whales who live year round in the waters just off the coast between Newport and Lincoln City. On 3 successive nights (July 2nd, 3rd and 4th) from the condo balcony we saw whales spouting at high tide. The first night was particularly spectacular with multiple spouts blowing simultaneously and at least 5 different whale-back sightings over the course of about 30 minutes. KG had been coming to this spot for over 30 years and had never seen whales. Upon hearing this, we were all the more appreciative of the sight we'd witnessed. Of course, we were so awe-struck, none of us thought to take a picture. Drat!
Sand Castles and Sand Sliding
Below the balconies, was a beach of duned sand. Apparently this was somewhat rare too, for the beach was usually flat. Back from the highest tide's edge, the sand had been shifted by wind into what looked like a series of trenches with steep sides, but only a couple of feet tall. These created effective, but sandy, wind blocks that we and others used for building beach fires. With all of the boy energy being fed into air-soft guns, Boo and I expected them to use the trenches and play guns. Surprisingly, they didn't. They used the trenches as starting points for elaborate sand castles. So, with garden shovels instead of toy guns in hand, all of the boys (K, K2, K3, T, C, and N) set to building things. The bigger boys also discovered a steep bank of sand that stood over 30 feet high a little further north. They would one by one jump from the top and do their best ski/board imitation down the bank. Apparently, K2 was hitting 360's by the time they stopped for good.
Hatfield Marine Science Center
We spent a day at the Hatfield Marine Science Center too. We all highly recommend it. It is officially free (though donations strongly encouraged), and about 1/3 of the space is dedicated to interactive exhibits. The remaining contains tanks of sea-life and presentations on waves, oceanography, climate change impacts, etc. I hadn't been to the science center since NOAA moved in next door. NOAA's influence can definitely be felt now, and its a good thing. All of that research now has a available-to-the-public outlet at the Science Center.
Devil's Lake
In my last post, I mentioned the Devil's Lake day-trip. Devil's Lake is a small lake (3 square miles) and seemed to be for boating than beach/swim access. R & KG found a city park that had a boat launch, but more importantly a lake-beach and a huge playground to play in/on. The younger kids had a blast. It was fun, but it was after K and K2 had left. This made T and C sad, and less active. We truly have become a completely blended family when we don't feel complete because some of the boys aren't there. I had heard that this was a family maturity state, but I hadn't seen it coming. The boys are back together again after a week apart, and it really is a homecoming.
Home Garage
After coffee Sunday morning, I wanted to find the oil leak and solve the persistent tail-light issue. Starting with the tail light, I discovered that when I installed the battery I must have bumped the tail light assembly. This bump flattened one of the dimples in the brake/running light dual-filament bulb. So, the bulb wouldn't sit in the holder correctly, causing a short across the positive contacts of the bulb. By swapping out the bulb, the problem went away.
The oil leak still escapes me. I cleaned the underside of the bus engine with brake cleaner. It seems like the oil is coming from the turbo-side of the engine, maybe from the low-pressure oil return? Since the oil level isn't meaningfully dropping, I'm not convinced its the problem. Next, I checked the oil level in the transaxle. On the transaxle, "full" means the fluid level is just under the fill hole. I opened the fill hole while the rear of bus was up on ramps and none dribbled out. No bueno. I shot in about 1/3 of a bottle before it started dribbling. I think we have our oil source. The trick is figuring out where it's coming out. I don't see a source on the outside, and the clutch doesn't seem affected, so if it's coming out from the output shaft end, we haven't noticed it yet. Curious. I may need to drop the engine and separate the tranny and engine to be absolutely sure. Since everything is running fine now, though, it will wait until camping season ends. Of course, that's how adventures begin.
More next time...
Who's Who
My sister, M, moved to Austin a few years back. She and her husband, S, have since bought and sold a house, bought and performed construction on a second, had a couple of kids, etc. They are very much Texans. I hadn't seen their daughter (I) for a couple of years and had never met their 2-year-old (K3). K3 is a pistol. OMG, he is such a joy. We played soccer, and laughed. What a sweetie.
My brother, R, has been living in the greater Portland area since the late 90's, met and married a local (KG) and has a girl (A) and boy (N) of his own. They are both very articulate for their ages, and can engage conversationally with adults with little difficulty. A and I are great friends who Skype when they're apart. Unfortunately, we're apart more than we'd all care for. N and K3 became buddies too, though, playing toys together. So, with that backdrop, we add 3 beach-side condo's and Newport's offerings.
Watching Whales, not the Temperature
![]() |
| low tide |
As the title suggests, we saw whales. There's a pod of about 40 grey whales who live year round in the waters just off the coast between Newport and Lincoln City. On 3 successive nights (July 2nd, 3rd and 4th) from the condo balcony we saw whales spouting at high tide. The first night was particularly spectacular with multiple spouts blowing simultaneously and at least 5 different whale-back sightings over the course of about 30 minutes. KG had been coming to this spot for over 30 years and had never seen whales. Upon hearing this, we were all the more appreciative of the sight we'd witnessed. Of course, we were so awe-struck, none of us thought to take a picture. Drat!
Sand Castles and Sand Sliding
Below the balconies, was a beach of duned sand. Apparently this was somewhat rare too, for the beach was usually flat. Back from the highest tide's edge, the sand had been shifted by wind into what looked like a series of trenches with steep sides, but only a couple of feet tall. These created effective, but sandy, wind blocks that we and others used for building beach fires. With all of the boy energy being fed into air-soft guns, Boo and I expected them to use the trenches and play guns. Surprisingly, they didn't. They used the trenches as starting points for elaborate sand castles. So, with garden shovels instead of toy guns in hand, all of the boys (K, K2, K3, T, C, and N) set to building things. The bigger boys also discovered a steep bank of sand that stood over 30 feet high a little further north. They would one by one jump from the top and do their best ski/board imitation down the bank. Apparently, K2 was hitting 360's by the time they stopped for good.
Hatfield Marine Science Center
| HMSC |
Devil's Lake
In my last post, I mentioned the Devil's Lake day-trip. Devil's Lake is a small lake (3 square miles) and seemed to be for boating than beach/swim access. R & KG found a city park that had a boat launch, but more importantly a lake-beach and a huge playground to play in/on. The younger kids had a blast. It was fun, but it was after K and K2 had left. This made T and C sad, and less active. We truly have become a completely blended family when we don't feel complete because some of the boys aren't there. I had heard that this was a family maturity state, but I hadn't seen it coming. The boys are back together again after a week apart, and it really is a homecoming.
Home Garage
![]() |
| bulb on left has lost its dimple |
The oil leak still escapes me. I cleaned the underside of the bus engine with brake cleaner. It seems like the oil is coming from the turbo-side of the engine, maybe from the low-pressure oil return? Since the oil level isn't meaningfully dropping, I'm not convinced its the problem. Next, I checked the oil level in the transaxle. On the transaxle, "full" means the fluid level is just under the fill hole. I opened the fill hole while the rear of bus was up on ramps and none dribbled out. No bueno. I shot in about 1/3 of a bottle before it started dribbling. I think we have our oil source. The trick is figuring out where it's coming out. I don't see a source on the outside, and the clutch doesn't seem affected, so if it's coming out from the output shaft end, we haven't noticed it yet. Curious. I may need to drop the engine and separate the tranny and engine to be absolutely sure. Since everything is running fine now, though, it will wait until camping season ends. Of course, that's how adventures begin.
More next time...
Wednesday, October 3, 2012
Transition to the New Transmission
This should be brief today, but every time I say that it's long anyway. Hahaha... It's been a productive and fun few weeks, but I'll focus on bus stuff today, particularly on the test drives and changes I made. Next time, I'll post on the current run of Furthur shows I hit this past weekend. I think I left off with the transaxle in, but before any driving. Let's start there...
Where's that Confounded Gear?
I figured when everything aligned on install that the shifting would be relatively close. It was... Until it wasn't. The initial drive away from MS's house was triumphant, but starting in second. I couldn't find first. Down the hill we went (Boo following in a chase car), and had to pull left onto a busy road at the bottom from a dead stop. After fiddling a bit, I found 1st, moved through 2nd and 3rd to a cruising speed of 35mph at an engine speed in the mid 2000's. Perfect. The whole drive home followed a similar pattern of 1st gear going missing. We hit a short stretch of freeway and I got up to 60mph on the entry ramp but near 3k on the tach, though. I had some coolant leaking challenges that left the bus stationary while I thought on how to fix.
Wheeler Dealer
When I chose to watch something on tv that isn't sports or a movie, it's usually either Family Guy or this British show called Wheeler Dealers (on Velocity). If you aren't familiar with the show, one host works the buy and sell end of the used car market while his partner fixes them up in between (Wiki Link). It was while watching this show that I realized my mistakes with the cooling system. They showed how they bled the air from the cooling system by getting the engine up to temperature, opening up the heater and then removing the cap from the overflow bottle. The key is leaving the engine running during this process, and letting the air bubble up through the overflow bottle. Keep adding coolant/water until it stops bubbling, and it stays at the full line. After I did this, I stopped having coolant leak issues and odd pressurization happening.
Shift the Shifter
While I was solving the leak issue, I continued to test drive the bus, but the gear seeking got worse. I decided that the limited-throw Skat shifter wasn't helping and it could actually have been harming the break-in of the transaxle. Fortunately, I'd only driven less than 20 miles, but I bought a replacement original gear shifter unit from Always VeeDub in Portland. By following the instructions in the Bentley (hold the shifter between the seats near the floor and set the ball & pin first, then tilt the shifter upright while holding the base firm), the shifter set in within 15 minutes. I was able to adjust the shift action somewhat, though I will need to do more. Currently, I can find all gears consistently, though it does pop out of 2nd when I rev up and then pull my foot off the pedal. When I get some time, I'll mess around with that some more.
Now, I have an old transaxle sitting in my living room, with a Scat short-throw shifter a-top it. I'll probably sell the shifter, but I need to get rid of the transaxle. It's a runnable gearbox, and a suitable rebuild candidate / core, so I should be able to find someone who can use it. I have driven the bus to work every day this week, as well as to the Further shows in Troutdale all last weekend. Lots of time grinning behind the wheel for sure. That's it for today. More next time.
Where's that Confounded Gear?
I figured when everything aligned on install that the shifting would be relatively close. It was... Until it wasn't. The initial drive away from MS's house was triumphant, but starting in second. I couldn't find first. Down the hill we went (Boo following in a chase car), and had to pull left onto a busy road at the bottom from a dead stop. After fiddling a bit, I found 1st, moved through 2nd and 3rd to a cruising speed of 35mph at an engine speed in the mid 2000's. Perfect. The whole drive home followed a similar pattern of 1st gear going missing. We hit a short stretch of freeway and I got up to 60mph on the entry ramp but near 3k on the tach, though. I had some coolant leaking challenges that left the bus stationary while I thought on how to fix.
Wheeler Dealer
When I chose to watch something on tv that isn't sports or a movie, it's usually either Family Guy or this British show called Wheeler Dealers (on Velocity). If you aren't familiar with the show, one host works the buy and sell end of the used car market while his partner fixes them up in between (Wiki Link). It was while watching this show that I realized my mistakes with the cooling system. They showed how they bled the air from the cooling system by getting the engine up to temperature, opening up the heater and then removing the cap from the overflow bottle. The key is leaving the engine running during this process, and letting the air bubble up through the overflow bottle. Keep adding coolant/water until it stops bubbling, and it stays at the full line. After I did this, I stopped having coolant leak issues and odd pressurization happening.
Shift the Shifter
![]() |
| bubble wrapped 002 on my carpet |
Now, I have an old transaxle sitting in my living room, with a Scat short-throw shifter a-top it. I'll probably sell the shifter, but I need to get rid of the transaxle. It's a runnable gearbox, and a suitable rebuild candidate / core, so I should be able to find someone who can use it. I have driven the bus to work every day this week, as well as to the Further shows in Troutdale all last weekend. Lots of time grinning behind the wheel for sure. That's it for today. More next time.
Labels:
002,
AA Transaxle,
Boo,
bus,
coolant,
fluid,
leak,
MS,
transaxle,
transmission
Friday, July 27, 2012
Enter Summer, exit posting
Yes, I'm alive. Like so many folks in the Pacific NorthWest, once Summer weather arrived, I stopped using the computer when I wasn't working, and got to playing. I do have some personal and bus updates, though, so I'll bang that out before pouring myself a welcome-to-weekend mojito.
Housing
As much as the news folks talk about how "bad" the real estate market is value-wise for sellers, it is very hard to find a good deal as a buyer. When I moved out of my townhouse apartment in mid-March, I started looking for a house, agent and mortgage lender and all. Within a month, I had an offer on a house, but between the banks holding the mortgages getting in the way, that house is still unsold. My offer expired, and I restarted it, but in the few days between, someone else got into the bank's radar system and they're in first position now. Apparently banks think serially, and can only address one offer at a time. Fun. It's a good thing other businesses don't operate that way. So, I offered on another house. And another. And another. All told, I've laid offers on 5 or 6 houses now. Most of them still haven't been sold and my offers just expired along the way. I think I just may get this last one, though. I put an offer on it in late May. Yes, that's right, late May. I have been extending and re-extending on this one. I've been told that I might expect an acceptance of my offer by the end of next week, or early August. I'll post a picture when that happens, so until then, here's a generic "Bank Owned" sign. Yeah, like that's gonna get you to place an offer on it. Prepare for weeks of no contact from the selling bank, and make your offer expiration date something you can live with, yet recognizing that the bank will not get it together within 60 days of you popping an offer on it.
So, how much of the real estate market / housing problem is being created banks who can't get it together? Had this been a normal deal, I would have gotten an accept, decline or counter-offer within a few days. By the bank adding in the 10 extra weeks, it looks like the houses are staying on the market an extra 70 days. That makes the market look falsely bad, like you can't sell a house because it's still dropping in value. The truth is, the market is coming back, based on what I'm seeing in terms of buyer traffic, but with the banks extending the process by literally months, it paints a different picture. One the news folks continue to hawk on the nightly's.
Microbus slightly too micro
I've been trying to figure out a way to fit 6 passengers into the bus, so we can take the whole family in one car. Boo and I toyed with the idea of buying something just for this reason, but cars are just too dang expensive. I said, "with a small fraction that money, we could get the bus to do it." So, while Boo drove my TDI Jetta to Montana with her 2 boys, I drove her car to Eugene to get a free (yes, $0) middle-row Vanagon bench seat. When I got it home, I did what anyone would do: try to fit it. Fail. From the edge of the Westfalia sink/stove unit to the edge of the sliding door is 39". The width of the benchseat with the cushions scrunched is closer to 42" (see overhang picture on the right). Add on 3-4 inches for the arms, and it totally won't fit.... with the sink/stove unit in place. I intend to pull the sink/stove to fit the bench seat, and build a new cabinet that's just 16" deep (or 7" less deep than the Westy one). Then, the seat will fit, and when removed at a campsite (or ski resort parking lot), the cabinet can be usable. I will probably forgo the stove, and only do a splash sink with a wide counter where we could use a Coleman portable stove instead.
Microbus to get macro-speed
Last, I finally have arranged for a new transaxle from AA Tansaxle in Seattle. Daryl and I have figured out the details, and he will be starting the construction on Monday. If all goes well, it will be crated for shipping by the following Friday. Then, I'll just need to find a spot to drop the existing engine/transaxle, remove the old tranny, attached the new one and re-install. (note to self: get a new throw-out bearing just in case) Dropping the engine/transaxle isn't hard, but mating a new transaxle while leaving the engine under the bus may be. Remember how far over to the side I needed to tilt the undressed, un-oiled, no coolant engine to get it under the rear valence? I wouldn't want to try that with the fluids in, nor with all the other parts attached. Better to just separate and mate under the belly of the bus. Lots of muscling ahead, I'm sure. I'll post pictures, etc.
That's it for now. With Summer in full swing, I doubt I'll be online too much. I'll try to get better about it. I have a big road trip to Ashland planned, if all goes well, maybe the bus will go too....
Housing
![]() |
| just making a point... |
So, how much of the real estate market / housing problem is being created banks who can't get it together? Had this been a normal deal, I would have gotten an accept, decline or counter-offer within a few days. By the bank adding in the 10 extra weeks, it looks like the houses are staying on the market an extra 70 days. That makes the market look falsely bad, like you can't sell a house because it's still dropping in value. The truth is, the market is coming back, based on what I'm seeing in terms of buyer traffic, but with the banks extending the process by literally months, it paints a different picture. One the news folks continue to hawk on the nightly's.
Microbus slightly too micro
| note the overhang |
Microbus to get macro-speed
| upper frame width pushes lower frame away from cabinet |
That's it for now. With Summer in full swing, I doubt I'll be online too much. I'll try to get better about it. I have a big road trip to Ashland planned, if all goes well, maybe the bus will go too....
Labels:
002,
AA Transaxle,
Ashland,
Boo,
flash,
home,
house,
housing,
middle seat,
real estate,
seat,
transaxle,
transmission
Wednesday, August 20, 2008
Parts is parts
I had one last maintenance item to deal with before I started mating the engine and transaxle - the engine rear seal. I had ordered one from "BleachedBora", but the part numbers got mixed up somewhere along the way and the part I got was a rear engine seal, but it wasn't the exactly right part. Apparently, gone are the days that VW makes the same part for all of their cars.
First, some orientation. The engine rear seal is what holds the engine oil inside the engine at the point where the driveshaft/crankshaft comes out of the engine to attach to the transmission. Ordinarily, people don't change these very often at all. In fact, most people dson't change them at all. If things start acting funny with their car, or there's an oil puddle they either sell the car or pay the dealer some ridiculous amount to pull the engine, seperate the transmission from the engine and replace a $40 seal. So, it seemed like it was a good idea to replace it when it was all exposed in front of me.
So, if you're looking at the crankshaft/driveshaft, there are 6 bolt head pointing at you going around in a circle. There are 2 others that are pointing at the ground that come up into the seal housing from below. These 2 from-below bolts are not the same for all ALH engines. Why!?!? So, I got the seal with the slightly smaller bolt holes, so the seal didn't fit. So much for preparing for mating engine and transaxle this next weekend. Another one is on the way, so I may still be able to get the engine/transaxle mated, but it will be a much longer day now.
Start me up...
I've spent some time over the last couple of days thinking about how I'm going to start this engine once its all together. The original 1972 starter will fit, but it isn't strong enough to turn a TDI engine. The TDI starter has a different bolt pattern, so it won't fit. There are "high power" starters out there, but the word on the street is they don't last very long, but they would fit, and would start the engine for a while... before they suddenly fail. So, we look to what the vanagon TDI converters do. They're lucky. They have a resource in Karl (at WestyVentures) that fabricates starter adapter plates. They make it so the TDI starter will fit into the bellhousing of a mid-70's through early 80's transaxle (the 091). Unfortunately, the 002 starter (for transaxles manufactureed between 1968 and 1975) and the 091 starter aren't identical. The shaft sticking out of the 002 starter into the bellhousing is 1/2" shorter. So, if Karl's adapter were to be used on a 002 transaxle, the gear would stick a 1/2" too far into the bellhousing, missing the flywheel. Argh.
Now is when you start thinking... why didn't I just buy the 091 adapter plate from Kennedy Engineering? That bellhousing would have fit my transaxle, and I could have used Karl's adapter. So.. back to the drawing board. I'm looking for a burned out TDI starter now, thinking that I may be able to fabricate something. If not, I may start looking for a KEP adapter setup for a 091 transaxle. This is where the money on conversions is lost. I thought I was saving money by not going 091 out the gate, and now I may end up there anyway. But first, I lose a bunch of time and money. Drat.
More next time--
First, some orientation. The engine rear seal is what holds the engine oil inside the engine at the point where the driveshaft/crankshaft comes out of the engine to attach to the transmission. Ordinarily, people don't change these very often at all. In fact, most people dson't change them at all. If things start acting funny with their car, or there's an oil puddle they either sell the car or pay the dealer some ridiculous amount to pull the engine, seperate the transmission from the engine and replace a $40 seal. So, it seemed like it was a good idea to replace it when it was all exposed in front of me.
So, if you're looking at the crankshaft/driveshaft, there are 6 bolt head pointing at you going around in a circle. There are 2 others that are pointing at the ground that come up into the seal housing from below. These 2 from-below bolts are not the same for all ALH engines. Why!?!? So, I got the seal with the slightly smaller bolt holes, so the seal didn't fit. So much for preparing for mating engine and transaxle this next weekend. Another one is on the way, so I may still be able to get the engine/transaxle mated, but it will be a much longer day now.
Start me up...
I've spent some time over the last couple of days thinking about how I'm going to start this engine once its all together. The original 1972 starter will fit, but it isn't strong enough to turn a TDI engine. The TDI starter has a different bolt pattern, so it won't fit. There are "high power" starters out there, but the word on the street is they don't last very long, but they would fit, and would start the engine for a while... before they suddenly fail. So, we look to what the vanagon TDI converters do. They're lucky. They have a resource in Karl (at WestyVentures) that fabricates starter adapter plates. They make it so the TDI starter will fit into the bellhousing of a mid-70's through early 80's transaxle (the 091). Unfortunately, the 002 starter (for transaxles manufactureed between 1968 and 1975) and the 091 starter aren't identical. The shaft sticking out of the 002 starter into the bellhousing is 1/2" shorter. So, if Karl's adapter were to be used on a 002 transaxle, the gear would stick a 1/2" too far into the bellhousing, missing the flywheel. Argh.
Now is when you start thinking... why didn't I just buy the 091 adapter plate from Kennedy Engineering? That bellhousing would have fit my transaxle, and I could have used Karl's adapter. So.. back to the drawing board. I'm looking for a burned out TDI starter now, thinking that I may be able to fabricate something. If not, I may start looking for a KEP adapter setup for a 091 transaxle. This is where the money on conversions is lost. I thought I was saving money by not going 091 out the gate, and now I may end up there anyway. But first, I lose a bunch of time and money. Drat.
More next time--
Friday, August 15, 2008
transaxle out
Like the title says, the transaxle (transmission) is now out of the bus. In terms of steps, its pretty easy... once the engine is out. The Bentley is accurate, and the Muir book is not. ell, I found the Muir book confusing on this, and the Bentley simple, so maybe Muir is right. I loved that book when I first got my bus. He explained everything in such conversational terms, it was easy to follow. Now that I've gotten used to the service manual and the terms for the different parts, the Bentley manual is easier to follow. Of course, the Bentley assumes you have this long list of weird VW tools that nobody has, so you have to use a blending of the 2 books for most things. The removal of the transaxle was one of those cases.
First, undo the clutch cable. This means spin the wingnut on the end until it falls off in y
our hand. You'll have to put a vice-grip or hold the end of the cable. I used a screwdriver in the end of the cable (it has a little slot for that). Pull the cable free of the clutch engaging arm (not sure what the real term is), and put the wingnut back on the end of the cable. Don't tighten it, but make sure it doesn't fall off either. Then, remove the 2 bolts that are holding the next secion of the cable to the transaxle housing. This is called the bowden tube, and it helps you adjust the clutch cable movement. It is held on with 2 13mm nuts. One of mine was so rusted on, the bolt unthreaded from the transaxle. I'll have to fix that later. Anyway, at this point, the cable is not longer connected to the transaxle, so we move on to the CV joints, then the shift linkage.
The CV (constant velocity) joints need to be unbolted from the sides of the transaxle. Now, a few years ago, that would have been a very scary sentence to read. But now, its just a matter of finding the right Allen wrench (6mm) and going to it. Before you do, check the travel of the axle. Hold the axle right at the transaxle and try to move it front to back. Does it move? That CV joint needs replacing. Check the other end too. I got lucky and didn't have to replace any of them. Pull all of the Allen bolts off, or at least enough to
separate the bolt from the transaxle. Pop the joint into a plastic bag, tape it up so water and dirt can't get in there and move on. You can either wire the axles up in the air or let them hang free. Somewhere in the pictures, you should see one of each.
Disconnecting the shift linkage is eerily easy. The Bentley says to have the transaxle in 3rd gear. Muir says neutral. I went with the Bentley, and put it into 3rd. Then, slide under the bus, cut the safety wire and unscrew the little square bolt that holds the shifter coupling to the front of the transaxle. Now, all that's holding the transaxle in are the 2 mounts. Grab a support. Bentley says to use some weird VW tool. Muir says to use a board and some chain. I used an ATV/Motorcyce jack - I bought it for engine drops, and it works great for transaxles too. If you do the same, slide the jack in the rear. Jack up the transaxle just a touch - just enough to support its weight. Disconnect the front transaxle mount. Mine had a 17mm and a 16mm head bolt. I thought that was pretty strange, but that's what fit.

Bentley described the next step as just sliding the rear support bolts out. Well, they failed to mention that the bolts threads work into threads in the top of the transaxle. Unwind them, and the bolts work their way out. Then, drop the transaxle and pull it on back.
Since I changed my transaxle gear oil less than 4k miles ago, I didn't drain the transaxle first. You might want to do that if you don't know when your oil was changed, or if you know it due (which, if you don't know when it was done, its due). Well, that's it for today. With the transaxle on the ground, I need to replace the rear main seal on the new engine, and I'm ready to start mating the transaxle, and the new engine on my garage floor. more later--
First, undo the clutch cable. This means spin the wingnut on the end until it falls off in y
our hand. You'll have to put a vice-grip or hold the end of the cable. I used a screwdriver in the end of the cable (it has a little slot for that). Pull the cable free of the clutch engaging arm (not sure what the real term is), and put the wingnut back on the end of the cable. Don't tighten it, but make sure it doesn't fall off either. Then, remove the 2 bolts that are holding the next secion of the cable to the transaxle housing. This is called the bowden tube, and it helps you adjust the clutch cable movement. It is held on with 2 13mm nuts. One of mine was so rusted on, the bolt unthreaded from the transaxle. I'll have to fix that later. Anyway, at this point, the cable is not longer connected to the transaxle, so we move on to the CV joints, then the shift linkage.The CV (constant velocity) joints need to be unbolted from the sides of the transaxle. Now, a few years ago, that would have been a very scary sentence to read. But now, its just a matter of finding the right Allen wrench (6mm) and going to it. Before you do, check the travel of the axle. Hold the axle right at the transaxle and try to move it front to back. Does it move? That CV joint needs replacing. Check the other end too. I got lucky and didn't have to replace any of them. Pull all of the Allen bolts off, or at least enough to
separate the bolt from the transaxle. Pop the joint into a plastic bag, tape it up so water and dirt can't get in there and move on. You can either wire the axles up in the air or let them hang free. Somewhere in the pictures, you should see one of each.Disconnecting the shift linkage is eerily easy. The Bentley says to have the transaxle in 3rd gear. Muir says neutral. I went with the Bentley, and put it into 3rd. Then, slide under the bus, cut the safety wire and unscrew the little square bolt that holds the shifter coupling to the front of the transaxle. Now, all that's holding the transaxle in are the 2 mounts. Grab a support. Bentley says to use some weird VW tool. Muir says to use a board and some chain. I used an ATV/Motorcyce jack - I bought it for engine drops, and it works great for transaxles too. If you do the same, slide the jack in the rear. Jack up the transaxle just a touch - just enough to support its weight. Disconnect the front transaxle mount. Mine had a 17mm and a 16mm head bolt. I thought that was pretty strange, but that's what fit.

Bentley described the next step as just sliding the rear support bolts out. Well, they failed to mention that the bolts threads work into threads in the top of the transaxle. Unwind them, and the bolts work their way out. Then, drop the transaxle and pull it on back.
Since I changed my transaxle gear oil less than 4k miles ago, I didn't drain the transaxle first. You might want to do that if you don't know when your oil was changed, or if you know it due (which, if you don't know when it was done, its due). Well, that's it for today. With the transaxle on the ground, I need to replace the rear main seal on the new engine, and I'm ready to start mating the transaxle, and the new engine on my garage floor. more later--
Subscribe to:
Posts (Atom)