Showing posts with label MGB. Show all posts

Thursday, August 20, 2026

Catching Up on Cars

It has been a busy Summer of car stuff. Some wrenching, some otherwise. In today's post, I will not try to cover everything, but there has been a lot. 
 
Oliver freshly cleaned
Before I begin, you may have noticed a new sticker on the right-hand side called "Electoral-Vote". If you aren't familiar, that is a site run by 2 history professors who started a site initially, I think, to analyze polls. I have been reading their page for well over a decade; maybe 2 decades at this point. From humble beginnings that aimed to provide insights into political polls, they are a daily site that examines the (mostly) US political theater. As the national political disposition has shifted right-ward, their political position has remained around or just left of where the political middle was during the Bush years. Now, that position is left-of-center (because, again, of the national shift) in the continuum of US national politics. As the primary season has ended, they are returning to their roots, looking at polls and providing the kinds of insights only 2 life-time history and statistic's nerds could provide. If you find that stuff interesting, check them out. Neither they nor I get anything money-wise out of my putting that sticker on my blog. They get clicks, I literally get nothing. Back to cars.
 
K'Lack
P0726 re-appearing
We will start with my nemesis car: K'Lack, the 2004 Jetta TDI Wagon that previously belonged to our son K. After driving it for years and logging thousands of miles, he needed to sell it off and get something that was newer? broke down less often? I'm not really sure, but at the end he was having transmission issues. Regardless, the trade-in amount he was offered was pennies-to-dollar value. So, we bought it for Kelley Blue Book value at the time (around $4500US) and took it directly to a transmission shop who was qualified to do transmission work on these 2000's-era automatic transmissions appearing in VW's and Audi's. Through the benefits of successful aging and poor record-keeping, I don't remember how much we paid them to rebuild the transmission, but it took literally months. If I remember correctly, it went into the shop in December and we got it back in March. It was around this time that our niece (another K, so I think maybe since all these "kids" are adults now, maybe I'll just start using their names), Krista needed a car. Her former car failed in some way I don't remember. We intended to sell her Flash. Remember Flash? He was a great 2001 VW Jetta TDI sedan, but he had a manual transmission. Loved that car, but a different niece needed a car, so when Krista was unable to drive a stick, Flash went to the other niece and K'Lack went to Krista.
 
replacing K'Lack rear caliper
Now, years later, and many repairs ranging from replacing the oil pan to a timing belt and camshaft replacement, K'Lack is currently having issues I cannot track down. It is throwing a P0726 code and after tracing wires and replacing the crankshaft position sensor, the issue persists. The code means a check-engine-light is lit which means the car will not pass emissions. It is also virtually un-driveable. It barely starts and at any point during a drive the car may suddenly shift into a too-low gear, causing it to buck. It is quite alarming and dangerous. I have date with a mobile mechanic, Ian, who has helped on some of Cedar's (that's "C" in all prior posts) cars. I hope very much that we can resolve this and get Krista back on the road with K'Lack. In the meantime, it is parked under a plum tree in the back near the shop and Krista is driving Boo's (okay, her name is Angela and I'll refer to her as Ang from now on) Ang's Astra.
 
Oliver
In the interest of getting Oliver, the 1978 MGB, out of the shop so I could move things onto shelves, I got Oliver running well enough to back out and idle-drive under a tree. I say idle-drive because the throttle cable had seized. Fortunately, parts for an old MG are not nearly as expensive as parts for new cars, so a after few bucks and about 15 minutes, the throttle cable was replaced, and Oliver could start and move around. Thrilled, I drove him out to the front and gave him a long overdue bath. His brakes were still a little squishy, so I moved him to the other side of that plum tree in the back and put his cover back on. I have to do a system-wide look at the brakes. They have been acting like they needed a bleed for a long time, no matter how much I bleed them. I think I must have a loose fitting somewhere that lets air in. I still intend to get him out and around, even with squishy brakes, before the Summer is over.
  
Hapy
cursed outlet flange
Earlier this year, I got Hapy put back together. I drove him out to Sheridan where Justin could do the injection pump re-seal. On the drive home, I popped the boosted air pipe and sorta limped home. But, after that, I took him on around-town outings and he ran great. He would start right up, have lots of pep, moved through the gears well. For almost all of the month of July, he was set up festival-style in the back, providing music, a hang-out spot and a groovy vibe. This past weekend, Ang and I had 2 different events. First, we had tickets to Joe Russo's Almost Dead (JRAD) in Eugene. JRAD brings the energy of the early 1970's versions of the Grateful Dead while performing everything and anything across their song catalog. I highly recommend to my DeadHead friends. The next day, I had an early-afternoon show in Rockway Beach, playing the NCAM benefit festival. I'll post on the festival later, but our adventure started and ended Thursday night, heading south to Eugene.
 
As I've mentioned before, Ang and I like to leave for events the night before, getting as far as we can in the cool dark and then vagabonding (boon-docking to some) in a random parking lot or on the side of the road to catch a sleep before completing the journey in the morning. Hapy likes the cool air and we really like awakening that morning most, or all, of the way there. The drive was relatively uneventful until after we got south of Wilsonville. I noticed that the rear window was getting blurry, and I had just washed it when we filled up. Growing concerned, I pulled off into the Charbonneau rest area near Aurora and glided into a parking spot. I went around back, opened the rear engine hatch and could see that the coolant bottle was empty, and I could hear steam. After moving the bedding out of the way, I could get the top hatch open and could see that the coolant was escaping from the cursed coolant outlet flange. I would later discover that the c-clip or "U" clip that holds the coolant sensor in place had a broken leg (so, really a "J-clip). If you look at the picture on the right, there ought to be a little plastic tab thing sticking downward from the bottom of that dark channel on the right side of the outlet flange. That would be the end of the "U" that's not there. Our trip to Eugene was over and I called for a tow.
 
trench filled
We waited for about an hour, and the truck operator seemed fine enough. He was nice, albeit quiet. In retrospect, he seemed less comfortable with Hapy not having a parking brake but Hapy has been on a flatbed lots of times without an issue. Until this time. I believe he did not strap the wheels down as tightly as prior truck operators had. I say that because Hapy seemed to move front-to back a little bit as he backed the truck into the driveway. I had not noticed that when he was loaded onto the flat bed in the parking lot. We rolled Hapy into place, and Ang and I called it a day, returning to Hapy the next day... when we discovered that putting Hapy in gear was not enough to hold him in place. Since it was enough to hold him in place on the flatbed, at least while he was getting strapped in, and this was over an hour after we had overheated, I conclude that the tow somehow messed up the transmission-to-engine connection (read: clutch). I wanted to see if the engine was locked up, so I put a 19mm socket on the crank end-bolt and gave the engine a short turn (like 15*). The timing belt moved, the camshaft moved with it, so I concluded no major engine damage was done. Or, at least, it's not frozen in place. That's huge, but I think I will need to pull the engine and transmission apart to fix whatever went wrong in between. With this knowledge, we called it a day on Friday and spent a lovely day at the beach on Saturday.
 
trench filled
Since I still had a trench running the length of the lane-way, I spent Sunday morning filling the trench. By the end of the day, Ang and I had flat-towed Hapy back to the shop with the X-Runner and 20' of trucker's chain, parking him out front. I need to clear some space inside the shop to put him, and get him in there. Then, I have the equivalent of a clutch job ahead. The last time I had to remove, separate, re-acquaint and re-install the engine and transmission, I vowed that I would cut a rear apron into the back so I could just remove the engine. Looks like that time is now. Regardless, Hapy will probably not make it back out on the streets this summer. Could I get it done before Summer ends? Maybe, but we have lots of things going on and I don't know if I have a weekend to dedicate to that right now. Besides, if I am going to cut, I want it well planned with a means of fastening what I have removed before I pick up an angle grinder.
 
EDIT: I was trolling through some of my old posts yesterday when I came upon Front is Front which clearly describes this same coolant sensor leak recurring, until I put the clip in from below. Over 15 years later, and I'm repeating myself. Had I remembered, or read, we would not have lost coolant, broken down, etc. There's a lesson in there somewhere.
 
Wrap
With Hapy's catastrophic failure, we are down to one operable car: The Toyota X-Runner, which Ang drives to work. She has a lingering bad shoulder from a skiing crash a dozen years ago, so driving a 6-speed in rush-hour traffic is really taking a toll. If Ian and I can't get K'Lack fixed, we are going to need to re-po the Astra and have Krista solve her car need another way. Generosity reaches a limit when another's convenience is literally causing you pain.
 
Well, that's where those 3 cars are at. I have a long tale of 2 Astra's to share another time. We have lots of active construction Ang and I are doing with our friend Ray, so I'll update on that, the Astra's and whatever else happens around here as things roll. I hope the reference to the electoral vote guys doesn't cross some no-politics line for you. I generally don't bring that noise in here, but elections are coming, and we all need to be as well informed as we can be.
 
Thanks as always, for following along. Until next time-

Friday, May 1, 2026

Hapy Shifting

In my last post (Hapy not Spittin Fuel), I described a stressful drive home without turbo and then losing access to my 2 lower gears. Today's post covers the install of the Gene Berg shifter, and some other little bits on the bus as well as the replacement of the throttle cable on Oliver the 1978 MGB.
 
Before I begin, especially to my union brothers and sisters, Happy International Labor Day. Employee protections were and remain hard-fought; from a legally defined "work week" to overtime pay and safer working conditions, we have our unions to thank.
 
Throttling Oliver
Gene Berg shifter
I'll start with Oliver, even though I did this cable replacement in the middle of the Hapy stuff. Recall, I moved Oliver out of the shop so the overhead door crew could install the door. At that time, I got Oliver to start, mostly by cleaning and re-gapping his spark plugs and otherwise being patient. Since Oliver does not have a stock carb set up (side draft SK Racing carb), the stock throttle cable is not an exact fit. The old cable had a much longer hard "pipe" to fit the cable through near the carb than the stock one I had ordered. I thought about simply removing the braided cable and sending it through the old sheath, but the points where the plastic sheath met the hard pipe was failing. I think the way the hard pipe was attached to the carb was a little hinky too, so the whole cable, hard pipe combination went in the bin.
 
Both the new and old cables attached to the pedal the same way: round ball on the end of the cable fits into a nook on the underside of the pedal. So, once you pass the cable through the slot, the springs on the carb effectively hold the pedal up through steady tension through the cable. The other end of the stock cable has a fitting on it which presumably fits onto the old carb with a c-clip or similar. I had to cut that off so I could thread the raw cable through the more common hole with a bolt model. Cutting the cable left wire shrapnel at the end, so it would not easily fit through the hole. Ultimately, I had to remove the actuator arm and the spring arm from the side of the carb so I could more directly feed the wire into the hole. While this was more destructive initially, I was getting nowhere trying to send a cable through a hole I could barely see.
 
One the cable was through the hole and bolted down tight enough so it would not fall off, I put the arms back, and re-added the spring. I got Boo to sit in the driver seat and move the pedal through it's full motion so I could set the depth of the hard tube and the cable length. I had other things to get after, so I did not test fire and drive Oliver. In retrospect, that may have been a missed opportunity.
 
Gene Berg Shifter
shifter diagram
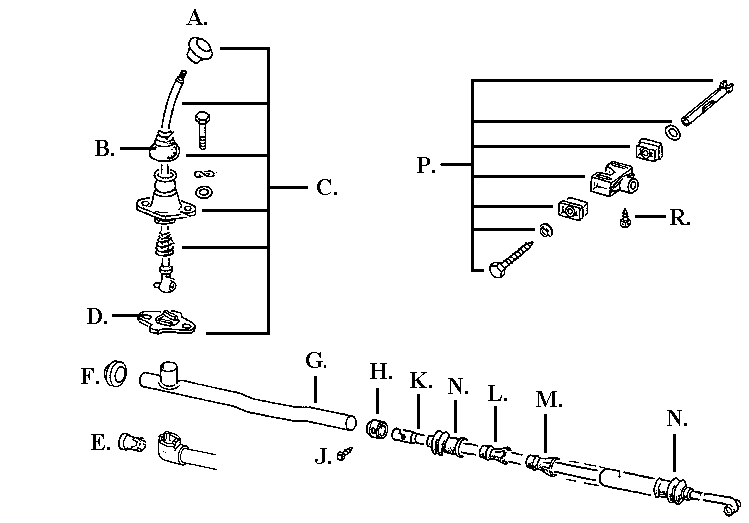
I don't know when I first installed the Scat chrome shifter into Hapy. It seems like it was always there, so it may have been one of the first things I did. Back when I first bought Hapy, he did not want to go into gear at all because the shift coupling at the front of the transaxle had lost the little plastic bits. Note the picture on the right, here. In sub-component "P", there are 2 rectangular things. Those are the plastic bits which were gone when I bought the bus. If you threw the shifter in the direction of the gear you were seeking often and hard enough, the long-ish bar thing (top of sub-component "P") would move the cage (center of sub-component "P") and eventually you might find a gear. The prior owner had beaten on the original shifter so much, it wasn't straight anymore. It was literally bent. Once I got the cage resolved, the bent shifter was just too strange to use, so I bought the upgraded shifter. Or at least it was. Over 15-20 years of use, I think it slowly may have moved, though there is no facility to adjust it -or- the limited-throw bits wore down over time. Since most folks think somewhat highly of Scat products, I'll assume it wore down or moved over the years. I will say that in recent years, Hapy has predictably popped out of 2nd gear every time, and I don't remember when that started.
 
greased up
The loss of both 1st and 2nd gear on the drive home was enough for me to do something drastic. After removing the Scat shifter and discovering the rust and what looked like some wear on the plastic bits, I decided to find the Gene Berg shifter I bought a few years ago. The Gene Berg shifter is simply bad ass. It is 3 or so inches longer (Scat is 21 inches, Gene Berg is almost 25) which puts the shifter in my hand without having to bend over like I did with the Scat after adding the Sprinter seats. The picture at the top shows how high it is. One drawback: when I put it in first, I hit the rear of the cup holder. The reverse lockout is a button on the side rather than a "T handle to pull up on. I like that better too, since there is less to think about and backing up a bus requests all of the focus you can. It uses a shift plate like item "D" in the diagram above so for the more stock-familiar, this vibes well. Perhaps the most important, the attachment of the pieces has adjustment capability engineered into it.
 
I test fit everything first, and finger-threaded the supplied bolts into the respective holes, just to be sure everything would fit. Then, I took it apart and greased everything: the ball, the slides, the shift plate, and the cup the shifter tip sets into. Then, I installed it again. One thing about a test fitting is the second time around, you know how it all goes together, making the final fitting much faster. Because of the adjust-ability factored into the shifter, it was easy to wiggle the shifter and the mounting footing to get it seated squarely and threaded snug. I tested the movement of the stick and did not feel a need to adjust it. I figure after some longer test drives, I will know for sure and then execute the minor adjustments. For now, though, I fired up the engine and backed Hapy out of the shop and drove him up and back on the laneway. At this point, I have all my gears.
 
Seasonal Scrubbing
I ended my weekend of yardwork and playing on cars by giving Hapy his spring cleaning. I have documented this in the past, but in brief: I use SoftScrub bathroom cleaner and a soft brush to clean the fiberglass top. This gets all the black ick from organic material removed. Prior to this step, I will clear out the luggage rack of leaves and such. It was especially bad this year so I need to circle-back, remove the rack and clean the metal top. Once the top is SoftScrub'd, I wash the entire bus (top again) with car wash like any other car. The end-to-end process takes 2 or 3 hours, but if the sun is out and it's not too hot or cold, it is a great way to spend a Sunday afternoon. I hope to get the luggage rack removed and the tin-top cleaned next weekend. That will also give me the opportunity to repair any part of the luggage rack which needs attention. In the meantime, I swapped the vehicles around, setting Hapy up as my daily driver and the lower mpg truck for specific-use-only. As of May 1st, regular 87 octane gas is $5.70/gallon here, and diesel is $6.20 but with the mpg difference, Hapy is less expensive per-mile.
 
Wrap
Around that work, there's the usual clearing brush, mowing lawn, etc that comes from living in a house, and spring growth. Our favorite construction contractor was over on Saturday to experiment with the south-facing doorway in the shop. After some large thinking, we are going to put in barn-door style doors, but with fiberglass so the little bit of winter light we get will make it into the building. That's it for this week. Thanks, as always, for following along-

Wednesday, April 15, 2026

Building a Shop - Doors

Ia accept that putting a garage door on your shop is barely car-content, but it is the big deal around here, and it is at least tangentially related to cars. Recall, the shop was designed with 4 openings: on the North, the big door and a person door; facing West, a barn door and facing South a to-be-determined door. I lightly described the barn door in the Ghost of GoRo. Today's post is about getting a big door for the front of the shop and all the stuff around that.
 
Before I begin, for my US readers, happy tax day. I recognize there are very curious ways this administration and his congress are choosing to allocate money, and today of all days, that "curious" feels more acute. You may not be able to influence their choices, but you can choose to vote with your wallet every day. Please direct your purchasing choices into small businesses. Those mom and pop operators are your neighbors. When you invest in them you are investing directly into your community, and not into some corporation which takes from it.
 
Measure Twice
This is so obvious and yet, this was almost my biggest mistake. When I first was designing the shop, I had the front of the shop (facing north) almost completely open for a massive door: 6 meters / 18 feet wide by 3.3 meters /10 feet tall. My thought at the time was that 6 meters would easily allow me to move 2 cars side-by-side without having to get either too deep into the shop. Like, I could have one sticking halfway out and still get a car in. This was great thinking until I decided I wanted a way to get in/out through a "man" (I say "person", but I'm not pronoun-hostile either) door. I also wanted this facing North, next to the big garage-style roll-up door. This way I could leave the big door closed and still come and go through a door with a lock on it. Consider the barn door is locked from the inside, and that was always the plan. I have no idea what the southern door will be like, but it may not have an externally-facing lock on it.
 
no wind inside
Anyway, fast-forward to after it is built and I am looking for a tracked roll-up door. After spending weeks looking for a 18' x 10' door, I have a site visit by a local door company (Overhead Door of Portland) who has a used door that big. We run the tape and sure-enough the opening is 10' high, the clearance above is adequate. Then we check the door width and it's only 16' (5 2/3m). Duh. When I added the person door, I reduced the size of the roll-up door and completely forgot. Ultimately, this saved me a bunch of money, though, because a standard residential tracked roll-up door is 5 2/3m (16 feet). When I say a bunch of money, the used door he had would have to cost me $14k US including install and an opener. The larger opening also would have pushed me into a commercial-grade door, so it would have weighed nearly double the residential door.
 
Patience Pays
open, windy inside
With the more accurate measurement, the fine folks over at Overhead Door of Portland dug into their stock of used doors. After a few weeks, they had a suitable door. Boo and I want a glass door, to maximize the light coming on for cold daytime work (think: winter weekends) and to not block overhead lights when it's open. We both also thought that a clear door would more closely approximate an old filling station look that we both had romanticals about. These glass doors, though, are less common and more expensive. The door they have is undamaged, but whoever had installed it chose to mask off the glass and then rattle-can paint the doors and rails with black Rustoleum paint. That decision would have been totally fine, had they prepared the surface for paint. At bare minimum the doors needed to be scuffed with 300-grit to 400-grit sand paper (or a red ScotchBrite pad) so the paint would have something to bite into and then wiped down. They did not and the paint did not. Instead, the paint is flaking off and is not presentable to most. For our purpose: make opening clear, yet lockable while looking old-Skool... it is perfect. We may change our minds and fix the paint, but for today, we are happy with it.
 
Car Mad Dash
Hapy's spot
As is so often the case, this was a full-on hurry up and wait. Well, really, it was more of a wait and then hurry-up. I have been looking for a door since the shop was built and now that we found one, the install was planned for less than a week later. From my prior post, you know that Oliver is against the east wall, right up against the big door opening. And, he was not running. Next to him is Hapy, barely jutting out the big opening and barely running. I needed to get both cars out the way and the lane way clear so they could get in there with the doors and equipment to get the door installed.
 
Getting Hapy out was easy: re-prime the Injection Pump with the MityVac, crack the injectors, pop the starter to a count of 5, re-tighten the injectors, start and back him out. This took less than an hour and I parked him in his longer-term designated spot where we can more easily visit and drive him. Yeah, I said visit; he's family.
 
Oliver drove!
Moving Oliver was a bigger deal, but only because I made it so. I wanted him to leave the shop under his own power. So that meant getting him running. In my last post, I described solving his fuel system. I don't know if it was insufficient patience or if I flooded the carb, but he would not start that day. A week later, and I have Hapy out of the way, I was ready to push Oliver out if I had to. First, I checked his spark plugs. They smelled like gas and were fairly black (fuel mixture probably too rich). I hit them with a wire brush and then re-set the gaps (0.033", internets recommend between 0.025" and 0.038") depending on lots of factors. I turned the key, got the fuel pump to prime and then quiet way down. At the carb with my hand, I "pumped" the accelerator a couple of times. At the wheel, I pulled the choke and tried to start him. After a few seconds, he started to act like he wanted to and after a few more tries, he fired up and held idle. This was the first time he ran since I rebuilt the carb, so an historic moment. Attempts to vary the engine speed with the accelerator pedal were fruitless, so I idled out of the shop, down the inclined gravel drive, and parked him in front of the person door. I was able to confirm that the throttle cable was junked. It would not stay on the pedal arm and then I was unable to move it consistently by hand. I'll be replacing that soon.
 
Final Prep
installers getting started
With the cars out of the way, I could get the last bits done for the door installers. I had strung outdoor patio lights around the inside of the shop, extending across the large door opening. So, half of that strand needed to come down. Last, I swept the floor which had not been really looked at since I moved the cars in last fall. With Oliver and Hapy out of the shop, I was able to really appreciate the size of my new workspace. It's really nice, and I will need to make a focused effort to leave myself room to work by not housing all of the cars inside all the time.
 
Door Install
The 2 installers from Overhead Door of Portland arrived as-scheduled around 10AM. They backed most of the way down the lane-way so the distance to carry the panels and runners was shorter. In half an hour, the doors were off the truck and positioned for installing (picture on the right). By 1130AM, 4 of the 5 door panels were installed on the runners and they were a-fixing the runners to the building. By 1PM, the door was in, the runners set, and the spring installed. Within the next hour, the install was complete, and Chris and Chase were showing us how the various controllers worked. With the door open, obviously, its almost like being outside. Well, its exactly like it was before the door was there: Full wind and misty rain on my face. Overhead, once lights are installed, the door will not block the light from reaching us beneath. That's huge. When the door is shut, the sound, wind and rain all stop. I did not expect the degree to which the air movement and sound would change. It is significant.
 
Wrap
Well, that's it for today. Next, I will be replacing the rear brakes on K'Lack (2004 Jetta TDI driven by my niece), replacing the throttle cable on Oliver and bringing Hapy over to Justin's to have the Injection Pump resealed. I don't know if any of those are really blog-post-worthy. Summer is coming, and having a safe vehicle (or a few safe vehicles) for Summer adventures starts now. As always, thanks for following along-

Tuesday, April 7, 2026

Oliver Fuel Fun

Boo had to work on Easter, so I had a Sunday to work with. Knowing others around the neighborhood were celebrating Easter with their families, I wanted to keep my noise and smoke to a minimum. So, I started slow, throwing Oliver onto a charger and then doing inside stuff. By 11, I was mowing the front lawn with the electric mower. With hand tools, I fixed the gates to the fence by lowering the little swivel wheels and re-setting the patio block they set on. Now, the gates sit mostly level and mostly vertical. By 2PM, most of the family gatherings were breaking up, so I felt I could make engine noises and such. So, I headed out to the shop. Engine noises. Ha. Such optimism.
 
No Start
fuel works
I am sure this comes as no surprise, but my first attempt to start Oliver was not successful. I really didn't expect it to, tho. I had a little over a gallon of gas in a jug that I poured into the tank, but I noticed that the fuel pump noise never lessened. So, as I walked to the rear of the car, I expected there would be no fuel in the filter. And there wasn't. The series of things the fuel needs to pass through before arriving at the pump is: fuel level sender / pick up tube -> flexible fuel line -> clear plastic fuel filter -> flexible fuel line -> fuel pump. From there, it travels, at pressure, thru another flexible line, through a short section of 90* hard line, more flexible line and then to the hard line that runs along the frame to the engine compartment. That's a lot of junctions. I started at the pump, testing with a MityVac vacuum pump, working my way back towards the tank. In retrospect, it would have been smarter to work my way forward from the tank all the way to the carb. Lesson learned.
 
Fuel Shower
upper one is bad
One of the short hoses was bad, but there was nothing visibly wrong with it. The picture on the right here is of those 2 lines. The top one cannot hold vacuum; the lower one can. This serves as a great reminder for those driving gravity-fed fuel system'd vehicles like the old VW bus. Fuel lines fail, sometimes not that long after you've installed it and sometimes you can't tell from looking at them. For a gravity feed system, you discover the leak after you've filled your tank, and it gushes onto the ground it you're lucky. Onto your hot exhaust if you're not.
 
While looking for the cause, I cracked the fuel level sender on the tank to confirm that I had enough fuel. I did. Once the one short line was replaced, I went up front, turned the key and started looking for another leak. I did not have to look very far. Immediately forward of the fuel pump, I had fuel going everywhere, running down the rear differential.
 
I concluded that it was another short hose, but noticed that the combination of short hose, weird 90* hard line, longer hose made little sense. I think I did that when I installed the fuel pump because the outlet of the new fuel pump was not clocked the same as the original and I didn't want a kink in the hose. If I remember correctly, I had already cut that longer hose, and solved the wrong problem. Or solved the right problem the wrong way. I think, that 90* bend was from the original system to go from the sender to the pump, and in this installation, I have a clear plastic fuel filter serving that function. Regardless, I corrected this time with a longer hose that runs from the pump to the long hard line. The longer hose was long enough to have a gentle arc, preventing a pinch in the line I was probably trying to avoid with the weird combo of parts. In the bottom picture, you can see that I have a small fuse for the fuel pump. This was not there stock, but I felt that with so many things living on the switched circuit, having a fuse around the fuel pump was probably a good idea.
 
Still No Start 
fuel pump
With the rear end lines set, I turned the key again, and the fuel pump quieted down after a few seconds. I looked under the car and no puddle was forming. There was not a drip at all. I went to the engine compartment, and there were no leaks there either. So, I tried to start it. No love. By now, it was approaching 5PM, and I had to get dinner started. But first, I wanted to know if the hard line was blocked or if there was fuel at the inlet on the carb. I removed the fuel line and gasoline dribbled out. Win. We have fuel at the carb. I put everything back together. Before heading inside, I checked the lights and hazards to give myself a little "well that works" energy before calling it a day.
 
Wrap Up
That's as far as I got on Sunday. After the random home-repairs, I had left myself more than enough time, had Oliver actually started, to give him a deep cleaning. That still needs doing, but first I need for him to run. I rebuilt the carb a couple of years ago, and the engine ran with it on there, so I don't think the issue is fueling, but it still could be. I will start with the spark plugs next time, and confirm I have spark. It is absolutely possible that something worked free during the move into the shop. If that does not bring me the start I am seeking then I will re-examine the carb. Maybe some gas residue became a thin varnish holding the bowl float, or is clogging a jet or something. 
 
That's all for now. Thanks, as always, for following along- 

Wednesday, April 1, 2026

Returning to Oliver

The last week or so has been busy with lots of not-car stuff. We have had our young niece over a bunch while her mom had surgery on her wrist, and a bunch of social events. Of course, with the return of spring comes the return of recurring yardwork as well. So, I have not had the dedicated time for wrenching that I always seem to think will be available. I was able to get out to the shop for a few hours on Sunday, though. I focused on Oliver, the 1978 MGB, letting Hapy ('72 VW microbus) sit until Justin has his time with the injection pump in April. The rate at which the price of diesel fuel is climbing (passed $6US/gal around the corner), I may find that it costs more to fill his tank than to pay Justin for his time. That's totally upside-down. Anyway, back to wrenchin.
 
Voltage Gauge
remember Oliver?
I installed a Smith voltage gauge into Oliver where the original analog clock used to sit. The clock didn't really work very well, and it ate voltage from the battery when I let him sit for too long. This made the clock less accurate, leading me to pull the positive cable off the battery while not in use. This led to the clock being completely worthless. So, I pulled it out and swapped in the voltage gauge. It seemed like a valuable bit of info to have, but I had wired it into the "purple" or always-hot circuit. Like the clock, the voltage gauge slowly drained the battery down, albeit not as quickly. So, again, I pulled the positive cable while not driving. I changed that on Sunday.
 
Bearing in mind that any entry back into working on cars may not seem like a big deal to regular wrenchers, but I have really not done much car stuff in over a year. So, any steps taken are a big deal. Removing the gauge was simply unwinding the knurled nut holding the rear support and the gauge flopped forward out of the dash. I removed and taped-off the "purple" wire and started seeking a viable switched "green"source to tap into. Switched is available at a few spots, but I decided to run a dedicated line from the fuse box instead. I could say I did that to remove variables or variability in the voltage signal. The truth is that Oliver is parked so close to the side wall of the shop that getting in and under the dash was virtually impossible. I was not going to just start grabbing an unplugging things.
 
Smith voltage gauge
Running another wire is simple enough. I started at the gauge and worked my way behind the dash, center console, and glove box to the firewall pass-thru. From the pass through within the engine compartment, the bundle of wires run along the left fender to the fuse box. I tied the new wire into the existing green bundle and tested continuity with the multi-meter. Success! I installed the gauge, hooked up the battery and tested by turning the ignition to "run". The voltmeter slowly crept up and I could hear the fuel pump banging away. I recall that it used to get quieter with fuel in the pump. Satisfied, I turned off the key and looked for any other parasitic drain on the battery. The wires in the engine compartment need some containment. I am not liking the scattered multi-colored angel-hair look in the picture below right.
 
Battery Drain?
technicolor angel hair pasta wiring
Testing for a parasitic drain on your battery ought to be relatively straight-forward. Disconnect one cable. Set your multi-meter to test for Amps and then place one probe on the battery post and the other on the cable end. All 0's? Switch to milli-amps and try again. According to the internets, if the drain is less than 50mA, it is not enough to drain your battery. I got 0mA, which, honestly, I do not believe. I tested it multiple times, and even after cleaning the cable and the battery post, I still got 0mA. So, I checked voltage across the 2 posts (12.08V) and left the cables attached. I figured if the voltage drops overnight then my battery-drain test will be proven faulty. I have since tested the voltage the last 2 days. The battery loses 0.02V overnight, which I think I can attribute to the stereo. Regardless, I will need to add a float charger.
 
Red Rollie
new lock, locked
I have this old red Kennedy tool cabinet we call "Red Rollie". It houses a bunch of tools, and for most the nearly 20 years that I've owned it, the lock didn't work. Well, I didn't have a key for it. We got the cabinet at an estate sale without the key. Anyway, some tools were stolen from my next door neighbor's yard a few months ago, so that changed our vector regarding the shop. We were perfectly fine using it without doors, but I can't leave entire tool cabinets unlocked if thieves have found our quiet little neighborhood. While I think the theft next door was an inside job (they run a construction business out of their home), one can never be too sure. So, I found a lock that fits this old Kennedy cabinet (Kennedy 80403 High Security Tubular Lock), and replaced it.
 
Replacing one of these locks is actually easier than on newer cabinets. The lock is held on with a U-shaped tang that slides off to the side. The hard part is you can't see anything. With my fingers I was able to determine which direction the tang needed to slide to be removed (facing the cabinet, slide right), and then set a stubby slotted screw-driver against the lip of the tang. It only took one well-leveraged push to get the tang removed and the lock to pop out. To install, orient the lock so the little inner divot on the outside facing part of the lock where the key goes in is facing down (unlocked). Set the lock into the hole with one hand while guiding the locking rod into the rectangular hole on the back of the lock. Then, push the U-shaped tang in place to hold it.
 
Red Rollie
This worked great, and effectively locked the top 2 drawers. The 3rd drawer down, however, had been bent where the little hook pokes out the back. To remedy, I got a framing hammer and a 1/2" ratchet extension and beat on it until it was more-or-less flush with the rest of the rear of the drawer. For years I wondered why that drawer always set deeper into the cabinet than the others. Now I knew. Once the drawer had been persuaded, the drawer fronts lined up and that 3rd drawer locked as well.
 
Wrap
That's how I spent my Sunday afternoon. The shop still needs the 2 largest doors, but my tools are secure, and I am really starting to get comfortable in there. For example, there was a period of time while working on Oliver that the skies opened up and it started pouring rain. I never felt it. In fact, I could only hear it hitting the trees. The insulation on this shop stops the sound of rain on the steel roof. I absolutely did not expect that.
 
That's it for today. Next week is Easter, so I may not get out to the shop for much. I hope to put a little gas into Oliver and at least back him out to where I can give him a deep cleaning. 

Thursday, March 26, 2026

The Ghost of GoRo

I have been coming off of an illness, having been sick for almost a month. Yeah, whatever that thing is going around got me good. In the meantime, we have gotten some headway on the shop doors and I got to start thinking about what's next on Oliver to get him on the road for the Summer. Today, though, is a cautionary tale about selling a car, no matter who you sell it to.
 
What's GoRo
GoRo
I'll back up a little bit first. Back in June of 2023, in my "Small Fence, Big Difference" post (link here) I mentioned in passing that we had sold GoRo, our 2009 Audi A4 to a guy down the street. We told him multiple times prior to closing the sale that he really did not want the car, that there were weird issues with the transmission, interior plastic bits were breaking off and that it was a generally crappy car. He would not heed our concerns, saying it was for his daughter, he could get the mechanicals fixed up fine, etc. There was still a couple of months left on the existing registration, and he was going to have to drive it to his mechanic, and then over to Department of Environmental Quality (DEQ) to get registered. So, Boo with her ever generous heart, let him take the car with the tags on it. We went inside and recorded the sale with the state of Oregon immediately.
 
Sales Daisy Chain
Of course, we were right. He took the car and within a couple of weeks he had sold it. But, he didn't tell us, nor did he remove the tags that we had left on there for him. In Oregon, you have a month after buying a car to change the registration. Since he hadn't had the car for a full month, he was officially in the clear, but whoever he sold it to also sold it within a few days, and we lost the handle on the ownership after that. 
 
Ticket Parade 
Why is all of this important? Within a few days after our
barn door
neighbor sold the car, we got our first of many speeding or other moving violation caught-on-camera ticket, followed by parking tickets and toll-lane charges. We got tickets from Montana, Texas, California and Colorado. In each case, we sent copies of proof that we no longer owned the car. For the tickets which came from legitimate state, county or city governments, the tickets were waived. In the case where the ticket was for not paying a toll on a "private road", the charging entity did not care that were were not the owners and could prove that we were not even in the state at the time of the violation. Instead, they sent the ticket to collections, dinging our credit. To prevent further damage to our credit, we paid that one. Most of these tickets arrived within the first 6 months after the car was sold.
 
Final Straw
This week, we got what we believe to be the final ticket. GoRo had been impounded in the City of Merced and would remain in their custody until we came down to their office and paid the bail on parking tickets. We don't care and after a while they will put the car up for auction, and it will be someone else's problem. I just hope the auction house or the City of Merced removes the license plates before handing it off to another sucker.
 
Buh Bye GoRo
barn door, inside
By the time we sold off GoRo, Boo and I pretty much hated the car. The seats were stiff like bleachers, increasing internal switches were failing, plastic bits were falling off, the transmission shifted funny, etc. It outside looked great, but wow, what a lemon of a car. The lesson here for us and for you: even if you're selling the car to your friend, remove the tags. If you are all down for the sale and want to be generous, drive over to DMV and remove the tags while your friend is getting temporary plates. Once that car leaves your possession, there is no telling what will happen to that car. You could find yourself with a big pile of tickets from uninterested parties who only want money, and are willing to hammer your credit to get it.
 
Car and Shop Stuff
I mentioned at the top that we have made headway on the doors on the shop. Recall, I have 4 openings which need closings. Over the past month, our friend Ray has built barn doors for the large opening facing west using extra siding I had added to the order for the shop so those doors could get made. It is a 10 foot wide opening, so the doors are each just over 5 feet wide. They totally look the part and glide open/shut easily. We also installed a "people door" on the north elevation or facing the farm house. This leaves a 8 foot wide doorway on the backside and the main large garage door next to the people door. I have been saving for the big door. While that doorway is a standard 16' wide, it is 10' high (just in case someone comes along with something really big, I guess). So, it is a semi-standard door.
 
On cars, I have Hapy about as ready to visit Justin as I can make him. Since he hasn't really driven since I put him back together, I really would have liked to have driven him a little more. With Diesel hitting $6/gallon around here, I all the more do not want to be driving with a fuel leak. So, his next drive will be to Justin's place.
 
voltage gauge upper right
To keep my hands busy, I have been looking at Oliver, the 1978 MGB. I couldn't get him to start when I went to move him into the shop and I didn't really look into why at the time, I just hauled him. I slid under the rear end and discovered why: I had drained all of his fuel out the last time I parked him. If I remember right, I put that fuel into the lawn tractor and the rest into Astra. Antyway, I test-fired the fuel pump with 12V directly from the battery and the fuel pump works. So, if it does not come on with the ignition key-turn, it's a wiring issue. After messing with that, I removed the voltage gauge from the dash and will be sourcing switched power for that. I had simply used the always-hot 12V for the clock I had replaced, but that runs the battery down eventually. I hope to have some time this weekend to finish the voltage gauge, put some gas in and see if I can get him to run, and idle. Then maybe I'll back him out and give him a long overdue bath and a drive-around.
 
Well, that's it for today. Keep your license plates when you sell your cars, and thanks, as always, for following along- 

Tuesday, February 18, 2025

MGB carb circle-back

So yeah.. it has been a long time since I've posted much. Life has been full. Today, I will just close the loop on the carb deep cleaning and re-gasketing. I will try to get back here relatively soon with some other goings on. I thought I posted this update last Fall when it happened, but I clearly didn't.

Just a reminder, Oliver (1978 MGB) has a SK Racing or OER Racing side-draft carburetor. These look very much like the DCOE Weber and even can use some of the jets from a Weber. The accelerator pump and float level can be adjusted from the outside and the main jets can be accessed through a cover on the top. So, very few of the changes one usually makes to a carb requires the carb to be removed from the engine. The inlet pattern matches the Weber DCOE, so you can use a more readily available intake from Weber. Even the 4 bolts on the bottom are the same so you can use a Weber-intended heat shield like I did. Curious about getting one? Here is a source in Japan (these are a go-to carb among Nissan/Datsun enthusiasts I am told). Those who have them rave about them. Except me, so far. I hope to be among the celebrating majority soon.

Almost a Test Start
Setting the stage, I had a crisp fall day to take a look at Oliver, the 1978 MGB. I wanted to see if the carb work was the winner for his bogging down when I hit the accelerator pedal. I pulled his cover off, hooked up the battery and added some fresh fuel. I had pumped the tank dry when I removed the carb; not sure if I mentioned that last time. Anyway, I turned the key to run. I got the satisfying sound of the fuel pump running and then that not-so-satisfying gasoline smell. I went around to the right fender and could see fuel shooting out towards the radiator. Eeek. I turned off the key and then spotted a failing fuel hose. After a brief rummage through some boxes in the "tool shed" I found some suitable hose and had the system buttoned back up relatively quickly. This is as good a time as any to remind all my fellow old-car owners to replace your fuel hoses.

Actual Test Start
With the new hose in place, I returned to the driver seat, turned the key to run and waited for the fuel pump sound to change, letting me know that it had established pressure. With the earlier fuel line failure, the smell of gas was still present, so I walked around to the front to inspect for leaks. Nope. So, I turned the key to run and he started pretty fast. It was rough, but I could keep him idling at the carb by pulling on the accelerator cable.

Fiddling with it
I focused first on getting the idle jets set. I followed the basic set-up rule of turn all the way in, then back out 2 turns when I did the reassemble. In theory, you should be close at that point. I did not notice much difference when I moved the screws in and out more than 1/2 a turn. I think I eventually settled on them being out just past 2 turns. I expect when fully warmed up and in an expert tuner's hands a different setting will be found.

Then I shifted to the idle speed screw. Doing this on your own without a hand-held tach is kind of comical. You walk to the driver door and look at the tach. Note the speed and if it needs to be faster, go to the carb and adjust. Then walk back and see if you hit your target. If not, wash-rinse-repeat. I am sure there are much more experienced mechs out there who can hear the right speed or have a hand-held tool so you aren't getting your day's steps in 2 steps at a time like that.

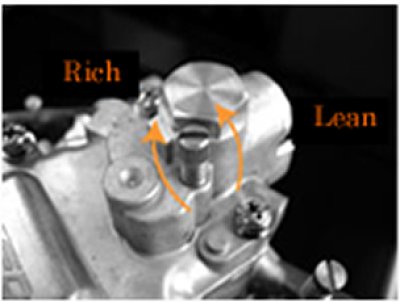
Last, I wanted to see if I had solved the bog-on-accelerate. So, I yanked on the accelerator cable at the carb and.. bog. Sadness. In my time during the rebuild, I spent more time looking at the exploded diagram than I had before. I remembered there was an accelerator circuit, and located the screw on the top of the carb. In the image on the left, here, the screw is the big one on the furthest left, near the intake-side of the carb.

When I dismantled the carb, that screw was nutted all the way down snug. So, either the prior owner had torqued it down or I did at a time I don't remember. Regardless, I started loosening that screw (lefty-loosey) while I rev'd the engine. And the bog started to fall away. I was able to rev it fairly quickly without the engine starting to die on me. I stopped loosening it before I was able to yank on the cable as if I was going from foot-off-pedal to pedal-on-floor. I believe what had been happening was that the accelerator circuit had been flooding the engine with too much fuel when I pushed on it. Now, it was getting the right amount of fuel to account for the big burst of air from the opening of the butterfly without overcompensating. Looking back, this has probably been the issue all along and the cleaning/resealing may not have been necessary. In the end, I don't care, and cleaning the carb will only pay more dividends anyway.

Wrap Up
So, did I go for a test drive? No. Why? The brake bleed attempts that I have done since I replaced the master cylinder have not gotten the brake pedal predictable. Rather than have a spirited drive to celebrate, I waited for the tailpipe to cool down and put Oliver's cover back on (queue the sad trombone). One of the first things I will be doing this spring is another brake-bleed attempt. I may just hobble over to the local Firestone and have them do it. I just want to drive this guy now and his spongey brakes have been a blocker for too long.

Also on the list are changing the 12V source for the voltage gauge from the purple circuit which used to power the clock to the switched and fused green circuit. I have a few other odds and ends I need to complete before Oliver is "finished", the largest of which is replacing the body-to-windshield seal so he can be driven in rainy weather. There is always something with these old cars and I really wouldn't want it any other way.... so long as the something doesn't leave me stranded on the side of the road outside cell range.

Well, that's it for this time. Sorry it has been so long. Life gets busy and I have not been able to play with my cars much. I am working through the permitting process to get a garage built so there will be posts about that, and then playing on cars (and blogging about it) can return to a year-round sport. Thanks for tuning back in, and I hope to be more frequent in 2025-

Tuesday, July 23, 2024

MGB - Side Draft Carb fun

Today, I return to the little British car: our 1978 MGB, Oliver. Oliver has sat unused for too long. I had been having considerable and increasing trouble just getting him to start and run. So, earlier this year, I removed his carburetor for dis-assembly, cleaning and re-assembly. I did the removal and tear down what feels like months ago, and just completed the re-assembly. So, while this post may feel like a couple of consecutive weeks of fun, it's really a little from March, a little from June and a little from last weekend.

Removal and Tear Down
re-assembled
As is the case with most things on a small car, removing parts requires some flexibility not needed for larger cars of this vintage. Still, removing a carb is not complicated, but I encourage you to take pictures. If your life is anything like mine, you may intend to be back to this in a few days, but days can become months really fast. Anyway, remove the air cleaner. Remove the fuel line (pinch it off first and then plug it). Disconnect the throttle and choke cables. Then remove the carb from the intake. With the side-draft weber (DCOE) and this SK Racing/OER carb, it is held to the intake with 4 nuts threaded onto studs emerging from the intake. The DCOE and SKRacing carbs use the same intake, by the way. Once removed, I stuffed rags into the intake to prevent critters from climbing into my engine, closed the hood and re-covered him. I took the carb over to a bench in the back of the little garage attached to the farmhouse.

At the work table, I started with the most obvious things and worked my way inward. First, the inspection cover and top half of the carb was separated from the main body. I removed every slotted bolt and whatever lay beneath, taking pictures as I went. Last from the top were the air correction jets and then I removed the set screws that held the venturi to the main body. The main body was effectively disassembled, so I shifted to the top half, removing the float, the fuel inlet bits and the choke bits. Last, I pulled the little cover or plate that faces the intake when installed. I am sure someone who does this often would have done it faster, but I needed to chronicle it so I could re-assemble later.

Carb Cleaning
remove from car day
I started like most folks probably do: shooting the carb with rattle can carb cleaner and gently scrubbing it with a toothbrush. I focused mostly on the exterior with the brush and let the carb cleaner do it's magic on the little holes without brushing. Satisfied that I got the worst of it, I pulled out a razor blade and removed all of the gasket bits and rubber seals. Then, put together a ultrasonic cleaner soaking tank with solution designed for carbs. I had read online that some folks will use Simple Green or other things, but I figured the correct solution was far less expensive than a replacement carb in the event those advisers were wrong.

The cleaners, well, the one that I got, but from what I read, many of them have a setting to warm up the solution while doing the ultrasonic. From what I read, there was some level of concern about how well they actually maintain temperature and that sometimes they can run the solution too hot. Since the solution is concentrated (read: need to add water), I decided to use boiling water and when poured into a room temperature solution, the overall temperature would be sufficient. I ran the carb body and all of it's pieces in the ultrasonic cleaner for multiple 20 minute cycles. Once I was satisfied that the carb was as clean as it was going to be, I moved it and the parts into a bucket and rinsed them with water. I then set everything out in the sun to dry.

Rebuild Kit
great kit
Unlike a Weber DCOE, the SK Racing/OER carb is not exactly common in the US. It is not generally sold here; it is much more popular in Japan. So, finding a rebuild kit for an obscure, foreign and old (time is relative) car part was time consuming on it's own. I was able to find a single supplier of a kit, a person in Japan with a storefront on eBay (Bprojects Japan). While I have a healthy skepticism of eBay sellers, deals and parts, I really had no other choice. The kit I received was incredibly well set. It included the major gaskets, replacement air correction jets and springs, new crush seals for the pump jets, a pair of ball bearings for the "pump non-return", a pair of copper crush seals for the fuel inlet and a big collection of rubber o-rings. It really had everything except a manifest indicating what part number each bit was for and the gasket for the jet inspection cover was missing. At this point I realized that I took pictures of the disassembly, but failed to take pictures of the rubber seals as I cut them off.

Re-Assembly
view from firewall
With my laptop open to the SK Racing carb manual, and my phone open to both the pictures I took and a blurry exploded view drawing of the carb, I started putting it back together. I started with the last picture I took and worked by way backwards through them. The only step I took that I had to undo and do again was the placement of the gasket between the top half and the main body. I had assembled the float, but the gasket needs to set above the float, which had I thought about that for a second, it would have been obvious. The float did not fit in the opening in the gasket, nor does it ever need to along its travel path. Also confusing was where the pair of ball bearings and small rectangular rods went. Process of elimination worked well here, choosing to do other things until it was apparent what hole those dropped into.

I used liquid gasket-maker for the jet inspection cover. That stuff makes a dark sticky mess. The instructions on the bottle say to let it dry "for a few minutes" before putting the 2 pieces together which need a gasket in between. I let that sit for well past the recommended few minutes and it was still very wet.. and even after letting it sit in the sun the stuff didn't dry very much. So, I did everything else install-wise and add the inspection cover dead last.

While I had the carb in hand, I decided to add a heat shield to the underside. The header that I installed has a thermo-barrier powder coating on it, but I know from having the hood open after driving it that a ton of heat is still getting into the engine bay. I suspect the source is the header (or the radiator), and the best thing I could do for the carb is to help prevent heat from getting to it. So, I got a DCOE carb heat shield from Pierce Manifolds. The mounting bolt pattern is designed for a Weber DCOE, but the SK Racing/OER is exactly the same in this area. The venturi maintenance holes line up, the cut-outs for the intakes, etc. it all just lines up. The heat shield is heavier and thicker than I expected, but I expect it will do exactly what it is intended to do: block and route-away heat rising from the exhaust.

Install
re-install day
As easy as the carb was to remove, installs always take longer. This bugger was no different. First, the carb mates to the intake with these thin (maybe 6mm thick?) plastic isolator bits between the carb and intake. On each side of the isolator resides a rubber O-ring that is set inside a groove. So, you are managing a carb, 2 isolators and 4 O-rings at one time. That required some dexterity.

I discovered that the heat shield has a small tab on the intake side that would hit the center header pipe. Recall, the MGB has a Siamese head, so the middle 2 cylinders share an exhaust. The PO had a home made exhaust manifold with a center pipe effectively pointed straight down. The header has a more typical curve. So, the heat shield came off and I adjusted that tab to point angled upwards so it did not hit the header pipe, but actually will shield the top-most end of it. Then, I realized that I could not address the lower mounting studs with heat shield installed so I removed it again, re-installing after the carb was nutted down into the intake.

From there, the install was about what you would expect, complete with a dropped bolt under the car. I had to reverse the spring-return arm on the carb as well as flip the fuel inlet. Still, it was relatively smooth, hooking up the fuel line, control cables and air filter.

No Test Fire
By this time, I had sweated my way through most of a summer afternoon and cleaned liquid gasket maker off my hands more times than I'd like to count. As much as I wanted to enjoy the sound of the engine running, I chose instead to take the limited win: Oliver was in one piece. Boo and I went to the county fair instead of test-firing Oliver's engine. Now, Oliver is covered back up, again waiting for me to have a few hours to test fire his engine and fiddle with settings. I sincerely hope the tear down / deep cleaning was what he needed. I'll post an update when I have one.

---

That's it for today. Thanks, as always, for following along-