Showing posts with label kick. Show all posts

Tuesday, June 21, 2022

Interior Carded

Once the headbanger was installed, getting the interior to a usable state was a downhill run. This post is really more a collection of all the little things that got done so we could hit the road. So, for today, "complete" means "good enough for this Summer"; it does not mean we're done. I will be picking this up once camping season comes to an end in October. Before I begin, Hapy Summer Solstice.

Cab Floor Complete
I had left some of the MLV splits un-taped. So, I started with that. I discovered that the Jute and MLV was too wide between the outer edges of the seat rails and the doors to allow them to close easily, so I trimmed them down. Then, the edges were taped down.

Sun Visors
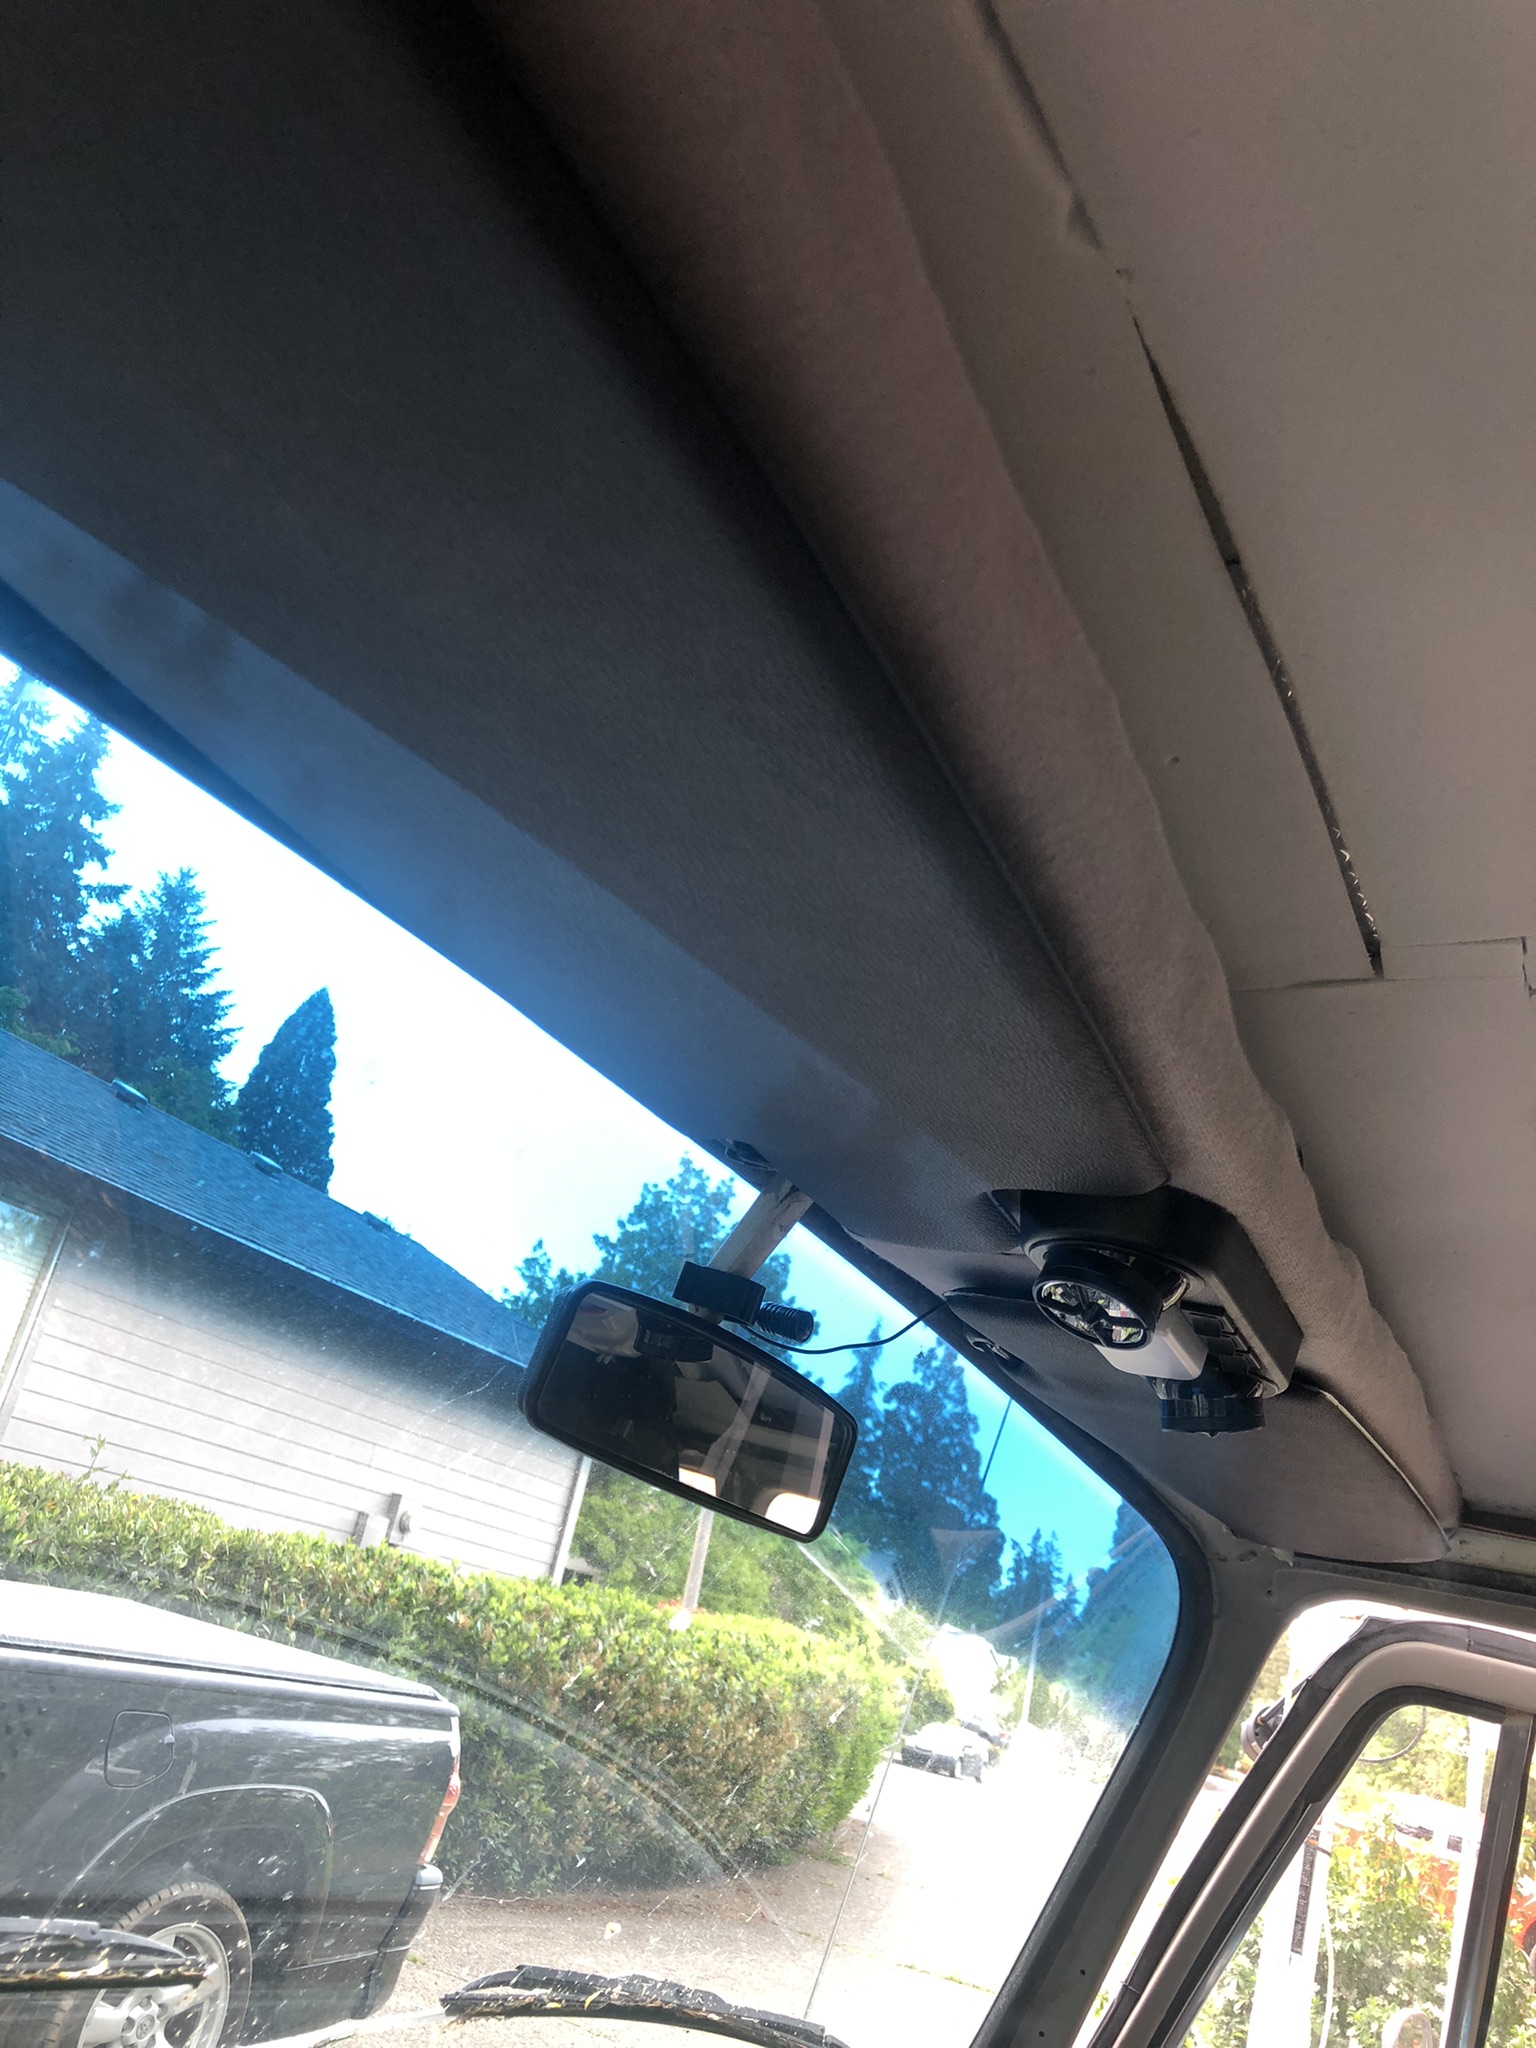
sun visors in
One of the upsides to the new shelf was the potential addition of sun-visors. The visors that are on the market these days are not the same as the ones I removed; that could be a reflection of my old visors, however. These new ones are shaped differently, with a pop-out on the end that is designed to go behind / around the mirror, and the little stick on the end that is supposed to go into the little keeper near the mirror is therefore much shorter. So, if I was looking for a direct-replacement, these would NOT have fit properly, but, again, it is entirely possible that the PO installed bug visors or something way back when. The mounting base near the A-pillar is the same. I re-tapped the holes, knowing at least one, if not all of them, had metal screws instead of bolts at one time before. I threaded M4 Phillips bolts in to hold the visors. I attached the little keeper thing to the underside of the shelf. So, the visor, when not in use, tucks flat to the underside of the shelf. It turned out that the weird shape of the visor allowed it to almost wrap around the light fixture, looking like it was designed for that install. Sometimes, its just better to be lucky than good.

Cab Door Cards
cab cards nearly complete
Recall, my old door cards were falling apart cardboard. There's a cat in Arizona named Werksberg who makes door cards out of PVC, and I ordered a set last Fall (his TheSamba ad). Apparently, his costs are skyrocketing so if you want some of these and have been sitting on the fence, you might get priced out if you don't make a decision soon. Anyway, I was finally ready to install the fronts. Unlike the original cards which need to be installed with metal clips into little rubber boots, these cards deliver with small plastic molly's which press through the card into the original holes. They appear re-usable. We'll see. The driver door card is not staying put, even after adding double-sided tape so I may need to add screws.

When I removed the original-to-me cards, I removed the little door vent things. I set them in my trove of parts and did not install them when I put on the cardboard cards. I put them on this time. The door looks much more finished now, as you can see in the picture above-right, here. The rest of the card install is the same as original. The window crank removes / installs with a Phillips screwdriver. As does the chrome door latch mechanism and the door pull strap. Once installed, the door looks so much better than it did. I have not decided if I will apply the thin closed cell foam or not, but I am not doing it for now.

Kicks
partitions and mid-walls carded
The last thing I got after in the cab was the re-install of the kick panels. With the new flooring and 4-1/2" speakers, this was not as simple as before. Still, I found by setting the outer edge and then bending the card, I could get it pretty much where I wanted it. I pulled the jute and MLV up, allowing the card to sit on the floor. I could remove them, and cut off the lower 1/2" so they sit on top instead. Meh. Something to think about as we drive around this summer.

Slider Door
Moving rearward, I pulled the middle row seat out and the original-to-me slider door card. The slider had not gotten much treatment over the years, so it got CLD and 2 layers of Mega Zorbe. I thought the extra layer might reduce the racket when the door opens. It didn't at first. I spent some time with oil & grease cleaner working on the door runners, and that actually helped a little bit. The lower door roller is the source of the lion's share of the noise and noticed that the outer edge of the runner was a simple 1/4" tall thin bit of steel. So, I ran some leftover white "U" seal I had from doing the luggage rack to see if that would help. Nope. It effectively pressed the wheel against the inner steel track edge, causing it to make a different, but equally unpleasant, noise. I concluded the wheel was the noise-creator, and I ordered a replacement lower guide with a vinyl wheel, instead of steel.
rear tail gate carded

There are 2 bolts and one Allen-screw holding the guide to the door. The bolts on the old guide were so rusted, they broke off, leaving me with just an Allen-bolt holding the guide in place. I will periodically shoot those rusted bolts with penetrant, and when I am able to remove them, I will use M6 bolts in their place. I will apply anti-seize, though. With the new lower guide in, the door was quieter, and operated more smoothly, but the upper guide was making noticeable noise now. So, I removed it, and improved it with penetrating oil until the guide-wheel would easily spin between my fingers. I re-installed it, and now the door was as quiet as a modern slider.

More Cards
I had some daylight remaining, so I grabbed the door card for the slider, and installed it. I also installed the card for the wall opposite the slider, and installed it. I did the rear tail gate and the extra cards for the rear-facing partitions behind the front seats. Each of these took some fiddling to get right, but that was on account of Hapy, not because of the cards. These things are great; the holes are mostly in the exactly right spots and the bag of Mollys had more than enough fasteners for me to damage a bunch of them and still not run out. I believe I can fit more sound deadener between the partition cards and the partition, and I may need some foam to reduce vibration noise, but right now, the interior of the bus looks really good. Removing those cards to add noise deadener will be simple when /if  I choose to do it.

I have a couple of cards remaining to be installed along the seat pedestals and I'll do them as the mood strikes / time permits. For those keeping track at home, I have installed the panels which sit at either end of the rock-n-roll bed, arching over the rear wheel wells, and have I attached the panels that cover the bare steel in the sleeping area. Because the sleeping area cards abut the rear-wheel cards, I needed to do them in the right order. As you can see in the image on the right, here, these cards, when used together, make a nearly seamless span. Boo and I will especially appreciate the sleeping area cards when we're camping. There are few things as jar-awake as having some bare skin touch up against the metal side after it has cooled down overnight. That is some quick-awakening. While this plastic / PVC will not be a great deal better, it does create a foundation for some foam and then some fabric later.

At this point, I felt ready for a test flight. I'll post on that next time. Thanks, as always, for following along-

Tuesday, February 23, 2021

MGB Interior Panels - Part 1

I spent a great deal of time working on Zed's body. Before and after that, I spent even more time on Hapy, with the wiring (both the re-wire and the P0121 code), the furnace and the heater. Around those efforts, I picked up and improved upon T's old Audi, Nemo. Today, I took a break from those other cars to return to Oliver, the 1978 MGB, to complete some interior things I had left undone. I was going to get after Nemo's rear wheel bearings, but honestly, I just want something in the warm garage and Oliver is the only car in a garage, so... off we go into another multi-part post.

Where Were We
Recall that I blew some manna-from-heaven on an interior refresh for Oliver two years ago (See New Seat, What a Treat Parts 1, 2, 3 and headrests). I completely restored his seats, replacing all of the foam and the covers. Out with the old black vinyl and in with new cream with black piping leather. The lighter color is really nice when the sun is super intense, like in the early Summer here. I put in seat-heating elements, but haven't wired them in yet. Instead, I focused on summer-supporting stuff, like the new stereo. This new stereo included front speakers attached to contoured plastic boxes mounted to the outer footwell sidewall (See MGB Gets Sound, Version 2), but the kick panels were not there, so I started with those.

Kick Panels
creating kick-panel pattern
The kick panels compliment the seats in that they are the same cream color. When I ordered these, I appear to have selected the option to include map pockets, which I guess are okay, but with the little speaker boxes, will not be terribly useful. Anyway, in order to pierce the kick panels in the exact right spot so I can mount the speaker boxes, I pulled a paper shopping bag and some cardboard out of the recycling. I traced the kick panel onto the paper and cut out the pattern. I removed the speaker box from the driver-side sidewall, set the paper against in it's place and found the mounting holes with a small nail. I transferred the holes onto cardboard to test the location, and they were a little off. So, I pushed the nails around until they were in the holes well and tried again. They were still a little off, but the third time they were perfect. I transferred the holes onto the rear of the kick panel and drove the nails through from behind with a framing hammer. I set the soft cream material onto a shop towel and set that on top of an old kitchen cabinet door so the nail could pierce without damaging the panel.

speaker box
attached to p-side panel
After presenting the speaker box to the panel, and pressing the mounting screws into their respective holes, I drove the screws into the panel and then held the pair against the side of the car. I needed to position the panel around things, so this actually happened more along the lines of... in, then out, then in then out a few times until the panel was tight against the leading edge of the door weather stripping, the holes were aligned and the screws were lightly threaded in. I verified the routing of the speaker wire and then set the screws all the way in into the speaker box was snug, but not overly compressing the panel. I re-mounted the speaker and turned to the passenger side. I followed was the same process, down to the multiple sheets of cardboard. Since there are fewer obstacles on the passenger side, it was easier, but only barely because I did the whole thing leaning across the transmission tunnel from the driver seat. I could still feel my ribs 2 days later, but they really look good. Pain is temporary; beautiful clean kick panels... well, they're kind of temporary too. Just not quite as temporary, I hope.

Rear Quarters
With the kick panels in, the door panels look that much more black. And wrong. So, I really needed to keep going, but I thought I would do the doors themselves last. There are 2 triangular-ish panels that sit just aft of the seats with the rear-most edge following the contour of the front of the rear tire well. So, I call these quarter panels; I'm sure they have another name, though. I thought they would be easier than the door cards, and with the location of the car so close to the wall on the passenger side, I'm not sure how I will get to the passenger door anyway.

ideal top orientation
to hit all 3 bolt heads
These need to fit under the convertible top mounts, but otherwise their positioning is fairly straightforward. The 3 bolt/screws are partially obstructed by the convertible top frame. So you cannot just lower the convertible top to remove the 3 bolts that hold the mount to the car. You can remove one, but to get to the other 2, the top needs to be partly open. This is where an extra hand is very helpful. I didn't have one, so I tried doing just the driver side first. I started by opening the top so it was sticking almost straight up. This exposed or unobstructed all 3 bolt heads.

When I removed the the rear-most bolt/screw on the driver side, the capture-nut inside the B-pillar fell off (30 year old weld failed). Also, one of the hinge-points on the passenger-side of my convertible top frame separated. The capture nut is easy: they are sold on Moss for around $18US. For the hinge-split, I literally held the pin where it was supposed to go and forced the pieces back together with channel-lock pliers. I looked around for repair kits or something, but I was unable to find anything. At this point, though, it is working.

To get a sense of the work, I did complete both sides (using only 2 screws/bolts on the driver side), one at a time, leaving the other side firmly attached. With the convertible top frame up, just like it is pictured above, remove the 3 bolts/screws. I completely removed one, and then moved back and forth on the other two, slowly removing them. With the frame lightly held in place, I shifted focus onto the panels.
 
The Doing
I tried 2 different approaches, and found the second approach works better. First, I tried to poke a tiny hole in the panel for each of the 3 bolts to pass through and then widened the hole with something so the screw/bolt can thread in without catching vinyl/leather on its way. Take care not to make it so large, however, that it is larger than the frame hole supports. On the passenger side, I used a razor knife to cut a small "X" for each of the 3 holes. Either way, set the panel nearby, and get yourself seated on the parcel shelf at the rear of the passenger area.

I completed the removing of the 2 final bolts while holding the frame steady with my head. Yeah, that's right. This is where having a helper would be very helpful. With the frame held steady (either with your head or by a helper), lift the mount up just enough to get the card in place. I set the rear-most corner in first, and then flexed the card to press the leading edge behind the weatherstripping. The holes for the frame will line right up, but I checked with a bolt to make sure first. Then, I lowered the frame down into place (optional tonneau cover mount held firmly against the top frame), and sent a bolt through, threading into the nut. With one fingered in, I sent the other two in, and then moved from bolt to bolt until they were all snug.

At this point, I have both of the front panels and both of the rear panels in. The doors are a little more complicated since the glass-scrapers need to be replaced, and the old cards are still in. Since the weather around here has been below freezing and wet (ice, freezing rain, sleet and snow), I will be continuing to play with Oliver since he is in the semi-heated garage until the weather changes.This means that my next post will probably include some work on the driver-side door card. The passenger side is trapped against a shelving unit, so I probably will not be getting to it for a while.
 
As always, thanks for following along-

Tuesday, February 9, 2021

Hapy Daily Driving

Well, that title might be overstating it a little bit. To clarify: Hapy is now capable of driving on a moment's notice. With the CoViD safer-at-home, I haven't been going anywhere. I may not have had an operable car for most of the last couple of months, but the lockdown has meant I haven't really needed one either. Today, I'll cover the little things that needed to be buttoned up after the big re-wire.

Reverse Lights
I mentioned the reverse lights at the end of the Electrical Gremlins saga. I had it wired up to a somewhat mystery switched 12V source before. When I tore the old wiring rats nest apart, it was left out of the new wiring. This resolution was fairly easy. Back when I set the mystery wire-up aside, I left the plastic-snap-shut fused wire in tact. So, there was just a plain bare wire to deal with. I fished it up into the spare tire well / wiring compartment from the engine bay. I spliced the wire into the switched source splice coming from relay 109 so the reverse lights will only come on when the computer thinks we are in "RUN". Since it already had an integrated fuse, this was a simple splice effort.

Headlight Flasher
When I was chasing the cause for my lack of amps during P0121 testing, I tore into the dash. I thought I had bumped something loose, and there are a bunch of things in there that could have shaken apart. Well, I didn't bump anything loose causing that issue, but I did bump something during that exploratory. Haha. During the Summer of 2020, I finally got my high-beam / low-beam flasher relay to work. It was because the replacement relay requires a source of 12V to pin 30. This pin wasn't on the old relay, and there is no wire leading to that pin in the original fuse box. I solved that before, but when I was looking for the buzzing noise during the P0121 effort, I pulled that relay and the wire heading to that pin fell out of the fuse box. I didn't notice that then. During post-testing, I discovered that the flasher no longer flashed. I found the wire, re-oriented it so it would not fall out, and returned things back to their prior cleaned-up state (zip-tied fuse-box). Hi-beam flash/relay works.

Defroster
Also in the Summer of 2020, I installed a defroster. Sort of. The defroster solution was moving the Vanagon rear heater under the belly, routing coolant along the driver side main beam and plumbing into the old air channel from just behind the front crossbeam. The air source was an experiment pulling from the old rear floor vent. The mechanical connection of the hoses to the heater was poor, and the experiment fell apart. This source needed to be remedied. Also, the switch was not operating the fan settings correctly. This was caused by poor quality wire connectors, so once the 3 at the switch and the 2 near the heater were replaced, we have a 3 speed fan again.

I decided that rather than solve for a cabin-source of air for the defroster, I would just remove the experiment for now. I have an idea for a source, but other cars need my focus. So, I removed the air supply hoses and called it good enough for now.

Mop Up
During all of the wiring work, the inside of the bus became considerably disheveled. It was one part shed, one part tool box and no part looking like a vehicle. This was easy to resolve, but made a huge difference in declaring the end of the work. The lot couch is back installed as a middle-row bench seat, for example. The rear speakers are hooked up and placed for sound again. After a quick trip with the shop-vac to get the wire-strippings and other fallout from all the work vacuumed up, he looked nearly ready.

I ran a test of the furnace, confirming that it would run on either the accessory battery or the main. It will, but the current draw for the glow-plug is so significant that I'm not sure I will want to start that heater if I am not running at least a float charger to the sourcing battery. Still, it moved the internal temperature of the bus from 43*F to 68*F (6*C to 20*C) in about 15 minutes. For the fuel-minded, it took about 500ml (or ~0.13US gallons or about 2 cups). As I understand it, maintaining the temperature requires far less fuel, so the consumption at that point dropped way off. I left it running for about an hour and the total consumed ml was about 530ml or 30ml (1/8 cup) for the remaining 45 minutes of keeping the bus warm.

I took one last step: I installed plastic kick panels I ordered like a year ago against the rear of the nose of the bus. Just like that, the cab looks like it is not an active project. It looks fairly clean now, actually. They install and remove easily, and once snapped in they really do not appear to need much more to hold them in place. The guy who makes them suggests poking holes through and screwing them into your bus. I might use Velcro, but I'll withhold decision-making until after we have had a few drives to see if they rattle or not.

Getting Legal
This last thing was actually one of the first things I did for Hapy after I set Zed aside. In fact, I think it was the registration that got me thinking about Hapy in the first place. His registration came due, and because of CoViD-19, I had to do it remotely. Since he is too old for smog and Oregon does not have inspections, I have been renewing his registration online for a few years. Still, this time I did the online steps in October 2020, but did not receive the stickers for his tag until January 2021. This used to take a couple of weeks at most. It sure felt good getting those stickers on his plates, though.

Test Drive
With the tags updated, the wiring fresh, the defroster responding, furnace functioning, etc... Hapy appeared nearly ready to be pressed into service. We just needed a test drive. For that, I did my usual neighborhood lap through a series of side streets out to the main drag, a quick 1-mile straight shot on that major street and then turning back into the side streets for home. As expected, Hapy was fairly peppy and responsive. He sounds great, and did not suffer any P0121 issues. There were a few stutters, but no codes, so I chalked that up to old diesel. That will solve with some snake oil and a fill-up. Considering that Hapy had not left the driveway in over a year, this drive was significant, albeit short.

Alt-Light
The battery light came on when the engine was revving low during the test drive, leading me to think that the unsettling "pop" noise I heard when the wiring was wrong (See Chasing the Hapy Electrical Gremlins - Part 6) was the sound of my alternator frying. This light had been popping on during testing, so the fact that it returned during the road-test honestly just reminded me. Before I jumped into anything, I in-bus tested the alternator: I alligator-clipped a fused wire to the alternator output and ran that wire on the ground up to the cab. There, I electrical-taped the bare wire to the positive probe of my multi-meter to free a hand. I set the negative probe into a small bolt-hole in the driver door frame for a good ground. First, a good base reading: 13.5V. Cool. I started the engine and it dropped down to 12.4V. Solid. With my hand on the go pedal, I revved the engine and watched the voltage climb up and down peaking above 14V. So, the alternator is fine. Since I have been running without an ALT/GEN light for 10 years, I could just ignore that light... Nah, I just can't do that. I figured that the bulb must simply be connected to the wrong wire of the 2 in the ALT plug.

I had spliced into the wire heading to the computer (DFM - or Digital Field Monitoring), and it needs to hit the one that routes to the cluster (L - Lamp). Simple fix: I cut the splice from the donor main harness to the 6-wire cable, and tied it into the other wire from the plug just upstream from the 4-pin plug. While I was back there, I added ring terminals to the sensor wires for the oil pressure and oil idiot light. There remains some wiring tidying I need to do on the driver's side, so I'll cut out the rest of the DFM-sourcing wire when I'm in there. 

As much as I'd like to say that once I completed, I took another test drive... I can't. I did test start and engine-rev in-place, however, just to see that ALT light wink out (which it did). Why did I not drive him? Well, remember Gramps (1996 VW Jetta 2-dot-slow from my folks that we gave to K2)? He re-appeared with a failed throw-out bearing after the first test drive, but before I'd solved the ALT light. So, I will have to juggle the herd to get Hapy free for a drive. And, you can probably guess what I'll be working on next.

That's it for today. While I may not need to go out much due to CoViD restrictions, I now have my beloved turbo-diesel powered microbus available-ish for whenever the need arises. While there are lots of little things I could tweak on Hapy, none of those things would prevent me from taking a drive. Sweet, sweet success. Thanks, as always, for following along.