Showing posts with label bus. Show all posts

Thursday, May 14, 2026

Building a Shop - Construction Permit Complete

For a project that started in December of 2024, I am surprised it took so long for the shop to reach "complete" for it's initial build permit. Today, I'll review some highlights and touch on a Hapy adventure.
 
The Doors
shop permitted
I had an entire post about the doors (See Building a Shop - Doors) where I detailed almost buying the wrong size big door. Then, we got things right. That big door faces north. Next to it, our contractor guy Ray installed a basic HomeDepot-special 36" (1 meter) wide person door. That door is the only door with an external-facing lock. Moving around to the west side, we have a 10-foot (3.3m) wide opening. In the Ghost of GoRo post, I mentioned the west-facing barn doors that Ray built. I will give them more detail below. The southern opening also got a barn-door style install, though the actual doors are a little different.
 
Ray's Custom Doors
barn doors by seating area
I'll start with the west-facing big barn doors. First, we sourced an external barn door rail system (~$300US) capable of supporting a few hundred pounds. The opening had a double header, so most of the rail was mounted to that, through the exterior skin. In order to create sufficient space for a door to hang, the rail install includes a small block of 2x4 between the rail and the outer skin at each bolt-point. The header only spanned the opening, so on either side, from the inside, Ray added a 2x4 on the inside for the mounting to attach to. The south-facing smaller doors had a similar barn rail system installed. We followed the pattern of using 2x4 blocks to create the offset, and using 2x4 planks inside for the mount to attach to. Unlike the west-facing door, the south-facing did not have a double header, so the entire rail needed the 2x4's installed.

southern doors
With the rails in, Ray shifted to construction of the doors. All 4 doors were framed with Sun-wood. This is exterior-qualified wood, but lighter than cedar and not chem-y like pressure treated. Because the west-facing doors are bigger, they were assembled with brackets to hold them square. And, they had angled planks added for strength against twisting or flexing. The south-facing doors were joined with biscuits, and did not have the angled planks added. Once the frames were ready and test fit, the west-side doors had siding attached so they match the building. The southern doors were skinned with clear plexiglass. This will allow the little bit of winter light we get from the southern sky to leak into the shop.

Once the doors were assembled, Ray re-hung them, and installed interior grab handles to operate them. On both sets of doors, we added guides into the concrete so the doors would not move away from the building while in place or traveling. Last, I added a lock to each door so they could not be opened from the outside. I need to prime and paint the south-facing doors, but they are operational as-is.
 
Inspected
southern doors
When I had the building inspected in August of 2025, the inspector asked for 2 things: install the doors and add a landing for the person-door. With the doors now complete, and the landing added in September (See Building a Shop - Steel Building Erected), I was ready for an inspection. So, on Monday I ordered the inspection. The inspector checked the boxes on Tuesday and now I have an officially completed building (per drawings, spec's and inspections). What does this really mean? Well, in terms of the permit and inspections, it means I get to pay taxes on the land improvement, and my home owner's insurance just went up. It also means that anything contained within that shop is now covered under my home-owner's insurance and if something catastrophic happens to the building, I'm covered insurance-wise.
 
What does this mean in terms of my personal use of it? Very little, frankly. I needed the doors so I could lock it. Once lockable, I can start storing tools out there, so I can work on a car in the shop and not walk the 40 meters from the shop to my tools in the garage and then the 40 meters back again. I have already repaired 3 cars in that shop with a 4th (Astra needs her alternator replaced) heading in on Friday. having a lockable shop means I can do that work that much faster because my tools will be right there.
 
Retrospective
where we began
Being an advocate of both Agile and Continuous Process Improvement (CPI), I believe that some kind of look-back when a project reaches its end is healthy and helps you and others make better decisions in the future. So, with that in mind, what did I learn that I haven't already mentioned?
 
     Permits: I covered most of the discoveries along the way in the linked permits post. Get Clean Water Services involved early and make sure you manage both erosion during the construction as well as any mud getting tracked into the street. Either can got your job flagged and then things get much harder.
 
    Survey: The "106" inspection is all about proper placement of the building relative to your plan and the property lines. If you don't know where your lines are and can't figure it out, you will need a survey, or you may not pass the first inspection. I split this inspection into 2 visits, with the first being informal wholly focused on the site location. This was Vai-the-concrete-guy's idea and he was 100% right.
 
excavated
    
Bidding: get lots of bids. I had 3 and had I gone with one of them, it would have cost me ~$5k more for the flatwork. Part of every conversation about the flatwork included a conversation about the excavation. For every bid, the excavation was a meaningful amount, even though it's not terribly time consuming, especially for out project. This might be something we could have done ourselves, but the schedule worked out better having Vai do it all. Last, make sure every bidder fully understands all of the parts of the plan. Vai had a brain-fade about the carve-outs for the lift and had I not asked about it after they ran the compactor, there could have been an issue. This served as a reminder that without a designated general contractor, YOU are the GC.
 
    Inspections: While Clean Water Services did verify that the erosion control measures were in place, and made sure that the storm outflow was planned for, the adherence to that plan was not in any inspection.Does this mean it isn't needed? No, nor does it mean that it won't be part of your project, it just wasn't part of mine and I managed the storm water with french drains once I was unable to attach gutters. So, I have a rock pit in my yard without purpose. The inspector can be your friend. Case-in-point, I would not have even known about an "Ufer" if the inspector had not mentioned it and then approved it. I now have a passing-electrical ground because of the inspector.
 
cleared and framed for concrete
    Concrete: I asked the concrete contractor specifically what, if anything, I needed to do once the concrete was poured. He said "nothing", and I got surface cracks because it did not cure uniformly. The correct answer is "try to keep the surface wet with a garden hose for a couple of days". Then, the top does not dry too fast relative to the concrete beneath. 
 
    Oregon Carports: these folks were great from start to finish. They were easy to work with, the plans were spot-on for the permits and inspections and the installers were fast and nice guys. It would have been nice to know that a gutter could not be installed without retro-fitting, but at this point we have weathered a full wet season easily.
 
    Driveway: When I planned the shop, I knew that the ground sloped downhill south to north but I did not account for the west-to-east down slope. Topology matters. After the steel building was up, I had over 1/3m (an American foot) drop off at the southeast corner. This led to many hours of hauling and spreading rock. Since my labor is free, this did not factor into final costs, but it may factor into your plans.
 
    Overhead Doors of Portland: Similar to Oregon Carports, the overhead guys were great to work with. They found us a door that just smashes for less than half of what I would have paid for new. They stopped by late last week to install a header board over the door and install the weather seals. Both after my check had long cleared. We will be using these guys again.
steel skeleton
 
    Ray: Ray is a star. He has been a contractor building things since he was a teenager. Now, he's getting near retirement and is not taking on any new customers. So, those of us lucky to have worked with him in the past are blessed to still have him, at least for a little while. One of Ray's greatest strengths is looking at a project without filters. He can imagine what you are looking to do and make it happen. He built the barn doors, yes, but he also built our kitchen with salvaged cabinets. 
 
Timeline
For history's sake, and in response to my "how did this take so long?" question above, here's the time line for the build, start to end. There was a break in the action over the winter Oct2025-Mar2026 while we financially recovered a little bit from the costs incurred so far. We needed to get onto Ray's calendar and figure out the doors a bit too.
 
2024-August: Boo and I decide to build a shop and figure out about where we want it
2024-December: steel building ordered from Oregon Carports
2025-January: permit started with Washington County (WC) ($700)
2025-March: Clean Water Services (CWS) involvement in plan
2025-April: permit accepted, initial payment of ~$1k
2025-May: self-performed survey, soliciting concrete bids; locating and placing "straw wattle"
2025-June: CWS inspection, excavation, WC site inspection, concrete poured, WC "106" inspection 
2025-July: steel building installed on foundation
2025-August: french drain install around foundation, WC "199" inspection fail
2025-September: rock and gravel of drain, north-side access
2025-October: move 4 cars before rains hit
-- work suspended to save some money -- 
2026-March: west-side barn doors, north-side person door installed
2026-April: north-side overhead door installed
2026-May: south-side barn doors installed, WC "199" inspection pass
 
Costs
Similar to the timeline, I'll detail the costs as I can find them. Of course these were all in as-of-that-day US$. With TrumpTarrifs and trumpflation, your numbers may vary widely from these.
        0: Advise from WashCo, inspectors and Clean Water Services
  1800: Permits with Washington County
23000: steel building from Oregon Carports
15500: excavation, framing, concrete pouring, incl $500 for the concrete pump rental
  7500: north-facing big door from Overhead Door of Portland, incl install and opener
  4800: all other doors, incl hardware, custom build, installs
    800: french drain materials, gravel
    500: large rocks for storm outflow
53900: TOTAL
 
From these numbers, I conclude that when you think about building a shop, the cost of the building itself could be less than half the overall costs. I paid more for permits than I did for rock and gravel, which is also interesting. The 4 doors cost almost half of what the overall building cost too. I could have had fewer openings, or installed a solid overhead door to lower costs, but I'm glad I didn't. Also it is worth noting that this shop has no electrical yet. I expect that will be a 5-figure as well since I will need a trench to run power, a panel, and then lots of cabling contained in conduit. Eek. I do not expect that work to take place any time soon. Instead, I will operate with a long extension cord from the house for as long as I can manage.
 
Hapy Shifting
In my last post, I celebrated Hapy shifting so well. That turned out to be premature. The next day, I lost the ability to put Hapy into gear and had to limp home in rush hour from around the corner.. in 3rd gear. One hot clutch later I was back in front of the garage and there he sat for a few days until I could get a look at him. Of all the things that could come apart, I did not expect the bolt going through the pin in the shift linkage at the front of the transaxle. In the image on the right, it's the screw in sub-component "P". I expected the grub-screw ("R" in the image) to have fallen out because I could not remember if I had run the bailing wire through or not. Turned out I did, and the grub screw was doing fine.
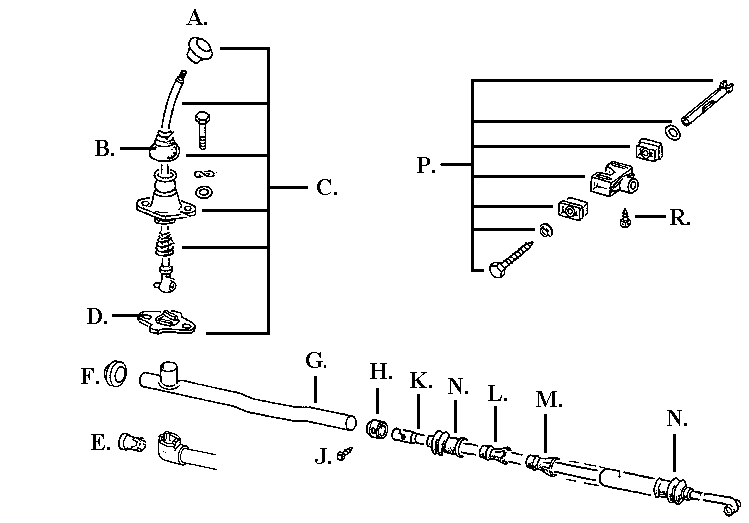
 
shifter diagram
I pulled the pin out and rummaged through my drawers of fasteners and found a 11mm bolt that fit. After around 20 minutes of wrestling, which consists of slightly moving the shifter in the cab, getting back under the bus, test fitting and repeating until you can muscle the pin through the hard plastic bits in the cage AND through the end of the linkage running from the front. This time, I put blue thread-lock on the bolt added a washer and sent it into the pin. I torqued it down as best I could considering my body position and the lack of something firm to grab on the opposite end. I used a pair of pliers to hold it.
 
Hapy is back to shifting normally again.
 
Wrap Up
After Ray finished the doors and I had locks on them all, I sat in one of the rear seats from C's new mini-van / stealth-camper we set in the shop as a seating area. I took a moment to just absorb. We so often will not take those minutes, choosing instead to rush off to the next thing. I sat for a few minutes, radio playing softly in the background and simply looked around at my shop. I really can't believe it. After so many years of lying in puddles, sliding on my back on wood chips or just outside in the rain, I cannot imagine what it will be like to work inside, on a hard dry surface come winter. Even now, as we head into summer, I will be working in the shade, on cool concrete, not hot tarmac. Of course, between then and now, I have a great deal of stuff to move and organize, but as of today, the shop is open and I can't wait to get out there.
Thanks, as always, for following along- 

Tuesday, May 5, 2026

Hapy Test Drives

Quick post today.
Before I start, Happy Cinco-de-Mayo. Our US-resident Latino friends and neighbors have had a brutal 18 months since the regime started incarcerating people in concentration camps around the country. This year, I hope there is more focus on the positive impacts of the Mexican culture and the negative impacts the ICE sweeps have had than on beer sales. While I'll probably be tipping a tequila this evening, I am not turning a blind eye to the perils our Latino friends are experiencing.
 
Hapy Drives
spring flowers
This past weekend, I had multiple shows I was asked to play, so I did not get into the vehicles much at all. Since I swapped things around, I did drive Hapy to both performances, though, so I got some quality test drives in. First, I sat in with a bluegrass outfit at a outdoor new food cart venue near Tannesborne. This was mostly surface streets, so I never got out of 3rd gears, but it was over 20 minutes each way. So, I was able to see how well he performed. As expected, he ran well. On the way home, dark had fallen, so I was able to prove that his lights were all working well too.
 
My other show was at a different food cart venue, supporting Brenda (find her here). She plays guitar and has an incredibly clean, clear voice. Anyway, that venue is in Hillsboro and rather than take the long slow slog out Tualatin Valley Highway (lots of traffic and traffic lights), I took the back country roads. This allowed Hapy to get up into highway speeds. Again, he drove great, had plenty of pep in 3rd and 4th gear. Even with the bigger nozzles and the CPU-tune, he is slow off the line from dead stop and doesn't really get his wheels going until we're over 2k RPM in 2nd. I recognize he's a loaf of bread getting pushed by around 120hp but I expected more, I think. I recall the test drive after the Malone tune, but as I re-read that (See Malone Tuning, Stage 2) post, again, Hapy really looked alive above 25mph moving into 3rd. 
 
MAF check-engine code
One thing worth noting, though, is all of the small improvements to his handling are really making a difference. Recall, the rear sway bar, but tightening the rebound on the shocks, replacing the tie-rods, the steering dampener, adjusting the steering box... for that matter we could go all the way back to my first few posts 20 years ago, like this one. Now, as I drove on country roads like a local (read: fast), Hapy holds the road, a cross wind doesn't impact as much and I don't arrive completely wrung out from stress. Again, he's still al oaf of bread so a cross-wind will move him more than a normal car, but its not nearly as bad as it was.
 
By the time I was starting Hapy for the drive home from the 2nd show, the starter noise when engaging that we heard over at Justin's place had disappeared. Perhaps the starter needed to wiggle itself into position a little bit. I don't know, but I will be sliding underneath to make sure the nuts and bolts are fully torqued down. 
 
Shop Locks
boost check-engine code
Other than than 2 shows, Boo and I mostly took the weekend off from projects. I did carve out a couple of hours to put some barn-door locks on the west-side barn-doors so they can lock from the inside. This will keep casual thieves out. I say "casual" because if someone wanted to smash-and-grab, there's plenty of smash-able glass. As I mentioned last post, Ray our contractor, is building some mostly clear barn-style doors for the southern doorway. These will move all the way outside of the door frames, leaving enough room to drive a car through, allowing us to move cars all the way through and into the "back 40" where I may need to store a car or 2 while working on others.
 
Wrap
I know there's not much in today's post. The big take-away is Hapy is absolutely operational now. He is driving great, starting immediately, etc. Of course, no adventure with Hapy is complete without something happening. As I was leaving the 1st show, Hapy threw one code (P0101: Mass Air Flow sensor) and has another pending (P1550:Solenoid Valve for Boost Pressure Control (N75) - Control Deviation). We have seen the P1550 before (See: Resolving the Stammer) and know how to resolve it, if it appears again and throws a legit code. For the MAF, I'll probably try to clean it first. Worst case, I need to replace it.
 
That's it for today. Thanks, as always for following along- 

Friday, May 1, 2026

Hapy Shifting

In my last post (Hapy not Spittin Fuel), I described a stressful drive home without turbo and then losing access to my 2 lower gears. Today's post covers the install of the Gene Berg shifter, and some other little bits on the bus as well as the replacement of the throttle cable on Oliver the 1978 MGB.
 
Before I begin, especially to my union brothers and sisters, Happy International Labor Day. Employee protections were and remain hard-fought; from a legally defined "work week" to overtime pay and safer working conditions, we have our unions to thank.
 
Throttling Oliver
Gene Berg shifter
I'll start with Oliver, even though I did this cable replacement in the middle of the Hapy stuff. Recall, I moved Oliver out of the shop so the overhead door crew could install the door. At that time, I got Oliver to start, mostly by cleaning and re-gapping his spark plugs and otherwise being patient. Since Oliver does not have a stock carb set up (side draft SK Racing carb), the stock throttle cable is not an exact fit. The old cable had a much longer hard "pipe" to fit the cable through near the carb than the stock one I had ordered. I thought about simply removing the braided cable and sending it through the old sheath, but the points where the plastic sheath met the hard pipe was failing. I think the way the hard pipe was attached to the carb was a little hinky too, so the whole cable, hard pipe combination went in the bin.
 
Both the new and old cables attached to the pedal the same way: round ball on the end of the cable fits into a nook on the underside of the pedal. So, once you pass the cable through the slot, the springs on the carb effectively hold the pedal up through steady tension through the cable. The other end of the stock cable has a fitting on it which presumably fits onto the old carb with a c-clip or similar. I had to cut that off so I could thread the raw cable through the more common hole with a bolt model. Cutting the cable left wire shrapnel at the end, so it would not easily fit through the hole. Ultimately, I had to remove the actuator arm and the spring arm from the side of the carb so I could more directly feed the wire into the hole. While this was more destructive initially, I was getting nowhere trying to send a cable through a hole I could barely see.
 
One the cable was through the hole and bolted down tight enough so it would not fall off, I put the arms back, and re-added the spring. I got Boo to sit in the driver seat and move the pedal through it's full motion so I could set the depth of the hard tube and the cable length. I had other things to get after, so I did not test fire and drive Oliver. In retrospect, that may have been a missed opportunity.
 
Gene Berg Shifter
shifter diagram
I don't know when I first installed the Scat chrome shifter into Hapy. It seems like it was always there, so it may have been one of the first things I did. Back when I first bought Hapy, he did not want to go into gear at all because the shift coupling at the front of the transaxle had lost the little plastic bits. Note the picture on the right, here. In sub-component "P", there are 2 rectangular things. Those are the plastic bits which were gone when I bought the bus. If you threw the shifter in the direction of the gear you were seeking often and hard enough, the long-ish bar thing (top of sub-component "P") would move the cage (center of sub-component "P") and eventually you might find a gear. The prior owner had beaten on the original shifter so much, it wasn't straight anymore. It was literally bent. Once I got the cage resolved, the bent shifter was just too strange to use, so I bought the upgraded shifter. Or at least it was. Over 15-20 years of use, I think it slowly may have moved, though there is no facility to adjust it -or- the limited-throw bits wore down over time. Since most folks think somewhat highly of Scat products, I'll assume it wore down or moved over the years. I will say that in recent years, Hapy has predictably popped out of 2nd gear every time, and I don't remember when that started.
 
greased up
The loss of both 1st and 2nd gear on the drive home was enough for me to do something drastic. After removing the Scat shifter and discovering the rust and what looked like some wear on the plastic bits, I decided to find the Gene Berg shifter I bought a few years ago. The Gene Berg shifter is simply bad ass. It is 3 or so inches longer (Scat is 21 inches, Gene Berg is almost 25) which puts the shifter in my hand without having to bend over like I did with the Scat after adding the Sprinter seats. The picture at the top shows how high it is. One drawback: when I put it in first, I hit the rear of the cup holder. The reverse lockout is a button on the side rather than a "T handle to pull up on. I like that better too, since there is less to think about and backing up a bus requests all of the focus you can. It uses a shift plate like item "D" in the diagram above so for the more stock-familiar, this vibes well. Perhaps the most important, the attachment of the pieces has adjustment capability engineered into it.
 
I test fit everything first, and finger-threaded the supplied bolts into the respective holes, just to be sure everything would fit. Then, I took it apart and greased everything: the ball, the slides, the shift plate, and the cup the shifter tip sets into. Then, I installed it again. One thing about a test fitting is the second time around, you know how it all goes together, making the final fitting much faster. Because of the adjust-ability factored into the shifter, it was easy to wiggle the shifter and the mounting footing to get it seated squarely and threaded snug. I tested the movement of the stick and did not feel a need to adjust it. I figure after some longer test drives, I will know for sure and then execute the minor adjustments. For now, though, I fired up the engine and backed Hapy out of the shop and drove him up and back on the laneway. At this point, I have all my gears.
 
Seasonal Scrubbing
I ended my weekend of yardwork and playing on cars by giving Hapy his spring cleaning. I have documented this in the past, but in brief: I use SoftScrub bathroom cleaner and a soft brush to clean the fiberglass top. This gets all the black ick from organic material removed. Prior to this step, I will clear out the luggage rack of leaves and such. It was especially bad this year so I need to circle-back, remove the rack and clean the metal top. Once the top is SoftScrub'd, I wash the entire bus (top again) with car wash like any other car. The end-to-end process takes 2 or 3 hours, but if the sun is out and it's not too hot or cold, it is a great way to spend a Sunday afternoon. I hope to get the luggage rack removed and the tin-top cleaned next weekend. That will also give me the opportunity to repair any part of the luggage rack which needs attention. In the meantime, I swapped the vehicles around, setting Hapy up as my daily driver and the lower mpg truck for specific-use-only. As of May 1st, regular 87 octane gas is $5.70/gallon here, and diesel is $6.20 but with the mpg difference, Hapy is less expensive per-mile.
 
Wrap
Around that work, there's the usual clearing brush, mowing lawn, etc that comes from living in a house, and spring growth. Our favorite construction contractor was over on Saturday to experiment with the south-facing doorway in the shop. After some large thinking, we are going to put in barn-door style doors, but with fiberglass so the little bit of winter light we get will make it into the building. That's it for this week. Thanks, as always, for following along-

Tuesday, March 10, 2026

Hapy Drives Again

It has been a long 18+ months without having a member of our family kicking around with us. But, Hapy is one injection-pump re-seal away from daily-driver status. Today, I'll go through the last little things. Again, my regrets for not taking many pictures. I have been away from fixing and blogging so I have fallen out of the habit of snapping a picture while I'm doing the doing. Also, I got hit by whatever flu thing that's been going around and was flat-backin bed-ridden for the last 3 weeks.

Clutch Adjustment
post-test drive
I touched on this at the end of my last post. I had to add an extra small spacer at the end of the Bowden tube as well as on the very end adjuster. To be fair, I really didn't need the one on the adjuster, but I would would not have much adjustment thread left if I hadn't. I ordered a replacement clutch cable and when it arrives, I will keep it under the rock-n-roll bed until I get to replacing it. I expect I will replace that cable relatively soon, but I want some fun drives before I take him off the road again, even to do something that I could do (and have done) on the roadside.
 
The standard adjustment advice is to shift the tension on the cable as felt by your foot on the pedal such that there is no engagement until the pedal has moved a good inch down towards the floor. This prevents premature wear on the clutch and/or throwout bearing. You don't want the throwout bearing riding on the clutch spindles all the time. That's noisy and introduces premature wear. What I did not recall from prior clownings on the cable was that the arm protruding from the transaxle would have so much play in it before the throw-out bearing touched the pressure plate at all. I recall it practically resting on the pressure plate, but my memory is not reliable. Anyway, I felt that the arm needed to press against the spring a little bit to get the adjustment correct. As I think on it now, that spring being engaged is what holds the clutch pedal all the way up so it's right. It just felt foreign. Honestly, it has been so long since I worked on Hapy, lots of this work has felt unusual.
 
Tail Light Show
Bowden Tube pic from theSamba
The tail lights were acting really strange prior to my first intended test drive after getting the clutch sorted. I start assessing the lights rather simply: run the hazards first. Since no other systems are involved, the blinkers ought to all light up together and turn off together. The left (driver) side was lighting up opposite from the others. When I added in simple running lights (still no key in ignition), the tail lights were a light show of blinking. I had initially thought that I did something funny with the reverse switch, but that is a simple dumb switch that allows 12V through when the transaxle is in reverse. So, I ruled that out. I concluded that the ground for the light fixture was poor, weak or virtually non-existent, causing the 12V to seek a ground though alternative paths of other not-illuminated lights, causing them to light up.
 
Getting into the Cavity 
The left (driver) side tail light is hidden behind a panel I added to offer colder air to the engine (See VW Bus Cold Air Intake). I had forgotten how much of the ugly TDI wiring was also hidden back there when I removed the panel. Anyway, first, I disconnected the cold air pipe at the last rubber coupling before the turn into the hidden cavity under the spare tire well. Then, I removed the 4 nuts holding the pipe flashing, and removed the air filter "assembly". While this was out of the bus, I thoroughly cleaned the air filter and shop-vac'd the cavity. With the air filter out of the way, I removed most of the screws holding the panel in place with a slotted screwdriver and bent the panel out of the way to access the tail light assembly.
 
Grounding
left side panel under spare
Immediately after sticking my head and a small flashlight into the space, I spotted a ground that had fallen off the grounding tab on the rear next to the light assembly. I popped that back onto the ground tab and tested the lights. There was no noticeable impact, but those grounds were probably used by something, so some other issue just got resolved.

I decided to add a ground directly from the metal back-plate of the tail light assembly to the unused grounding tab next to the one I had just resolved. I added what I call a "chair" tab splitter (because it looks kinda like a chair), that turns one tab into 2, to the grounding tab on the rear of the tail light. I re-attached the existing ground to one side of the "chair" and added a short brown wire to the other side, connecting it to the unused tab on the rear body. I then retested, and the crazy light show was over, and the left tail lights were much brighter. So much so, that I decided to add a ground the right side tail light, in hopes of balancing the lights.
 
The right (passenger) side is much easier to access on Hapy, but probably harder for anyone without a cold air intake cavity thing because the battery makes things tight. Unlike the left side, I disconnected the light fixture from the bus and hung it out the rear while I worked. I basically did the same thing as I did on the left/driver side: chair splitter, used an unused nearby grounding tab. Once reassembled, the left side did not see as significant an improvement, but I think the original grounding wire is shared between the lights so the right side was already getting benefit from what I did on the left side before I started messing with it, I just hadn't noticed during the left-side test.
 
Test Drive
At this point, I felt that I was safe enough to travel on a shared street. So, I backed out of the shop, down the lane-way and out to the street. He easily went into 1st gear and away we went. I did not have the little UltraGauge plugged in, choosing instead to use my senses to vibe the test loop. Hapy ran great. Power on demand at my foot, easily shifting from gear to gear, and getting into 4th but only barely before dropping back down. He still popped out of second when I quick-decelerated, but it was not as immediate and on a light decelerate he stayed in gear. So, there's some improvement there; I did not expect any. The exhaust was much quieter; I think some of my "wow this bus is loud" that drove to all the sound containment may have been at least in part from the broken exhaust-to-muffler joint. Facepalm.
 
The drive was not without its issues, tho. While the cooling fan and intercooler fans both came on by the manual switch, the intercooler fan was louder than I remembered. This could in part be because I couldn't hear it over the exhaust. Also, the noise of the turbo through the right cooling "ear" (behind the rear-most right side window) was unexpectedly loud. Again, this could have been masked by the louder exhaust and isn't really a bad thing. In a way, it's kinda cool and I can't hear it from inside the bus. Its only when walking around it did I hear any of these things and none of these are deal-breakers or send-him-to-the-shop things. I did notice that the dual-gauge I installed during the CoViD lockdown was acting funny (See Oil Temperature and Pressure). The pressure rose to the top and never came down and the temperature basically sat just off the bottom. I figured either the wires fell off on one end or the sender went bad.
 
Fixing Oil Gauge
left nut missing
Having the UltraGauge is great, but I really prefer just using the simple dual oil gauge. I can see if the temp is getting too high without a digital readout changing every few seconds. In fact, I have a VDO coolant temp gauge in my stuff somewhere that I have thought about adding into the dashpod and then I really wouldn't need the UltraGauge anymore. Anyway, solving the dual-gauge was fairly straightforward, starting with the engine-end. I figured that I did lots of moving things around, so simply disconnecting and re-connecting those wires to the sender would remove that variable. One quick peek, and clearly that was the problem: one of the M4 knurled nuts had shaken it's way loose and completely fell off. I ordered a set of 5 (the smallest set I could find not on amazon, and it still cost, like $15US). When I installed, I put some blue locktite on there so these don't shake off either. I was very grateful to not have to open the dash.
 
Diesel Leak Persists
catching the leak
Two years ago, when Hapy first started having hard-start issues, it was a fuel leak coming from his injection pump. Back then, there was literally fuel flying all over the engine bay. I spent time getting the top-end of the pump sealed, and that resolved the flying fuel and most of the hard-to-start issues, but it was during those months that I ground down the ring gear, putting us on the last 18 month trajectory. Also, I continued to lose prime in the pump, but without visible leaks. Now, I can see the pump dripping on the ground. So, the seal between the body and the head appears to be the problem, and its getting worse. I ordered a replacement deluxe kit from DieselGeek. Rather than do that seal myself, I have asked our old friend Justin (OldPoopie) to do it for a couple of reasons. First, he does these all the time, but more importantly, he has the computer bits to really get the timing spot-on. I expect that once the pump has been re-sealed and the timing set, Hapy will be a monster.
 
Well, that's it for today. Justin is super busy, so it will be a month or so before he can get hands on Hapy. In the meantime, I will be shifting focus onto doors for the shop, we have some house projects to chase and maybe I will be getting my hands on Oliver, the 1978 MGB. It feels like nice weather is not too far away, and taking the MG on a picnic run with Boo would be awfully sweet. Thanks, as always, for following along- 

Tuesday, February 17, 2026

Hapy Runs Again

Picking up where I left off last time, we had Hapy mostly in one piece, needing coolant. His exhaust was still in pieces, rear bumper on the ground and he had not started since June of 2024.
 
Coolant
full moon down the street
There is really no adventure here, but in the interest of being thorough, I topped off Hapy's coolant with some G40. I worked air bubbles out of his system by squeezing hoses, but they won't really fully work themselves free until the engine is running. So, after a couple more top-offs, I called it good and capped the overflow and coolant bottles.
 
Exhaust
The not-my-favorite, too-small-diameter, cheap exhaust installed on this engine all those years ago went back on. This was not my first choice, but I want Hapy running, so I'll circle-back on a new exhaust later. The old one came apart where the piping enters the muffler. I think the cheap muffler failed allowing the section of pipe to which the exhaust "downpipe" (we'll call it that: it's the pipe that leads from the turbo, but it does make it sound awfully grand) was welded to fall out of the muffler body. The weld is a good 4 inches from the end of the pipe which clearly fits inside the muffler body and sets inside an inner pipe within. I regret not taking a picture here; apologies.
 
ShadeTree mechanic'ing
So, I hung the muffler body by the support hook and then set to attaching the downpipe. There is one stud attached to the turbo that the 3-holed flange hangs on. Then, you swing the rest of it into place, square the gasket and send the other bolts (with washers) through. A 13mm spanner is needed for the lower bolt, but the other 2 can be approached with a socket. With the muffler swinging on its mount and the downpipe firmly a-fixed, I set the pipe into the muffler and literally hammered the muffler into the pipe with a rubber mallet. These parts will easily work themselves apart again, if I didn't do something. So, I went full shade-tree, and added a 1" angle bracket, screwed into the muffler and the pipe to hold it together. The picture on the right, here, tells the tale. Not a proud moment but that will all go to the landfill / recycler eventually.
 
Bumper
Feeling confident that Hapy would be a runner again very soon, I installed the rear bumper / tow hitch component. I detailed the original install of the tow hitch in Bus Tow Hitch. Re-install is not nearly as involved. 15mm socket needed. I set the hitch onto the TravisJack and lifted it close to where it would eventually sit and then balanced on the TravisJack while I set bolts. I fingered-on the left (driver) side and then the right (passenger) side, taking care not to drop the unit off the jack and onto me. I discovered that the exhaust pipe leaving the muffler hung in the way, but a solid kick with my boot resolved it without causing any damage to anything. Just needed some sudden blunt force. Once all 6 bolts were finger tight, I set the bumper where I wanted it depth and parallel-to-the rear-wise and torqued them down.
 
Injection Pump Prime
electrical connection cleaner
Any time I let Hapy sit undriven for a while, the injection pump loses prime. I believe this is because of a failing seal, but it's the one that's much harder to get to (and I don't have on-hand). So, I have let that sit to be solved another day. Enter the mighty MityVac. Since I disconnected the large fuel filter for the flywheel replacement, I was unsure if that filter was completely full, so I started with the line which enters the injection pump, moving to the return side of the pump next. This is relatively straightforward: disconnect the fuel line, apply vacuum with the MityVac (using the collection bottle between the pump and the fuel line, of course) until the collection bottle consistently gets fuel. Then, remove the vacuum contraption and reconnect the line. For the return line, I also clamped the return line from the injectors to the pump so I did not lose vacuum through them. Once the pump was full, I cracked the hard lines at the injectors with a 17mm spanner. This last bit of priming needs to be done by turning the ignition and counting to 5. Well, that's how I did it. When I returned to the engine compartment, each of the 4 injectors had some fuel sitting on top where the hard line connected. I snugged them back tight.
 
DeOx-it D5
Before I ran to the cab to give the engine a try, I wanted to make sure all of the plug-in bits were set. So, I went around the top of the engine, disconnecting, shooting-DeOxit D5 into the connectors and clicking them back together. This served 2 functions. First, a simple survey of the top of the engine allowed me to see if I had missed anything. Second, every electrical connection was confirmed a good-click connection and it was cleaned/deoxidized for a better connection. Having done this, and it only taking literally a minute, I intend to include a similar final survey when doing top-side maintenance going forward. Its so easy, and removes many possible variables to failures.
 
And Then It Happened
At this point, I felt that I had done everything I could to set up for a successful first start since June of 2024. I put the trans-axle into neutral turned the key to run and saw the familiar lights. With an inhale, I turned the key to start and after about 3 seconds he fired up. I didn't expect immediate, since fuel still needed to get pushed down into the injectors, but he started well and ran strong, arriving at a comfortable idle almost immediately. I left him run for a while, sitting in my shop in neutral while I checked for leaks and drips. There were none, which was little short of a miracle.
 
I thought about giving him a little test drive, but I have not solved for the electrical cord for the FrostHeater yet. Curious, though, I tried to ease him into gear, but he wouldn't. Knowing that he easily moved in and out of gear when the engine was not running, I concluded that the clutch cable needs adjusting.

Clutch Adjustment
This adjustment took a little bit of effort, but with a thicker spacer where the Bowden tube meets the mount on the transaxle, and another spacer on the adjuster, I was able to get the clutch to engage and disengage properly. The Bowden tube needs a curve in it to reduce clutch chatter, so this was needed regardless. The fact that I needed a spacer on the adjuster tells me that the cable that I replaced.. jeez.. almost 20 years ago... may be stretching. This is often a warning that the cable will fail soon. So, time to order a replacement.

I used a Velcro ties to hold the FrostHeater cable up and out of the way. But, before I wrapped it up, I tried the FrostHeater, and I think it might be broken. I'll have to do some research, but I expected the unit or at least the top hose to warm up to the touch a little bit. I did not notice any warming, so that effort may have been for nothing after all. Again, I will look into it and I may get a replacement unit, but I'll be pretty bummed if it was really only used a couple of times before it got damaged.

Here's a video of him running, probably 3 minutes after his first start in like 18 months.


I noticed that the rear lights were acting all weird, but a different kind of weird than usual after messing with the battery. So, I did not want to risk a drive-about. It seems like every time I touch the battery, the tail lights short-out such that stepping on the brakes completes an unexpected circuit. That's the usual. This time, the reverse lights were lit up and the blinkers were acting all strange, but only the rear. I think I may have done something with the reverse lights, like reversing the plugs when I wired up the switch, but I ran out of daylight before I could get after it. I'll diagnose and attempt to fix it next time. 

Thanks, as always for following along, and I'll post with any test-drive observations, and other improvements as they happen. At this point, I am thrilled that Hapy self-starts and can move around again--

Tuesday, February 3, 2026

Hapy Gets a FrostHeater

Today, I nearly complete the re-assembly from the flywheel (well, ring gear, really) replacement that has been an open effort since US Independence Day. I had to order a clip to hold the coolant temperature sensor in the coolant outlet flange, so this post picks up where I left off after placing that order. Before I begin, hapy belated GroundHogs Day or Imbolc, if you're a little less western in your seasonal outlook. Either way, there's 6 more weeks of winter because Spring Equinox is still 6 weeks away no matter what a Pennsylvania rodent sees. Anyway...
 
Some History 
installed
For background, Hapy was having increasing trouble starting over the past 2 years. I thought I was getting poorly manufactured starters because every time I replaced one, he would be okay to start for a few times. That was until the last couple, including a new highly-recommended starter from IDParts and a fresh local rebuild of the original TDI starter by a very reputable rebuilder. I concluded the teeth on the "ring gear" or in my case the teeth on the flywheel since this flywheel was one formed unit, had broken off enough that the starter teeth could not engage. This started a path that started with removing the engine-transaxle on my falling-into-pieces driveway, having the transaxle fall off a jack and popping off a flange, hauling Hapy in a sketchy way back to the shop, and finally, now, almost completely reassembled. When this saga completes, he would have been not running since July of 2024 (when we drove home from the final 4Peaks Music Festival).
 
FrostHeater
Frostheater is a vendor who uses a widely available Zerostart 3309040 coolant heater with hoses and brackets for a custom fit for various makes and models. If you have not tried one and are tired of cycling your glow-plugs multiple times before you can start your diesel in the winter, I suggest giving them a look. The unit Frostheater uses looks to be the top of the line from Zerostart in terms of build, capacity and cost. There are plastic other brands, and block heaters that are effectively a glue-on heating pad, but I have found these FrostHeaters to be really effective. From what I can tell, there are no moving parts. By placing the unit near the lowest point of the oil cooler loop the unit draws colder coolant from the oil cooler and the warmed coolant flows up through the upper bib into the head. That rising heated coolant then puts pressure on the coolant in the block to move into that vacuum, through the oil cooler and the loop completes. A few years ago, I installed a Frostheater into a 2004 VW Jetta Wagon (K'Lack). It worked great. We sold K'Lack to our niece a few months later, and she never used the heater. So, when we had to do a major timing belt and cam shaft maintenance, OldPoopie removed the FrostHeater, and restored the original coolant line which I left in place when I installed the Frostheater. The Frostheater and related hoses went into a box for future Hapy consideration.
 
Coolant Temperature Sensor
#6 in diagram
Before I get too far ahead of the story, I installed the coolant temperature sensor and retaining clip first. That sentence is easy to type, but the actual install is very unpleasant. In Hapy, the coolant outlet flange sits behind the fuel tank and barely above the top of the body cross-support that also contains the center-mount for the transaxle. So, there is no way to insert the clip from below, it must go in from above. Directly above the insertion point for the temperature sensor, however, is the to-the-heater side of the coolant outlet flange, leaving a 1/4" or so to fit the clip. Since the orientation of the clip is straight  up and down, there is not enough room to simply slide it in. Of course, let's not forget that you can't actually see anything because it is all on the front side of the engine. For the ALH-TDI engine install into the bay-window bus, I believe this is the single issue that challenges the install. It is minor, in the grand scheme, but it is still highly unpleasant when you need to replace this sensor.
 
So, how do we do this? With a fingernail, I find the slot on the far side (front) of the flange where the one side of the clip will go, and send one "leg" of the clip into that slot while holding the sensor firmly in place. The clip will flex hard, and the inner "leg" of the clip needs to bend somewhere while the first notch of the clip is slid in, I found that having it flex away from the flange (towards the sensor) gave me something to work with. Once the clip is most of the way down and it seems like the clip can't possibly flex any more, push the flexed inner "leg" towards the flange until it clicks into the hidden slot. I spent a couple of hours wrestling with this, and broke a clip along the way, but this method does work. These clips are inexpensive, so buy several when you need to install one. Also, I found it much easier to access the coolant flange from the driver side (the sensor side) if the charged air hose is removed.
 
FrostHeater Install
where fits FrostHeater
I could have stayed on target at this point, filled the system with coolant and started test firing the engine. In fact, I try to follow that pattern more recently: finish what you started, then do the next thing. In this case, I had already lost the coolant from just below the outlet flange and above. I figured swapping out one hose for 2 with the coolant heater was not a significant scope increase when compared to the effort to open the system to add the heater later. I figured adding it later could be years away.
 
All of the install drawings and instructions I was able to find gave very model-specific directions. I was able to determine through loosely related searches that the life of the heater is significantly extended if it does not suffer the constant vibration of being attached to the engine block. So, I looked for a place along the right side of the engine bay where it would be low enough to be nearly the lowest point relative to the engine block while still being reachable by the hoses I had on-hand. That area has a small wire bundle, the main 12V line and the diesel fuel lines, so my placement will need to be careful, but there is a section a few inches front-to-back where it could go. With that general placement decided, I shifted to hoses.
 
The BEW TDI hoses that were part of the FrostHeater kit are not an exact fit for my early ALH TDI. The top hose (red line in the drawing on the right), which runs from the top of the heater into the head hose bib which protrudes on the oil cooler side of the engine just below the coolant outlet flange (#11 in drawing), had an extra bend at the far end that I trimmed off. I felt that the extra bend made the hose want to have a large arc which would have created a hard-to-manage air pocket -or- it was a kinking risk, reducing the coolant flow. The lower hose that runs from the lower bib on the oil cooler to the lower bib on the heater simply would not work for where I could install the heater and still use the upper hose. So, I decided to reuse the hose I had originally running from the oil cooler to the head for the lower hose from oil cooler to heater (blue line in drawing).
 
viewed thru top hatch
Now, we get to hard-mounting the heater to the engine bay. The BEW install bracket on top of the heater unit was oriented to mount to the left side of something. I don't remember what. But the bracket could be easily removed with a 7/16" socket and flipped over, aligning the bracket for a right-side install. Flipping the bracket also placed the heater about an inch lower and set the angle of the bracket against the lip of the engine bay, offering some additional support. With the hoses attached, the heater unit had a smaller range of motion for deciding where to mount it without putting stress on the hoses. Still, I was able to find a spot where the bundle of wires and everything else would not get bound beneath the bracket, and marked it with a sharpie. I planned for and then drilled for a M6 rivnut. The M6 was considerably smaller than the original, but the heater is super light and I was fairly sure that bolt was designed to go into a pre-existing hole. I say "planned for" because once I got the hole drilled, there was no way I was going to be able to fit the hand-riveter into the engine bay and set the rivnut. So, instead, I simply sent the bolt through and nutted from behind like most things. It is still a M6 bolt, using washers, of course, just no fancy riv-nut. So, to remove, I will need 2 wrenches rather than one. Not a big deal.
 
Fill 'er Up
from behind approx level
With the cooling system seemingly buttoned up, it was time to add coolant and burp out the air bubbles. This is where my effort ran out of supplies: no G40 coolant on hand. I added some water to confirm there were no leaks, and after shifting the upper hose clamp on the FrostHeater, there were not any. In the picture on the right, here, you can see how well tucked up and out of the way it is, even though it is below the oil cooler. Note the dry, albeit stained, concrete floor underneath. No leaks.
 
I still need to solve for the routing of the electrical cord so it can be reached relatively easily on a cold day, but far enough out of the way that it is not subjected to flying gravel and road debris. At this point, I am looking at tucking it up behind the right rear wheel, under the battery tray and holding it in place with a strip of cable-management Velcro.It might be time to consider mud flaps back there to help protect the cable from tire kick up.
 
Last, when I removed the exhaust at the start of this project, it came apart where the pipe meets the muffler. To be honest, I was never terribly pleased with the exhaust that was put on there. But, it did last 15 years, so I can't complain too much. Still, I have a 2" exhaust kit that is a bunch of straights and turns that I intend to eventually cobble together into a better exhaust. I think, to get Hapy on the road, I will put the existing, falling apart system back in. Then, I can plan for the 2" exhaust as a near-future improvement.
 
Thanks, as always, for following along, and I intend to get coolant this week and get Hapy running next weekend.  
 

Tuesday, January 27, 2026

Hapy Re-Assembly Continues

First, thanks for following along. I know blogs have fallen far out of favor, with videos and such being the preferred means for getting information. I can't watch videos at work, but I can read, so for me, this is still viable. There's an old saying about not having a face for video, or a voice for radio, you can still print. That's me. Besides, I barely have time to do my thing and write about it, much less shoot and produce video. I don't know how those content producers get any sleep, especially the ones who aren't making any money at it, which, lets be honest, that's most of them. More power to them, and I greatly appreciate their efforts. When I finally wind down at night, I love me some car-fixin videos.
 
So, where were we? Oh yeah, Hapy was almost assembled. Well, his engine and transaxle were mated and they were mounted to the bus. That's the fun, exciting, sexy part. What's left is everything else. I stayed under the bus and finished everything there first before getting after the from-above stuff. I didn't take any pictures, mostly because with all the extra layers simply moving around under the bus is a challenge.
 
Transaxle Finish
I started at the front and worked by way backwards. This started with the nose-mount. At some point when the transaxle was removed, one of the mounting bolts broke off inside the threaded body mount. I know I need to resolve this, and practically every time I get under the bus, I shoot that broken-off bolt with some penetrating oil. I believe the front mount carries very little actual weight, but it does make sure the transaxle remains aligned. I gotta get that bolt out and replaced, but not today. With the one bolt in, I connected the grounding strap. I slid to the left side and connected the Bowden tube and clutch cable. I make a point of leaving bolts partly threaded into where they go so (a) I don't lose them and (b) so I know where they go when I return to a project 6 months later. This made installing the Bowden tube just the usual challenge and not accentuated with a bolt search first. To make the threading of the butterfly nut on the end of the cable easier, I prop up the clutch pedal and then put vice-grips where the cable meets the threaded end. Lots of tightening later, I then test the play of the pedal and slide back under a few times to make sure the pedal has an inch or so of travel before the pedal meets resistance.
 
The last thing on the transaxle is the reverse light plug. In my efforts to install, I smashed the reverse light plug quite a bit. Perhaps this happened when the transaxle fell of the jack this past summer. Hard to know. Anyway, with needle-nose pliers I straightened them out. The leads, have been in the same position for so many years that they were already pre-oriented for the right spots to plug in. 
 
Rear (Anti-)Sway Bar 
Sliding further rearward, I got after the rear sway bar. I will again mention how helpful this bar has been for handling, especially in a strong cross-wind. I will also stress how important it is to have it out of the way for a transaxle R&R. I raised the center of the bar with the TravisJack so I could use both hands on the various mounts. I made sure to put a small smear of clear, hi-temp grease (not black axle grease) on the hard bushings, finger-threaded everything and then nutted every thing down. The grease extends the life of the hard bushings, by reducing the direct-wear of hard bar twisting against them. I had not greased these previously, but we really have not run more than a few hundred miles since I put this bar on.
 
Starter
Now we're getting near the end of the below-the-bus stuff, with the starter going in. With the newer starter adapter, with the studs to hang the starter on, the install is much easier. It really is as easy as popping on there and nutting down with a 17mm socket. The top nut can be a challenge to reach, but the rest of it is easy. Pop on the 12V send from the battery and the 12V send-to-front onto the main post, nut down with a 14mm. Last, pop on the starter trigger. Done. Next!
from warmer summer days

Before sliding out, I hooked up the ground from the right side of the engine to the frame.
 
Fueling
For the most part, I left the fuel system in-tact. Right now, I start to feel the advantages of not pulling the motor all the way out of the engine bay. All I did to enable this job was remove the big Caterpillar fuel filter from the frame, and drape it on the engine. So, a couple of bolts later, the fuel system is back together, hopefully holding prime.
 
Cooling
Similar to the fueling system, I minimally disconnected the cooling system. So, I thought it would be just as easy. I lifted the overflow bottle and noticed the bottle was low, and could hear splashing noise coming from the driver side. I lowered the bottle and the steady stream stopped, so clearly there was a breach up higher in the system, and not a breech in the radiator cooling lines or something that would have potentially cost me all of the coolant. Sure enough, the coolant temperature sensor that plugs into the coolant outlet flange was loose and the c-clip was no where to be seen. It is highly likely that the clip was lost last Summer. At this point, I ordered a replacement, and moved on, but not without laughing at how, again, the coolant outlet flange bit me again. 
 
Charged Air
All I removed from the charged air system were the 2 silicone elbows that connect the inter-cooler to the system. Then, the inter-cooler can be moved out of the way for the work. The silicone elbows are held in-place with large clamps that require a special tool (or lots of patience with channel-lock pliers). I used both. Once complete, I noticed that the little blower fan I have on the inter-cooler was barely clinging to the inter-cooler so I fixed that with some new zip-ties. I intend to one day replace the air-to-air inter-cooler with an air-to-water system, reducing overall inbound air temperatures and freeing up some engine compartment space.
 
This was as far as I could really go without that little clip. So, this is where I stopped while waiting for them to arrive from ECS Tuning. While waiting for the coolant temperature sensor c-clip to arrive, I put the battery on the charger. Next time, we'll get after that little clip and whatever other adventures we uncover.
 
Thanks, as always, for following along-