Showing posts with label Jetta. Show all posts

Tuesday, July 20, 2021

Shade Tree with Gramps

Today's post is about some efforts on cars that are not mine, around the cycles of applying Bondo, sanding it down, applying a guide coat of sand-able primer and repeating. This is all so I can get the panels as smooth and flat as I can before I get into the paint. Recall, I am still waiting for the body kit, so I am in a holding pattern anyway.

Shade Tree
I have mentioned in passing a few times that one of more of the kids we know will drop by to work on their cars in our driveway. They are new to car ownership, have few tools and a little experience. Boo and I call it our "Shade Tree" where they or their friends can come to get after some work on a car in a safe place with the tools they need, WiFi and an extra pair of hands. We bought a couple of car port canopies last year, and those serve as the base for this Shade Tree concept. Nearby, we have parked Hapy, and set up like DriveWay Fest: lot couch pulled out, seats strewn about, camping table set up. So, when you need to take a break, there's shade, a comfy seat and a cold beverage.

For me, this is an opportunity to hang out, wrench on some cars and help a friend or two out. If I could, I would do this every day. Fortunately, as the kids get more into their respective cars, this is happening more often.  I have not posted about these moments, but with my time dedicated to the Bondo cycles, I am not generating material... just lots of dust. So, today's post is about a weekend afternoon spent with a couple of kids and their cars.

K2 - Gramps
stock image, not Gramps
K2 got my parent's old Jetta3 when they decided that they should not drive anymore. That was a great decision, and for a base grocery-getter Jetta, Gramps was a pretty good little car. It does not have air conditioning, and it suffers the 2-dot-slow engine (non-turbo), but that should make it easier to work on, since there are fewer parts. Still, those parts which remain can be a PITA. Case-in-point, K2 wanted to do a simple tune-up, replacing the spark plugs. Well, to do that, you need to remove the intake plenum because the sadist engineers at VW located the sparkplugs on the fire-wall side of the engine, underneath the big air intake. To remove the plenum requires considerable flexibility, so this basic maintenance has not been done.

With that backdrop, we learned a couple of weeks ago that Gramps was not running. It turned out that Gramps was running, but he would go from everything-is-fine to suddenly overheating within a few minutes after achieving normal operating temperature (NOT). So, K2 drove Gramps over and pulled him into the front spot in the driveway nearest Hapy. He explained that he was sitting in a drive-thru and steam started billowing out from under the hood. After popping the hood and noticing a new hose clamp near the outlet flange, we learned that shortly before the overheating, he had removed and replaced that clamp. Why that was done was not explained, however, we concluded that maybe it was related.

The symptoms were interesting. Like I said above, the engine would run fine for a while and then water would start bubbling out of the overflow bottle as the engine temp climbed above normal. I felt the hoses. The top hose heading into the radiator was hot. The radiator was not, nor was the lower hose. That indicated water not moving, so I figured that there's either a blockage or the pump isn't working. Once the engine cooled down a little bit, we added water, but the issue repeated. I thought maybe there was an air pocket stemming from the prior hose clamp removal, so we remove the upper hose from the radiator. No water came out. I was able to run 1/2 a gallon of water into the top of the radiator before it was full, so I felt like we were approaching the solution. With the upper hose removed, and the open end held below the top of the radiator, we continued to put water into the over flow bottle, squeezing the hoses by hand to force water through. Eventually, water started to drip out of the upper hose, so we re-connected it. Then, we performed a repeating process of adding water, running the engine to get the bubbles out, turning off the engine, adding water, etc. We discovered very early that the radiator was now getting warm, so the circulation had solved. The fans, however, were still not firing. Still, the car was able to not overheat enough for him to drive it home and on short trips until he had time for another visit and diagnose of why the fans were not coming on.

G - unnamed
sort of what G wants
it to look like
K2's best friend, G, recently bought a late-model Jetta. I don't know the exact year, but it's possibly the newest car among those we have clowned on. A few months ago, I helped him remove his old stock muffler to install a fart-can. He knew then that he would need a cat-back exhaust system to get the sound he wanted. Since that time in the driveway, he got and installed a cat-back system. It has a sporty rumble to it now. On this visit, G wanted to replace his coolant, and do a little customization of the front grille. G had found a step-by-step online where you could cut and fab lower grilles from wire mesh as a replacement for the little slotted-looking vent things. He had built and installed them, but they looked kind of weak. To improve the look, he first removed the front bumper cover. G taped around the little grilles and then shot the grilles and the bumper covers inside the grilles with black spraypaint. We talked about cutting the fog-light supports out, but decided that just shooting black was enough to hide the body color and now he had the option of installing fog lights later. The coolant was fairly straightforward. He loosened the lower hose from the radiator, and drained into a pan. He re-connected the hose and filled the overflow bottle. So simple. These take about 1.5US gallons of 50/50 G12 (or G40) when completely emptied. Since he had not opened up his heater, that coolant did not get drained. So, his refill only used about a gallon. After driving it around, the level didn't drop, so we're confident that he filled it.

Zed
Of course, I continue to perfect Zed's body. I had a mishap with the Bondo where I believe I mis-mixed the hardener in. The symptom: it never fully hardened, and when I sanded on it, the Bondo came off in rubbery strings. I ultimately had to remove all of that layer of Bondo, and start over. Fortunately, I have been mixing smaller and smaller batches, since the areas which need attention are also shrinking. So, much of the areas I fixed that day were quite good. I mentioned at the start that I used a guide-coat. It was after this cycle of Bondo that I did that. I shot a light coat of sand-able automotive primer on top of the areas I had just sanded and then scuffed with 220 grit paper. I found 4 spot that I had not sanded sufficiently and about a dozen small imperfections (dips or gaps) that needed another round of filler. Around helping K2 and G, I sanded down the handful of high spots, vacuumed and re-shot with primer. I will scuff that guide-coat and fill the tiny spots next.

I am starting to wonder if that body kit will arrive after I am past ready for it. I expect I will focus on the hinges and other stuff, as well as shooting primer on the parts that will not be impacted by the kit (like the hood, doors, tailgate).

If you're in the area and need a place to tweak your car, come on by. We'll help as best we can. All we ask is that you lead on your work, the car leaves (but my tools don't) when you do and you check your politics at the curb. So, that's it for this week. Thanks, as always, for following along. 

Tuesday, April 13, 2021

Injector-Go-Round (Part 2)

Today, we continue and complete the efforts to get old used stock injectors from Hapy to work in Flash, and then brand new higher-performance injectors installed into Hapy. Fun with injectors starts.... now.

Injector-Go-Round
Now comes the fun part. With the wedged-nut extractor tool I mentioned in part 1 (See Injector-Go-Round Part 1), I pulled the injectors out of Hapy, Then, I pulled the old injectors out of Flash and installed Hapy's old injectors into Flash. That sentence took less than 10 seconds to type, and I feared it would take all weekend to do. It was actually fairly uneventful and quick. On Friday night, I set myself up by putting Hapy and Flash near one another, and then shooting the injectors where they enter the head with the trusty old Kroil penetrating oil. The next morning, I cleaned around the injector-to-head points, took my slap-together injector puller / slide hammer and all 8 injectors popped out with little effort. Seriously, each injector took fewer than 5 pops with the slide-hammer, and none of the "pops" had much force at all behind them. Honestly, I was being gentle because I didn't want the wedged nut to fall off the hammer. So, I held the slide between my index finger and my thumb and gently pop-pop-popped, moving the slide less than 4 inches each time with a flick of my wrist. I think the Kroil really helped, though I expect there will be some who bristle at the thought of letting some penetrating oil slip into the engine. 

I carefully arrayed the brackets, bolts and washers (excepting the one I lost) so I could re-install them in the same spots. In Hapy, I left the injectors loose, but still in their respective holes while I completed the extract on Flash, cleaned the holes and the head mating surface. Then, in one move, I pulled the injectors from Hapy, carried them across the driveway like a cat's cradle and set them into Flash's head. Ideally, I would have replaced the copper crush-washers on the injectors, but I didn't have replacements on hand, and this was the day I had to do this. *Dumb short-cut actually taking more time warning*

The install of the new-to-Flash injectors was fairly straightforward. Once the injectors were set in, I cleaned each bracket, rested it into place, and then lightly threaded the bolt through. Once I had all 4 in place, I threaded them down finger tight. I plugged in the 3rd-injector plug, set the glow-plug harness under the hard-lines and then re-connected the hard-lines to the tops of the injectors, but only barely threaded on. Once the lines are in the right spot, the compression fittings on the pump can be tightened down. Then, I wrenched down the brackets to around 10 foot-pounds (spec says ~15), snapped the glow-plug harness onto the glow-plugs and connected the return line to the injection pump.

Drift, Torque, Repeat
At this point, I test-cranked the engine to force air out of the hard-lines. There are a few ways to do this, of course, and the video I mentioned in part 1 is as good a way as any. He did the injectors in pairs while I did them one at a time, tightening the hardline at the injector end as each injector-to-hardline point spat out fuel. My one-at-a-time method moves from injector to injector based on the way they are connected to the injection pump: closest-to-the-ground one first, highest one last. My thinking is that any air in the pump will work its way up that way. By the time I was on the last injector, the engine was trying to fire.

I got that last line done, and Flash started right up. I could see some vapor puff-puff-puffing above the head, and could hear a "psst-psst-psst" noise, so I knew there was a leak. Boo helped me here, by jumping into the driver-seat and starting the engine while I looked and felt for the leak. It was around the #2 injector, but not at the hard-line mate point. It was around the injector near the head. Engine off, I grabbed a socket extension to use as a drift. I lightly smacked either side of the #2 injector bracket near the injector. Then, I re-torqued the bolt. I was surprised by how much more I could turn the bolt (like 3/4 a turn), so I repeated the process on the other 3, and continued to do this until the bolts torqued down at 15 ft-lbs and would not accept more after more drift-smacks.

This process worked very well. When we test fired it again, Flash started right up, made no funny noises (nor puffs of vaporized fuel) and ran strong during the test drive. The biggest indicator of our success was the near-immediate start the following morning and no cloud of smoke. He had been getting harder and harder to start in the morning. I now conclude that his old injectors were leaking (evidence of that was found upon their removal, as they leaked all over the paper shopping bag I set them on), and the fuel system needed to prime every morning, causing the long hard-start effort. I decided to change his oil immediately, while waiting for the delivery of the new injectors from KermaTDI.

Priming the Injection Pump
During the oil change, I discovered that the #2 injector had actually leaked at the head again during the test drive, and concluded that replacing the copper crush-washers (or injector seals) is not optional. I got a replacement set from the local parts store (not DIP, still bummed about that) and re-did the removal / install. This time, I did a pair of injectors at a time, starting with #1 and #2. Oddly enough, the injector pump lost it's prime in the few minutes the system was open this time. Half as many injectors, loosened the lines less and it still lost prime when it didn't the last time when I did all 4. Ah well; just shows that luck is a factor. With the MityVac, I applied vacuum on the low-pressure return side (no more than 7 pounds so the seals inside the pump were never in jeopardy, and more vacuum would not have tangibly sped the process) of the injection pump until fuel appeared in the MityVac collection cup. Then, I buttoned things up, cleared the hard-lines of air by cracking the connections one at a time (bottom to top, like above) until Flash started. Again, I see no puffs, but I did the #3 and #4 injector seals anyway. Fool me once. After letting Flash sit for a few days, he lost prime again.

So, I ran another round of MityVac priming and got him running. I let him sit an idle while I got a really close look at the injectors. I noticed that #1 had fuel appearing around the injector mount-point into the head. The #1 injector is unique in that it has a cap on one of the return bibs. That cap was leaking. I didn't have a real one, so I made one from low pressure hose and a bolt. This helped, so after letting Flash sit for a few days he would start, albeit roughly. Believing that the low-pressure return lines I moved from Hapy were no longer viable, I considered my options for replacement.

Hapy Injected
Once KermaTDI had the injectors set up, they FedEx'd them over with a new set of copper seals. They arrived mid-week, but with the dicey weather, I waited to until the weekend so I could have a nice big block of time. Hapy's head had been cleaned when the old ones were pulled and I had stuffed rags into the injector holes so it would stay clean. With the injectors in-hand, I could at least prepare them for install by removing the "T" fitting from Flash's old #3 injector, and moving the low-pressure return lines onto the replacement set. The kit from KermaTDI delivered with brand new low-pressure return lines so the set up of the injectors was that much easier. With the injectors set up, and a new weekend day, I followed the same process I did with Flash, except for skipping the test-start parts. I am having issues with Hapy's ECU, so this is as far as I could really get.

I'll describe the test-drive once I have Hapy buttoned back up. Between then and now, I need to get his ECU sorted but at least the exhaust is back on. There's never a shortage of things to do. Couldn't be Hapy-er.

Thanks, as always, for following along.

Tuesday, March 23, 2021

Injector-Go-Round (Part 1)

I got back outside and started playing on the TDI's (Hapy the camperbus and Flash the daily Jetta) as the weather has been somewhat hospitable, though not consistently so. Since Hapy is running so well (still no codes, accelerator responding as one would expect, etc.), I decided to step up his injectors and get that Malone Tune I had dreamed about for years. In contrast, Flash has been making a plume of black smoke when he starts in the morning (after a long start cycle), so I figured his injectors had gotten pretty clogged up. My thinking: I can upgrade Hapy's injectors and put his under-100k miles injectors onto Flash to extend his life. Today's post is about picking, and removing injectors. I'm still perfecting both Flash and Hapy injector installs, so I'll post part 2 on that once at least one of them is running right. Good times.

Injector Selector
PowerPlus 764
For the uninitiated, like me, the world of diesel injectors or nozzles is cloudy and the choices not clear. For one thing, the manufacturers all suffer with varying quality because of their efforts to get them constructed at lower costs. As is true with any market, there are always new players. Some new players build good stuff, but have little recognition. Others are simply trying to turn a dime and build garbage, but have flashy advertisements. Like I said, all markets are like this, but for a product about which you know little, how do you avoid overpaying or getting garbage? This is where your trusted vendors are so important. For TDI stuff, I go to KermaTDI and IDParts first and then some others like PartsPlace or TuneMyEuro to see what they are selling. When they are all selling the same subset of the market, you can be fairly sure those are the better quality-to-price. In many cases, your greatest gains from an injector upgrade require an ECU tune, a turbo upgrade, or both. Regardless, my research indicates that they need to be balanced / pressure checked / set-up or you will probably not get the performance you were expecting.

To help me through the maze, I worked with the folks at Malone Tuning and researched my 2 usual forums: TDIClub and VWVortex. There really is nothing better than true end-user feedback, but in most cases, the folks who replaced their injectors were going from clapped-out original stock injectors to something new, so, of course, they worked way better. And, they only did that one set ever, so they only had the old crappy ones to compare against. Still, the forums helped steer me where KermaTDI and TuneMyEuro were already taking me: Bozio injectors are the market leaders right now, but even they have quality issues. So, having them set up will best ensure a high-performing set. I decided to have mine set-up by our friends at KermaTDI since that brought with it better guarantees and some things are just best done as a unit.

DLC 1019
I spent considerable time toggling back and forth between the DLC1019 and the PowerPlus764. I ultimately went with the PP764, but, in retrospect, they are both great injector nozzles from everything I have read. Here is another write-up of the PP764. Both injectors appear to have the DLC protective coatings that extend the nozzle life against lower quality and low-sulfur fuel. Knowing that the quality of diesel fuel varies across the country, this is important. The PP764 also has hardened surfaces, etc. to extend its life relative to the stock injectors (the DLC1019 probably does as well), and have a higher upside in terms of HP potential with additional upgrades. Ultimately, the TDIClub seems to feel that the PP764 may produce more smoke, but more power than the 1019, but again, as in so many things, your mileage may vary, and with all the other variables at play, it is very hard to distinguish between these nozzles... except for which one can handle larger modifications: the PP764.

I had Kerma set them up at the lowest "pop" stage, so they are fairly tame, which parallels the stock-for-now turbo. I should be able to replace the original VNT-15 turbo with a stock-in-some-VW's VNT-17 and the PP764 injector set up can remain the same. The 1019 may not embrace the higher boost as well as the PP764. Again.. who really knows? This feels like a job for MotorTrend's Engine Masters, if they ever give a whiff about performance in otherwise not monster engines... and diesels in general.

Injector Removal
still from KermaTDI vid
I had a rain-free, beautiful Saturday morning, with a forecast for decent March weather (read: spotty rain) all weekend, so I had my opening. KermaTDI co-hosts a great video on YouTube for how to remove / replace the injectors which I mostly followed. So, I am not going to go through all those steps in great depth here. Instead, I will highlight what I found particularly interesting. In the video, the glow-plug harness was removed at the very beginning. It was easier to remove once the injector hard-lines were moved out of the way. Getting a good angle on the bottom compression fittings on the injector pump was difficult, but not impossible, especially during initial removal. With the hard-lines out of the way, for the Hapy removal, I then had to remove the vacuum ball and the bracket holding it to the head in order to get to the clips for the 3rd injector plug-wire. This bracket did not interfere with the plug in Flash, but his plug was very difficult to get out of the bracket. With that unplugged, I shifted to the injector-hold-down brackets. On Hapy, I lost concentration for a second and pulled the bolt out of the 4th injector bracket independent of the bracket, causing the dished washer to disappear into the engine bay. This momentary lapse cost me some time searching.

I never found that washer, but it was nowhere near the injector so I moved on. Finding a single replacement washer took some time, though. For posterity, it is either part number N0231312 or N0237314. With the brackets removed, the injectors would not budge (no surprise). So, I cleaned up around them as much as I could with brake cleaner and a slotted screwdriver, getting as much black gunk off as I could. I felt this would minimize the risk of that hard yuck falling into the open injector port once the injector came out. I applied a short burst of Kroil penetrating oil around each of the injector-to-head mating surfaces to help in the extraction.

Injector Removal Tool
no worky
The injector has a M14-1.5 thread where the hard line injector fitting attaches. Metalnerd makes a slide-hammer specific for removing this injector that threads right on. As of this writing, they cost around $45US. Back when I was working on the dents on Zed (the 1978 Datsun 280ZX), I got one of those stud welder / dent slide hammer kits from Harbor Freight. This kit includes a 2-pound slide hammer with a single thread-on attachment that is designed to grab onto one of those studs. The thread on the slide hammer is M14-2. Soooo close to the injector thread, but not. I would rather re-use a tool in-hand rather than buy another rare-use tool. So, I got 2 nuts from the hardware store (M14-1.5 and M14-2) and JB Weld'd them together. I would have Mig welded, but welder one I used on Oliver's floors has disappeared into the tool collective of Travis' friends and I didn't want to wait. Besides, I'm not sure welding these nuts would have been a slam-dunk anyway. Turned out, the JBWeld failed on the first injector, so my tool became just the one M14-1.5 nut: I force-wedged it onto the slide-hammer and threaded the other end into the injectors. Yes, this cross-threaded the nut at the slide-hammer end, but it served it's purpose.

I'm going to stop here, and pick up the actual removal and install experience in the next post. Like I said above, the removals were actually quite easy. Like so many things, destruction is easy; construction is hard.

Gramps Clutch
Unrelated, I mentioned the clutch replacement for Gramps (2-dot-slow Jetta 3) a few weeks back when I was considering what work to do next. K2 decided that he wanted to hire that out, so we called up Courtney over at MobilePdx. We have called on these guys a few times over the years when our workload was more than we wanted to handle at once, and they have never disappointed. He and his guys (Lou and Joe) knocked it out, replacing the clutch, flywheel (old clutch blue'd the friction surface), throw-out bearing, the throw-out bearing cover, etc. Before they started the tear-down, the engine got a de-greasing. Once everything was apart, they replaced the rear main seal on the engine. With everything clean, they were able to lubricate things (like the shift linkage), and confirm the oil leak was the rear main seal. All in, it was a ton of work, but Gramps is running like a champ again. And, he is no longer marking his spot every time he parks. Thanks MobilePDX!

Last, an early shout-out to my local-to-NW Oregon friends: Hapy turns 50 on 3-September-2021, so to celebrate, we will be camping at LL Stub Stewart State Park that weekend. If you have little else to do for US Labor Day weekend, we (Hapy, Boo and I) would love to see you.

Thanks, as always, for following along and I'll post again once at least one of the 2 injector beneficiaries is running right.

Thursday, December 31, 2020

Chasing the Hapy Electrical Gremlins (part 4)

Before I begin, I hope we all have a 2021 that allows us to all forget just how bad 2020 was. That really capped off quite a decade. Anyway, with the new decade now in front of us, let's all work together on making our little worlds more friendly, livable and Hapy. On that, I spent way more hours than I could count over the last few weeks clowning on this wiring. I work slowly, so even when I have a huge block of time, meticulous work takes nearly forever. I got so carried away in fact, I missed my usual posting day this week, so this one is a little late. HNY!
 
Wiring Diagram
I have completed the wiring diagram. I mentioned in a comment on that last post that I had to start over because of differences between the Jetta and New Beetle of the same year. So goes. I now have a 12-page custom wiring diagram for this build. It includes things that I have not yet completed nor posted about (like a glow-plug light), but it does NOT include anything about the original bus. So, when working on something related to the TDI, we use this new one. When addressing something in the 50-year old transporter, we reference the Bentley. I expect that I will be making small modifications to the diagram based on what happens during the harness surgery. I figure that if the diagram isn't accurate, it really isn't very valuable.
 
Complete the Cut-Apart
When I last posted, I was in the process of cutting down the part of the wiring harness that ties into the fuse box and relays. I have worked on this area before. In retrospect, I maintain that leaving the engine harnesses that go to the ECU untouched is the right answer. I had looked at cutting them down too, and concluded that is playing with fire. Besides, just this one harness was quite a time consumer. This harness has the T10 plugs (white, black, orange, blue) and a T6 that in the NewBeetle's case is red, but on other cars it is brown. As I mentioned, this also has the fuse box, and relays. It also includes the dashpod, an OBD-II plug, an oval "T10" that is also black that lives in the engine compartment and there are a handful of little 2 or 3 pin plugs for the alternator, air conditioning and coolant level. It's really a random collection of things; making a decent custom harness from it is not all that easy. Anyway, my goal was to label-label-cut enough so I could remove the harness and thin it out. After the over-zealous cutting I mentioned in my last post, this was going to get much bigger. I got the last few of that "handful of little things" label-label-cut so I could bring the whole thing onto my kitchen table. I will get into the thinning in a future post (probably my next one).

Install Plan
Few things that go well happen purely accidentally. You have to make a plan. With the fuse box, relays and dashpod out of the way, I could re-assess the spare tire well which I'm now calling the "wiring compartment". I need to keep the dashpod wired-in for the engine to run correctly. Since it is rather small, I planned for it to go into the far end of the compartment, with the rounded top slightly pitched so I can see it when I'm tinkering with the compartment exposed. On the other end, nearest the rear hatch, I planned to put the ECU, with the new fuse/relay box in between. For this to work, I'll need to shorten many wires in the harness I just removed, but the result will be a wiring compartment with a few cables, but no spaghetti. The T10's will plug into the thicker ECU harness below deck, so there will be some cleaning, arranging or obfuscating I'll need to do there.

Dashpod Mount
The donor pieces I received included the plastic surround for the New Beetle dash. The front/top cover snaps in place, hiding the screws that hold the dashpod to the plastic mount. This cover, however, makes the dashpod too wide to fit in the spare tire well, so I tossed it. I also had to cut down the plastic mount so it would fit, leaving the front-most flat section and the lower plastic bits that support the screw-holes for the dashpod. The second picture from the top shows the dashpod in 2 pieces. The upper 2 pieces were cut apart. I set and reset, fiddled with and eventually arrived at a spot for the dashpod. I marked holes, drilled them out and sent long screws thru the dashpod mount into the front curved side of the tire well. The dash pod clicked into place, and was quickly screwed into place. I checked clearance for the 2 cables that click into the dash pod, and there were no issues.

ECU (computer) Mount
Mounting the computer was not as simple. I received what looked like the plastic ECU holder back when I first got the New Beetle TDI, but I could not figure out how to orient the ECU so it would fit between the base and the protective flap door thing. So, I tossed the base, and screwed the flap door into the spare tire well instead. The ECU sits quite nicely on there and the cables are unimpeded. I will need to either Velcro the ECU to the mount or use something else. I will use short hook-end straps (like these) for now, since I have a few of them, so they are free. I intend to treat myself (and Hapy) to a Malone tune, eventually. I'll go Velcro after that, since I don't know how the Malone tune thing works with sending a computer in or if you get a flash download or what. Something to learn, and post about later, I guess.

Fuse / Relay Box Mount
final-ish look
With the ECU and dashpod located, there was really only just enough room for that fuse/relay box to fit between them as you can see from the picture on the side here. I chose to locate it on the inside of the wheel well, but it could just as easily gone on the other side. This way, the fuses are furthest from the rear hatch, but the orientation is consistent with my drawings (where I have the fuses at the top). This was a relatively simple matter of aligning the top of the closed fuse box with the top of the rear deck, marking the spots and boring them out. A standard hand drill doesn't fit there, so I put the drill bit in my Dremel. That is probably not the best solution, so I don't recommend it, but without one of those fancy 90* air-powered drill things, we make do with what we have.
 
That's it for today. Next time, I intend to get into the harness surgery. Thanks for following along and Hapy New Year-

Tuesday, December 3, 2019

TDI Fighting Frost

Another departure from the TDI retrospective posts, today's post covers my efforts to install a FrostHeater into the new-to-us 2004 TDI JettaWagon. I discovered that this is a later-year model, so it does not have the ALH engine, rather the BEW. Neat. But, that's a different story.

Why a FrostHeater?
Our weather turned especially cold in September and never really recovered, here in the Pacific Northwest. While the rest of the country appeared to enjoy nice warmer weather (as evidenced by the short sleeves at the Major League Baseball playoff games), we were breaking out our hats and gloves. After scraping ice multiple days, I decided something that got the engine warmer faster would be a good idea, both for the car's engine as well as it's inhabitants.
http://www.frostheater.com/

I looked for and found the FrostHeater, courtesy of the TDIClub. Everyone loves these things, and while they are more expensive than many others, they are 100% USA made and they do exactly what you would expect: the coolant is heated so the engine is warm when you try to start it. So simple. No weird hot-patch glued to the oil pan, creating a small area of intense heat, and not really helping the engine warm up. There were tales of those things falling off, too, so mid-winter you are suddenly without it. Not good. It's hard enough to work on the car outside when the weather is kinda crummy; full-on winter is beyond-the-pale unpleasant.

More Sadism
I brushed up against the sadistic nature of the German auto-engineers when I did the head removal on T's Audi A4, Nemo (See Sadist Engineering). That was nothing compared to what they set up when they did the hoses behind the radiator in the TDI. On the driver side, we have the oil:coolant exchanger where the oil is cooled or warmed by the coolant. This is actually a really great idea, but the way it was implemented puts your hands behind the fan housing, if you want to mess with those hoses. At some point, you will need to replace them. In my case, I was removing the hose that runs from the bottom of the exchanger to the upper radiator hose. The rear of the fan housing, at least in my case, is hard and sharp-edged. By the time I was finished, my hands looked like I had spent the day baling hay: covered with little cuts (20 or more of varying lengths and depths on each arm/hand) and pink from knuckles to elbows. Note to the reader: get a set of hose spring clamp pliers like those shown in the picture here. The skin on your arms, and potentially many hours of suffering, will be saved.

Lower Hose
Again, I encourage you to get a set of hose spring clamp pliers. I have a set now, and will actually enjoy clowning with these clamps next time. Start by removing the under-engine pan. Then, put a catch-pan below the oil:coolant exchanger and remove the lower hose from it. Allow the coolant to drain. Once you're fairly sure you are not going to get coolant dripping on you, start positioning the heater unit. On this engine block (BEW, remember?), there are 2 holes which could hold the heater. You want the one that is closer to the passenger side, but not yet. First, route the hoses. The lower hose runs parallel to the bottom of the engine block and loops up and around to the lower fitting on the oil:coolant exchanger. I suggest attaching it entirely, with a hose clamp. It is easier to thread the bolt from the heater bracket into the hole in the block if the hose is partly helping you hold it in place. Even then, this is not easy unless you have abnormally long, thin fingers.

Heater Unit
Frostheater unit
Before you start with the bolt, shoot the hole with some brake cleaner and mop it out with a rag or paper towel. If the threads aren't clean, this only gets harder. Anyway, you are on your back, holding the unit up with one hand while slipping your fingers between the bracket and the block. With your finger tips, you will need to wiggle on the bolt, lightly turning it until the threads set. I found the bolt would just bite into the threads before it was too hard to turn with my fingertips. The tight space makes it impossible to gain purchase with more of your fingers. With a 17mm wrench (socket won't fit), tighten it down being careful not to cross-thread the hole.

Upper Hose
In the instructions, the FrostHeater folks indicate that you should route the upper hose before you attach the heater unit. Yes, it could be helpful to do it first. I routed and re-routed this hose many times (both before and after the heater was bolted on), mostly because the directions and pictures were not very useful for this part. The hose runs around the oil filter housing from below. The directions indicate that the hose runs between the AC hose and the housing. While that's correct, they omit the part where it runs around the front to the oil filter housing to the upper radiator hose. The picture in the instructions doesn't show it. Anyway, once you have the hose routed, remove the old hose, and slap that new one on.

Retrospective
The instructions and the web site indicate this is a 45 minute job. It took me 5 hours, which further proves my shop-time math. We test drove it to work the next day to make sure any air bubbles worked their way out, and plugged it in overnight that night. The swift-start and instant-heat from the heater was very welcome. Everything behaved as expected: at start-up, the coolant temperature was at normal operating temp (NOT), and once we started moving, the temp dropped a little bit while the warmed coolant met the cold that was in the radiator. After the coolant blended, the temperature rose back up to NOT quickly, like, by the time we were on the main roads. While this install was a super PITA, we will enjoy this heat for years. Already this autumn we have greatly appreciated how little we have had to scrape ice even though all the other cars in the driveway had icy windows in the mornings. Having heat coming out the vents before we're out of the driveway is really really nice too.

The main take-aways from this are: get a set of those hose clamp pliers, give yourself lots of time, and recognize that the hoses are probably original, so they will be super stubborn to come off. If I ever get to driving Hapy in the winter, I would definitely install one of these. In fact, this install gives me a thought for how I could install the coolant filter I got over the Summer.

That's it for today. Thanks, as always, for following along.

Tuesday, April 9, 2019

The Wagon Returns

Quick post today, I think. Before I start, Hapy 21st birthday to T. It has been an amazing ride, and you have grown into an incredible person. So hapy to have had you in my life, my friend.

Some Background
Late last fall, I remarked on how many cars we removed from our driveway in a short amount of time (See Herd Thinning). One of those cars, K's 2004 JettaWagon has returned. Back then, it had sat for almost 18 months because of transmission problems. He was collecting money to do a 5-speed swap, but that proved too elusive. Between the changing prices for a kit from folks on TDIClub to difficulty finding someone willing to do the job (much less at a reasonable price), he resolved to fixing the transmission and selling it. $1500US later, the transmission is better than new and one of the front axles has been replaced.

On the inside, the driver seat had lost some of the leather on the seat bottom cushion. Based on his conversation with an upholsterer, that was probably caused by a faulty seat-heater. This news gave me immediate pause, since I have just completed the seats in our beloved Oliver. I will just make sure that the seat-heaters are on an ignition-switched circuit so they shut off when the car does. Anyway, K had the driver seat re-upholstered in a fairly-close color match. It's not perfect, though, and both Boo and I can see the difference. Which wouldn't matter if we hadn't been the ones buying K's car.


Snow Flashback
You see... years ago, when Boo and I shared that old condo we hit the mountain a lot. Pretty much, if we had the boys, we were going to play in the snow. The condo was just too small for anything else with 4 boys. One of those night-ski nights was especially icy at SkiBowl. I wiped out trying to navigate off of the Lower Bowl run onto Low Road when I hit solid ice (See Holiday approacheth). I landed on my left elbow and even now, over 6 years later, it still doesn't feel quite right.

That same night, Boo came flying down Lower Reynolds and as she entered the "whoopdies" near the bottom she hit some ice and landed on her back and backside with her right arm reaching back, hurting her shoulder. Like my elbow, her shoulder still isn't right. It was so close to the holidays, but we wanted to have her shoulder checked out. By the time she could get on-schedule for an MRI, it was Christmas Eve, so we didn't exactly get the A team. I have long concluded that the initial scan and scan reading was not done well, but every subsequent discussion starts with a specialist saying "they didn't find anything on the MRI", not bothering to look at the results themselves. That's the American medical system at work. Anyway, since her shoulder acts up from time to time, driving a stick-shift in rush-hour bumper-to-bumper, rubber-banding traffic greatly aggravates it.

2dot0
For a short time, we had a nice Jetta sedan with an auto-tranny, but the hated 2-dot-slow engine See Welcome 2dot0). Boo drove that, and greatly appreciated the non-stick for her shoulder. She loves to drive a manual, mind you, just the hurt shoulder really took away a lot of that joy. Remember that I failed to recognize the state of the timing belt and it snapped days before we were scheduled to move (See Oh Snap). So, we sold the car pretty much for what I'd paid for it, leaving Boo back in a stick-shift car. Until now.


JettaWagon
When K started talking about selling his car, Boo and I talked about helping him out, and helping ourselves along the way. Flash has over 210k miles on him. His interior was a horrible mess when I bought him, and the body has taken a lot of abuse. The JettaWagon, on the other hand, had about 130k miles on it, and was in incredibly nice shape; much nicer shape than Flash was when I bought him. So, we bought it. Now, Boo has a auto-tranny TDI JettaWagon.

Like with any new acquisition, there were a few things that needed to be fixed. The battery in the remote is dying. The brake lights all fire up when the headlights are on. The leather seats don't match. That's it so far.

I replaced the single-filament bulbs that had been installed with dual filament ones and the brake/tail lights work properly now. I did note that in the book for bulbs at NAPA, they incorrectly reference a single filament bulb. So, this is probably common for DIY folks.

Anyway, rambling post today. More car content is being generated. Maybe, if the weather is willing, I'll be able to pull the cover off of Hapy and evaluate him for Summer fun. Thanks, as always, for following along-

Tuesday, February 5, 2019

Flash fixes continued

I left off my last post about Flash with a summary of fixes stemming from replacing my 3 seasons tires with studded snows. Today, I finish the work by repairing the not-operating wipers and getting the reverse lights to work again.

Wipers No Wiping
The RainX held us for the handful of days while we waited for the new linkage to arrive. I got new wipers and a wiper-arm puller as well. Everything arrived on a Friday night, so the next (Saturday) afternoon I tore into the job.

Before you start, make note of where your wipers are. Similar to getting your engine into TDC (Top Dead Center) firing position for cylinder #1 before you start removing things, move your wipers into the rest position (all the way down) before you start or getting things to line up at the end will take much longer. The arms remove with a 13mm socket, hidden under a small plastic cap. Save that cap and the nuts. Once the nuts are off, the arm puller popped the arms right off. Next, the plastic cowl needs to be pulled away. The rubber seal along the front edge should remove easily, leaving just the 4 snap-on bits along the rear. These pull away by getting your fingers under the plastic along the windscreen and pulling more towards the front than straight up. I have seen others post about using a pry-bar; I found that excessive and introduced more risk to breaking that plastic cowl or scratching the glass. I removed and re-installed this cowl a few times while trying out various parts, so I can say for certain that a pry bar should not be necessary.

nicked from VWVortex
With the cowl out of the way, you should see the unpainted metal linkage connected to the wiper arm bolts. It is held to the car by 3 10mm bolts. Remove the bolts, and the washers underneath and save them. The linkage should now be free, but it can't be removed until you unplug the electrical plug from the motor. It is a flat 6-pin plug with a little catch on the underside. Press the catch and pull it away from the motor. Now you can wiggle the whole operation free from under the windscreen. Note how the motor connects to the linkage. There are 3 10mm bolts holding them together and a central 13mm nut holding the business end of the motor to the operational part of the linkage. Consider the orientation of that "operational part". If the wipers were in their resting position before you started tearing things apart, the short arm is pointing directly to the right (front is front), making it difficult to get the 13mm wrench in there to remove the nut. Remember this when you're putting it all back together.

I took the opportunity to clean out the little wiper controls bay at this point. There was all kinds of organic debris in there from years of parking outside. I dug around with a stick and used my shop-vac to get it clear. I also started testing things. First, I compared the new linkage with the original. I noticed that the new and old operated the same. In fact, the old one moved more freely. So, I concluded that the linkage was not the problem. So, I plugged the motor back in, and tested its operation with the wiper switch. The motor made noise, but did not turn the threaded end. So, the motor was the bad item. I needed a new one today or we were going another week, this time a projected-stormy one, without wipers. Eek.
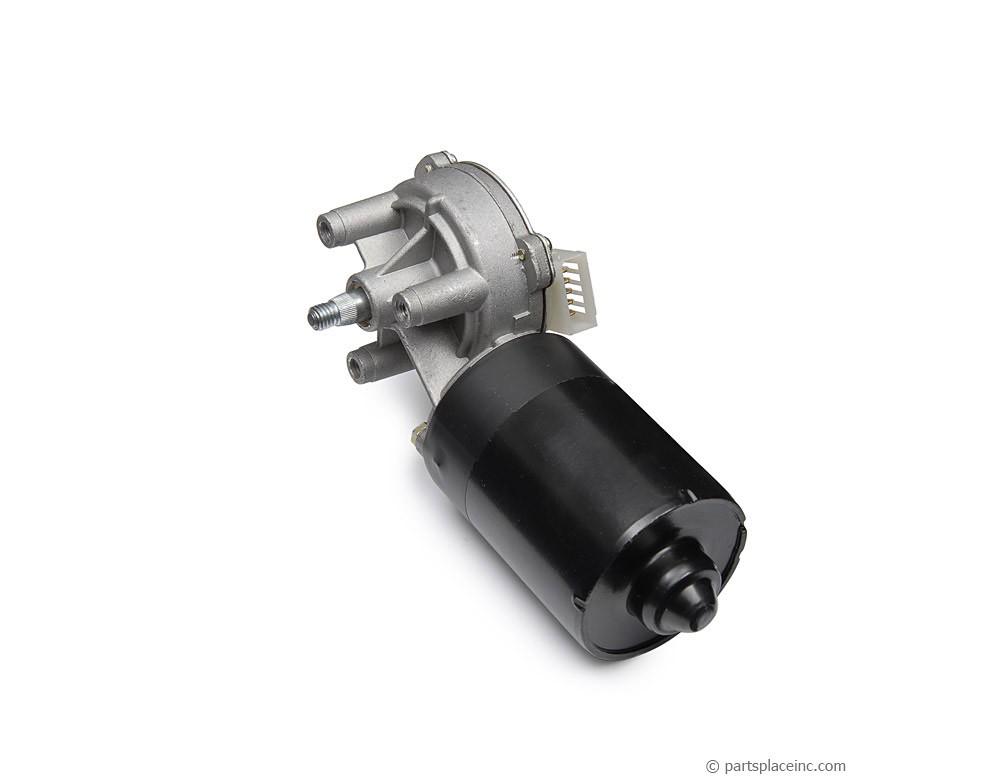
wiper motor

Local Auto Parts
With Discount Import Parts now 1-1/2 hours away round-trip (no, I just can't let that go), I started looking around at the common local places. NAPA reportedly had one just down the street, according to their website, but after ordering one for pickup, I was called by the store and told that they actually didn't have one, but they could have one to me by Tuesday. Hmm.. this is why Amazon is crushing typical retail; I could have one in-hand tomorrow from Amazon. I want one now. Today. Next, I tried O'Reilly's about 30 blocks away, who also claimed to have one. They did. I failed to test it before I left the store, and it failed to work, right out of the box, when I tried to install it. No motor movement; no motor sounds. By the time I got it returned, it was getting into Saturday evening, so I aborted for the day, knowing that the Hillsboro location (20 minutes away) had 2. One of them would probably work.

Sunday morning, I hit the Hillsboro store, swapped a $100US bill for a motor and tested it in the parking lot. Bad the same way as mine: motor hums but the threaded end didn't turn. I've come to the conclusion that this transition part (I refer to as a transmission) is a fail point that is not looked at during rebuilds, or at least not often enough to prevent bad parts going to stores. For reference, it's the silver section of the motor in the picture on the right, here. Anyway, the other motor they had looked much better. The transmission looked new, the paint on the motor was not all over the transmission (like the others were), and best of all, it passed my driveway test of plugging the motor in while it was resting on the hood/windscreen and flipping the wiper switch.

I had brought my old linkage and the fasteners so I re-assembled the wiper motor and linkage, re-installed them and attached it all to the car right there in the O'Reilly's driveway. That's one more plus for them over NAPA: NAPA has a big sign on the side of the building forbidding patrons from doing spot repairs in their parking lot. O'Reilly's guys will come out and help you do it. Anyway, with everything under-cowl put together, I tested the switch and watched the wiper bolts rotate. Regretting that I had not brought at least the driver-side wiper arm and blade with me, I nosed the car east and back home.

Clear Screen
Bosch ICON wipers
The finish-up of the job was very simple. Between the linkage and the cowl resides small rubber boots that I had not mentioned earlier. I think these protect the linkage from rusting, so I re-installed them. Considering how rust-free and genuinely operational the original linkage is, I think this a fair assumption. Then, I wrestled the cowling back under the hood (bonnet for my non-US friends), setting it tight along the front edge before snugging the 4 snaps along the rear edge. I re-set the seal along the front edge, and then put the wiper arms back on, snugging them down with the 13mm socket and finally pressed the plastic caps into the arms. Like all things, test before you call it done. I had been doing all this in a steady Pacific NorthWest rain, so there was plenty of water on the windscreen for a valid test. The new Bosch ICON wipers ran smoothly from park to post and back again.... and completely cleared the glass in one pass. So sweet.

Reverse Lights
The last thing I needed to fix on the old Jetta was the not-operating reverse lights. Start with the simple, obvious things first: the bulbs. While they do not fail at the same time very often, I find coincidences like that happen more often with this car than many others I have owned. Not this time, though. Next, test the switch. The switch sits under the battery tray, behind and to the left of the starter motor. If you unplug it and then jumper across the 2 pin holes in the harness, you simply turn the ignition to "run" and you should see reverse lights. If you do, the switch is bad. If you do not, the issue may lie elsewhere.

Remove and Replace Switch
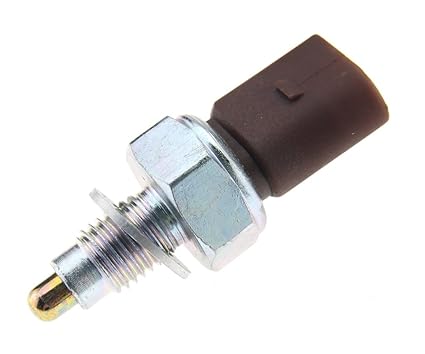
reverse switch: do not use the washer
I read a few how-to's on the reverse switch, and they all sounded very involved, including removing the battery and tray, removing the air box or both. Yikes. I looked at the location and considered that I could see the hex edges of the switch, so I could probably get a spanner in there. Sure enough, a 7/8" spanner fits the switch perfectly and can thread behind the battery box, but far enough ahead of the transmission to gain purchase on the switch. Unplug the switch first. Then, just pop the spanner on that switch so it can move. I didn't have to move my spanner more than 30*. Facing the engine from the front, reach along the rear of the radiator (under the upper hose) and under the battery box until your fingers reach the switch. I had my elbow brushing the driver-side radiator fan. The switch removes fairly easily (lefty-loosey). The install is the reverse, seriously, and then snug it tight with the 7/8" spanner..

I applied some thread seal on the switch, dropped on the included washer, reached around and under the battery box and threaded it home. I plugged it in and... nothing. Huh? I backed out the switch, and tested the switch by plugging it in, holding it depressed with my new wiper arm puller and saw the reverse light illuminate. Yes, I could have asked someone inside to come out, but it was raining... and raining hard, so why get everyone wet? I concluded that the included washer is NOT for the Jetta TDI engine, but may be used in one of the switch's other applications. Great. So, I pulled the washer, re-installed, plugged it back in and... it worked. Hapy dance.

So, now, the only thing that is still broken on old Flash is the hazard switch. I have bought multiple new ones and they all arrive failed. I think it stems from manufacturing moving away from Germany and Brazil to China, lowering the quality of the soldering along the way. I will just get one from the junkyard the next time I go. I still need to solve for the heated seats one of these days, but I am content to have all of the lights and wipers working for today.

Thanks for following along, and I will be getting back to Oliver's interior now that the daily-driver is safe again.

Tuesday, November 20, 2018

Herd Thinning

Purging unneeded items has become a bit of the thing for Boo and me. When we moved from the house next door, our square footage dropped by over 20%. We have been steadily selling off, donating or otherwise dumping belongings ever since. On the inside and in the yards, things are approaching the uncluttered aesthetic we both like. But, the cars hadn't reached that point until now. In posts earlier this summer, I about lamented how many vehicles I had. Such a first-world problem I look back on with some embarrassment. Since then, I have thinned the number of cars down to something manageable. So, today, we'll walk through those cars which are no longer with us.

Jetta Wagon
My step son K bought a 2001 TDI Wagon with an auto-trans 3 years ago. It ran very well for the first year before the transmission started acting up to the point where it would not go into reverse unless it was warmed up. So, he was driving it, but reversing to park everywhere. Sometimes, that's not exactly easy. So, after a few months of that, he backed it into our driveway. Almost 18 months later, he has moved it again, this time to where he's living, but the transmission is still bad. The picture to the right here was after Boo spent a day cleaning it at the end of it's 18 month visit. K's wagon may be coming back for a transmission swap, but, hopefully not until next summer, if then.

Nemo - the A4
The A4 was T's replacement for the white Jeep Cherokee (Jaws) that he sold. There have been a few posts about getting this car back operational, but few pictures. This one here is as T left for school where Nemo is now (see Let's See). I think the radiator is getting replaced as I write this.

DonorZ
At the peak of the car-jam, I had 2 280ZX's. The DonorZ gave us a complete interior (except headliner), some replacement tail lights, and a few other odds and ends. It was sold to a 280ZX collector / restorer based out of Hillsboro.

Dude
Dude was a gold 2001 Saturn SC2 that Boo had owned for 17 years. We had initially freed it from our yard by lending it to a friend who needed a car. He used it to drive fellow elderly residents to appointments and the grocery store. Unfortunately, the frequency and severity of property crime in SouthEast Portland has only gotten worse since I lived there. Our beloved Dude, which you could start by putting a slotted screwdriver into the ignition, was stolen from outside the 55+ living facility where our friend lived. The genius who stole it destroyed the ignition cylinder and the entire steering column, only to leave the car and his tools in plain sight. The police found and impounded the car within 24 hours of it being stolen, tools and all. At the yard, it was clear that the ignition and steering could not easily be restored, so the car was classified as "totaled". We miss you, Dude.

FR-S
2 years ago, I broke down while driving Hapy to my old job (see Running on Empty). Boo and I had just been struggling with other cars and we found ourselves with one car and 2 people who needed auto-transpo just to get to work. We were at our wits end for broken cars so, enter the FR-S. I haven't really posted about that car. We bought it from a used lot down in Salem after we were bait-switched for a different one with fewer miles, and an automatic transmission. "You didn't really want that one," the scum-salesman said. Actually, we wanted an automatic for Boo to drive since she was spending a lot of time in stop-and-go traffic and the shifting was aggravating her shoulder. Anyway, we got the car and drove it a little here and a little there. Even back when Flash's clutch failed (See Oh Clutch), we really didn't drive him. Mostly, my job change shortly after purchasing it reduced our need: I take the train to work now. So, 2 years and less than 10k miles later (actually about 15k kilometers for everyone NOT in the US), we sold it off. Between the payments and the insurance, it is a car we didn't need and a luxury we no longer felt driven to pay for. Pardon the pun.

What's Left
So, with all of those cars no longer around, our driveway is uncharacteristically empty. We have Hapy, the bus which launched this blog, stored under the BusDepot bus-cover for the winter. We have Oliver, the MGB, in the garage waiting to get the interior done. We have the keeperZ (who still needs a name) in the other garage bay steadily getting closer to paint. And, of course, we have Flash, the TDI-powered Jetta that got me turned on to turbo-diesels in the first place.

Approaching Blog Silence
The work on the Zed is going to be long and not terribly post-worthy for a while. I have a few more areas to strip and then it's body-fill and sand time. I may take a break to do some things on Oliver's interior, but even that may pause in case we need to drive him now that we're down to one operational car. So, there could be a break in my regular posts since there won't be much to post about. In the event I suspend posts while I generate new content have a Hapy ThanksGiving, White Friday and seasonal Holidays.

Thanks for following along.

Tuesday, November 6, 2018

Cowling the Hapy Radiator

Brief post today. Before I begin, you'll notice that the advertisements are gone. I never made a penny on having them there, and I think we get bombarded with too much advertisement anyway, so now we will all enjoy a less cluttered, advertisement-free experience. On to the new radiator fan shroud...

Fan Shroud or Cowling
as pulled from shipping box
Modern cars and many older cars, have something on the rear side of the radiator surrounding the fan. This shroud or cowling helps pull air through the radiator when the fan is on. Since auto makers don't spend a penny where they need not, I have come to the conclusion that the shroud helps keep temperatures down. Initially, I thought it was to protect fingers when the fan snapped on, but I've since learned from reading articles that these shrouds do help pull air through the radiator and can reduce temperatures by up to 40%.

Hapy Rad Background
Since I did the engine swap on Hapy, he had been running without a tailored shroud. I put a cowling of sorts around the outer edge, but that was mostly to help keep the waste hot air from re-circulating into the radiator intake. I'm not sure how well that worked, but let's assume it worked okay. I had 2 fans on the bottom, with the intent to pull air through the radiator, but it is entirely possible that lots of air leaked around the edges of the fan, greatly reducing their cooling capability. So, I went to eBarf looking for an aftermarket shroud, in hopes of finding something that could bolt onto the new Mishimoto radiator. While I could have fabricated one, if I could find one inexpensive enough, I'd go with a bolt-on.

Found
front p-side corner
The radiator size I have is from a Jetta3, and fortunately, there are many of these still on the road, creating a market for things like an aftermarket shroud. I had to try a few sources, though, as the supply is drying up, or those who manufacture and import them have been carefully managing their inventory due to the new import tariffs. Anyway, I found a seller and $90US on eBarf later, I have a direct-replacement shroud with fans.

Install
The mounting holes lined up perfectly with the mount holes on the Mishimoto radiator. This made the install crazy easy. I cut the cable-ties (zip-ties) which held on the old fans, unplugged the wires and set them aside. I cut the plastic bag off the new shroud and slid it between the radiator and the metal strap which holds the sides together (see the bottom picture). I removed the 10mm bolts which held the radiator to the support frame, fit the radiator mounting tabs into place and re-threaded the bolts into their respective holes. Once the wires were plugged back in (black to ground, blue to switched 12V from the relay), the install was complete. I flipped the fan switch on the dash to confirm everything was good (both fans spinning, and both in the right direction).

I have set the old fans aside, planning to reuse one of
them for the MGB. With the new cowling and fans, I hope the days of watching my temperature gauge are over. We could have a few nice days ahead, but rains are pretty much upon us now, so the likelihood of getting a hardy test before spring is unlikely. Regardless, I expect that it is no worse than it was. If so, I can easily revert back, but that would be quite a surprise.

With the conclusion of this effort, Hapy is back "in the bag": covered with the BusDepot bus cover for the winter. It is always a sad day when we cover him up, knowing that the summer didn't quite have as many camping or festival adventures as we wished. I sincerely hope that I can get him uncovered and out for drives early enough next season to shake out the issues so we can have an adventure-filled summer.

That's it for today. For my US readers, Hapy Election Day. Whatever your politics, please express them at the polls. One day, I hope, we can return to discussing political opinions as rational people without raising voices, alarms, or threats. Yes, my non-US friends, it has become that dire here. Thanks for following along-

Tuesday, May 15, 2018

Back to the Bus: Rad Swap (Part 2)

Continuing from an earlier posting, today I'll cover the assembly and install of a new Mishimoto all-aluminium radiator into the TDI-powered microbus.

Where Were We?
Old rad, for perspective
In the last post in this series, I removed the old radiator from the bus, destroying the wiring along the way. I removed the framing / bracketing that supported the radiator from the old one and cut off the fans. Now stripped bare, we can compare the new and old radiator. The outlets are the same distance apart. The holes that I used to hold the frame on were in the same spots... but... all the other bits for holding the radiator into a Jetta were flipped over. So, the original fan housing (and air conditioning condenser) would line-up, but it looks like the inlet and outlet are on the wrong side (driver-side versus passenger side). And, the temperature sensor that triggers the fans is now on the same side as the inlet/outlets. So, in a Jetta, this could be solved with different hoses. In the bus, this gets interesting.

Bracketing
Because of the reversal of the inlet/outlet, I realized that the front bar where I had 2 radiator mounts attached needed to get flipped over. I cut off the pop-rivets holding on the mounts, and re-set their location the same way I did it the first time: threading the mounts to the radiator... but wait a minute. The new radiator doesn't use screws. It is threaded for bolts. Neat. I found one bolt in my fastener bins that fit, took it to ACE and got 8 stainless steel hex-bolts that fit: M6 1.0 pitch.

installing fans
Once back from ACE, I threaded on the front mounts, lined up where they should connect to the bar and marked the spots. A quick-run with a 1/8" drill bit and the pop-riveter and the front bar was ready again. I then turned my attention to the fans

Fans
I looked at the pile of plastic and foam bits. I thought I could drill a hole through the original bottom-bit and thread a zip-tie through. Instead, I found fender washers that had a small enough hole to allow the zip-tie, but not large enough for the end to slide through. This would work! So, from the bottom, the zip-tie passed through a washer, a foam bit, the fan housing, the radiator, another foam bit and last a plastic zip-tie anchor. To be extra sure, it would all hold, I ran the zip-tie back through the fins and then through the zip-tie head on the bottom.

Cowling
adding cowling
With fans in place, I attached the mounts. The radiator was starting to get a little heavy. We're feeling almost done, until the flip-over design of the mounting points would stymie the work again. The cowling wasn't fitting anymore. The left and right (driver-side / passenger-side) needed to be reversed because of the angles (front pitched downward to catch some slipstream), but it wasn't quite that simple. After some head-scratching, this ended up being as easy as folding the cowling the opposite direction from what it had been. Then, it bolted right on. I concluded the prep by zip-tying the fan electrical leads to the cowling so they wouldn't be buffeted by the passing winds any longer.

Install
One it was in one piece, I took it back over to the bus and slid it under from the driver side. I hung the threaded carabiners onto the eye-hooks on the frame. Then, I put the front bar on the jack and lifted it into place. Once I was able to get the threaded carabiners onto their respective lengths of chain, I removed the jack and repeated the effort with the rear mounts, again doing the driver side first. I checked the movement, verifying that the radiator unit would swing back and forth, front to back and had some headroom to bounce up.

Wiring Re-wiring
install-ready. topside
Now that the new rad is physically mounted, I switched my focus to the electrical. The new radiator did not deliver with a fan switch, but it did have a threaded hole for one. I had ordered one years ago when I wanted to have the fans come on automatically. I just never got to it. So, I ran the threads on the switch with plumbers tape and threaded it into the hole (with the rubber gasket in place, of course). I still don't have the trust that the temperature-sensitive fan switch will work, so rather than wire that in, I stripped out all of the extraneous wiring and set up the switch on the dash to fire both radiator fans and the little motorcycle fan on the intercooler.

For my sake, I'm posting the circuit numbers from the relay:
30: 12V+ this is fused, but unswitched power so the fans can run with the key off
85: grounded
86: to the fans
87: trigger switch. One day the thermo fan switch will wire in here. For now, it's the dash switch

I cleaned up the wiring so it's nice and tidy with the relay zip-tied to the underside of the bus and out of sight. I may wire the fan switch into relay pin 87 just to see if it works. It might be interesting to wire those pins to a light on the dash so I can see what temperature they fire at... for a first step. If nothing else, I could use that as a temperature warning light.

Plumb and Fill
install-ready. underside
With the electrical solved, and the rain well settled in, I didn't want to give up. I was mostly under the bus anyway, and the bus cover provided additional rain-cover so I wasn't really getting too wet. Fortunately, water hadn't started running under me in growing puddles yet. So, with that motivation, I wriggled the longer hoses onto the 90* bends off the radiator and hose-clamped them really tight. It surprisingly took me no longer to do than it took to type. I went around to the back of the bus, pulled the cover up, opened the tail gate and filled the overflow bottle with G-40. This is a process, requiring filling up to the full line and then venting the air out of the lines with the little spigot I installed just below the thermostat. I continue this process until coolant/water mixture comes out the spigot. It took the gallon of G-40 and wanted more. So, I topped off with distilled water (about 1/2 a gallon).

I dodged to the front of the bus, confirmed the fans ran and then disconnected the battery, closed everything up and dashed inside. One day, I'll have a huge garage. Until then, I work in the rain.

I took Hapy out for a test drive, and I believe the swap is complete. I suspect one or more of the hose clamps will need tightening, but otherwise, I think it's ready. If this fancy super-radiator doesn't do the trick for keeping the temps down, I may need to route more air through it. That would mean either lowering it, routing some ducting from the front or both. Here's hoping the super-rad does the job.

Grilled
I made one last change to the set up after the test drive. I had a section of security fence lying around, so I cut a section, spray-painted with a couple of coats of semi-gloss black and slapped it on the front. This will prevent plastic bags and other garbage (that seems to be appearing on the roads in greater frequency) from getting sucked into the radiator, fouling it's ability to cool the engine. I had meant to do this with the original radiator install. Once I did it, I was surprised at how quickly it went from the cardboard package through the tin-snips and paint to install. In terms of actual effort, it was less than 30 minutes. I really should have done this earlier. The picture to the right shows it mid-install. The nut with washer on each lower corner have since been tightened down and there are zip-ties across the bottom as well as on the top corners holding it in place.

That's it for today. I would like to do something with Hapy's brakes before a real trip. I have rear wheel cylinders and I'd like to replace the lines between the master cylinder and the fill reservoir as well as all brake fluid. Maybe I'll get that done before 4Peaks. I hope so. Anyway, thanks, as always, for following along-