Showing posts with label linkage. Show all posts

Tuesday, February 5, 2019

Flash fixes continued

I left off my last post about Flash with a summary of fixes stemming from replacing my 3 seasons tires with studded snows. Today, I finish the work by repairing the not-operating wipers and getting the reverse lights to work again.

Wipers No Wiping
The RainX held us for the handful of days while we waited for the new linkage to arrive. I got new wipers and a wiper-arm puller as well. Everything arrived on a Friday night, so the next (Saturday) afternoon I tore into the job.

Before you start, make note of where your wipers are. Similar to getting your engine into TDC (Top Dead Center) firing position for cylinder #1 before you start removing things, move your wipers into the rest position (all the way down) before you start or getting things to line up at the end will take much longer. The arms remove with a 13mm socket, hidden under a small plastic cap. Save that cap and the nuts. Once the nuts are off, the arm puller popped the arms right off. Next, the plastic cowl needs to be pulled away. The rubber seal along the front edge should remove easily, leaving just the 4 snap-on bits along the rear. These pull away by getting your fingers under the plastic along the windscreen and pulling more towards the front than straight up. I have seen others post about using a pry-bar; I found that excessive and introduced more risk to breaking that plastic cowl or scratching the glass. I removed and re-installed this cowl a few times while trying out various parts, so I can say for certain that a pry bar should not be necessary.

nicked from VWVortex
With the cowl out of the way, you should see the unpainted metal linkage connected to the wiper arm bolts. It is held to the car by 3 10mm bolts. Remove the bolts, and the washers underneath and save them. The linkage should now be free, but it can't be removed until you unplug the electrical plug from the motor. It is a flat 6-pin plug with a little catch on the underside. Press the catch and pull it away from the motor. Now you can wiggle the whole operation free from under the windscreen. Note how the motor connects to the linkage. There are 3 10mm bolts holding them together and a central 13mm nut holding the business end of the motor to the operational part of the linkage. Consider the orientation of that "operational part". If the wipers were in their resting position before you started tearing things apart, the short arm is pointing directly to the right (front is front), making it difficult to get the 13mm wrench in there to remove the nut. Remember this when you're putting it all back together.

I took the opportunity to clean out the little wiper controls bay at this point. There was all kinds of organic debris in there from years of parking outside. I dug around with a stick and used my shop-vac to get it clear. I also started testing things. First, I compared the new linkage with the original. I noticed that the new and old operated the same. In fact, the old one moved more freely. So, I concluded that the linkage was not the problem. So, I plugged the motor back in, and tested its operation with the wiper switch. The motor made noise, but did not turn the threaded end. So, the motor was the bad item. I needed a new one today or we were going another week, this time a projected-stormy one, without wipers. Eek.
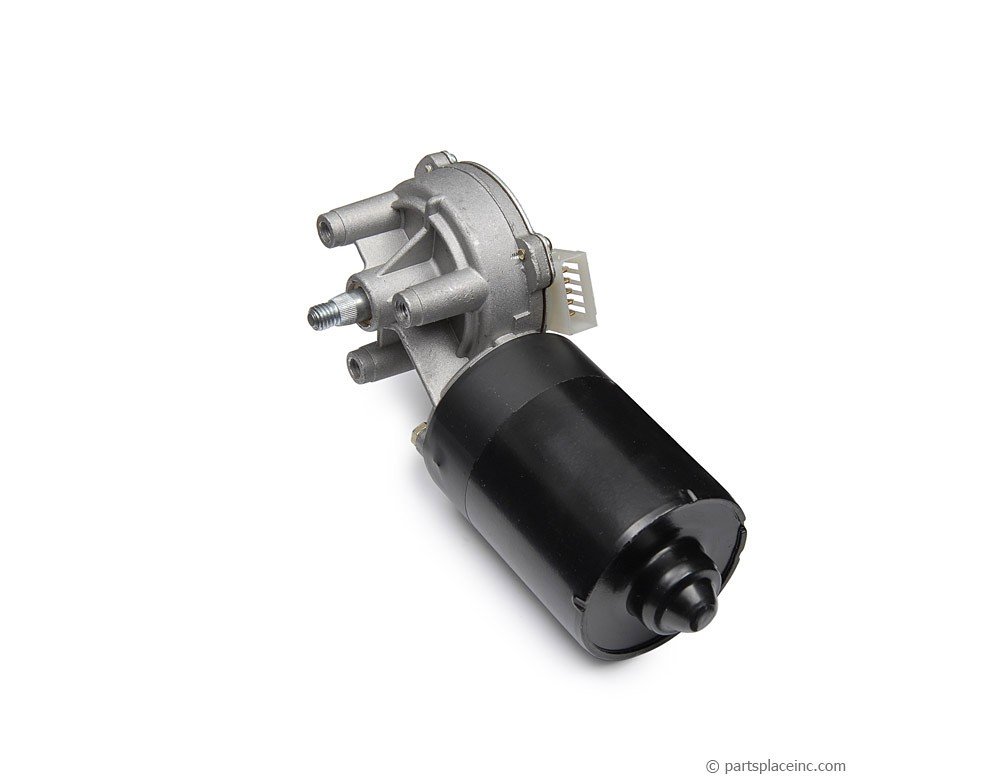
wiper motor

Local Auto Parts
With Discount Import Parts now 1-1/2 hours away round-trip (no, I just can't let that go), I started looking around at the common local places. NAPA reportedly had one just down the street, according to their website, but after ordering one for pickup, I was called by the store and told that they actually didn't have one, but they could have one to me by Tuesday. Hmm.. this is why Amazon is crushing typical retail; I could have one in-hand tomorrow from Amazon. I want one now. Today. Next, I tried O'Reilly's about 30 blocks away, who also claimed to have one. They did. I failed to test it before I left the store, and it failed to work, right out of the box, when I tried to install it. No motor movement; no motor sounds. By the time I got it returned, it was getting into Saturday evening, so I aborted for the day, knowing that the Hillsboro location (20 minutes away) had 2. One of them would probably work.

Sunday morning, I hit the Hillsboro store, swapped a $100US bill for a motor and tested it in the parking lot. Bad the same way as mine: motor hums but the threaded end didn't turn. I've come to the conclusion that this transition part (I refer to as a transmission) is a fail point that is not looked at during rebuilds, or at least not often enough to prevent bad parts going to stores. For reference, it's the silver section of the motor in the picture on the right, here. Anyway, the other motor they had looked much better. The transmission looked new, the paint on the motor was not all over the transmission (like the others were), and best of all, it passed my driveway test of plugging the motor in while it was resting on the hood/windscreen and flipping the wiper switch.

I had brought my old linkage and the fasteners so I re-assembled the wiper motor and linkage, re-installed them and attached it all to the car right there in the O'Reilly's driveway. That's one more plus for them over NAPA: NAPA has a big sign on the side of the building forbidding patrons from doing spot repairs in their parking lot. O'Reilly's guys will come out and help you do it. Anyway, with everything under-cowl put together, I tested the switch and watched the wiper bolts rotate. Regretting that I had not brought at least the driver-side wiper arm and blade with me, I nosed the car east and back home.

Clear Screen
Bosch ICON wipers
The finish-up of the job was very simple. Between the linkage and the cowl resides small rubber boots that I had not mentioned earlier. I think these protect the linkage from rusting, so I re-installed them. Considering how rust-free and genuinely operational the original linkage is, I think this a fair assumption. Then, I wrestled the cowling back under the hood (bonnet for my non-US friends), setting it tight along the front edge before snugging the 4 snaps along the rear edge. I re-set the seal along the front edge, and then put the wiper arms back on, snugging them down with the 13mm socket and finally pressed the plastic caps into the arms. Like all things, test before you call it done. I had been doing all this in a steady Pacific NorthWest rain, so there was plenty of water on the windscreen for a valid test. The new Bosch ICON wipers ran smoothly from park to post and back again.... and completely cleared the glass in one pass. So sweet.

Reverse Lights
The last thing I needed to fix on the old Jetta was the not-operating reverse lights. Start with the simple, obvious things first: the bulbs. While they do not fail at the same time very often, I find coincidences like that happen more often with this car than many others I have owned. Not this time, though. Next, test the switch. The switch sits under the battery tray, behind and to the left of the starter motor. If you unplug it and then jumper across the 2 pin holes in the harness, you simply turn the ignition to "run" and you should see reverse lights. If you do, the switch is bad. If you do not, the issue may lie elsewhere.

Remove and Replace Switch
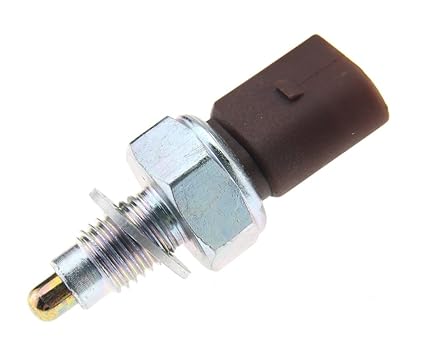
reverse switch: do not use the washer
I read a few how-to's on the reverse switch, and they all sounded very involved, including removing the battery and tray, removing the air box or both. Yikes. I looked at the location and considered that I could see the hex edges of the switch, so I could probably get a spanner in there. Sure enough, a 7/8" spanner fits the switch perfectly and can thread behind the battery box, but far enough ahead of the transmission to gain purchase on the switch. Unplug the switch first. Then, just pop the spanner on that switch so it can move. I didn't have to move my spanner more than 30*. Facing the engine from the front, reach along the rear of the radiator (under the upper hose) and under the battery box until your fingers reach the switch. I had my elbow brushing the driver-side radiator fan. The switch removes fairly easily (lefty-loosey). The install is the reverse, seriously, and then snug it tight with the 7/8" spanner..

I applied some thread seal on the switch, dropped on the included washer, reached around and under the battery box and threaded it home. I plugged it in and... nothing. Huh? I backed out the switch, and tested the switch by plugging it in, holding it depressed with my new wiper arm puller and saw the reverse light illuminate. Yes, I could have asked someone inside to come out, but it was raining... and raining hard, so why get everyone wet? I concluded that the included washer is NOT for the Jetta TDI engine, but may be used in one of the switch's other applications. Great. So, I pulled the washer, re-installed, plugged it back in and... it worked. Hapy dance.

So, now, the only thing that is still broken on old Flash is the hazard switch. I have bought multiple new ones and they all arrive failed. I think it stems from manufacturing moving away from Germany and Brazil to China, lowering the quality of the soldering along the way. I will just get one from the junkyard the next time I go. I still need to solve for the heated seats one of these days, but I am content to have all of the lights and wipers working for today.

Thanks for following along, and I will be getting back to Oliver's interior now that the daily-driver is safe again.

Thursday, April 26, 2012

Natural-born Amusement

More fun tales from the last 2 weeks.  Its been busy, and the bus is back home and daily-driving again.  The joy of looking out the windscreen of a bus is unlike anything else.  Even when looking at a dreary gray morning through barely caffeinated eyes, it brings deep deep joy. 

Big Ol' Rounder in my Foldin Bed
First things first, I'm fully moved into Boo's place.  My boys and her boys have really gelled, and the few nights a week when we're all home are rowdy and fun.  Its a little crazy come bed-time, though.  the place is small, and wasn't really built for 6 people to sleep in, so its a little crowded.  Between a loft space and a bunk bed, though, everyone has a spot.  Add one more, though, and we'd need a cot in the hallway.

Man Comes By Lookin' For His Hat
One of the challenges of temporarily staying somewhere, is finding your stuff.  Most of my things are in storage, but there are some regular things that need to find homes.  From bills to car keys, basic processes have had to change around from when I had my own place.  A month into it and we're down to the last few things that need a system.  This included where to park and how to best make use of the bus.  For the last 3 weeks, I had been parking the bus at various locations near my old apartment.  I'd move him from one spot to another or from one parking lot to another every other day.  This kept the towing companies away, but it was annoying.  At least the engine was getting started, but it wasn't really even getting warm.  But, it was the system until yesterday.

On the Road Again
Yesterday, Boo grabbed the keys and dashed over to where we'd last parked him: her friend's apartment complex parking lot.  She had never driven him before, but she's driven a bus before.  She got him home and the report wasn't completely rosey: "its hard. I couldn't find 1st or 2nd consistently. He played Alpha (male) on me."  Yeah... that transaxle has been a beast since I bought him.  I know a new one is in order, its just a question of finding $1500 - $1800 plus a core charge.  Regardless, she got him home.  Now, I'll be driving him to work, she'll be driving the Jetta and her 16 year old (K) will be driving her old car.  This leaves an old Mountaineer out of the rotation and back at the stable.  Since it gets about 8mpg, this should save us some money, longer term.  Since the HOA rules for teh condo-complex forbid any work being done on the bus while parked in the lot, I'll be parking on the street for those days when I want to work on something... like fixing the shift linkage... or the cabin lights... :)

Natural-Born Amusement
It felt great to wind-up the bus this morning.  He's as peppy as only the TDI could allow, and I only had a can't-find-the-gear moment once, while trying to down-shift into second as I passed through a busy intersection.  No worries.  As he gets used to being driven, the gears get easier to find.  And there's always that promise of a new gearbox with hopped up gears...  He didn't even get to thermostat-open temp (185*) before I got to work, so I'll have to take longer drives to prove out his real road-readiness.  Camping season approaches!

That's it for today.  Thanks for following along.  Now that I'm driving him every day, I expect to have more relevant adventures to document.  Besides that, camping season is coming, and there are things I'd like to have ready for this Summer of fun.  It should be a fun Spring!

Friday, April 6, 2012

When in doubt, over-estimate

In my last post, I thought that I'd be finishing the apartment move that day.  Well, I was wrong.  Again.  So, today, I will remind myself how important it is to be fair to both myself and whatever project I am working on and over-estimate the effort.

Move
On Saturday, I did move a bunch of stuff: an extra bed from one friend's place to another's and everything I could carry down to the garage from the upper levels.  The big things I mentioned in that last post were moved... on Sunday.  And, I loaded the bus a few times on both days.  Sunday ended with me loading the bus to the gills with stuff, but running out of time to get to the storage place before they closed.

Tax Man Snow Therapy
Mt Hood at Sunset
from atop SkiBowl
Monday, I had to pay the piper, and have my taxes done.  As I've mentioned in earlier posts, I divorced last fiscal year, but with my withholdings not adjusted until mid-year, I hadn't had enough pulled out.  So, I owe a big chunk o' change to Uncle Sam.  Grr..  My tax preparer is in Gresham, and I kinda knew it was gonna be bad.  So, I prepared for the worst by loading my snow gear into my car before heading East.  Once I saw the amount due, I knew snow therapy was in order.  On the side, here, is a picture I took from the top of the upper bowl at SkiBowl before taking the plunge down "Radical".... my first run down a black on the upper bowl face.  The snow was crusty on top, requiring jump-turns rather than edge-to-edge transitions, but it was fun.  Ultimately, I slid on different trails for about 2 1/2 hours and then drove home.  It didn't reduce the bill, but it sure got me "right" with it.  My advice to a reader who may be heading for divorce: change your withholdings early and over-estimate your potential tax burden.

One Screw Short of a Linkage
linkage drawing
courtesy of Bus-Boys
On Sunday, the shift linkage failed on the way out of the storage facility.  It was the only run my brother went on, and the first time he rode in the bus since the drive to Furthur.  So, I'm not saying he's a jinx, but everything was fine, until.. :)  At the front (FIF) of the 002 transaxle, a rod sticks out.  On the end of the rod is a small square cage-looking thing (see picture) that is attached with a screw (part "R"), which is then wired in place.  This cage mates with the linkage running back from the front of the bus in a true VW way.  The cage has a plastic block on either side.  Each plastic block has a round hole in the center of it.  Through this hole, a metal sleeve is threaded, and through a round hole in the rear-end of the main linkage.  This sleeve handles the stress of the shift manipulation, resisted by the transaxle through those plastic blocks.  The sleeve has these indentations which act like a nut so when a screw so threaded through, it is held together.

On Sunday, it became un-screwed.  Or should I say, the screw worked its way free at some point and the sleeve broke-free, dropping one of the plastic blocks on the ground and making shifting impossible.  The screw was no where to be found.  My brother and I were able to find both plastic blocks and the sleeve though.  In rooting through the rock'n'roll bed, I found a zip-tie.  I mashed the plastic blocks and sleeve together in the linkage and threaded the zip-tie through the sleeve.  Zip-zip, we have linkage.  I've driven the bus this way a few times (to storage and back), and its worked fine.  I intend to find a bolt and lock-nut so it can't work its way apart again.  Again: over-estimate your bus' ability to work parts free and make use of lock-tite and locking washers and nuts.

Okay, so that was pretty long.  I guess its been a busy week.  On top of all that, there's work issues, I'm looking at places to live more permanently and continuing to move stuff.  The moving is about done, and the apt gets cleaned next.  This time, I'll estimate the effort to take the better part of a day rather than assume a couple of hours :-D

Thanks for following along...