Showing posts with label Riviera. Show all posts

Tuesday, July 16, 2024

Door Cards

Today I will be picking up where I left off regarding the doors. As I described in my last post, the front doors now open, close and lock like a real car. No slamming, not funny jiggling of the handle, etc. Just open, close and lock. Well, the passenger door lock is different from the driver, but I'll swap that out once I find all my parts. Anyway, since I had to remove the cards to fix the doors, I thought I would take the opportunity to improve them.

Door Cards As-Was
foamed card installed
With operational doors, I got to thinking about how to get the door cards to hold to their respective doors. The Arizona gentleman who ran the business creating and selling these ABS door cards was looking to sell off the business a couple of years ago, so I imagine that has happened by now. He had a mixture of molly-based fasteners delivered with the cards. Either the fastener was a screw that dug into the molly which was pushed through the card into the original mounting hole or it was a push-to-hold plastic bit. Regardless, the molly's did not hold in all of the original mounting holes on my bus (YMMV). This could have been poor implementation on my part, something particular about Hapy or just less-than-ideal engineering on the fasteners. It doesn't really matter; for Hapy, they did not work. When combined with the slamming doors, the door cards would rattle and Hapy had a very junky vibe. Now that the doors no longer need to slam shut, improving the cards adherence to the doors will help un-jalopy Hapy that little bit more.

Door Cards, Mounting Upgrade
broken M4 riv-nut bit
To remedy the floppy door cards, I tried a more permanent solution: Riv-nuts and bolts. The plan: into each original mounting hole in the door, I attach a riv-nut (it's a nut that is applied with a rivet gun, basically), and then send a bolt through a washer and then the card, into the riv-nut. Such a simple plan, and while a little time-consuming, it was easy to do. Of course, I found that not all of the original holes were the same size. To fix, I used some as large as an M6 or as small as an M4. I think this is why the supplied molly-based fasteners did not work as well: the M6-sized holes were simply too big for the molly and they fell out. As shown in the picture here, too much pressure with the riveting tool and you can break it. Once I had all of the riv-nuts set, I shifted to the cards themselves.

Noise Abatement Revisit
setting riv-nut
While I had the door cards out of the bus for repairs, I applied a thin noise-absorbing closed-cell foam to the 3 cards. This material was among the things I got a few years ago when I did the sound deadening effort, and it's application to the door cards was part of that plan. At the time, the research I did (See Hapy Noises - Part 2) indicated that multiple attack vectors would bring the best result: Constrained Layered Dampener, an open cell sound deadener like Jute Thermal and then Mass Loaded Vinyl. These all really address reducing the impact of external (and mechanical) noises transferring into the cabin. Any noises or sound that make it into the cabin which are not absorbed by the seats are prone to bouncing around. I placed some larger acoustic panels (these) under the upper bunk, in the slot where the original sunroof used to go. I believe they are helping absorb some ambient sound. I also covered the ceiling with Mega Zorbe to address the sound reflection and ambient sound absorption. In the picture on the right, here, you can see the MegaZorbe applied to the inside of the outer door skin. 

Based on the tests I did at the end of the effort, the only real gains as-measured were in the "around town" (under 40mph) zone. Decibels at idle or on the highway appeared about the same. In practice, however, using a less complex "measure" like how loud we have to run the stereo to hear it on the highway, it is definitely quieter. An even less precise indicator is how loud we need to speak to each other to have a conversation: barely louder than we talk at home, which is quiet (no yelling house) where we used to have to almost yell without the stereo on. So, I am setting aside the scientific evidence and embracing the anecdotal: this implementation of the sound abatement absolutely and significantly improved our road tripping experience. I may take more readings because the numbers I took before continue to bother me.

Door Cards, Reflective Sound Absorption Added
applying the foam
So, with all that context, I decided to press forward on my original plan to apply the thin foam sheets to the hard plastic cards. I started with the cards along the sleeping deck, running from the rear hatch forward along both sides under the windows to the rear of the rock-n-roll bed (1 foot tall by about 4 feet long). I started here for 2 reasons: it was very easy and the plastic cards were jarring-cold when bare skin pressed against them while sleeping. The foam definitely improved that.

For the slider and front doors, I simply traced the door shape on the peel-off paper side of the peel-n-stick foam and cut along the line with scissors. I aligned the cut along the card and peel-stuck them down, working from one corner, down along one side and then across. I will be applying carpet later, but felt that the foam might help reduce the reflected sound while also providing a cushion under the carpet.

With the foam applied to the cards, I considered the game of "which bolt fits" for each mounting point. I could have just started trying bolts, but that felt like an exercise in frustration. So, instead, I grabbed some painters tape and marked to the outside of each hole (where the card would not cover) which bolt size to use. I set the front door cards in place using the door pull to hold the card in the right spot. Then, I simply sent bolts through a black vinyl washer and then the card into the door. Once mounted, I removed the tape. Easy-peasy. If you do this, I suggest that you do the corners first, and only threaded enough to hold. Then, skip around the card, and have all of them like that before you start tightening. Then, again, start with the corners and pay close attention to the bottom edge near the vent. These ABS cards fit perfectly, but the one hole near the bottom align the trailing edge of the door did not line up for me and I had to skip it. YMMV, of course.

slider door foamed
The door card kit included panels for the wall under the driver-side jealous window and for the partitions behind the front seats. I have yet to do those cards, but I am holding off on doing those until I am ready to fast-follow with carpet. The foam is not as scratch-resilient as the hard plastic, and those cards take the brunt of the abuse when camping or music gear is loaded, unloaded and in-motion. So, I will apply the foam and the carpet at the same time. All of that will happen at some point in the future. As it is right now, there is that little bit less noise reflection happening and when bare skin touches the side of the sleeping area, it no longer triggers a shuddering wake up. We are taking the win.

---

That's it for today. Thanks, as always, for following along-

Tuesday, July 9, 2024

The Doors

Yeah.. not the band, but I really like Ray Manzarak's keyboard. It has been a very busy year, and I have not been playing with cars much until very recently. Zed, the 1979 Datsun 280ZX remains covered and completely unchanged since we moved into the farmhouse. Oliver, the 1978 MGB, on the other hand, has received some of my focus. I'll start there, and then get after the original topic. 

MGB Carb Dis-Assembled
carb tear down
I arrived at the conclusion that a participating reason for Oliver running so badly (and getting worse) could be that the carb was a little gunky when I bought him, and he has gotten little use, making it worse. So, I removed the carb, took it apart and ran it thru a sonic dip / cleaner. I ordered a comprehensive rebuilding kit from Japan, and will re-assemble the carb with those bits and gaskets. I hope this will resolve his issues so we can drive him around this summer.

Door-Slamma-Slamma
Over the course of the last few years, all 3 of the regularly used doors (driver, passenger and slider) on Hapy, the 1972 VW Bus, have become harder to open and/or close. Each had their own unique issues. Starting with the slider, it suddenly refused to close outside a venue after unloading gear for a show. It would slide as far as about an inch from being actually closed and then bang on something. I couldn't tell if it was the front edge or the trailing edge, but did not have time to really resolve. I forced it closed by pushing with steady pressure against it straight towards the bus (not pushing towards the front). Fortunately, it opened and shut with similar assistance until I fixed it.

foaming doors
The driver-side door would not close consistently. I would have to bang-bang-bang it shut until it finally latched. The lock was another issue; once locked, it would not easily become unlocked, especially if anyone touched the door handle when the door was locked. This condition only worsened to the point where the lock started to fail entirely and banging the door was not holding the door shut well enough. I had the door fly open while taking a right turn and the swinging door almost hit another car.

Of the 3 doors, the passenger door was the easiest to solve, but it was the last. That door would not shut easily because the seal in the front lower corner was tweaked. This put pressure on the door handle, which also was hard to depress, so opening the door took a firm grip. The inner door cards were not holding in-place as well as they had when I installed them, so I decided to tackle the door operation and the cards as one effort.

Slider Door Adjustment
None of these issues were stuck-on-the-side-of-the-road level, but they were all annoying and reducing the joy. I started with the slider since I had to have that door open consistently for gigs. I first considered the leading edge latch mechanism. I shot Kroil into the latch, but discovered very quickly that the leading edge latch was not the issue. After shooting Kroil into and around the trailing latch, I concluded that this also was not the issue. Still, this lubrication was long overdue. I could tell that the upper hard-bar, that applies the trailing latch was misaligned (too loose). I tightened it and that seemed to resolve the closing issue, allowing the door to close consistently. Opening the door was still inconsistent. I started looking at the lower sheathed-wire that opens the trailing latch. That sheathed-wire is similar to a bike handbrake cable with an adjustment collar near the leading edge latch. This wire was dangly-loose so I tightened it until it was taught and adjusted from there until the door would easily open from working the handle.

Driver Door Fix
'74-'79 left front door latch
Repairing the driver door operation was next most important. Once the door lock was un-unlockable from the outside, the only way into the bus was through the rear hatch. So, if the bus was loaded with gear, it was an army crawl over stuff and under the headbanger to get to the front door or even the slider. Following the instructions in the Bentley manual to remove the door latch mechanism (remove outer handle, disconnect activation bar, remove inner handle, remove lower bolt in window guide, remove bolts holding latch, wiggle free), I spent a few minutes orienting to it and figuring out how it works. Since it was not working correctly, it was not easy to determine neither what was preventing it from working correctly nor how it was supposed to work. The image to the right, here, is for a later bay bus (the early bay latch does look a little different, especially in the area of greatest interest), but it should work well enough to illustrate. For orientation purposes, the side facing away in the image faces rearward when installed in the door so what we can see are the inner guts usually hidden inside the door. Consider the part furthest to the left; that is the lock/latch mechanism which connects to the activation bar. There are 2 circled springs: one larger spiral facing up (marked 1) and a smaller one partially hidden by a tab (marked 2). On the early Bay, spring #1 is not a spiral, it looks more like a "C", but on Hapy that spring was missing. Spring #2, however, was there, and it was kinda mangled.

I attempted to un-mangle spring #2, and instead it launched from the latch into my yard. Distressed, I cleaned the latch with brake cleaner while trying to arrive at a solution. Once clean, I shot the moving parts with Kroil and worked the latch. I started to come to the conclusion that without those 2 springs, the latch and lock actually worked much better. In fact, they worked great. Curious, I re-installed the latch by literally reversing the steps. I found positioning the latch inside the door and then getting the window guide in place were the challenges. I lowered the window and started testing the latch: open, close, open close, lock, try the latch, unlock, etc. It worked like any other car door latch. I can close the door with very little effort, and it stays latched. I can lock it, it stays locked and will unlock by pulling the lock tab inside the or from the key on the outside. Attempting to open the door when locked no longer fouls the lock. I mean, I can try the handle and then immediately unlock it. Even unlocking it no longer requires moving the key like I was locking it first (which I had to do even if no one tried the handle).

Passenger Door Fix
This was the easiest fix of the 3. The Passenger door resisted closing and the handle needed Herculean grip. I repeated what I did on the driver side first: remove the latch, clean and Kroil it. Then, I re-installed. This resolved the Herculean grip issue. The door resistance stemmed from the door seal not being correctly place in the forward lower corner of the door. It was hanging on the inside edge of the door. I still intend to paint Hapy this summer, so I applied a little carpenter glue on the seal rather than the super-strong black seal adhesive. I held it in place by hand until it seemed to hold and then shut the door to really hold it in place while the glue dried. This totally fixed the close resistance.

I started on the door cards, but didn't complete that. I will post about the door card improvement once they are back in Hapy.

---

That's it for today. There have been many adventures and experiments over the last few months. I'll get to posting them as time makes itself available. Thanks, as always, for following along-

Wednesday, June 26, 2024

4Peaks 2024 - Road and Festival report

It's that wonderful time of year again when Boo and I trek over the Cascades in Hapy the Wonderbus to take in whatever Stacey has cooked up for 4Peaks. After taking a couple of years off, she and her staff put together a fantastic return. Some years, I have spread my love of 4Peaks across 3 posts, covering our travels, the festival and the music as separate posts. Since we had very little in terms of adventures getting to and from, I will only have 2 posts this year, with the other one dedicated to the bands.

Backdrop
4Peak sunset
After replacing Hapy's starter and then doing the seals on the injection pump (see Diesel Dumping Discontinued, we still experience sporadic issues with Hapy starting. Once he starts, he runs like a champ. For example, the weekend before 4Peaks, I had driven Hapy, laden with gear, to a show and then over to the after-party. He was not interested in driving home. So, he came home on a flatbed and after removing and re-installing the starter, he would start again. A 1972 microbus should not behave like Windows 95, requiring a shut-down/restart sequence pretty much anytime the temperature changes.

I am also seeing diesel fuel drips on the bottom edge of the oil pan. Overnight, there will be a small wet spot underneath. While we are all fairly well aware that VW's like to mark their spot (it's usually oil), I think the Injection Pump reseal may not have 100% solved the problem. In fact, I think the failure-to-start issue has nothing at all to do with the starter and everything to do with the pump losing some of it's prime overnight. With starting concerns in my head, we spent the day before 4Peaks locating and packing our gear. I say locating because with the move and all the construction, our gear had moved around a bit. We used what we call "the Boot" to carry lawn chairs, the folding table, a just-in-case personal porta-potty, and a few other larger items. This makes for a much easier vagabond, and much better visibility.

There and Back Again
sporting a 2019 cup
With thoughts of no-start in our heads, we followed the philosophy we had years ago when we left town for ChinookFest (see ChinookFest 2017 Road Report) to go one stop at a time. Each time we stopped, we would park on an incline and well out of the way in case we needed to roll-start or R&R the starter again. Luck was on our side as we did not suffer a no-start, but luck favors the wise, and we did not shut off the engine unless we absolutely had to. For example, we had to shut off the engine for the fill-up on our way out of town, but we chose to try to get all the way home without re-filling (that's almost 350 miles round trip, which is especially dicey with a fuel leak). We also did not turn off the engine at the rest stop on the US-22 or any other time until we parked for the night at WinCo in Bend.

The route to and from 4Peaks is well worn by now: US-217 to I-5 South to US-22 East to US-20 East. We left before dark, but it was still almost 8PM. Traffic was light all the way to mile post 72 on OR-22 where we hit a night-time paving operation. Again, we chose to not turn off the engine while we sat for at least 15 minutes. Once we were through the construction, the traffic pressure behind us was downright scary. Apparently, many others who travel at night believe the speed limits and other safety expectations (like not tailgating, not cutting people off and not trying to run others off the road) expire at sunset. 7 or 8 vehicles of the possibly 30 which were in the construction queue passed us before we reached Sisters. Of those, the first 2 were perhaps the most dangerous I've had the displeasure of sharing a road. One was in a lifted truck who was following so close I could not consistently see his high-beams, but they were so bright they illuminated the road around us. Recall, we had the Boot, so the rear of the bus was a full meter further back than the bumper usually was. I now wonder whether a person could have walked between our vehicles, he was so close, and we were going 55-60 mph on curvy mountain roads.
 
When we arrived at the first passing lane, I immediately moved to the furthest right edge of the lane an eased my speed down to 55. He blew past and then I discovered he had a lane-filling double-axled utility trailer attached. If I had made a sudden stop to avoid wildlife, debris or a broken down car, his mass would have plowed through us. But he wasn't the scariest. The truck immediately behind him was worse: He tried to pass after the passing lane had ended and practically skimmed my mirror off as he passed. That road menace was also hauling a double-axled trailer, but his was a camper and twice as long as the utility trailer. I nearly hit the gravel on the far side of the right shoulder before he passed and I could aright Hapy. The others passed during dotted yellow lines or regular passing lanes and mostly did not create too much excitement.

restival
We vagabonded (slept in Hapy without putting the top up) in the WinCo parking lot, parking around back where the employees park, but also where the ground has a slight downgrade towards the exit. We hit the bathrooms and bought ourselves some dinner from the service deli, scarfed and went to sleep. The following morning, we returned to WinCo for bathrooms and breakfast. We were 20 minutes from the gates and had all morning so we hit the shops, collecting the things we were unable to find before leaving town (camp shower, an extra yoga mat, some bath towels, etc), and, of course, the coffee cart for a couple Americanos.

The drive home was less eventful and once Hapy started we didn't shut him off until we got home. We were very appreciative of all of our friends at 4Peaks sending "he will start" vibes our way. There were multiple stretches of road where the traffic was bad enough for us to clutch in and out of 1st gear: heading into Sisters from the East on US-20 and heading North on I-5 between Donald and Wilsonville. These are both common slow traffic areas, but I felt that clutch pedal in my left butt cheek the next morning. Otherwise the roads were clear, the traffic non-threatening and the weather was a comfortable 25*C (77*F).

4Peaks - The Festival
Sonny and Hapy
Boo and I have been going to 4Peaks since 2015 (see the first 1..2..3..4Peaks). The festival had been growing through 2019 and then CoViD hit. Stacey cancelled 2020 for CoViD, did a mini-Peaks for 2021, but then skipped the next 2 years to rethink/retool/refocus (and get married! Congrats Stacey!). I thought, perhaps, 4Peaks was not coming back. Needless to say, we are glad it did. 2024 was smaller, maybe even smaller than it was in 2015 at the old location. It was the same groovy, with art by Ryan Kerrigan, great local food vendors and our emerging favorite: yoga with Nicole. Boo and I hit Nicole's class all 3 days it was offered, and fell all the more in love with her approach. So holistic, and full of explanations of why we're doing certain things. Afterwards, we feel physically great, emotionally centered and a little smarter. Thanks Nicole!

We arrived about an hour after the gates opened, so we were able to set up near the entrance to the festival grounds. This meant that, like mini-Peaks, we would have incredible sound quality at our camping spot. Boo suffered with sinus pressure on Saturday so we heard most of the bands from "home", rather than in-venue, unlike Friday when we spent considerable time inside. The sound was amazing, and when she had stretches of feeling good, we danced in the grass. An additional benefit of where we camped was our proximity to the 4Peaks Founders' camp (Stacey and her closest friends, basically). So, while we had seen most of them over the years at various spots within the festival, we hadn't really met them, had drinks, swapped stories, etc. They're lovely people and massive Phish-heads, so we got on great. Michael, one of their friends, arrived late in a yellow-orange late Bay named Sonny, and set up alongside our camp. Michael farms cherries, and just completed his harvest... causing him to arrive so late. Griffin was in a golden tent and worked at a camp outside Sisters, and Pete drove down from Montana and slept in the bed of his truck. Further up the fire lane, a 1978 VW Westy driven by Natalie (2nd owner!) and her husband camped. She had a sign-sign on the side of her bus encouraging attendees to write a positive note and sign in exchange for a 4Peaks sticker she had made. Of course we participated and that sticker will appear on Hapy shortly. Over the course of the weekend, we re-connected with many of our old friends (Mike and Suzie, now living in Central OR, eg) as well. Obviously, we made a bunch of new ones. There are few things like a couple of old VW's to bring the curious, and we are more than Hapy to chat up whoever drops by.

Main Stage from behind Hapy
The last morning always comes too soon, and like every other year, we left before the final band (Garcia Birthday Band) had completed their set. We were not alone. It is actually fairly common for most of the festival goers to be gone before the final band finishes, and we were not in the 1st half of those who left. We had tried every food vendor, explored every product vendor, visited Kidlandia, played on the swings, walked the entire camping zone, danced and laughed all weekend. We will be watching our email for early-bird ticket announcements for 4Peaks 2025; we are 4Peaks lifer's now.

---

That's it for today. I'll post about the bands next time. Thanks, as always, for following along-


temp tattoo from the Founders

Tuesday, March 26, 2024

Fixing Hapy Furnace (part 2)

Picking up where I left off the last post, Hapy has an operational furnace again.

Fuel Pump Swap
As I mentioned in my last post, the fuel pump which originally delivered with the heater/furnace would not work when I tried to bring things back to life. I splurged and bought a more expensive "quiet" model for $50US rather than another standard pump for $20US. I figured quieter or not, the more expensive pump may have better parts in it, and it may last longer whether it is quieter or not. Or it was just a marketing gimmick and I got took. Let's chalk it up to the cost of an experiment.

The old fuel line path was relatively simple. The "hard" (clear but firm plastic) lines that delivered with the furnace had short (50mm / 2-inch) stretches of fuel hose between them and the pump. The pump was suspended from a cross beam by the included rubber mount held in place by a single sheet metal screw. After a few turns with a screwdriver, the pump was on the ground. A few more and the fuel lines were removed from it. The supply fuel line started dripping fuel after a few seconds, so I caught it with a pan. The line on the pressurized side was completely empty, so no drips. I simply reversed the removal: added the rubber mount from the supply end of the pump, added the supply fuel line, suspended the pump from the cross beam and then added the pressurized-side line.

Prime and Fire Up
The Afterburner has a control page where you can direct only the fuel pump to fire up. This allows you to get fuel all the way to the furnace without the glow plug turning on (drawing the battery and maybe burning out the glow plug). I had not connected the pressure line to the furnace, but I wanted to clear the lines of any bad fuel, so I moved the pan under the dangling hardline and triggered the Afterburner to prime. Within a minute of the prime starting, fuel started spurting out the end of the line. It took longer than I expected it to, but perhaps that is an indication of how little fuel these units actually consume. Once the fuel leaving the pressure line looked like the fuel supplied at a filling station, I stopped the prime function and connected the hardline to the fuel hose dangling from the furnace.

While the pump was slightly larger than the original, it did not seem much quieter during the prime. Of course, I hadn't heard it pump in a couple of years, and memory is a funny thing. I do recall that when the furnace was running, I could hear the tick-tick-tick of the fuel pump over the whoosh of the furnace. With this in mind, I set the furnace to start. I did not want to consider the experiment with the new thicker, dedicated wiring yet, so I left the battery tender hooked up. At no point did the battery fall below 13.5V so either the tender was working hard, or the new wiring is a hit.

Regardless, the glow plug got lit, the fan started spinning and after 2 or 3 minutes the furnace ignited. This felt like a considerably longer period of time than before. Perhaps the priming was incomplete and I needed to prime again after connecting the hose to the furnace. Perhaps it took time to ignite simply because it had been so long. Once it ignited, a huge plume of smoke poured out of the little muffler. There was virtually no wind, so the cloud grew and sat slowly obscuring first the rear end of the bus and slowly 2/3 of the bus before a light breeze broke it up. After a few minutes, the cloud dissipated and the exhaust emission was reduced to nothing. All that remained was a light smokey haze inside the bus. I regret not taking a picture of that.

Noise Observations
While the temperature inside the bus slowly crept up from 55*F (13*C), I noted the noises. I could only hear the fuel pump ticking inside the cabinet where the furnace is located and even then, only when I stuck my head into the cabinet. I think the pressurized line is transmitting it. I stuck my head into the rock-n-roll cabinet above the spot where pump is actually installed and could not hear it. Maybe this new pump is quieter. Then, I moved outside where in the past I could clearly hear the pump from several feet away, even from the passenger-door side. I could not hear it, but I could hear the furnace whoosh. Of course, my muffler-ing of the furnace is different this time, having removed the second small rectangular muffler and the motorbike muffler. Perhaps the pump is no quieter, but the furnace is that much louder. To determine if the muffler configuration is a variable, I decided I will conduct another test at a different time, after re-attaching the other muffler bits. I had thought about bringing them along for while-parked use, and maybe I will need to, out of respect for our festival-going neighbors. In the past, I took decibel readings, but they were for while the furnace held a temperature, not during temp catch-up (full blast).

I will continue to experiment with noise readings and post if I find any readings are different than they were 4 years ago. I expect that once I put the extra rectangular and motorbike mufflers on, the readings will be what they were before. The only real mystery to me is whether the fuel pump can be heard over it. At this point, though, the pump seems significantly quieter.

Thanks, as always, for following along-

Tuesday, March 19, 2024

Fixing Hapy Furnace (part 1)

Having finally arrived at a place where we have some heat while we're moving, I felt motivated to fix the heat for when we are standing still. Today's post covers most of the saga of getting a Chinese diesel heater operational again. Spoiler alert: the heater isn't running by the end of this post.

Brief History
Back in the early days of CoViD, I installed one of those Chinese diesel parking heaters into Hapy (See Parking Heater 1, 2, 3, 4, 5 and Final for deep detail). While I was able to run it a few times, I found that the heater pulled the voltage way down on whichever battery was connected to it. I tried to solve by providing multiple batteries to source from: one to start, one to run, but switching from battery to battery seemed like a bad practice. I had other priorities, so I just let the furnace sit unused. When I did the sound deadening effort and the luxury electrical re-wire, I dismantled the cabinet which housed the furnace so I could get sound deadener underneath it and electrical cables through it. This meant dismantling part of the furnace too. Later, when the band wanted to use Hapy for the album cover, I removed the furnace exhaust so it would not appear in pictures. So, I had a furnace without an exhaust, and would draw way too much juice.

Electrical
Over time, and with more learning about electrical stuff, I have concluded that the wire used to convey electricity but perhaps more importantly the wire for a ground were far too thin. It was due to these thin wires that the voltage would drop so badly as the furnace attempted to compensate. Wires which would have been barely up to the job had the battery been sitting right on top of the heater will definitely NOT be up to the task once you move the battery a few feet away. This is exacerbated by running the ground to the body of the bus instead of back to the battery. The ground location should not matter as much, but I'm citing it as a participant cause anyway. So, addressing the electrical came first after removing the furnace from the bus.

A small harness of wires leaves the furnace body and enters a black plug (see picture on the right). The harness that ships with the furnace includes a pigtail that clicks into the furnace black plug. To my eye, the red and black wires in the pigtail are not nearly as thick as the wires leaving the furnace. This probably saved the manufacturer a few pennies, but the amp draw issue starts right there (and in my case got worse). So, I cut the main power and main ground wires from the furnace black plug and put male/female wire ends on them (12V/ground respectively). I made them different so I couldn't accidentally plug it in backwards. I then prepped a thick 2-wire black/red cable with matching wire ends, and routed it over to the luxury battery. At the battery end, I added a ring terminal for the ground and added a 20Amp fuse into the positive side before adding a ring terminal on that end. I left things detached as I switched to preparing for the exhaust.

Exhaust
From under the bus, it was clear that I had not made the hole(s) large enough for the exhaust, intake and fuel to be easily maintained. Quite the contrary, I had installed it such that once it was all together, it would have to all come apart to fix anything. Frowny-face. So, I started by cutting a 4-inch square hole into the lower belly pan. Many buses do not have these, but I got lucky. Anyway, with the hole cut I could see where the furnace sat, and noticed that the exhaust was getting pinched by the too-small hole in the floor as the exhaust left the furnace. So, I went topside and expanded the upper hole both in the floor of the cabinet and the steel floor of the bus. With the larger hole, the exhaust easily fits and things could be maintained from below. Still, I did what I could on the furnace itself before lowering it in: Connect a 6" long stretch of fuel line, attach a small circle of window screen to the intake (so bugs and pebbles don't get in) and then attach maybe a foot of heat-wrapped exhaust. I set the furnace in place and attached a small subset of the muffler arrangement I had used before: just one rectangular muffler. I may bring the expanded muffler set up for use when we are in tighter camping spots (like festivals), so we can bolt-on some extra quiet. I mounted the muffler to the underside of the frame rail, with the outlet pointing rearward and slightly away from center (picture on the right).

A keen eye can see some fresh Rustoleum primer + paint above the muffler where I discovered some rust had eaten all the way through the body. When I was working on the other stuff I ground the metal down, removing the rust, but exposing the holes. Sadness. That rust traces back to when this bus had a small vent window directly above this spot. That vent window was badly leaking and the rust had already been forming to the point of marring the paint when I bought this bus over 20 years ago. I eliminated the vent window in 2015 (See Calling "glass") with a window I purchased from BusBoys in Redding, CA in 2009. Some things move slower than others.

Fuel
I shifted over to fueling at this point. The fuel line that had been between the included "hard" line and the furnace had breeched, probably when I did the sound deadening. The fuel in the line looked dark, so I dropped the line into an empty pail, and figured I would prime the fuel system, and purge the bad fuel at the same time. Unfortunately, the fuel pump is no longer functional, so I am waiting on a replacement to finish this job.

Afterburner
Back when I first did this job, I bought an Afterburner from the guy who hand builds them in Australia. Apparently, there are people building knock-offs, eating into his business, since they basically have cloned his work. So, if you are looking at getting the much nicer controller for your parking heater, please connect with Mr. Jones in Australia and get the real deal. Anyway, with the Afterburner, I tried to prime the fuel system, but the fuel pump wouldn't respond. When I unplugged the pump, I got a code; I concluded the wiring to the pump was good but pump was bad. So I ordered a new, supposedly quieter, one. We'll see. While I was clowning around with the Afterburner, I got it onto my home network, downloaded the newest firmware and wandered around the new-to-me website that the Afterburner hosts. It's really cool. I am looking forward to triggering the furnace to warm the bus from inside. For reference, here is a link to the user manual.

This is as far as I've gotten. I am waiting for a new fuel pump to arrive. I need to purge the old lines of nasty fuel, and install that new pump. I expect there will be other discoveries, and I need to rebuild the cabinet innards. There's always opportunities to improve things. Anyway, thanks, as always, for following along-

Tuesday, February 27, 2024

Hapy Heat Repeat (Part 1)

Ask anyone who has owned or simply driven an old air-cooled Volkswagen in not-Summer and 9 times out of 10 they will regale you with tales of being cold. These awesome vehicles were designed to have heat, its just that they were also designed to be owner-maintained, and maintaining the cabin climate control is not easy. With aftermarket replacements of J-tubes for heater boxes, cardboard pieces eventually failing over time and long channels under the car (where road salt, etc gets in), it's no wonder heat doesn't make it. Anyway, today's post documents another attempt to get some warmth into Hapy, specifically onto my feet and maybe even onto the windscreen.

Why the Obsession
By now, you must wonder why am I so focused on getting heat into the bus. And I get it. Put on a coat or something, right? Besides, it's not like we really get snow in the Northwestern Willamette Valley. This is all true. For folks who own these cars and busses in genuine snow country, I suspect either they are summer-only vehicles or you are far more brave than I, driving in moon boots or something. Around here, we really only have about 10 weeks of warm-to-hot weather out of the 52 in a year. For the rest of the year it is either cold or cold and raining. Driving around in the cold is not as fun when you're bundled up (ski-gear head to toe) and still cold. Regardless, the temperature is hovering around the dew point during those 42 weeks, and overnight for most of the 10 weeks of warm-to-hot season. In the mountains, it approaches the dew point earlier in the evening and remains later into the morning. So, having a means of getting the fog off the windscreen, and not adding to it, is super important.

The Plan
so it begins
Last November, I posted an update (see: Hapy Update) where I replaced Hapy's crappy glow plugs with a new set. I did not circle-back on that since, but he has started without a hitch all winter. Those plugs are fantastic. The real test will be how well they behave next winter. Anyway, in that post, I mentioned that I had acquired a Maradyne Fans heater unit and shut off the Vanagon rear-seat-heat unit because I believed it had started leaking again. We had a "break" in the weather (almost 10*C / 50*F and only occasional rain), so I took the unit out to Hapy. The think was to remove the old, and swap in the new. Ain't nuttin ever that easy, but it's in now.

Old Heat Exit
The Vanagon rear-seat-heat was suspended from beneath the belly of the bus just forward off the radiator. I had fab'd a custom plenum from the heater unit into the original 3" diameter air channel, run coolant lines along the driver side to feed it and run electrical from the dash to control the fan. I hadn't tried to control the valve, choosing to leave it on or off by setting the valve before a drive instead. I unplugged the electrical first, then the flashing/plenum that routed the air into the 3" channel. Then I set to removing the heater from the underside of the bus. Both of the nuts at the bottom of the threaded bolt supporting the unit had rusted so I had to encourage them with a hammer.

Last, the coolant lines needed to be removed. I held the lines closed with vice grips so I did not lose a bunch of coolant and then set a dishpan underneath so I didn't spread coolant all over the ground when I disconnected things. The lines removed easily enough and a small amount of coolant dribbled into the pan. From this I concluded that the unit had been the source of the leak in the cooling system or there would have been more than the few ounces that appeared. I set the unit aside and shifted to the new heater.

New Heater Hung
mounting angle
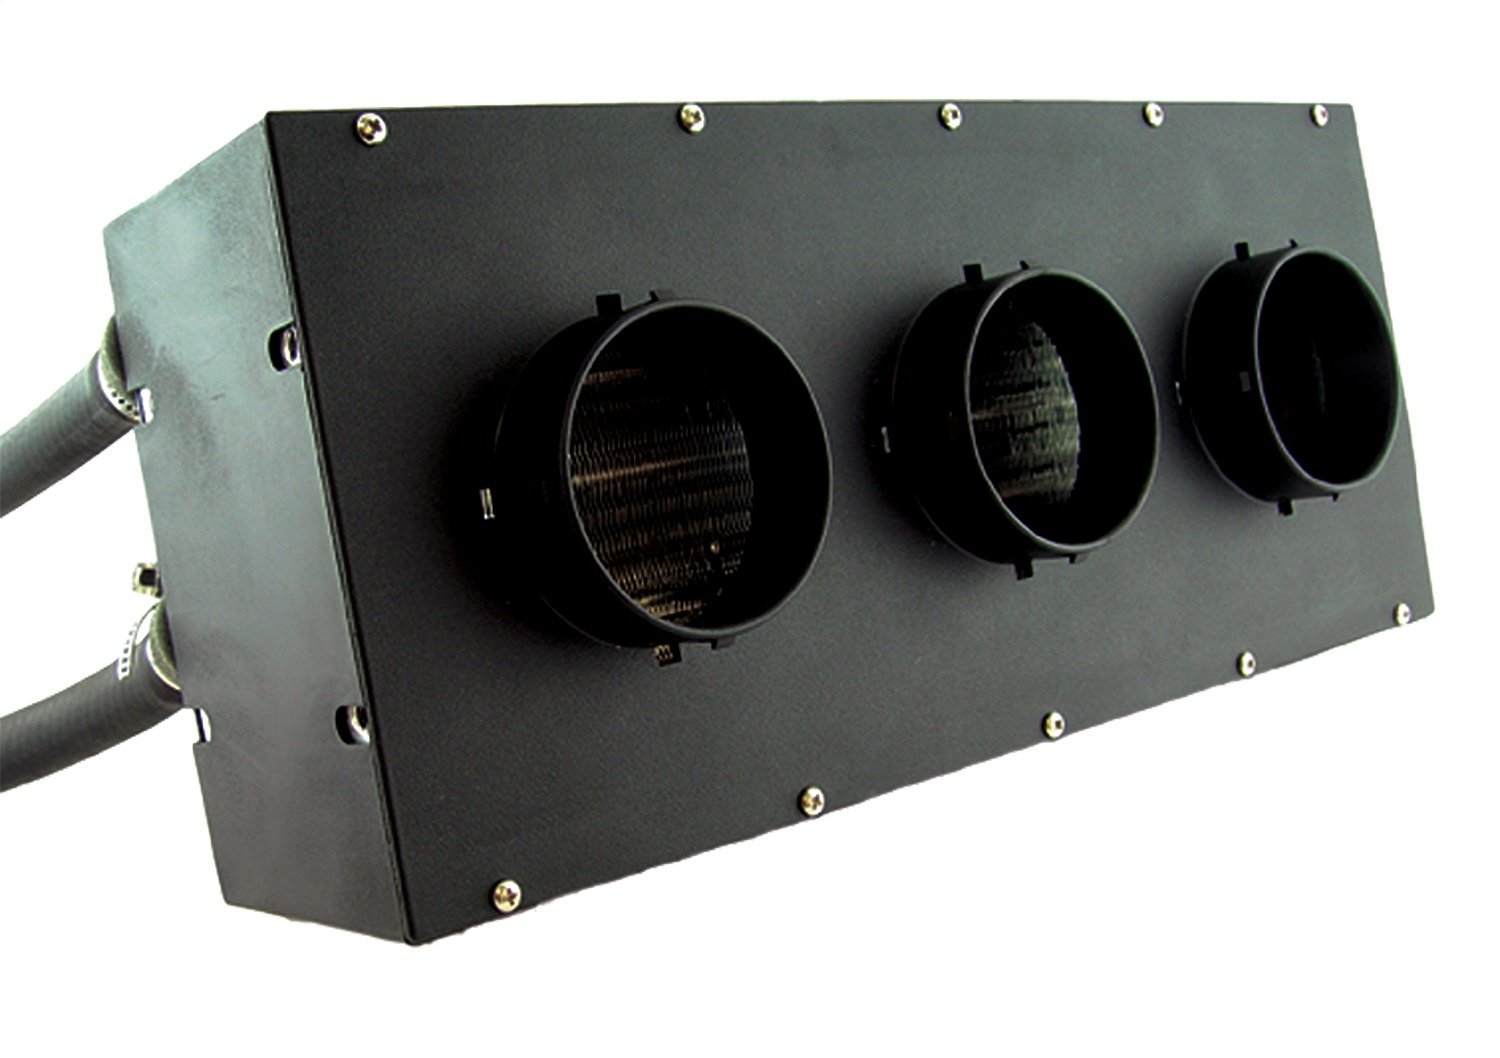
For installing the new unit, I started with placement thinks. I wanted it in essentially the same place, running air into the same 3" diameter hole. The force and size of this new unit dwarfs the Vanagon rear-seat-heat unit, however. The Vanagon unit is 6" tall and about 9" wide. The Maradyne unit is also 6" tall, but it is almost 18" wide. The Maradyne unit arrived with a cover that had 3 3" vent protrusions. The outer edges of those protrusions are 13" apart, so I decided I would retain the cover and enclose the vent protrusions inside my new plenum. I was unable to reuse any of the old piece.

After some failed attempts to place the heater straight/level with the ground, I shifted the mounting hardware so the new heater was at approximate 45* angle with the bus, pointing upwards. One would reasonably assume this would cause the unit to hang considerably lower, but because of the placement of the fans, the unit is only about an inch lower. How? Well, in this configuration, the top edge of the heater unit nearly touches the floor of the bus. Neither the Vanagon rear-seat-heat nor this unit could do that in the horizontal position because of all the various pipes running under the floor. In the picture on the right, here, the heater looks much lower than the radiator; that is probably caused by the angle I held the phone. In reality, the radiator is a hair lower. The mounting brackets have 2 holes, designed to be used with the enclosed screws. Yes, that's right, screws, and short ones at that. With this install design weakness in mind, I suspended the heater from a pair of metal tubes under the bus floor with.. wait for it... cable ties. Yeah, that is so RoadKill; I am not a fan of using cable ties this way. Having said that, I have not ever experienced a failure with cable ties, and if my 20-year history with Hapy is any guide I will be up under this bus fairly frequently. So, I will be able to monitor the health of these ties and resolve before any real issue arises.

Plumb It
With the heater relatively stable, I flipped to the driver side of the bus and started working on the coolant lines. As I mentioned in the referenced post from November, I picked up an old-skool control valve. Prior to installing, I noticed that the valve seemed to operate more like a shut-off valve than a gradual taper. When "closed", it was definitely closed, but it remained mostly shut through about half of it's travel, then opened up very quickly through the next 1/4 of it's travel and then that last 1/4 its no more open, in fact it almost seems to close a little bit. So, from closed to open the valve really only had to move a little over 1/4 of it's overall travel. I chose to drill out a little bit of material at the barely open part of the valve so that the first 1/2 of travel now actually opens a little bit near the end of that movement. Overall, I think the open-to-closed is closer to 1/2 the overall travel now.

Once modified, installing the coolant lines part was fairly easy. I cut a short stretch off of the return line, and added that to the return off the heater. To that I attached the valve, minding the indicated direction of coolant flow marked on the side. Last, I connected the supply and return lines and then removed the vice grips. I am not 100% thrilled with the routing of the hoses and will incorporate a 45* angle so they are not forced so route to low. After this picture was taken, I shortened the return line another inch or so to reduce the droop a little bit. I poured a bunch of water into the coolant bottle and called it a day as it was starting to get dark.

Plenum
I returned the following morning to complete the job. In a typical install of one of these Maradyne heaters, either the purchaser connects 3" hoses to the outlets or maybe some directional vents (neither are included). Remaining a-typical, I assembled a 4 sided plenum, like the one before it, held together with the higher-end flashy ducting tape.. The top is a 13" by 5" rectangle with 1" long drop-down sides, with a 45* angled rear tail and an up-turned front (image on the right). The bottom is 13" long by 4" (with 1" drop-sides along the shorter edge) and the plenum sides are right triangles with 4" long sides. Remaining ever cost-conscious, I cut material from the old furnace intake. Recall, it was 15" square, so I cut up one side and got 13" length with 1" for the drop-sides with one cut. I taped on the top and bottom first, then the sides, and closed up all the gaps. I get this is not exactly contours-quality... this is far from that. This is all about getting on the road with whatever heat I can extract from a TDI engine. Besides, the last taped-together plenum lasted a few years and would have continued had I not torn it apart for this install.

Electrical
Before I got started on the electrical, I looked back on the post I wrote about the Vanagon rear-seat-heat fans (See Defrosting - Part 4). I discovered that the fan switch that I bought for that install was the exact same as the one that delivered with the Maradyne fans, just with a different knob. So, while I could run new wires and replace the switch, I didn't need to. So, I didn't. Instead, I cut the 3-wire plug off the fan power wires and the ring terminal, leaving enough material so I could reuse it somewhere later. I added female spade connectors to the four wires. I could easily identify the ground wire and low-fan wire so I connected those and tested the fan. Success! And even on low, this fan is more powerful than the Vanagon rear-seat-heat unit on medium. It probably rivals that unit on high, in terms of airflow, but not fan noise. This is super quiet: no fan noise, only the sounds of the rush of air.

With a multi-meter, I confirmed which of the remaining 2 disconnected wires was the wire for medium. I decided that since I had a strong 12V signal, I would reuse the relays and simply wire up the fan. This was also much easier and it insurers that the wires won't melt when I turn the fan on one of the higher settings. The air flow on the "medium" setting is considerable. Boo and I have noticed that the heat in ToyoTruck is most effective on the not-highest setting, concluding that the air speed is so high on the highest setting, it is unable to pull heat out of the heater core as it passes through. As I wired up the high fan, I considered that we could have a similar issue in Hapy now, and may really only use the lower 2 speeds. Time will tell.

Any time the coolant system is open, there are a series of engine runs or test drives followed by adding water and coolant until it levels off. Since I did not need to drive Hapy during the week following this work, I didn't run the engine. Instead, I prepared for "part 2".

The inlets for the fans are drawing outside air and the control valve is still managed by rolling under the bus. I'll get to the valve eventually, but I don't want to wait too long. The drawing outside air, however, needs to be considered right away. As it is, a drive through one of our seemingly ever-present puddles and I've got warm fog blowing up on the windscreen. At least until I route the fan inlets to the bus interior. Since wet season will persist for another few months, I got after changing the air source shortly after I completed this post. I added the image on the right here to illustrate the first problem I encountered: the return coolant line runs straight through where an air inlet would go. Of course, the support bracket isn't helping either.

Thanks, as always, for following along-

Tuesday, February 20, 2024

Hapy Speedometer Cable replaced

I mentioned in my last NewOldHouse posting that Hapy's speedometer suddenly stopped working on the way home from a party. It worked on the drive there, but didn't on the way home. Fortunately, there was lots of traffic for me to keep pace with ,but it's still annoying not having a speeod. Today's post covers the adventure of replacing the speedometer cable. Before I begin, today's my birthday, so Hapy Birthday to me, I guess.

Symptoms
working on concrete!
It makes sense to start with the symptoms I noted before the speedometer stopped working. Other than the obvious of it not working, during the drives prior, I noticed that the speedometer needle was bouncing an awful lot. This is often a sign that the cable is binding either due to age or because it hasn't been lubricated recently. Since it was the original cable, and I had never lubricated it (I know bad owner), I concluded that the cable had broken. Had I recognized these symptoms earlier, perhaps I could have prevented the failure. Ultimately, I am not sure the cable actually broke, but at this point in my process, my conclusion seemed solid. Before I began, I disconnected the battery. I did not want to pop a fuse or smoke another wire.

Removing
Someone posted on the Samba that replacing a speedometer cable took 15 minutes. I know better, and assumed it would take me hours, which proved correct. Because of the size of the holes through which the cable passes, it can only be removed one way: from the wheel up through the back of the dash. So, I started with raising the driver-side front corner and removing the front wheel, and then the grease cap. With a pair of pliers, I removed the hard rubber boot on the rear of the wheel (that the speedo cable passes through) and then pulled the cable through. I wiped off the grease and then got under the bus, pressing back the 2 sets of tabs that hold the cable to the underside. Then, the cable easily pulls through to the front of the bus.

Next, I reached around the steering column and detached the cable. In Hapy, the cable actually enters a converter box that creates a wave pulse for collecting speed and mileage for the TDI computer. I hadn't connected the wiring for that, but it was between the speedo cable and the speedometer. With the speedometer disconnected, I could pull it up through, feeding from below with one hand while pulling taught with the other. Once the cable was out, I tried turning each end, and watched the other end turn, albeit sporadically. So, the cable was good, but not working very well. Since I had a brand new cable, I decided to keep going.

Preparing
cable lubrication
I took the new cable over to the side and started working silicone-based cable lubricant into it. My process was fairly simple: shoot some into the speedometer-end of the cable until it pooled up to the lip. Then, wiggle and turn the cable from the other end until the puddle disappeared into the cable sheathing. I repeated this may times. Once I was satisfied that there was a lot of lubricant inside the cable sheathing, I laid the cable flat so the lubricant could spread out and took a long lunch.

I added a little bit of lubricant to the outside of the wheel-end of the cable so I could easily add the rubber boot and then started my re-install. I had purchased 2 circlips for the wheel end of the cable and a new grease cap. I shot the new grease cap with some wheel paint so the brassy cap would not be so grossly out of place. 

Installing
I started by passing the cable from behind the dash, choosing to not pass it through the oval hole in the steering column support. Why? That hole seemed to prevent the cable from easily installing, and actually seemed to force the cable to bend unnaturally. By skipping the hole, the cable had a much more gradual curve back behind the dash. Time will tell if this was a poor decision. Finding the hole through the floor in the nose proved to be the single most time-consuming part of my process. Since I had added holes and electric cables, I had more wrong ones to chose from. Once I found it (there are 2 original holes, one directly in front of the other. The speedo goes through the one that's rearward), the cable easily passed through and I was able to route it the rest of the way to the wheel. I refrained from securing the secure-to-body tabs at this point so I had the most play in the cable at the wheel.

I slid the rubber boot on and then passed the cable through the wheel. I left myself plenty of excess so I could add the grease cap and circlip. I found, however, that the new grease cap did not fit. It is just a hair too small. After many attempt to make it work, I abandoned the new cap and switched back to the original. Because of the nature of the grease cap, I found the grease had found its way to the edge where the cap needed to seat on the wheel. With grease on that lip, the cap would not rotate with the wheel. I think this may have been part of the bouncing speedometer needle. To remedy, I cleaned the edge of the cap and the seating lip with brake cleaner, careful not to let it near the greased wheel inside. Once clean, the cap fit on correctly and rotated in time when the wheel spun.

Satisfied with the cable attached to the wheel, I added a touch of silicone grease to outer edge of the rubber boot and fit it into the hole. I tried to fit it without the lubricant, and it would force the grease cap off. With the lubricant, the rubber seated and the cable is set. I moved to the body-securing tabs next and closed them snug. Last, I returned to the behind the dash to connect the cable.

Extra Conditions
Hapy as album cover
It was at this point, that I started to question the quality of the speedometer cable converter box. When disconnected from everything, spinning one end of the converter had no resistance: is spun normally. If I connected it to the back of the speedo and gave it a spin, the needle would move. What was interesting was when I connected the cable to other side of the box. The output would not be fluid consistent. I could spin the wheel and see the cable rotate freely by itself but as soon as I connected it to the converter box, the converter box output was all over the place. At this point I concluded that the box was the main problem. Since I had not been capturing or using the output of the box, I decided to not integrate it, connecting the cable directly to the rear of the speedo like everyone else.

To test, I spun the wheel a few times and I could see the odometer slightly move in the 10th-of-mile. I concluded that the main issue was resolved. Since I was back behind the dashboard again, I needed to confirm I hadn't done anything wrong, so I verified the running lights, fans and hazards after reconnecting the battery.

That's it for today. While it was a little frustrating getting the cable replaced, it re-excited me about working on Hapy. I have a serious backlog of things I want to do, so if the weather is willing, and I have some time, maybe I'll get after one of them next weekend. Thanks, as always, for following along-

Tuesday, January 16, 2024

Hapy Electrical Fix and Planning

A few weeks ago, I rotated the headlight switch clockwise and that caused a short that allowed a wire to release it's smoke. Today's post covers that resolution, with some expected twists and closes with a plan to update the fuse box.

Poof
72 bus wiring diagram
First, I accept that what happened was entirely my fault. I turned a push-pull knob, and the housing was loose so I created a short. At first, I thought I had grounded a pin on the back of the switch. Based on the wire which fried, I'm not so sure, but the grey wire fell off of pin 58. That wire fall was what caused the running lights to not function: they tie into fuses 1 and 2 which control them. It wasn't wire 58 which fried.

So, I dug into the interweb. I found another person who had the buzzing noise from their flasher relay and they discovered the root cause was that the dashboard did not have power. Sounds about right, I suppose, so we remove the dash to see. The dash removes with 4 screws. If you are fortunate enough to have the vent and oily-smelling-air controls, you may need to manage them first. I have the older style controls which originally had the little colored spring-loaded clips. Of course, Hapy didn't have the colored clips, and still doesn't. Anyway, remove anything from the vent control levers which impede the dash removal, remove the 4 screws and detach the speedometer cable. Then, the dash lifts straight out (a little diagonal) to the steering wheel. At that point, I rotate it so the face points to the floor. To me, this puts the least pressure on the wires while exposing them for me to see. From here, I could see that the black wire from fuse 12 that delivers 12V to the dash had it's plastic casing melted off. How and why that wire fried rather than popping the fuse, I don't know. The fuse was and is still there, it was relatively new (like, in the last 5 years), the right rating and it was seated properly.

Clumsy
1 fried wire
Knowing which wire needed to be replaced is a great first step. Getting that wire replaced without negatively impacting anything else in the original electrical system, however, is a virtually impossible task. Such was the case this time. First, I pulled the wrong wire out of the fuse box, and as I did, I dislodged a couple of fuses. Then, I got the wire back in and dislodged some other ones. Finally, I found and removed the bad wire from the fuse box, bumping a wire out of the high-beam relay holder as I did. Neat.

I formed a new multi-female-spade-connector wire, using the fried one as a pattern. With a multi-meter, I confirmed the connectivity between all of the end points had 0 resistance and returned to Hapy's driver seat. I plugged the wire into the tabs on the dash, and dangled it behind, finding the tab in the fuse box. Again, I unsettled a few fuses, but once they were in place again, I started testing. First, I confirmed that the running lights and headlights came on. It being daytime, I could tell the lights were on, but not that the headlights were the high-beams. I turned the key to run and the buzzing was gone. The turn signals worked, the hazards worked, and continued to work when I turned off the key. I even test started the engine to prove things were good. What I didn't test: the wipers. It seems that when I was messing around with the fuses, I failed to reseat fuse 11 (which controls the wipers and the rear defogger) after reseating what felt like all of the others -or- another wire fell off. I didn't discover that the wipers didn't work until I tried to take a drive at night in the pouring rain. So much fun. I don't think Hapy likes the winter weather very much; he does seem quite persistent in staying in the driveway.

About Had It
So, after spending so much time diagnosing issues only to discover the issue was the 50+ year-old fuse box or really the style of fuse used in the 50+ year old fuse box, I have decided to look into replacing it. I say that because the wire that fried was on a fuse that didn't blow and the fuses are in the box so loosely now they become disconnected simply by brushing past them. Based on my research, I understand the fuse-box layout / purpose to be this table below. I will replace with a simple 12-slot 12-independent-circuit box that uses spade fuses instead of the old buss style. It will ultimately use the same circuit numbers as before for all of the things I am keeping (never had ambulance fans, nor ignition buzzer, nor interior lights). Plus, it will include things I need, like radiator fans and the fan for the heater.

Fuse # Original Purpose Changed Purpose
1a front running lights, license plate light
2a rear running lights
3b passenger low headlight
4b driver low headlight
5b passenger high beam
6b driver high beam
7* open? looks like it was for ambulance fans radiator fans
8* emergency flasher and interior light emergency flasher only
9* ignition buzzer, rear interior light interior heater fan
10# horn, brake light warning switch/light
11# windshield wiper, rear defogger plus the windshield washer pump
12# dashboard, emergency flasher
rear backup light
a: supply-side from light switch
b: supply-side from headlight flasher (dimmer relay)
*: always hot
#: switched
&: inline fuse not in fuse box

I will be adding a master circuit-breaker as well back by the starter (where the main 12V source for the fuse box comes from) so there is a safety on the entire #30 circuit that goes to the ignition and the head light switch via the supply-side of the always-hot fuses. I do not know when I will get after this, though. The joy I have had since removing the rat's nest of wires for the engine control has been significant. The wires for the original bus have their problems, and I will be replacing some of the runs (particularly the rear tail lights), but for the most part, they have been up to the task. I just need to find a way to stay somewhat dry and maybe a little not-freezing so I can get after it. Since it is January, I recognize my opportunities for something this big will probably not appear for a while. Still, I can't keep letting smoke out of the wires, and I would very much like to get Hapy out of the driveway for a safe drive-around before spring. For the Pacific NorthWest, that starts with getting the wipers working again and then getting the high-beams turned off.

That's it for today. Thanks, as always, for following along-

Wednesday, November 22, 2023

Hapy Update

Today I could continue the dissertation on the effort to move the furnace in our 1948 farmhouse. Instead, I actually have something car related... the check-in on Hapy that I said I was going to do in a prior post and then flat-forgot. Remember Hapy? He's the 1972 VW camperbus that launched this blog. I meant to post this yesterday, time got away from me.

Hapy No Start Returns
A few weeks ago, as the weather turned cold, Hapy became increasingly difficult to start. Again. I figured it was the same issue as last time (See Hapy No Start Again), and started checking things with my multi-meter. I started where the old problem was: the main fuse for the glow plugs. Nope, there's a clean over-12V signal there. Then, I checked the voltage at the relay, and it was fine there too. Same for the resistance in the wire and the fuse.. no issues. So, I started thinking about the glow plugs themselves. I swapped this set in when I put in the chipped CPU and bigger nozzles, but not because there was anything wrong with the ones that were in there. I had this set of plugs that I had lying around for a few years, and I was selling Flash. Flash had failing glow plugs (resistance tests between the plugs were not within a few ohms of each other). So, rather than put the new set into Flash, I got selfish and put Hapy's nothing-wrong-with-them plugs into Flash and installed the new-never-opened plugs into Hapy. Looking back, I don't think these plugs were nearly as good. I think we have had starting-while-cool problems from the beginning, but it was Summer when I did the swap and never thought about it. Until now.

I pulled the rear-most plug (#4?) and tested it by resting the glow plug threads against a grounded bit of steel on the engine and triggering the ignition to "run". After a 3 count, the tip of the plug started to glow orange. After another 3 count, I could hear the relay click off, and the tip returned to black. I did this a few times and each time it took a few seconds for the plug to respond and even then it was only the very tip. Based on some internet imagery, I concluded that those plugs were insufficient and bought a fresh set.

A few days prior to installing the new set, I started hitting the in-engine plugs with some Kroil penetrating oil at dinnertime. I did not want a plug to break off or damage the head during removal. Whether it was necessary or not, the plugs removed relatively easily. All of them had soot on them when they were removed. Into the trash they went. For each of the new ones, I applied some anti-seize onto the threads prior to installing and then only snugged them down (did not torque the snot out of them).

Unfortunately, my efforts to start Hapy when the glow plugs were not working did a number on the starter. Again. So, my attempt to start him after replacing the glow plugs was not fruitful. Since I did the glow plug swap around the furnace work, and the furnace still is not operational, I self-limited my time to just swapping the plugs and then getting back under the house. I returned the following weekend (bumming rides and car-sharing with Boo the week between) to remove and inspect the starter.

should be 1 part, not 2
I admit, I expected the starter to just need a remove / re-install cycle. I was wrong. This rebuilt starter was installed in June 2023. After a summer of being my "daily driver", the starter was cycled well less than 500 times. I guess rebuilt Bosch starters are not all the same. Maybe the starter was a Bosch but the rebuild was done with cheap-o parts, leaving just the case as a Bosch unit. Regardless, it did not take very long to notice that the seal on the end (which is supposed to go around the shaft which juts out when 12V is applied) wasn't there anymore. It had potato-chipped inside the little pocket where the nose of the starter goes. Neat! So, off to the internets I went looking for a suitable replacement. I decided to get a new one from MetalManParts. Run by MetalNerd, his site only sells things that he personally fabricated or installed into his own vehicle. I have purchased both types of things from him before and have no regrets. Since Bosch was sold off to Seg Automotive, he now supplies new starters from them. I trust that if he is selling them, he is using them.

Sadly, the install of a starter has become fairly rote, since I've done it so many times. I simply put a 19mm socket, 13mm socket, a ratchet and a couple extensions into my pocket, slide under the bus with the starter and it's installed in less than 15 minutes now. If the rear sway bar were not there, I could probably have it done half that time. Of course, I ran the battery down with all my glow plug testing, so it got a spell on the battery charger before I could test my handiwork. Once that was resolved, I turned the key to "run", counted to 6 (for the glow plugs, it's 45*F here) and returned the key to "off". I repeated and then tried to start. Fired right up! I let him run a few minutes to top off the battery and now he is back to being my daily driver.

Hapy Heat Not Heat
Remember all that effort I went through to install the Vanagon rear heater under the bus for some heat? While that was fun, the result is not much heat. I described the lack of warm on the drive to and from the Cascade Equinox festival. Beyond the lack of detectable warmth, opening the valve to try to get heat has resulted in a coolant leak. I can attribute no other source for why Hapy's coolant level is suddenly not holding. So, I turned the valve back off and will be replacing the Vanagon rear seat heater with something else: a Maradyne Fans Stoker heater.

Maradyne, but could be any
There are lots of auxiliary fans which all look the same and have the same spec's (300cfm, 40k BTU - airflow and heating capacity, respectively). JEGS has their own, for example, that looks identical. Since I am unsure who is the originator, I went with a manufacturer with a known, solid reputation. There is little documentation and hardly any photos of this particular unit on the interwebs, making this choice perhaps a little more risky. I find the 40k BTU number everyone is using to be gross hyperbole, but I don't know how to test that nor the 300cfm number. I will bench test to get some amp-draw numbers before I install it. The amp-draw might be useful information for the next person since even Maradyne doesn't list this detail on their product page. And, it could be one more thing that is exactly the same on all of these units. For future reference, the JEGS unit draws 5.5, 7.1 and 11.6 amps (for low, medium and high settings respectively). I had relays in-place for the medium and high draw switch positions for the Vanagon unit. I don't know if I  will re-use them. Perhaps the amp-draw numbers will help me decide.

One other thing to point out: none of these heaters ship with a coolant control valve. Since I was leveraging the valve in the Vanagon, I have to add one of these or the heat will be on maximum all the time. I included this "vintage" control valve in my order. I thought about going with an electric one, but decided that I would really like to re-use one of the big original heat-sliders on the dash to control the amount of coolant flowing into the heater core. That feels more authentic than another knob attached to the bottom of the dash. Of course, I haven't ever had that control cable, so I will be running this either full-on or full-off until I do.

For now, this means that trips in Hapy will be just like all the other trips I've ever made with him in the not-Summer. They will be cold. It will be like driving around in an ice-fishing shed, unless I can either install that heater soon-ish -OR- get the little Chinese diesel heater/furnace working.... or both. Since I do not have a garage and I barely have a 4-meter square piece of concrete to work on... and I have a house furnace to fix, I do not think Hapy's heat will get addressed terribly soon. At least I have the parts for when I do. Of course, now that he is my daily-driver again, I may decide another week without a furnace might be a fair trade for some heat, any heat, in Hapy.

That's it for today. Thanks, as always, for following along-