Tuesday, July 28, 2020

Defrosting - Part 4

After that fun experiment, I really couldn't get myself back to sanding. So, today, I am going to talk through the electrical set up. I will eventually get back to sanding and Bondo, and more sanding and then primer... and more sanding...

12V and Grounding
routing wiring
Unlike my stereo installs, this time I started with the most basic of wiring: B+ (12V supply) and ground. For the supply-side, there was one remaining basic bladed fuse spot in the battery-top fuse location that wasn't already in use. I spliced a 12ga wire into that spot, and ran that wire along the other back-to-front wires along the passenger side. Leaving myself plenty of extra length, I stripped the end.

Then I switched over to the ground side. Again, with a 12ga wire, on one end I added a ring terminal and screwed it into the rear cross-beam where I have the radiator fans grounded. On the other end, I added a female spade connector. With these 2 wires, I tested the heater to make sure the fan would spin at different speeds based on which of the 3 male connectors was given 12V. First, of course, I added a 20A fuse into the bladed fuse spot. I felt this would work, since the heater unit worked before, but again, I probably could have tested this when the heater was freshly out of the bus and on the ground rather than waiting until it was installed, register constructed and installed, etc.

All 3 speeds work. While the fan was running I crawled out from under the bus and checked the air flow at the windscreen. I don't think the lowest speed will really be terribly useful, but the middle and upper speed should be sufficient to clear the screen, I think. Any of them will be better than the squeegee / towel method bus drivers usually use.

Control Wiring
finished view from underneath
Satisfied that the fan will work, I shifted over to how to control the fan. In my shelve of random stuff, I have about 10 meters of trailer wiring. This is a flat cable which contains 4 16ga wires. I felt that 16ga was too thin to carry the current for the middle and upper speed, but should not overheat for the lowest setting. After my findings above about the usefulness of the lowest setting, I'm not sure it will be used much anyway. So, my thought is that I will send 12V from the supply up to the fan switch through one wire and the signal for which speed will pass through the other 3:

Red - 12V
Black - low
White - mid
Green - hi

Similar to the cable I sent front-to-back for the gauges earlier, I sent this cable along the main harness, through the center belly pan and through a new hole I cut next to the other 2. I made sure this hole was fairly large (1/2-inch) so I could send a thicker control cable through that hole later. With the cable hanging on the emergency brake handle, I wired up the rear end. First, I removed about 4 inches of cable jacket so I could work with the wires individually.

To the Green and White wires in the flat cable, I attached female disconnects. I put together a pair of 12ga wires with female disconnects on either end, each wire is about 40 centimeters (15 inches) long. These will go from the relays to the fan for the mid and hi speeds. I put together a pair of 12V supply wires for the relays: each wire is about 10 centimeters (4 inches) long with a female disconnect on one end and a long (1cm) stripped end. The stripped ends were spliced together. These stripped ends were then fed into one end of a larger crimp-splice. Into the other end went the 12V source from the battery as well as the Red wire from the flat cable. I did something similar for the ground side, creating a pair of short wires that were then spliced into the ground for the heater. With all the wiring ready, it was time to plug in the relays.

Relays
these area a matched pair. Mine aren't
I was fortunate to have 2 12V automotive relays in my cache of electrical stuff. While they were both old Radio Shack relays, they were not identical so the pins had different arrangements of pins between them. Of course, my eyesight isn't that of a young man, so each pin was managed carefully. I started with the ground wires going to pin 85 and the signal wire going to pin 86. The 40cm wires connected to pin 87, with the other end going to their respective fan pin. Last, the 12V wires connected to pin 30.

These relays delivered with a mounting hole molded into the plastic housing, like the picture here. Most folks would send a screw through that hole and mount it into the body somewhere. Well, first, I guess I'm not most people and second, getting a drill up under the bus with a flat enough angle to put a hole through the crossbeam, and high enough to keep the wires up out of the air stream was simply not possible. So, instead, I ran a cable tie through, and zipped them up to one of the steel tubes running just under the floor. This held the relays up near the floor. Last, I wrapped the wiring with one of those plastic wire loom things so rather than seeing a bunch of wires hanging around, you only see one black cable.

I tested the relays before I moved on. I did that by simply jumping the 30 with the corresponding pin 86. Once the relay clicked and the fan spun up, I moved on.

Fan Switch
silver on the knob may be too shiny
With the fans all wired, I needed to put in a switch. I did not want to reuse the old vanagon rear heater switch again. I was unable to get it to mount well before, and there are so many viable alternative options out there. I went with a made-in-USA INDAK switch. These have a standard 1/4 inch shaft, but the threaded mounting shaft is slightly thicker than the standard hole in the bus dash. I had to expand the hole with a drill bit to 11mm. On the side that is buried within the dash, there are 5 pins, though I only need 4 of them. The extra one (labeled "C") is for powering a clutch or lighting a bulb to let you know the fan is on. I think we'll be able to figure out if the fan is on without a light. I wrapped that pin with heat shrink so it wouldn't accidentally short out. Of course, when I run the battery down because I forgot that the fan was on the low setting, I'll post about it. Hahaha. I checked the length of the flat cable and then added female disconnects to the 4 wires. Following the table above, I plugged in the switch.

pay no attention to the dangling wires
I ran one more set of tests to make sure the fans spun at the right speed for the various switch settings. Once satisfied, I slid the switch through the hole I had expanded earlier, threaded on the mounting nut, popped on the knob and called the electrical done. Hazah!

So, I guess that's kind of it for the defroster for now. I will improve the sourcing of the input air as well as add a control for the amount of coolant flowing into the heater core, but I don't know when I'll get to that. Frankly, the way I've been avoiding the Zed bodywork, it could start tomorrow. Hahaha...

Thanks, as always, for following along. Stay safe. Please wear your mask covering both your nose and your mouth (seriously people. that much should be obvious). A mask is not a political statement; it is to protect the people around you, whether you or they believe in CoViD-19 or not.

Tuesday, July 21, 2020

Defrosting - experiment

And so it continues. I think, when it comes right down to it, I don't want to do paint prep. Sanding sucks. I see why most people pay others to do this when they can. Ugh. So, I'm dodging it for another day and clowning on Hapy instead. Today, I hacked together something as an air intake for the defroster/heater. This was only an experiment, and a way to kill some time in the Summer sun.

Winter is Wet, Summer is Hot
With some nice weather settling in, I am finding pleasure in doing little things that do not involve getting super dusty from sanding. Or worse, getting super sweaty and then having sand-dust settle onto that sweat. So, instead, I did a semi-worthless effort on the heater/defroster. One of my ongoing concerns for this heater is that when I hit a puddle, the wet will hit the heater air intake and my windscreen will instantly fog up. I figured I could slap something together as an experiment to reduce that risk. So, off to the headed-to-the-dump pile I go.

Dumpster Diving, the Home Game
vent-hole end
The tipping fee at the dump seems to climb every year. They get you for, like $25US just to drive in, so we will usually queue a load and make a run to the dump once a year. This year, that pile includes an array of rusted car parts (big surprise) and a carpet cleaner that fell apart. That carpet cleaner provided me a couple of 1-1/4 inch diameter hoses to use as an air intake. I rinsed them out with the garden hose and let them dry in the sun while I figured out how to connect the hoses between the heater intake and some part of the bus.

Back to the pile. I found some 1-1/4 inch PVC pipe. This pipe fit perfectly inside the hoses, so I had the makings of hose bib's. I cut 4 3-inch lengths, and put the rest back in the dump pile. Why 4? Because I will use the hoses in parallel. Why? Because the air intake side of the Vanagon rear seat heater is designed such that one of the coolant lines runs straight across the intake. Back when I had this unit on the luxury battery tray I had added a flange to attach a 4" dryer vent hose, but I didn't have any dryer vent hose in the dump pile and I wanted to do this experiment with free stuff.

Last, I picked up the original bottom plate for the defroster heat register that I discarded in my last post about this defrost saga. I figured I could cut something up to go against the air intake out of that tin.

Hack, but Free
free supplies
The bus air system originally has a floor vent between the front seats that routes air back to the main cabin. There is a cable-controlled flap that Y's off of the main air pipe into a corregated hose. On Hapy, that hose was falling apart when I bought him, and the cable-controlled flap was rusted shut. So, I removed the hose, tapes off the openings at either end with that fancy metal HVAC tape and didn't think about it again. Until now. I thought I would try to source cabin air from that vent. The vent hole, however, is smaller than the combined 1-1/4 inch bibs. So, I cut a pair PVC pipes on an angle and super-glued the angled sides together so the narrowed end could fit into that vent hole.

On the other end, I cut up the discarded HVAC tin into a 4 inch circle with 2 1-1/4 inch holes in it that aligned with a gap between the coolant line and the edge of the flange. In an effort to just get it together, I attached the PVC pipes with glue and that metal HVAC tape. I do not expect this to last terribly long, but this was just to see if the idea was viable. Besides, this whole experiment was to get me out of sanding... No, that doesn't make sense, but don't throw logic at me. I am justifying why I'm not sanding. Anyway, I slid the hoses over the respective bibs, and now we have a means of testing whether we can motor through a puddle in cold weather and avoid fogging the windshield.

Next Time
inlet side hack
Truth-be-told, I will probably be getting some dryer venting for the house anyway, so I'll just buy a meter more than I need for the house. There is a hole in the driver-side belly pan around which I can attach a flange. I should be able to fit a hose, albeit wedged up and folded by the coolant line, onto the flange on the heater, and connect that to the flange I add to the belly pan. Regardless, this was a fun experiment, and kept my hands and brain busy on an otherwise lazy summer Saturday during the CoVid-19 safer-at-home period.

Thanks for following along. I might do something more constructive next time I avoid sanding. Or, I'll actually do the sanding and my next post will be about an old trip or the threat to humanity currently occupying the white house or maybe (shock!) I'll actually post about sanding. Nah, that would not be interesting reading. Stay safe, stay physically distant and please consider that you wear a mask to protect others regardless of their politics. Or yours.

Tuesday, July 14, 2020

Defrosting - Part 3

I have spent the better part of my free time over the last several weeks sanding and hammering on the Zed. If you do that long enough, eventually you need a break, to focus on something else. Otherwise, you'll lose interest in the job, or maybe working on cars in general, and find yourself taking a few weeks off, like I did last winter when I did the TDI retrospectives. I just didn't feel like working on my cars and the weather was crappy, so motivation was at a premium. Anyway, today's post collects together the bits and pieces of hours I've spent taking a break from the sanding to move one little step forward on Hapy's defroster.

Model First
model from p-side rear
One thing I've learned along the way is to model what you want to build before you built it. With the speakerbox I built for Oliver (the MGB), I built a box out of cardboard first, That allowed me to really understand how it could fit before I started cutting MDF. I did the same thing for the heat register in Hapy when I did the parking heater. So, it should come as no surprise that I built a model of the defroster register with cardboard before starting in on the zinc-coated steel.

This had some aspects that were similar to the parking heater register: I needed to connect a round inlet/outlet with a rectangular inlet/outlet. That is about where the similarity ended, though. The space I had available, and the means of accessing that space made the design of this register quite different.

Piecing It Together
model from d-side rear
I started with a top-plate that matched the 9" wide heater, with 2 partial sides that dropped about 3 inches on each side. This is a simple rectangle with 2 90* bends. For the bottom I tried a trapezoid shape, with a large rectangle in the center, aligning the 9" bottom of the heater with the bottom of the front cross-support bottom. The sides are triangles that bend upwards, overlapping with the 2 sides dropping from the top. These two pieces would be held together with sheet metal screws, and the seams taped with the same contractor-grade metal HVAC tape. This shape is obvious, but it does not route the air towards the round hole. It just compresses the air from a 9" by 6" rectangle to a 9" by 3" rectangle. I figured there would probably be significant air turbulence, reducing the actual air-flow down the pipe to the floor or windscreen.

To reduce the turbulence, and improve the air flow, I added 2 trapezoid-shaped angled sides. Three straight sections were parallel to the heater face and the cross-beam as well as along the top. The one the angled side runs along the bottom from the lower edge of the heater to the lower edge of the cross-beam, just to the side of the round hole. Now, this still wasn't perfect, since the register now ends in a square, around the round hole. I figured this was the best amateur register I could come up with.

Install Planning
nutria and ducks in harmony
Finishing the model took many trips under the bus, fitting and then sliding back out to trim or add material (blue tape). Once I had the piece constructed so I could fit it into place, I needed to figure out how to install it such that I could assemble it in-situ, but could disassemble it and remove it when necessary. Note I didn't say "if"; it's wise to assume that you will need to undo something or you are just making life difficult for your future you.

The top plate was fairly straight forward. It could go in independently, simply by tipping the front (front is front) downward and sliding the rear edge up and over the top of the heater, rotating the front into place and then settling the plate down. The bottom was similarly easy, just offer it up. The challenge was with the angled side-runs.

I had considered pop-riveting the side-runs to the top in-place. This would have been difficult to undo for removal, so I planned on sheet metal screws instead. The side-runs got extra tabs along the top and bottom through which I drilled a pair of holes in each. These holes aligned to holes in the top and bottom so I could screw the side plates first into the top and then into the bottom.

Build and Fit
model to tin
Once I had it all working with a cardboard model, I transferred the lines to the zinc-coated HVAC sheet metal and cut the lines with tin-snips. As could be expected, the lines weren't perfect and some additional fitting was necessary. In fact, I abandoned large parts of the model entirely to get it to fit. First, getting the angled sides to fit in-situ with screws was simply not going to happen. Second, and more important, the cardboard model had flex to it that belied the fit. So, I abandoned the screws and held the sides to the top with that really good metal HVAC tape on both sides. I also used this tape to hold the front of the top section to the cross-beam.

Then, the real fun began. The bottom plate did not fit; at least not on the passenger side. I am not sure how, but the passenger side ended up about 25mm too long. It was just off. Again, I credit the flexibility of the cardboard during the modelling. Boo had asked why I had retained the fuller size of the bottom, stretching all the way across the whole span, when the sides really abbreviated how much I would really need. This is why working in groups is so powerful. Taking her advice, I modeled a new trapezoid-shaped bottom out of cardboard that would fit between the sides, front and back. I transferred to the flashing a cardboard cut up of a new bottom. Again, I used the metal HVAC tape to attach the sides to the bottom as well as the front and back. While this isn't as "perfect", the goal will still be met: air flow from heater/defroster will route into the original air pipe. With careful use of tape, I was able to have only the silver part of the tape visible from the sides.

When I can't take the body-work any longer, I will look into running the wiring and switch for the defroster fan. I'll post when I get to it. I did test the register by running a fused 12V source to the heater unit (and grounding the heater). The register had a couple small leaks that were easily fixed with more metal HVAC tape. That stuff is magical.
Thanks, as always, for following along--

Tuesday, July 7, 2020

Birthday Road Trip

Between the CoViD-19 chaos and the parking heater work this spring, I totally forgot to post about a road trip Boo and I took down to the north side of the San Francisco Bay. Today's post covers it.

Why Feb?
another winter day in Portland
After last year's once-in-a-lifetime trip to Hawaii for my birthday, Boo and I kind of wanted to get out of the endless gloom of the Pacific Northwest. For those who don't live here, rainy season starts around Columbus Day (mid October), and with the return of "standard time" our daylight at the end of the work day disappears rather early. By winter solstice, sunset is arriving around 430PM. When you add the gloom from the clouds, it really is pretty much dark all the time from US Thanksgiving (25-Nov) until after MLK Jr Day (third Monday in January). By the time my birthday comes around (around George Washington's: 22-Feb), it's gotta-get-outta-the-rainy-dark time. Some years, we can avoid this by going to Timberline and getting above the clouds to play in the snow throughout the winter. Not so much these last few years.

Why Fly?
With that context, Boo and I started talking to my sister in January about a trip down to visit. My sister had come up to visit my aging folks. Boo and I had looked at flights, but were waffling because of the costs. So, when we asked about the third weekend in Feb, my sister asked "you gonna fly or drive?". Well... we hadn't even thought about driving. Part of why we wanted a trip was for some deeper connecting. We both had been working a lot, and not seeing each other much. So, 12 hours each way in a car together sounded much better than airport parking, security check-points, etc though it would shorten the trip by 6 hours each way. Still, when we looked at the cost, it cost about half to rent a nearly brand-new SUV. So, we chose to drive. Ironically, for the 3 months after this trip, Boo and I were locked down together. Funny. We got 24 hours together in a car and then 3 weeks later we were in lock-down, getting all kinds of time together. Honestly, it was absolutely wonderful. I sincerely hope you like your spouse as much as I like mine. 3 months woulda felt like 90 days in the hole if we didn't.

Najeeb
I made a reservation with a car rental place (Dollar) for a Jeep, and made a plan to take the train from downtown Portland after work out to the airport to collect it, and drive it home. We intended to pack-up and leave at night, like we usually do with Hapy, figuring a vagabond sleep somewhere along the way. The train to the airport is easy (just jump the Red line), though I was surprised to see how much garbage there is along the train lines on the east side. I used to live over there, and I cannot believe how far-gone it has become with liter. By the time I got out to the airport district, I was quite disappointed, and clearly distracted because once I got to the airport, I jacked up the car rental plan and ended up shuttled to an off-site rental company.... the wrong one. Neat. The one I ended up at (Budget) gave me the same rate and a nicer SUV, a Ford Edge. Fortunately,  the original reservation did not charge me anything. When I arrived at home, Boo was puzzled by the not-Jeep I arrived in. And then she named our rental Najeeb, since it sort sounds like "Not Jeep".

Seven Feathers
We packed up for a weekend away plus the foam pad from Hapy so we could take a nap somewhere along the way. We learned after the fact that the spot we chose is the usual stop for my sister and her husband when they are on their way back south from visiting Portland: Seven Feathers Hotel and Casino. Offhand, you're probably thinking what I thought when we started to pull over: "yeah... casino parking lot? This won't be good." Actually, while there is the hotel, and they offer cabins and an RV campground, there is a rest area just south and above the hotel. This area does not have a ton of those big bright lights, but there are enough to provide safety. There are real bathrooms and a drinking water filling spigot. They are actually set up for long-drive nappers like us. There were a few of us there, and though it was super cold, we were left unbothered. We awoke to daybreak after parking shortly after 2AM, so we were still a little sleepy as we pulled back onto I-5 south. Boo pulled together some fruit and granola for road-breakfast, combined with canned coffee to help power us through. The drive the night before had been pleasant and the road ahead all the way to just north of Sacramento was as well.

I have been on this section of I-5 very few times. The last was in 2009 when I drove with GratefulEd and Mayhem in Belle the 73 RIviera to catch The Dead at Shoreline. On that trip, we drove overnight, so I didn't really see a whole lot of the landscape in California. This time, it was mid-day, and I was the pilot, so I could really take it in. I did not realize just how much produce is generated along the Sacramento River between Lake Shasta and Sacramento. There were times when there were fruit trees as far as you could see in all directions, only interrupted by small honeybee boxes and the occasional road. And then, there would be a line running east-west where the fruit trees would stop and some other thing would start. And then, just like with the trees, that new thing would go in all directions. We stopped in Redding for In-n-Out Burger. Honestly, it wasn't as great as I remember. Given the option, I'll take Burgerville for a fast-food burger, but ultimately the best burgers are made on a home BBQ. Anyway, It was warm enough in Redding to sit outside and eat in the sun. In fact, we were in T-shirts by the time we were done eating. Crazy weather for February. My sister routed us to her place by way of American Canyon Highway. I only mention it because after nearly 12 hours of driving, this turn-off provided our first glimpse of the ocean. Yeay!

Vallejo
Vallejo Ferry Terminal
We arrived at my sister's place in Vallejo by mid-afternoon. We visited long enough for a drink and then drove over to a reclaimed dump turned park along the bay called Glass Beach for a walk before sunset. This is a fascinating wetlands impacted by tides, influencing various ponds throughout the area. Water moves from pond to pond through large pipes, and no matter what time of day you go, water is moving one way or the other. Waterfowl and sea-water critters of all kinds are back in the area after years of now-cleaned heavy pollution. This is a true environmental victory for Vallejo.

We visited downtown Vallejo on our last full day of our stay. It is a quaint downtown, with a great coffee place (Moschetti Cafe) with welcoming servers and patrons. We walked over to the ferry terminal, which was bustling with folks for a weekend, before driving over to Albany to collect some treasures from the local spice shop as well as Kathmandu (an import-export shop).

Mare Island and Muir Woods
Muir Woods
After Glass Beach, we had dinner at my sister's place and talked about what we wanted to do while in the San Francisco area. We just wanted to see them, but maybe see some of what they liked, or had meant to see but hadn't yet. They recalled taking me to one of the worst neighborhoods in Boston because I had read about the influence of the society on the planning that was happening there. So, this really wasn't much of a surprise. We agreed that Muir Woods was definitely worthy, but they wanted to show us an urban curiosity: Mare Island as well.
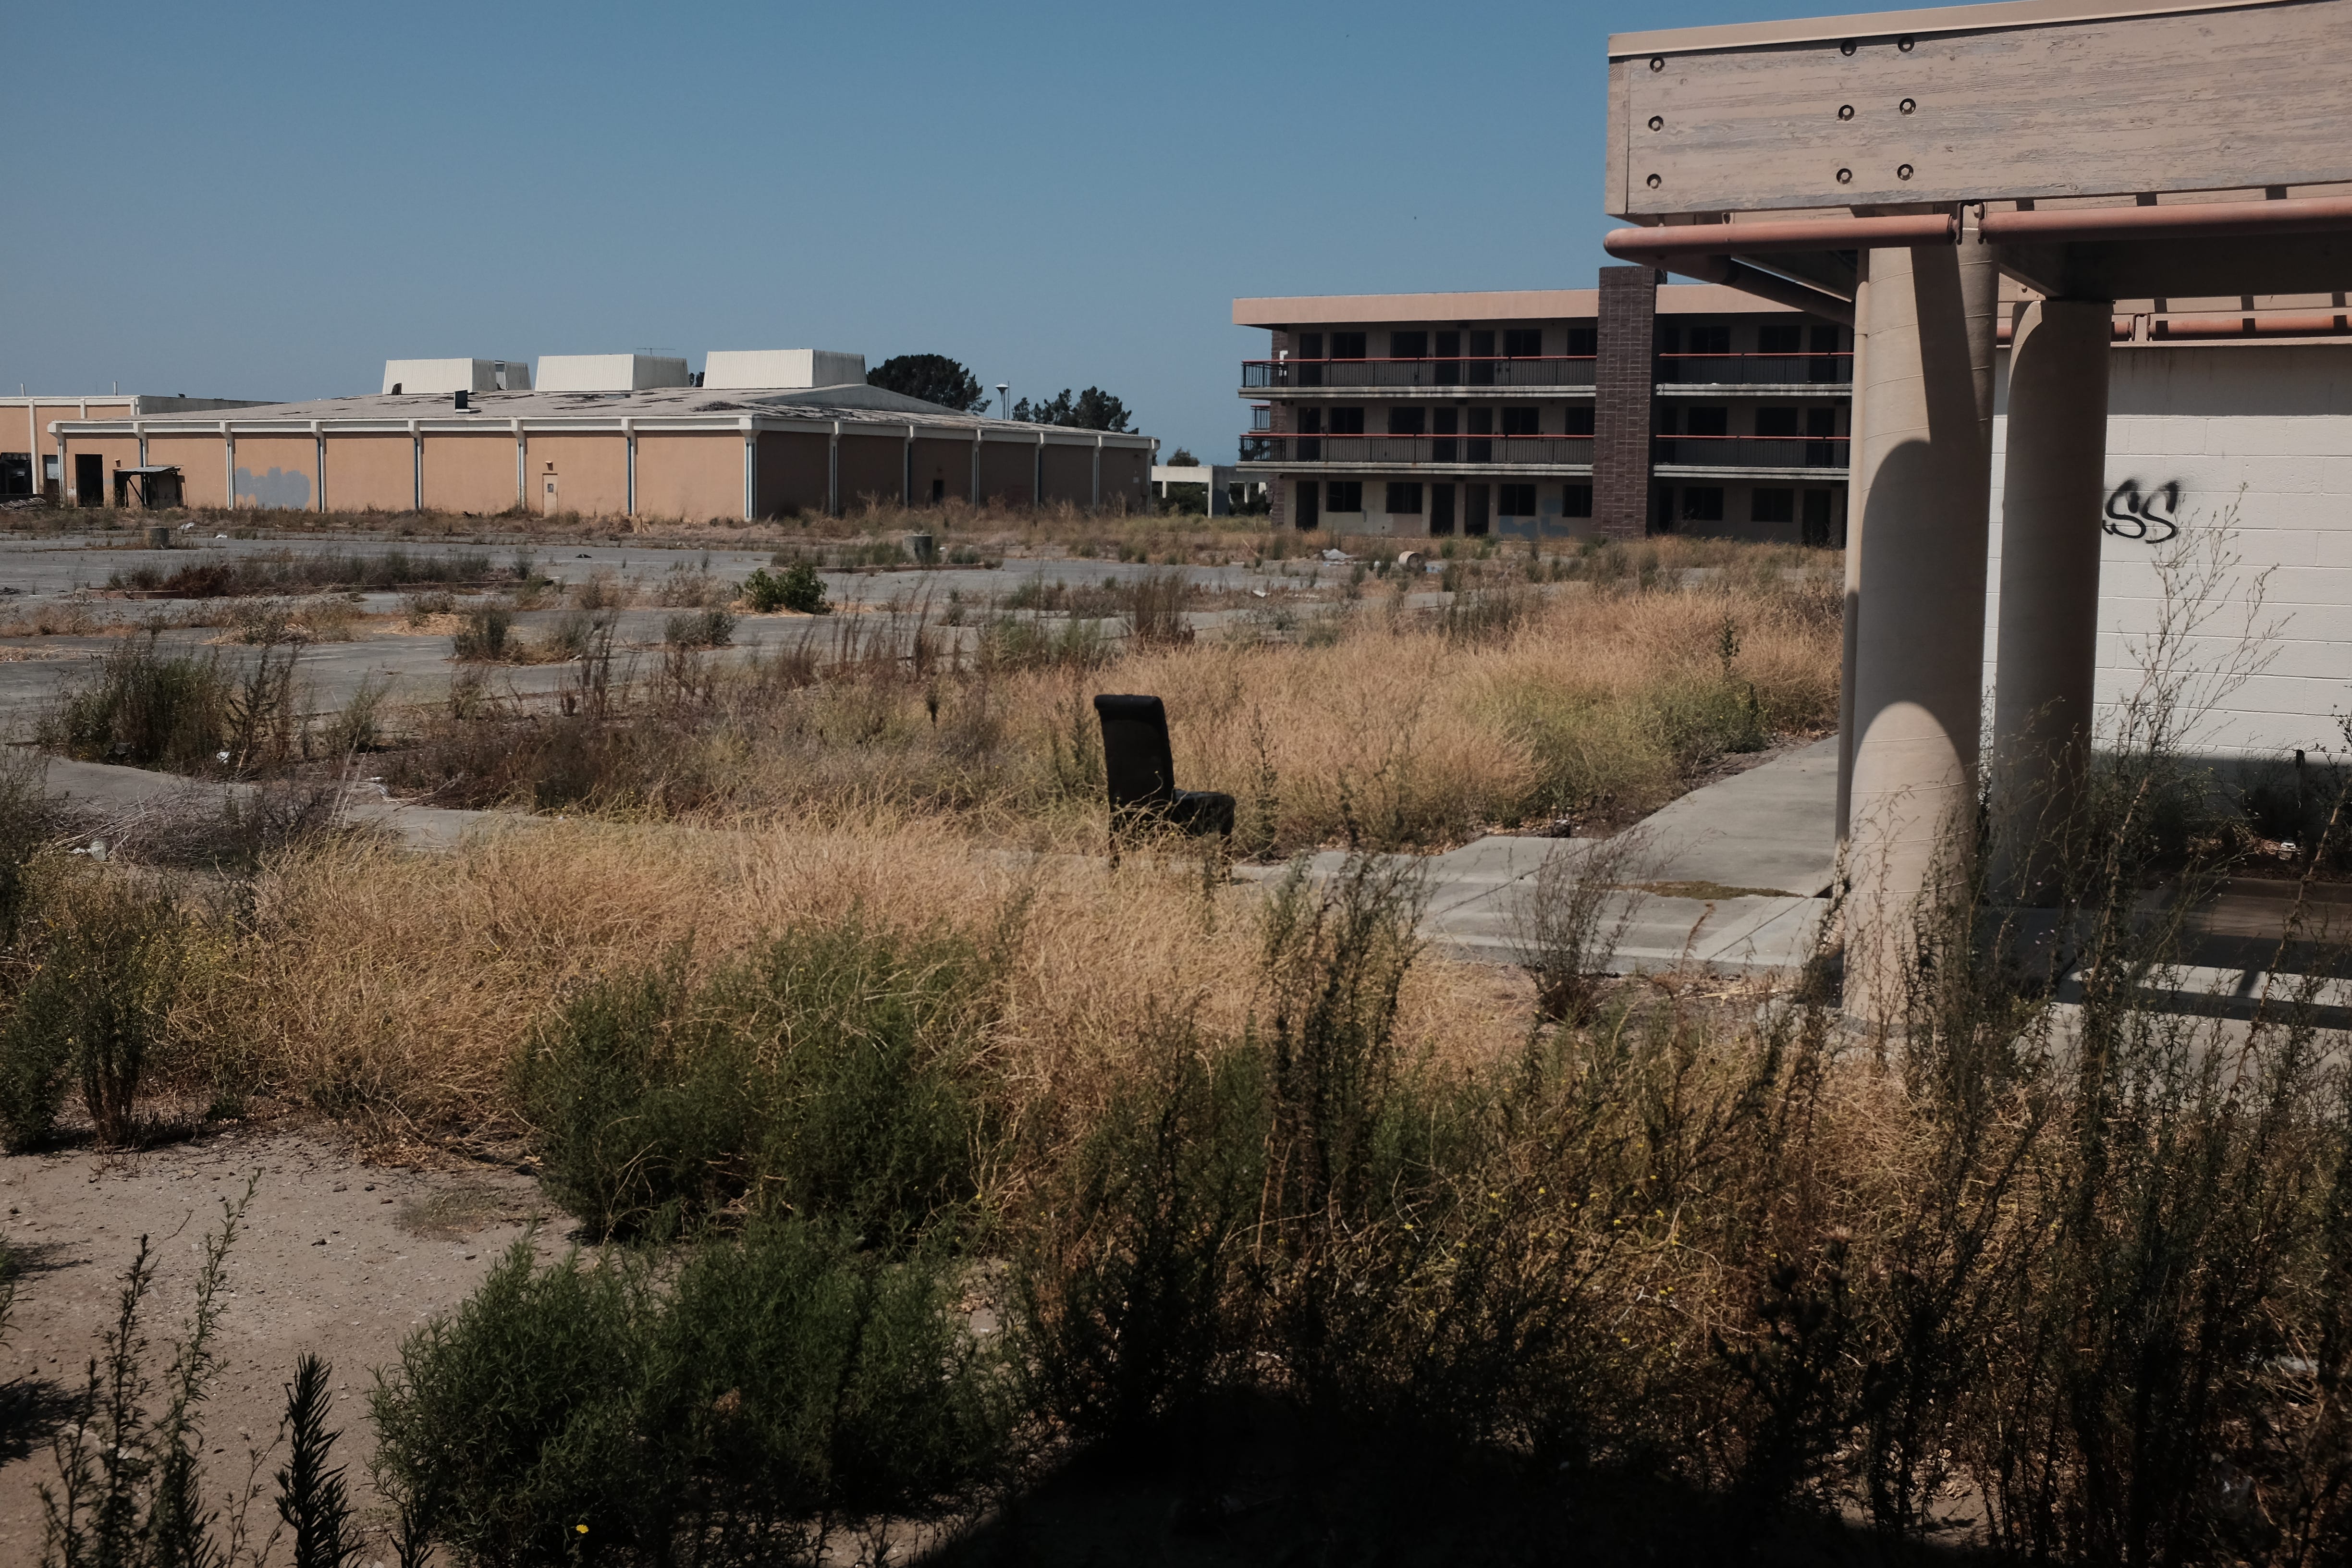
Mare Island
Mare Island is an effectively abandoned ship yard. Empty building after empty building for many square blocks. There are theories about what's in those empty buildings, ranging from homeless camps and underground raves to storage for the movie industry. We spotted one legitimate business, but only a handful of cars and less than a handful of people. For an area that is served by the ferry in and out of downtown San Francisco, the Portlander in me is puzzled by how so much viable residential / loft-living could be left vacant and decaying. If I were a young, up-and-coming techno-geek, that's where I'd want to live.

Muir Woods is the complete opposite of Mare Island. Where Mare Island has cracked concrete, Muir Woods has carefully defined foot paths. Mare Island has tall decaying buildings, Muir Woods has Redwood trees. I need not go on. Muir Woods was fairly crowded, but we were able to navigate a few trails, get our hike on and see some amazing woods. Boo and I really appreciated the way the keepers of the Woods had constructed the retaining walls along the ravines to both perform the needed function, but do so in such a subtle way that the walls sort of disappeared into the landscape.

Which Way is Out?
Muir Woods Cathedral
We left Muir Woods by a different route than we took on the way in. The road is super narrow, and the drop-off rather severe. So, thinking there had to be another way, we kept going. We found ourselves at Muir Beach. Muir Beach is as beautiful as Muir Woods, in it's way. Just south of the sand are sweeping hills covered in wild flowers. Apparently, this is part of the Golden Gate National Recreational Area. We walked the sand, and enjoyed the sunset before heading back towards civilization; we thought. We actually went the wrong way on Highway 1, discovering our error when we hit Stinson Beach. We could have gone up and over Mt. Tamaipais down a narrow switch-back filled road in the approaching dark. We decided instead to keep going and turned east at Olema, heading through Tocaloma and Lagunitas before eventually touching down in San Rafael. We hit Phil's place (Terrapin Crossroads) for a late dinner.

Homing
After 3 days of driving and walking, that last night we settled for pizza at my sister's place. We still stayed up late, talking until we were all too tired to talk, but still not really wanting the visit to end. After one too many long conversational pauses one of us said something about being tired, and that was just enough to drive the rest of us in that direction. We woke late-ish, enjoyed some coffee and light breakfast. My sister had to work, so that was enough impetus to get me and Boo on our way home as well. The morning news had a story about some new illness that had sprung up in China and the first case had been found in the greater San Francisco area. This was the first we had heard about this, and didn't think much of it. We were sad to leave, but glad we were heading home.
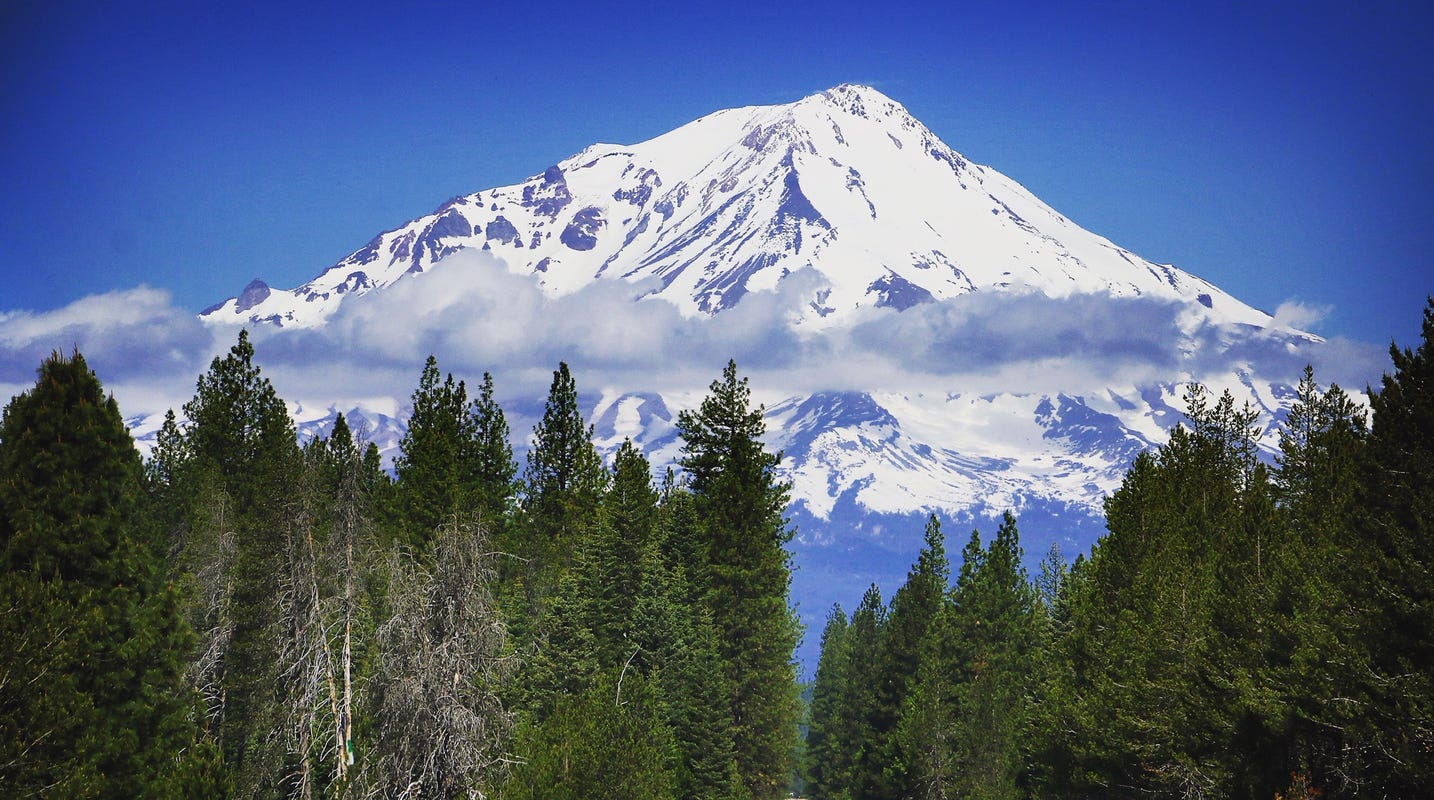
Mt Shasta
The drive home was one long straight shot. Boo took the wheel for the first stretch, handing it back over to me around Mt Shasta. It was about then that the rain started, and for the next few hundred miles, it was a less pleasant squint of a drive. The rains let up around Eugene where we met up with  T for dinner. Boo took the wheel again for that last leg from Eugene back home. I called Budget for an extension, and while I was assured that the daily rate would be an extension of the rate I had been paying, that was not the case when I returned the car. With that one day extension, the math for driving versus flying would have been nullified. Lesson learned: reserve for longer and return it early.

Anyway, it was a great trip. In light of what happened in the days and weeks that followed, Boo and I were grateful that we chose to not fly through San Francisco airport (read: CoViD fear). As to car stuff, I continue to sand and hammer on the Zed. As my last post said, you're never really ready for paint, but when you have a car that has been dinged and danged on pretty much every body panel, it goes beyond simple prep. Anyway, I am approaching the end of the hammering and expect to get into the skim-coating of the Bondo here fairly soon. Once I actually reach that point, I'll post something.

Thanks, as always, for following along--