Showing posts with label brake. Show all posts

Tuesday, November 1, 2022

Zed Moves

I have been doing all kinds of things to get NewOldHouse ready for us to move. The exterior is painted. The interior is almost ready for paint after many more days of caulking and masking. Because we knew the end of the dry days were almost upon us, I took a couple days off work so Boo and I could get after some outside stuff. Today's post covers that.

Back to Back Chicken Shacks
Zed's new home
That's right. This property has two 8' x 12' locking sheds right next to each other that the prior owners were using as chicken shacks. The one closer to the house looked to be in better shape, while it's Furthur (see what I did there?) twin has a failing roof. We decided that we would clear them of chicken scat, hay and whatever else we found and then determine what to do with them. After a few minutes of working on the better-shape shed with a respirator and a shovel, it was clear that it was salvage-able, and had not had any rodent activity (no rat scat). I got the nasty out first with a shovel, then with a rake, then a broom and finally with a high-pressure hose. Once cleared, I sprayed it with house-wash and rinsed it down. The front-most section of flooring will need a replacement sheet of plywood/chipboard, but the rest of the shed will work, and serve as my car-parts/tool shed until a more permanent shop can be constructed.

The other shed did not see as much progress. The roof and the entire floor will need to be replaced. Still, that's a couple hundred dollars of plywood (plus some roofing material that we happen to have lying around) to repair a shed that would cost, like, 5K(US$) new. It will hold garden implements and supplies, and can do that even with a rotted floor... until we can get some time to repair it. Eventually, the lawn tractor will even get parked in there. I will return to the scat-removal and clean-up of the FurthurShed after we move. The repairs will probably wait until next year. But, to help protect it for one more year, Boo and I stapled thick, large black garbage bags (flat) over the holes in the roof. Now, that sounds pretty ShadeTree, and it absolutely is. Still, after a couple relatively heavy rains since, the inside of that shack is dry, so the wood that is not rotted will not get worse before we can get out there next year and repair them right.

Zed in Motion
man-hunt on
With the sheds ready to be pressed into service, we cleared the area where the 2 carports were assembled, around the back of the house. The grass was cut down to the dirt, all of the little weedy shrubs were cut down, and then the car ports were set in place: as tight to the house as they could go without bumping into the siding. Last, we laid out a tarp to act as a vapor barrier between the earth and Zed's underside. We were ready to move Zed. Before I started working on how to tow him, I thought I could try to drive him. Sure, he has no interior, no glass, no side mirrors, no tail lights, a 4-year-expired registration, it's raining, it's garbage day and there is an active man-hunt in the neighborhood by Beaverton's finest. Still, it's worth trying; worst case, I have to tow him. Regardless of outcome, it would be a funny story.

Long ago, I had drained Zed of gas by loosening the fuel line in the engine compartment and firing up the fuel pump, pumping the fuel into a gas can that I then used to fill the lawn mower. I had not tried to start Zed again. Knowing this day was coming, I had charged his battery and then disconnected the negative terminal (saving the charge). After confirming the battery was full (12.5V), I poured a fresh gallon of gas into his tank, hooked up the negative cable to the battery, flipped the ignition and fuel pump switches and tuned the key. BahRoom... he fired right up. Now, even though I had pumped the fuel out, there remained some old gas remnants in the lines or the injectors were kinda fouled. Regardless, Zed ran rough, and did not want to idle. I babied him along until he settled down and idled. Cool. So he runs. I took the next step and tried to back him up, but he wouldn't budge. I felt like his brakes were rusted on. I tried to high-rev reverse to break the brakes free, but that didn't work. I suspected the rear brakes were rusted tight from sitting motionless for a couple of years.

the "nicer" shack, before
Undeterred, I chocked his front wheels. I raised the passenger side rear wheel by the axle with my trolley-jack and removed the wheel. I shot rust buster onto the brake shoes (which looked pretty much worn to nothing anyway) and then hit the caliper with a framing hammer, sometimes using a flattened chisel on the pad, to loosen the rust-hold. After a few cycles, I could see that the brake shoe no longer held to the rotor. So, I slapped the wheel back on, lowered the jack. I repeated this on the driver side... all while keeping my head on a swivel for the police escapee (hence, no pictures). Satisfied, I pulled the wheel chocks. I topped off the brake fluid to make sure the front calipers would have the most capability of stopping us, since the rears were now covered in oil.

Feeling confident, I put my red plastic toolbox on the floor for a make-shift seat to try to drive Zed again. I bungie-corded the driver door shut, and fired him up. He started a little rough again, but settled into an idle quickly. I popped him into reverse and Zed started to back up. I navigated around the shrub on the corner of the parking spot and then down my not-quite-straight driveway by looking through the passenger-side tail light hole. It being garbage day, I had to wait for the truck to clear out of the cul-de-sac, but that let the engine idle a little more, working more of that bad gas out and good gas in.

the "nicer" shack, after
The brakes took some pumping to get to a full stop, but I figured it was mid-day during a work-week and I was driving about a block-and-a-half, so the risk was low. I got the rest of the way out of the driveway, put Zed into first, and puttered down the street, stopped at the sign on the corner, and turned onto the more highly-used street to the NewOldHouse. I could see cop cars down the street both behind me and in front of me (picture above shows cops 2 doors down from our new house), but no cops between me and the NewOldHouse. I went for it. I puttered to the house, straight down the drive and around the back. It took a 3-point turn, but Zed now sits on top of a grey tarp, underneath a carport, ready for me to revisit once we're moved (shown in the top picture).

I think that's about it for today. Boo and I are finding that with each potential challenge presented by this house, it always looks worse than it really is. From the chicken shacks to the interior plaster, once things get cleaned, the condition underneath is not nearly as bad as it looked. I continue to get more excited about what this new home, and a potential new shop, could mean.

Thanks, as always, for following along-

Tuesday, July 5, 2022

Phil and Phrends Road Report

A few weeks ago, I changed tactics on the sound deadening / interior refresh so Hapy would be ready for a trip to see Phil and Friends play in Eugene. Today's post covers that trip. For my US readers, Hapy belated Independence Day.

Unrelated: Northwest String Summit is having their final festival this year. While this may not arrive as news to some, it may be to others. I failed to get tickets, and have given up looking for myself but I am hoping you might have a line on a pair for my friend and his caregiver. My old dear follow-the-Dead friend was diagnosed with MS a few years ago, and he is now mostly confined to a wheelchair. I don't know how many festivals he has left in him, so I'm using my 'Miracle ticket mojo' to help him get to one more. If you know someone who was going to go onto CashOrTrade, Craiglist or something to offload a pair of tickets and a parking pass, please consider routing him/her/them to me so I can connect them with Mayhem, the merry fester.

Terrapin
rest area
The last time Boo or I saw Phil Lesh play live was 2013. Now, nearly 9 years later, we had the opportunity to see him play with his son, Graham. Over the years, Boo and I visited Phil's now-closed venue, Terrapin Crossroads (TerrapinCrossroads.net is gone now too), but we had not been able to align a trip with a time he was on-stage. When we heard he was coming to the Pacific Northwest, I jumped on tickets, with a hope that we could catch 2 shows, knowing that he may not pass this way again. The closer venue, the Cuthbert Ampitheater in Eugene, offers reserved seats for those willing to pay a premium. Again, I figured our chances to see Phil are decreasing with each year, so I got us a pair of seats maybe 20 feet from the stage, in the center of the house. Arguably, this was the closest I've been to the stage occupied by a member of the Dead since my touring days, and it was really special to see the facial expressions and the non-verbal communication between the players.

On the Road Again
Before we could take our seats, of course, we needed to get there. Boo worked the day before, so I assembled the usual gear without her. This has become virtually automatic, since we have it fairly well organized: 3 milk crates of stuff plus the canopy, bedding stuff, a large water cooler and emergency stuff. Since I had emptied my overflowing toolbox into that new tool cabinet, I needed to assemble a smaller tool set for the road. Rather than carry everything, like I used to, I grabbed my 10mm and 13mm ratcheting spanners, a small set of sockets, a pair of stubby screw drivers and a pair of longer handled screw drivers, a couple pairs of pliers (one needle-nose, one regular) and a couple pairs of scissors (one fine, one larger shears). Last, I tossed in my multi-meter, some wire connectors and a roll of electrical tape. I figured that if something broke beyond those tools, we would flatbed home.

Boo and Hapy, pre-func
On travel day, we assembled a couple of days of clothes, a small cooler of drinks and snacks and hit the road, stopping for some B20 at the corner filling station. Reflecting the new reality, our corner station was charging more than double what we paid in 2019 ($6.05/gal versus $2.99/gal). The price has continued to climb since then, like everywhere else, it seems. The freeway leading to the interstate was very busy, and crawled slow, but it allowed Hapy time to get up to temperature and settle down. Most of the squeaks and moans that used to plague our trips were gone, leaving the low drone of the engine and a wind-whistle near my left ear, coming from the door seal.

By the time we hit I-5 South, his engine temp was steady at 185*. South of the I-205 interchange, traffic spread out a little bit, and we could just cruise. We had all day to get to the Cuthbert, so we didn't push Hapy too hard. We knew that the speedometer reads slow, believing that when it reads 60mph we are closer to 65mph. For fun, we tried to calculate exactly how fast we were actually going by taking stop-watch times between mile markers while I tried to hold speed at 60mph. Of course, holding a steady speed on uneven ground in traffic is not exact. Nor is clicking a stopwatch as you pass a mile marker. Still, we determined that when the speedometer reads around 60mph, we are actually going closer to 62mph. I guess, it's not as far off as I thought.

Wheel
Stu, Phil and Graham
Just the fact that we were talking about speed and speedometer accuracy describes the drive... by what we were NOT talking about: temperature, struggling to keep pace, electrical gremlins, thrown codes, etc. From start to finish, the engine temp peaked at 190*F and that was on the uphill south of Salem where I have seen Hapy's temp climb upwards of 200* in years part. We were able to take the hill in 4th gear, holding steady at 60mph on the speedo. So far, so good. The drive south was dry until around the Corvallis exit, when the rain started. The road remained clear, and traffic good all the way to the venue, but it was a harbinger of things to come.

Of course, we did discover or encounter or develop some things along the way. For example, when I installed the stereo head unit into the glove box, I did not include the metal cage that would have locked it into the box. Why? I wanted to easily remove the head for the inevitable installation of an amplifier. Well, without that cage, pushing buttons with more than the lightest pressure caused the head unit to slide backwards into the holder. Yep, that happened. Repeatedly. So, I will be putting in the cage, and will figure out how to manage an amplifier install which includes a removing the head unit from that cage later.

We discovered that one of the tail lights has a dim brake light. It is not out, it is just dim. Also, that weird issue where I cannot turn off the engine without my foot on the brake pedal re-appeared even after I cut off the entire diagnosis plug. Clearly, I will have to cut off that diagnosis wire from the driver side taillights. If that doesn't work, I may replace the wires from the brake switch to the taillights so any weird grounding from 50+ year old wiring goes away. This may also address the dim bulb.

Speaking of brakes, on the way home, Hapy lost his vacuum/boost brake assist. This could be something as simple as the hose nearest the booster got some brake fluid on it and compromised it to the point where it failed. Or, this could be as big a deal as the booster unit itself has failed. Since Hapy is over 50 years old, and the brake booster is original (and has a healthy coating of rust), I will be assembling parts expecting the worst.

Truckin'
Unbroken Chain
With these downsides, it would be easy to dwell in the negative. Those issues were the only ones we encountered. We used and greatly appreciated the 2-way dome light by the slider. The single position was really handy when we first got back to the bus after the show. Otherwise in the dark, we could find the camping chairs, some snacks and bev's without reaching for a light, shining a flashlight or even setting muddy-foot inside the bus. The floating speakers and the headbanger speakers were very useful for the pre-func after someone parked right next to us, preventing us from hanging out next to the slider. So, we moved to the rear of the bus, popped the rear hatch, and moved the speakers. Boom, we're wrapped in sound, comfy as can be.
 
Regarding Hapy functioning, the rear anti-sway bar had Hapy holding the road like never before. There is considerable open farmland south of Salem where there are fairly consistent, strong gusting winds. The winds are especially strong when a storm is approaching, as it was on this drive. In past years, encountering those winds has been a white-knuckling event, buffeting the bus, pushing us into either the next lane to the left or into the shoulder. Not this year. I drove in a relaxed body position, with gentle arms and shoulders, the entire drive. I felt the wind, but it didn't move us. The topper of it all, though, has to be the new front seats. Unlike prior drives, where I felt like someone had driven over me by the time we got to our destination, these Sprinter seats were so comfortable, my body felt like we had driven across town, not 2+ hours. I believe the relaxed posture and happy body were a result of the anti-sway bar, the stiffer shocks and the new seats combined.

Cold Rain and Snow
After the show, we waited for the crowd to thin before leaving the parking lot. As we started to leave, the staff pro's had assembled in a line with their flashlights to start shepherding stragglers, so our timing was spot-on. The exit routes fairly easily onto I-105 and then on to I-5 North, so we started our way north. By the time we left the lot, it was almost midnight and as the miles ticked by the show afterglow started to fade. Hapy was driving so well, though, neither he nor I wanted to stop. He definitely didn't want to. His temperature was holding at 185* no matter how fast we went. There was a point when our speedometer hit 75mph (the rpm counter near 3500) when we passed a truck and Hapy just cruised without a bump in his temperature. Eventually, I couldn't combat the fatigue. So, we hit the rest area just north of Albany to grab a nap, vagabond-style.

Once we had things set up, we intended to use the USB chargers in the headbanger. They work great, super-fast charging, but they cast a blue light that is super annoying at night. So, I will be covering the LED's with black electrical tape to dull them.

I mentioned the rain on the way South. We had intermittent sprinkles through the evening, but it was mostly clear during the show. It remained clear for our drive as far as the rest area heading north, but when we awoke the next morning, the rain had set in. It appeared to have been raining steadily overnight. It was constant, but varying in intensity from moderate to heavy. And, it was colder, like mid 40F's.
 
rare picture of me
We packed up the vagabond, returning Hapy to a drive-able state and headed back onto the interstate. It was at this point that a lack of a defroster became apparent. Of course, Hapy has never had a working defroster, like most type2 busses, but still, after driving more modern cars, it is becoming a glaring gap in the wet/misty Pacific Northwest. We wiped down the windscreen and front windows with a towel, and pressed into the rain.

I Will Take You Home
Driving Hapy has become such a pleasure, but in interstate traffic, when you can't see terribly well, in rain so heavy that the ruts are becoming hydroplaning ponds, the joy fades. Of course, the brake booster was no longer functional, so I had the need for extra stopping distance playing with my mind as well. By the time we got to Salem, we needed some breakfast to consider our options. The weather system which had settled over the northwest was still just moving in from the southwest, moving northeast, covering our entire trajectory with heavy rain. This was projected to continue all the way to Seattle, our intended next show. As much as I love Phil, and as much as I really wanted to be there, I feared I would be a mess by the time we got there. Then there would be standing/dancing in pouring rain followed by camping in pouring rain, packing up in the pouring rain, and then driving 5 hours back home in... you guessed it... pouring rain. Our best guess was that we were looking at 8-10 hours of driving. I just couldn't do it. So, for the first time since I bought Hapy 20 years ago, the humans gave up before the machine did.

After breakfast, we hit the highway and went home instead of continuing on to Seattle. In the end, this was probably the better choice for Hapy, and for us. We stopped wanting more, but perhaps more importantly, we stopped before Hapy really gave out. I have brakes to fix, a stereo to mount, a pair of USB chargers to dim and a defroster to figure out, in that order of importance.

Thank You For a Real Good Time
I didn't really mention the show, and I won't be posting independently about it. It was a lot of fun, and they played well. We hope we get to see Phil again, but if we didn't, our last time spent with him was far from Plain Jane. Quite the opposite: the jams were tasty, the arrangements purposeful and the execution spot-on. If I had any disappointment it would be the keyboardist (Steve Molitz) not being loud enough in the mix during his solos. He was rippin, but we had to strain to hear his leads over the rest of the band. Arguably, he was putting the most energy into the performance, almost like he was playing with Joe Russo.

This was a highly successful trip. While I will have some work to do before the next one, it is always easier when you are building on success rather than trying to resolve after a failure. Fair warning: the blog may go quiet for a while as I re-enter the work for Zed.

Thanks, as always, for following along-

Phil and Friends setlist:
Set 1: Ripple - Brown Eyed Women - Cosmic Charlie - Loose Lucy - Scarlet Begonias - Sugaree
Set 2: Help on the Way > Slipknot > jam > Dark Star > long jam > Unbroken Chain > another jam > a "Jessica" jam (very Allman Bro's sounding) > Slipknot reprised > Franklin's Tower - Not Fade Away
enc: Phil's Donor Rap - One More Saturday Night

Tuesday, June 28, 2022

Hapy Test Flights

After a fall/winter/spring of making modifications to Hapy, we took him for a test spin. Today's post covers that, the discoveries made and resolved and then another test drive.

The Changes
First, off, let's recap some of the changes since we last drove Hapy. Recall, that last run was a drive to Cornelius after resolving the stammer by cleaning up the vacuum lines and appliances. That was our last drive (except for the decibel tests) in those loaned-by-GratefulEd seats. We now have Sprinter seats. The old flooring was removed, CLD, jute insulation and MLV was laid in it's place. Of course, we have sound deadener all over and the stereo is operational (it was before, it's just better). On the mechanical side, the engine has a "cold" air intake now and there is a rear sway bar for handling. It is a different feel. More different, I think, is my familiarity with driving him. I have been driving GoRo (the Audi A4) and ToyoTruck, which are much more modern. So, my frame of reference is a little off and the Sprinter seats sit much higher, so I have to lean over to reach the stick now, especially when pulling away from a stop sign. I find myself hunched, and twisted to look left for oncoming traffic. Regardless, I think it will take a few drives to re-acclimate to driving the old bus. Looks like there will be more bus driving ahead. Sweet. One thing worth noting, I think: again, for the entire drive (albeit a short one), we didn't have the stereo on. Funny how much effort I put in and how little it gets used on the road. There is just something about riding in the bus that lends itself to no radio, and carrying on a conversation instead.

The Drive
On to the drive! Hapy started right up like he had been driven the day before. The throttle is super responsive, and the engine drove like a champ. He still doesn't like 2nd gear, but I haven't done anything to address that (it might be my install of the Scat short-throw shifter). The overall low-end drone is MUCH quieter, but some rattles remain, especially the screens in the jealous windows. I probably have them installed incorrectly (this video shows correct). Hapy still stops well, and he takes corners WAY better. There was almost no sway around street corners; of course, we did not drive very far nor very fast. We simply drove to a nearby park, played with the dog and returned home by way of the local c-store for some ice cream on a stick. The combo oil pressure / temp gauge still works great, and we did not throw any codes. While we didn't get above 35mph, the sound inside the bus never grew so loud that we couldn't talk at a conversational level. We could not hear the hum of the tires at all, and we really did not notice the sound of the engine. We could hear it, sure, but it was not as ever-present as it used to be. Recall, I used to describe the noise while driving the bus like sitting in an old metal shed next to a running a diesel generator, in a wind-storm. It is definitely not like that around town. I will execute a full decibel test lap to test the noise at highway speeds, but first, there are some things to fix.

The Issues
First, the exterior lights continue to produce phantoms. The brake pedal causes a bunch of the exterior lights (like the front running lights?) to light up, but not both brake lights. Also, the turn signal doesn't work when the brake pedal is pressed. No pedal and no running lights on... and the blinkers work. I remembered that I had the exact same experience when I took Hapy on that decibel test drive (buried in the Hapy Noises - Part 2 post). So, nothing I did over the winter caused it, but nothing fixed it either.

Probably equally important, the fan switch no longer triggered the fans to fire up. After we returned home, I found that one of my wiring bits had become disconnected. While repairing, I noticed how hot the wires would get during testing, and decided that I had gone too thin a gauge in some areas. So, I replaced the merged fan ground wires with individual 14ga grounds, and improved the supply-side to 14ga as well. The fans now both work, and the wires are air temperature.

The speedometer didn't work. I must have disconnected the speedo to get into the dash at some point over the winter that I don't remember and failed to reconnect it. This took no brainpower, just lots of patience opening up the dashboard, and trying not to upset any of the wiring back there.

We dropped into that awful 1200RPM limp mode right before we shoved off, but it only happened that one time. Believing I had fixed that before, this was especially frustrating. I must have bumped the wiring connection at the pedal while installing the jute and MLV. I checked those connections (pressing the joint-points firmly between my fingers), but nothing felt off. After multiple drives since, Hapy has not dropped into that 1200RPM limp mode again. 

Last, Hapy had not yet received his annual Spring cleaning (after-photo is at the top). So, he had a blanket of pollen on his pop top, moss on his window seals / windshield wipers, dull looking paint and dirty windows. The spring wash is the biggest of the year, taking a couple of hours, but it is so worth it.

Exterior Lighting Diagnosing
I have tried so many times to figure this out, and so many ways, but I had not been successful. I won't list them, but between resistance and voltage testing everywhere, running test wires the length of the bus, and replacing things, I thought I had tried everything. This weird brake light thing had been a recurring phantom for years, practically since I first did the engine swap. One of the frequent causes for the issue to return after being gone for a while was a remove/install of the battery. This always seemed strange. Sure, the battery is part of the electrical system, but why would it re-conjure an electrical ghost? It occurred to me this time around that the old 20-pin diagnosis plug is back by the battery. Perhaps my incomplete removal of that plug and related wires is a contributing factor?

Unable to determine this through my prior methods, I did something completely different. I removed the tail light assemblies from the bus, letting them loosely hang in the body holes. I took a different 12V auto battery, and ran a test wire from its ground post to the body ground point next to the main on-board battery. Using a fused wire, I touched various light circuits to see which ones worked as expected and which did not. All of this time, I had believed the issue was in the passenger tail-light: it is the light fixture closest to the battery, so I thought I was bumping something while installing the battery. Nope. The tail-light circuits would fire the correct lights. When I ran the same test on the passenger light fixture, lights were batty like I described above.

I checked the wiring diagram related to the driver tail light, and noticed that there was a tie-in between it and the battery location: the old test plug circuit. The yellow circled 9, 10 and 12 which tie into the driver tail light all correspond to the pin numbers in the plug. I knew that the running light was the one that was lighting up in-error, so I figured that red wire was the compromised one. I cut it off at the tail light, and the phantom behavior ended. Both brake lights illuminate when I step on the brake pedal, and all the running lights light up correctly (and only when I turn on the lights, not when I step on the brake).
 
I ultimately cut off all of the wires going into that old diagnosis plug at the plug, and cut the diagnosis wire from the passenger-side rear turn signal. I will probably have to go back into the driver side and cut off the remaining diagnosis wires to make sure I have really exorcised the electrical demons.

Victory Lap
With the brake lights working, the speedo showing speed, the fans firing and the body looking clean, Hapy and I were ready for a test. I figured that I had numbers for the test lap around the neighborhood from last Fall (documented here), so combining a test lap with a decibel collection made sense. Other than all of the changes I made for sound containment, there were no only other variables. Well... I took one lap, but it started just pouring rain, so I took another one. After that one, I realized that I did not know which "filter" to use on the reader because I didn't document that. I know I made a choice last time, though. Still, I think the test was valid enough for my not-terribly-scientific method. This time, I just used the default "A" filter. I did one last lap, but discovered at the end that I had failed to start the dB recording. Sigh...

Fall 2021 (pre-sound absorb) test:
Sitting at idle (900 RPM): 60dB
Around town (less than 40mph): 65dB +/- 5dB. 75dB peak
On the byways (above 40 but under 55): 65dB +/- 10dB

Spring 2022 (post-sound absorb) test:
Sitting at idle (900 RPM): between 55db and 60dB
Around town (less than 40mph):  60dB - 65dB. 70dB peak during highest-rev
On the byways (above 40 but under 55): 65dB - 70dB

Looking at those numbers, I am not impressed, nor do I expect you to be. That was a LOT of work for not much gain. I hit my original goal of dropping the overall sound and the peaks by 5dB, but after the initial drive-about experience, I was expecting more. Again, I need to remind myself that 5dB is actually a large span. Consider, 60dB is normal conversation and 70dB is a running vacuum cleaner. That is a huge difference for an increment of 10. Also, consider that in the link I used for sound level references, it includes "passenger car" at 70dB. So, if my drive around the smaller test loop only peaked (and even then only twice) at 70dB, then Hapy is quieter than a typical passenger car inside. Okay, maybe I'm feeling a little better about it. One last thing to consider.... if I used a different filter last time, then the numbers collected last time should have been much higher, or my efforts were a complete waste of time and money. Since the perceived noise is so much better, I am inclined to believe that I used filter A last time too, since that is the default. Here's an interesting link about filters.
 
At this point, Hapy is ready for summer, and it really could not have happened any later. While I intend to circle back on parts of this project, I do not expect to have to take Hapy off the road to do so. Yes, the furnace needs a re-do, the fridge cabinet is still in pieces, neither the headliner nor the carpet is in... he is still ready for camping. So, for the next few months, we are going to enjoy that, and I will be returning my attention to Zed. Last Summer ended with Zed still in primer. I would like to end this Summer with him painted, and ready for interior work over the Fall/Winter/Spring.

Well, that's it for today. Thanks, as always, for following along-

Tuesday, February 22, 2022

Burying the Brake Reservoir

This shorter-than-normal-but-actually-reasonably-length'd post was originally included within the second Hapy Seating post (See Hapy Seating - Part 2). I pulled it out into it's own post because the content stands on it's own, and the seating post was pretty long even without this. So, today, I will document the moving of the upper brake reservoir in the 1972 VW Bus.

Stock Reservoir
before image
Consider the original location of the upper brake reservoir on the 1972 bus is a tab/perch that juts forward from the driver seat partition. I clarify it by year because from the pictures I have seen, the reservoir appears in different places for different years. In Hapy's case, this perch sits, maybe, 6 inches off the seat floor with an opaque hard plastic hose attached to the bottom. The hose has a bulb at the top, allowing it to fit over the nipple on the reservoir. It is held on with a plastic clamp, and there is a rubber sleeve between the inside of the hose/bulb and the outside of the nipple on the reservoir. This opaque plastic hose runs down to the seat pedestal floor, and passes through a special hole in the floor of the pedestal. Within the pedestal, there is a cavity about 4 inches across between the inner wheel well of the driver front wheel and the outer edge of the pedestal. The opaque hose runs downward into this cavity and out a hole in the floor of the bus. Underneath, the hose runs forward about a foot to the master cylinder, upon which is another reservoir, that the hose attaches to. The hose connection to the lower reservoir is the same as the connection to the upper reservoir: bulb, clamp, rubber sleeve. Between the bulbs, the hose is narrower. The picture on the right, here, is from Hapy before I replaced the hose the last time. Note the rust, but more importantly, note the tab on the partition. Also, near the lower right corner of the rear-most square opening is the round hole through which the original brake reservoir hose passes. I do not have a picture of my original, complete, assembled set up, nor can I find any examples on the interweb. Trust that a square-ish reservoir hangs on that tang and connects to an opaque hose that passes through that round hole.

Gimme a Brake... Reservoir... Hose
pre-paint test mount
A while back, when I took that picture above, I purchased and installed a replacement opaque plastic hose between the remote, upper, brake reservoir (behind the driver seat) and the sitting-on-master-cylinder lower reservoir, but I did not shorten it to fit. It was "the" hose that was available, and was described as the right part for all buses and Vanagons. One size fits none again as the upper reservoir did not sit where it was supposed to. Just to hold it still, I zip-tied it to the driver seat partition through a pair of factory threaded holes near the top crossbar. It was not pretty, but it was functional and it didn't leak. So long as the driver seat was pushed back, no one could see how ratty the solution was. 

I wanted to fix this ugliness. I had mentioned the location of this reservoir in passing in the first post about the Sprinter seats (See Hapy Seating). I thought about the reservoir, it's location and the hard plastic backside of the 2016 Sprinter seat, concerned whether the brittle plastic reservoir in the original position would get run into if the seat was pushed back to the partition. Fairly sure the two unforgiving plastics would hit each other, potentially cracking the much older reservoir, I moved it inside the pedestal of the front seat. It can now be accessed through a pre-existing square-ish hole in the pedestal, near the rear of the seat. The picture on the right, here, shows the new location. I may get creative with a cover when I do the carpet or I may leave it exposed, but that's a decision for another day.

Re-Locating the Brake Reservoir
I started by MityVac'ing a bunch of brake fluid out of the hose, down below the stock mount point. Before I made the decision to simply move the reservoir, I tried to shorten the plastic line. I cut the hose, heated it up and tried to force-jam it onto the filler. Yeah, that doesn't work. I could not figure out how to make the "one-size fits Vanagon - otherwise you're on your own" hose to fit. Additionally, the plastic is too hard to wedge a 2-sided nipple in a line breach, so a simple cut and double-barb solution wouldn't work. I abandoned that plastic line and started seeking a rubber line solution.

reservoir in service
The hose barb on the original reservoir accepts a 12mm hose. Flexible 12mm brake hose is not easy to find in lengths greater than 4 inches around the usual online sources for some reason, and those short sections are crazy expensive (like $8US before delivery charges). However, a half-inch hose is only .7mm bigger, and those are plentiful, here in the US. So, I ordered a 2 foot length 1/2" Department of Transportation (DOT) -rated brake hose, and ran it from the master cylinder up under the driver pedestal, through the original hole in the floor. The hole through the floor needed to be expanded, however. I do not have drill bits that big so I used a sledge-hammer and an old 2-ton floor/trolley jack's removable handle (as a chisel) to smash the hole larger. Yeah, that felt a bit destructive, but it only took about 4 or 5 whacks with my small sledge to drive the jack handle through. The jack handle was completely unmarred by it. Once expanded, the hose slid through the hole.

I fit the upper connection first, and completed with a clamp. The hose settled onto the plastic nipple, but I unexpectedly needed to use a touch of force. I had thought that .7mm would have allowed the hose to slide on and slop around. I was pleasantly mistaken. Then, I slid underneath and figured out the correct length of hose. Once the length was decided, I cut it with tin snips, and mounted with a clamp. I mounted the upper reservoir to the side of the seat pedestal last, filled it with brake fluid and checked for leaks. I stepped on the brake pedal a few times to create some pressure. Finding no leaks, a firm brake pedal and feeling quite satisfied, I called it complete.

Oh, the 2016 Sprinter seat easily slides back over the top of the reservoir with plenty of room to spare. Like multiple inches to spare. As to what would have happened had I pushed the seat all the way back, I'll never know for sure. But, the rear of the seat comes within an inch of the little tab thing, so they would definitely have collided.

That's it for today. More next time-

Tuesday, June 22, 2021

MGB - Brake Booster Replacement

In my last post about Oliver, the 1978 MGB, I mentioned that the brake booster was the cause of a vacuum leak in the engine. This vacuum leak was causing cylinder #1 to run very lean compared to the others. Fortunately, Oliver has not seen much road time, so the engine should be fine. Regardless, today, I cover the fun of removing and then installing a replacement brake booster.

I would like to note that the body work on Zed came to a full stop when the Oregon weather predictably shifted back to cold-wet. For those who don't live here, we experience a wonderful donut-hole of beautiful weather in April/May smack in the middle of the cold-wet. The cold-wet returns for the month of June, usually lasting until Independence Day. So, I entertained myself with other projects, like this, while we waited for the weather to change back. After yesterday's high temps, I suspect the cold-wet is over until October.

Booster in an MGB
We start with where the booster lives in the small engine compartment of the MGB. The brake master cylinder, the clutch master cylinder and the brake booster all live together, attached to one another through the "pedal box": a rectangular steel box just in front of the firewall on the driver side. Closest to the rear is the clutch master cylinder. It is bolted to the back of the box with a lever extending into the box and attaching to the clutch pedal with a pin that is held in with a cotter pin. Attached to the front of the pedal box is the brake booster, with 4 1/2" nuts. This has a lever passing rearward, attaching to the brake pedal with a similar pin-with-a-pin design. To the front of the booster, the master cylinder is attached (2 nuts either 7/16" or 1/2"). Into the master cylinder a rod is passed from the brake booster.

You can imagine the brake action then: pedal is depressed which leverages against the clevis pin to press the lever into the brake booster. The brake booster converts some engine vacuum into more braking force which is then applied through the rod to the master cylinder.

Booster OUT OF an MGB
booster out
The Bentley manual has a step-by-step instruction for removing the brake booster, but I found the instructions to fall down. It started with removing the cover on the pedal box. I agree with that. It then described removing the clips for the brake lines leading to the master cylinder within the engine compartment. I agree with that. Then, it instructed to remove the bolts holding the brake master cylinder to the front of the booster. I also agree with that. At this point, the brake master cylinder can be slid forward off the booster-rod. By doing it this way, no air is introduced into the brake system. I likey.

Then, the instructions said to remove the cotter pin holding the clevis pin for the brake pedal to the leaver on the brake booster. This is not possible for anyone with adult male (and probably female) fingers for width and no one with child fingers for how deep you need to go. The gap between the side of the box and the partition which runs front-to-rear is not wide enough for fingers. I tried long needle nose pliers, but I concluded that even if I got the cotter pin free, and got the clevis pin off, I would not be able to re-install this way. So, I started my own path from here.

My plan was to remove the pedal box with the brake booster still attached and remove the booster from the pedal on my bench. Unlike the brake cotter pin, the partition is much wider on the clutch side, so my average-thickness fingers were able to remove both the cotter and clevis pins without too much difficulty. So, with the pedal disconnected, we remove the clutch master cylinder from the box by removing the 2 bolt/nut combinations that attach it from the rear.  Once removed, the clutch master  cylinder can be pushed rearwards out of the way. Next, we focus on the pedal pox. There are 2 bolts from the top, along the outer edge of the box nearest the centerline of the car. There are 3 bolts from inside the driver footwell going up. Last, there are 2 bolts from behind the dash running forward. Once all 7 bolts are out, the box is only held in place by gravity and the seal. Some light upward pressure on the brake booster and the unit pops free. Getting the unit out of the car took some wrestling, but I think this was more difficult because I could not see where the pedals were dangling. I found that by rotating the unit 90* clockwise helped the pedals to make it through the hole. had I read my old post about removing the pedal box (See MGB - Master Cylinders (Part 1)) or the post about the install afterwards (See MGB - Master Cylinders (Part 3)), I would have known to loosen the bolt fastening the clutch pedal so it dangled a little bit more. This would have made the removal much less of a muscle effort.

pedal box upside down on
workbench with old booster
Once the pedal box was out, it was a simple matter to remove the cotter pin and clevis pin between the brake pedal and the brake booster.... from the underside. I removed the remaining nuts on the brake booster, and started the install by performing the steps in the opposite order: attach the brake booster to the front of the pedal box. Thread the clevis pin through the lever and pedal, minding to include the washer before re-inserting the cotter pin.

Booster Back In MGB
With the unit in the same relative state of assembly as it was in when it was removed, I returned to Oliver to install it. I approached the install in the same manner as it was removed: rotated 90* so the booster was pointing across the engine. The pedals didn't fit, but with some rotating of the box and squeezing the pedals together, I could get them to fall through. Then, I wiggled and rotated the box, checking for cables wires and tubes from getting underneath until it settled in place. I decided that I would do the hardest first, so I did the clutch pedal/master first. I bolted the clutch master cylinder to the rear, after wiggling it around to fit, setting the lever alongside the clutch pedal. Then, I attached the pedal with the clevis pin and cotter pin. I found there was more play that I expected at this joint point, and concluded that I got the clevis pins backwards between the brake and clutch. Food for thought if you are doing this: the longer clevis pin is for the brake.

new booster in
With the clutch master cylinder tied in, I added the brake master cylinder to the front. This is much easier to get to. Once fitted, I started fitting the pedal box to the body. Because of the brake and clutch hard-lines, the pedal box is reluctant to move. I found that putting the 2 bolts through from the dash forward into the rear-most part of the pedal box allowed me to move the box into position. Once the bolt holes along the inside edge (2 of them, one 1/2" one 7/16") aligned, I set those 2 through. Last, I got back on my back inside the driver footwell and sent the last 3 7/16" bolts through the outer edge of the pedal box.

Brake Booster Hose
With the new booster on the pedal box and the pedal box in the car, all that remained was connecting the vacuum hose. I had oriented the booster upside down from the original so the vacuum nipple is on top, rather than below. I did this because of the significant heat source below the booster (exhaust) that is less present above. Also, the hose is much shorter and straighter from intake manifold bung to brake booster nipple. Wanting to avoid any possible issues with the original one-way valve on the intake manifold, I replaced it as well.

Re-Tune and Jetting
Because the old booster was creating a vacuum problem, I re-did the ColorTune tuning steps. Similar to the first time, I tuned using cylinders 1 and 3 but achieved a nice blue in both banks this time. I did swap out the idle jets (50F9 jets), but in order to find blue, I had the idle mixture screws further out than 2 full turns. I will drive Oliver around a little bit, but I think I may need to go up to 55F9 jets if the instructions in the SK Racing manual are to be followed. I noticed that the SK Racing product page describes the "pilot jet" in the carb set-ups they are selling today as 55. Assuming this is the idle fuel size, that's more support for trying 55F9 idle jets.

Since these SK Racing carbs are so similar to the side-draft Weber, here's another tuning link I found specifically for Weber. Notice how that article indicates the starting spot for the idle mixture screw is 2.5 turns out? That is about where mine are now. Curious. One last link, again on the much more plentiful Weber DCOE, but this time about some recommended jet sizes. It recommends the 50F9 idle jets for a late B like I just put in, so honestly, at this point, it will come down to a road test.

under the jet cover plate
Swapping out jets in this carb is seriously one of the easiest things I think I have ever done on a car. There is a cover plate on the top of the carb which is held in place with a slotted bolt. Once the cover is removed, the 4 jets (one idle per side and one main per side) are held in with slotted jet holders. The idle jets are the ones further from the engine / closer to the air filter. The holder threads out, and the jet is held in the holder basically with friction. The old jet slides out, the new jet pops in and you thread everything back together again.

The engine tune did not meaningfully change after the re-jet, so I concluded that the air-fuel mixture from the old jet was virtually the same. So either I removed a pair of 50F9 jets only to put in new ones or the old ones were a similar enough combination that they provided the same air-fuel at idle. At least I know what they are now.

All that is left is a drive... but wait! I didn't hook up the brake light switch. Well, I did, and after a few days of head-scratching trying to get the lights to illuminate, I realized that I had plugged it in wrong. The source 12V arrives in a dual plug, and the signal to the brakes departs through a single plug. I had thought the single plug was from the old carb-preheater, so I had failed to send either side of the switch to the brakes. Instead, I simply wired both sides of the switch to the 12V supply. Hahaha. Simple fix. Once the cars were shuffled so Oliver could get out past the herd, I did a longer test-loop. It did not take long to get the engine to normal operating temperature and he ran great. There was a slight stumble (bog) from dead stop, indicating that he was still a little lean. So, once back in the garage, I turned the idle screws about 1/8 a turn more rich. When I rev'd him from idle, I could not note a bog so I figure he is fairly close to tuned now. More road testing will confirm, and I expect I will fiddle with these screws as weather and altitude factor.

Thanks, as always, for following along-

Tuesday, January 14, 2020

TDI install retrospective: Secondary Electrical

Continuing the process of back-documenting what I did to put a TDI engine into an old (1972) air-cooled VW bus. Today I cover what I call the "secondary electrical". This includes everything that isn't responsible for the alternator:battery:starter system. So, this is the radiator fans, the accelerator pedal, the OBD-II plug by the driver seat and any other miscellaneous stuff I can think of.

This is the first post following the announcement of Neil Peart's death, and I can't let it pass without expressing my heart-felt loss. I love Rush and wish Getty and Alex my deepest condolences. With 2112 blasting in my ears, and "with hungry mind and open eyes"... we return to the TDI retrospective.

Random Cables
Beyond the core primary cables, there are a few thicker wires that need to be run between the relay bank and the battery-top fuses. For these, I found wire of the same thickness, and ran them through the hole in the spare tire well, along the top of the rear engine hatch to the battery-top fuse box. This pathway became fairly well used for sending wiring from the computer to the sensors and senders around the engine. To enable that, I expanded the hole from a tiny drip opening to a 1 inch by 2 inch rectangle.

Cooling Fans Circuit
old NB pedal on left, brake switch on right
I had originally tried to re-use the TDI-stock thick relay and control module to control the radiator fans. That was a mess, and didn't work, so I ripped it all out. Instead, I used one of the small battery-top fused circuits for a power source and a switch on the dash to trigger the fans. The switch went into a hole in the metal dashboard that had not been exposed through the vinyl cover, right next to the ashtray. It receives power from an always-on source so I can cool the radiator even when the engine is off. It triggers a standard relay mounted next to the radiator on the passenger side. When triggered, the 12V from the battery-top fused circuit sends 12V to the radiator fans and the little fan on the inter-cooler. This is a simple circuit, but I have found that long bumpy road trips cause the clips to slowly shake off the relay. So, I may need to put a dab of threadlock on there to stop that.

Accelerator Pedal
new pedal
I originally used the accelerator pedal from the NewBeetle (NB). This was a one-year-only part, so when it eventually failed I had to either pay a few hundred dollars for a replacement or swap it out for the more common pedal. The challenge with the more common pedal was that the rheostat was integrated into the pedal body, so I couldn't hide it like I had hidden the NB pedal. The NB pedal had been stowed inside the belly pan, and allowed me to continue to use the original bus pedal. The integrated housing style pedal meant that the entire pedal would be changed, and it would need a support. I still don't like the final look, but it places the pedal in the right spot for my foot, and it drives correctly. The wiring was fairly easy. There are 6 wires attached to a flat pigtail. I extended the wires and ran the 6-wire bundle under the bus from front-to-back, arriving in the spare tire well, and wired into the computer where the pedal originally wired in. I believe I used wires that were just a bit too thin, because I get sporadic limp-mode issues from lack of signal from the accelerator pedal. See Pedal on the Right for details on the install.

Brake Pedal
NOT USED. If you intend to use cruise control, the computer needs to know when the brake pedal has been depressed. I thought about tying into the brake warning system or putting the sensor on the master cylinder. Ultimately, I made a little bracket on the arm of the brake pedal and the switch triggers when I step on the brake. I don't use cruise control, so I've kind of forgotten about this pedal. 10 years later, this may not work at all, so be advised, this may not be a viable solution. You can see a picture of my switch above. No, it isn't pretty, but at the time it was functional.

Fuel Level
NOT DONE. The range of allowed values for the fuel level gauge in the bus is quite different from the range for the TDI. If you want to swap out the original sender, I found one that would work at Summit Racing. I had thought about building a circuit which would translate the reading on the stock sender into the range accepted by the TDI computer, but I shifted onto other things. My thought was that the original gauge could still work, or I could reference what the computer thinks. I may still do this, or just buy something that does it, like the SN34 from Classic Instruments. For now, I am using the stock level sender and gauge; the computer has no idea how much fuel we have. Most of the time, I don't either.

Speed Sensor
NOT DONE. There are a few ways to go after this. I started down a few paths and decided that I didn't need for the computer to know how fast I was going, so I stopped working on it. My first stop was to try to adapt the vehicle speed sensor (VSS) from the TDI. I couldn't figure that out. So, then I looked into getting something that fit between the dash and the speedometer cable. This looks especially promising as there is a company in Britain (RJ Engineered Solutions, VSS link here) that makes a thread-in plug that fits into the back of the speedometer that the cable threads into. It produces a square wave the computer can understand. While writing this post, I ordered one so I could complete the experiment later. I'll post about my findings once I have some. Since I first investigated this, there are more plug-in options (like Dakota Digital), so you may find something that better suits your project than the RJES solution. The last option is to build your own Hall Effect (or other) sensor. Whichever way you go, Dakota Digital also offers a small magic box (SGI-5E Universal Signal Interface Unit) that can adjust the signal from the sensor to the ECU so you can account for a signal mismatch or simply because you got bigger tires... like I did.

OBD-II
UltraGauge
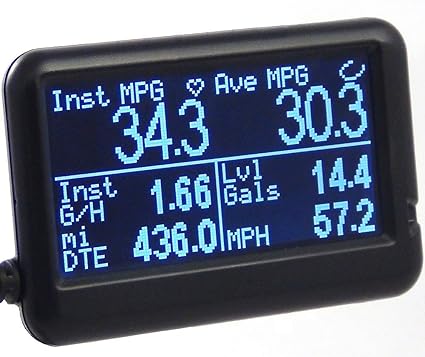
Since I decided against retrofitting the Beetle dash-pod into the dash of the bus, I still needed some engine monitoring. The old bus had 2 lights for monitoring: one to tell you you're out of oil so your engine is toasted and the other to tell you your electrical is shot. Ultimately, your warning system is your ears. Good thing the radio is so lousy, or not there, so you can hear the clamor from the engine bay. That model doesn't work for the TDI: you can't hear a coolant leak or overheating, and by the time you hear the result of the failure, it's too late. So, I extended the signal wire from the OBD-II plug from the rear of the bus to the front by the gearshift. I got a generic OBD-II plug off eBay (it's new, I just avoid Azn) that only had 3 wires: 12V power, ground and signal. The first 2 were easy, wired the 12V to a switched circuit (15) and grounded against the dash. For the signal, I traced the signal wire on the generic and determined which wire from the stock plug matched it. I know that sounds improbable, but it totally worked. Back then, there weren't the BlueTooth OBD-II readers around today. I got a wired one (UltraGauge) for around $80US that's about 1.5 inches tall and maybe 2.5 inches wide that I have jammed into the corner where the dash meets the driver-side A-pillar. I set the screen to show me engine temp and RPM's so I can watch the 2 things I care most about. I love/hate that thing. The longer I go without a coolant temperature issue, the more I realize just how much that $80 gadget saved my engine.

Along the way, I got a ScanTool OBDLink LX thinking I would integrate a more sophisticated graphical dashboard. It is pretty clever, and with a small tablet, a fuller engine monitoring capability is there for the taking. For me, it doesn't make sense until I have the fuel level and speed getting sent to the computer, so the tablet dash will wait.

Heater Fan
I had heat, but when I had my ignition fire, I removed the electrical parts to reduce the load on the circuits up front. If you intend to wire fans for heat, I suggest you find a strong source of 12V power and use an isolated circuit for it. I would just check the power draw for your fans and plan accordingly. You don't want to blow an important fuse because you kicked the fans onto high. I know I will be doing something to restore a defroster at least. I will probably source power from the battery-top fuses rather than the original bus fuse box and then use a new switch rather than the original Vanagon rear-seat heater switch. Because I already have it in-hand, I will probably re-use the Vanagon rear-seat heater unit, though. I'll just need to figure out where to locate it closer to the front of the bus without appearing in the passenger compartment.

Un-Rat-Nest Wiring
I have done this a few times and still need to do more. Unlike all of the other things on this project, this one is most like cleaning your shop or going to the dentist: you never feel like it, but you're so grateful you did afterwards. The original harnesses are not length-appropriate for this application. Along the way, we extended the ones we needed to extend. This step is about shortening all the others so you don't have a big old rat's nest of wire. I have sourced a relay block to re-route all of the relays, and I will be mounting the TDI fusebox as well as tidying up the wiring so it looks like it was all done on purpose. As of now, however, I have only removed the extra wires that were not needed.

There are quite a few wires running from the engine or computer to the front of the bus, but they can be isolated into clumps based on purpose. Accelerator pedal (6), brake pedal (2), ignition (2), OBD-II (1) and the fan switch (1)... so 12 wires. All of them are relatively thin, like 18ga or smaller, because they just send signals, and don't push power. Arguably, all of them could run through one cable of multi-colored wires (like this). If I were to start from scratch, that's probably how I would do it. In fact, I may re-do it anyway and eliminate the occasional signal loss from the accelerator pedal to ECU. If you include the speed sensor and fuel level sender, you will need more than 12 wires, so maybe something like this instead.

Prior related posts:
Preparation
Fuel System
Physical Mounting
Vacuum System
Air, Inter-cooler and Exhaust
Primary Electrical
Cooling

Next related posts:
ECU, dashpod and Sensors

Tuesday, May 28, 2019

Brake Fluid Replaced

When I had the wheels off, I tested the brakes, replaced some parts and replaced the brake fluid. Today's post covers that adventure.

Brake Check
The wheel saga I just recently posted about all started because the camping festival season is coming and I wanted to make sure my brakes were up for another season. I had remembered that my old rear hydraulics were bad and I hadn't checked the wear since the beginning of last season. Even then, it was a visual without removing the rims. So, after I got the wheels off, I checked things off.
Front pads: 60% remaining
Rear shoes: 70% remaining
Front rotors: unblemished along friction surface, rust along outside edge
Rear Drums: some scoring
Front calipers: unblemished, bleeder caps missing
Rear hydraulics: some surface rust, one bleeder cap missing

This was a far better state than I feared. I knew, however, that the brake fluid hadn't been changed in a long time. I couldn't remember doing it, but I must have when I replaced the rubber lines on the corners. That would have been 8+ years ago, so that fluid is way past due.

DOT3 or DOT4
Sometimes, I think the internet is the great religion creator. If you have a relatively straightforward yes/no question, you can find all kinds of long treatises waxing the pro's and con's but getting a real yes or no can be nearly impossible. In the case of DOT3 or DOT4 brake fluid, I have found some level of consistency, which I found rather surprising. So...can your older car which required DOT3 brake fluid can use DOT4: Yes. Can your newer-ish car which required DOT4 use DOT3? Only in tiny quantities, with the expectation that the system will be bleed-filled with DOT4 later. In other words, if you are running low on fluid and somewhere that you cannot buy DOT4, you can put in some DOT3 to get you back to civilization. DOT3 cannot handle as much heat as DOT4, so to prevent failure of your DOT4-requiring system, you should stick to DOT4.

As to me, and the old bus, I can run either. DOT4 can handle higher temps. Some folks say the DOT4 absorbs less water (and that's why it can handle higher temps), so you can change it less often. Like any good pseudo-science, there are great theories (sometimes with great single-experience stories), with little science, to support both of those claims. Enter religion. Regardless of whether they are accurate, I chose DOT4 for the higher temperature tolerance. I will assume that I need to change the fluid on a 3-year interval just like I was supposed to before. I was apparently a brake-system sinner before, letting it get so outdated.

Vacuum or Pedal
Once you decide on the fluid, you need to arrive at a method. If you have a helper, I encourage the pedal method. If you don't have a helper, but you have a MityVac, you can do the fluid change with it. Take ibuprofen first; your wrists and hands are going to hurt later. Regardless of your choice, the pattern is the same:
keep the reservoir topped off with new fluid while bleeding old fluid out of the bleeder furthest from the master cylinder. Once it changes color, and stops changing color, move to the next-furthest bleeder. Don't let air into the system at the bleeder or you will have that to deal with. Move from furthest to closest wheel until you've done all 4.

New Reservoir Hard Hose
I have come to realize that any time I am touching a system on this 50 year old bus that I haven't touched for a long time (or maybe ever), I should assume that any rubber part will need to be replaced. And, I should assume that I may touch something else that will fall apart on contact while the one thing I'm trying to get apart will require acts of God to get them separated. Never was this more true than the little rubber bushings that snug the connections between the hard plastic hose and the 2 brake fluid reservoirs. Yes, this bus has 2 of them. There is one sitting on top of the master cylinder like any normal car. We'll call this the lower reservoir (LR). Attached to the side of this is a plastic hose which runs up behind the driver seat to another reservoir. We'll call that the upper reservoir (UR). To be fair, it is much easier to add fluid up there, so that's probably why they designed it that way. The hard plastic hose stays connected to the hard plastic reservoir because there is a little rubber bushing between the plastic parts and then the whole thing is cinched together with a plastic thing that looks like a hose clamp with a slotted screw holding it together. Very sketchy. I figured the rubber bits on mine were gone, and that the damage to the steel behind and under the driver seat was caused by leaking brake fluid. The fact that fluid didn't stay in the UR for very long supported this theory. Knowing that parts on this old bus are either falling apart, rusted or otherwise seized, I got replacements for the hose, the rubbers and even the UR. I only ordered one grommet, and it turns out I needed 2. Check twice, order once. Don't assume the websites know your bus; you have to look yourself.

NLA
Unfortunately, the hard hose in its original length is no longer available (NLA). Only the Vanagon hose is available, and it is at least 8 inches longer. Longer is better than shorter, I suppose. That's definitely true for summer days and early Dark Star's, but this is a hard hose, so putting a few bends in it to make up the slack is not an option. On each end, the hose is fluted to fit around the nipple on the reservoir, so even though the web sites all say to cut the hose to length, that's all fine until you want to install it, and then the cut end won't fit on the nipple. And, because you cut it, it is not returnable. So, I suggest you don't cut it and do something clever... like I did.

You have 2 options:
(1) cut 8" out of the hose in the middle and figure out a way of joining the 2 ends without creating a new leak source or
(2) keep the hose the way it is and figure out a new way to attach the UR to the short wall behind the driver seat.

I went with option 2, knowing I could always fall back to option 1 if I couldn't get it where I liked it. The UR is basically a cube with a filler cap along one edge, pointing away from the dead-center of the cube at a 45* angle. Originally attached with the cap facing forward, this made filling easier than having it smack on top. We can use this angle to our advantage. If we rotate the reservoir 90* so the filler cap faces the center of the bus and then tilt the hose towards the door frame, eventually the cap faces straight up. It can be mounted to the wall like that. Before you get too far down this path, assemble the hose, rubber bits, plastic hose clamps, etc to the various reservoirs. Connecting to the LR is swear-word generating-ly frustrating, so prepare with a loud radio and sending the kids inside.

Install Hose
LR image from theSamba
I started by threading the one grommet around the hose and then the hose from above down through the hole in the floor. Since I didn't have a second grommet, I did not want to cause the hose to fail prematurely, so I did not thread it through the little hole in the driver seat pedestal. Instead. I routed it through the large square hole immediately in front of it. This may make it more susceptible to getting struck by camping gear, but I rarely put anything behind the seat, so that risk should be low. It also looks quite janky, and I will probably want to solve it properly before I re-install pedestal carpeting. Regardless, I decided to go with option 1 because I wanted to get this on the road for test drives, and knew I could change this fairly easily later.

Anyway, once threaded through the hole in the floor, it settles onto the nipple of the LR. It takes prodding to get it to sit on the LR nipple without damaging the rubber bushing and getting it deep enough that it won't leak. For me, it took wrapping the hose with a rag and grabbing on with channel-lock pliers to force it on that last bit. I found that putting the bushing on the nipple rather than seated in the fluted end of the hose was more effective as well. Tighten on the plastic hose clamp with a slotted screwdriver. Circle-back to check for leaks later, once you've put brake fluid in.

schematic from VWHeritage
The UR is easy to assemble with the hose, if you don't cut off the end. Placement of the reservoir, in my case, is temporary while I figure out a better long term solution. Ultimately, I will probably do option 2, and cut out a section in the middle. If I can do it right, I'll make the cut between the floor and the driver pedestal so the cut solution is not visible once the pedestal carpet is re-installed.

That's it for today. We got the DOT4 through out the system, using the vacuum method for the rear and the pedal-pump for the front. While the vacuum works, I greatly prefer the pedal-pump method. It is much faster and you get to hang out with a friend while you do it. After a test drive, the brakes settled down into a predictable response as the air worked it's way back through the master cylinder and up through the reservoirs. After several longer drives, the UR fluid level has remained unchanged, and the brakes are consistent. The brakes are ready for another season.

Thanks, as always, for following along.