Showing posts with label wiper. Show all posts

Tuesday, February 5, 2019

Flash fixes continued

I left off my last post about Flash with a summary of fixes stemming from replacing my 3 seasons tires with studded snows. Today, I finish the work by repairing the not-operating wipers and getting the reverse lights to work again.

Wipers No Wiping
The RainX held us for the handful of days while we waited for the new linkage to arrive. I got new wipers and a wiper-arm puller as well. Everything arrived on a Friday night, so the next (Saturday) afternoon I tore into the job.

Before you start, make note of where your wipers are. Similar to getting your engine into TDC (Top Dead Center) firing position for cylinder #1 before you start removing things, move your wipers into the rest position (all the way down) before you start or getting things to line up at the end will take much longer. The arms remove with a 13mm socket, hidden under a small plastic cap. Save that cap and the nuts. Once the nuts are off, the arm puller popped the arms right off. Next, the plastic cowl needs to be pulled away. The rubber seal along the front edge should remove easily, leaving just the 4 snap-on bits along the rear. These pull away by getting your fingers under the plastic along the windscreen and pulling more towards the front than straight up. I have seen others post about using a pry-bar; I found that excessive and introduced more risk to breaking that plastic cowl or scratching the glass. I removed and re-installed this cowl a few times while trying out various parts, so I can say for certain that a pry bar should not be necessary.

nicked from VWVortex
With the cowl out of the way, you should see the unpainted metal linkage connected to the wiper arm bolts. It is held to the car by 3 10mm bolts. Remove the bolts, and the washers underneath and save them. The linkage should now be free, but it can't be removed until you unplug the electrical plug from the motor. It is a flat 6-pin plug with a little catch on the underside. Press the catch and pull it away from the motor. Now you can wiggle the whole operation free from under the windscreen. Note how the motor connects to the linkage. There are 3 10mm bolts holding them together and a central 13mm nut holding the business end of the motor to the operational part of the linkage. Consider the orientation of that "operational part". If the wipers were in their resting position before you started tearing things apart, the short arm is pointing directly to the right (front is front), making it difficult to get the 13mm wrench in there to remove the nut. Remember this when you're putting it all back together.

I took the opportunity to clean out the little wiper controls bay at this point. There was all kinds of organic debris in there from years of parking outside. I dug around with a stick and used my shop-vac to get it clear. I also started testing things. First, I compared the new linkage with the original. I noticed that the new and old operated the same. In fact, the old one moved more freely. So, I concluded that the linkage was not the problem. So, I plugged the motor back in, and tested its operation with the wiper switch. The motor made noise, but did not turn the threaded end. So, the motor was the bad item. I needed a new one today or we were going another week, this time a projected-stormy one, without wipers. Eek.
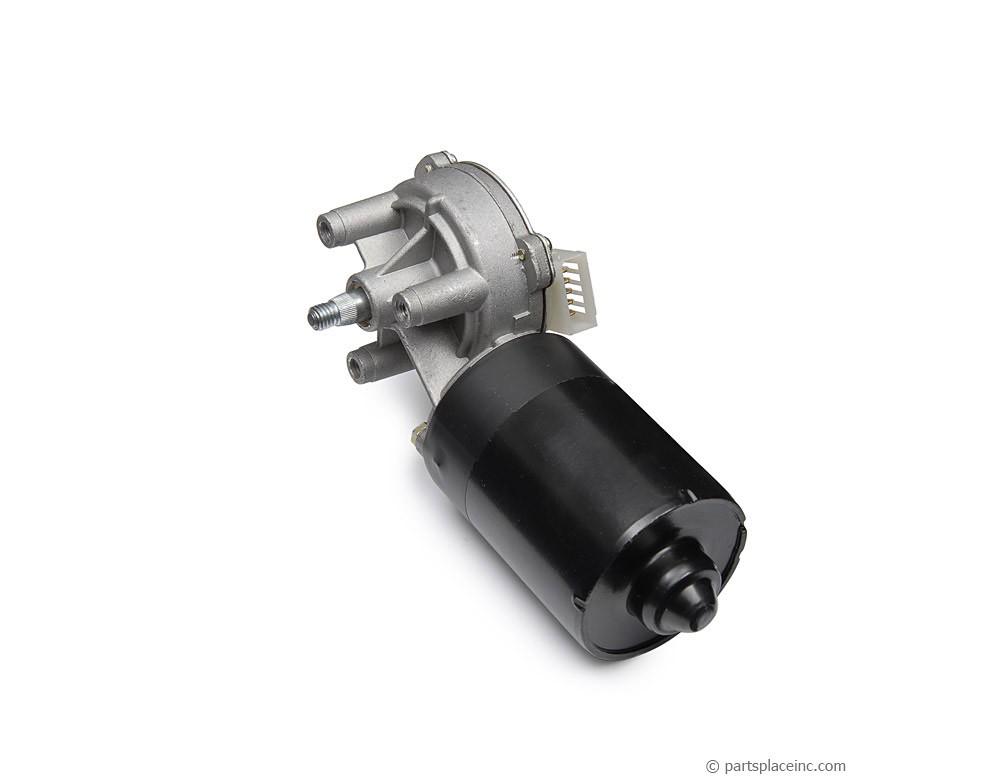
wiper motor

Local Auto Parts
With Discount Import Parts now 1-1/2 hours away round-trip (no, I just can't let that go), I started looking around at the common local places. NAPA reportedly had one just down the street, according to their website, but after ordering one for pickup, I was called by the store and told that they actually didn't have one, but they could have one to me by Tuesday. Hmm.. this is why Amazon is crushing typical retail; I could have one in-hand tomorrow from Amazon. I want one now. Today. Next, I tried O'Reilly's about 30 blocks away, who also claimed to have one. They did. I failed to test it before I left the store, and it failed to work, right out of the box, when I tried to install it. No motor movement; no motor sounds. By the time I got it returned, it was getting into Saturday evening, so I aborted for the day, knowing that the Hillsboro location (20 minutes away) had 2. One of them would probably work.

Sunday morning, I hit the Hillsboro store, swapped a $100US bill for a motor and tested it in the parking lot. Bad the same way as mine: motor hums but the threaded end didn't turn. I've come to the conclusion that this transition part (I refer to as a transmission) is a fail point that is not looked at during rebuilds, or at least not often enough to prevent bad parts going to stores. For reference, it's the silver section of the motor in the picture on the right, here. Anyway, the other motor they had looked much better. The transmission looked new, the paint on the motor was not all over the transmission (like the others were), and best of all, it passed my driveway test of plugging the motor in while it was resting on the hood/windscreen and flipping the wiper switch.

I had brought my old linkage and the fasteners so I re-assembled the wiper motor and linkage, re-installed them and attached it all to the car right there in the O'Reilly's driveway. That's one more plus for them over NAPA: NAPA has a big sign on the side of the building forbidding patrons from doing spot repairs in their parking lot. O'Reilly's guys will come out and help you do it. Anyway, with everything under-cowl put together, I tested the switch and watched the wiper bolts rotate. Regretting that I had not brought at least the driver-side wiper arm and blade with me, I nosed the car east and back home.

Clear Screen
Bosch ICON wipers
The finish-up of the job was very simple. Between the linkage and the cowl resides small rubber boots that I had not mentioned earlier. I think these protect the linkage from rusting, so I re-installed them. Considering how rust-free and genuinely operational the original linkage is, I think this a fair assumption. Then, I wrestled the cowling back under the hood (bonnet for my non-US friends), setting it tight along the front edge before snugging the 4 snaps along the rear edge. I re-set the seal along the front edge, and then put the wiper arms back on, snugging them down with the 13mm socket and finally pressed the plastic caps into the arms. Like all things, test before you call it done. I had been doing all this in a steady Pacific NorthWest rain, so there was plenty of water on the windscreen for a valid test. The new Bosch ICON wipers ran smoothly from park to post and back again.... and completely cleared the glass in one pass. So sweet.

Reverse Lights
The last thing I needed to fix on the old Jetta was the not-operating reverse lights. Start with the simple, obvious things first: the bulbs. While they do not fail at the same time very often, I find coincidences like that happen more often with this car than many others I have owned. Not this time, though. Next, test the switch. The switch sits under the battery tray, behind and to the left of the starter motor. If you unplug it and then jumper across the 2 pin holes in the harness, you simply turn the ignition to "run" and you should see reverse lights. If you do, the switch is bad. If you do not, the issue may lie elsewhere.

Remove and Replace Switch
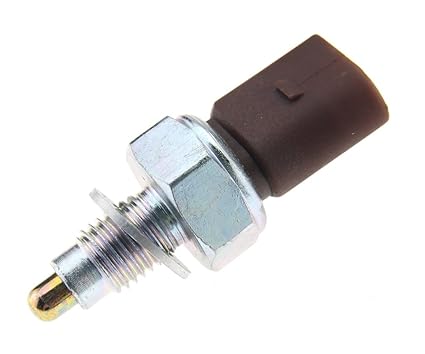
reverse switch: do not use the washer
I read a few how-to's on the reverse switch, and they all sounded very involved, including removing the battery and tray, removing the air box or both. Yikes. I looked at the location and considered that I could see the hex edges of the switch, so I could probably get a spanner in there. Sure enough, a 7/8" spanner fits the switch perfectly and can thread behind the battery box, but far enough ahead of the transmission to gain purchase on the switch. Unplug the switch first. Then, just pop the spanner on that switch so it can move. I didn't have to move my spanner more than 30*. Facing the engine from the front, reach along the rear of the radiator (under the upper hose) and under the battery box until your fingers reach the switch. I had my elbow brushing the driver-side radiator fan. The switch removes fairly easily (lefty-loosey). The install is the reverse, seriously, and then snug it tight with the 7/8" spanner..

I applied some thread seal on the switch, dropped on the included washer, reached around and under the battery box and threaded it home. I plugged it in and... nothing. Huh? I backed out the switch, and tested the switch by plugging it in, holding it depressed with my new wiper arm puller and saw the reverse light illuminate. Yes, I could have asked someone inside to come out, but it was raining... and raining hard, so why get everyone wet? I concluded that the included washer is NOT for the Jetta TDI engine, but may be used in one of the switch's other applications. Great. So, I pulled the washer, re-installed, plugged it back in and... it worked. Hapy dance.

So, now, the only thing that is still broken on old Flash is the hazard switch. I have bought multiple new ones and they all arrive failed. I think it stems from manufacturing moving away from Germany and Brazil to China, lowering the quality of the soldering along the way. I will just get one from the junkyard the next time I go. I still need to solve for the heated seats one of these days, but I am content to have all of the lights and wipers working for today.

Thanks for following along, and I will be getting back to Oliver's interior now that the daily-driver is safe again.

Tuesday, January 29, 2019

Flash fixes

I realized that I hadn't posted on a collection of things that broke all around the same time on Flash, the Jetta, so today I'll cover what went wrong and what I did to fix them.

Snow Shoes Grow
With a plan to hit the mountain for a taste of snow over the Christmas holiday, I pulled out the snow tires I got for Flash last Thanksgiving (Nov 2017). I got them new off of craigslist for $400 already mounted on universal steel rims. I say universal because they fit the 2 standard VW 5-bolt patterns. In looking back on my old posts, I don't think I ever posted on this purchase. Anyway, they are i-Pike tires and hold firm in ice and snow like no tires I have ever owned. Since we were down to one car, I had to swap the tires after Boo got home from work, so, on the night of December 23rd I set to swapping out tires in some nasty weather. I found, however, that the brakes were in pretty shabby shape and needed to be done as soon as possible. I found some locally-sourced pads (Adaptive One brand) and on Christmas Eve I did a brake job before we left for the mountain.

Lights? Who Needs Lights?
The pads fit well, and have performed extremely well, considering I'd never heard of them, and I didn't go with one of the usual VW-friendly brands. If Discount Import was still on the West Side, I would have gotten pads there. Anyway, while I was digging around the driver front wheel, I noticed a light bulb dangling by a wire. I concluded that it had fallen out of it's holder on the front bumper on one of the many times the bumper got ripped off by a parking curb. Yes, this happens often, and apparently happens to anyone owning a Jetta MK4. The TDI engine is an engineering marvel; the body it was delivered in, however, is not. Anyway, I put the bulb into the little hole, and finished the brake job. When I went to take a test drive, though, the brakes were great... but I lost my dash lights. That is, I lost all of the lights on the dash except the idiot light telling me I needed to replace my brake pads. Suddenly that light was on now. Love you, Flash.

Mountain Fun
We drove to the mountain anyway, having no idea how fast we were going. While we were still near the city, this was not much of an issue. We just stayed with the speed of traffic. Once we got onto US26 east of Sandy, though, we were alone. So, I checked speed periodically with a flashlight. We arrived in Welches after the local grocery closed for the holiday, so we just hit the cabin for the night. Christmas morning, we (me, Boo and T) drove up to Timberline Lodge, and we rode snow until sunset. We drove down, again without the benefit of dash lights, but the traffic was so heavy it didn't matter. By the time we hit the Damascus turn-off, the traffic was so crazy it really didn't matter how fast we were going; someone else was going to come racing up from behind anyway.

Dash Light Fix
As you may have surmised, the cause of the dashlight failure was that otherwise uninteresting bulb I found hanging. A small section of bare wire had become exposed, probably when it was force-ably removed from the bumper. When any one of your running lights creates a short, it blows a fuse... which also routes 12V to the lights on your dashboard. Either side can cause this. I find it so hard to understand how a fuse box with so many fuses doesn't isolate the dashboard from the running lights. Engineering marvel. So, I taped up the bare wire, replaced the fuse and the dashboard lights returned.

Brake Warning Light Fix
When I did the brakes, I plugged in the sensor in the new pads. Apparently, the sensor doesn't work. Maybe there is not enough metal material in the pad to conduct electricity or maybe these AdaptiveOne pads are NOT that great. Regardless, I check the condition of my car often enough that an idiot light should not be necessary. So, I cut the wire from the "sensor" in the brake pad and removed it from the car. I stripped and spliced the two wires together and plugged it back in. Warning light off: but also will never light up. So, I will be sure to check my brakes when I switch over to regular tires in March, and may just add that check to my oil-change routine.

Wipers Not Wiping
No sooner were we back to having an operational car than the wipers stopped working. Seriously, I fixed the lights on a Sunday night and on Monday morning the wipers stopped working. If you turned them on, the wiper would move a few inches and then stop. You could hear the motor, and since they tried to move, but failed, I thought the problem was in the linkage between the wiper arms and the motor. While waiting for linkage to arrive, I applied Rain-X water repellent. That stuff is magic. The following morning, we were greeted by ice on our windows. While letting the car warm up, I set to scraping. The windscreen was the only glass to which I had applied the Rain-X, and it was also the window which was freed of ice the easiest. Also, as we drove down the road, the little bits of left-behind ice quickly melted and beaded away.

I'll post on the wiper repair and the other fix (reverse lights) next time. Both of those jobs have more tale to tell than I can put in one post. Thanks, as always, for following along-

Tuesday, January 8, 2019

MGB now in service

Just in time for the snowy winter months, Oliver, the convertible MGB, is now ready to be pressed into service. Today's post highlights the final touches: tires, brake bleeding, preparing the windshield for rain and the dash lights. oh, Hapy New Year.

New Shoes
I had lamented the body roll during the last test drive when I did the alignment (See MGB Alignment). I knew the tires were old, and wanted to remove that variable first. So, on a day when I had to miss work for a routine dental cleaning, I bopped past the local Les Schwab Tire Center and got Oliver some all-season tires. I haven't forgiven the other Schwab for not tightening down the boots on the steering of Flash (Jetta TDI), but I thought a different Schwab might be okay. I hit the Schwab on Lower Boones Ferry, which was under construction. For a mid-week, mid-morning, the place was buzzing. They were able to serve the need though, and had a new set of 195/65R15 tires on within an hour. I asked them to give the brakes a bleed while they had it on the rack, but they didn't. They checked the brakes and indicated that they might need a bleed, but didn't do anything about it. Les Schwab, you are just not the same tire shop that you were 10 years ago. This may be the last of our business together.

The tires are nice, though a little louder than I expected. Perhaps that will shift as they age, though I've found tires usually get louder, not quieter. The drive from Beavo to the dentist, then the tire shop and then back home was a great test. Morning rush hour meant lots of rubber-band driving, so lots of clutch, brake, low gear driving. Oliver did that in stride. On the way home, the morning rush was over, so the highway was fairly clear. So, I could get Oliver up to a much higher speed. That was super fun, but the brakes still were a little softer than I'd like. I made a plan to bleed the brakes the following weekend.

Brake Bleed
I have tried to get the last air bubble out of the brake system a few times. I bled the master cylinder (see MGB Sponge Brakes) and thought I had the air out of the system then. I was wrong. And, after having that belief confirmed by the Les Schwab folks, I knew I needed to get it right this time. I started on the rear wheel furthest from the master brake cylinder. I put the rear end up in the air, removed the rim and got out the MityVac. The bleed screw is a 5/16", and I think my prior challenges before came from a combination of little errors that I corrected this time:

First, rather than use the box-end of the spanner, I used the open end this time. I found this did not encourage the vacuum line to lift off the bleed screw.
Second, never let the vacuum drop below a few pounds of vacuum in the line. In fact, I made sure I had no less than 5 pounds of vacuum in the line when I closed the bleed screw.
Third, I started with brake fluid in the vacuum bleeder canister, and made sure it always had some. I think this prevented air from working it's way back up the bleed line.
Fourth, and perhaps most importantly, I never let the master cylinder reservoir fall below half-full. By doing all these things, no air was introduced into the system.

So, I was able to follow all the other good practices: monitor the fluid coming out of the bleeder for bubbles, minding that tiny and/or large bubbles mean the seal of the vacuum bleeder is not perfect. You are looking for a small bubble. Also, bleed far more than you think you really need to. There is nothing wrong with completely replacing the fluid in the line from the reservoir to the bleed screw.

Windscreen and Wipers
While driving Oliver late last Summer, I found that seeing through the windshield was virtually impossible when I turned into the sunset. This is a fairly common problem in Oregon because so many of the roads run due east-west, and the low-hanging sun finds its way directly in your face in the weeks nearest to the equinox. I think this is why the US-26 west of Portland is called the Sunset Highway. To remedy, I used the Rain-X Xtreme Clean. I'm sure there are other and arguably better products out there, but I had it in the garage. Like the directions said, I cleaned the windshield with glass cleaner, then applied a small amount of the RainX stuff onto a damp clean cloth. I rubbed it a bunch in a circular motion and then wiped it clean. Except for a few deeper gouges from bad wiper scratches, the windshield looks considerably better. I failed to take a picture before I started. Honestly, I just jumped in and did it before thinking about taking pictures. To complete the rain-readiness, I replaced the 2 nasty stiff crumbly old wipers with a pair of new ones I got in one of my other orders from Victoria British.

Dash Lights
I had one last thing that I needed to solve before Oliver was road-ready: his dash lights didn't really work. I tested them in a dark garage and found that the tach and the cigar lighter were the only things that lit up when I turned on the headlights. That won't do. The rheostat that controls the brightness of the dash lights is a common failure part, and finding a replacement for the late-model (read: rubber-bumper) MGB is pretty difficult. Many of the usual part places don't carry it. Many owners simply wire around the switch so the dash lights are full-bright when the running or headlights are on. I did this on Oliver (leveraging a 10amp fuse from the feed line to a wire-splitter which I then wrapped with electrical tape), but I may still replace the switch.. Getting the old switch out was a real bear, since the nuts had frozen in place and the set-screw for the knob had as well. I effectively destroyed both, so I'll need new for both if I decide to install a dimmer. Still, with the hack in place, all of the lights come on so no bulbs needed to be replaced. Winner! I had been thinking about adding some fog lights, so if I don't replace the dimmer, that hole in the dash would be perfect for a fog light switch. Hmm..

So, now with the number of cars available meaningfully reduced (See Herd Thinning), Oliver will be seeing some road time. We really only have one regular-driver car: Flash. Flash will continue to see 95% of the drives through winter, but when we have those rare needs to be in two places at once, and mass-transit can't abide, we can safely drive Oliver. I intend to slowly work through the interior replacement work, but won't be officially taking Oliver off the road to do it. This will make for an interesting few months.

Thanks, as always, for following along.

Friday, November 20, 2015

Daily Driving

At some point after my trip to Boston, the clunking noise coming from the front end of my 2001 TDI Jetta (Flash) started to really get to me. I don't know if it was the weather changing or the car's growing desire to turn right, but I knew something was going sideways. Today's post covers that saga.

Rebuild Parts
from MetalMan Parts
I trolled around the internet and found some good pub on this rebuilding kit from MetalMan Parts. So, I hit the site, and made some decisions. First, I got the fuller kit with the TT rear bushings. While that cost a little more, I figured this was a replacement I probably wouldn't be doing again. I also got new front struts (COFAP for comfort, recognizing the TT rear bushings will stiffen the ride) and new strut mounts. I had read good things about a 1" lift kit from Evolution Import, and I got that too. A few days later both shipments had arrived.
Upon inspection, the MetalMan kit was pretty fantastic. Every fastener that needed to be removed had a replacement. They sent both sway-bar bushing sizes and replacement clamps. It looked great.
The Evolution Import kit wasn't as impressive, but it looked like what I expected from the instructions online. It was shiny and relatively simple. I ended up not putting the rear lift in, and the Jetta sits flat with out it.

Destroyed My Arms on My Arms
I set aside the weekend to install everything, with the recognition that I would need to take the strut assemblies somewhere to get the springs moved from the old set to the new set. I'd also need to get the alignment done somewhere. Otherwise, I felt I could do everything else. 9:AM Saturday morning, I pulled Hapy out of the garage bay where he'd been resting since our active Summer and put Flash in his place. By 11:AM, his was on stands, the Panzer plate was off and I had my plan of attack. I'd start with removing the control arms. Once the old ones were off, I could easily get at the sway bar bushings as well as get the struts out.  The sway bar links came out with little trouble, but the 2 18mm bolts with point towards the rear were a little tight. I had to work them pretty hard, and I found my arms started to get sore. But that was nothing compared to the 2 bolts which fed up from below. I tried PB Blaster. I tried a propane torch. I tried this stuff from Amsoil called "toolbox helper". I went back to the torch. By late-afternoon, it was clear I wasn't going to get either of them off so I soaked them with the Amsoil stuff and let it sit overnight.

Sunday morning, I ate well, enjoyed coffee with Boo and then went back to the bolts. Within 30 minutes, I'd concluded that the soaking hadn't helped and I was stuck. My arms were really aching from the day before, so I started looking for options. Since the front end was in pieces, I couldn't easily take the car to someone to get the bolts off, so I hit craigslist for someone willing and able to do the work in my garage. I found a father-son team, and they were happy for the work.

MobilePDX
now that's a breaker bar
MobilePDX is a father and son team who have worked on cars for years. Courtney is around my age (dirt is older, the internet is not) and has been wrenching on cars since he was a kid. They were organized, clean and left my garage in better shape than they found it. I'd originally intended to have them just get the 2 bolts off and swap the struts, but once they got going, it was just easier / faster to have them finish the job. They were able to get the passenger side bolt off with a breaker bar and youthful strength. The driver-side had to get ground down with an angle grinder. I'm not exactly sure how they got the bolt out after that. They followed my original plan from there, verifying my thinking... which is always nice.

Aw Nuts
After MobilePDX got everything back together, they discovered that the front caliper bolts were not grabbing into the hubs. Upon inspection, the threaded holes weren't threaded anymore. Neat. The proper repair is to over-drill the holes and thread in a helicoil (or something similar). That is what Courtney said and the chat-rooms agree with him. Others have used an oversized bolt that is so widely available both on the internet and the FLAPS (friendly local auto parts store), I'm inclined to think it is becoming a widely endorsed solution as well. While I sort this out, Flash sits on jack-stands and I am driving Hapy every day.

Hapy Hapy Joy Joy
I'm sure if I look back into this blog, I have many references of going back to driving the bus after a period of not driving him and expressing the pure joy of driving the bus. It really is awesome. The smiles, waves and conversations happen as much in the wind and rain as they do in warm summer. That's pretty neat.
I have continued my experimenting with the shift-point, shifting now around 3400RPM. This allows for the engine speed (when dropped into gear) to still have some turbo influence. So, he's got even more zip than the old 1700 had from the bottom to the top.
I just put 10 gallons into the tank, and I got over 28mpg since the last fill. Since there's a lot of city driving in there, I think I could have a viable city/highway mix guess: 27 city / 33 highway. Pretty fantastic. It hasn't been all smooth sailing though.

Fix-It List
On an exceptionally cold morning, I discovered that the dash vents weren't quite aligned properly. When I went to fix it, I accidentally pulled the wiper electricals out of the switch. Turns out, that bundle of wires needs to go through the hitch in the center of the plastic "Y", not around it.
After fixing that in the parking lot at work, the heat is suitable for clearing the windscreen from mist or fog, but it smells like diesel exhaust. I need to locate a source for fresh air before I drive Hapy into real cold weather.
The fuel gauge needs to be replaced. I still don't know the actual capacity of the tank and guessing based on the mileage when I last filled isn't a reliable measure. Cold wet weather isn't the time to guess if you need fuel.
I didn't re-install the door seals after I painted the top 1/3 of the bus. This creates a pretty good breeze when travelling over 35mph. I need to install them. Of course, the old ones were pretty beat up, so I need to order another set.
The bus still has some rattles, and I think one of the door skins is the main culprit for most of it. Also, the other jalousie window is now making the noise the rebuilt one used to make. Perfect. Time to rebuild the other window.
Last, the brake warning light flickers at me. This usually happens when I remove or do something around the battery. Since I had to charge the battery before moving him out of the garage, this was self-inflicted. I think there's a fluid leak near the master cylinder, though, so I may have to do a fuller brake overhaul soon. Either way, I'd like so much for the flicker to go away, or just never happen.

That's it for today. Like usual, if I'm not posting, its because I'm working on one of the cars.... or traveling. Once the front brakes / hubs are solved, Flash will be driving again and I'll start knocking down the list above for Hapy. The good times never end. As always, thanks for following along, and please pray for snow. I'd really like to get some gravity testing in this winter and our farmers need the snow-pack for summer irrigation-