Tuesday, May 29, 2018

MGB Sponge Brakes

During the various test drives as I solved for the various leaks I described in my last post, the brakes have been spongy. If I lightly pumped the brakes a couple of times before using them, I could stop well, but that's not a safe situation. Before I could go on a real test drive, I'd need to fix them for real. Today's post covers that.

Master Cylinder pre-fill
The brakes were spongy since I completely re-did them. after bleeding and re-bleeding the system at the wheels, I concluded that there was air in the master cylinder. I hadn't bench-bled the master before install, so it seemed pretty likely that the issue was there. In retrospect, I should have pre-loaded the master cylinder with brake fluid by the process folks call a "bench bleed". This is where the master cylinder is set in a vice with the shipping plugs still in it. Using a pair of pliers, the activation lever is moved back and forth while brake fluid is added through the reservoir. Once the chambers are filled, the master cylinder is installed into the car. In the MGB, the master cylinder fits onto the end of the brake booster, so this could have been done.

Getting the hard lines attached can be an interesting challenge. As I look back on my efforts to get my master cylinder in, I suspect I would have leaked brake fluid all over the engine compartment. So, while I probably could have done it the "right" way, I think the way I solved it could actually have saved the paint on my driver inner fender.

de-Sponge
So, since I didn't do the bench bleed, nor think much about air in the system at all other than pulling it out at the wheels, I figured it had to be air in the master cylinder. To solve, I took the bleeder hose from the MityVac kit. It's about 3 feet (1 meter) long. I put a coffee filter on one end to catch particles from the hard lines and dipped it into the master cylinder reservoir. I put the other end on the driver-side front wheel bleeder. Then, I pumped the brakes moving brake from the reservoir through the master cylinder, down the hard line, then the soft line to the brake caliper. From there, it passed out the bleeder into the clear hose and traveled back up into the reservoir. The key here is to keep the coffee-filter end in the fluid in the reservoir. Without that, air stays in the system. So, keep topping off the reservoir and keep pumping the brakes until there wasn't any air in the clear hose.

This worked great, except I couldn't close the bleeder without re-introducing air. I tried 3 times before I had spread brake fluid all over the inside of the tire and the garage floor. I succumbed to the obvious: remove the tire first. Yes, I failed to both mention and do that above. At any point before you connect the clear line to the bleeder screw you should remove the driver side front wheel. Why yes, that does sound obvious. If you don't, you'll be like me and try to do this with limited success because getting the bleeder closed without letting in air when the wheel is still on is virtually impossible.... especially if your car is on the ground (not on a lift), and its on the ground in a garage that's full of projects, parts and tools... and sports equipment... and camping gear... and laundry machines.

Anyway, after washing off the brake fluid, I set up again, and had the line bubble-free on my fourth attempt. This time, I was able to get the bleeder closed. I proceeded to quick-bleed the other 3 corners, but virtually no air bubbled appeared. Another test drive, and the brakes were nice and responsive. I haven't tried the stomp-on-the-brakes test that the car shows on Velocity TV do, but I will be next time I take the little car out.

That's it for this time. Thanks, as always for following along--

Thursday, May 24, 2018

MGB leaking leaking leaking

While solving the missing emission control issues (See eMission Control We Have a Problem), I took a few test drives to shake out each change. Today's quick post covers 2 things I discovered on that first test drive.

Leaking Fuel
The MGB had been stuck in the garage behind the donorZed all winter. I didn't have much cash to do a lot of work, so in some ways the winter was kind of lost to the donorZed. Still, with it finally gone, I was able to restart the MGB efforts. So, for my first test drive, after getting it unburied from being stuck behind the donorZed, was to get some gas. The drive there was similar to my last drive last Fall: loud with squishy brakes. Lovely. Still, I was almost completely out of petrol, so I stayed the course. This time, though, all of the signals worked, the brake lights functioned, the temp gauge worked, and the fan came on when I flipped the switch, so things were looking up.... until I started filling the tank.

Here in Oregon, we're not allowed to fill our own gas (but diesel is okay), so while the attendant started gassing, I washed the windscreen. Within a minute, the gas attendant started freaking out about gas dumping out under the car. Neat. I looked under and could see that the fuel level float was leaking. Not one to test drive without a trunk full of tools, I grabbed a slotted screwdriver and pushed it the rest of the way, stopping the leak. The gas man was too freaked out, so we called it "full enough" and I drove home. It didn't leak again, and a quick shot with carb cleaner got the gas off the underside of the tank.

The fuel level gauge wasn't working 100% reliably, and I concluded that the sender was not getting a good enough ground. So, I ran a short wire from the side of the float to one of the bolts holding the tank in-place. Whether that was a factor or not, the level looks much better now, showing over 1/2 a tank.

Leaking Coolant
When I got home, I saw that the thermostat housing was leaking again. Grr... so much for a fun drive about. Instead, I removed the housing, applied more gasket sealer and actually followed the directions: apply liberally, hand tighten and let sit for an hour, torque down to spec and then, most importantly, no liquids or back-into-service for 24 hours. I'm pretty sure I did the first 2 steps and then forgot about the torquing the last time. Duh. The following day, I topped of the cooling system and took a test drive. No leaking at the thermostat. Sweetness.

Unfortunately, a few days later, after another test drive, I noticed leaking coming from the block drain. Apparently, this drain is the source of one of two common troubles: either it is completely clogged with cooling system gunk (rust particles, and general sludge) or it is a leak source. I'm in the second camp, but my leak is special. Usually, the leak is from the spigot not sealing because of a design flaw. No, mine is leaking from around the edge. So, rather than get a replacement drain, I'm just going to remove it, wrap the threads in plumbers tape slobber on some blue gasket-maker and thread it back in. Of course this time, I'll follow the gasket-maker instructions right the first time.

Leaking Voltage
It turned out that the battery that came with the car was 7 years old. After many cycles of short drives, I found that I needed to put the battery on the trickle charger more and more often until finally it just stopped accepting a charge. I went out and got a "gold" battery and new ground cable at Advance Auto Parts. We get most of our batteries from Les Schwab, but their hours are just not well suited to people who have day jobs, so Advance got the business.

Now, the little car fires right up, the gauges all work, the lights and fans come right on... its almost like a "real" car.  The brakes are still spongy, and it is still really loud. I got after those next and I'll post about what I did.... next time. Thanks, as always for following along.


Tuesday, May 22, 2018

Why Does Dead and Company Suck?

Today is a complete rant about nothing car or bus related. Enjoy or ignore. Either way, I'm sure this will upset someone. To keep things calm, I will turn off the ability to add comments to this post.

Who the Hell Do I Think I Am?
Before Jerry Garcia died, self-identifying as a DeadHead was similar to self-identifying with a national (US) political party. People knew where you were coming from. You're not a metalhead, not a jazz aficionado and not a generic "fossil-rock" or classic rock fan. Being a DeadHead was specific. Nowadays, similar to identification with a political party, self-identifying as a DeadHead is not so simple. Like the many versions of political thought within a single party, there are many versions of "Dead fan" under the DeadHead banner. I know 'heads who feel that once Jerry died, it all changed and they'd never go to see a fragment of the Dead. There are those who will reflect on earlier days believing that things were better when (insert non-Jerry former member name here) was with them. There are some who will twirl to the sound of a child banging pans together. For others, all you need is a shuffle beat and it's worthy of praise, whether its a Dead fragment or a couple folks hammering on guitars in the parking lot. For the most part, all sides tend to agree that being off key or having some difficulty instrumenting doesn't matter. It's all good if you're groovy. Do whatever you're doing, but be genuine, push your limits and keep improving.

I'm somewhere in the middle of all that. I guess, if pressed, I'm sort of in that second group of  'they were better when'. Let me explain. I started following the Grateful Dead in the 80's, and my last tour with Jerry was in 1992. Except for my first few shows, I went to every show completely sober and danced my ass off. I missed the mid-90's through the early 2000's, picking back up with The Dead in 2009 and catching about a dozen Furthur shows before they stopped. I was at the JGB show in Milwaukee, WI that was just released on CD, drove overnight from Las Vegas to SF for the Golden Gate Park memorial when Bill Graham died and spent my honeymoon in 2012 (thx, Boo) witnessing the final New Years Eve run any Dead fragment performed.

So, who the hell am I? I'm someone who listened. I completely enjoyed every nuance of what greatness came from the stage and endured every plain-Jane set list, missed vocal note, and missed lyric, knowing more greatness would follow, and danced on. For that reason, I've waited 2 years for Dead and Company to follow the mess they create nightly with some greatness. It hasn't happened yet, and I don't think it will. Today's searing post details why I think that. Honestly, if this assemblage of players toured under a name that didn't have the word "Dead" in it, they would be playing bars, not stadiums. Agree or don't, but I have to get this out of my head.

Phil
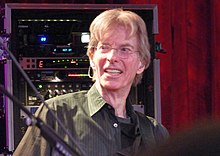
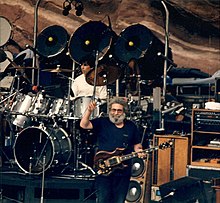
Let's start with what's missing: Phil Lesh. He's the soul, the last remaining member truly believing that when the music leaves the speakers its everyone's. He embodies the freedom that the Grateful Dead packaged and delivered. As a player, Phil approaches the bass like it was a lead jazz instrument unlike just about everyone else who plays bass as part of a group. He is able to lead a group of musicians from song to song with little more than an encouraging smile (see photo) and a few little teases on the strings. He doesn't seem to approach the same chord change the same way twice, each time coming at the shift from a different angle, keeping the underpinnings of a song fresh and interesting. Sometimes, these experiments don't go as planned, but the experienced players he surrounds himself with are able to adjust and move with it. This was true with the Grateful Dead, the fragments of the Dead he worked with as well as his most current projects. While his voice hasn't been a benefit to any group of musicians he's played with for a long time, it was actually better during the Furthur days than it was for many years before or since.

Bob
Moving on to what's wrong, listen to a bootleg from just 10 years ago. Bob used to sing. Black-Throated Wind, Cassidy, Sugar Magnolia were some of the nicest vocal lines in the Dead songbook with his name on them. Check this video or this video from '78, for examples. Such sweet and powerful vocals. Sure, that was 40 years ago, and he was a much younger man, but now, he does a blend of barking, yelling and talking. He doesn't even try to make it sound like how the songs go, or to even sound like singing for that matter. So, while Phil's singing may not exactly be in tune, at least he's singing and trying to stay true to the melodies as best his voice can.

Bob's guitar work, however, remains just as interesting as it was in the 70's, only ripened with age. He voices chords and plays poly-rhythms in an extremely unusual way and he attracts players like bees to fresh flowers because of his innovative approach to the guitar. His bark-yelling the words to songs that used to have beautiful melodies, on the other hand, is just atrocious.

Drumming
In their hay-day, Billy and Mickey were able to set a groove. Sometimes the songs moved their beat and other times their beat moved the songs. The early half of "Drums" was one of my favorite and arguably most consistent spots for a show. It was highly rhythmic, encouraging dance like a tribal beat does. If a show was exceptionally plain-Jane, it was often this part of the show that turned it around. You could feel a hum-drum show turn. Something great would flow out of Space, completing the show with a strong handful of songs all thanks to Drums pulling the concert out of the bin.

After not playing together for a few years (since Rhythm Devils split in '08 and The Dead stopped in 2010), I figured it would take a while before Billy and Mickey hit their stride. Unfortunately, they still haven't and it's been long enough for them to get it together. There are definitely two drummers, not two instrumentalists making one rhythm. Perhaps they can't decide or agree on what they're doing. As a listener, it doesn't matter; they are less of a cooperative unit and more like two guys banging on things in the back. There are points when it sounds like there is a team of carpenters erecting a shed or drum-riser on stage rather than a cohesive percussive rhythm driving and complimenting the music.

John Mayer
One thing that sets Jerry Garcia's sound apart from everyone else, especially in the psychedelic space, is the most simple thing that John Mayer doesn't ever do: use the Mixolydian mode of the scale. Jerry didn't use it exclusively, but John never uses it. Ever. Even on the songs that cry out for it (The Other One or Terrapin, are examples, but there are plenty). He insists on only playing blues-style solos. That's great on Bobby's cowboy tunes or some older blues songs, but to only play that way against the Grateful Dead songbook feels like you're petting the fur the wrong way most of the time. When Warren Haynes toured with the Dead, he was able to bridge the gap from classic rock / blues to shred on some of the more psychedelic numbers. So, it can be done; John Mayer hasn't shown that he can, but then he's no Warren Haynes either. Of all the things that are wrong, John's approach to solos is the back-breaker for me. It just doesn't work in so many songs, I just can't take it.

John can sing (yeah, that's hardly news given his Grammy's). It's on key and pure. It just sounds a little old-style crooner which makes Dead tunes sound contrived, and the lyrics less powerful. Just as Aerosmith has to be sung with a little edge in the voice, the Dead can't be sung by Mel Torme. To me, it needs an edge; it needs a little sorrow. One cover song here or there is one thing. Singing half of a show without that soul just doesn't work.

Oteil
Oteil has a great voice. I hadn't heard him sing before last Summer and it is just beautiful. He sang a "China Doll" that was just amazing. When contrasted by Bob barker, I can't help but wonder why Oteil doesn't sing more and Bob sing less. It would probably make his main job (playing bass) much harder.

That bass work is just not the same as with Phil. Unlike Phil, Oteil plays like bass is a complimentary instrument that doesn't have much freedom. It's almost as if he had spent the last 20 years playing in a classic rock band. Oh yeah, he did. With the Allman Brothers. Yes, there are fills and runs here and there reflective of his years with the Aquarium Rescue Unit, but nothing like an old "Phil and Ned" or even some of the tasty lines Phil would drop into more straight-forward numbers like Scarlet or Music Never Stopped. But, Oteil has it in him to get out of the box. The guy can totally groove; I don't know how much freedom he has to do so in this group for two reasons. First, he is in a rhythm section comprised of him and the carpenters I described above. To keep the song together, he really can't move too far from dead-center or the shed construction could completely unravel a song while he is pushing the creative envelope. Second, Bob will need to let Oteil loose. Having watched video of Bob working with other players, I know he runs a tight ship. But having so much of the responsibility for keeping the song together may be the true barrier to Oteil really blowing some minds.
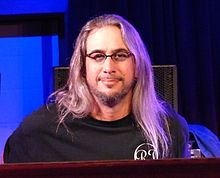
Jeff
I haven't mentioned Jeff Chimenti, and I really should. He's fantastic. Really fantastic. Really really fantastic. He's been playing with members of the Dead for 20 years, and he totally gets it. I first caught him with The Dead and have enjoyed every show I've seen him play since. In my mind, he's reached, and maybe surpassed "Brent status" in terms of his keyboard. On those occasions when I gave Dead and Company a try, it was Jeff's keyboard work that kept me listening well beyond my patience would allow had he not been crushing it so hard. He is simply inspired. I hope to see the Golden Gate Wingmen one of these days to see how he and JohnK play together in their new group. And maybe hear what some of his original material is like? That would be so great. Okay, I've run out of descriptors. Let's just summarize with: he's awesome.

That's my rant for today. I'll get back to my usual car or bus work and road trips next time. Thanks for bearing with me, and if there's a jam band that you like (that's not Dead and Company), I'd love to hear them. I'll be trying on String Cheese this summer, and really want to hear whatever else is going on in the jam-band space. Have bus, will travel-

---

2023-August days-between update... now that Dead & Co's final tour has ended, I am hopeful for the next incarnation. I had not been following the news items about them, so I missed the part where they parted ways with Billy, leaving only Bob and Mickey as original members. Arguably, Mickey was a later addition, but lets not split hairs. I heard some of the final tour, and the new drummer was great. Awesome energy and ticking like a flippin clock. It seems like the "creative differences" between Dead & Co and Billy may have been Billy's contribution to the drum riser construction I mentioned above, seeing how it was not going on anymore. Also, Oteil was WAY more active and present, implying that my theory that he was under-playing just to hold things together may have been somewhat on-target. Anyway, RIP Dead & Co, and may a greater phoenix rise from these ashes, preferably without John Mayer. Musing... maybe just swap out JohnM for JohnK and drop the word "Dead" from the name so they aren't playing stadiums full of 50k persons chasing their personal pasts. Instead, they can return to more intimate venues like Further played, and return to the experimentation we got to witness in doing so. One can dream.

Tuesday, May 15, 2018

Back to the Bus: Rad Swap (Part 2)

Continuing from an earlier posting, today I'll cover the assembly and install of a new Mishimoto all-aluminium radiator into the TDI-powered microbus.

Where Were We?
Old rad, for perspective
In the last post in this series, I removed the old radiator from the bus, destroying the wiring along the way. I removed the framing / bracketing that supported the radiator from the old one and cut off the fans. Now stripped bare, we can compare the new and old radiator. The outlets are the same distance apart. The holes that I used to hold the frame on were in the same spots... but... all the other bits for holding the radiator into a Jetta were flipped over. So, the original fan housing (and air conditioning condenser) would line-up, but it looks like the inlet and outlet are on the wrong side (driver-side versus passenger side). And, the temperature sensor that triggers the fans is now on the same side as the inlet/outlets. So, in a Jetta, this could be solved with different hoses. In the bus, this gets interesting.

Bracketing
Because of the reversal of the inlet/outlet, I realized that the front bar where I had 2 radiator mounts attached needed to get flipped over. I cut off the pop-rivets holding on the mounts, and re-set their location the same way I did it the first time: threading the mounts to the radiator... but wait a minute. The new radiator doesn't use screws. It is threaded for bolts. Neat. I found one bolt in my fastener bins that fit, took it to ACE and got 8 stainless steel hex-bolts that fit: M6 1.0 pitch.

installing fans
Once back from ACE, I threaded on the front mounts, lined up where they should connect to the bar and marked the spots. A quick-run with a 1/8" drill bit and the pop-riveter and the front bar was ready again. I then turned my attention to the fans

Fans
I looked at the pile of plastic and foam bits. I thought I could drill a hole through the original bottom-bit and thread a zip-tie through. Instead, I found fender washers that had a small enough hole to allow the zip-tie, but not large enough for the end to slide through. This would work! So, from the bottom, the zip-tie passed through a washer, a foam bit, the fan housing, the radiator, another foam bit and last a plastic zip-tie anchor. To be extra sure, it would all hold, I ran the zip-tie back through the fins and then through the zip-tie head on the bottom.

Cowling
adding cowling
With fans in place, I attached the mounts. The radiator was starting to get a little heavy. We're feeling almost done, until the flip-over design of the mounting points would stymie the work again. The cowling wasn't fitting anymore. The left and right (driver-side / passenger-side) needed to be reversed because of the angles (front pitched downward to catch some slipstream), but it wasn't quite that simple. After some head-scratching, this ended up being as easy as folding the cowling the opposite direction from what it had been. Then, it bolted right on. I concluded the prep by zip-tying the fan electrical leads to the cowling so they wouldn't be buffeted by the passing winds any longer.

Install
One it was in one piece, I took it back over to the bus and slid it under from the driver side. I hung the threaded carabiners onto the eye-hooks on the frame. Then, I put the front bar on the jack and lifted it into place. Once I was able to get the threaded carabiners onto their respective lengths of chain, I removed the jack and repeated the effort with the rear mounts, again doing the driver side first. I checked the movement, verifying that the radiator unit would swing back and forth, front to back and had some headroom to bounce up.

Wiring Re-wiring
install-ready. topside
Now that the new rad is physically mounted, I switched my focus to the electrical. The new radiator did not deliver with a fan switch, but it did have a threaded hole for one. I had ordered one years ago when I wanted to have the fans come on automatically. I just never got to it. So, I ran the threads on the switch with plumbers tape and threaded it into the hole (with the rubber gasket in place, of course). I still don't have the trust that the temperature-sensitive fan switch will work, so rather than wire that in, I stripped out all of the extraneous wiring and set up the switch on the dash to fire both radiator fans and the little motorcycle fan on the intercooler.

For my sake, I'm posting the circuit numbers from the relay:
30: 12V+ this is fused, but unswitched power so the fans can run with the key off
85: grounded
86: to the fans
87: trigger switch. One day the thermo fan switch will wire in here. For now, it's the dash switch

I cleaned up the wiring so it's nice and tidy with the relay zip-tied to the underside of the bus and out of sight. I may wire the fan switch into relay pin 87 just to see if it works. It might be interesting to wire those pins to a light on the dash so I can see what temperature they fire at... for a first step. If nothing else, I could use that as a temperature warning light.

Plumb and Fill
install-ready. underside
With the electrical solved, and the rain well settled in, I didn't want to give up. I was mostly under the bus anyway, and the bus cover provided additional rain-cover so I wasn't really getting too wet. Fortunately, water hadn't started running under me in growing puddles yet. So, with that motivation, I wriggled the longer hoses onto the 90* bends off the radiator and hose-clamped them really tight. It surprisingly took me no longer to do than it took to type. I went around to the back of the bus, pulled the cover up, opened the tail gate and filled the overflow bottle with G-40. This is a process, requiring filling up to the full line and then venting the air out of the lines with the little spigot I installed just below the thermostat. I continue this process until coolant/water mixture comes out the spigot. It took the gallon of G-40 and wanted more. So, I topped off with distilled water (about 1/2 a gallon).

I dodged to the front of the bus, confirmed the fans ran and then disconnected the battery, closed everything up and dashed inside. One day, I'll have a huge garage. Until then, I work in the rain.

I took Hapy out for a test drive, and I believe the swap is complete. I suspect one or more of the hose clamps will need tightening, but otherwise, I think it's ready. If this fancy super-radiator doesn't do the trick for keeping the temps down, I may need to route more air through it. That would mean either lowering it, routing some ducting from the front or both. Here's hoping the super-rad does the job.

Grilled
I made one last change to the set up after the test drive. I had a section of security fence lying around, so I cut a section, spray-painted with a couple of coats of semi-gloss black and slapped it on the front. This will prevent plastic bags and other garbage (that seems to be appearing on the roads in greater frequency) from getting sucked into the radiator, fouling it's ability to cool the engine. I had meant to do this with the original radiator install. Once I did it, I was surprised at how quickly it went from the cardboard package through the tin-snips and paint to install. In terms of actual effort, it was less than 30 minutes. I really should have done this earlier. The picture to the right shows it mid-install. The nut with washer on each lower corner have since been tightened down and there are zip-ties across the bottom as well as on the top corners holding it in place.

That's it for today. I would like to do something with Hapy's brakes before a real trip. I have rear wheel cylinders and I'd like to replace the lines between the master cylinder and the fill reservoir as well as all brake fluid. Maybe I'll get that done before 4Peaks. I hope so. Anyway, thanks, as always, for following along-

Tuesday, May 8, 2018

Back to the Bus: Rad Swap (Part 1)

It's been a long time coming, but today, I cover the removal of the under-belly mounted radiator in the TDI-powered bay-window bus. In a subsequent post, I'll cover the bracketing retrofit and install fun. First, some background.

Background
disconnected front chains
Last Summer Boo and I had three incidents with the bus getting too hot. We couldn't keep up with GratefulEd on the way home from 4Peaks (See 4Peaks 2017 Road Report). Then, we were stranded on the side of the road climbing the foothills on our way to Frog Lake (see Almost Frog Lake). Last, we barely scratched out a round trip into central Washington for Chinook Fest (See Chinook Fest 2017 Road Report). First, I thought it was because I let the coolant level get too low. Topping up with water didn't help. Then, I thought I had caused irreparable damage from using the wrong coolant, and did a complete flush and fill. It didn't fix the issue. On the drive home from Chinook Fest, I promised Hapy that I would replace his radiator before we took another drive. After emptying the bus of camping gear, I parked him and winterized him. He has sat with a Bus Depot bus-cover ever since.

Radiator - (almost) 9 Years Later
draining the coolant
I had to reach pretty far back into this blog to figure out when I originally installed the radiator. My earliest references to it date back to November of 2009, and I already had it in hand. If I remember correctly, I bought it used off of CL that summer for $40. It could have been the summer of 2008 or even that spring, I suppose. I just know that it was a nice warm dry day, and that definitely doesn't happen in November. Regardless, this used radiator from an early 90's Jetta gave us 6 years of service, but I believe it has served it's last trip. Looking back through the posts, I detailed location thoughts (here), how I constructed the frame/bracket (here and here), the cowling, test fitting and final fitting, the routing of the coolant lines, etc. I did not change the design with the new radiator, in fact, I reused everything except a few fasteners and zip-ties.
photo nabbed from JEGS,
where I bought mine

Meet the New Rad
I figured that if I was going to buy a replacement radiator, I had 2 options: direct exact replacement (aluminium single-pass core with plastic sides) or an upgraded (multi-pass) all-aluminium one. I considered that I can't say for sure that the original radiator was powerful enough to cool the TDI pushing the bread-loaf down an interstate. When I first did the swap, I babied the bus and I still had my eyes on the temperature gauge. I would really like to stop doing that, so I looked a little deeper into the all-aluminium ones which are supposed to have considerably better cooling capability.

The interweb can't decide if the all-aluminium models are any good. In the mixed reviews, most of the issues appear to be with drop-in fitment, not with performance once installed. Since my fittings are completely custom anyway, I was not deterred. The performance ratings are across-the-board positive, with some actual numbers demonstrating the quality. Of course, not all manufacturers are equal, so I looked to what online vendors sold. There are many radiators which appear to be only sold on eBarf by drop-shipping companies direct from China. That is, except for Mishimoto. The Mishimoto radiators are sold through Summit Racing, ECSTuning, JEGS and a few others. That was enough for me, and I ordered one that was supposed to "fit my vehicle" when I said it was a Jetta3.

It arrived in a very well packed box, designed for shipping and typical shipper mishandling. The extra thick cardboard protected it very well, and it looked so nice and shiny. It looks pretty much like the picture, actually, though instead of "MISHIMOTO" emblazoned across it, there's a big "M". Before I could get too excited, though, I needed to see how the mounts compared to the one I was removing... which meant I had to remove the old one first.

Removal
removing the cowling
and frame mounts
Like so many things, removing is so much easier than installing. I know some folks feel the opposite, but just about every project on this bus starts with an hour of removal followed by a couple of days of trying to get the "exact replacement" installed. This project was no different. Like any radiator removal, we start with draining the coolant. I have a large black catch-pan used just for this purpose, so I slid it under the bus, got myself under there with a slotted screwdriver and had the hoses off and draining within 5 minutes of walking out to the bus. Next, I unplugged the fans. This, unfortunately, was not completely clean. Some of the wires separated from their plug-ends, and the extra wiring for the fan switch complicated things. Last, I had not done a very clean job with the dash fan switch wire when I installed it, looping it around the radiator framing. I had to cut that wire. Grr.. present "me" is not thrilled with past "me". With the wiring in a heap, I kept moving.


The radiator is suspended from the underside of the bus with chains: one on each corner. The top of the chain is attached to an eye-hook that is mounted to the frame just under the floor. The chain and eye hook are connected with a thread-closed carabiner. The same combination is at the bottom of the chain, with an eye hook at each corner and a threaded carabiner attached to it. In between is a short stretch (3 or 4 links) of high-test chain. To remove the radiator from the bus, I slid my orange floor jack under the front rail of the radiator frame and lifted the unit until there was sufficient slack in the chain for the bottom link to slide out from the threaded carabiner. Once free, I lowered the front down, and shifted to the driver-side rear corner and then last the passenger side (I was lying on the passenger side so this order kept things within my sight and reach). Once the radiator and frame were on the ground, I slid them to the driver side so I could pull it out, and took the whole operation into the garage.... just as the rain started.

Radiator Off-Frame
about to remove the fans
Once in the garage, I needed to get all the frame bits and the fans taken off the old radiator. The frame was held on with 10mm screws, 4 on each end  (2 top, 2 bottom). Once removed, the frame and cowling fell away.

Each fan was held on with 4 one-use-only custom zip-ties. On the bottom end was a plastic square that crudely fit into a spot on the bottom of the fan. Connected to that is a zip-tie-like plastic stick that fits through a foam bit, the radiator fins, another foam bit and then another plastic square that clicks along the zip-tie. This last bit is what holds the zip-tie tight. To remove, I cut the custom zip-tie off with wire-cutters, retaining all of the pieces. I had thought that I could drill a hole through the bottom plastic square, and re-use all the rest (except the zip-tie stick part) by using a basic zip-tie. I didn't drill or reuse that bottom plastic bit, but I'll get into that during the re-assembly.

Like so many of my topics, this is too big to fit into one post, so I'll continue this later on. At this point, the old radiator is completely removed and stripped bare. Thanks, as always, for following along,

Tuesday, May 1, 2018

Cosa sta succedendo in Italia?

A few months ago, the hit-rate on this blog really took off. I thought it was because we had started working on a project that was of wider interest than the usual fare of Volkswagon bay window bus and the MGB. To be fair, we have documented our work on a few other cars: the Jetta, a couple A4's, a subbie and, of course, Jaws the Jeep. We have done little things to help out friends along the way too, and we haven't really documented those, but that's not really important.

Back to a few months ago, I thought there was a new interest because of the 280ZX project. This theory was fueled by a considerable uptick in overall blog interest, but more from the hit-rate those particular postings were getting. That behavior is not holding, however, and I'm seeing higher hits on all postings. Am I getting more interesting? No. Are my posts really appealing to that much broader an audience? I doubt it. So, with the assumption that my posts are no more interesting nor widely appealing, I started looking into the numbers a little bit more.

This all brings me to the title of the post: Cosa sta succedendo in Italia? or "what's going on in Italy?"

The numbers indicate that I am getting a very unusual spike in traffic from Italy. Based on the sharp peak (it looks like a tack sitting on it's head), I'm inclined to believe that it is a bot of some kind spider'ing the blog with 50 or so post views in a span of a few minutes. With all the craziness stemming from the Russian influence on elections and the use of Facebook in that effort, I think everyone is a little more on edge. So, when I saw that usage spike I figured it was a troll-farm thing, but it's not from Russia and frankly this blog doesn't really hit their target content-wise.

The stats collected about where the views come from or what browser is being used are quite literally of no interest to me. I don't look at that. I am interested to know what posts hold interest over time, but just from a curiosity perspective. I don't think it meaningfully influences what I write about. My life drives what I write. If a car breaks, I fix it and then write about it. If my kid buys a car or the family moves or we take a trip somewhere, I write about it. If you were to bring your car over and we work on it, I'll write about it or maybe I won't. I don't know. Yes, that's an open invitation to bring your car over if you need to do something on it, even if it's just a simple oil change.

Anyway, weird post for today, but after months of wondering what's going on this post will serve as the salve to get it out of my system. I love cars. I love talking to people about cars. But mostly, I love working on them, and even better is working on them with someone else. If the Italian Blog Bot feels the same way, then I absolutely welcome its spidering behaviors. Spread the love, Iron Man. But, if you're trolling for political leanings or how to learn how to best influence an election, you're definitely in the wrong place. We talk cars, not politics here.

Happy May Day-

MGB Emissions Update:
I didn't change the oil because it was clean as honey when I checked it. I guess I changed it before I started all the work on it.
I replaced the spark plugs (they were Champions) with NGK's, and gapped them to .03. The old ones had really wide gaps, but the tips were light-ish colored telling me that the fuel mixture was lean if anything out of normal. I replaced the plug wires, distributor cap and rotor as well.
I routed the oil breather into the top of the air cleaner by drilling a hole in the chrome-top and threading a 1/2" hose joiner into the hole. For hose I used a junk garden hose, which I'll replace with something more suitable later. I was aiming for minimum spend in case MG failed smog miserably. I did a few other little things, that I'll post on later, but that was it for the smog stuff except for getting and hooking up the charcoal fumes thing I mentioned last post.

T and C took a joy ride in MG while I was at work, starting with a trip to the DEQ. MG passed! It passed way better than I could have imagined, actually. For posterity:
hydro-carbons (HC) need to be at or below 220 parts per million (ppm). MG scored a 6ppm.
CO needed to be at or below 1%. MG scored .0201%
With this happy news, I'll be dancing into the DMV to renew my tags. Regular driving of this little British sports-car is just around the corner.