Showing posts with label wiring. Show all posts

Tuesday, January 16, 2024

Hapy Electrical Fix and Planning

A few weeks ago, I rotated the headlight switch clockwise and that caused a short that allowed a wire to release it's smoke. Today's post covers that resolution, with some expected twists and closes with a plan to update the fuse box.

Poof
72 bus wiring diagram
First, I accept that what happened was entirely my fault. I turned a push-pull knob, and the housing was loose so I created a short. At first, I thought I had grounded a pin on the back of the switch. Based on the wire which fried, I'm not so sure, but the grey wire fell off of pin 58. That wire fall was what caused the running lights to not function: they tie into fuses 1 and 2 which control them. It wasn't wire 58 which fried.

So, I dug into the interweb. I found another person who had the buzzing noise from their flasher relay and they discovered the root cause was that the dashboard did not have power. Sounds about right, I suppose, so we remove the dash to see. The dash removes with 4 screws. If you are fortunate enough to have the vent and oily-smelling-air controls, you may need to manage them first. I have the older style controls which originally had the little colored spring-loaded clips. Of course, Hapy didn't have the colored clips, and still doesn't. Anyway, remove anything from the vent control levers which impede the dash removal, remove the 4 screws and detach the speedometer cable. Then, the dash lifts straight out (a little diagonal) to the steering wheel. At that point, I rotate it so the face points to the floor. To me, this puts the least pressure on the wires while exposing them for me to see. From here, I could see that the black wire from fuse 12 that delivers 12V to the dash had it's plastic casing melted off. How and why that wire fried rather than popping the fuse, I don't know. The fuse was and is still there, it was relatively new (like, in the last 5 years), the right rating and it was seated properly.

Clumsy
1 fried wire
Knowing which wire needed to be replaced is a great first step. Getting that wire replaced without negatively impacting anything else in the original electrical system, however, is a virtually impossible task. Such was the case this time. First, I pulled the wrong wire out of the fuse box, and as I did, I dislodged a couple of fuses. Then, I got the wire back in and dislodged some other ones. Finally, I found and removed the bad wire from the fuse box, bumping a wire out of the high-beam relay holder as I did. Neat.

I formed a new multi-female-spade-connector wire, using the fried one as a pattern. With a multi-meter, I confirmed the connectivity between all of the end points had 0 resistance and returned to Hapy's driver seat. I plugged the wire into the tabs on the dash, and dangled it behind, finding the tab in the fuse box. Again, I unsettled a few fuses, but once they were in place again, I started testing. First, I confirmed that the running lights and headlights came on. It being daytime, I could tell the lights were on, but not that the headlights were the high-beams. I turned the key to run and the buzzing was gone. The turn signals worked, the hazards worked, and continued to work when I turned off the key. I even test started the engine to prove things were good. What I didn't test: the wipers. It seems that when I was messing around with the fuses, I failed to reseat fuse 11 (which controls the wipers and the rear defogger) after reseating what felt like all of the others -or- another wire fell off. I didn't discover that the wipers didn't work until I tried to take a drive at night in the pouring rain. So much fun. I don't think Hapy likes the winter weather very much; he does seem quite persistent in staying in the driveway.

About Had It
So, after spending so much time diagnosing issues only to discover the issue was the 50+ year-old fuse box or really the style of fuse used in the 50+ year old fuse box, I have decided to look into replacing it. I say that because the wire that fried was on a fuse that didn't blow and the fuses are in the box so loosely now they become disconnected simply by brushing past them. Based on my research, I understand the fuse-box layout / purpose to be this table below. I will replace with a simple 12-slot 12-independent-circuit box that uses spade fuses instead of the old buss style. It will ultimately use the same circuit numbers as before for all of the things I am keeping (never had ambulance fans, nor ignition buzzer, nor interior lights). Plus, it will include things I need, like radiator fans and the fan for the heater.

Fuse # Original Purpose Changed Purpose
1a front running lights, license plate light
2a rear running lights
3b passenger low headlight
4b driver low headlight
5b passenger high beam
6b driver high beam
7* open? looks like it was for ambulance fans radiator fans
8* emergency flasher and interior light emergency flasher only
9* ignition buzzer, rear interior light interior heater fan
10# horn, brake light warning switch/light
11# windshield wiper, rear defogger plus the windshield washer pump
12# dashboard, emergency flasher
rear backup light
a: supply-side from light switch
b: supply-side from headlight flasher (dimmer relay)
*: always hot
#: switched
&: inline fuse not in fuse box

I will be adding a master circuit-breaker as well back by the starter (where the main 12V source for the fuse box comes from) so there is a safety on the entire #30 circuit that goes to the ignition and the head light switch via the supply-side of the always-hot fuses. I do not know when I will get after this, though. The joy I have had since removing the rat's nest of wires for the engine control has been significant. The wires for the original bus have their problems, and I will be replacing some of the runs (particularly the rear tail lights), but for the most part, they have been up to the task. I just need to find a way to stay somewhat dry and maybe a little not-freezing so I can get after it. Since it is January, I recognize my opportunities for something this big will probably not appear for a while. Still, I can't keep letting smoke out of the wires, and I would very much like to get Hapy out of the driveway for a safe drive-around before spring. For the Pacific NorthWest, that starts with getting the wipers working again and then getting the high-beams turned off.

That's it for today. Thanks, as always, for following along-

Tuesday, June 28, 2022

Hapy Test Flights

After a fall/winter/spring of making modifications to Hapy, we took him for a test spin. Today's post covers that, the discoveries made and resolved and then another test drive.

The Changes
First, off, let's recap some of the changes since we last drove Hapy. Recall, that last run was a drive to Cornelius after resolving the stammer by cleaning up the vacuum lines and appliances. That was our last drive (except for the decibel tests) in those loaned-by-GratefulEd seats. We now have Sprinter seats. The old flooring was removed, CLD, jute insulation and MLV was laid in it's place. Of course, we have sound deadener all over and the stereo is operational (it was before, it's just better). On the mechanical side, the engine has a "cold" air intake now and there is a rear sway bar for handling. It is a different feel. More different, I think, is my familiarity with driving him. I have been driving GoRo (the Audi A4) and ToyoTruck, which are much more modern. So, my frame of reference is a little off and the Sprinter seats sit much higher, so I have to lean over to reach the stick now, especially when pulling away from a stop sign. I find myself hunched, and twisted to look left for oncoming traffic. Regardless, I think it will take a few drives to re-acclimate to driving the old bus. Looks like there will be more bus driving ahead. Sweet. One thing worth noting, I think: again, for the entire drive (albeit a short one), we didn't have the stereo on. Funny how much effort I put in and how little it gets used on the road. There is just something about riding in the bus that lends itself to no radio, and carrying on a conversation instead.

The Drive
On to the drive! Hapy started right up like he had been driven the day before. The throttle is super responsive, and the engine drove like a champ. He still doesn't like 2nd gear, but I haven't done anything to address that (it might be my install of the Scat short-throw shifter). The overall low-end drone is MUCH quieter, but some rattles remain, especially the screens in the jealous windows. I probably have them installed incorrectly (this video shows correct). Hapy still stops well, and he takes corners WAY better. There was almost no sway around street corners; of course, we did not drive very far nor very fast. We simply drove to a nearby park, played with the dog and returned home by way of the local c-store for some ice cream on a stick. The combo oil pressure / temp gauge still works great, and we did not throw any codes. While we didn't get above 35mph, the sound inside the bus never grew so loud that we couldn't talk at a conversational level. We could not hear the hum of the tires at all, and we really did not notice the sound of the engine. We could hear it, sure, but it was not as ever-present as it used to be. Recall, I used to describe the noise while driving the bus like sitting in an old metal shed next to a running a diesel generator, in a wind-storm. It is definitely not like that around town. I will execute a full decibel test lap to test the noise at highway speeds, but first, there are some things to fix.

The Issues
First, the exterior lights continue to produce phantoms. The brake pedal causes a bunch of the exterior lights (like the front running lights?) to light up, but not both brake lights. Also, the turn signal doesn't work when the brake pedal is pressed. No pedal and no running lights on... and the blinkers work. I remembered that I had the exact same experience when I took Hapy on that decibel test drive (buried in the Hapy Noises - Part 2 post). So, nothing I did over the winter caused it, but nothing fixed it either.

Probably equally important, the fan switch no longer triggered the fans to fire up. After we returned home, I found that one of my wiring bits had become disconnected. While repairing, I noticed how hot the wires would get during testing, and decided that I had gone too thin a gauge in some areas. So, I replaced the merged fan ground wires with individual 14ga grounds, and improved the supply-side to 14ga as well. The fans now both work, and the wires are air temperature.

The speedometer didn't work. I must have disconnected the speedo to get into the dash at some point over the winter that I don't remember and failed to reconnect it. This took no brainpower, just lots of patience opening up the dashboard, and trying not to upset any of the wiring back there.

We dropped into that awful 1200RPM limp mode right before we shoved off, but it only happened that one time. Believing I had fixed that before, this was especially frustrating. I must have bumped the wiring connection at the pedal while installing the jute and MLV. I checked those connections (pressing the joint-points firmly between my fingers), but nothing felt off. After multiple drives since, Hapy has not dropped into that 1200RPM limp mode again. 

Last, Hapy had not yet received his annual Spring cleaning (after-photo is at the top). So, he had a blanket of pollen on his pop top, moss on his window seals / windshield wipers, dull looking paint and dirty windows. The spring wash is the biggest of the year, taking a couple of hours, but it is so worth it.

Exterior Lighting Diagnosing
I have tried so many times to figure this out, and so many ways, but I had not been successful. I won't list them, but between resistance and voltage testing everywhere, running test wires the length of the bus, and replacing things, I thought I had tried everything. This weird brake light thing had been a recurring phantom for years, practically since I first did the engine swap. One of the frequent causes for the issue to return after being gone for a while was a remove/install of the battery. This always seemed strange. Sure, the battery is part of the electrical system, but why would it re-conjure an electrical ghost? It occurred to me this time around that the old 20-pin diagnosis plug is back by the battery. Perhaps my incomplete removal of that plug and related wires is a contributing factor?

Unable to determine this through my prior methods, I did something completely different. I removed the tail light assemblies from the bus, letting them loosely hang in the body holes. I took a different 12V auto battery, and ran a test wire from its ground post to the body ground point next to the main on-board battery. Using a fused wire, I touched various light circuits to see which ones worked as expected and which did not. All of this time, I had believed the issue was in the passenger tail-light: it is the light fixture closest to the battery, so I thought I was bumping something while installing the battery. Nope. The tail-light circuits would fire the correct lights. When I ran the same test on the passenger light fixture, lights were batty like I described above.

I checked the wiring diagram related to the driver tail light, and noticed that there was a tie-in between it and the battery location: the old test plug circuit. The yellow circled 9, 10 and 12 which tie into the driver tail light all correspond to the pin numbers in the plug. I knew that the running light was the one that was lighting up in-error, so I figured that red wire was the compromised one. I cut it off at the tail light, and the phantom behavior ended. Both brake lights illuminate when I step on the brake pedal, and all the running lights light up correctly (and only when I turn on the lights, not when I step on the brake).
 
I ultimately cut off all of the wires going into that old diagnosis plug at the plug, and cut the diagnosis wire from the passenger-side rear turn signal. I will probably have to go back into the driver side and cut off the remaining diagnosis wires to make sure I have really exorcised the electrical demons.

Victory Lap
With the brake lights working, the speedo showing speed, the fans firing and the body looking clean, Hapy and I were ready for a test. I figured that I had numbers for the test lap around the neighborhood from last Fall (documented here), so combining a test lap with a decibel collection made sense. Other than all of the changes I made for sound containment, there were no only other variables. Well... I took one lap, but it started just pouring rain, so I took another one. After that one, I realized that I did not know which "filter" to use on the reader because I didn't document that. I know I made a choice last time, though. Still, I think the test was valid enough for my not-terribly-scientific method. This time, I just used the default "A" filter. I did one last lap, but discovered at the end that I had failed to start the dB recording. Sigh...

Fall 2021 (pre-sound absorb) test:
Sitting at idle (900 RPM): 60dB
Around town (less than 40mph): 65dB +/- 5dB. 75dB peak
On the byways (above 40 but under 55): 65dB +/- 10dB

Spring 2022 (post-sound absorb) test:
Sitting at idle (900 RPM): between 55db and 60dB
Around town (less than 40mph):  60dB - 65dB. 70dB peak during highest-rev
On the byways (above 40 but under 55): 65dB - 70dB

Looking at those numbers, I am not impressed, nor do I expect you to be. That was a LOT of work for not much gain. I hit my original goal of dropping the overall sound and the peaks by 5dB, but after the initial drive-about experience, I was expecting more. Again, I need to remind myself that 5dB is actually a large span. Consider, 60dB is normal conversation and 70dB is a running vacuum cleaner. That is a huge difference for an increment of 10. Also, consider that in the link I used for sound level references, it includes "passenger car" at 70dB. So, if my drive around the smaller test loop only peaked (and even then only twice) at 70dB, then Hapy is quieter than a typical passenger car inside. Okay, maybe I'm feeling a little better about it. One last thing to consider.... if I used a different filter last time, then the numbers collected last time should have been much higher, or my efforts were a complete waste of time and money. Since the perceived noise is so much better, I am inclined to believe that I used filter A last time too, since that is the default. Here's an interesting link about filters.
 
At this point, Hapy is ready for summer, and it really could not have happened any later. While I intend to circle back on parts of this project, I do not expect to have to take Hapy off the road to do so. Yes, the furnace needs a re-do, the fridge cabinet is still in pieces, neither the headliner nor the carpet is in... he is still ready for camping. So, for the next few months, we are going to enjoy that, and I will be returning my attention to Zed. Last Summer ended with Zed still in primer. I would like to end this Summer with him painted, and ready for interior work over the Fall/Winter/Spring.

Well, that's it for today. Thanks, as always, for following along-

Tuesday, June 7, 2022

Returning to Hapy Sounds - Part 3

I think I've touched pretty much every other part of Hapy's sound system this winter/spring, so I guess it's only right to finish it up with improving the head unit install. Of course, no stereo entry is complete without some fun with wiring, so there's some of that too. I am still pushing hard to have the bus ready for camping season. So, while this may seem to be a departure from the shortest trip to complete, we can't go camping or long-distance driving without sounds. In a way, the ability to easily hear the stereo was what triggered the noise containment project. We just gotta have it.

How Did We Get Here?
planning the cut
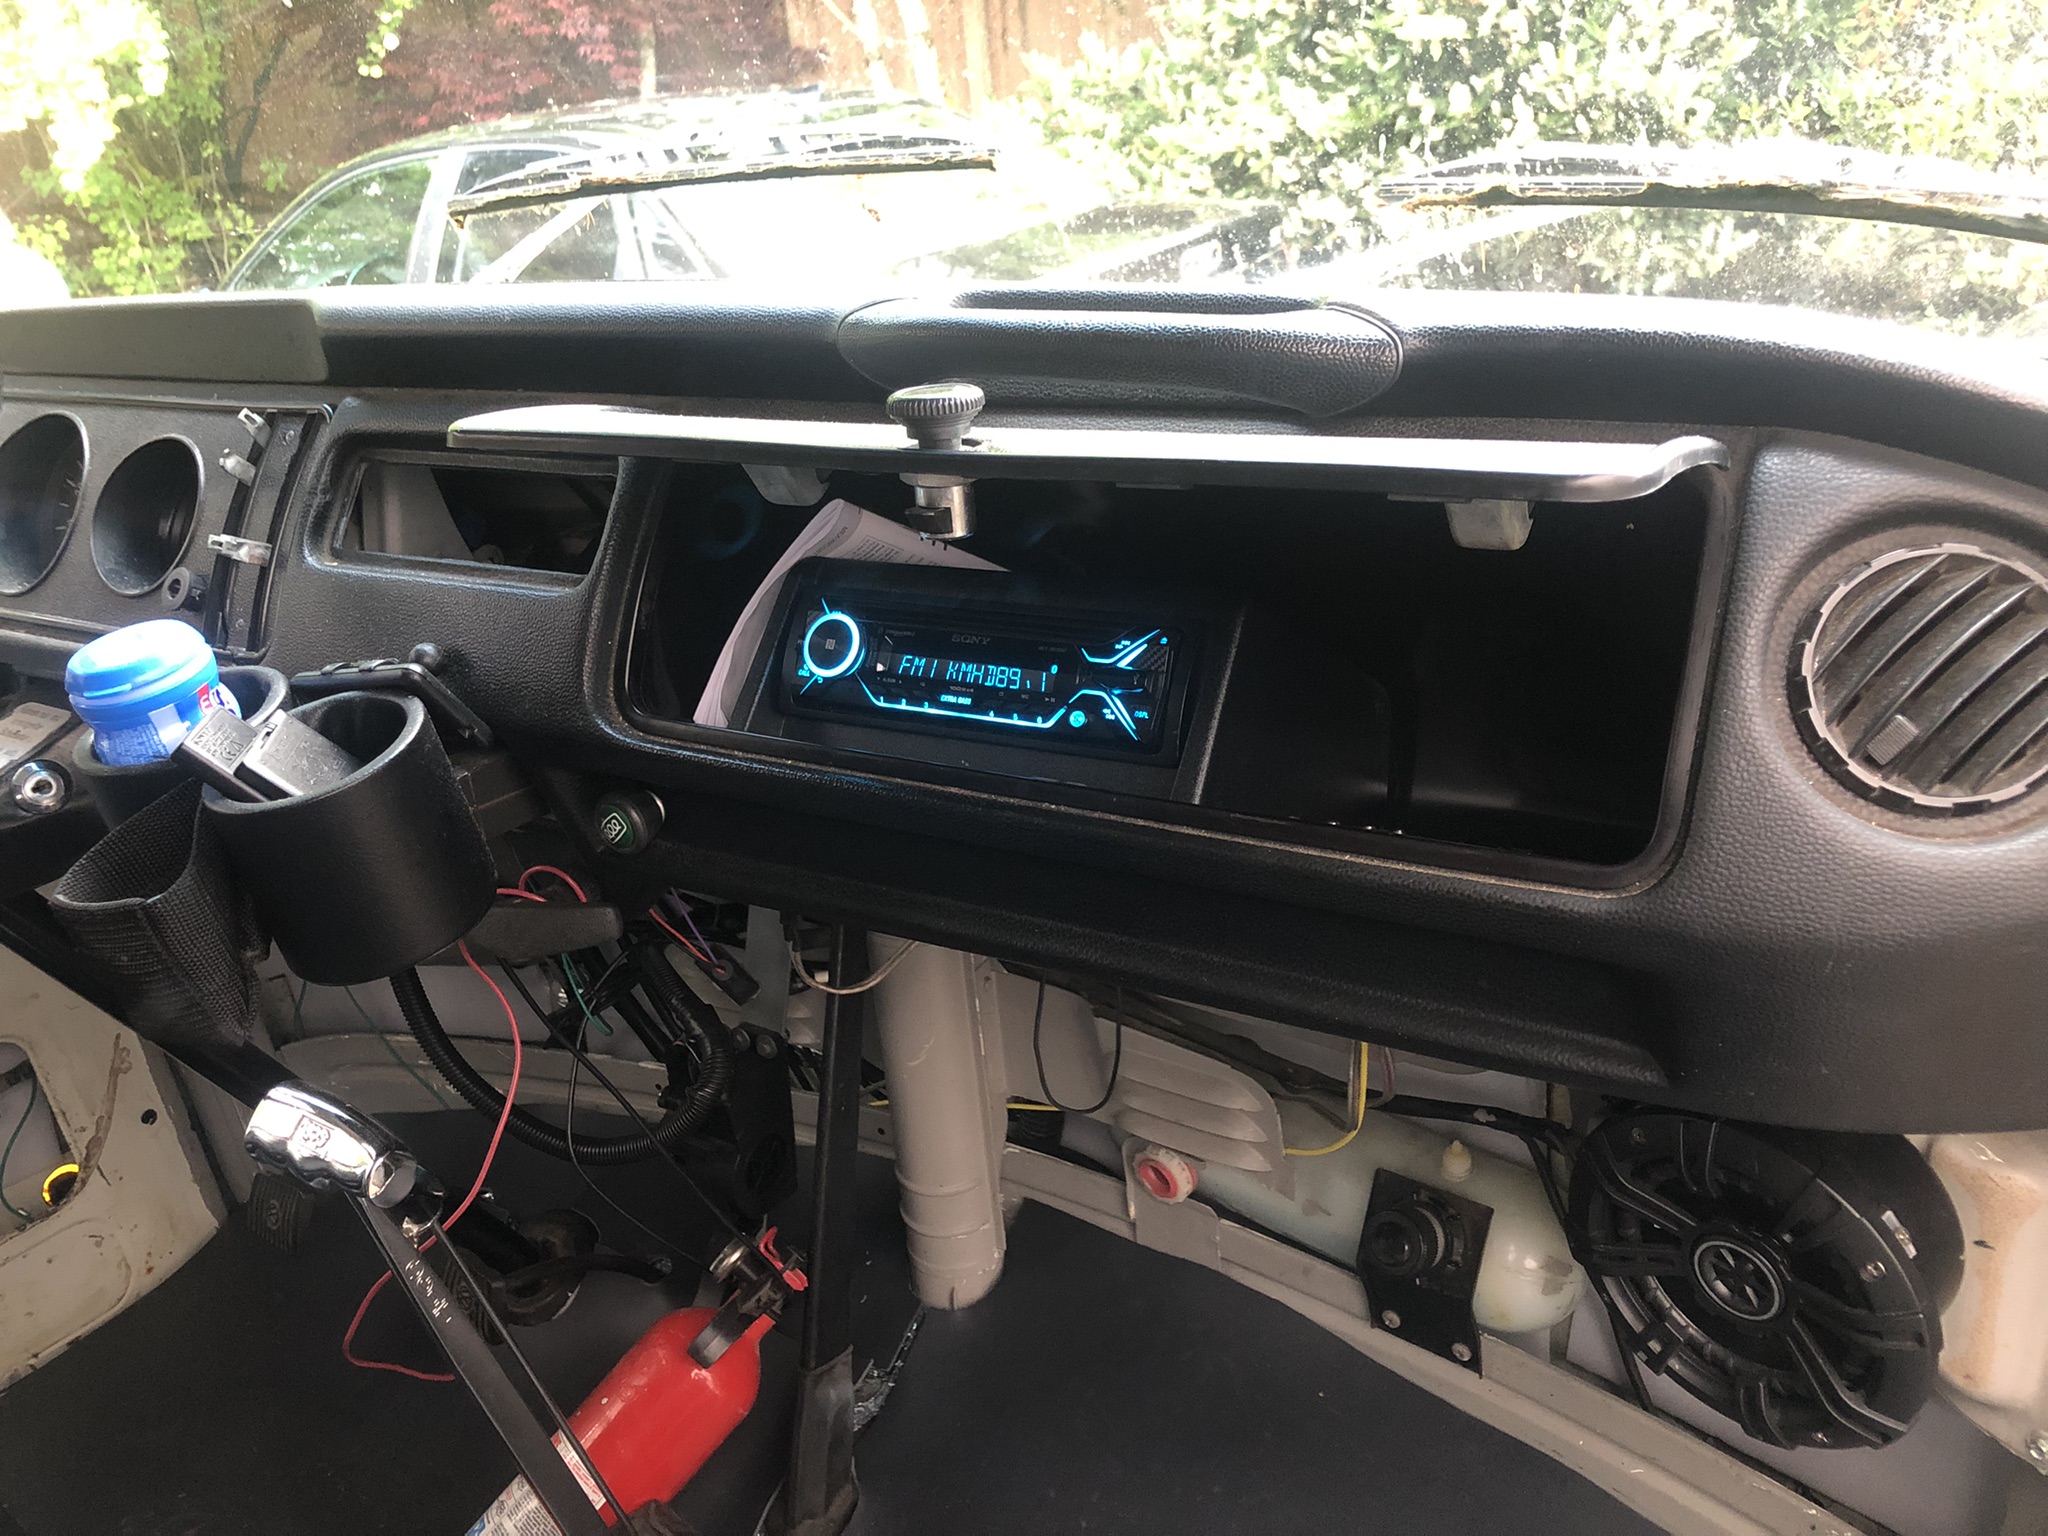
While I was working on getting sound deadener behind the original cardboard glove box, I decided to remove it for better access. I had already disconnected the luxury electrical set up for the electrical rough-in (See Ceiling Wire Rough In), so I simply unplugged the head unit that I had stashed in the glove box and pushed the plug out the hole I had bored in it. After emptying the remaining contents into a small cardboard box, I looked at the glove box. I discovered that the old cardboard box was holding on for dear life, and the removal of the support bar (Phillips screw on the underside of the glove box) did it in. The rear edge (front is front) that is pressed up against the dash had been all raggedy anyway, and once I started removing the box, that edge powdered off in chunks. So, I ordered one of those ABS plastic replacements. With the deteriorating original box in hand, I considered how I could more permanently mount the stereo when the new ABS box arrived. These were on back-order, like so many things these days, so I had to wait a while to complete this.

Solve the Head
mock-up with original box
I got a Metra Universal under-dash mounting kit (model 99-9000), and started fiddling with how that rectangular kit could fit into the rounded glove box. After several measure and test-fit attempts, it was fairly clear that hanging the stereo from the top of the box was not practical. The glove box was too shallow and the mounting kit too deep. I would have had to cut a large rectangle out of the rear of the glove box, and I'm not sure it would have fit right afterwards.

Back when I first got this head unit, I set the head unit in the glove box, on top of the molded shipping cardboard. It fit, and I could manage all of the buttons. Since hanging the box from above didn't work, I tried the kit upside down, mounting to the floor of the glove box. The kit was still too deep, but only by an inch or so. I measured, marked and cut an angle off the rear and it snugged right in. I confirmed that the stereo unit did not extend past the shortest point in the trimmed-down mount-box-thing. To mount the cut-down box to the glove box, things got interesting. I have demonstrated multiple times that I cannot manage to transfer measurements consistently. So, rather than swiss-cheese the underside of the box, I set the kit where I wanted it and marked two holes on the inside (blue tape, then a marker) of the box. I drilled out those 2 holes so I could align the rest of the box from below. I set the box such that the holes aligned and then held it in place with vice-grips while I marked the rest of the holes. Then, I drilled them out. Even then, the holes were not 100% perfect, so I expanded them where needed with a file. I added a hole at the rear of the glove box for the wiring pigtail with a hole saw and then attached the mounting kit with M3 bolts. That sentence took seconds to write, but the work took a couple of hours: tiny bolts + little finger room = patience needed.

Because, Wiring
marking holes
When I did the head unit the first time, I simply ran the power wire on the floor under the carpet. That was very Agile, demonstrated that having a stereo was a good thing, and that leveraging the luxury battery was a great call. So, since the stereo and the rest of the wiring in the bus was torn apart anyway, I changed the wire routing. Similar to the T12 front-to-back cable, I ran 2 sets of speaker cables and a power cable from behind the dash, down through the cable port behind the accelerator pedal and under the bus. I ran this collection of wiring along the frame and then found an existing factory hole (probably a drain hole) just inside of the passenger rear suspension up into the rock-n-roll bed. To keep things straight, the speaker wires were marked with tape (yellow-left, orange-right).

The yellow power wire was routed over to the driver side under the rock-n-roll bed and lightly tucked into place so it doesn't dangle into things and then integrated into the new fuse box (See Luxury Electrical Restored). Onto the speaker wires, I re-integrated the female wire connectors that I had before. One pair of two is under the rock-n-roll bed on the passenger side. Similar to the power wire, I tucked the wires under the rear edge of the bed floor so they stay out of the way. The other pair (recall there were 2 before) was sent through to the other side of the rock-n-roll bed up into rear of the formerly-fridge cabinet. Later, I may switch the female wire connectors to ports, but not today. At this point, I grabbed the floating remote rear speakers and plugged them in.

Back at the front of the bus, I integrated the various rear-speaker wires. Consider there's the pair that run up the A-pillar and to the rear over the sleeping area and the pair that now run under the bus to the rock-n-roll bed. The pair that run under the bus were the same as the pair that used to run along the floor. When I cut them, I marked them left-right. The pair that were sent up the A-pillar, however, were not. to figure out which one was which, I stripped one pair and clipped them together. Then, at the plug at the rear of the bus, I checked the plugs for continuity between the center-hole and the outer ring. One was infinite, the other was almost 0 resistance. 0 resistance is the winner, so I marked the end at the front with the same color tape (orange:right, IIRC) and then marked the other one. I spliced the remote speaker wire pairs together first, and then added the tiny wire from the stereo loom. I expect I will be adding an amp at some point, so I did not soldier them up. 

Putting it Together
note the mounting bolts
With the speaker wires integrated into the loom, the hard part was done. I spliced in ground and the yellow power wire and cleaned up the loom -to- front speaker connection. We were ready for install. The plastic glove box does not fit as easily into the dash as the old cardboard one does. I think it is a little larger, which really is fine. I needed and found a longer mounting screw (about an inch longer) for the support bar. To set the box in place, I found that suspending it in the support strap with the opening pointing up was most effective. Then, the box just tips into place. Since the box is bigger and less malleable, I focused on getting the bottom edge in the right spot, and let the top edge sit high. I sent the mounting screw home and the box doesn't wiggle at all.

I sent the wiring loom, the antenna cable and the wireless phone mic cord through the hole in the back of the glove box and plugged everything in. I took a quick glance at the fuse box and saw the tell-tale red LED telling me that I had a good circuit. Loving that fuse box feature. I set the stereo into the hole added a 10A fuse and fired up the local jazz station. After a few set-up steps on the stereo and burying the excess wire, the stereo is as complete as it needs to be for this Summer. 

So, the stereo is complete.... until I get a wild hair again to change it again. Like, wouldn't it be cool to have remote speaker plugs outside the slider so we can close the door without interrupting the music when set up for festivals or camping? Moments like this are when it is so obvious that this bus will never be done. There are always new ideas.

That's it for today. Thanks, as always, for following along-

Tuesday, May 31, 2022

Luxury Electrical Restored

As I work through the interior of the 1972 bus, I am learning that there are many layers to the electrical re-visit. I posted about the re-wire of the ceiling circuits (see Ceiling Wiring Rough-In). Today, I go over some of the other modifications I have been doing in the electrical space. I had the interior torn apart, so it seemed like a good opportunity to get after things before I put it all back together again. For example, the cushions have been removed from the rock-n-roll bed, and the cabinets have been emptied. 

Changing Tack
I am absolutely feeling time pressure, as the days get longer and camping season looms. So, I am shifting to getting things good 'nuf for Summer. What does that mean? I am setting aside the headliner. I am setting aside the carpet and the door card stuff. Instead, I am going to focus on getting Hapy operational enough for us to enjoy the Summer. The new reduced scope for the Spring includes the finish electrical (this post), completing the sound deadening (slider door and a few little bits here and there) and getting everything else that was pulled apart put back together. If I have any time opportunities pop up, I will do a little thing here or there so long as it doesn't impact our ability to take Hapy out for a spin or a camping trip.

Furnace Control Moved
Afterburner control
Recall the diesel furnace I added a couple years ago. When I did it, I added a custom computer-based thermostat, called Afterburner, hand-built by a guy in Australia. I had mounted the control unit to the side wall about where the 1979 Westfalia control panel traditionally sat. I decided that I did not need to see the thermostat all the time, and would prefer the less-cluttered look. Also, the LED panel glows whenever there is power (it doesn't have a sleep concept), so at night, it acts like a potentially unwelcome nightlight. I moved that control panel right next to that 1979 control panel: inside the rear cabinet. The wiring was readily available, and simply required another hole to be bored in the wood panel. The temperature probe, of course, needs to be in open space. I had previously routed it up along the C-pillar (between the mid-window and the rear window) and set it sort of hanging on the window frame. Obviously, that was temporary. I am not sure where I will put it now, but according to Ray, Mr. Afterburner, the sensor wire can be extended with CAT5 cable. The extension should work, but if I can avoid adding another variable, I will. Ultimately, I will solve this later. I did, however, run a CAT5 cable from the bottom of the B-pillar back to the furnace control so I could make the modification later, if I so choose.

I discovered during testing, however, that a couple of things are not working properly with the furnace. First, it test-fired okay, and it really pulled the voltage down on the luxury battery. I had forgotten about that, and the fact that I cut off the furnace wire back to the drive battery during the interior tear-out. I will need to upgrade the wiring to thicker gauge to see if that stops the heavy voltage drop, and then maybe re-plumb the wiring to the drive battery. Second, during the test run, it became obvious that the exhaust had become disconnected as exhaust started to appear inside the bus. That's bad. I will need to completely exhume the furnace and re-do the install to make sure there are no leaks. Last, there is something not right with the Afterburner controller. It no longer supports a web access point. So, it has all the other great stuff, but I can't start it remotely. In the end, the furnace will sit unused until I fix the exhaust... and the voltage drop. Maybe I'll figure out what's up with the Afterburner access point after that. Of course, it may be next spring by then.

New Fuse Box
new fuse box
I had been wrestling with a decision about the luxury fuse box for a while. I had been using a spare bay window bus fuse box. It worked well enough, but it was not perfect. It lacked a common positive post, some of the fuses had a common supply side and others did not, and there was a whole relay section that I didn't use. The fuses were the old-style fuses, not the newer bladed ones, and those old-style ones are becoming harder to source, and more expensive. Last, it is kind of big, almost 50 years old and the way I was using it was a hack that would fail. So, I bought a smaller 12-slot fuse box and a master circuit breaker / switch to put between the battery and the fuse box. Since many of the wires were being replaced, and the remaining were going to get at least touched as part of the routing, changing the fuse box was a small incremental increase in scope. I needed to remove the prior box for the noise contain efforts anyway, so I was halfway there already.

Doing the Doing
wire up in process
In the Ceiling Wiring Rough-In post, I described what color wire was going to be used for what. I ran or strung the wires to their destinations, and routed the other end down the driver-side (left) B-pillar, along the front edge of the middle window, under that window around the fridge-cabinet and left things pretty much in a heap right there. I started by completing the routing of the wires along the route that the solar collector wiring ran (See Hapy Gets Solar). I zip-tied the wires together and against the side of the bus and then solar wiring inside the fridge cabinet to hold them secure. Once I determined which fuse spots were to be used for which wire (see below), I mounted the new fuse-box onto the top of the wood box under the rock-n-roll bed which covers the old Westy rectifier.... basically in the same spot as the old one was before.

With the fuse-box in a fixed location, I could determine wire lengths and mount them up. In an ideal world, I would have used ring terminal wire-connectors on the wires. I could not find enough of them on hand, so I just used the bare wires. In classic Paulie Axiom form (See Light a Cigarette, Attract a Bus), I found them after I did this work so I will be slowly retrofitting them onto the wires. Anyway, once the wires were routed, trimmed and connected, I wrapped the bundle in one of those plastic wire tube things.

Fuse Layout
fuse wire color purpose
1 Grey Cab 12V Accessory Plug
2 Purple Cab Dome Light
3 Yellow Stereo
4 White 3-switch Dome Light
5 Pink PopTop Light / 1-switch Dome Light
6 Blue 3-position Westy Light
7 Yellow Furnace
8 Green Rock-n-Roll 12V Accessory Plug
9 Green Sleeping Area Dome Light
10 Orange Sleeping Area USB Chargers
11 OPEN OPEN
12 OPEN OPEN
 
Wait a Second...
wired up
The keen eye will notice that circuit #3 is wired up in the picture on the right, but isn't in the picture above it. Fuse #3 is the stereo. This is interesting only because of the gymnastics I executed to get it there. Before I started the noise project, the power lead for the stereo ran on the floor under the carpet. Yeah, that was not ideal, but it worked short-term. I ran a new power lead behind the dash and through the original wiring harness pass-thru hole in front of the accelerator pedal. From there, it runs along the inner edge of the passenger side frame rail and passes up under the rock-n-roll bed through what looks like a factory drain hole. A closer look at the rear edge of the wood floor will show the yellow wire running along behind / underneath. I didn't stop there, but that's another post I'll write up and post later.

Battery and Ground
Finishing up the circuit, I first confirmed that none of the wires I just hooked up to the fuse-box effectively ran to ground with the multi-meter. I returned the luxury battery to it's old location, and hooked up the ground cable to the same grounding bolt near the fridge cabinet under the seat. With the sound killer installed, it was a little harder to find.

ugly (for now) but functional
My last step was connecting the B+ or positive side. My old set up had many smaller gauge wires all wound together at the battery post. I used a very short stretch of 8 or 10ga wire to bridge from the positive post to a master switch, and then some more of it to bridge from the switch to the fuse-box. The wire was the thickest I had around. I will mind the overall amp usage, but this should not be an issue except for when the furnace first starts up. Even then, I do not expect much system stress. The master switch is a battery/fire-saver, basically, that will prevent more than 100A draw. I don't see this switch ever popping, but it is better to be safe than on fire. Based on the length of the wire, and my uncertainty about it's thickness, it is very possible that the wire will fail before the switch pops. Ultimately, I would need to have every circuit in use and have the furnace kick on to get close to even 50A. So, the switch becomes little more than a means to turn the whole system off.

Completing the Circuits
I had very little in terms of electricity consumers actually connected at this point. So, my ability to test was fairly limited and I only put fuses in the circuits as they were completed. Still, I was able to turn on the light by the front seats, and test the accessory plugs up front and by the rock-n-roll bed. All good. I checked continuity on the circuits which did not yet have a consumer, but I did not really expect any negative findings, and didn't have any. So, I started down the path of hooking up lights.

not as ugly. functional
I started with the light fixture over the sleeping area (pictured above). I used the mounting bolt for my ground, attaching a ring connector to the white wire, and leaving it inside the fixture. To the black and red wires, I connected female wire connectors. My method has been that the power-supply side wire would get a male connector, and continued that throughout. To the green (to fuse 8) and white (to the switch over the slider) supply-side wires I attached male wire connectors. I discovered, as I attempted to install the light fixture, that that 1/2" thick Mega Zorbe sound absorber was too thick for my bolts to reach the riv-nuts. I considered finding longer bolts, but concluded that the heat produced by the light fixture could have a negative impact on the foam, and chose instead to remove the foam where the fixture went. The fixture effectively recessed into the foam, which, I think will actually look better once the headliner goes in. It admittedly looks pretty trash right now. Once the fixture was mounted, I plugged in the wires, and Immediately, the red LED on the fuse-box next to fuse holder 8 lit. This told me that the circuit was good, and just needed a fuse. I popped in the fuse, and the light came on. Sweetness.

so many lighting choices
I followed this same path for the 3-position light over the window behind the driver seat (pictured above)... mounting bolt for ground, male female orientation, even plugging it all in to see the red LED. I needed to add a mounting plate behind the Mega Zorbe, but that was barely post-worthy. I cut out a small section, cut a rectangle of HVAC and screwed it to the bus. I set the fixture where I wanted it, marked and bored the holes. Easy-peasy.

I verified the pop top light at this point, and then shifted to the modified dome light (See Dome Light Mod to Trigger Other Lights). I had tried to mount this light earlier, and the mod wire broke off. I mentioned that in a comment on that original post, but I simply duplicated the effort with a thinner multi-stranded wire. On my repair version, I super glued the wire end down like before, but also added a 1-inch long stretch of superglue to adhere the insulation to the light housing. That bugger was not moving. I wrapped every bit of exposed metal (chair adapters, bits of relay, etc) with electrical tape so nothing would short out after I popped a couple of fuses. Once they were wrapped, and I could get the relay tucked in deep enough, I was able to settle the light fixture into place.

Testing the Lights
Once all of these circuits were completed, I cleaned up Hapy's interior and then hit it with the shop vac. Clean, and de-cluttered, Boo and I tested / played with the lights. The lights up front will work for checking a map or even reading a book. The original dome light, when turned on as a single creates plenty of light in the main cabin to see things on the floor, and even on top of the fridge cabinet. When the modified light circuit is turned on, the entire bus is well lit, from dash to tail gate. Since the rock-n-roll bed is not together, we could not test the reading lights for reading, but that test/play will be very soon.

With the new plan of just getting Hapy ready for the road, I do not feel the same pressure I did before. The lighting is functional, and I learned along the way that I needed to make modifications which would have been unpleasant after the headliner went in. Removing these fixtures for the headliner install will not be difficult either.

Thanks, as always, for following along-

Tuesday, May 3, 2022

Dome Light Mod to Trigger Other Lights

In my ceiling electrical rough-in post (See here), I described the ceiling wiring. Among the circuits, I mentioned the original dome light, and moving it over the slider. I wanted to take this 3-position switched light and have it optionally trigger the dome lights in the rear and the front. Today's post will cover how I made that work.

Original Dome Light
dome switch innards
Let's start with a review of the original light and switch. This switch is some basic stuff. There are 2 wire tabs near the switch and one at the other end of the housing for connecting to ground. The 2 tabs correlate to the wire that connects to the switch on the dash (if you still have it) and the switches in the doors (again, if you still have them). The door switched side of my dome light never worked, and I removed the switch from my dash so I could reuse the hole for the heater fan switch. But, I digress; there are 2 tabs. The tabs relate to either side of the 3-position switch, with the middle position for all-off.

Inside the light housing, how the switch works is more apparent. Each wiring tab has a corresponding little tang that hangs or runs down towards the lens on either side of the plastic switch. Outside of each tang runs a metal arm that connects to the positive side of the bulb. So, when the plastic switch is moved from the middle / all-off position, it pushes the little tang against the metal arm, closing the circuit. When 12V is sent to the corresponding tab, the bulb lights up.

Experimenting
So, with that context, we consider how do we tie into the switch to close a circuit elsewhere. The wiring to the other bulbs has been strung; they just need 12V sent when the switch is flipped. We cannot just attach to the metal arm, because then the remote lights would fire up regardless of which position the switch was in. If that's your goal, then that's great, and less difficult. We cannot just tie into the wiring tab because then the remote lights would be on all the time. We need to somehow tie into the movement of the switch so that when the tang is pressed outward, we can pick it up for the extra lights.

experimenting
I noticed that the little hang-down tangs are not the same length, the amount of exposed brass related to each circuit is not equal and the wiring tabs are 90* offset from each other. I do not know how much these details relate to one another, but the longer length of the one hang-down tang provide a way to tie in. The longer one is attached to the side with less exposed brass overall and with a wiring tab that is parallel with the lens. Again, not terribly relevant.

I conducted some experiments with the switch and a bare-metal female wire connector (picture on the right), as opposed to one that's wrapped with a plastic housing. I was able to set a connector fairly close to the housing, but not touching any brass, unless the switch was moved in that direction. Then, the female connector would make contact with the end of the hang-down tang. It was a great fit inside the lens, and did not prevent the circuit connecting with the metal arm. Similar experiments with a wire connector that had a plastic housing produced different results: did not work. The housing was too thick to fit in the space, even if I cut it down so there was metal exposed for the tang. I tested connectivity with a basic multi-meter to confirm that the switch would create a connection when engaged in the one position, but not at any other point.

After spending the better part of a weekend morning fiddling with this plan, I had to change it. I glued the female wire connector onto the lens and discovered that during the experiments, the connector moved slightly as I activated the switch. So, when I had it completely stationary, it jutted out just enough to prevent the tang from touching the arm: the connectivity on the multi-meter was infinite. So, that bulb would not power up had I left it that way. The lesson here, I guess, was to vice-grip the female wire connector in-place during the experiments so it would absolutely not move.

Tying In
bailing wire tang
So, I considered something that was smaller, and more like the little tang I was trying to interact with: a short stretch of bailing wire. With the tip of my needle-nose pliers, I shaped a hook-end and then a twist to create a footing I could adhere to the lens. Learning from my experimenting mistake, I set the bailing wire tang in place with vice-grips and repeated my experiments. In retrospect, something more pliable for the tang, like some thin copper or even a short stretch of solid 20ga wire probably would have been more effective because it would have more flex/give when the switch was flipped. Still, after a few cycles of set-test-reset-retest, I was able to find the spot when both the original arm and the new bit of bailing wire demonstrated connectivity with the wiring tab when the switch was in position.

I soldiered a stretch of insulated 18ga wire to the bailing wire tang, and then a-fixed the tang to the lens with superglue. Once the glue set up, I repeated my experiments to make sure that I could consistently find connectivity from the wiring tab to the end of the 18ga wire as well as the on the original light.

Triggered
Reasonably or not, I considered the amp draw through that little connection between the tang and the bailing wire, and assumed that expecting 2 lights to get powered through it is asking too much. So, to protect against overheating that connection, I'm adding a basic 4-pin relay. Recall the basics of a relay: when there is a sufficient voltage difference between pins 85 and 86, a connection is made between pins 30 and 87. So, we connect the inbound juice (that will be attached to the tab on the light) to pin 30 and ground pin 85. Pin 87 connects to the wires supporting the remote lights and pin 86 connects to the bailing wire tang I added to the light fixture. Because of where I am putting the light over the slider, there is considerable room in the ceiling for the relay and the extra wire.

Install Awaits
one switch. 3 lights
Parts of this could be installed immediately, but so much of the interior is still in disarray. The sound suppression steps are still ongoing, the remote lights are still just bare wires. I thought about stuffing the relay up into the ceiling, but decided that I could just as well wait and install the whole unit at once. Before setting it aside, I confirmed the concept, though. I pulled out a car battery, and set the 3 light fixtures on my kitchen table. I ran wiring between all the lights, and the relay, and simply played with the switches (note the fuse next on the positive side of the battery on the right edge of the picture). Yes, I did use clothespins to hold the wires together; I didn't want to stress the wires by twisting them together or waste wire connectors. When the original dome light is in one position, all 3 lights fire. When it is in the other position only that light comes on. Perfection. While I had it all set up, I played with the other (remote) lights, just cuz. I will, of course, have to retest everything when it gets installed, but seeing things light-up gives me some confidence that the concept, and maybe even the implementation, will work.

That's it for today. Thanks, as always, for following along-

Tuesday, April 12, 2022

New Cab Shelf

Back in 2016, I removed the old falling-apart sun visors that we couldn't use because they were so decrepit. In their place, I built a shelf, reusing the holes that supported the sun visors. Today's post is a revisit of that work. If you want to get grounded in the original, see Sunshade to Shelf. This version might better suit your need if you have a drop ceiling, and you are not attached to your sun-visors. 

Before I get into today's post... Boo and I hit a brand new venue in SE Portland on Sunday, 10-April (The Get Down, officially opened 8-April-2022) for Pink Talking Fish. You may recall my reference to them in the 4Peaks 2019 - Music Report where I said they were the buzz of the festival. We also caught them in February of 2020 at Mississippi Studios right before the CoViD-19 lockdown started. They have since evolved with more complicated songs, but still throwing down the funky. Translation: we danced hard. Everyone around us did too. The venue is pretty fantastic. The staff was solid, the ticket and drink prices low, and the sound mix was great. For an opening weekend, they really had it together. Boo and I highly recommend. Back to the shelf...

Why?
the original shelf installed
The original cab shelf has been such a great addition. When we were on the road or camping, that shelf was where our phones, our wallets, and pretty much anything super important goes. We would hang a privacy curtain from the edge, so it doubled as a curtain rod, sort of. In fact, if I had not gone down the path of reducing the noise in the bus, I probably would have left it alone forever.

But I did look into improving the noise in the bus. Part of that look-see including removing the wooden drop ceiling (See Noise Control Update). Once it was down, I could see that there was headroom lost to the original Westfalia interior design. With the larger Sprinter seats installed (See Hapy Seating - Part 2), that headroom was welcome. With the drop ceiling out, I figured I could move the bottom of the shelf up to where the drop ceiling was, and have sun visors again. This was a best of both worlds: I could see out the full windshield or I could flip down visors like every one else... but I would still have a shelf up top for important stuff we would like within arms' reach.

Planning
original shelf pre-install
I started with the assumption that I could take the old shelf, and shorten it a little on each side and it would work as-is. This also assumed that the cut out in the center front (front is front) that I originally made to accommodate the rear view mirror could be reshaped to fit around the metalwork that remained from the original Westy pop-top directly above the rear view mirror. This metal work supported the little tang that the old pop top would latch onto when it was lowered. Last, the old pop top scissor-lift mechanism had supporting metalwork on either side above the doors which I would need to consider.

While test-fitting after carefully trimming the old shelf to address the "tang supporting metalwork", that metalwork simply fell off. It was held in place with a single pop-rivet, installed in September of 1971, so I guess that tells us the shelf-life of a pop-rivet. Anyway, with that out of the way, I considered the need to retain the other support bits for the long-removed scissor supports. I concluded they were not needed. Similar to that front "tang-support", the side pieces popped right off. Neat. Unfortunately, all three of these support metalwork pieces left holes in the roof where the original Westy-top scissor supports used to bolt through. So, this shelf thing grew, but, to be fair, if I hadn't been looking at these support things, I wouldn't have known that the ceiling was not as sealed as it looked. In retrospect, perhaps I could have anticipated that when I removed the original top 10 years ago. The discovery of these holes led to the removal and subsequent refresh of the luggage tub (see Refresh the Luggage Tub), which I posted about last week.
 
model and shelf start
Regardless of what happened with the support metalwork and corresponding holes, the shelf, if located directly above the sun visors, may need a more complicated line. Consider that the top front of the bus is curved both front to back and from the center down to the sides. So, if I simply jammed a shelf into the space between the top and the sides, it would be shaped like an upside down spoon. Instead, this shelf will need to be lower in the center, near the mount-point for the rear-view mirror. So, it turned out that the metal tang never really was a thing to concern myself with. LOL's. The shelf ends, however, can rest on the inner lip where the top meets the sides. This will cause the shelf to cross from above to below back to above the lip that runs across the top from one side to the other.

With these constraints in mind, I started with a basic tape measure to define the line along the front. I thought I could define a point between the mirror and the side that is consistent for both passenger and driver sides. Then, I could construct a shelf that was cut to fit above the lip on the ends and secure from below in-between. The distance from lip to lip is over 47 inches and the overall drop from the center to the side is 2-1/2 inches. At this point, I abandoned the original shelf as a material.

Modeling Again
test-fitting shelf
After many measurements, I thought I was ready. I grabbed some cardboard, measured out the mid-point, end points and lip-intersection points. Similar to the original shelf, I wanted this new one to be deep enough to fit a phone, but not so deep that things could disappear. I started with a shelf drawing that was plenty deep, planning to trim down the excess once I had cut the lip intersections. The distance between the lip and the top immediately above is, like, 2 inches, but knowing that there will be noise absorbing foam and a headliner going in there, the shelf will not go all the way in. Quite the contrary, it will hang below the lip between the intersection points.
 
shelf headroom: center
I started with a cardboard model that is 48 inches wide, 3 inches deep on the ends and 5 inches deep in the center, making the rear edge (front-is-front) straight and the front edge angled (from 3 to 5 inches from edge to center respectively). The leading (rear-facing) edge of this rough model pretty much aligned with the contour of the shelf I removed and fit better than I expected. I notched front center of the model about 1-1/4 inches across, and an inch deep to fit around the center rear view mirror. This allowed the shelf to sit back, and the front lip-to-shelf intersection point could be identified on either side. I marked and cut into the model and re-tested. Again, it fit better than expected. I noted that most of the shelf would be under the front lip, with only a few inches on either end above it. This would have created a gap across the front edge, but I re-shaped that edge of the model with blue tape to extend deeper. This will eliminate the opportunity for things to slide off that edge of the shelf, and create a way to attach the shelf with small fasteners to the lip, strengthening the overall install. The overall width of the shelf could be no less than 48 inches. This left less than 1/2" on either side to rest on the lip at the edges.

Install Timing Considerations
dome light
Once I had the model defined, I had to think about the timing of this install a little bit. My plan at this point was to apply the noise absorption (Mega Zorbe) and headliner after I have the shelf in. The shelf will make it harder to get a headliner installed, but the fasteners for the shelf can be covered with headliner material. If I did the headliner stuff first, the fasteners would be visible, reducing the aesthetic. I also considered that if the shelf is in when the headliner goes in, I could integrate the headliner from the roof into the front edge (front is front) of the shelf. So, I pushed forward, with a loose plan of completing the shelf to the point of being ready to install, get the Mega Zorbe on to the ceiling and then mount the shelf.

12V Accessories
My last thoughts as I modeled this new shelf were about the placement of the 12V accessory plug and whether I could incorporate a downward-pointing light fixture. The question about the accessory plug was fairly simple: center it and put it above the shelf so we don't have cords hanging. Next! The light became complicated simply because I want a very small not-too-bright light with an integrated switch. There are many lights on the interweb, but they are mostly clumsy-large and/or very bright.
 
mirror view clearance
I chose this Europa RV dome light for a few reasons. First, it has integrated switches, rather than depend upon a door opening or a remote add-on switch to turn on and off. Next, there are independent swivel map lights so Boo can read, look at paper stuff or whatever while we drive. Last, this runs basic bulbs, not the super-white-almost-blue LED's that have become so common. Yuck. All three bulbs are a "168 wedge" style of bulb, so I could swap out to LED's for lower amp draw later... but they would have to be in the yellow end of the color spectrum for my taste. According to the manufacturer, this light only draws .7amps against 12.8V, so I'm not sure there's a great deal of improvement room with an LED swap other than longevity of the bulb. This light fixture will sit directly behind the rear view mirror, but because the central light is only 1-1/2 inches thick (swivels hang down another 1/4 inch), it will not block visibility through the mirror. I say that confidently based on the picture on the right here, showing a mirror image of the tape indicating at least 3 inches before it is entering my view through the mirror and on to the rear window. The fixture mounts with 2 screws through the housing found when you remove the dome light bezel. I tried suspending the light to the underside of the cardboard model to get a feel for how it would light the space. I will place it at the rearmost spot under the shelf to help the swivel lights reach our laps. I think, in an ideal setting, the dome light would attach to the ceiling allowing the swivel lights to illuminate our laps more from behind than in front of us. But, I like the idea of an uninterrupted headliner, so it is going on the underside of the shelf.

Materials
gap at the center
When I built that first shelf, I had free 3/8" plywood on hand from the original bus flooring. It was old, and partially rotten from 40 years of Pacific NorthWest moisture, but it was free. It served the purpose well, but I would rather use a material that is not rotted wood for its replacement. I considered steel. For strength, it is superior to wood at a thinner gauge, or course. That is, I can use 18 gauge steel and it would be as solid as the outside of the bus. It would, however, be another surface that could vibrate or reflect sound. MDF is solid, but it also reflects sound, and could chip off or swell from moisture. Ultimately, I went back to wood, well, "oriented strand board" or OSB. For about $9US, one can find a 4-foot long, 2-foot wide piece. According to reviews, this material is great for shelving because of how stiff it is, but I planned for a thin piece of wood trim for the leading (rear) edge anyway. I figure the trim will protect the edge of the OSB from chipping, and it will help hold the shelf firm in case reviews are wrong. Either way, it will help keep things from falling off the shelf into our laps, feet, whatever. I expect I will cover both the top and bottom with material; probably trunk carpet and headliner respectively, so the material choice will not be obvious once completed. In full transparency, after I made the material decision, I found a 4' by 2' piece leaning against a tree with a "free" sign on it while walking the dog. I swear, I had made the decision first. This was just dumb luck that someone a few streets over had extra material from building shelves in his/her/their garage. So, both shelf concepts have been built with free wood. Hahaha.

Shelf Build
gap at the end
I noted that the angle of the lip from ceiling towards the floor is closer to 45* than 90* to level, so the entire rear edge which is below the lip would benefit from an angled cut. Recall that the shelf will be above the lip only on the outermost few inches on either side. Whether the ends are angled or not makes no difference. 

Satisfied, I transferred the cardboard model onto the OSB, simply tracing the outline, and cut it with a jig saw. Yeah, I usually avoid power tools; call me old-skool. I have found that, with a hand tool, mistakes are much smaller, but in this case, getting the angle I just described cut correctly would have been too difficult by hand. Once that front line was cut, though, I wasn't finished. I test fit, noted where the shelf needed to have the curve adjusted and shaved some off. At this point, it became clear that a model for this was really just enough to get the shelf started. No cardboard magic on my part (YMMV) could have gotten this spot-on. It was during these cycles that I abandoned the notch for the rear-view mirror. The test-fits indicated that the shelf would not sit deep enough to require a notch.

over windscreen wall in
Satisfied with the fit, I discovered that the shelf still needed a back. I had thought that the shelf would sit high enough, or that it was thick enough, to not need something against the lip above the windscreen. The 2 pictures above show the space that needed to be filled in. To get a rough idea of the curve, I grabbed the old drop-ceiling out of the junk pile and cut the top couple of inches off the front-most edge. That got me close enough to mark up a simple arc out of some of my old door card material. The angled cut I made into the OSB worked to my advantage, creating a gentle tile to the arc that roughly mirrored the curve of the ceiling. It is not perfect, of course, but with the Mega Zorbe and a headliner, perhaps the finished product will have a reasonable aesthetic. I added 48inches of wood trim across the rear of the shelf (front is front). Then, I sanded edges of the rear wall, the point where it intersected with the shelf, the front edge and all the corners smooth. Ultimately, the shelf will wrapped in some material so the sanding may not have been 100% necessary. That wrapping, however, will wait.
 
Shelf Install Prep
test fit with 12V accessories
Finally, I was ready to finish and start test-installing this shelf. First, I added the 12V accessory plug and the dome light. I bored a hole through for the wiring for the dome light, sent the wires through and mounted the light. I moved the 12V accessory plug to the center of the shelf, rather than put it back in the same spot, adjacent to the passenger door A-pillar. I figured, having it more in the middle would make it much easier for me to use while driving alone, and it's location hides the wiring from the new dome light. 
 
I added a common grounding point directly above the rear-view mirror for the 2 12V accessories. I bored a hole through the door card material large enough for male wire connectors to pass through. To the 12V accessories, I added female wire connectors to the wire ends, expecting to put male connectors on the the colored wires I set up earlier. I verified I had plenty of the wire, but did not plug everything in. I just needed things ready-enough at this point.
 
Last, I wanted to prepare for the shelf physical mounting. During the test fittings up to this point, it was clear that the shelf was going to be much more stable than the earlier version. So, this shelf would not require mounting points other than at the ends and it was not going to wiggle-wobble as we drove around. I borrowed from the early Westfalia metal flashing I mentioned above by cutting a pair of 2-inch squares out of some scrap HVAC sheeting to fabricate little mounts for the ends of the shelf. The bits needed a little bending, a little filing, and a few holes bored through. I mounted the bits to the shelf with tiny screws, and then confirmed the fit to the bus. I marked and bored the holes into Hapy for install, but did not actually attach it. I will bring the shelf back out once the Mega Zorbe is installed. While it is out, I will attach trunk carpet, and maybe a thin layer of foam, to its top, so it is a more complete piece. I haven't decided if the rest of it will get a trunk carpet or headliner treatment. 

This is as far as I have gotten, and will get, until the Mega Zorbe is in and I have made a decision about a headliner. So, that's it for today. Thanks, as always, for following along-