Showing posts with label circuit. Show all posts

Tuesday, February 18, 2025

MGB carb circle-back

So yeah.. it has been a long time since I've posted much. Life has been full. Today, I will just close the loop on the carb deep cleaning and re-gasketing. I will try to get back here relatively soon with some other goings on. I thought I posted this update last Fall when it happened, but I clearly didn't.

Just a reminder, Oliver (1978 MGB) has a SK Racing or OER Racing side-draft carburetor. These look very much like the DCOE Weber and even can use some of the jets from a Weber. The accelerator pump and float level can be adjusted from the outside and the main jets can be accessed through a cover on the top. So, very few of the changes one usually makes to a carb requires the carb to be removed from the engine. The inlet pattern matches the Weber DCOE, so you can use a more readily available intake from Weber. Even the 4 bolts on the bottom are the same so you can use a Weber-intended heat shield like I did. Curious about getting one? Here is a source in Japan (these are a go-to carb among Nissan/Datsun enthusiasts I am told). Those who have them rave about them. Except me, so far. I hope to be among the celebrating majority soon.

Almost a Test Start
Setting the stage, I had a crisp fall day to take a look at Oliver, the 1978 MGB. I wanted to see if the carb work was the winner for his bogging down when I hit the accelerator pedal. I pulled his cover off, hooked up the battery and added some fresh fuel. I had pumped the tank dry when I removed the carb; not sure if I mentioned that last time. Anyway, I turned the key to run. I got the satisfying sound of the fuel pump running and then that not-so-satisfying gasoline smell. I went around to the right fender and could see fuel shooting out towards the radiator. Eeek. I turned off the key and then spotted a failing fuel hose. After a brief rummage through some boxes in the "tool shed" I found some suitable hose and had the system buttoned back up relatively quickly. This is as good a time as any to remind all my fellow old-car owners to replace your fuel hoses.

Actual Test Start
With the new hose in place, I returned to the driver seat, turned the key to run and waited for the fuel pump sound to change, letting me know that it had established pressure. With the earlier fuel line failure, the smell of gas was still present, so I walked around to the front to inspect for leaks. Nope. So, I turned the key to run and he started pretty fast. It was rough, but I could keep him idling at the carb by pulling on the accelerator cable.

Fiddling with it
I focused first on getting the idle jets set. I followed the basic set-up rule of turn all the way in, then back out 2 turns when I did the reassemble. In theory, you should be close at that point. I did not notice much difference when I moved the screws in and out more than 1/2 a turn. I think I eventually settled on them being out just past 2 turns. I expect when fully warmed up and in an expert tuner's hands a different setting will be found.

Then I shifted to the idle speed screw. Doing this on your own without a hand-held tach is kind of comical. You walk to the driver door and look at the tach. Note the speed and if it needs to be faster, go to the carb and adjust. Then walk back and see if you hit your target. If not, wash-rinse-repeat. I am sure there are much more experienced mechs out there who can hear the right speed or have a hand-held tool so you aren't getting your day's steps in 2 steps at a time like that.
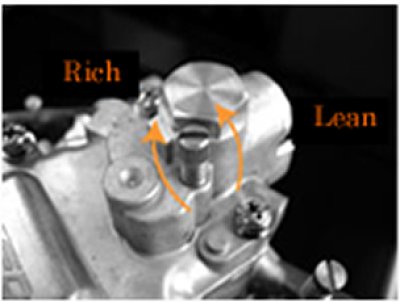
Last, I wanted to see if I had solved the bog-on-accelerate. So, I yanked on the accelerator cable at the carb and.. bog. Sadness. In my time during the rebuild, I spent more time looking at the exploded diagram than I had before. I remembered there was an accelerator circuit, and located the screw on the top of the carb. In the image on the left, here, the screw is the big one on the furthest left, near the intake-side of the carb.

When I dismantled the carb, that screw was nutted all the way down snug. So, either the prior owner had torqued it down or I did at a time I don't remember. Regardless, I started loosening that screw (lefty-loosey) while I rev'd the engine. And the bog started to fall away. I was able to rev it fairly quickly without the engine starting to die on me. I stopped loosening it before I was able to yank on the cable as if I was going from foot-off-pedal to pedal-on-floor. I believe what had been happening was that the accelerator circuit had been flooding the engine with too much fuel when I pushed on it. Now, it was getting the right amount of fuel to account for the big burst of air from the opening of the butterfly without overcompensating. Looking back, this has probably been the issue all along and the cleaning/resealing may not have been necessary. In the end, I don't care, and cleaning the carb will only pay more dividends anyway.

Wrap Up
So, did I go for a test drive? No. Why? The brake bleed attempts that I have done since I replaced the master cylinder have not gotten the brake pedal predictable. Rather than have a spirited drive to celebrate, I waited for the tailpipe to cool down and put Oliver's cover back on (queue the sad trombone). One of the first things I will be doing this spring is another brake-bleed attempt. I may just hobble over to the local Firestone and have them do it. I just want to drive this guy now and his spongey brakes have been a blocker for too long.

Also on the list are changing the 12V source for the voltage gauge from the purple circuit which used to power the clock to the switched and fused green circuit. I have a few other odds and ends I need to complete before Oliver is "finished", the largest of which is replacing the body-to-windshield seal so he can be driven in rainy weather. There is always something with these old cars and I really wouldn't want it any other way.... so long as the something doesn't leave me stranded on the side of the road outside cell range.

Well, that's it for this time. Sorry it has been so long. Life gets busy and I have not been able to play with my cars much. I am working through the permitting process to get a garage built so there will be posts about that, and then playing on cars (and blogging about it) can return to a year-round sport. Thanks for tuning back in, and I hope to be more frequent in 2025-

Tuesday, August 28, 2018

Hapy Rides Again

My last 2 posts have been about my efforts to resolve the electrical melt-down we had on the way home from 4Peaks. Today, we hit bottom and work our way back to operational.


No Start
With so many good signals, I wanted to try starting the engine. So, I turned the key to run and nothing happened. At first, this was because the wire to the starter (circuit 50) out of the ignition wasn't connected. Once that was solved, things got worse. I tried the start again and everything went dead. Nothing worked. I went around to check the voltage on the battery and it was crazy low, like 5V. Huh? While watching the voltmeter, it climbed back up to 12.5V. I checked other circuits and they started to show 12V too. By the time I had worked by way to the front of the bus, everything was working again.

I was able to demonstrate this a few times, and it seemed like no matter what wires I tested, I couldn't find a new burned wire. "Could the starter have fried," Boo asked. Why, yes. Yes, it could have. Since so much power routes through the positive post on the starter, the electrical fry that smoked between my knees could have caused a short there too. So, I pulled the starter and tried a ShadeTree starter test.

ShadeTree Starter Test
First, I checked for resistance between the positive and negative sides of the starter solenoid. It was infinite, which told me that the solenoid was probably fine. Still, I couldn't find a good recommendation for testing the starter motor on the internet. Most folks encouraged various tests while the starter was in the car. Mine was on the ground, and I wanted to test just the starter motor without all the other variables. So, I tried my own ShadeTree bench test. I grabbed an old battery that I had lying around. It had around 9V charge. That's enough to trigger the start, but not enough to do much else.

I took my jumper cables, and clipped one black end to the mounting ear (ground) and the negative battery post. I clipped one red end to the positive post on the starter and the positive battery post. I double checked the voltage. No change, indicating again that the solenoid is not blown. If it had been the solenoid, I would have expected current to travel through the starter all the time (solenoid broken with the current open) or none of the time. I worked the leads for the multi-meter into the clips on the starter so I could see how voltage changed when I triggered the start. Using a short section of insulated wire, I touched one stripped copper end to the positive post on the starter and the other stripped copper end to the trigger tab.

The starter did not fire, but the voltage dropped to almost 0. I immediately removed the trigger wire and watched multi-meter. The voltage climbed slowly, but steadily back to 9V. Yep. That starter got toasted, but the solenoid was doing it's job: open the circuit to fire the starter when 12V (or in this case 9V) is applied to the switch. I phoned over to the no-longer-local VW Friendly Auto Parts Store and they had one for me on the following Monday.

Assuming the starter was fried during the initial issue, replacing it should be fine. What if the starter was fried by my test-start because something else was still wrong? Then, the next test-start will cause the new starter to fry as well, right? Eek.

Re-Start-er
My fears, ultimately, were not realized. I swapped out the rebuilt Bosch I installed less than 3 months earlier with another rebuilt Bosch from Discount Import Parts (still only on the east side... and still not Hapy about it). I followed the instructions I laid out back then, and the test start provided the same disheartening click noise. So, I removed the starter and performed a very similar ShadeTree test. I used the battery and battery-to-starter cable from the bus for the positive side. I clamped a black jumper cable on the negative battery post and to the mounting ear on the starter for the negative side. Using the same little jumper wire from before, I triggered the starter and it fired. So, I haven't re-fried a starter and so maybe some of the wiring has been improved. But something remained. So, I looked at what was still an unknown around the starter while I re-installed it again.

Wiring
There's the 30 circuit (always hot) that runs to the front of the bus from the positive post and there's the trigger signal plug (circuit 50). I checked the 30 circuit first next because I felt it would be easy to rule it out. The 30-circuit is a red-with-white-stripe wire that runs from the starter positive post to the fuse box. In the Bentley book it is labeled as a "4" thick. That's in cubic millimeters and translated to AWG 12 (see my handy conversion reference here). The plastic on the wire near the fuse box was a little melted or swollen from the ignition failure, but I assumed (possibly a mistake) that it was just from being near the issues and that it was fine. To prove it wasn't an issue, I tried a few things. First, I did a continuity test to show that the wire didn't have a break in it. I believed that wasn't the case and the continuity test proved it. Resistance tests didn't show anything either (very low resistance). I didn't want to run voltage through that wire again, so I ran a long wire from the positive post on the battery along the ground under the bus through the driver door and into the same spot on the fuse box as the red-white stripped wire. This eliminated that wire from the equation as a variable. Then, I tried to start again. Just a "click" again. I tried swapping out the "50" wire that triggers the starter to fire. "Click".

Clumping the Circuits
In the interests of reducing variables, I considered the wiring as 3 large units or clumps.
There's "front-of-bus": that's the original wiring, including the ignition switch, fuse box,etc.
There's the "back-of-bus": that's the '98 NewBeetle engine related wiring. I include the battery in the back-of-bus not because its in the back, but because there are lots of wires routing to the NewBeetle stuff and only one heading to the front-of-bus.
Last, there's the "accessory" that is the deep cycle battery that powers the cabin lights. The accessory is completely separate, only connected by a common ground: the bus chassis. So, we rule that out.
If we consider that the front and the back only connect through a few wires, and I just tested replacements for them above, maybe we can unplug those and test. So, I disconnected the trigger wire for the starter (50), the always hot wire from the starter (30) and the signal wire for switched power (15) from the front-to-back connections, completely separating the clumps. Using my remote starter, I tried to start. "Click". From this, I concluded that the issue was not a front-of-bus problem nor a connection between problem. It resided squarely in the back. That's when Boo dropped by to see how things were going. "Could the battery have gotten affected," she asked. I had been checking voltage and it had been consistently 12.5V, but maybe there just isn't power (amps) behind that voltage. So, following that question, I put the battery on the charger.

Start
I left the battery charging at low amps (2A setting) overnight while Boo and I went to catch the new Incredibles movie. The next day, I re-set all my wiring was back at normal (front-to-back returned, nothing left unplugged, etc), and verified that the battery charger was complete. Everything looked good. So, I tried the new key. It fired right up. Ahh... much rejoicing.

Dollars and Sense
old housing,
melted and hammered
In the end, we add one starter ($160) to the total of the running costs from the last post, and we're approaching $1000. That's pretty darn expensive, but I can't say it was because of either owner neglect nor because of the engine upgrade. The interfaces between the front and rear of bus are very few, insulated with fuses or relays and weren't part of the problem. Ultimately, 50 year old wiring eventually fails. I need to commit to a complete rewire one of these days... but not while there's camping to be had this Summer. As to the total cost, if I remove the wiring harness I didn't need, the cost of the hotel that was just a bad timing thing and the steering wheel I chipped due to being dumb, this electrical repair cost me $295US ($85 for new housing and switch, $25 sub-harness, $25 headlight switch which is another whole story, $160 new starter) plus a $300 tow.

I do want to point out that the 2 major failures found along the way after the original ignition was solved were both identified by Boo. Obviously, she's amazing, but this also serves to illustrate something so important on projects like this: this is a team sport. You need input from a random friend leaning against the fender while drinking a beer pointing at stuff and asking questions. Or, a helpful wife wandering over with a lemonade innocently asking if the starter or battery could have been affected. I'm looking at trees, and she asked about the forest. Brilliant.

That's the end of the ignition smoked saga. While we may have missed String Cheese in the bus, it looks like our other musical (and simple summering) events can include Hapy. Thanks, as always, for following along.

Tuesday, November 28, 2017

The 80-20 Rule

I'm sure you've heard the phrase 80/20. If not, its a theory that the last 20% of the project takes 80% of your time. No where is that more true than working on old cars. In one of my last posts about the MG, I detailed all of the various things I had done, and how close it was to road-worthiness. Since that fateful drive, I have spent many many hours trying to diagnose the small electrical issues that remain (See Ug-letrical). Today runs through some more of that fun.

Seeing Green
The MGB has 4 major circuits running through 4 fuses. The brown circuit is "always hot". It basically runs from the Alternator to the Battery, providing juice to the headlight switch and power to the hazard relay. Red is for the courtesy lights: side marker, running lights, and license plate. Purple runs the horns, the clock, cigarette lighter and "dome" light. There are 2 lesser circuits: blue-stripped between the headlights and the headlight switch and red-stripped for illuminating the gauges. Everything else is on the Green circuit. Seriously everything else: gauges, wipers, turn/hazard signals, even the reverse lights and radiator fans. So, when there is a break in the green circuit, lots of weird things start to happen. It was odd behavior in this circuit which drove me to replacing the fusebox last fall. On my recent test drive (See MGB - Test Start, Test Drive), most of the things on the green circuit didn't work: wipers, turn signals, tachometer.

Following my own advice, I started with the fuse, and demonstrated to myself that electricity was making it past the fuseblock to the next step in the wiring. Fiddling with the fuse and testing wires must have shaken something free, though, because after simply testing voltage and wiggling wires, the wiper motor started working. So did the cooling fans. So, I started to focus on the turn signals and hazard flashers, recognizing that wire shaking could just as easily cause those things to suddenly stop working too.
taken from MG experience posting

Hazard
The hazard switch is one of the more complicated bits in the MGB electrical system. I covered the early diagnosis of this circuit earlier (see MGB - Ug-lectrical). It has 6 pins coming out of the back, with 4 clustered at one end and 2 at the other. The 2 pins allow voltage through when the switch is in the hazards-are-not-on position. This permits the turn signals to work. The 4 pins clustered together map a brown circuit wire from the hazard relay (into pin #3) to light up the "hazard" light in the center of the dash (pin 4) as well as fire both left and right turn signals (pins 1 and 2).

The Interweb says these switches get crusty and need to be flipped up and down a bunch of times to get them to work again. I tried that, but it didn't work. So, I moved back to testing wires and electrical bits. I thought I'd proven that it was the brown wire which led to the relay, by routing a new wire around it, but I actually proved that the original brown wire wasn't seating. Once I pulled the wire off and onto the relay a few times, the hazards started working.... on just the driver side. I concluded that the switch was faulty. Be forewarned: the new made-in-China switches fail often, and can be short-lived. In fact, the replacement that I got from Moss appeared to have failed right out of the box. Neat.

I shot DeOxit into the plug in which the hazard switch is attached. I took a short stretch of wire and tested the plug, to prove that it was indeed the switch and not the plug. One at a time, I jumpered from pin-hole #3 to holes 1, 2 and 4. The jumpers worked, and I was able to get the dash light and one side and then the other to act properly. This confirmed my suspicions: bad hazard switches, even out of the box. I plugged the originally-on-the-car hazard back in, and tried the turn signals. Now, they worked. So, the DeOxit cleared whatever was wrong on that side, but the hazard part of the switch didn't work. To remedy, I bought a New Old Stock (NOS) part off of eBarf. While expensive at $45, having a hazard switch is a safety item I should not be driving without. Even with the new, proven functional hazard switch, the lights wouldn't flash. The hazard relay, though, made the tick-tick-ticking sound. Now, I've read that the original Lucas hazard flasher relays are a bit touchy. So, I dug around in my electrical stuff and found a bunch of relays from the TDI swap on the bus. One of them matched the pin pattern from my MGB - Ug-lectrical post. With a basic black (black for grounds in British cars) wire grounding pin #31, I connected the wire from the ignition relay and the wire heading for the hazard switch. Viola! We have hazards and directionals!

Stopped
Once I solved the hazards, I moved on to the brake lights. I'd solved these before (See MGB fuse box), but with the work on the pedals and master cylinders, they stopped working again. Knowing what worked last time, I went straight to the brake light switch on the pedal box. With it in-hand, and the ignition turned to run, I pressed the little nub on the end (that lightly rests on the brake pedal arm), and the brake lights lit up. Perfect. This is a basic adjustment issue. I turned the adjustment nut further up the switch. Then, I fit the switch through the side hole and threaded it into the pedal box. I think I got some paint into the threaded hole as the switch started to bind. I cleared the holes with a bolt and re-threaded the switch. I had to employ needle-nose pliers to fully set the switch, but now, when the pedal is depressed about a 1/2 inch, the brake lights fire. I set the adjustment nut down against the pedal box, and one more little nagging issue is solved.

That's it for today. I'm still working through other 80-20 issues and hope to have the MGB ready to put to bed until the rains stop (and my money replenishes) so I can drive it to get a top put on. While I wait for that, I have a radiator replacement I need to do on the bus and C will need a second pair of hands getting the 280ZX road-worthy. And then, there's that broken daily-driver I mentioned last time... its a true target-rich environment.

Thanks, as always, for following along.