Showing posts with label housing. Show all posts

Tuesday, March 17, 2020

Side-Marker Lights

This is my first post since CoVid-19 completely took over the international conversation with cancelled professional leagues, concert tours and pretty much every other social outing. Boo hit the grocery for our usual restock and what she saw was out of a zombie apocalypse movie: partially filled carts strewn all over the place, shelves stripped to nothing in some areas (toilet paper?) and virtually untouched in others (fresh produce). And, of course, tons of people, having lost all sense of public-face calm, filling their carts with strange things like cases of Gatorade. People are weird when they're scared, or maybe they don't usually cook at home. Either way, the world is very odd today.

My employer has directed all of us to stay home and work remotely thru 3-April, so I expect I will be getting cabin fever stir-crazy quite soon. Since today is St. Patrick's Day, may we all have a little touch of the Irish luck and see this pandemic pass quickly. Anyway, where was I? Oh yeah. Side Marker Lights.

Side Markers - Original
When I first got Hapy, the side lights didn't work. I didn't think much of it since they were cracked and had nasty looking moss growing inside them anyway. Later, I removed them when I thought I was going to paint him. I got as far as priming him. I figure when I finally do get to painting him, I don't want to wrestle with the side markers. I figured I could do that now.

On the early bay-window bus, there is a single side marker light, located rear-ward of the rear tire, fairly low on the body. Each one is wired into the respective tail light for juice courtesy of the wiring loom. Or at least that's how they're supposed to be set up. Once I got into it, I discovered why my side markers didn't work: the wiring was gone. Just cut away. Oh well. No judging. I have done some things on this bus that will scratch some heads, but this left me with a puzzle.

Side Marker - Passenger Side
Without wiring, I decided that I would tap into the tail light, so I spliced off of both the housing ground and the running-light signal. This was fairly straight-forward with some female dis-connectors and some 16ga wire. Mounting the light was far more interesting. The old set up was falling apart when I took it off, and it was so long ago, I don't have a clear picture of how it was on there. If memory serves, the outer lens was held on with long screws run through the bulb-holder and into the side of the bus. When I tried to align the new holder, with the correct snap-in plastic buttons, there were no holes in the bus to pop them through. They had been filled with bondo prior to my getting Hapy. Sweet. I chose to drill holes where the holes should have been and then attach the holder with a pair of short screws through those holes. That mostly worked, and once the bulb was set I was able to successfully test that the wiring was good (see picture),

Side Marker - Driver Side
While pushing and shoving on the wiring harness near the driver side (looking for the side marker wires), I managed to cause a failure in the driver-side running light. I looked at the wiring diagram, and it looks like that bulb has it's own fuse and circuit from the fuse box. Since the fuse box only has, like, 12 fuses, I thought this was super weird. I was not going to run a new wire from the fuse box and this was not going to be the watershed moment where I decide to replace the whole harness (which, if you remember, I got when the ignition fried, and cannot return). Instead, I did a classic DPO move. I changed the wiring for the passenger-side side marker into a 2-wire splice, running a long wire along the original harness over the engine hatch to the driver-side tail light. At this point, I made a second 2-wire splice, sending one into the running light in the tail light housing and one to the side-marker.

Unlike the passenger side, the driver side had all of the correct holes. Unfortunately, this install showed that the replacement parts do not have a "pop-in" plastic nub that is long enough to actually snap the housing into place. Since the nubs are easily removed, I simply pushed a bolt through the housing and the side of the bus and threaded on a washer and nut from inside the engine compartment. I popped in a bulb, tested and then shifted to the lens. The lens set on easily enough, though they do not ship with screws/bolts so you're on your own for those. Once all assembled, I re-confirmed the running lights work all-around (again, see picture).

K'Lack Came Back
I intend to continue doing these low-risk things until I am ready to tackle 2 big projects on Hapy: (1) re-wiring the front-to-rear using a cable and (2) implementing a defroster. Both of those will be big, and I'd like some dry weather before I start them. But first, we finally got K'Lack (our TDI wagon) back from the transmission shop. Recall that K'Lack was suffering a form of morning sickness, being unwilling to shift out of first on cold mornings. I thought it was from old activators inside the transmission, so we took it back to the rebuilder to swap them out. That wasn't it. After 2 months of trying to figure out the mystery, they discovered that the rebuild kit they were sent for the rebuild a year ago was for a 01P not a 01M transmission. After trying everything else, they pulled the transmission, rebuilt it again and compared the servos to the ones they removed and learned that they are different sizes, but barely noticeably. Anyway, with K'Lack back in service, I can pull Oliver (the MGB) off the road and fit him with a catalytic converter before he is due for Oregon DEQ in May.

Remember how at the end of the TDI retrospectives (here) I said that there would be a gap in postings for a while as my projects got spun back up? Well, I think that's finally going to happen now that K'Lack is back. With 2 operational cars, K'Lack and Flash, I can comfortably take Oliver and Hapy out of service. So, the project fun is about to begin, but that means that the blog silence is as well.

Thanks, as always, for following along. There will be more when something I haven't started yet is close to completion. Wash your hands, for 20 seconds, many times a day, my friends --

Tuesday, January 7, 2020

TDI install retrospective: Cooling

Continuing the process of back-documenting what I did to put a TDI engine into an old (1972) air-cooled VW bus. Today I cover the cooling system. Somehow, I managed to not plan for this post when I started this retrospective. Ha. To keep concepts separate, I won't go into the electrical, but I'll cover everything else cooling / coolant related.

Radiator
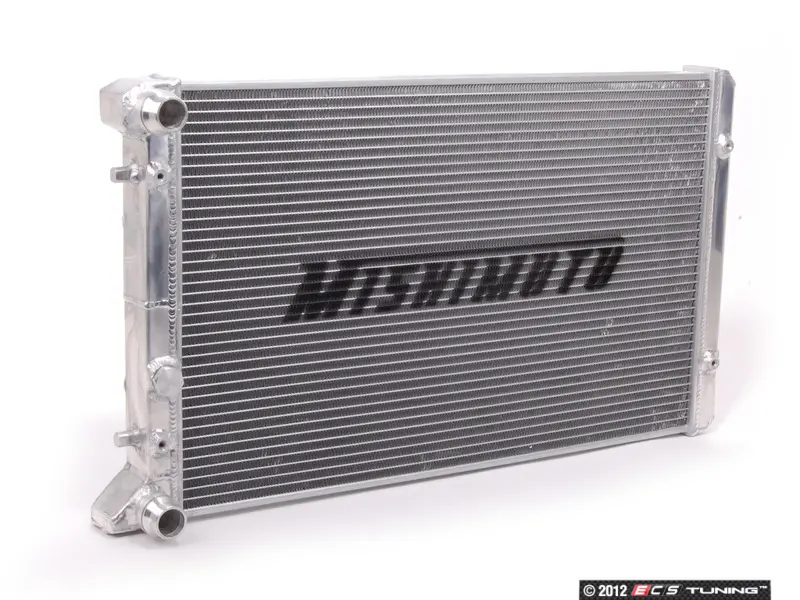
I started with a Jetta3 radiator I got off craigslist for $20. This met the need, but eventually was swapped out for a Mishimoto radiator designed for a Jetta3. This allowed all of the bracketing work I did for the original radiator to be re-used. Sort of. The bracket design was relatively simple: Add a straight square-tube bar across the leading edge of the radiator, and form brackets which are affixed to the bar, but thread into the radiator mounts. The crossbar then had eye-hooks added so the radiator could suspend from the underside of the bus. To the front of the bar, steel security screening was added to prevent refuse from entering the radiator. See bracketing the radiator and Radiator mounting planned for more details.

On the rear, simple individual brackets were formed for each of the 2 mount holes on the radiator. Each bracket had an eyehook added, similar to the front bar. From the 4 eyehooks, the radiator would hang from the underside of the bus. I used 400# test chain to hold the radiator, and placed it at an angle (front about 4" lower than the rear) so the exhaust heat would be encouraged to vent down-and-rearwards and so that the leading edge of the radiator might scoop some air as it passed beneath. Corresponding eyehooks were added to the frame under the center of the bus, and the chains have threaded carabiners on the ends for ease of connecting / servicing. See rad brackets continued and Radiator test-fitted for more details.

To discourage hot air from recycling into the intake side of the radiator, I cut and attached some sides to the radiator unit with some thin zinc-coated sheet metal used as cold-air return material in houses (See Radiator Shrouded). Underneath, I attached an aftermarket fan:cowling to maximize the suction of the fans drawing air through the radiator (See Cowling the Hapy Radiator). For more details, See Radiator InstalledBack to the Bus Rad Swap 1 and 2.

I have not experimented with lowering the radiator beyond it's current height of about 9" above the ground. I had ideas of adding a scoop to the leading edge bar, or adding a means of lowering the radiator with a lever or something, but the bus now runs cool enough without added complexity. If that changes, those options remain.

I know there are some who will read this and not accept that an under-belly radiator is sufficient. Consider that the Aussies are doing it, and were doing it well before I started my project. They have super-hot, dusty conditions and they drive their under-belly conversions in the outback. So, some gravel from the road or a mid-western summer are not really the factors we may fear them to be. After 10 years, these have not influenced the cooling at all. The keys to keeping the temperature controlled are getting the exhaust air away and getting air to draw through the radiator through cowling and fan suction.

Overflow Bottle
The overflow bottle for the NewBeetle is shaped like a ball with a mounting tab on one side, like in the picture here. That tab has the 2 mount holes. I built a simple angled bracket that aligned with those 2 holes, and attached it to the front-to-back floor support at the front right corner of the hatch I added. The bottle needs to be located height-wise in the same relative position as it appears in a stock TDI install. This places the full line at the top of the head. This height requirement may force you to put in an access hatch just so you can add coolant. I suppose a port-hole could work. Your bus, your choice.

Hoses
Unlike the inter-cooler and vacuum, the cooling system left only a few pieces I could re-use. The runs to/from the radiator were solved with multiple 2' long Goodyear flexible hoses fitted together with metal connectors. These flexible hoses satisfied the run from the engine bay to the radiator, but within the engine compartment, there were other considerations. For example, the outlet from the thermostat housing exits the engine pointing at the passenger-side rear wheel. This needs a 90* downward bend, so I used a short piece of original hose, and mated the bend to the flexible hose with a metal joiner that included a small (1/2") "T" which I routed to a bleeder. I have used this bleeder to get air out of the system while filling with coolant many times. The run from the outlet flange also points to the passenger side, and it needs to include a temperature sensor. So, again, there is a mix/match of TDI hose, a piece of TDI plastic holding a sensor and the flexible hose.

I omitted the EGR, so the plumbing around the EGR needed to be eliminated as well. This actually simplified some of the paths. Last, there was the coolant line run to the overflow bottle.

Extras
nicked from TDI-club
I haven't introduced any changes to the oil cooler nor the oil-to-coolant exchanger, but this feels like the right spot to mention it. I have thought about swapping out the original stock TDI exchanger for the V6 4motion Passat oil cooler or the late model NewBeetle / Jetta / Passat / Toureg (also Audi) oil cooler. Both are larger, and with the amount of concern I've had over temperature control over the years, this is an upgrade I will probably do as part of a Malone tune. The V6 4motion looks a lot like the TDI one, just a little bigger while the later model cooler has the coolant inlet/outlets oriented differently (middle unit in the picture). I got these part numbers from this thread on the TDIClub and only re-post here for my own future reference benefit. The TDIClub thread author (Kennedy) deserves all the thanks and praise for assembling this detail.

V6 4motion Passat
028117021E OIL COOLER (should come with upper gasket)
038117061 LOWER COVER TO OIL COOLER WITH SEAL
*I believe the original lower cover will fit, but I'm not 100% sure

late model
038117021B OIL COOLER
038117061 LOWER COVER TO OIL COOLER WITH SEAL
038117070B SEAL

Heater
image nicked from theSamba
For some, having a heater isn't an extra. Its mandatory. I wanted to remain stock-VW parts as much as possible, so I looked into a real defroster-type heater unit. I couldn't fit anything that big into the space I had, so I bought a used Vanagon rear-seat heater. I plumbed that into the heater/defroster hose loop, placing the heater unit on the extra battery tray, under the spare tire well in the engine compartment. This actually worked fairly well. The coolant lines were very short, and I was able to route an insulated flexible air hose to the front, connecting it to the original bus air system. I removed it all when my original ignition went up in smoke, and now don't have a heater. More importantly, I don't have a defroster. In retrospect, I probably could have retained the heater, and just sourced the 12V elsewhere.

I have considered adding an aftermarket heater closer to the front of the bus, and running longer coolant lines to support it. The long air hose system was slow to respond because the air in the hose needs to warm up or cool down before you can feel the change. That's the beauty of the modern systems: no air hoses. The coolant, however, could cool off before it gets to the front of the bus, and there are would be a need for a bleeder, etc. so this isn't exactly perfect either. So, as much as this is a retrospective, some things clearly aren't really done.

De-Scale
Regardless of what you do, if your engine isn't new, and you don't really know how well it was maintained by the prior owner, it might be wise to de-scale it before you consider your system complete. I ran a Thoroflush procedure and that made a massive difference in the bus' ability to ditch heat. Check out the Now Water-COOLED post for some more detail.

Prior related posts:
Preparation
Fuel System
Physical Mounting
Vacuum System
Air, Inter-cooler and Exhaust
Primary Electrical

Next related posts:
Secondary Electrical
ECU, dashpod and Sensors

Tuesday, September 17, 2019

Now Water-COOLed

Before I begin, our family lost a brother over the weekend (14 September). Travis was taken from us too soon, but he left doing what he loved most, riding his Harley on a beautiful early autumn afternoon. To meet him was to know him, and to know him was to love him. You will be greatly missed, brother. On to today's post...

The cooling system for Hapy's new engine has been a journey. Looking back on multiple years of efforts to get Hapy to be genuinely water-cooled, today's post covers what may be the last thing I needed to do. I have lots of links referencing pretty much all of the things I've done, but I probably missed a few at the beginning of the project because many of those early posts covered multiple project aspects.

Initial Cooling System
Recall when I started this project, I sourced a radiator off craigslist for $30 (See TDI - Day 2). At the time, I was even offered the air-conditioning condenser, and it had the original fans. I passed on the air-conditioning condenser, which he subsequently sold, and I removed the fans. I added 2 flex-cool fans and wrapped the radiator with an aluminum frame (See bracketing the radiator and rad brackets continue) and put sides on it (See Radiator shrouded) to reduce the amount of air allowed to slip back around from the rad exhaust back into the rad intake. This sort of worked, though I always had my eye on the temperature. Along the way, I removed a bunch of extra wiring from the original harness that was part of the air conditioning circuit, and added a switch to the dash for turning the fans on.

Troubles
Then the leaks started. I spent many hours trying to solve outlet flange leaks (See Reality Strikes, for example). Ultimately, I learned that the plastic parts were designed to fail first, so more expensive parts didn't fail when the engine got too hot and the coolant expanded faster than the expansion tank could handle. Still, replacing that outlet flange and getting the coolant temperature sensor to seat properly are two of the most patience-testing things I've done on this conversion. Having these components by the fuel tank makes the reach and visibility particularly difficult.

Still, with the system seemingly in-tact, the engine temperature would still climb and not come back down easily. As the miles and years passed, the engine would heat up faster and cool down slower. We had a super-long return from 4Peaks in 2017 (See 4Peaks 2017 - Road Report), and had our first vagabonding experience when we were unable to make it to Frog Lake due to an overheat, and big coolant loss (See Almost Frog Lake Part 1 and Part 2). The whole time, Boo was incredibly supportive, and heroically kept my spirits up. My last, most tragic failure was when I added the wrong kind of coolant. That amplified the problems, and ultimately led to the troubled drive to Newberry this Summer (See Newberry 2019 - Getting There).

Resolution Path
I promised Hapy that I would start fixing the cooling system when we were on the side of the US-26 outside Rhododendron, unable to make it to Frog Lake. So, that next Spring, I replaced the old Jetta radiator with a Mishimoto all-aluminum radiator (See Back to the Bus: Rad Swap Part 1 and Part 2). Things were not that much better on the way to 4Peaks in 2018 (See 4Peaks 2018 - Road Report), but with the ignition fire on the way home, it quickly moved to the back burner. I removed the wiring for the heater fan controls when I did the ignition replacement, believing it was causing large load spikes. While that didn't really change the cooling system, its a change worth documenting. By the time the ignition was done, festival season was over. But before I covered Hapy for the winter, I replacing the fans with a real dual-fan shroud (See Cowling the Hapy Radiator). I thought this was the final solve. The drive to 4Peaks seemed fairly good (See 4Peaks 2019 - Road Report), with temperature spiking at 196*, but the drive home was again spent watching the temperature gauge. We peaked at 205*, but the alternate route through the farm country allowed us to keep our speed (and therefore temperatures) down. The drive to Newberry, though, was enough for me to know that I had not solved the problem, and I really needed to fix it right if I was going to truly enjoy driving distances with Hapy.

Last Solve
In my last post, I described the issues with the fuel I bought in Oakridge (See Green Diesel isn't BioDiesel). That bad fuel held my speed so low, I didn't have temperature issues the rest of the way home. I knew they still lurked, so after the fuel system was drained, new filter system installed and new fuel added, I shifted back to my nemesis: the cooling system. I started with a basic drain and water-flush. Then, I removed the thermostat and filled with water, ran the engine, and drained. I did this a couple of times. Then, I went nuclear and did a chemical flush with Thoroflush. The Prestone radiator flush is weak tea compared to this stuff.

The directions are hard to find on the internet, but it's fairly clear:
Remove 1 gallon of coolant from your system
Mix one gallon of water with the right amount of Thoroflush mix for your application
Add mixture to cooling system
Get engine up to temperature (to open thermostat) and run for 10-15 minutes. DO NOT RUN LONGER THAN 15 MINUTES
Drain and flush with water until drainage is clear (no pink from chemicals)

Seems fairly straightforward. But, I pulled my thermostat, so how long do I need to run it? I was unable to find any direction for this case. I concluded that since my engine was fairly warm (upper 160's), if I added the mixture and ran it for less than 15 minutes, I would do no harm, but might not get maximum benefits. So, that's what I did. I used the water from the 2nd rinse-flush and added the mixture to that, ran the engine for just shy of 15 minutes, drained, flushed, and flushed again. After flushing everything out, I re-installed the thermostat with a new housing and O-ring. I determined that the old housing was slightly warped (possibly from the flushing efforts), and found that removing the hose from the thermostat housing makes re-install 100x easier. I filled with G40 and distilled water, clearing the bleeders so there were no air pockets trapped in the system.

Testing and Proving
gmap image of 99W steep
I wanted to demonstrate that this was the fix. So, I drove around town like a total dick: jack-rabbit starts, rapid accelerations... basically zooming around West Beaverton pushing the bus as hard as I could for a good 15 or 20 minutes. It wasn't until I pulled over onto our quiet street that the temperature raised above 185*F (to 188*F), and even then it was only for a second before it dropped back down to 185*F. The real test came later in the week when we drove to Honeyman State Park, up to Newport, through Lincoln City and home again. I'll post on that trip later, but I'll summarize the coolant test with a simple number: 194. 194*F was the highest the temperature ever got the entire 300+ mile road trip, including climbing the coast range and driving in slow, heavy traffic. At no time did I need to pull over because of the temperature. I did not drive especially gingerly either.

There is a hill climb on 99W between Newberg and Sherwood. Every time we take the back road alternate route, we drive up this hill as our last big pull. Accordingly, it is a consistent gauge for how Hapy is doing. When I drove this hill after Newberry, I barely kept the temperature under 203*F, driving with the flashers on in 2nd gear (25mph* tops). This time, Hapy's temp peaked at 194*F running at the speed of traffic (55mph*) in 4th. In both cases, this was at the end of a multi-hour daytime summer-heat drive. This feels like strong evidence the cooling issues have been solved.

That's it for today's saga. Sorry there weren't any real pictures, there really wasn't much to take a picture of, except, maybe, a picture of the cooling system map. That reminds me, I never did document system-by-system how the conversion was done. Hmm.. maybe I should dust off that documentation effort over the winter. Anyway, thanks, as always, for following along.

Wednesday, January 28, 2015

Prepping for Paint

While working on the windshield washer effort, I got to thinking about the paint on the front of the bus. Those 2 tiny nozzles were original as is the paint on most of the bus, and the paint is in about as good a shape as those nozzles were: barely functional. So, once I got the washer bits done, I resolved to getting the paint looked at and decided that I was going to prep and paint the nose.

Organization is Key
headlight can rust
from 12 o'clock to 5
One thing that John Muir was always harping about was the need to properly tag and bag your bits an pieces. I wholeheartedly agree. No matter how optimistic you are about spending every spare moment on your project, things come up. There's a Bruin game on tv or there's a freak snowstorm you want to go play (or have to work) in. So, as bolts come off, collect them into zip-lock baggies and write with a Sharpie on the bag what the bits are for. The only exception to following this religiously is when you can thread the bolt back into its originating location (bumper bolts, eg) where they won't get in the way, or lost.

Beyond the baggies, the parts I removed needed to be categorized. Some things, like the front bumper, don't need any additional work done to them except maybe a soap-water wash or a polish. Others, like the headlamp cans need to be rust sanded, primed and painted. A final pile was created for those things which just needed to be replaced because they were beyond rust repair or a replacement was less expensive than trying to save the old part.

Removing the Bright Work
turn signal during removal
I love that British phrase for what we colonists call "the chrome pieces". Bright work sounds so much more refined. Rather than tape off things, I chose instead to remove everything and go deep on rust while I was at it. The front bumper goes first with 8 bolts: 2 each under the doors and then 2 each on either side of the belly pan. I'd hand-painted it with white rustoleum paint (see Front Bumper part 4) about a year ago. It held up okay, but the white looks dirty already. I guess I should have washed it more often. Regardless, I set the bumper into the back of the bus to start the wash/polish pile.

Once the front bumper was off, I pulled the headlight surrounds (one Phillips-head bolt and it pops out), headlamps and the cans. The original cans have rust spots on them, and the body cavities where the cans reside have a little too. Considering the bus is 40+ years old, I thought that was a really good sign. The headlight surrounds went with the front bumper. As I pulled the cans out of the nose of the bus, I labeled which side each can came from. I separated the bolts and spring and put all of that stuff into a single headlamp baggie. The cans started the rust treat pile. Next, I removed the front turn signals. The lenses are good, but filthy (clean/polish pile) but the housings were spotted with rust. I simply touched the reflector with a finger and it started flaking off. So, the turn signal housings started the "replace" pile. The housings were then joined by the fresh-air vent intake: rust appeared on the back/inside, and a replacement is available at busdepot.

stripped of what could be removed
and the sanding started
The last thing to remove (in my case) is the spare tire hanger. Held on by 3 thick screws, the tire mount appears more universal than I'd realized. It had a dusting of surface rust / patina in a few areas, but, again, it was in great shape for its age. Clearly, it wasn't original, though, as I found a sloppy peace sign had been spray-painted on the nose prior to the tire mount being installed. The tire mount went into the rust treat/paint pile and the screws into a baggie.

Now, the nose is ready for paint. Except... the windshield is still in... and won't it look funny if just the nose is painted, and the doors that match up against the nose aren't? The story continues next time.

Monday, September 29, 2014

Transaxle Re-assembled

Last weekend, I got the transaxle put back together and back into the bus.  Fast sentence to write.  Lots of effort to do.  Today covers the first half of that 'effort to do': getting the transaxle ready.

Slinging Oil
slinger by hole in bell housing
where it's supposed to be attached
The bellhousing for the 002 and 091 transaxles are supposed to have this ringed collar around the input shaft to help guide the hypoid oil away from the input shaft seal and back towards the gears.  There are a few names for this bit, but the boards call it an "Oil Slinger".  According to the Bentley, this was supposed to be a non-repair item that was pressed into the bellhousing with a 4-ton press.  If it separates, you get a new bellhousing or re-press it in.  Well, the VW world has discovered that's not exactly right anymore.  Instead, you create a rough edge on the inner edge and along the rear (engine side) of the bellhousing.  I used a chisel and a file for this.  Then, rough up the lip and outside of the slinger near the lip.  Peanut butter the edge with JB Weld and press it into place by hand.  I treated the excess like caulking, and ran a gloved finger along the edges, pressing it in and making the edge clean.  Last, hold it firm with a simple weight and gravity.  Once its cured (18 hours), its ready.

Install Input Shaft Seal
roughed up edges
This was actually quite simple.  Lightly brush the inner and outer edge with hypoid oil.  Set into place by hand, and press it enough by hand so it sits still.  Find a short section of 3/4" PVC pipe (I used a 3/4" - 1/2" T from Home Depot).  With a rubber mallet, smack the seal until it seats flush with the face of the bellhousing.

Into One Piece
When the transaxle was built by AA Transaxle in Seattle, the bellhousing was sealed to the transaxle body with what looked like clear silicone caulking.  Not a fan.  I scraped all that out and instead ran hi-temp form-a-gasket along all of the mating surfaces.  Once it becomes tacky, set the 2 sides together and set the bolts in.  Rubber mallet the bellhousing into place and finger-tighten the bolts.  Following the jump-the-center torquing process, set them to 18ft-pounds (if memory serves. check the Bentley).

Topped Off and Ready
slinger with JB Weld
Before I put the bellhousing on, I made sure the oil drain plug could be loosened.  I had vaguely remembered that it was frozen in-place.  I was right.  After some hard torquing, I got the nut out.  I cleaned off the tiny metal filings off the attached magnetized rod, cleaned the threads and re-seated it.
Once the transaxle and bellhousing were one piece again, you need to give the form-a-gasket time to cure.  I gave it 24 hours and then opened up the fill hole.  It took all the gear oil I had on hand, and was still a touch low.  I'll need a fresh bottle to top it off before I take much of a test drive.  Remember, the tranny is full when oil spills out of the fill-hole when the tranny is on level ground.

That's it for today.  The tranny looks good, the input shaft has almost 0 wiggle to it and the seal / form-a-gasket are holding oil.  Hazah!

Sunday, September 23, 2012

Meeting Beaverton's Finest

I'll get to the bus test drives and such, but today I have to share a story from last night.

The Set Up
Boo has been working an unsustainable number of hours lately.  I like to complain about my schedule, but like I said in my last post, this is the most productive period of the year, so of course I'm working a lot.  Still, my hours pale in comparison to hers.  Beyond just working 7:AM past 7:PM during the week, she worked yesterday from 7:AM and didn't get home until almost 10:PM.  With a schedule like that, and a small condo full of people, we agreed to take a walk to de-pressurize.  I've mentioned before how I dropped an offer on a short sale house back in May.  This house is within a short walk of our condo, so we drive or walk by with some regularity just to make sure everything is okay with it.  Last night's walk was another one of those.

Decrepit
Since I placed the offer, the owners have moved away, leaving the house vacant.  Unfortunately, when they left, they weren't overly concerned with the state the house was in.  There's trash along the side and the yard and gardens have become wild.  It looks vacant.  Since the walk was too short to truly get the pressure off, we decided that we'd work off some stress by pulling weeds out of the driveway concrete.  This is where things turned a little weird.

Hello, the neighbors
We spent about 20 minutes pulling weeds and then pushed the results into a pile in the center of the drive.  there wasn't a yard debris barrel around, so we just left it there and set off back home.  As we stepped into the street, we could see first one flashlight and then a second approaching from 2 different directions on the street.  "Curious," I thought.  These flashlights accelerated towards us and behind them were 3 members of the Beaverton Police.  Apparently, they also are aware of the house being vacant.  So are the neighbors.  Our efforts to make the driveway a little less trashy attracted someone's attention, and they called the cops.  Nice.  While Boo explained to a female officer, I was talking to another, detailing our short-sale offer woes and our desire to not have the house become overly neglected before the paper-chase completes.  They accepted our story once I offered MS's contact info and they inspected the pile of weeds in the middle of the driveway. (queue a line from Arlo Guthrie's Alice's Restaurant about the tools and shovels and the garbage in the back of a red microbus).

So Much for Stress Relief
The flashlights snapped off, we turned to leave and the Beaverton police disappeared into the dark.  We started walking home while I shared tales of being shaken-down on a nearly bi-weekly basis while I lived in Las Vegas many years ago.  Boo would have none of it, completely overcome with the craziness of her work schedule and lamenting that we can't simply pull weeds out of a driveway without it going sideways.  I do have to admit, we're a long way from being neighborly.

Good Dude Deed Doers
In my youth, my friends and I would spot a car in the parking lot with their lights on and try to turn them off, calling ourselves the "Good Dude Deed Doers".  Nowadays, car alarms and theft paranoia prevent such a neighborly demonstration.  Instead, announcements across a PA system in a crowded mall are how car lights are resolved.  Nice and anonymous.  No community needed.  When I think about our weed-pulling, and how it was initially misinterpreted as potential property damage, I'm saddened.  Adding to that disappointment, the neighbor who saw us in the driveway chose to just call the cops rather than actually watch what we were doing.  Had s/he taken an extra 10 seconds, s/he would have seen we were simply pulling weeds.  A strange thing to do at 10 o'clock at night?  Yes, but certainly not harmful.  Ultimately, I'm grateful that my new neighbors keep watch on my soon-to-be new home, though.  The alternative of vagrants breaking in and camping there is far less appealing.

That's it for today.  I'll post some test drive thoughts next time.

Friday, July 27, 2012

Enter Summer, exit posting

Yes, I'm alive. Like so many folks in the Pacific NorthWest, once Summer weather arrived, I stopped using the computer when I wasn't working, and got to playing. I do have some personal and bus updates, though, so I'll bang that out before pouring myself a welcome-to-weekend mojito.

Housing
just making a point...
As much as the news folks talk about how "bad" the real estate market is value-wise for sellers, it is very hard to find a good deal as a buyer. When I moved out of my townhouse apartment in mid-March, I started looking for a house, agent and mortgage lender and all. Within a month, I had an offer on a house, but between the banks holding the mortgages getting in the way, that house is still unsold. My offer expired, and I restarted it, but in the few days between, someone else got into the bank's radar system and they're in first position now. Apparently banks think serially, and can only address one offer at a time.  Fun. It's a good thing other businesses don't operate that way.  So, I offered on another house. And another. And another. All told, I've laid offers on 5 or 6 houses now. Most of them still haven't been sold and my offers just expired along the way. I think I just may get this last one, though. I put an offer on it in late May. Yes, that's right, late May. I have been extending and re-extending on this one.  I've been told that I might expect an acceptance of my offer by the end of next week, or early August.  I'll post a picture when that happens, so until then, here's a generic "Bank Owned" sign.  Yeah, like that's gonna get you to place an offer on it.  Prepare for weeks of no contact from the selling bank, and make your offer expiration date something you can live with, yet recognizing that the bank will not get it together within 60 days of you popping an offer on it.

So, how much of the real estate market / housing problem is being created banks who can't get it together? Had this been a normal deal, I would have gotten an accept, decline or counter-offer within a few days. By the bank adding in the 10 extra weeks, it looks like the houses are staying on the market an extra 70 days. That makes the market look falsely bad, like you can't sell a house because it's still dropping in value. The truth is, the market is coming back, based on what I'm seeing in terms of buyer traffic, but with the banks extending the process by literally months, it paints a different picture. One the news folks continue to hawk on the nightly's.

Microbus slightly too micro
note the overhang
I've been trying to figure out a way to fit 6 passengers into the bus, so we can take the whole family in one car. Boo and I toyed with the idea of buying something just for this reason, but cars are just too dang expensive. I said, "with a small fraction that money, we could get the bus to do it."  So, while Boo drove my TDI Jetta to Montana with her 2 boys, I drove her car to Eugene to get a free (yes, $0) middle-row Vanagon bench seat. When I got it home, I did what anyone would do: try to fit it. Fail. From the edge of the Westfalia sink/stove unit to the edge of the sliding door is 39". The width of the benchseat with the cushions scrunched is closer to 42" (see overhang picture on the right). Add on 3-4 inches for the arms, and it totally won't fit.... with the sink/stove unit in place. I intend to pull the sink/stove to fit the bench seat, and build a new cabinet that's just 16" deep (or 7" less deep than the Westy one). Then, the seat will fit, and when removed at a campsite (or ski resort parking lot), the cabinet can be usable. I will probably forgo the stove, and only do a splash sink with a wide counter where we could use a Coleman portable stove instead.

Microbus to get macro-speed
upper frame width pushes
lower frame away from cabinet
Last, I finally have arranged for a new transaxle from AA Tansaxle in Seattle. Daryl and I have figured out the details, and he will be starting the construction on Monday. If all goes well, it will be crated for shipping by the following Friday. Then, I'll just need to find a spot to drop the existing engine/transaxle, remove the old tranny, attached the new one and re-install. (note to self: get a new throw-out bearing just in case) Dropping the engine/transaxle isn't hard, but mating a new transaxle while leaving the engine under the bus may be. Remember how far over to the side I needed to tilt the undressed, un-oiled, no coolant engine to get it under the rear valence? I wouldn't want to try that with the fluids in, nor with all the other parts attached. Better to just separate and mate under the belly of the bus. Lots of muscling ahead, I'm sure. I'll post pictures, etc.

That's it for now. With Summer in full swing, I doubt I'll be online too much. I'll try to get better about it. I have a big road trip to Ashland planned, if all goes well, maybe the bus will go too....