Showing posts with label water flange. Show all posts

Tuesday, January 7, 2020

TDI install retrospective: Cooling

Continuing the process of back-documenting what I did to put a TDI engine into an old (1972) air-cooled VW bus. Today I cover the cooling system. Somehow, I managed to not plan for this post when I started this retrospective. Ha. To keep concepts separate, I won't go into the electrical, but I'll cover everything else cooling / coolant related.

Radiator
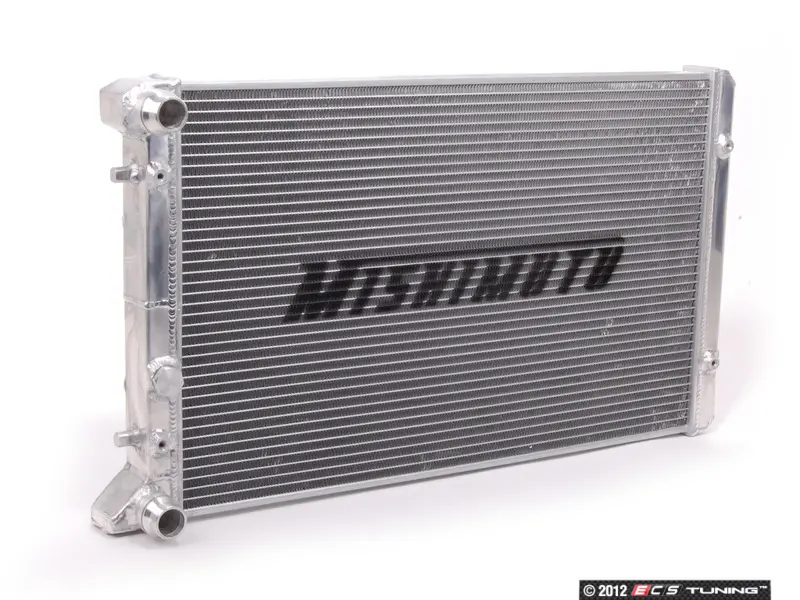
I started with a Jetta3 radiator I got off craigslist for $20. This met the need, but eventually was swapped out for a Mishimoto radiator designed for a Jetta3. This allowed all of the bracketing work I did for the original radiator to be re-used. Sort of. The bracket design was relatively simple: Add a straight square-tube bar across the leading edge of the radiator, and form brackets which are affixed to the bar, but thread into the radiator mounts. The crossbar then had eye-hooks added so the radiator could suspend from the underside of the bus. To the front of the bar, steel security screening was added to prevent refuse from entering the radiator. See bracketing the radiator and Radiator mounting planned for more details.

On the rear, simple individual brackets were formed for each of the 2 mount holes on the radiator. Each bracket had an eyehook added, similar to the front bar. From the 4 eyehooks, the radiator would hang from the underside of the bus. I used 400# test chain to hold the radiator, and placed it at an angle (front about 4" lower than the rear) so the exhaust heat would be encouraged to vent down-and-rearwards and so that the leading edge of the radiator might scoop some air as it passed beneath. Corresponding eyehooks were added to the frame under the center of the bus, and the chains have threaded carabiners on the ends for ease of connecting / servicing. See rad brackets continued and Radiator test-fitted for more details.

To discourage hot air from recycling into the intake side of the radiator, I cut and attached some sides to the radiator unit with some thin zinc-coated sheet metal used as cold-air return material in houses (See Radiator Shrouded). Underneath, I attached an aftermarket fan:cowling to maximize the suction of the fans drawing air through the radiator (See Cowling the Hapy Radiator). For more details, See Radiator InstalledBack to the Bus Rad Swap 1 and 2.

I have not experimented with lowering the radiator beyond it's current height of about 9" above the ground. I had ideas of adding a scoop to the leading edge bar, or adding a means of lowering the radiator with a lever or something, but the bus now runs cool enough without added complexity. If that changes, those options remain.

I know there are some who will read this and not accept that an under-belly radiator is sufficient. Consider that the Aussies are doing it, and were doing it well before I started my project. They have super-hot, dusty conditions and they drive their under-belly conversions in the outback. So, some gravel from the road or a mid-western summer are not really the factors we may fear them to be. After 10 years, these have not influenced the cooling at all. The keys to keeping the temperature controlled are getting the exhaust air away and getting air to draw through the radiator through cowling and fan suction.

Overflow Bottle
The overflow bottle for the NewBeetle is shaped like a ball with a mounting tab on one side, like in the picture here. That tab has the 2 mount holes. I built a simple angled bracket that aligned with those 2 holes, and attached it to the front-to-back floor support at the front right corner of the hatch I added. The bottle needs to be located height-wise in the same relative position as it appears in a stock TDI install. This places the full line at the top of the head. This height requirement may force you to put in an access hatch just so you can add coolant. I suppose a port-hole could work. Your bus, your choice.

Hoses
Unlike the inter-cooler and vacuum, the cooling system left only a few pieces I could re-use. The runs to/from the radiator were solved with multiple 2' long Goodyear flexible hoses fitted together with metal connectors. These flexible hoses satisfied the run from the engine bay to the radiator, but within the engine compartment, there were other considerations. For example, the outlet from the thermostat housing exits the engine pointing at the passenger-side rear wheel. This needs a 90* downward bend, so I used a short piece of original hose, and mated the bend to the flexible hose with a metal joiner that included a small (1/2") "T" which I routed to a bleeder. I have used this bleeder to get air out of the system while filling with coolant many times. The run from the outlet flange also points to the passenger side, and it needs to include a temperature sensor. So, again, there is a mix/match of TDI hose, a piece of TDI plastic holding a sensor and the flexible hose.

I omitted the EGR, so the plumbing around the EGR needed to be eliminated as well. This actually simplified some of the paths. Last, there was the coolant line run to the overflow bottle.

Extras
nicked from TDI-club
I haven't introduced any changes to the oil cooler nor the oil-to-coolant exchanger, but this feels like the right spot to mention it. I have thought about swapping out the original stock TDI exchanger for the V6 4motion Passat oil cooler or the late model NewBeetle / Jetta / Passat / Toureg (also Audi) oil cooler. Both are larger, and with the amount of concern I've had over temperature control over the years, this is an upgrade I will probably do as part of a Malone tune. The V6 4motion looks a lot like the TDI one, just a little bigger while the later model cooler has the coolant inlet/outlets oriented differently (middle unit in the picture). I got these part numbers from this thread on the TDIClub and only re-post here for my own future reference benefit. The TDIClub thread author (Kennedy) deserves all the thanks and praise for assembling this detail.

V6 4motion Passat
028117021E OIL COOLER (should come with upper gasket)
038117061 LOWER COVER TO OIL COOLER WITH SEAL
*I believe the original lower cover will fit, but I'm not 100% sure

late model
038117021B OIL COOLER
038117061 LOWER COVER TO OIL COOLER WITH SEAL
038117070B SEAL

Heater
image nicked from theSamba
For some, having a heater isn't an extra. Its mandatory. I wanted to remain stock-VW parts as much as possible, so I looked into a real defroster-type heater unit. I couldn't fit anything that big into the space I had, so I bought a used Vanagon rear-seat heater. I plumbed that into the heater/defroster hose loop, placing the heater unit on the extra battery tray, under the spare tire well in the engine compartment. This actually worked fairly well. The coolant lines were very short, and I was able to route an insulated flexible air hose to the front, connecting it to the original bus air system. I removed it all when my original ignition went up in smoke, and now don't have a heater. More importantly, I don't have a defroster. In retrospect, I probably could have retained the heater, and just sourced the 12V elsewhere.

I have considered adding an aftermarket heater closer to the front of the bus, and running longer coolant lines to support it. The long air hose system was slow to respond because the air in the hose needs to warm up or cool down before you can feel the change. That's the beauty of the modern systems: no air hoses. The coolant, however, could cool off before it gets to the front of the bus, and there are would be a need for a bleeder, etc. so this isn't exactly perfect either. So, as much as this is a retrospective, some things clearly aren't really done.

De-Scale
Regardless of what you do, if your engine isn't new, and you don't really know how well it was maintained by the prior owner, it might be wise to de-scale it before you consider your system complete. I ran a Thoroflush procedure and that made a massive difference in the bus' ability to ditch heat. Check out the Now Water-COOLED post for some more detail.

Prior related posts:
Preparation
Fuel System
Physical Mounting
Vacuum System
Air, Inter-cooler and Exhaust
Primary Electrical

Next related posts:
Secondary Electrical
ECU, dashpod and Sensors

Sunday, August 17, 2014

Welcome 2dot0

While searching for parts for Flash (the TDI Jetta recently wrecked by T), I found a perfect parts candidate.  Or is it more?  The one on Craigslist was a year younger, but had 192k miles on it.  A gasser with a 2-dot-slow engine, it was the GLS model with a tan leather interior and a bruise-free white exterior.  The biggest drawback: the owner believed he had blown the engine, and had left it untouched since mid-February.  Today's posting is the adventure we had with this listing / car.  Found on Thursday, I wanted to get there right away, which meant driving up the next day.

Oregon -to- Washington Friday Afternoon Traffic
First things first, the parts-car-candidate was living on the far North East corner of Vancouver, Washington.  Since I live in central Beaverton, that represented a 40 minute drive without traffic.  On Friday afternoon in the Summer, it can take considerably more time.  Like almost 3 hours one-way.  Fortunately, I drove Dude (2000 +/- Saturn) and his A/C was working fine.  Still, 3 hours of bumper-to-bumper rubber-banding traffic is hard on a clutch leg.  When I got there, the owner's wife had chosen to happy-hour with her friends, so the owner wasn't really able to focus attention on what we were doing as he had to manage little kids.  Turns out, she hadn't signed the title so it didn't matter if he wanted to do the deal or not; he couldn't.  So, after agreeing I wanted it and that he'd hold it for the weekend, I set back home into the reducing rush-hour traffic.

Haul it Home, Eventually
I got up the next morning (Saturday) and called AAA to see if I could get a tow from Vancouver.  After I was assured that the wait time would be around 30 minutes, and to call back when I was with the victim, I set off back to Vancouver.  Unlike the afternoon before, the drive this time took 40 minutes, even with a detour down Columbia Blvd. to avoid a 2-lane wreck just south of the Interstate Bridge.  I re-contacted AAA at the car and was given a 45 minute expectation.  Perfect.  The owner and I exchanged pleasantries, money and forms, then pushed the car into the street.  I climbed into Dude to wait for the tow truck.  And wait.  And wait.  After an hour, I contacted AAA to see what was going on. and I was given a revised time of another 75 minutes.  Crap.  The alternative: hire another tow company and hope AAA would reimburse it.  By the time the tow truck arrived, I had sat in front of the old owner's house for 3 hours.  I gave the tow guy directions, explained my need for food, and we set off separately.

I only stopped for about 15 minutes to eat, but that was enough of a head start for the tow truck to get to my house, drop the car and leave.  Boo was there to catch it, fortunately.  She and I pushed 2dot0 into the garage so I could consider it's engine's health.

2dot0
The prior owner had told the tale of how the car had fallen into its current state.  It seems that the early February snow storm I mentioned in Front Bumper (part 2) played a major part in 2dot0's demise.  He had driven to the community college for class and had been wrestling for traction in the snow when a large white cloud of smoke came out from under the hood.  He quickly wheeled into a parking spot and killed the engine.  He figured the engine was seized and had the car towed home after the snow cleared.  Because of the weather, getting that tow was a long wait; way worse than mine.  He was unable to get the engine to hold water, so he gave up on it, bought a different car and listed it to make room in his driveway.

$40 Later
That's where we come in on Sunday.  I did the same thing he had been doing: pour a little tap water into the overflow bottle and see if/where it comes out: slightly behind the front driver's wheel.  With a bare hand feeling for where dry meets wet, I was reminded of my diagnosing issues with the cooling leaks on Hapy.  That was the moment I realized it was the same coolant flange which had stymied me with the bus for a year.  Off to O'Reilly's Boo and I went to get a replacement flange and G12 coolant.  On removal, we could see that the old flange had split at the collar almost halfway around the underside.  I put on the new flange, topped off with tap-water to verify the leak, and presto! no leak.  Now the real test: try turning it over.  It started right up, but it blew lots of smoke.  I feared a failing head putting oil into the combustion chamber.  Still, we pulled 2dot0 out of the garage and I took a test drive around the neighborhood. It ran very well.  Brakes grabbed a little bit, but the steering was sure.  The engine had some pep (for a non-turbo 2.0) and the smoke went away.

Get Legal
On Monday, 2 days after having the car hauled home with a "blown engine", Boo and I went out to dinner in 2dot0.  The following Friday (after getting insurance), I drained the water and filled the cooling system with G12 coolant and distilled water.  Then, embraced more risk with a drive down the highway to the DEQ.  We passed, though I hadn't filled the system entirely with coolant and the temp ran high on the way home.  We didn't overheat, though, and we found a shade-tree under which I was able to top-off the system safely.
This past Friday, I ran the paperwork through DMV and got Oregon plates.  Between DEQ, DMV and the parts at O'Reilly, I spent over half of what I spent on the car.  For any other purchase, that would sound really bad, but this was a $500 car.

Now what?
So, now we have another car in the stable.  The question is, "what do we do with it?".  With such a high-mile engine, top-end work is inevitable.  Maybe bottom-end too.  We decided that since it hadn't had the benefit of many miles of trust-building, it will be my 2-miles-to-work car when the weather turns rainy.  T will continue to drive the dependable TDI (Flash), and we returned Joan (really large SUV) to Boo's ex-husband.

That's it for today.  I'd heard of folks getting a really great deal on a car, but after buying and selling over 10 cars, I'd never had that kind of luck.  Until now.  The stories are real.  Since I was looking for a parts car, getting a working car wasn't on the radar, but that's what I got.  I'll post next time on how we resolved the parts we needed to get Flash looking better.

Monday, August 12, 2013

bum buh NAH!

In my last post, I talked about getting the coolant to stop dripping.  Today, I'll briefly cover the test flight.

Re-Assembly
rare August rain approaches
Sometimes, when you put a project back together, you almost know it isn't right.  The re-assembly seems to take a little longer, parts don't fit together as easily.  Its almost like the repair gods are trying to tell you "don't bother, you got it wrong", but we press on.  Other times, the re-assembly is flawless.  The hoses just line up, the parts simply click together.  The re-assembly of the bus after trying to fix the coolant leak ran the spectrum.  I got to where I couldn't trust the re-assembly ease as a barometer for when my repair was crap.  So, this time, when everything just fit (I didn't drop any fasteners, and the engine started on the first touch with the key, etc ), I didn't trust that nodding, "oh yeah" feeling.

Taking Flight
I didn't drive very far.  In fact, I didn't actually leave the neighborhood.  Amid cheers from the boys, I drove out the driveway, and down to the end of the street, turned around and backed back into the driveway.  All told, including just letting the engine idle, it took me 15 minutes or less.  The engine didn't get up to normal operating temperature, but in the past it didn't need to for the stream of coolant to appear behind the bus as I drove.  This time.. there wasn't a stream.  There were no well-spaced drips.  There was nothing but dry pavement... and more cheers.  This time from me.  "bum buh NAH!"  we have success!

Bath Time
afterbath
So, after so many months of not operating, the boys wanted to give Hapy a bath.  We played with the hose and some soapy water and then let Hapy sit in the sun drying for the afternoon.  All the windows were open, the pop-top open and they clambered around inside like they were half their current ages again.  There are few things like a microbus for a fort when you're a kid.

So that's really it for today.  I plan to drive Hapy to work a couple/few times this week (with the life-raft bike in the back just in case) to verify the cooling.  I'm very optimistic.  He hasn't been this dry since I first installed the engine with Justin's engine harness.  The boys are already talking about taking the bus to the mountain this winter.  Fortunes can turn that way, I guess.  I suppose I should start thinking about how we should carry skis and snowboards next :)

Thursday, March 28, 2013

Musings over an Open Engine

This week is Spring Break in Oregon.  I was fortunate enough to get the week off and my boys, so its been a week of play.  I'll post on our fun later on.  I do have a theory on the leaking bus, so I'm focusing on that today.  You see, I went out there to look at the engine with the access hatch open while sipping my morning coffee today....

Coolant Flange... What?
I installed a TDI engine from a manual-transmission'd NewBeetle into my '72 bus.  The manual transmission-mated engine has a weird flange coming off the head that includes some coolant warm-up plugs.  When this engine is mated to a bus transmission, and put into a bus frame, that weird flange really sticks into the fuel tank.  I solved that issue by swapping that flange with one from an auto-tranny engine.  I don't know why they're so different, but the 3 main connectors are there: one to route to the oil cooler, one to route to the heater and one to route to the radiator.  Also, there's the coolant temp sensor.  I have droned on and on about the temperature sensor.  I still think there's something wrong there, but I'll leave that for now.

Not It
I modified the auto-tranny coolant flange.  Even with the shorter imposition into the fuel tank, the outlet for the oil cooler banged into the bus frame.  So, I cut that one off, leaving a little material on the end.  I screwed a bolt into the hole and sealed it with RTV.  One might think that's where the leak is... but its not.  That spot has been bone-dry since day one.  In a recent post, I talked about tightening the flange to the head.  That is still rock-solid, so that isn't a leak source.  There's an outlet to the radiator.  That one is pretty big, and the route of the line takes a 90* turn towards the ground, and would usually route straight to the radiator.  In my set up, it hits a "T" where a small off-shoot goes to the oil cooler.  Leak site?  Nope.  The last outlet, though, may be our culprit.

Dumb Engineer Meet Unobservant Shade-Tree Mechanic
The outlet that routes to the heater is really nothing special.  It points straight out to the left (driver-side) and a hose runs to the heater core in the auxiliary battery area. What does make this outlet interesting is that there's no clamp holding it to the flange.  *face palm*  There is a clamp there, but its one of those awful new VW style ones that require a funky tool to open and close them.  I'm sure VW engineers had their reasons for creating these clamps, but I'll take a simple screw-based clamp over one of those things any day.  Anyways, I don't have that funky cable-driven hose clamp tool, and I apparently never got around to solving this clamp issue.  Tomorrow, I'll hit NAPA or similar and buy a clamp that fits.

If that clamp was the problem, this will serve as one more example of why you should do the job right the first time.  If you do "enough for now", "for now" will be just as short-lived as it sounds.  Thanks for listening-

Sunday, March 10, 2013

Couldn't Stand the Weather

Car stuff today.  Brief?  Is it ever?.  Complains about no garage?  No, actually.  I have to remind myself that owning cars that are over 10 years old with more than 150k miles on them requires owner responsibility.  In that spirit, no complaints; just doing.

Silence Canyon at the pull-out.
Note the snow line in the trees
Cold Shot
While I was getting Flash back from Johnny, he pointed out that the he (Flash) still didn't want to start first thing in the morning.  I thought it had something to do with the vacuum lines.  So, I spent the beautiful Saturday afternoon re-running the vacuum lines.  Some folks may not see that as a perfect Saturday, but it was in the low 60's (F), sunny and the birds were out.  I have evidence of that last part on the side of Flash, but I digress.  Some of the vacuum lines were original.  Yikes.  Most seemed okay, but I replaced them anyway.  I needed about 8 feet of 3mm and 7 feet of 5mm line to do the job.  I have a few extra feet of the 3mm after over-buying.  Anyway, the cold-start trouble persists, so I'll be hitting the interweb (read:TDIClub) for clues.  No codes, no smoke (except on that cold start) and Flash runs fantastically otherwise.

Couldn't Stand the Weather
Sunday (today) was a day for the bus, and a change in the weather.  I mean that both ways.  The clouds rolled back in, dropping spittle-rain this morning.  After running T over to a youth group meeting in Flash, I decided I'd give the bus a go for the pick-up trip.  Remember, that I hadn't taken a test drive to verify whether I'd actually fixed the leak, but I felt pretty confident that I'd nailed it.  He started on the first try.  No real hesitations, but he was chilly.  The drive over was an exercise in getting the gears all slippery.  Shifting was stiff and he wanted to pop out of second.  I sat with the engine running in the parking lot while waiting for T to appear.  He was out of sight, but apparently heard the rumbly rumbly and tore around the corner, beaming.  e knew exactly what I was driving.  As we pulled out of the parking lot, he asked, "how's he driving?".  I responded with driving the bus like I stole him (well, as much as you can with a microbus).  "Zippy," T said.  At this point, the engine temp finally got high enough to trigger the thermostat and allow coolant to really move through the flange and into the radiator.  The temp climbed to 196* and crawled back down.  It see-sawed from 188* to 194* from then on during the drive home.  We stopped to look at the house we had tried to short-sale purchase last Summer.  We saw a puddle forming under the bus and knew then that the "fix" wasn't.  Back to the condo we went, a little dejected after such a promising start.

germane to nothing, it's a Nutria 
When the House is a-Rockin' Don't Bother Knockin'
As we pulled into the parking lot of the condo complex, I noticed the neighbor walking towards our parking spot.  Now, this neighbor isn't one of the condo folks.  He lives in a house that shares the property line.  In front of his house are parked many cars (some volksies).  They split and sell firewood.  They build and sell picnic tables.  There are always one or two folks out front, and a radio is always playing alternative radio.  Modern hippies?  Maybe.  Anyway, one of the guys who live there walked over and asked if we (T & I) could solve a debate.  Apparently, they heard me drive off, and that sparked a whole debate about whether it had a diesel in it or if it was just tuned crazy.  Big smile.  I pushed back the matress and the engine hatch I cut and watched is eyes bug-out.  LOL.  Made my day. Apparently, he and a bunch of folks he knows are mechanics and they specialize on VW's.... mostly the older ones, but they work at a shop I know if (omitted to protect everybody).  I encouraged any one of them to stop on by if they wanna see the crazy TDI-powered microbus.  I added, "if they wanna elp figure out the coolant leak, I live right there (pointing)".  :-D  I'm no dummy, and I'm tired of trying to isolate the leak.

That's it for today.  I'll revisit the leak next weekend.  Hopefully, I'll have a few extra pairs of hands around, even if they're just there to talk and point and drink beers.  To avoid the questions, I spotted that Nutria in the picture on my way into work as I passed a water hazard / green space.  If you've never seen one before, it was big, like a 16" long body plus a nearly 10" tail, nibbling on the grass.  Sometimes Mother Nature is just plain weird.


Monday, February 6, 2012

Mopping Shop and Eating Crow

Being Monday, today is all about updating what happened over the weekend.  I was able to test drive the bus,  take a run at the mountain, work on the cooling system some more and even watch a little football.

Mopping Shop
Well, as you may expect from the sub-heading here, the test drive got a little, uh.. wet.  Like my prior attempts to drive the bus, I had all the usual trappings.  Everything seems fine, and then its not.  I started him up, checking for leaks and for air bubbles in the overflow bottle.  Nada.  Then, I drove the bus down to the local 7-11 and picked up a celebratory beer.  Drove home.  By the time I got home, the engine was warmer, and the coolant started to leak.  I parked him in front of my place and like a nervous puppy, he formed a puddle underneath.  Drat.  I proceeded to mop the garage floor where he is usually parked and backed him in.  I slid a pan under the drip, went upstairs with my now-conciliatory beer and watched the Blazers beat the tar out of Denver on tv.

View of Mt. Jefferson
from the top of Magic Mile
Timberline Shines
I awoke to an alarm on Sunday morning, triggering a day playing in the snow.  I grabbed Boo, met my brother in Hollywood and made it to Timberline Lodge by 9:30.  We figured the resort would be less crowded on StuporBowl Sunday, but there were still quite a large number of folks there.  The weather was absolutely fantastic: sunny with a slight wind.  It was cold enough to stave-off the melting but warm enough so you didn't need lots of layers.  Perfect weather.  The snow was pretty packed, but there weren't many ruts and the groomers had churned enough to keep the top fresh.  Everything except the Palmer Ice Sheet was open, though the Magic Mile trails were pretty icy (making them fast and easy to catch edges).  Alpine, Thunder, Glade and Kruser were really good runs, with plenty of open space between folks.  The terrain parks were jammed, but I avoid those anyway.  We played until around 2 when we packed off back home.

Dinner of Crow
I dropped my brother and Boo off at their respective homes and hit the parts store for an o-ring.  I'd come to the conclusion that the leak was caused by an o-ring failure, not a human error.  I got home and my legs declared they were too tired to do anymore.  So, I snapped on the game.  Boo and I stopped for a quick bite at one of our regular spots (Mandarin Palace on the corner of Allen & Scholls Ferry), and I saw the 1st quarter there.  It seemed like it was a decent enough slow-start StuporBowl.  By the time I got home with my o-ring, got my snow stuff into the laundry and the game back on, it was nearly over.  Yes, that was an amazing finish to any football game, and it being the final game of the year makes it all the more impressive.  I watched the post-game interviews and swallowed my crow.  Maybe I'll try to watch the game next year.  It sure would be nice to see a West Coast team in there, though.

More Cooling Surgery
After the game, I took my new o-ring and swapped it into the bus.  This time, I did things a little differently.  First, the o-ring is a little oversized.  The stock part is metric, but all I could find was one in imperial sizes. So, rather than 3mm thick, it is 3.1mm.  Instead of 20mm inner diameter, it is 19.6mm.  You get my point. As a result, the o-ring was snug on the temperature sensor and snug in the flange.  Once the c-clip was back in place, I couldn't wiggle the sensor at all.  I contrast that with the ability to wiggle it enough to make it leak before, and I think I've found the leak source.
Second, I captured the coolant differently.  Rather than try to drain coolant, I caught all of it at the flange during the sensor removal.  Take a clean kitchen garbage bag and push the closed end down from the flange towards the ground.  Wrap the open end around the flange and remove the c-clip.  Pull the sensor and all the coolant goes into the bag.  Put the new o-ring on the sensor, install the sensor and pour the coolant back into the overflow bottle.  In my case, the coolant bottle didn't drain during the work, so I had to start the engine to circulate the air bubbles back into the bottle.  Then, I re-filled it from the bag.  Neat!  And no mess!

I'll test drive when I have some time this week.  Like every other time, it feels like I have it fixed.  We'll see. Maybe this time I actually found and fixed the problem.  Thanks for following along.  More next time..

Wednesday, January 18, 2012

Reality Strikes

As optimistic as my last few posts were, there just had to be a reality check.  Unfortunately, it came in the form of a coolant leak on Monday, so the trip to the mountain for MLK Day was scrapped.  I'll explain that today.  I haven't gotten around to looking at the problem, but I have a theory.  I'll hit that at the end.  First, a quick snow update from Saturday and the state of C's concussion.

Saturday Sliding
looking up the Multipor lift
The 6 of us (Boo plus boys in one car, me plus my boys in another) hit Mt. Hood Ski Bowl on Saturday for some afternoon and night skiing.  C, of course, couldn't slide because of his recent concussion.  He spent the day in the lodge with Boo's younger son (K2) playing on a laptop, playing chess and by the end of the day, making a snow-fort outside the lodge.  C's concussion symptoms are completely gone and he's back to his old self again.  The snow on Saturday was probably the best I'd seen all season.  Fluffy, yet quick, so you could get some good speed going, but if you took a spill, you had a nice soft powdery landing.  The lifts and slopes were not that busy.  In fact, look at this picture.  There was no one on this lift except us.  Nothing but empty chairs extending into the falling snow.  Even the run under the chairs was empty.
The cafe and Beer Stube were busy, though, because of the NFL playoffs.  I found that a little amusing, actually: drive 2 hours from home through chain-required conditions to watch a football game on tv.  I admit I watched the end of the Saints-49ers game while having a pint, but I spent the rest of the day and night on the slopes, eating up that powder until my legs couldn't take any more.  It was fantastic.  I'll be up there again this next weekend.  Maybe I can get the bus fixed in time... which leads me to the reality check....

My Outlet Flange History
If you've been reading this blog a while, you'll remember the troubles I've had with the coolant outlet flange on the front (pointing towards the front of the bus is "front") of the engine.  This flange attaches to the cylinder head where the valves live and allows for the passage of coolant from the engine out to the heater core, the radiator and the coolant bottle.  There's also a little coolant temperature sensor in there that connects to the engine harness that I've had all my troubles with.  I don't recall how much I complained about the difficulty in getting the coolant sensor in-place and the harness clicked into it.  It was a real PITA.

Flange Drives Tank Design
This area at the front of the engine is also the cause of the modification to the fuel tank.  The flange sits just above the bellhousing where it connects to the bus frame and it juts into the space where the fuel tank is.  So, getting your hands in there for maintenance can be challenging.

Flange Placement
sensor for ALH TDI engine
Last, the way the coolant sensor is set in place in the flange is a bit strange.  The sensor is about an inch long with the 4-prong plug at one end and a bronze post at the other.  The bronze post extends into the passing coolant, collecting temperature readings.  Between those 2 ends is where the trouble lives.  First, an O-ring needs to be placed around the wider throat of the sensor as it sits against the opening in the flange.  Then, the sensor is held tightly in place while a "U"-shaped plastic holder (U-clip) is set into the slots in the flange.  Getting all of this to work is much easier when the TDI engine is in its more native placement.  In my bus, this 3-handed job is performed while hanging over the top of the engine with your hands slipped between the engine and the fuel tank.

Leaks
When I swapped out the original harness for the borrowed one, I had challenges getting the everything right.  The coolant sensor was a real bear.  I had leaks.  I broke a U-clip, lost another one.  Lost a washer.  Then lost another one.  Finally, I got it all together, and I was able to drive around eventually.  When I swapped my original harness back in, I had some challenges getting the harness to reach properly.  I didn't really think about what the impediment was, I just worked it and worked it until I had enough cable to make it, and then clicked it together.  My test drive seemed fine, but I ended up low on coolant.  Later, there was what looked like water on my garage floor, but I chalked it up to rain.  Once I saw the puddle form under the bus at the gas station, though, I knew there was a leak, and the ski trip was off.

Cause Theory
What I didn't think about was the stress I placed on the sensor trying to get the cable to reach.  I believe that effort affected the sensor such that the U-clip no longer is holding the sensor flush against the flange.  I think the stress of the cable effectively pulled the sensor out enough to allow coolant to escape.  The sensor location is the epicenter of the leak, so this theory does seem reasonable.

I'll be digging into this tomorrow night after work (and a trip to the gym).  I hope the U-clip is undamaged.  I plan to remove the sensor, re-seat it, re-clip it and test for leaks.  I need to re-route the harness to eliminate the stress as well.  I wish I had a trip report instead of another "guess what I found" post, but that's what happens on this adventure.  Thanks for following along...

Sunday, October 4, 2009

Fuel done, starter done

I looked back at the post I did about a month ago (school starts) where I listed the critical things that needed to be done before the rains hit. Today, I'll check things off that list, and set the stage for the Fall.

1 - Engine Mount
Hal got the tower a little closer to completion, but the dog bone work hasn't started yet. I think he still has most of the 8 hours of work remaining. The tower was reinforced with another upright (in the middle) instead of a plate. Hal's thinking is we want direct access behind the tower, so a plate would have gotten in the way. He spent some time closing off the ends of the uprights so water doesn't get in to rust from the inside. I think its ready for paint. I shot the support bar with some black paint I had lying around. Its kinda glossy, but it doesn't really matter where its going. I'll use the same paint on the tower so it'll look like it belongs. We have the dog bone to do still. Not sure how long that will take.
Estimate: 6 hours.

2 - Fuel System
The tank was welded up and re-installed. The filter has been mounted to the side of the engine compartment. The return line was tied into the tank this afternoon, and the feed line was connected as well. I put in a primary filter from a Mercedes to reduce the filth in the main (read: expensive) TDI filter. Hopefully, this will cut down the replacement frequency a bit. All told, the fuel system is effectively finished. I will have to deal with the fuel level sender when I get to secondary electrical, but as far as dealing with the fuel itself, this is actually done.
Complete.

3 - Vacuum System
The vacuum pump is in, and tied into the system. The vacuum ball is attached to the bus and tied into the system as well. The brake booster was just hooked up, but the remaining openings (waste gate, air cleaner) need to be blocked off for winter. I'll get to that later this week after work on Thursday or next weekend. No hurry on this.
Estimate: less than 1 hour.

4 - Primary Electrical
I got the starter in today. Connecting the electrical, and the hot-start relay still needs to be done later, so that estimate is the same. I need a primary positive battery cable, and I'm assuming it needs to go from the battery to the starter directly or at least somewhere near the starter anyway. There's a cable coming off the ALT that looks like it is supposed to touch the "+" of the battery too. I'll have to spend some time with the Bentley or my Jetta to see where the thick cables go.
Estimate: 2 hrs, but not needed before Winter.

5 - Coolant System
The water flange is in, but I haven't done any planning for water routing. I have to tie the oil heater/cooler into the system, but, otherwise, I should be able to go along the "stock" Mexi-bus paths. Hal found a guy in SoCal that has a legal watercooled Mexi-bus and he got a bunch of pictures. We'll see what we can get about the cooling and heating systems from those pictures. At this point, knowing how to route the water forward of the engine to the mid-section of the bus would be sufficient.

6 - "Engine holes" -or- little things
The turbo is back in, the oil cooler is back in. Basically, all I need to cover up is the intake, turbo intake/exhaust and the water system openings. Easy stuff. I got the clutch cable connected with some shims for the bowden tube I found in a box of misc hardware. We got the rear engine lid strike-plate back on, so the door closes and latches again. I need to turn the bus around (pushing) so at least the rear-end is not where the puddle forms. There's a dump run I have to do before I can put Hapy in his spot next to the garage. Fun fun fun.
Estimate: less than a day, but pushing that beast so he's facing the other way could be a real bear.

Next steps:
I'll be focused on getting Hapy turned around and the junk hauled to the dump. After the dump run, Hapy will go into his spot along the garage. The vacuum seals and the "holes" get dealt with next. Then, after some more research, I'll switch over to the water system.

Monday, September 28, 2009

Roll ready

No, not ready to roll in the 'under its own power' sense. But, Hapy is now set up enough for me to roll him off of the main driveway (where the rainwater pools) up a slight incline to a cement pad next to the garage. Sure, from the outside this sounds like a "shrug" of a post, but it is significant:

I won't lose the Winter.

Pushing Water Uphill
If you aren't familiar with Northwestern Winters, then you really haven't experienced incessant rain. I've lived in other parts of the country and when they see steady rain, it lasts for a couple/few days and everyone starts getting antcy. Here in the Great Pacific NorthWest, 2 or 3 days of steady rain could happen during the Summer drought. Steady rain here is up to 30 straight days of measurable precipitation. So, getting the bus where it won't sit where the water collects is a big deal. Next to the garage will be well drained, on the lee side of the prevailing rain direction, under a tent thing, closer to the tools, light and power in the garage, and last: a portable heater will actually warm the work-space.

Progress
I got a lot done on Sunday, and Hal nearly finished out the rear mount. Starting with his work, he was able to get the rear mount adjusted into place, and the final set of bolt holes set. The rear support bar was then removed for paint. We decided that the tower (hollow box) could be further supported / cross-membered by welding a plate onto the rear (FIF) of the tower. As I consider how that will look, I'll have to think up something interesting to paint there. Maybe a smiling sun or something non-commercially iconic. Hal also got the fuel filter bracket mounted to the right side of the engine compartment using a little bracket extension he fab'ed. We talked about integrating the fuel return line, but we didn't hit on a solution.

On my side, I did the little things under the bus to get it ready to move. This included getting the shift linkage and CV joints (axles) re-connected to transaxle. Though that sounds very little, it took me a couple of hours because the shifter and transaxle hadn't seen each other in, like, 2 years. I got a bunch of other things done before Hal arrived, like removing the masking on the turbo and reinstalling it with new gaskets. I got the vacuum ball installed (with original bracket), plumbed into vacuum system and the vacuum pump plumbed in. I still have to integrate the power brake booster, but that should be relatively straightforward. There's a picture here showing how it tucks nicely under the westy cabinet on the left side of the engine compartment.

Last, I got the water flange in. This took a little more modification, unfortunately. I had to cut off the bib on the bottom of the flange as it hits the floor of the fuel tank bay. I tried cutting just part of it off, but there really wasn't space for a hose to connect once I got it down to where the flange would fit. There was maybe 1/4", and that included that thick ring right where the flange and the bib meet. I figure I can run a short section of rubber hose to a metal line that has a bib threaded into it. I can only think of one drawback to this: the original location was at the intersection of the cabin heat circuit return and the radiator return. This would expose the oil:heat thing to the cooling benefits of both systems. My bib solution would only expose the oil:heat thing to the cooling benefits of the radiator. I'm not sure if this matters, but its worth noting.

Next up:
connecting clutch cable, shooting the paint on the support bar, installing the starter. After that, there's primary electrical, the cooling system, etc.

Pictures:
top - distance from fuel tank to vacuum pump. Its just over 2-1/2".
botom - vacuum system. air cleaner, waste-gate still need to be tied in.