Showing posts with label seal. Show all posts

Tuesday, March 10, 2026

Hapy Drives Again

It has been a long 18+ months without having a member of our family kicking around with us. But, Hapy is one injection-pump re-seal away from daily-driver status. Today, I'll go through the last little things. Again, my regrets for not taking many pictures. I have been away from fixing and blogging so I have fallen out of the habit of snapping a picture while I'm doing the doing. Also, I got hit by whatever flu thing that's been going around and was flat-backin bed-ridden for the last 3 weeks.

Clutch Adjustment
post-test drive
I touched on this at the end of my last post. I had to add an extra small spacer at the end of the Bowden tube as well as on the very end adjuster. To be fair, I really didn't need the one on the adjuster, but I would would not have much adjustment thread left if I hadn't. I ordered a replacement clutch cable and when it arrives, I will keep it under the rock-n-roll bed until I get to replacing it. I expect I will replace that cable relatively soon, but I want some fun drives before I take him off the road again, even to do something that I could do (and have done) on the roadside.
 
The standard adjustment advice is to shift the tension on the cable as felt by your foot on the pedal such that there is no engagement until the pedal has moved a good inch down towards the floor. This prevents premature wear on the clutch and/or throwout bearing. You don't want the throwout bearing riding on the clutch spindles all the time. That's noisy and introduces premature wear. What I did not recall from prior clownings on the cable was that the arm protruding from the transaxle would have so much play in it before the throw-out bearing touched the pressure plate at all. I recall it practically resting on the pressure plate, but my memory is not reliable. Anyway, I felt that the arm needed to press against the spring a little bit to get the adjustment correct. As I think on it now, that spring being engaged is what holds the clutch pedal all the way up so it's right. It just felt foreign. Honestly, it has been so long since I worked on Hapy, lots of this work has felt unusual.
 
Tail Light Show
Bowden Tube pic from theSamba
The tail lights were acting really strange prior to my first intended test drive after getting the clutch sorted. I start assessing the lights rather simply: run the hazards first. Since no other systems are involved, the blinkers ought to all light up together and turn off together. The left (driver) side was lighting up opposite from the others. When I added in simple running lights (still no key in ignition), the tail lights were a light show of blinking. I had initially thought that I did something funny with the reverse switch, but that is a simple dumb switch that allows 12V through when the transaxle is in reverse. So, I ruled that out. I concluded that the ground for the light fixture was poor, weak or virtually non-existent, causing the 12V to seek a ground though alternative paths of other not-illuminated lights, causing them to light up.
 
Getting into the Cavity 
The left (driver) side tail light is hidden behind a panel I added to offer colder air to the engine (See VW Bus Cold Air Intake). I had forgotten how much of the ugly TDI wiring was also hidden back there when I removed the panel. Anyway, first, I disconnected the cold air pipe at the last rubber coupling before the turn into the hidden cavity under the spare tire well. Then, I removed the 4 nuts holding the pipe flashing, and removed the air filter "assembly". While this was out of the bus, I thoroughly cleaned the air filter and shop-vac'd the cavity. With the air filter out of the way, I removed most of the screws holding the panel in place with a slotted screwdriver and bent the panel out of the way to access the tail light assembly.
 
Grounding
left side panel under spare
Immediately after sticking my head and a small flashlight into the space, I spotted a ground that had fallen off the grounding tab on the rear next to the light assembly. I popped that back onto the ground tab and tested the lights. There was no noticeable impact, but those grounds were probably used by something, so some other issue just got resolved.

I decided to add a ground directly from the metal back-plate of the tail light assembly to the unused grounding tab next to the one I had just resolved. I added what I call a "chair" tab splitter (because it looks kinda like a chair), that turns one tab into 2, to the grounding tab on the rear of the tail light. I re-attached the existing ground to one side of the "chair" and added a short brown wire to the other side, connecting it to the unused tab on the rear body. I then retested, and the crazy light show was over, and the left tail lights were much brighter. So much so, that I decided to add a ground the right side tail light, in hopes of balancing the lights.
 
The right (passenger) side is much easier to access on Hapy, but probably harder for anyone without a cold air intake cavity thing because the battery makes things tight. Unlike the left side, I disconnected the light fixture from the bus and hung it out the rear while I worked. I basically did the same thing as I did on the left/driver side: chair splitter, used an unused nearby grounding tab. Once reassembled, the left side did not see as significant an improvement, but I think the original grounding wire is shared between the lights so the right side was already getting benefit from what I did on the left side before I started messing with it, I just hadn't noticed during the left-side test.
 
Test Drive
At this point, I felt that I was safe enough to travel on a shared street. So, I backed out of the shop, down the lane-way and out to the street. He easily went into 1st gear and away we went. I did not have the little UltraGauge plugged in, choosing instead to use my senses to vibe the test loop. Hapy ran great. Power on demand at my foot, easily shifting from gear to gear, and getting into 4th but only barely before dropping back down. He still popped out of second when I quick-decelerated, but it was not as immediate and on a light decelerate he stayed in gear. So, there's some improvement there; I did not expect any. The exhaust was much quieter; I think some of my "wow this bus is loud" that drove to all the sound containment may have been at least in part from the broken exhaust-to-muffler joint. Facepalm.
 
The drive was not without its issues, tho. While the cooling fan and intercooler fans both came on by the manual switch, the intercooler fan was louder than I remembered. This could in part be because I couldn't hear it over the exhaust. Also, the noise of the turbo through the right cooling "ear" (behind the rear-most right side window) was unexpectedly loud. Again, this could have been masked by the louder exhaust and isn't really a bad thing. In a way, it's kinda cool and I can't hear it from inside the bus. Its only when walking around it did I hear any of these things and none of these are deal-breakers or send-him-to-the-shop things. I did notice that the dual-gauge I installed during the CoViD lockdown was acting funny (See Oil Temperature and Pressure). The pressure rose to the top and never came down and the temperature basically sat just off the bottom. I figured either the wires fell off on one end or the sender went bad.
 
Fixing Oil Gauge
left nut missing
Having the UltraGauge is great, but I really prefer just using the simple dual oil gauge. I can see if the temp is getting too high without a digital readout changing every few seconds. In fact, I have a VDO coolant temp gauge in my stuff somewhere that I have thought about adding into the dashpod and then I really wouldn't need the UltraGauge anymore. Anyway, solving the dual-gauge was fairly straightforward, starting with the engine-end. I figured that I did lots of moving things around, so simply disconnecting and re-connecting those wires to the sender would remove that variable. One quick peek, and clearly that was the problem: one of the M4 knurled nuts had shaken it's way loose and completely fell off. I ordered a set of 5 (the smallest set I could find not on amazon, and it still cost, like $15US). When I installed, I put some blue locktite on there so these don't shake off either. I was very grateful to not have to open the dash.
 
Diesel Leak Persists
catching the leak
Two years ago, when Hapy first started having hard-start issues, it was a fuel leak coming from his injection pump. Back then, there was literally fuel flying all over the engine bay. I spent time getting the top-end of the pump sealed, and that resolved the flying fuel and most of the hard-to-start issues, but it was during those months that I ground down the ring gear, putting us on the last 18 month trajectory. Also, I continued to lose prime in the pump, but without visible leaks. Now, I can see the pump dripping on the ground. So, the seal between the body and the head appears to be the problem, and its getting worse. I ordered a replacement deluxe kit from DieselGeek. Rather than do that seal myself, I have asked our old friend Justin (OldPoopie) to do it for a couple of reasons. First, he does these all the time, but more importantly, he has the computer bits to really get the timing spot-on. I expect that once the pump has been re-sealed and the timing set, Hapy will be a monster.
 
Well, that's it for today. Justin is super busy, so it will be a month or so before he can get hands on Hapy. In the meantime, I will be shifting focus onto doors for the shop, we have some house projects to chase and maybe I will be getting my hands on Oliver, the 1978 MGB. It feels like nice weather is not too far away, and taking the MG on a picnic run with Boo would be awfully sweet. Thanks, as always, for following along- 

Tuesday, July 23, 2024

MGB - Side Draft Carb fun

Today, I return to the little British car: our 1978 MGB, Oliver. Oliver has sat unused for too long. I had been having considerable and increasing trouble just getting him to start and run. So, earlier this year, I removed his carburetor for dis-assembly, cleaning and re-assembly. I did the removal and tear down what feels like months ago, and just completed the re-assembly. So, while this post may feel like a couple of consecutive weeks of fun, it's really a little from March, a little from June and a little from last weekend.

Removal and Tear Down
re-assembled
As is the case with most things on a small car, removing parts requires some flexibility not needed for larger cars of this vintage. Still, removing a carb is not complicated, but I encourage you to take pictures. If your life is anything like mine, you may intend to be back to this in a few days, but days can become months really fast. Anyway, remove the air cleaner. Remove the fuel line (pinch it off first and then plug it). Disconnect the throttle and choke cables. Then remove the carb from the intake. With the side-draft weber (DCOE) and this SK Racing/OER carb, it is held to the intake with 4 nuts threaded onto studs emerging from the intake. The DCOE and SKRacing carbs use the same intake, by the way. Once removed, I stuffed rags into the intake to prevent critters from climbing into my engine, closed the hood and re-covered him. I took the carb over to a bench in the back of the little garage attached to the farmhouse.

At the work table, I started with the most obvious things and worked my way inward. First, the inspection cover and top half of the carb was separated from the main body. I removed every slotted bolt and whatever lay beneath, taking pictures as I went. Last from the top were the air correction jets and then I removed the set screws that held the venturi to the main body. The main body was effectively disassembled, so I shifted to the top half, removing the float, the fuel inlet bits and the choke bits. Last, I pulled the little cover or plate that faces the intake when installed. I am sure someone who does this often would have done it faster, but I needed to chronicle it so I could re-assemble later.

Carb Cleaning
remove from car day
I started like most folks probably do: shooting the carb with rattle can carb cleaner and gently scrubbing it with a toothbrush. I focused mostly on the exterior with the brush and let the carb cleaner do it's magic on the little holes without brushing. Satisfied that I got the worst of it, I pulled out a razor blade and removed all of the gasket bits and rubber seals. Then, put together a ultrasonic cleaner soaking tank with solution designed for carbs. I had read online that some folks will use Simple Green or other things, but I figured the correct solution was far less expensive than a replacement carb in the event those advisers were wrong.

The cleaners, well, the one that I got, but from what I read, many of them have a setting to warm up the solution while doing the ultrasonic. From what I read, there was some level of concern about how well they actually maintain temperature and that sometimes they can run the solution too hot. Since the solution is concentrated (read: need to add water), I decided to use boiling water and when poured into a room temperature solution, the overall temperature would be sufficient. I ran the carb body and all of it's pieces in the ultrasonic cleaner for multiple 20 minute cycles. Once I was satisfied that the carb was as clean as it was going to be, I moved it and the parts into a bucket and rinsed them with water. I then set everything out in the sun to dry.

Rebuild Kit
great kit
Unlike a Weber DCOE, the SK Racing/OER carb is not exactly common in the US. It is not generally sold here; it is much more popular in Japan. So, finding a rebuild kit for an obscure, foreign and old (time is relative) car part was time consuming on it's own. I was able to find a single supplier of a kit, a person in Japan with a storefront on eBay (Bprojects Japan). While I have a healthy skepticism of eBay sellers, deals and parts, I really had no other choice. The kit I received was incredibly well set. It included the major gaskets, replacement air correction jets and springs, new crush seals for the pump jets, a pair of ball bearings for the "pump non-return", a pair of copper crush seals for the fuel inlet and a big collection of rubber o-rings. It really had everything except a manifest indicating what part number each bit was for and the gasket for the jet inspection cover was missing. At this point I realized that I took pictures of the disassembly, but failed to take pictures of the rubber seals as I cut them off.

Re-Assembly
view from firewall
With my laptop open to the SK Racing carb manual, and my phone open to both the pictures I took and a blurry exploded view drawing of the carb, I started putting it back together. I started with the last picture I took and worked by way backwards through them. The only step I took that I had to undo and do again was the placement of the gasket between the top half and the main body. I had assembled the float, but the gasket needs to set above the float, which had I thought about that for a second, it would have been obvious. The float did not fit in the opening in the gasket, nor does it ever need to along its travel path. Also confusing was where the pair of ball bearings and small rectangular rods went. Process of elimination worked well here, choosing to do other things until it was apparent what hole those dropped into.

I used liquid gasket-maker for the jet inspection cover. That stuff makes a dark sticky mess. The instructions on the bottle say to let it dry "for a few minutes" before putting the 2 pieces together which need a gasket in between. I let that sit for well past the recommended few minutes and it was still very wet.. and even after letting it sit in the sun the stuff didn't dry very much. So, I did everything else install-wise and add the inspection cover dead last.

While I had the carb in hand, I decided to add a heat shield to the underside. The header that I installed has a thermo-barrier powder coating on it, but I know from having the hood open after driving it that a ton of heat is still getting into the engine bay. I suspect the source is the header (or the radiator), and the best thing I could do for the carb is to help prevent heat from getting to it. So, I got a DCOE carb heat shield from Pierce Manifolds. The mounting bolt pattern is designed for a Weber DCOE, but the SK Racing/OER is exactly the same in this area. The venturi maintenance holes line up, the cut-outs for the intakes, etc. it all just lines up. The heat shield is heavier and thicker than I expected, but I expect it will do exactly what it is intended to do: block and route-away heat rising from the exhaust.

Install
re-install day
As easy as the carb was to remove, installs always take longer. This bugger was no different. First, the carb mates to the intake with these thin (maybe 6mm thick?) plastic isolator bits between the carb and intake. On each side of the isolator resides a rubber O-ring that is set inside a groove. So, you are managing a carb, 2 isolators and 4 O-rings at one time. That required some dexterity.

I discovered that the heat shield has a small tab on the intake side that would hit the center header pipe. Recall, the MGB has a Siamese head, so the middle 2 cylinders share an exhaust. The PO had a home made exhaust manifold with a center pipe effectively pointed straight down. The header has a more typical curve. So, the heat shield came off and I adjusted that tab to point angled upwards so it did not hit the header pipe, but actually will shield the top-most end of it. Then, I realized that I could not address the lower mounting studs with heat shield installed so I removed it again, re-installing after the carb was nutted down into the intake.

From there, the install was about what you would expect, complete with a dropped bolt under the car. I had to reverse the spring-return arm on the carb as well as flip the fuel inlet. Still, it was relatively smooth, hooking up the fuel line, control cables and air filter.

No Test Fire
By this time, I had sweated my way through most of a summer afternoon and cleaned liquid gasket maker off my hands more times than I'd like to count. As much as I wanted to enjoy the sound of the engine running, I chose instead to take the limited win: Oliver was in one piece. Boo and I went to the county fair instead of test-firing Oliver's engine. Now, Oliver is covered back up, again waiting for me to have a few hours to test fire his engine and fiddle with settings. I sincerely hope the tear down / deep cleaning was what he needed. I'll post an update when I have one.

---

That's it for today. Thanks, as always, for following along-

Tuesday, March 12, 2024

Diesel Dumping Discontinued

In my last post, I discovered that the injection pump was leaking fairly badly. Today's brief post covers my replacing the 2 top seals.

Symptoms
If you don't open your hood very often, especially while the engine is running, any leak may not be obvious. With the engine under the rear deck, and the rear deck often having stuff on it, I hadn't seen the leaks evolve. On my last few drives, I had smelled diesel fuel, and I had made a mental note of it. Honestly, I thought it was related to the now-not-operational furnace which still had a diesel line filled with diesel running to it. I suspect I fueled with something which was not B20 and that caused the seals to shrink. Recall, I wanted to run the air out of the new heater so I popped open the rear-deck engine lid (I cut in years ago) and fired up the engine. I walked to the back of the bus and could see fuel dumping down the sides of the injection pump. I dashed to the driver seat and turned off the engine. Returning to the engine bay, I added coolant, but tried to figure out where the fuel was coming from. It looked like it was coming from the black plug on the side, and maybe out of the edge along the top on the opposite side. The top seals had finally shrunk to the point of being compromised.

DieselGeek
There are lots of sources for seals and seal kits, but IMHO, the best is from DieselGeek (like here). The operator is a TDI owner and only sells things he actually uses. His opinions are highly regarded on Fred's TDICLub forum too. The kit is complete; and you will want to include an anti-tamper socket (here) to get that one fastener removed. His product page contains a link to a complete how-to (also linked here) that will take you through the process. Since it is so well documented, I will not repeat it here. I will only highlight things that I discovered that either differ or underscore that documentation.

Clean and Mark Pump Location
After ordering the kit, I went out to Hapy and cleaned outer case of the Injecion Pump with degreaser. I paid special attention to the seams where the seals would be replaced. Once clean and dry, I applied the JB Weld (as instructed) on 2 corners of the pump covering the lower seals both above and below. This will allow for a more precise re-location of the pump after the lower seal has been replaced. I also took a chisel and made a clear mark that crossed the seam. For good measure, I added lines with a Sharpie. Although diesel fuel can remove Sharpie lines, I did not suffer that fate.

Top Seal
Following the instructions, I replaced the top seal first. Before I started, I wrapped the Injection Pump below the lower seal with a ratty old towel to capture spilling diesel fuel. This turned out to be an unnecessary precaution, but when I need to replace these seals again, I will do the towel wrap again anyway. Better to be safe. I left the return fuel line attached and tilted the cover far enough so I could reach the old seal. With a watch-repair slotted screwdriver, I picked out the seal. It looked fine, but I did notice that it was practically flat with the edge of the cap, so I could imagine how it could be leaking. Once removed, the groove was perfectly clean. I gave it a cursory pass with a paper towel anyway and the new seal slid in perfectly. Before returning the cap to the pump, I noticed some gunk buildup on the black-plug side so I carefully scraped it off with a razor blade and then wiped it clean with a paper towel. It is little things like that which can prevent a complete seal.

Bottom Seal
The lower seal is a little tricky, but, again, the instructions were spot-on with only one exception: The Torx bolt holding the corner directly below the fuel return may not be easily addressed, depending on your tools. The picture below-right illustrates the issue. My Torx socket fits a 1/2" ratchet so it's rather thick. It is also kind of stubby, so the socket itself needs to occupy the space where the fuel return is. So, either have longer throw Torx sockets or do what I did: Remove the cap to remove and install that once fastener. Yes, that's a pain in the butt, but I found no alternative other than loosening the banjo bolt, and after the power steering debacle with Flash all those years ago, I want nothing to do with a banjo bolt if I can avoid it. I just went looking for the post and I can't find one. I can't believe I didn't post on the saga of replacing Flash's steering rack, like, 10 years ago. The banjo bolt was nearly the death of me; my thumb swelled up from applying pressure to get things bolted together... it was a nightmare.

Similar to the upper seal, once the unit was unbolted, the TDIClub documented process was spot-on. Even the "smack it with a bit of wood to crack the JB Weld worked as written. I did not remove the hose from the fuel return line, however. I just tipped the unit back far enough to remove the seal without fear of something dropping into the top of the pump. I also found some gunk build up along one side on this piece, like I did on the cover. So, I did the same thing: slowly scraping it clear and then cleaning the metal with a paper towel. With the seal in place, I again followed the instruction to make sure the little drive stick entered the hole on the piston (you can feel it locate) and set the unit in place, using the fracture lines in the JB Weld to position. Because of how thick the new seal is compared to the old one, there was some wiggle space in the fractures, so the extra marks, bot the chisel and the Sharpie, were necessary to get the unit in the right spot.

Because of the Torx socket challenge, I got 2 of the fasteners on, then removed the cover, put the other Torx fastener in place. At this point, I re-set the location of the top unit comparing the lines again. Then, I tightened down the 3 Torx bolts hand-tight. Since these are brass bolts going into aluminum, the threads can strip, so mind your torque settings (less than 8 ft-pounds). Content, I put the cover back on, added the anti-tamper bolt and the cover Torx bolts.

Testing
At this point, it is recommended to prime the system with a MityVac. I read some comments by users who did not need to do so. I thought I would try starting before getting into the hand-vac, and Hapy fired right up. I walked around to the back and there were no leaks, and he idled nicely around 903 rpm like always. The test for whether the little drive-stick is in place is simply to try the accelerator. If the engine RPM's change, it's in there. Success. So, we took a quick drive around the usual test loop. Hapy was responsive and slowly warmed up. As part of my test drive, I tried the heater.. that worked too! I could feel warm air blowing up through the defroster.

When I got home, I noticed that Hapy was having a harder time maintaining a consistent idle. He would drop down around 875 and go up around 950. I vaguely remember this being a thing for him and a quick tap on the accelerator settled him down. I don't know why this is a dynamic for him, but with the seals replaced he is acting exactly how he used to... without dumping fuel.

That's it for today. I hope to get after the furnace next. We'll see what the future holds. Thanks, as always, for following along-

Tuesday, June 30, 2020

You're Never Actually Ready for Paint

It's sort of like when you tell yourself that "maybe we'll take that trip next year". Or "maybe we'll do that bathroom re-model after the taxes are paid". "Maybe I'll go back to school after the kids are gone." Yeah. It's like that. What is? When you say "we're almost ready for paint". No, you're not; we have been saying "we're almost ready for paint" about this 1979 280ZX for almost 3 years. Today's post pulls the Zed out of storage and back into the workplace. First, let's remember some of the history of this thing.

Zed, a History
original CL listing
We bought it 3 years ago (come August) from a couple of guys who were turning it into a drift car. They made many dubious decisions like removing the center console, the little rear partition where the stereo speakers go, the sunroof (tack-welded and duct-taped on a piece of tin to fill the hole), the carpet, etc in the interest of dropping weight. They hacked up the ignition and wiring so the fuel pump, ignition and radiator fans are all controlled by switches. Of course, the switches don't match and they were installed kinda hinky, but they work. They did start with a great shell, though they painted a big purple V on the hood that just had to go. There is very little rust. In fact, there's hardly any anywhere on this thing. They did fold the driver door and fender, though. And, they did a top-end rebuild, so the valves still need to be re-gapped.

We bought a second 280ZX from a guy outside Seattle and had it towed home. This one was rusting apart, but it had a very clean grey interior, the center console and some other goodies, like original alloy rims. Our plan was simple: remove the interior, rims and other bits... then pitch the donor. The keeper would get a decent paint job (probably one that we'd do and learn how along the way), and then we would re-add all of the pieces. A replacement driver door was found during a separate trip T and C took into northwestern Washington. Unfortunately the yard was closing by the time they got there so they couldn't grab the matching fender. Oh, I almost forgot: this was my son's project. So, I was available labor, bur the decisions were his. The body parts were removed and hand-stripped either with chemicals or a grinder by C. Somewhere along the way, he either lost interest or became overwhelmed and the Zed was parked.

Out of Garage Storage
After shimmying along side the Zed, parked in the prime spot in the garage, for the next 2 years, I decided I needed to take more of a lead role. So, Boo and I pushed Zed back into the driveway. We are going to do everything we can to keep the Zed from returning to the garage in less than 1 piece. Zed hasn't been meaningfully looked at in months, so I spent a few minutes just getting re-familiarized with it. The fenders looks decent. The driver side has some small dents from where the fold near the driver door was hammered out. The passenger side looks straight. Both have a little rust along their bottom edges. The tailgate is solid, with some rust along the top edge. The hood is in great shape, showing no rust. A replacement driver door was originally a copper color, the outside skin had been stripped like the rest of the body panels, but the inside and edges were still copper. Overall, it felt like we could be fairly close to paint.

Still Not Ready for Paint
purchase day, passenger side
And yet, we're not. Over an exceptionally rainy weekend, I tucked into the 2 doors. I laid out cardboard, and starting with the passenger door, removed the glass, window controller and door latch mechanisms. Then, I re-sanded the outside with 100 grit and then 150 grit to get the skin smooth enough to an initial coat of primer, or filler if needed. The passenger door had a glaring imperfection at the door handle that I needed to bang out. Not having decent body tools, I made do with what I could pull together. In the end, I was left with a divot about an inch across (25mm) and about 1/4" deep. Because of where it is located, I can't get a good push angle from the inside. Anyway, I'll body fill that divot in stages so the filler dries correctly. I found some additional little pits that I can fill while I have the Bondo mixed.

The replacement driver door was in better shape, but it had a small horizontal outward fold about 6 inches from the bottom near the rear edge (front is front) that I couldn't see nor feel until I has the skin nice and smooth. That will be harder to get flat. I worked it with a rubber mallet, and that actually fixed most of it. There is, of course, more to be done before the doors are ready. These cars are so rare, the door rubber isn't available anymore. So, I am carefully removing the originals for reuse after paint. Once removed, the rest of the silver (passenger door) and copper (driver door) that would be visible after the door cards are returned will be sanded. Then, I'll do the body filler. Only then can I tape them for paint. Of course, the fenders (look at the driver fender in the original CL posting for an idea of the worst of it), the tail gate and the hood need similar attention... as does the remaining shell. So... it's gonna be a while before we're actually laying paint.

Ready is a State of Mind
In some ways, maybe this is like considering having a child: you're never actually ready for that either. Ultimately, you have the kid when you don't think you're ready, but maybe you actually kinda were; you were just scared. I think the same will be true of the paint prep. I painted houses for years, and if you are methodical and meticulous, you eventually get to the end. In both cases, it's about trusting yourself, and accepting that you're never ready and it's never perfect. At least not for your first few paint jobs... or your first few kids.

I can tell you that this effort will be consuming the next several weeks, and I have stopped all work on Hapy to make room to get this thing moving forward. I probably won't post much. But, then again, I have said that before and always managed to post anyway, so who knows? Regardless, thanks as always for following along.

Tuesday, April 10, 2018

MGB - floor pans (Part 4)

When I completed the last segment of the floor pans (MGB - floor pans (Part 3)), I mentioned that I was going to get some seam sealer and some paint on the floors, and that it may not warrant another posting. Well... now that it's been a few months, I think maybe it is.

Seal the Seams
Seam sealer is this sticky black goop that makes sure the seams are weather sealed. I guess that's kind of obvious. Anyway, it comes in a caulking tube and is applied like caulk around a window in your house. Except its not that easy. And you're probably outside. And you're all scrunched into some crazy twisted body contortion because getting the tip of a caulking gun against the underside of a little British sports car is virtually impossible without a lift. Like caulk, you need to press it into the seam with the tip of your (gloved?) finger, and make sure the edges are tapered down so there's not a spot for water to collect. I did this on both the underside and the topside of the floors. It was actually kinda fun.

Flex Seal
You've seen the commercials. "I cut my boat in half!" he cries as he completes the cut from stem to stern with a cut-off wheel on an angle grinder. In an older advert he replaced the bottom of his boat with a screen door, painted it with some clear stuff and then by the end of the ad he's paddling around while sitting on a screen door. Yeah, that's pretty crazy, but the picture here shows it. I thought I'd experiment with it, since I guess that's what I do. So, once the seam sealer dried, I got a quart of the black Flex Seal and painted the edges and then the floors and then up the sides of the MGB tub. I made sure to keep the drains cleared, and the areas around the plastic plug-pulls cleared as well. I wondered if it would meaningfully change the amount of noise. I found that banging on the floor with my knuckle before and after did see a reduction of around 10dB. From that, I've concluded that it would suppress the noise from a rock hitting the underside. All of the interweb sites dealing with noise reduction insist that the noise associated with vibration is a very special animal not to be caged by simple things like a rubber-y paint. Okay fine. I tried it anyway and there are noise reducers in paint form now too, so I don't know what to make of that. I guess the interweb can't agree on it.

Sound Deadener
Once the Flex Seal paint was dry, I thought I'd go after the traditional asphalt, rubber or butyl sound deadener. I've used a couple different things before, and had leftovers of both. The foil-backed stuff costs more than the plain rubber-ish mats available from McMaster-Carr, but back when I experimented with them before, I couldn't really tell how well they worked because I didn't have a decibel tester. This time, I put the McMaster-Carr stuff on the big open spaces in the trunk, and tried the knuckle banging test. It didn't deaden the sound nearly as much as I expected. If memory serves, it was within the margin of error for my inconsistent banging force. Same went for putting the foil-backed stuff on the floor of the cabin. But then I noticed something: the foil backed stuff wasn't really sticking to the Flex Seal. Grr.. Piece by piece the foil-backed, expensive sound deadener lifted off the floor, no longer sticky. I decided I didn't want to deal with it right then. So, I installed the seats and moved onto other things for the winter.


Paint Again
Now, many months later, I'm back with some time and interest in the little car. I've spent many weeks clowning with rims and stripping parts of a 280ZX, so I'm ready for something a little more satisfying. I have a bunch of interior bits and a new convertible top on order from the UK, so I figured I better get the steel and noise containment solved. Knowing that the noise reduction won't stick to the Flex Seal, I concluded that a coat of regular paint on top of the Flex Seal might work. In my gut, this felt like putting lipstick on a pig or just throwing darts in the dark. Still, the thinking was that if regular paint gripped the Flex Seal and the noise reducer sticks to the regular paint, then it worked. Of course, will the noise reducer actually work? First, let's get the paint and the deadener on there, eh? For paint, I used some black paint I had in a touchup can. As described by the Flex Seal folks, the paint adhered very well. In retrospect, the problem could have been that the old noise deadener was just that: old. Maybe it didn't stick because it's stickiness had dried out or faded over time.

Deaden Again
Since I was effectively out of the 2 kinds of sound deadener, and I wasn't terribly impressed with their noise reduction anyway, I bought a third kind: Noico 80 mil butyl automotive sound deadener. With a focus on just doing the parts of the car that were going to be covered with carpet, I bought 18 square feet, their smallest ship-able size. I eventually will want to cover more area, like inside the doors, but I'm not going to do new door cards yet, so why make this project any bigger than it already is? I'm not sure this is the right stuff for under the hood (the manufacturer, of course, says it's great anywhere that doesn't get super-duper hot like a muffler), so I'll probably do a test-stick of a small piece to see how it handles the heat and vibrations under there.

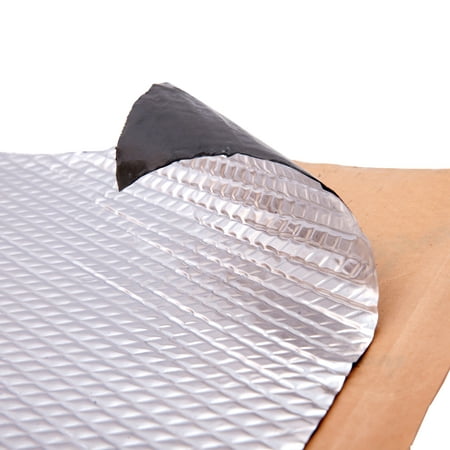
For the tub, though, it gripped very well. In my usual experimental fashion, I didn't paint over the top of all of the Flex Seal. In some of those other areas, I lightly sanded with 220 grit sandpaper and in others I left it just as it was. The butyl stuff I bought was a little different in that it had diamond embossing (see picture). The directions indicated that an area installation was complete when the diamonds had been pressed flat, preferably with a roller. I hadn't a roller. I looked at Harbor Freight and they didn't have one. I could order one online for $12US or more, but then I'd have to wait for it to arrive. So... I tried some other things I did have in the garage.... and one from the kitchen.

Sticky Tuna
I found 2 tools were very effective at getting the butyl to adhere and the diamonds to flatten out. First, I used a can of tuna. Yeah, that's right. It's round and flat like a hockey puck, so it was able to flatten the bigger areas pretty quickly. For pressing on edges and tight spots, I used the plastic handles on the scissors I was using otherwise to cut the sections. I didn't do other things exactly like the directions either. For example, the manufacturer (and the interweb) say to draw a template on paper and then translate that template onto the paper-backing of the sound deadener. That's a lot of time and paper. Instead, I used a sheet of aluminum foil over and over again. I would take the piece, press it into the spot where I want the material to go and then drag my fingernail along the edges. I would then transfer that edge to the backing, cut and apply. For applying, it is recommended to pull the paper as you install, and I followed that advice. I also followed the advice of cleaning the area with a degreaser (I'd cleaned these spots so many times, I just used window cleaner as a final check) before fitting deadener. Even with the foil time-saver, this is quite time consuming even on a little car. I spent over 4 hours and got 2/3 of the driver side done and about 1/3 of the passenger side before I ran out of material. Of course, getting down behind the pedals on this thing takes some doing, so there's time lost there. I expect the trunk will be much faster.

I'm waiting for more material, and I'll be finishing up the floors once it arrives. After that, it's carpet pad and carpet, unless I discover something else that needs to be done to the floors first. I really can't imagine anything, but I'll continue this thread if it does. Otherwise, that's it for today. Thanks ,as always, for following along-

Apologies for the post-fail where an early draft of a future posting got released. That post (about replacing the radiator in the TDI-powered microbus) will appear later on, once I've re-written it a few times.

Friday, November 20, 2015

Daily Driving

At some point after my trip to Boston, the clunking noise coming from the front end of my 2001 TDI Jetta (Flash) started to really get to me. I don't know if it was the weather changing or the car's growing desire to turn right, but I knew something was going sideways. Today's post covers that saga.

Rebuild Parts
from MetalMan Parts
I trolled around the internet and found some good pub on this rebuilding kit from MetalMan Parts. So, I hit the site, and made some decisions. First, I got the fuller kit with the TT rear bushings. While that cost a little more, I figured this was a replacement I probably wouldn't be doing again. I also got new front struts (COFAP for comfort, recognizing the TT rear bushings will stiffen the ride) and new strut mounts. I had read good things about a 1" lift kit from Evolution Import, and I got that too. A few days later both shipments had arrived.
Upon inspection, the MetalMan kit was pretty fantastic. Every fastener that needed to be removed had a replacement. They sent both sway-bar bushing sizes and replacement clamps. It looked great.
The Evolution Import kit wasn't as impressive, but it looked like what I expected from the instructions online. It was shiny and relatively simple. I ended up not putting the rear lift in, and the Jetta sits flat with out it.

Destroyed My Arms on My Arms
I set aside the weekend to install everything, with the recognition that I would need to take the strut assemblies somewhere to get the springs moved from the old set to the new set. I'd also need to get the alignment done somewhere. Otherwise, I felt I could do everything else. 9:AM Saturday morning, I pulled Hapy out of the garage bay where he'd been resting since our active Summer and put Flash in his place. By 11:AM, his was on stands, the Panzer plate was off and I had my plan of attack. I'd start with removing the control arms. Once the old ones were off, I could easily get at the sway bar bushings as well as get the struts out.  The sway bar links came out with little trouble, but the 2 18mm bolts with point towards the rear were a little tight. I had to work them pretty hard, and I found my arms started to get sore. But that was nothing compared to the 2 bolts which fed up from below. I tried PB Blaster. I tried a propane torch. I tried this stuff from Amsoil called "toolbox helper". I went back to the torch. By late-afternoon, it was clear I wasn't going to get either of them off so I soaked them with the Amsoil stuff and let it sit overnight.

Sunday morning, I ate well, enjoyed coffee with Boo and then went back to the bolts. Within 30 minutes, I'd concluded that the soaking hadn't helped and I was stuck. My arms were really aching from the day before, so I started looking for options. Since the front end was in pieces, I couldn't easily take the car to someone to get the bolts off, so I hit craigslist for someone willing and able to do the work in my garage. I found a father-son team, and they were happy for the work.

MobilePDX
now that's a breaker bar
MobilePDX is a father and son team who have worked on cars for years. Courtney is around my age (dirt is older, the internet is not) and has been wrenching on cars since he was a kid. They were organized, clean and left my garage in better shape than they found it. I'd originally intended to have them just get the 2 bolts off and swap the struts, but once they got going, it was just easier / faster to have them finish the job. They were able to get the passenger side bolt off with a breaker bar and youthful strength. The driver-side had to get ground down with an angle grinder. I'm not exactly sure how they got the bolt out after that. They followed my original plan from there, verifying my thinking... which is always nice.

Aw Nuts
After MobilePDX got everything back together, they discovered that the front caliper bolts were not grabbing into the hubs. Upon inspection, the threaded holes weren't threaded anymore. Neat. The proper repair is to over-drill the holes and thread in a helicoil (or something similar). That is what Courtney said and the chat-rooms agree with him. Others have used an oversized bolt that is so widely available both on the internet and the FLAPS (friendly local auto parts store), I'm inclined to think it is becoming a widely endorsed solution as well. While I sort this out, Flash sits on jack-stands and I am driving Hapy every day.

Hapy Hapy Joy Joy
I'm sure if I look back into this blog, I have many references of going back to driving the bus after a period of not driving him and expressing the pure joy of driving the bus. It really is awesome. The smiles, waves and conversations happen as much in the wind and rain as they do in warm summer. That's pretty neat.
I have continued my experimenting with the shift-point, shifting now around 3400RPM. This allows for the engine speed (when dropped into gear) to still have some turbo influence. So, he's got even more zip than the old 1700 had from the bottom to the top.
I just put 10 gallons into the tank, and I got over 28mpg since the last fill. Since there's a lot of city driving in there, I think I could have a viable city/highway mix guess: 27 city / 33 highway. Pretty fantastic. It hasn't been all smooth sailing though.

Fix-It List
On an exceptionally cold morning, I discovered that the dash vents weren't quite aligned properly. When I went to fix it, I accidentally pulled the wiper electricals out of the switch. Turns out, that bundle of wires needs to go through the hitch in the center of the plastic "Y", not around it.
After fixing that in the parking lot at work, the heat is suitable for clearing the windscreen from mist or fog, but it smells like diesel exhaust. I need to locate a source for fresh air before I drive Hapy into real cold weather.
The fuel gauge needs to be replaced. I still don't know the actual capacity of the tank and guessing based on the mileage when I last filled isn't a reliable measure. Cold wet weather isn't the time to guess if you need fuel.
I didn't re-install the door seals after I painted the top 1/3 of the bus. This creates a pretty good breeze when travelling over 35mph. I need to install them. Of course, the old ones were pretty beat up, so I need to order another set.
The bus still has some rattles, and I think one of the door skins is the main culprit for most of it. Also, the other jalousie window is now making the noise the rebuilt one used to make. Perfect. Time to rebuild the other window.
Last, the brake warning light flickers at me. This usually happens when I remove or do something around the battery. Since I had to charge the battery before moving him out of the garage, this was self-inflicted. I think there's a fluid leak near the master cylinder, though, so I may have to do a fuller brake overhaul soon. Either way, I'd like so much for the flicker to go away, or just never happen.

That's it for today. Like usual, if I'm not posting, its because I'm working on one of the cars.... or traveling. Once the front brakes / hubs are solved, Flash will be driving again and I'll start knocking down the list above for Hapy. The good times never end. As always, thanks for following along, and please pray for snow. I'd really like to get some gravity testing in this winter and our farmers need the snow-pack for summer irrigation-

Wednesday, May 13, 2015

Calling "glass"

It has been a very busy week or so. I have lots to cover, but today is just about getting the glass back in. My VW camperbus (like many) has 4 solid-pane windows: the windshield, the rear hatch and the 2 rear-most side windows. Some buses have a flip-out window on one side or the other in their rear-most side window spot. I used to too, on the left side, but found that it was the cause of a pretty bad leak. In fact, that leak caused some of the rust-through I was solving earlier. Anyway, on to the installs.

Seal to Glass
it's actually better if you put
pressure where the blade and
handle meet
If you troll around the internet, there are many articles explaining how to install a solid-pane window, but they usually miss something. The first thing you need to do is get the seal onto the glass. While this sounds obvious, it's not easy. You will be tempted to try water or glass cleaner to lubricate the edge. Don't do it. Use the glass cleaner to get the glass clean, especially along the edge, but both the seal and the glass should be dry. If it is lubricated to get on, it will be lubricated to slip off.

Next, take note of where the natural corners are in your seal and align them with the corners of your glass. Again, it seems obvious, but if you don't lay it out, you'll probably get partway along and realize the seal needs to rotate 90*. Ask me how I know :) Also note which side of the seal is the inside. The outer edge will have multiple lip/edges and the inner side will have a second slot in it.

I found that if I placed a putty knife blade against the glass, but at an angle towards the seal (which wasn't yet on the glass), I could part the seal enough to get it to sit on the glass. Then, I used various pressures with fingers or my knee to press the seal all the way on. Place pressure near the spot where the knife meets the handle, so the seal has the whole length of the blade to run to get parted and just seated on the glass (not where the picture over there shows). I found I was able to run 8-12" sections in one pop after a few experiments with pressure and angles. It is important to get the seal to seat all the way down. If you don't, it won't fit in the window hole and you'll be clowning with the seal again.

Rope Method
opens paint cans, threads rope
and opens a beer bottle when you're done
This is where most of the internet advice comes in: use a rope to seat the glass. Yep, that's the magic. Find 3/8" rope that is at least 1.5x longer than the circumference of the window. Thinner rope might work too, but not much thinner. Some advise against nylon rope and encourage only cotton. I used nylon and had no ill-effects, but the MS Glass folks (see below) used cotton. I have not seen much good advice for how to get the rope into the slot. I found the best tool was a paint-can opener. I slid it in and rotated it, and the seam opened right up. I set the rope in and slid the tool along while feeding rope in. Once I got a foot or so in, I doubled back and pressed the rope in with the same tool. I watched the MS Glass guys, and they used a plastic jump-rope handle (or a carefully trimmed caulk-tube tip) through which the rope was threaded. They simply slide the jump-rope handle along the seam, pressing the rope in as they went. Very clever! And very fast.

While setting the rope into the seam, make sure you create a loop outside of the seam on every side. This doesn't seem obvious when you're doing it, but on each side, somewhere near the middle, let some rope out of the slot, create a 6" loop and then re-start from the spot where you left, making a small overlap (less than an inch will do). This is very useful for later. Once you've made it all the way around, overlap the starting point by an inch or so. Now, with painters tape, tape the loops to the inside of the glass window. With the rope out of the way, you're ready to set the window in the hole.

Lubricants
note the four loops of rope:
one per side
Simple put: don't use them. If you can get the window to seat without lubricants, you're probably doing it wrong. I tried KY Jelly, water, soap... All they did was make a mess and make it all the easier for one side of the window to pop out of the hole while exerting pressure elsewhere. Like the Band says, "Don't Do It". All four of my solid-pane windows went in without lubricants. I was setting the windows into somewhat freshly painted holes, so they were effectively the most sticky possible, and they still went in.

Seating
This area also gets a light brushing on the interweb. Most advice is somewhat simple: set the window squarely in the hole. Honestly, that's about right. Don't set the top, bottom or any side any deeper than any other side at first. Since the upper half of the bus (where the window is going) is tilting away from you, the window also needs to be tilting away from you. If you set it upright, the bottom will be too deep. Once the window is set evenly around the entire edge, you can start working the sealed glass into the hole.

Pressure
hatch and rear-most left
windows in
The key here is to use little pressure at first, and work the inner edge of the seal by knuckling it towards the center of the glass while lightly pressing inward. Focusing on keeping the window square (no side too much deeper than any other), slowly work the window deeper into the hole. You will need to increase the amount of pressure force, but don't try banging on it. That will just create an opportunity for the sealed glass to pop out at the other end. If it isn't going in with medium pressure (maybe 50 pounds of force or so), pull it out and re-try seating. If you've tried this cycle a couple of times, go back to seal-to-glass and start all over again. Yes, I had to do this with the hatch window. For the left-side rearmost window, I had to seat and re-seat a few times.

Big Finish
windscreen installed
Once the seal is up against the lip, you're ready to pull the inner edge of the seal over the lip with the rope. From the inside, you should see one rope loop along each straight edge, each taped to the inside of the glass. Perfect. There is varying advice on where to start pulling, but, since most folks don't think to advise putting multiple loops (one per side), their further advice is limited. We have multiples, so we have options. For bowed windows, like the windshield, start with the sides. A little on each end, until both verticals have the seal over the lip. Then, do the upper corners and finally the lower corners. Why? We are doing the shortest distances first, and the distance between the upper corners is shorter, allowing the glass to flex and bow while we set the window. Next, work the ropes from the corners towards the center, moving a little at a time from each of the corners. You may need a helper friend to push on the glass from the outside.

MS Glass
Some of the advice above I discovered on my own. Some, I learned after I did my hatch and left-side rearmost window. While trying to get the seal on my windshield, it cracked, so I had to get a new one. Enter MS Glass. Since they do onsite installs, I had them do it, and that was where I got some of the rest of the advice. They do the one-loop-per-side, and did the steps in the "Big Finish" above. We both did the no lubricants, rope trick and seal-to-glass. They didn't use anything to part the seal as they got it onto the glass, but they do this stuff every day so they have Superman hands easily capable of forcing the seal on without tools. They were pretty amazing, and I'd totally use them again.

That's it for today. The bus has all of his window glass back in now, with new seals. Thanks for following along. More posts coming on all the other work that's been done. Onward!

Wednesday, March 18, 2015

Think, then Do

Quick post. I cleaned the garage and started exposing the interior of the bus. Today goes through some of that.

Think Once
I hadn't realized just how much think time I waste on some projects. Take cleaning the garage as an example. Usually, I'll just start at one end picking things up and putting them away until I'm either done or sick or doing it. Then, I'll sweep whatever I find and call it good. Net-net, its a crappy job of cleaning, but it looks better than before, so I'll call it clean. This takes a long time. I realized this past weekend why, I think. For each item I pick up, I have to think about where it goes or should go. I'll take it over to that spot, and then have to figure out whether there's room, etc. Lots of standing there thinking time. This weekend I tried a different approach: think once.

I went into my garage with no intention of starting anything cleaning-ish. I had my coffee in my hands and wool socks on my feet. I just surveyed. Sports equipment over there. Christmas decorations over there and there. Skateboards and snow equipment in little piles. And, of course, lots of bus parts. I took mental notes of what needed to go where and considered what-would-fit-where all at once.

Then Do
Like anything else, once a plan is set, just execute the plan. All this sounds simple and obvious, I'm sure, but I'd never gone after cleaning a garage that way. I had it organized in half the time. Following a quick sweep, I was able to shift focus onto the bus. First, there was the not-so-small matter of all the exterior parts. Since I'd planned for where all those parts were going to go, it took 15 minutes to empty the bus of stuff. Then, I simply removed the rest of the interior of the bus.

Removing the Interior
interior strip in progress
I started with the wall panel. It popped off with light tugging with my fingers. Choosing to use standard fasteners rather than bolts pays off in the removal step here. Once the MDF is covered with thin foam and vinyl, it will appear as an even better decision.
The Vanagon middle sliding bench that I installed a couple of years ago is held in place with 4 13mm bolts. Remove them and the seat easily slides out. So I don't lose the bolts, I fingered them back into their original holes.
I discovered that the refer cabinet that I converted into a storage cabinet (see: From Fridge to Storage) is not actually held down. Neat. The cabinet pulled out very easily (obviously), but I'll have to consider how to actually mount it to the bus. There is a bolt that should pass between it and the rock'n'roll bed that is missing. That's a start, but it will need something else at one end or the other... or both.
Next is the rock'n'roll bed. It is held to the bus with 4 different fasteners. Two are obvious: they are the 2 Phillips head bolts holding the upper back to the section on top of the fuel tank. One the right side (facing forward), under the seat there are 2 small (8mm) nuts which hold the folding bracket to the right wheel well. Last, there is a 13mm bolt under the front-center of the seat, bolting the floor of the seat to the floor of the bus.
Last, I removed some of the thin sections of the wood floor that is used to keep the floor level. I chose not to remove everything just yet. I left the middle seat rails, the rock'n'roll bed and some of the wood in place at this point. I'm not sure if I need to paint the steel floor, but I'd like to at least inspect it for rust. Frankly, if I'm going that far, I might as well fill any little holes and paint it too.

Rear Window
Great movie, not a good seal. I replaced the rear (as in the window pointing to the rear) window seal a few years ago with a BusDepot seal. Usually their seals are pretty good, but this one separated at the upper right corner a while ago. I should have replaced it when that happened, but there's lots of shoulda's out there. Anyway, I had rust under the old seal, but when I cut this seal off, there was water under it. Since the bus has been in the garage for quite some time, that water was quite alarming. Once I had the seal off and the window out (don't forget to unplug the defroster wires from your window before you start cutting your seal), I could see some new rust. Drat. More to fix. I'll just add that to the list of rust repairs I need to make before I paint anything. That list isn't too bad, but it is growing...

That's it for today. One last thing: I taped a piece of paper to the side of the bus for me to write down any parts that I need to replace. The list is too long for just having a pile of "replace these" parts. When many of the parts are seals that I need to cut off, there's nothing to throw into the pile that I could reference anyway. This week, when there's time, I'll be repairing small holes in the interior and getting the rock'n'roll bed and wood floor out so I can make steel floor decisions.

Thanks for following along...

Thursday, February 26, 2015

Windscreen Removal

Well, the prep for painting has really gotten underway now. Today's brief post is about removing the windscreen and what lies beneath. Depending on your windscreen, you may be removing it to replace it. If that's the case, you may not need to take as much care as I did. My glass was perfect, but I needed to get a look at the metal surrounding it as well as get the paint underneath it. One more seal is worth the rust containment.

Cut
multiple passes
For tools, you only really need a box-cutter / X-Acto. Extend the blade halfway. Approach the bus from the front and go to the top corner of the passenger side first. Slide the side of the knife blade against the windscreen with the sharp side pointing down. Cut the rubber seal from top to bottom by sliding the side of the blade against the windscreen. It will resist, so that's why we're only using half of the blade edge. Don't press too hard; let the knife to the work. The harder you fight it, the more likely you will scratch your windscreen. Extend the blade to 3/4 length and run the same seal edge top to bottom. Extend the blade to full length and repeat. This time, you should hear that satisfying noise of the knife against the A-pillar. The rubber should separate from the glass and just hang there. If not, gently run the knife along the A-pillar being careful not to disturb the paint. It is possible a previous owner painted the seal on, ran caulk to try to stop a leak or glued it in. Glue is not necessary for this seal. Nor is caulk, but I've seen some crazy road-side repairs go untouched for years, and caulk is definitely one of them.

Repeat
Repeat the cuts for the driver side and then the top. By now, there should be rubber hanging off the bus, or sitting in strips by your feet. Nicely done. If its an old seal, some of those cuts were very difficult. If it was anything like my first seal replacement on my bus, there were a few spots where I was able to cut right through very easily. I discovered that those spots also aligned with rust. When I cut off the seal the other day, it was only a few years old, and held very well. I'll be getting another Bus-Depot seal for the re-install later.

Bottom Cut Last
Pulled away a little bit
The best is saved for last. When I did my first seal, I had to be careful while I cut the last section. It wasn't holding very well, so I had to keep one hand holding the windscreen while I finished the cut. The newer seal, though, held strong even after I cut off the bottom. The windscreen held to the bus. It held very firm, actually. Your experience may differ, and you may want a buddy around when you make your last cut (as I did a few years ago).

Pop It Out
Old seals don't hold well, so the windscreen may just fall out once you've made your last cut. In my case, I reached one hand through the front door and pushed towards the front while catching the edge out front. This freed the sides, but the center still held. I had to grip the windscreen from the bottom near first the driver side then the passenger side and gently pull forward. Slowly, the seal gave in and handed me my windscreen. I carefully set it where it wouldn't get scratched and pulled out the remains of the seal. If yours was glued in, this could take some time. You want to get back down to smooth metal.

Now What?
glass out. rust inspection
I looked at the rust treatment I did years ago with some POR15. I was impressed. From my memory, the rust had not meaningfully advanced. Still, I needed to sand the whole opening to make sure. It looked pretty good, so I decided I would just expose the rust (read: sand and Dremel) and re-treat it. Then, I'll just handle it like any other metal panel: prime and paint with lots of sanding mixed in. Since it lives under a seal, there's no point in adding Bondo to the rust pits except as practice for visible spots I need to do later. Still, I'm going to skip Bondo'ing here.

As always seems to happen, this small painting effort has grown into a pretty big deal. Next up, removing the dash-top, more rust inspecting and sanding. Apart from deciding how far to go with paint on the interior, I think I'm almost done with the initial prep work. I still have lots of sanding and such to do, though. Unfortunately, that doesn't lend itself to print very well, so it might be a little while before my next few posts appear after this. Thanks for following along.

Monday, September 29, 2014

Transaxle Re-assembled

Last weekend, I got the transaxle put back together and back into the bus.  Fast sentence to write.  Lots of effort to do.  Today covers the first half of that 'effort to do': getting the transaxle ready.

Slinging Oil
slinger by hole in bell housing
where it's supposed to be attached
The bellhousing for the 002 and 091 transaxles are supposed to have this ringed collar around the input shaft to help guide the hypoid oil away from the input shaft seal and back towards the gears.  There are a few names for this bit, but the boards call it an "Oil Slinger".  According to the Bentley, this was supposed to be a non-repair item that was pressed into the bellhousing with a 4-ton press.  If it separates, you get a new bellhousing or re-press it in.  Well, the VW world has discovered that's not exactly right anymore.  Instead, you create a rough edge on the inner edge and along the rear (engine side) of the bellhousing.  I used a chisel and a file for this.  Then, rough up the lip and outside of the slinger near the lip.  Peanut butter the edge with JB Weld and press it into place by hand.  I treated the excess like caulking, and ran a gloved finger along the edges, pressing it in and making the edge clean.  Last, hold it firm with a simple weight and gravity.  Once its cured (18 hours), its ready.

Install Input Shaft Seal
roughed up edges
This was actually quite simple.  Lightly brush the inner and outer edge with hypoid oil.  Set into place by hand, and press it enough by hand so it sits still.  Find a short section of 3/4" PVC pipe (I used a 3/4" - 1/2" T from Home Depot).  With a rubber mallet, smack the seal until it seats flush with the face of the bellhousing.

Into One Piece
When the transaxle was built by AA Transaxle in Seattle, the bellhousing was sealed to the transaxle body with what looked like clear silicone caulking.  Not a fan.  I scraped all that out and instead ran hi-temp form-a-gasket along all of the mating surfaces.  Once it becomes tacky, set the 2 sides together and set the bolts in.  Rubber mallet the bellhousing into place and finger-tighten the bolts.  Following the jump-the-center torquing process, set them to 18ft-pounds (if memory serves. check the Bentley).

Topped Off and Ready
slinger with JB Weld
Before I put the bellhousing on, I made sure the oil drain plug could be loosened.  I had vaguely remembered that it was frozen in-place.  I was right.  After some hard torquing, I got the nut out.  I cleaned off the tiny metal filings off the attached magnetized rod, cleaned the threads and re-seated it.
Once the transaxle and bellhousing were one piece again, you need to give the form-a-gasket time to cure.  I gave it 24 hours and then opened up the fill hole.  It took all the gear oil I had on hand, and was still a touch low.  I'll need a fresh bottle to top it off before I take much of a test drive.  Remember, the tranny is full when oil spills out of the fill-hole when the tranny is on level ground.

That's it for today.  The tranny looks good, the input shaft has almost 0 wiggle to it and the seal / form-a-gasket are holding oil.  Hazah!