Showing posts with label outlet flange. Show all posts

Tuesday, January 7, 2020

TDI install retrospective: Cooling

Continuing the process of back-documenting what I did to put a TDI engine into an old (1972) air-cooled VW bus. Today I cover the cooling system. Somehow, I managed to not plan for this post when I started this retrospective. Ha. To keep concepts separate, I won't go into the electrical, but I'll cover everything else cooling / coolant related.

Radiator
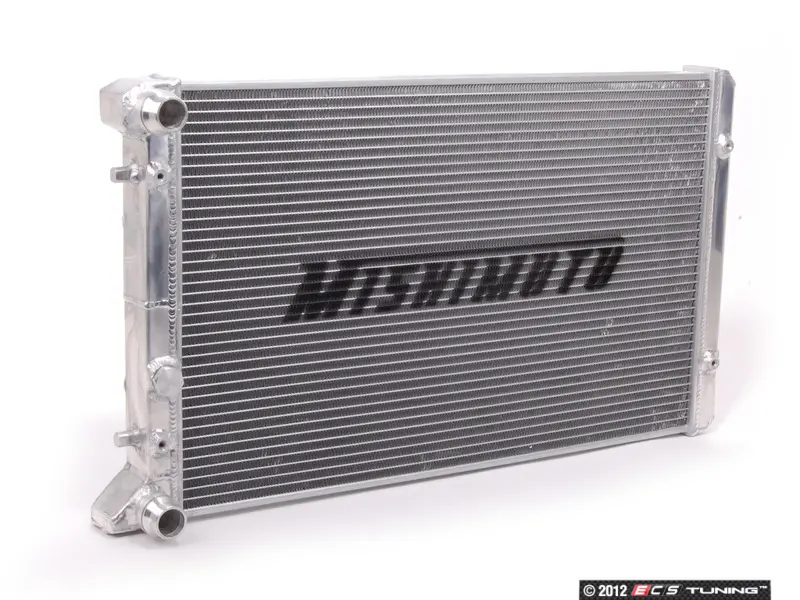
I started with a Jetta3 radiator I got off craigslist for $20. This met the need, but eventually was swapped out for a Mishimoto radiator designed for a Jetta3. This allowed all of the bracketing work I did for the original radiator to be re-used. Sort of. The bracket design was relatively simple: Add a straight square-tube bar across the leading edge of the radiator, and form brackets which are affixed to the bar, but thread into the radiator mounts. The crossbar then had eye-hooks added so the radiator could suspend from the underside of the bus. To the front of the bar, steel security screening was added to prevent refuse from entering the radiator. See bracketing the radiator and Radiator mounting planned for more details.

On the rear, simple individual brackets were formed for each of the 2 mount holes on the radiator. Each bracket had an eyehook added, similar to the front bar. From the 4 eyehooks, the radiator would hang from the underside of the bus. I used 400# test chain to hold the radiator, and placed it at an angle (front about 4" lower than the rear) so the exhaust heat would be encouraged to vent down-and-rearwards and so that the leading edge of the radiator might scoop some air as it passed beneath. Corresponding eyehooks were added to the frame under the center of the bus, and the chains have threaded carabiners on the ends for ease of connecting / servicing. See rad brackets continued and Radiator test-fitted for more details.

To discourage hot air from recycling into the intake side of the radiator, I cut and attached some sides to the radiator unit with some thin zinc-coated sheet metal used as cold-air return material in houses (See Radiator Shrouded). Underneath, I attached an aftermarket fan:cowling to maximize the suction of the fans drawing air through the radiator (See Cowling the Hapy Radiator). For more details, See Radiator InstalledBack to the Bus Rad Swap 1 and 2.

I have not experimented with lowering the radiator beyond it's current height of about 9" above the ground. I had ideas of adding a scoop to the leading edge bar, or adding a means of lowering the radiator with a lever or something, but the bus now runs cool enough without added complexity. If that changes, those options remain.

I know there are some who will read this and not accept that an under-belly radiator is sufficient. Consider that the Aussies are doing it, and were doing it well before I started my project. They have super-hot, dusty conditions and they drive their under-belly conversions in the outback. So, some gravel from the road or a mid-western summer are not really the factors we may fear them to be. After 10 years, these have not influenced the cooling at all. The keys to keeping the temperature controlled are getting the exhaust air away and getting air to draw through the radiator through cowling and fan suction.

Overflow Bottle
The overflow bottle for the NewBeetle is shaped like a ball with a mounting tab on one side, like in the picture here. That tab has the 2 mount holes. I built a simple angled bracket that aligned with those 2 holes, and attached it to the front-to-back floor support at the front right corner of the hatch I added. The bottle needs to be located height-wise in the same relative position as it appears in a stock TDI install. This places the full line at the top of the head. This height requirement may force you to put in an access hatch just so you can add coolant. I suppose a port-hole could work. Your bus, your choice.

Hoses
Unlike the inter-cooler and vacuum, the cooling system left only a few pieces I could re-use. The runs to/from the radiator were solved with multiple 2' long Goodyear flexible hoses fitted together with metal connectors. These flexible hoses satisfied the run from the engine bay to the radiator, but within the engine compartment, there were other considerations. For example, the outlet from the thermostat housing exits the engine pointing at the passenger-side rear wheel. This needs a 90* downward bend, so I used a short piece of original hose, and mated the bend to the flexible hose with a metal joiner that included a small (1/2") "T" which I routed to a bleeder. I have used this bleeder to get air out of the system while filling with coolant many times. The run from the outlet flange also points to the passenger side, and it needs to include a temperature sensor. So, again, there is a mix/match of TDI hose, a piece of TDI plastic holding a sensor and the flexible hose.

I omitted the EGR, so the plumbing around the EGR needed to be eliminated as well. This actually simplified some of the paths. Last, there was the coolant line run to the overflow bottle.

Extras
nicked from TDI-club
I haven't introduced any changes to the oil cooler nor the oil-to-coolant exchanger, but this feels like the right spot to mention it. I have thought about swapping out the original stock TDI exchanger for the V6 4motion Passat oil cooler or the late model NewBeetle / Jetta / Passat / Toureg (also Audi) oil cooler. Both are larger, and with the amount of concern I've had over temperature control over the years, this is an upgrade I will probably do as part of a Malone tune. The V6 4motion looks a lot like the TDI one, just a little bigger while the later model cooler has the coolant inlet/outlets oriented differently (middle unit in the picture). I got these part numbers from this thread on the TDIClub and only re-post here for my own future reference benefit. The TDIClub thread author (Kennedy) deserves all the thanks and praise for assembling this detail.

V6 4motion Passat
028117021E OIL COOLER (should come with upper gasket)
038117061 LOWER COVER TO OIL COOLER WITH SEAL
*I believe the original lower cover will fit, but I'm not 100% sure

late model
038117021B OIL COOLER
038117061 LOWER COVER TO OIL COOLER WITH SEAL
038117070B SEAL

Heater
image nicked from theSamba
For some, having a heater isn't an extra. Its mandatory. I wanted to remain stock-VW parts as much as possible, so I looked into a real defroster-type heater unit. I couldn't fit anything that big into the space I had, so I bought a used Vanagon rear-seat heater. I plumbed that into the heater/defroster hose loop, placing the heater unit on the extra battery tray, under the spare tire well in the engine compartment. This actually worked fairly well. The coolant lines were very short, and I was able to route an insulated flexible air hose to the front, connecting it to the original bus air system. I removed it all when my original ignition went up in smoke, and now don't have a heater. More importantly, I don't have a defroster. In retrospect, I probably could have retained the heater, and just sourced the 12V elsewhere.

I have considered adding an aftermarket heater closer to the front of the bus, and running longer coolant lines to support it. The long air hose system was slow to respond because the air in the hose needs to warm up or cool down before you can feel the change. That's the beauty of the modern systems: no air hoses. The coolant, however, could cool off before it gets to the front of the bus, and there are would be a need for a bleeder, etc. so this isn't exactly perfect either. So, as much as this is a retrospective, some things clearly aren't really done.

De-Scale
Regardless of what you do, if your engine isn't new, and you don't really know how well it was maintained by the prior owner, it might be wise to de-scale it before you consider your system complete. I ran a Thoroflush procedure and that made a massive difference in the bus' ability to ditch heat. Check out the Now Water-COOLED post for some more detail.

Prior related posts:
Preparation
Fuel System
Physical Mounting
Vacuum System
Air, Inter-cooler and Exhaust
Primary Electrical

Next related posts:
Secondary Electrical
ECU, dashpod and Sensors

Tuesday, September 17, 2019

Now Water-COOLed

Before I begin, our family lost a brother over the weekend (14 September). Travis was taken from us too soon, but he left doing what he loved most, riding his Harley on a beautiful early autumn afternoon. To meet him was to know him, and to know him was to love him. You will be greatly missed, brother. On to today's post...

The cooling system for Hapy's new engine has been a journey. Looking back on multiple years of efforts to get Hapy to be genuinely water-cooled, today's post covers what may be the last thing I needed to do. I have lots of links referencing pretty much all of the things I've done, but I probably missed a few at the beginning of the project because many of those early posts covered multiple project aspects.

Initial Cooling System
Recall when I started this project, I sourced a radiator off craigslist for $30 (See TDI - Day 2). At the time, I was even offered the air-conditioning condenser, and it had the original fans. I passed on the air-conditioning condenser, which he subsequently sold, and I removed the fans. I added 2 flex-cool fans and wrapped the radiator with an aluminum frame (See bracketing the radiator and rad brackets continue) and put sides on it (See Radiator shrouded) to reduce the amount of air allowed to slip back around from the rad exhaust back into the rad intake. This sort of worked, though I always had my eye on the temperature. Along the way, I removed a bunch of extra wiring from the original harness that was part of the air conditioning circuit, and added a switch to the dash for turning the fans on.

Troubles
Then the leaks started. I spent many hours trying to solve outlet flange leaks (See Reality Strikes, for example). Ultimately, I learned that the plastic parts were designed to fail first, so more expensive parts didn't fail when the engine got too hot and the coolant expanded faster than the expansion tank could handle. Still, replacing that outlet flange and getting the coolant temperature sensor to seat properly are two of the most patience-testing things I've done on this conversion. Having these components by the fuel tank makes the reach and visibility particularly difficult.

Still, with the system seemingly in-tact, the engine temperature would still climb and not come back down easily. As the miles and years passed, the engine would heat up faster and cool down slower. We had a super-long return from 4Peaks in 2017 (See 4Peaks 2017 - Road Report), and had our first vagabonding experience when we were unable to make it to Frog Lake due to an overheat, and big coolant loss (See Almost Frog Lake Part 1 and Part 2). The whole time, Boo was incredibly supportive, and heroically kept my spirits up. My last, most tragic failure was when I added the wrong kind of coolant. That amplified the problems, and ultimately led to the troubled drive to Newberry this Summer (See Newberry 2019 - Getting There).

Resolution Path
I promised Hapy that I would start fixing the cooling system when we were on the side of the US-26 outside Rhododendron, unable to make it to Frog Lake. So, that next Spring, I replaced the old Jetta radiator with a Mishimoto all-aluminum radiator (See Back to the Bus: Rad Swap Part 1 and Part 2). Things were not that much better on the way to 4Peaks in 2018 (See 4Peaks 2018 - Road Report), but with the ignition fire on the way home, it quickly moved to the back burner. I removed the wiring for the heater fan controls when I did the ignition replacement, believing it was causing large load spikes. While that didn't really change the cooling system, its a change worth documenting. By the time the ignition was done, festival season was over. But before I covered Hapy for the winter, I replacing the fans with a real dual-fan shroud (See Cowling the Hapy Radiator). I thought this was the final solve. The drive to 4Peaks seemed fairly good (See 4Peaks 2019 - Road Report), with temperature spiking at 196*, but the drive home was again spent watching the temperature gauge. We peaked at 205*, but the alternate route through the farm country allowed us to keep our speed (and therefore temperatures) down. The drive to Newberry, though, was enough for me to know that I had not solved the problem, and I really needed to fix it right if I was going to truly enjoy driving distances with Hapy.

Last Solve
In my last post, I described the issues with the fuel I bought in Oakridge (See Green Diesel isn't BioDiesel). That bad fuel held my speed so low, I didn't have temperature issues the rest of the way home. I knew they still lurked, so after the fuel system was drained, new filter system installed and new fuel added, I shifted back to my nemesis: the cooling system. I started with a basic drain and water-flush. Then, I removed the thermostat and filled with water, ran the engine, and drained. I did this a couple of times. Then, I went nuclear and did a chemical flush with Thoroflush. The Prestone radiator flush is weak tea compared to this stuff.

The directions are hard to find on the internet, but it's fairly clear:
Remove 1 gallon of coolant from your system
Mix one gallon of water with the right amount of Thoroflush mix for your application
Add mixture to cooling system
Get engine up to temperature (to open thermostat) and run for 10-15 minutes. DO NOT RUN LONGER THAN 15 MINUTES
Drain and flush with water until drainage is clear (no pink from chemicals)

Seems fairly straightforward. But, I pulled my thermostat, so how long do I need to run it? I was unable to find any direction for this case. I concluded that since my engine was fairly warm (upper 160's), if I added the mixture and ran it for less than 15 minutes, I would do no harm, but might not get maximum benefits. So, that's what I did. I used the water from the 2nd rinse-flush and added the mixture to that, ran the engine for just shy of 15 minutes, drained, flushed, and flushed again. After flushing everything out, I re-installed the thermostat with a new housing and O-ring. I determined that the old housing was slightly warped (possibly from the flushing efforts), and found that removing the hose from the thermostat housing makes re-install 100x easier. I filled with G40 and distilled water, clearing the bleeders so there were no air pockets trapped in the system.

Testing and Proving
gmap image of 99W steep
I wanted to demonstrate that this was the fix. So, I drove around town like a total dick: jack-rabbit starts, rapid accelerations... basically zooming around West Beaverton pushing the bus as hard as I could for a good 15 or 20 minutes. It wasn't until I pulled over onto our quiet street that the temperature raised above 185*F (to 188*F), and even then it was only for a second before it dropped back down to 185*F. The real test came later in the week when we drove to Honeyman State Park, up to Newport, through Lincoln City and home again. I'll post on that trip later, but I'll summarize the coolant test with a simple number: 194. 194*F was the highest the temperature ever got the entire 300+ mile road trip, including climbing the coast range and driving in slow, heavy traffic. At no time did I need to pull over because of the temperature. I did not drive especially gingerly either.

There is a hill climb on 99W between Newberg and Sherwood. Every time we take the back road alternate route, we drive up this hill as our last big pull. Accordingly, it is a consistent gauge for how Hapy is doing. When I drove this hill after Newberry, I barely kept the temperature under 203*F, driving with the flashers on in 2nd gear (25mph* tops). This time, Hapy's temp peaked at 194*F running at the speed of traffic (55mph*) in 4th. In both cases, this was at the end of a multi-hour daytime summer-heat drive. This feels like strong evidence the cooling issues have been solved.

That's it for today's saga. Sorry there weren't any real pictures, there really wasn't much to take a picture of, except, maybe, a picture of the cooling system map. That reminds me, I never did document system-by-system how the conversion was done. Hmm.. maybe I should dust off that documentation effort over the winter. Anyway, thanks, as always, for following along.

Sunday, August 17, 2014

Welcome 2dot0

While searching for parts for Flash (the TDI Jetta recently wrecked by T), I found a perfect parts candidate.  Or is it more?  The one on Craigslist was a year younger, but had 192k miles on it.  A gasser with a 2-dot-slow engine, it was the GLS model with a tan leather interior and a bruise-free white exterior.  The biggest drawback: the owner believed he had blown the engine, and had left it untouched since mid-February.  Today's posting is the adventure we had with this listing / car.  Found on Thursday, I wanted to get there right away, which meant driving up the next day.

Oregon -to- Washington Friday Afternoon Traffic
First things first, the parts-car-candidate was living on the far North East corner of Vancouver, Washington.  Since I live in central Beaverton, that represented a 40 minute drive without traffic.  On Friday afternoon in the Summer, it can take considerably more time.  Like almost 3 hours one-way.  Fortunately, I drove Dude (2000 +/- Saturn) and his A/C was working fine.  Still, 3 hours of bumper-to-bumper rubber-banding traffic is hard on a clutch leg.  When I got there, the owner's wife had chosen to happy-hour with her friends, so the owner wasn't really able to focus attention on what we were doing as he had to manage little kids.  Turns out, she hadn't signed the title so it didn't matter if he wanted to do the deal or not; he couldn't.  So, after agreeing I wanted it and that he'd hold it for the weekend, I set back home into the reducing rush-hour traffic.

Haul it Home, Eventually
I got up the next morning (Saturday) and called AAA to see if I could get a tow from Vancouver.  After I was assured that the wait time would be around 30 minutes, and to call back when I was with the victim, I set off back to Vancouver.  Unlike the afternoon before, the drive this time took 40 minutes, even with a detour down Columbia Blvd. to avoid a 2-lane wreck just south of the Interstate Bridge.  I re-contacted AAA at the car and was given a 45 minute expectation.  Perfect.  The owner and I exchanged pleasantries, money and forms, then pushed the car into the street.  I climbed into Dude to wait for the tow truck.  And wait.  And wait.  After an hour, I contacted AAA to see what was going on. and I was given a revised time of another 75 minutes.  Crap.  The alternative: hire another tow company and hope AAA would reimburse it.  By the time the tow truck arrived, I had sat in front of the old owner's house for 3 hours.  I gave the tow guy directions, explained my need for food, and we set off separately.

I only stopped for about 15 minutes to eat, but that was enough of a head start for the tow truck to get to my house, drop the car and leave.  Boo was there to catch it, fortunately.  She and I pushed 2dot0 into the garage so I could consider it's engine's health.

2dot0
The prior owner had told the tale of how the car had fallen into its current state.  It seems that the early February snow storm I mentioned in Front Bumper (part 2) played a major part in 2dot0's demise.  He had driven to the community college for class and had been wrestling for traction in the snow when a large white cloud of smoke came out from under the hood.  He quickly wheeled into a parking spot and killed the engine.  He figured the engine was seized and had the car towed home after the snow cleared.  Because of the weather, getting that tow was a long wait; way worse than mine.  He was unable to get the engine to hold water, so he gave up on it, bought a different car and listed it to make room in his driveway.

$40 Later
That's where we come in on Sunday.  I did the same thing he had been doing: pour a little tap water into the overflow bottle and see if/where it comes out: slightly behind the front driver's wheel.  With a bare hand feeling for where dry meets wet, I was reminded of my diagnosing issues with the cooling leaks on Hapy.  That was the moment I realized it was the same coolant flange which had stymied me with the bus for a year.  Off to O'Reilly's Boo and I went to get a replacement flange and G12 coolant.  On removal, we could see that the old flange had split at the collar almost halfway around the underside.  I put on the new flange, topped off with tap-water to verify the leak, and presto! no leak.  Now the real test: try turning it over.  It started right up, but it blew lots of smoke.  I feared a failing head putting oil into the combustion chamber.  Still, we pulled 2dot0 out of the garage and I took a test drive around the neighborhood. It ran very well.  Brakes grabbed a little bit, but the steering was sure.  The engine had some pep (for a non-turbo 2.0) and the smoke went away.

Get Legal
On Monday, 2 days after having the car hauled home with a "blown engine", Boo and I went out to dinner in 2dot0.  The following Friday (after getting insurance), I drained the water and filled the cooling system with G12 coolant and distilled water.  Then, embraced more risk with a drive down the highway to the DEQ.  We passed, though I hadn't filled the system entirely with coolant and the temp ran high on the way home.  We didn't overheat, though, and we found a shade-tree under which I was able to top-off the system safely.
This past Friday, I ran the paperwork through DMV and got Oregon plates.  Between DEQ, DMV and the parts at O'Reilly, I spent over half of what I spent on the car.  For any other purchase, that would sound really bad, but this was a $500 car.

Now what?
So, now we have another car in the stable.  The question is, "what do we do with it?".  With such a high-mile engine, top-end work is inevitable.  Maybe bottom-end too.  We decided that since it hadn't had the benefit of many miles of trust-building, it will be my 2-miles-to-work car when the weather turns rainy.  T will continue to drive the dependable TDI (Flash), and we returned Joan (really large SUV) to Boo's ex-husband.

That's it for today.  I'd heard of folks getting a really great deal on a car, but after buying and selling over 10 cars, I'd never had that kind of luck.  Until now.  The stories are real.  Since I was looking for a parts car, getting a working car wasn't on the radar, but that's what I got.  I'll post next time on how we resolved the parts we needed to get Flash looking better.

Saturday, September 28, 2013

A Tale of Two Trips

Since I last posted, Furthur announced they wouldn't tour in 2014.  Within a week of that announcement, VW Brasil announced they would stop production of the VW Kombi (bay-window bus) at the end of 2013.  While seemingly unrelated, for those who drive VW buses around the country to see music, this was quite the double blow.  The day after the VW Brasil announcement, I bought a pair of tickets to see Furthur at Marymoor Park east of Seattle to compliment the pair I already had for the following night in Eugene.  Today's post covers the 3-day adventure.

Getting Out of Dodge
Tuesday is a typical workday for me and the Marymoor venue is 3.5 hours from home with good traffic.  Since the show started at 6,  We had to leave by 2 to have any hope of seeing it start.  I'd written off the lot scene.  Work was, well, work, so I didn't actually get Boo and start driving north until almost 3.  With the compressed timeline, we left the bus at home and took the more consistently reliable Jetta.  As speed limits rose, the rain intensified.  We rolled music off my iToy to keep the mood calm.  Outside Fort Lewis, emergency vehicles were on maneuvers, jamming up traffic in both directions without any actual accident scene.  Lost 20 minutes.  We hit Olympia by 5 and the rush hour traffic that usually arrives with evening.  The Jetta handled well, drove fast, and we found the venue with very little trouble.  We arrived less than 30 minutes late, only missing the first song entirely.  We heard the second while parking and the third while walking to the gate.

Marymoor
Marymoor Map
We met our friend Grateful Ed just inside the gate.  He'd driven up much earlier in the day at a much less frantic pace.  Being a park, he was able to settle before 2, fell into a photo shoot for REI and pre-func'd with some heads from WA.  He'd landed us a spot less than 40 feet from the stage, and led us in to a nice 1/2-Step.  As a location to see music, Marymoor is fantastic.  It is one large flat lawn with a small berm ringing the outer edge.  On the other side of the berm are food carts (though the food options were weird and lines non-moving), beverage gardens (no line) and the restrooms.  Aisles through the lawn are painted: no railings, fences or concrete.  I'll absolutely go back for more shows there.  I just wish they'd have some back-to-back nights and a place to overnight camp nearby (EDIT: found a place: Vasa Park Resort).  The crowd was older and small.  We didn't see any wookies either, so we figured that the folks traveling with the band skipped this show and we'd meet them in Eugene.  The show was good, the second set really good with a foreshadowing "Goin' Down the road Feelin' Bad" encore.

Let the Real Adventure Begin
Since Boo and I hadn't eaten since lunch, and it was almost midnight as we left the lot, we concluded we should grab some eats before heading back to Oregon.  A Denny's stop with Ed later, we're ready to go.  Boo and I had been having some sporadic battery issues with the Jetta around town, with the battery light popping on after starting.  After driving for a bit, the light would go out, so we didn't pay it much heed.  I figured the alternator was failing, and had it tested.  "All good," says the mechanic.  I tossed the car-battery charger into the backseat anyway.  So, as Boo drove us through that construction zone between Seattle and Tacoma, we started to get some weird idiot lights firing.  The battery light was already lit, but the ABS light started to flash and the radio started to cut out.  We turned off the radio, but the ABS light stayed on steady.  The air-bag light then lit up.... then the dashboard lights started to dim... the blinkers stopped working.... the headlights turned off... Within a couple minutes we went from safely following Ed down the I-5 to completely failing electrical system.  We couldn't raise Ed on the phone, so we douche-dived the first exit we came upon: Tillicum, WA, and rolled into the Chevron.  While the engine idled, I spotted an electrical outlet on the side of the building.  We hooked up the battery charger and watch the idiot lights turn off one by one.  Boo asked (and was denied) to use the Chevron bathroom and got us a water.  After 15 minutes of charging (1:50AM), we figured we'd gotten enough juice to get going again, but we had the failures cascade again before we made the freeway on-ramp.  We were lucky enough to get back to the Chevron before the engine died.

Tillicum
from Google maps
Sitting in the middle of the Chevron lot in the wee-hours of the morning was surreal.  An older boy / young man was peddling a bike through the lot and helped us push it into a parking spot.  He then asked for a smoke and rode on.  I called in AAA for a tow home, and learned than my membership got 100 free miles.  The remaining 40 were my problem, but the driver would be there within an hour.  Once we got the immediate problem resolved, Boo and I looked around at where we'd landed.  Sketch.  Very Sketch.  Cyclone fencing, closed businesses and boarded up cheap apartments.  Sweet.  We saw the Taco Bell and McDonald's down the street had their lights on, so we walked down there to sit and wait.  Neither business was open, and we concluded they left the dining room lights on to reduce break-ins.  On the walk and wile waiting in the car, we got a more intense sense of how sketchy the area was.  The young guy on the bike kept re-appearing, clearly following a route from one location to another.  A a light blue cab stopped at the Chevron multiple times (though that could have been innocent enough).  And a young woman all dressed in black appeared multiple times, dashing from one boarded up location to another.

AAA
The flatbed tow truck arrived shortly after 2:30AM, driven by a guy with a long chin-strap beard that ended flat (like ZZ-Top).  He reminded me of a gnome with a plumber's crack.  While hooking up the car, he admitted that he'd worked until midnight, had worked the night before, and had very little sleep.  We climbed into the cab, and Boo told him that we needed first to stop at a restroom.  The driver flipped a U-turn, led her into the Chevron and got the clerks to let her use the restroom.  Apparently, they don't let customers use the restroom because they've been robbed so many times.  Awesome.  With thoughts of "lets get the hell out of here", our gnome wheeled to the freeway and we nosed south.  The truck was bouncy, the bench seat nearly as hard as a bleecher, but fatigue finally caught up to me.  I was awakened by a few big bumps, as was our gnome-driver at least once, motivating Boo to stay awake, chatting him up so he didn't fall asleep.  Her sacrifice meant I could sleep (we thought she'd sleep on the drive to Eugene), and I didn't awaken for good until we were on the Freemont Bridge watching dawn break over downtown Portland.  The Jetta was tucked away on the driveway at 6:AM, and after refusing a cup of coffee, the driver-gnome took my $160 for the 40 miles of towing and headed back to Washington.

Hapy
Boo hadn't slept for more than 15 minutes, and I'd gotten about 2 hours of rough sleep, so we decided to take a nap or a few hours before thinking about Eugene.  At 9, we hosed off, scarfed some instant oatmeal, and started loading the bus.  Since we were going to overnight in Boo's sister's driveway, we didn't need much camping gear, just sleeping bags and food.  We'd agreed to meet at Grateful Ed's at 11:30, and we arrived a few minutes early.  Hapy (the wonderbus) needed to get his gears warmed up, but once we got to operating temperature, he handled great.  I'd driven him to work and back a few times last week to get some confidence up and to confirm that the leak was solved.  Once Mayhem arrived at Grateful Ed's, we started the carabus south, taking turns leading.  Hapy can cruise at 60mph with the RPM's just under 3k.  We discovered that pushing the RPM's above 3k increases the noise significantly, so 60mph became the standard cruising speed.  Because of the late start, we drove straight to the Cuthbert Ampitheater parking lot, agreeing to meet Boo's sister and husband there.  We arrived just after 3, and got a prime parking spot along the main strip (parked with sliders facing each other), but not on Shakedown Street.  We did not see many other old buses, but the few we did see were close by.  Again, we leveraged the removable middle seat as a lot couch, creating seating for all 6 of us easily.  I'm really loving that.  On the whole drive, Hapy's temperature never hit 190*, and stayed at 185* almost the entire time, only climbing above after pulling uphill.  He handled very well, making the drive to Eugene the highlight thus far.

Cuthbert
Furthur farewell
The Cuthbert Ampitheater, unlike the Marymoor, is almost completely pitched ground.  The front now has reserved seats, but the concrete is not flat.  Behind the seats is a narrow non-flat grass area where seats are not allowed, backed by a 18" drop-off down to a cement walkway.  Behind the walkway is the steeper lawn where low beach chairs are allowed.  Simply standing on that grass wears on your muscles like running downhill.  Now, try dancing for 3 hours.  Yeah, that can hurt, but its worth it when the show is smokin'.  They started with a Brother Esau, and kept it funky throughout.  The crowd included many more of the usual road-warriors, supporting our thoughts about them skipping WA.  It also included many of the Oregon old-guard 60's-era hippies.  We sat next to a couple who drove in from the coast, for example, who had been seeing forms of the Dead since the mid-60's.  Ken Babbs was there.  Very cool when you contrast that with the kids dancing on the walkway who were born after Jerry died.  Unlike 2 years ago, the scene in the lot after the show was much more calm.  The staffers weren't trying to cowboy the concert-goers out of the lot 20 minutes after the last note was played.  There were tour-heads swinging beer, T-shirts, posters and coasters.  For the first time since the 90's, I heard a nitro tank filling balloons.  

Homing
Belle heading home
Boo, her sister, Grateful Ed, Mayhem and I skipped the after-party, but Boo's sister's husband went and closed The Cooler.  The band played until almost 2:AM.  If we'd gotten more sleep over the prior couple of days, maybe we would have gone too.  Instead, we tipped a couple beers, played with Boo's sister's dog and visited in the comfort of the old hippie Dr. Seuss house.  We grabbed breakfast at Brail's and headed north.  Hapy again, drove like a dream.  This time, Ed led the carabus (see picture at right), setting a slightly slower pace to help keep his temperatures down.  That also lowered the noise in my bus a little bit, making the drive all the more pleasant.  We got home a little after 2, making the entire Eugene run, including to/from the venue, Boo's sister's house, grocery stops, etc on less than one tank of diesel.  I'll know my actual mileage when I fill again, but I figure I drove 250 miles and I put in just under 10 gallons before leaving home.

As always, thanks for following along.  The long trip with the bus has helped me understand what needs to be looked at next (adjust shifting linkage, headliner, deep-cycle battery charger, tighten steering, better seal for engine hatch, fuel gauge, painting the exterior...).  The journey is the destination.

Monday, August 12, 2013

bum buh NAH!

In my last post, I talked about getting the coolant to stop dripping.  Today, I'll briefly cover the test flight.

Re-Assembly
rare August rain approaches
Sometimes, when you put a project back together, you almost know it isn't right.  The re-assembly seems to take a little longer, parts don't fit together as easily.  Its almost like the repair gods are trying to tell you "don't bother, you got it wrong", but we press on.  Other times, the re-assembly is flawless.  The hoses just line up, the parts simply click together.  The re-assembly of the bus after trying to fix the coolant leak ran the spectrum.  I got to where I couldn't trust the re-assembly ease as a barometer for when my repair was crap.  So, this time, when everything just fit (I didn't drop any fasteners, and the engine started on the first touch with the key, etc ), I didn't trust that nodding, "oh yeah" feeling.

Taking Flight
I didn't drive very far.  In fact, I didn't actually leave the neighborhood.  Amid cheers from the boys, I drove out the driveway, and down to the end of the street, turned around and backed back into the driveway.  All told, including just letting the engine idle, it took me 15 minutes or less.  The engine didn't get up to normal operating temperature, but in the past it didn't need to for the stream of coolant to appear behind the bus as I drove.  This time.. there wasn't a stream.  There were no well-spaced drips.  There was nothing but dry pavement... and more cheers.  This time from me.  "bum buh NAH!"  we have success!

Bath Time
afterbath
So, after so many months of not operating, the boys wanted to give Hapy a bath.  We played with the hose and some soapy water and then let Hapy sit in the sun drying for the afternoon.  All the windows were open, the pop-top open and they clambered around inside like they were half their current ages again.  There are few things like a microbus for a fort when you're a kid.

So that's really it for today.  I plan to drive Hapy to work a couple/few times this week (with the life-raft bike in the back just in case) to verify the cooling.  I'm very optimistic.  He hasn't been this dry since I first installed the engine with Justin's engine harness.  The boys are already talking about taking the bus to the mountain this winter.  Fortunes can turn that way, I guess.  I suppose I should start thinking about how we should carry skis and snowboards next :)

Sunday, August 4, 2013

Holding water... holding my breath

Hey folks.  I may have solved the coolant leak problem, so I'll focus on that.  We've had some family events over the Summer (as have you, I hope), and I'll touch on some of that too.  Rockin' on...

Planning the Cut
cooling diagram for reference
In my last post, I concluded that the hard line that runs across the top of the bell housing was the cause of all of my leaking problems.  I was convinced that it much be the cause.  So, I removed some parts of the intake and the vacuum ball to gain access to the pipe.  As I did, I found that there appeared to be a leak at the coolant flange.  "Ay carumba," I cried, believing that yet again it was the coolant temperature sensor leaking.  With careful inspection using my dry fingers, I was able to prove that it wasn't the sensor, but it was the flange itself.  Curious.  I removed the flange, covered the o-ring with high-temp sealant (red Lock-tite product) and re-connected everything.  It failed to hold, but the water leak pattern was the same, leading me to believe that I'd found the actual problem.  Next stop: new o-ring.

By the time I'd realized it was the flange-to-head connection, it was the middle of last week.  On Friday morning, I hopped on the phone wit the fine folks at the FLAPS (Friendly Local Auto Parts Store): Discount Import Parts (DIP).  Gotta love those acronyms.  The guy on the phone mis-heard me, and pulled an entire outlet flange.  So, wen I arrived to get my o-ring, there was a little confusion.  He pointed out that the flange will warp sometimes, and they had a 100% return policy for un-installed parts.  Figuring it was a worthwhile $10 risk abatement to just take the flange, I took it.  And a couple o-rings.  And another temperature sensor o-ring.  And some high-temp gasket sealant.  And a couple bottle of coolant.  Simply put, it was a project in a bag.

Add a Flange, drop the Reverb
Old flange. rocked left to right. 
With the old flange in hand, I was able to compare what a new one was like.  Posted on the right are hard-to-discern pictures of the old and new flanges.  When the new flange is pressed against something flat (in this case a piece of finished furniture), it is perfectly flat.  The old flange rocks from corner to corner: the corners which don't have bolt-holes.  This told me that once tightened down all the way, coolant could escape through a neighboring corner.... just like it did.

Now, for the easy part.  I made the same modification to the new flange as I did to the old one: cut off the outlet which lead to the oil-cooler and sent a short bolt through the hole, sealing it off.  This is necessary because of the proximity of the flange to the frame in the bus.  I took the high-temp gasket stuff and put a thin bead on top of the o-ring, and let it sit (per instructions) for 15 minutes.  A few minutes of re-assembly later (new coolant temp o-ring, fully seat the temp sensor, new C-clip) and the flange was ready.  It bolts on easily, once the holes line up :)  The hoses slid back on, the clamps seated well, and all things appeared right.  Finally, you have to be patient for 24 hours while the gasket stuff completely dries.  It doesn't specify it on the tube, so in an emergency situation, it may not be necessary.  Still, I didn't want to go this far and have that be a problem.

New flange. no movement.
Anyway, this morning, I poured a bottle of water into the overflow bottle and listened.  Glug glug glug went the air bubbles through the top of the overflow bottle.  They got quieter to a tick-tick-tick sound, to silence.  Straining to hear the "sss" sound of a leak, or the "bloop" of a water droplet landing in the catch-pan, I still heard nothing.  The water appeared to ave leveled off just under the fill line.  I squeezed the rubber hose leading from the flange down to the oil cooler and radiator... no leak, just a little more air released.  Hmm... I seem to have fixed it!

Graduation Congratulation
After attaching the flange yesterday, I spent the afternoon with my family (including Boo, T & C) celebrating my sister-in-law's graduation from a Master's program.  For 5-1/2 years she worked through first completing her bachelor's degree and then a master's so she could have her dream job: teaching nursing.  She started working that dream job a few months ago, so now, with paper in hand, she's reached her goal.  Emotional speeches and a slab of chocolate cake later, we all recognize just how much effort it took.  Congratulations, J.  Your impact on the health and well-being of thousands of patients will be monumental through your demonstration of providing care from a place of respect and love.

That's it for now.  I have about an hour of buttoning-up left on the bus and then we'll be ready to test drive.  If he holds, then we can start looking at what's next.  Maybe, we'll just enjoy him as-is for a while and try to wedge some camping in before school starts up again.  Regardless, thanks for following along...

Saturday, July 20, 2013

Back from having fallen off the edge

So, yeah, its been 4 months of silence.  Now, I'm back in a somewhat stable space again, and I can take on the bus and the blog.  I didn't exactly fall off the edge of the Earth, but it probably seemed that way.  4 months ago, I wrote about a theory about the leak, but I wasn't able to really test that theory until today.  I'll touch on that and provide a whirlwind tour of my last 4 months.  First, the leak....

Dude, You Crushed It
ALH TDI cooling diagram
As you may remember, I've been suffering some coolant leak problems since I swapped Justin's engine harness out for mine.  We thought it was the coolant temperature sensor.  At this point, I think that actually was the original leak source.  I actually got it fixed last Labor Day when I last pulled the engine to trade out the old tranny for the new high-geared one.  Unfortunately, I believe that was when I damaged the coolant hard line that runs over the top of the bell-housing (part #11 in drawing).  In a stock install, this line is not in harm's way at all.  In fact, I'm not sure why they did that rather than just use rubber lines with junctions, but there was probably a penny saved in there somewhere.  Anyway,  In the bus, this hard line runs very close to the frame to which the trans-axle is mounted.  Adding insult to injury, the hard line has a bracket as part of it which needs to be attached to the front of the block,sharing a bolt through the outlet flange.  Its not obvious in the picture, but its the bolt that is referenced just above the #12 in the picture.  Anyway, it wasn't connected, so I thought the leak was being caused by that not being connected, and the lines allowed to flop around.  It's possible the hard line damage was caused by this.  Its also possible that I crushed the line, popping a little hole in it, when I did that Labor Day install.  Groovy.
Boo has to work tomorrow morning, so I'll start attacking the problem.  I plan to drain the coolant down below that level (assuming the leak hasn't done it for me), cut the hard line above the junctions and route rubber in its place.  I'll need to prevent the rubber from rubbing against things, but after examining the coolant schematic, there just isn't another explanation for why its leaking now.  The #20 and related bits are gone, replaced instead with just a simple heater circuit.  Hmm..

Move ah move ah
Shortly after that last post, Boo and I had finally had it with the condo, the idiots on the HOA board and the self-serving nature that same board spent the budget.  The last straw was after we attended a board meeting about nonsense, but the published minutes described decisions which were never discussed.  Crazy.  Representative government my ass.  So, we hit the rental papers, found and landed a house within a couple weeks.  The current occupants weren't ready to leave for a few weeks, but that gave us the time to rapid-pack 2 families worth of stuff while trying to helicopter boys to lacrosse practices and such.  It was a good time Spring.  We moved in early May.  Immediately following the move-in, we set our eyes on getting the condo ready for someone else.  We followed the Navy axiom of "if it moves, oil it; if it doesn't, paint it".  Needless to say, we pushed 1080 square feet of paint, replaced a ton of broken or worn down stuff, etc.  To be totally fair, 95% of the work was done by Boo.  W(Sh)e finished on Wednesday.  It looks amazing.  Now, we can really address the sea of boxes stacked up in our living room.
On move day, the garage (like any move) became the default staging area for stuff when we started running out of time.  After a Saturday of digging, I had room for the bus.  I am still digging out, but I was able to crack into the bus today.  I don't know where most of my parts or tools are, exactly, but that won't stop me from getting in there with a saw anyway.

That's it for today.  Now that we've moved, school's ended, the condo is done, etc, I expect I'll be back to updating more often.  Its nice to be back for sure.  Tomorrow, I'll get that hard line cut out of the deal and see if I can get a test drive in this next week...

Thursday, March 28, 2013

Musings over an Open Engine

This week is Spring Break in Oregon.  I was fortunate enough to get the week off and my boys, so its been a week of play.  I'll post on our fun later on.  I do have a theory on the leaking bus, so I'm focusing on that today.  You see, I went out there to look at the engine with the access hatch open while sipping my morning coffee today....

Coolant Flange... What?
I installed a TDI engine from a manual-transmission'd NewBeetle into my '72 bus.  The manual transmission-mated engine has a weird flange coming off the head that includes some coolant warm-up plugs.  When this engine is mated to a bus transmission, and put into a bus frame, that weird flange really sticks into the fuel tank.  I solved that issue by swapping that flange with one from an auto-tranny engine.  I don't know why they're so different, but the 3 main connectors are there: one to route to the oil cooler, one to route to the heater and one to route to the radiator.  Also, there's the coolant temp sensor.  I have droned on and on about the temperature sensor.  I still think there's something wrong there, but I'll leave that for now.

Not It
I modified the auto-tranny coolant flange.  Even with the shorter imposition into the fuel tank, the outlet for the oil cooler banged into the bus frame.  So, I cut that one off, leaving a little material on the end.  I screwed a bolt into the hole and sealed it with RTV.  One might think that's where the leak is... but its not.  That spot has been bone-dry since day one.  In a recent post, I talked about tightening the flange to the head.  That is still rock-solid, so that isn't a leak source.  There's an outlet to the radiator.  That one is pretty big, and the route of the line takes a 90* turn towards the ground, and would usually route straight to the radiator.  In my set up, it hits a "T" where a small off-shoot goes to the oil cooler.  Leak site?  Nope.  The last outlet, though, may be our culprit.

Dumb Engineer Meet Unobservant Shade-Tree Mechanic
The outlet that routes to the heater is really nothing special.  It points straight out to the left (driver-side) and a hose runs to the heater core in the auxiliary battery area. What does make this outlet interesting is that there's no clamp holding it to the flange.  *face palm*  There is a clamp there, but its one of those awful new VW style ones that require a funky tool to open and close them.  I'm sure VW engineers had their reasons for creating these clamps, but I'll take a simple screw-based clamp over one of those things any day.  Anyways, I don't have that funky cable-driven hose clamp tool, and I apparently never got around to solving this clamp issue.  Tomorrow, I'll hit NAPA or similar and buy a clamp that fits.

If that clamp was the problem, this will serve as one more example of why you should do the job right the first time.  If you do "enough for now", "for now" will be just as short-lived as it sounds.  Thanks for listening-

Monday, February 6, 2012

Mopping Shop and Eating Crow

Being Monday, today is all about updating what happened over the weekend.  I was able to test drive the bus,  take a run at the mountain, work on the cooling system some more and even watch a little football.

Mopping Shop
Well, as you may expect from the sub-heading here, the test drive got a little, uh.. wet.  Like my prior attempts to drive the bus, I had all the usual trappings.  Everything seems fine, and then its not.  I started him up, checking for leaks and for air bubbles in the overflow bottle.  Nada.  Then, I drove the bus down to the local 7-11 and picked up a celebratory beer.  Drove home.  By the time I got home, the engine was warmer, and the coolant started to leak.  I parked him in front of my place and like a nervous puppy, he formed a puddle underneath.  Drat.  I proceeded to mop the garage floor where he is usually parked and backed him in.  I slid a pan under the drip, went upstairs with my now-conciliatory beer and watched the Blazers beat the tar out of Denver on tv.

View of Mt. Jefferson
from the top of Magic Mile
Timberline Shines
I awoke to an alarm on Sunday morning, triggering a day playing in the snow.  I grabbed Boo, met my brother in Hollywood and made it to Timberline Lodge by 9:30.  We figured the resort would be less crowded on StuporBowl Sunday, but there were still quite a large number of folks there.  The weather was absolutely fantastic: sunny with a slight wind.  It was cold enough to stave-off the melting but warm enough so you didn't need lots of layers.  Perfect weather.  The snow was pretty packed, but there weren't many ruts and the groomers had churned enough to keep the top fresh.  Everything except the Palmer Ice Sheet was open, though the Magic Mile trails were pretty icy (making them fast and easy to catch edges).  Alpine, Thunder, Glade and Kruser were really good runs, with plenty of open space between folks.  The terrain parks were jammed, but I avoid those anyway.  We played until around 2 when we packed off back home.

Dinner of Crow
I dropped my brother and Boo off at their respective homes and hit the parts store for an o-ring.  I'd come to the conclusion that the leak was caused by an o-ring failure, not a human error.  I got home and my legs declared they were too tired to do anymore.  So, I snapped on the game.  Boo and I stopped for a quick bite at one of our regular spots (Mandarin Palace on the corner of Allen & Scholls Ferry), and I saw the 1st quarter there.  It seemed like it was a decent enough slow-start StuporBowl.  By the time I got home with my o-ring, got my snow stuff into the laundry and the game back on, it was nearly over.  Yes, that was an amazing finish to any football game, and it being the final game of the year makes it all the more impressive.  I watched the post-game interviews and swallowed my crow.  Maybe I'll try to watch the game next year.  It sure would be nice to see a West Coast team in there, though.

More Cooling Surgery
After the game, I took my new o-ring and swapped it into the bus.  This time, I did things a little differently.  First, the o-ring is a little oversized.  The stock part is metric, but all I could find was one in imperial sizes. So, rather than 3mm thick, it is 3.1mm.  Instead of 20mm inner diameter, it is 19.6mm.  You get my point. As a result, the o-ring was snug on the temperature sensor and snug in the flange.  Once the c-clip was back in place, I couldn't wiggle the sensor at all.  I contrast that with the ability to wiggle it enough to make it leak before, and I think I've found the leak source.
Second, I captured the coolant differently.  Rather than try to drain coolant, I caught all of it at the flange during the sensor removal.  Take a clean kitchen garbage bag and push the closed end down from the flange towards the ground.  Wrap the open end around the flange and remove the c-clip.  Pull the sensor and all the coolant goes into the bag.  Put the new o-ring on the sensor, install the sensor and pour the coolant back into the overflow bottle.  In my case, the coolant bottle didn't drain during the work, so I had to start the engine to circulate the air bubbles back into the bottle.  Then, I re-filled it from the bag.  Neat!  And no mess!

I'll test drive when I have some time this week.  Like every other time, it feels like I have it fixed.  We'll see. Maybe this time I actually found and fixed the problem.  Thanks for following along.  More next time..

Wednesday, January 18, 2012

Reality Strikes

As optimistic as my last few posts were, there just had to be a reality check.  Unfortunately, it came in the form of a coolant leak on Monday, so the trip to the mountain for MLK Day was scrapped.  I'll explain that today.  I haven't gotten around to looking at the problem, but I have a theory.  I'll hit that at the end.  First, a quick snow update from Saturday and the state of C's concussion.

Saturday Sliding
looking up the Multipor lift
The 6 of us (Boo plus boys in one car, me plus my boys in another) hit Mt. Hood Ski Bowl on Saturday for some afternoon and night skiing.  C, of course, couldn't slide because of his recent concussion.  He spent the day in the lodge with Boo's younger son (K2) playing on a laptop, playing chess and by the end of the day, making a snow-fort outside the lodge.  C's concussion symptoms are completely gone and he's back to his old self again.  The snow on Saturday was probably the best I'd seen all season.  Fluffy, yet quick, so you could get some good speed going, but if you took a spill, you had a nice soft powdery landing.  The lifts and slopes were not that busy.  In fact, look at this picture.  There was no one on this lift except us.  Nothing but empty chairs extending into the falling snow.  Even the run under the chairs was empty.
The cafe and Beer Stube were busy, though, because of the NFL playoffs.  I found that a little amusing, actually: drive 2 hours from home through chain-required conditions to watch a football game on tv.  I admit I watched the end of the Saints-49ers game while having a pint, but I spent the rest of the day and night on the slopes, eating up that powder until my legs couldn't take any more.  It was fantastic.  I'll be up there again this next weekend.  Maybe I can get the bus fixed in time... which leads me to the reality check....

My Outlet Flange History
If you've been reading this blog a while, you'll remember the troubles I've had with the coolant outlet flange on the front (pointing towards the front of the bus is "front") of the engine.  This flange attaches to the cylinder head where the valves live and allows for the passage of coolant from the engine out to the heater core, the radiator and the coolant bottle.  There's also a little coolant temperature sensor in there that connects to the engine harness that I've had all my troubles with.  I don't recall how much I complained about the difficulty in getting the coolant sensor in-place and the harness clicked into it.  It was a real PITA.

Flange Drives Tank Design
This area at the front of the engine is also the cause of the modification to the fuel tank.  The flange sits just above the bellhousing where it connects to the bus frame and it juts into the space where the fuel tank is.  So, getting your hands in there for maintenance can be challenging.

Flange Placement
sensor for ALH TDI engine
Last, the way the coolant sensor is set in place in the flange is a bit strange.  The sensor is about an inch long with the 4-prong plug at one end and a bronze post at the other.  The bronze post extends into the passing coolant, collecting temperature readings.  Between those 2 ends is where the trouble lives.  First, an O-ring needs to be placed around the wider throat of the sensor as it sits against the opening in the flange.  Then, the sensor is held tightly in place while a "U"-shaped plastic holder (U-clip) is set into the slots in the flange.  Getting all of this to work is much easier when the TDI engine is in its more native placement.  In my bus, this 3-handed job is performed while hanging over the top of the engine with your hands slipped between the engine and the fuel tank.

Leaks
When I swapped out the original harness for the borrowed one, I had challenges getting the everything right.  The coolant sensor was a real bear.  I had leaks.  I broke a U-clip, lost another one.  Lost a washer.  Then lost another one.  Finally, I got it all together, and I was able to drive around eventually.  When I swapped my original harness back in, I had some challenges getting the harness to reach properly.  I didn't really think about what the impediment was, I just worked it and worked it until I had enough cable to make it, and then clicked it together.  My test drive seemed fine, but I ended up low on coolant.  Later, there was what looked like water on my garage floor, but I chalked it up to rain.  Once I saw the puddle form under the bus at the gas station, though, I knew there was a leak, and the ski trip was off.

Cause Theory
What I didn't think about was the stress I placed on the sensor trying to get the cable to reach.  I believe that effort affected the sensor such that the U-clip no longer is holding the sensor flush against the flange.  I think the stress of the cable effectively pulled the sensor out enough to allow coolant to escape.  The sensor location is the epicenter of the leak, so this theory does seem reasonable.

I'll be digging into this tomorrow night after work (and a trip to the gym).  I hope the U-clip is undamaged.  I plan to remove the sensor, re-seat it, re-clip it and test for leaks.  I need to re-route the harness to eliminate the stress as well.  I wish I had a trip report instead of another "guess what I found" post, but that's what happens on this adventure.  Thanks for following along...

Friday, September 25, 2009

Fuel Tank solved

Progress! I have a fuel tank in the bus and the engine has been re-installed. Hapy is ready for Hal's welding work to resume on Sunday, and I'm able to move off of the fuel system for a while and focus on some other things.

Tank modification design
After proving that the below-deck boat tank wouldn't git in the fuel tank bay, I went looking for other alternatives. I heard and tried suggestions ranging from putting the boat tank under the rock-n-roll bed to hammering the original tank. I had marks on the tank from where the vacuum pump hit during install attempts and I had marked where the water flange was hitting the horizontal seam. I extended out from those end points a few inches to provide room for coolant lines and drew vertical lines on the tank. At the top, I measured a 45* angle towards the center for 5" and then drew a straight line across the top (parallel to the rear lip of the tank) for the top cut. This extra space would provide room for the vacuum pump for sure, but it also provides space for my hand to go in front of the pump and/or flange if I need to fix something later. The pictures should help illustrate this. Please contact me if you want/need more detailed measurements.

Finding a Welder
After exhausting what I felt were all other options, I found and hired a welder off of craigslist. I wasn't sure Hal wanted the work with the exploding fumes potential. Brad (the CL guy) has done other automotive welding and fabrication and wasn't at all concerned about welding on my tank. The finished job is exactly what I wanted, right down to the vent line included in the new material. I was very stoked.

Painted and Ready
I thoguht about running some Bondo onto the seams to smooth them out, but I figured I'd probably just dork it up somehow and they would eventually become rust spots instead. So, I just shot the rear of the tank with Eastwood's Tank Tone. I re-mounted the fuel level sender, soldered a ground lead with a couple of eyehooks, and it was ready for install.


Fuel Tank Install
Actually getting the tank in and out of a bus with a TDI in the engine compartment isn't brain-hard, but its body-hard. The engine needs to be lowered all the way to the ground. Then, the vacuum pump needs to be removed as it interferes with the tank install. Then, put your bus jack into the right-side (passenger) rear jack mount and raise the bus to the highest the BusDepot jack will go. The tank will slide in through the rear engine hatch from the right side, glide over the top of the engine and get rotated into the fuel tank bay. The fuel fill line took some muscling, but the vent lines were easy. Mount the ground wire to the body and then the hold down straps. I did not wire-in the level sender lead because I'm not sure how that will integrate into the main wiring. That should be easy to reach, especially now that the front edge of the tank is a few inches closer to the sender.

Engine In
Once the tank was in place, it was time to get the engine back in. Now, I still have to tighten down the fuel tank hold down straps, but getting the engine in was a bear. A few posts ago, I mentioned that I wasn't careful enough on my jack adapter alignment, so the engine came down a little crooked. This made the re-install almost as bad as the first time without the adapter. I finally got the rear transaxle bolts in though - driver side first. Now, we're ready to finish out the engine mounts come Sunday.

What's Next
I expect Hal around 5 on Sunday. With the shortening of the days, we won't have much time, but I'm optimistic that he'll be able to get the rear mount finished on Sunday. We still have the dog-bone to integrate, but there may not be enough time before darkness falls. While he works on the rear mount, I'll be getting the starter back in, and the vacuum ball installed. If time allows, I'll get the exhaust manifold/turbo re-installed and tie-in the waste-gate actuator into the vacuum system (as well as the vacuum pump). If I still have time, I'll start working on the induction side of the engine. I don't have enough detail to work on the radiator stuff yet.

I'll post after Sunday's work is done.

Tuesday, September 8, 2009

School starts

So, Summer has effectively ended around here. We attended our friends' goodbye-to-Summer BBQ last night, and sent the kids off to their first day of school this morning with bags full of supplies. If going to see the Dead in a friend's bus wasn't motivation enough, there's nothing quite like the fear of Fall to get that Summer effort moving at a dead run. I've got to figure out what can reasonably be done with very little time between now and the rainy season and then Winter.

I figure I have about a month, maybe 6 weeks at the outside before the rains really hit here in the PacNW. Of course, it isn't drought between then and now so I need to plan while considering that could lose an afternoon to bad weather. I can't afford to lose a day to poor planning, like I lost Labor Day weekend. How did I manage that? Well, I took too long coming to the realization that I couldn't fit the new engine and the old fuel tank together. I ordered the WestMarine tank I mentioned in the previous post, but not until Friday. So, I was able to drop the engine and get the old tank out, but I can't move forward until the new tank is in hand and I've figured out how to fit it. Back to planning... I have maybe 3 dry Sunday afternooons and a few after-work evenings available. In order to be ready for rain, I need to have a few systems buttoned up.

1 - engine mount
This work needs to be completed, if for no other reason for my sanity. I think Hal's wife will have him on the couch if this stretches into the deep Fall anyway. We're very close on the tower, but the dogbone needs to be tied into the deal still. This will be close, and will keep Hal busy most of the way to the rainy season.
Estimate: 8 hours more.

2 - fuel system
The fuel tank questions need to be resolved and no longer force the engine to be dropped. Fuel tank in and fuel filler hose routed at a minimum. If the rest of it could tie in, that would be a bonus, as getting to the top of the tank isn't easy once the engine is in. This is my first priority. Tank will be on-hand Thursday afternoon. If I can resolve some fitment issues and get it into the tank bay before the weekend, it would be fantastic. I don't expect that to happen, however. Better expectation: lose the weekend to it, but done by Sunday night.
Estimate: 6 hrs.

3 - vacuum system
It is almost ready. Once the engine can go back in with the stock vacuum pump, this system is effectively finished. There's the vacuum ball. Figure a couple of hours tops for that. I can leave a few of the remaining lines disconnected, but I will have to seal them off for the Winter. This should take less than an hour. Hooking them up properly can't be completed until later anyway (no air filter, don't want to hook up the waste gate until the mounts are done).
Estimate: 1 hr now, 1 hr later.

4 - primary electrical
Once the engine is in "for good" I can put the starter in. It gets in the way of the p-side tranny bolt access, so I'd rather leave it out until the engine is in for the Winter. Installing the starter should takes less than an hour, but it'll probably be one of those after-work deals, and everything takes longer in the dark. You remember I don't have a garage for this project, right? After the starter, there's the battery and the hot-start relay. Those items can wait. There's little point in leaving the battery outside in the rain all Winter, and I'll need some thinking time on the wires to know how to hook up the relay.
Estimate: 1hr now, 2 hrs later.

4 - coolant system
Based on the estimates for the other systems I'll be working on, I should be able to focus on the coolant issues by the mid-point of my 2nd dry Sunday. With the fuel tank resoolved, we'll be back to the original (auto-tranny) water flange, so the biggest immediate issue will be resolved. The best goal for now, though, is to have a clear plan for locating the radiator, and routing the pipes. Perhaps, if that is planned early enough, I can have the pipes routed before the rain hits. Not terribly likely, but if everything else stays within estimates, there will be 1-1/2 afternoons.

5 - engine holes
The turbo is loosely hanging on the exhaust ports. The oil cooler is disconnected. The water system is open. All this needs to be closed up, and rags hammed into openings. We won't get to the new oil cooler unless something uber-fantastic happens, so the old one will be put back on to seal the system.
Estimate: 1 hr.

Anyway, no real meat since the last post other than I ordered the tank, and I got the luggage rank re-installed on the top. I never got around to painting it, but at least it's clean underneath it. I'll post pictures and progress on the tank after its in-hand and (hopefully) in-bus.

Sunday, July 26, 2009

Camp cancelled, work progressed instead

The day before we were going to leave for Central Oregon, we found out that our reservations had been canceled because of "bear activity". So, while our friends (Belle's owners) tried to find another place to camp, my wife started to suffer through some kind of sinus thing. We packed for the trip, loaded the car and hoped for the best. Our friends found another spot, and called us with the details, and we shared our bad news. Thursday morning, we couldn't go; she was still sick. Friday morning, we couldn't go for the same reason, so we ended up canceling the whole trip. Our friends went, though we haven't heard from them since we called with the bad news, I'm sure they had fun. I already had the 2 days off from work, so between running for tea, making meals, yard work projects and helicoptering the kids around, I got some things done on the bus. Details follow...

Starters for starters
I took the starter to a rebuilder on the SE side (All Battery & Electric) to have the starter I was given by Justin the TDI guru. The starter tested fine, but I noted one thing: the sprocket on the starter pops out about 3/8" when 12V is applied. I thought this was especially interesting since the adapter allows the starter sprocket to mesh with the flywheel when it is not energized. This makes me think that the starter will introduce some drag on the drivetrain that is not typical. I'm going to look into making a 3/8" standoff. I think a piece of pipe for the starter and a couple of nuts on the bolts would do it. Since the starter didn't require a rebuild, I'll be returning the starter to Justin and start shopping for a starter. The rebuild was estimated at $60 to $160 depending on how "toast" it was.

tanks for nuttin
I thought I'd drop the engine, slap in the fuel tank, and get the engine back in on Friday. This would be my first attempt with the ATV jack adapter that I built. The adapter worked beautifully. I was able to set it without a great deal of guessing, and I had complete control of the engine at-pitch. Dropping and raising the engine is now very easy, and I can drop / re-install within 45 minutes by myself. Unfortunately, the engine is still much taller than the old engine, so the rear end of the bus must be raised considerably to get the engine completely free of the bus. Anyway, in order to get the tank in, I had to raise the right side with the BusDepot jack all the way to its highest setting. Once the tank was threaded in, the engine wouldn't go in because of the vacuum pump and the hot coolant exit flange (even the smaller non-US manual version).

So, I dropped the engine again. After giving it considerable thought, I've decided to remove the vacuum pump, and put a block-off plate in its place. I'll be selling the pump to pay for a Cummins electric vacuum pump. For the flange, I am not sure what to do. I had a spare and I cut it up to see how bad the clearances are. The RTV is still setting, so I'll post on that another time. I replaced the thermostat and the pipe that goes with it this morning. I figured it might be a good time to get it done.

Completely tank'd
Since I've decided to keep the original tank and figure out how to fit the engine around it, I had some tasks left. I reconnected the side vents with some fuel line and clamps. The original fuel filler vent was mostly steel, but it used a no longer available (NLA) rubber hose. So, I replaced the whole stretch with a single rubber hose. I grounded the fuel level sensor and strapped the tank down. All that's left is threading in the nipple at the bottom and tying in a "Y" for the return line.

I popped the engine back in this morning. Hal and I will attack the mounts again next Sunday. Hopefully, we'll fab a vacuum pump block-off plate. I'll look into the water flange viability before then. Not sure if I'll make any real movement this week, but I hope to get the "Y" to finish off the fuel delivery and try the flange.

Pictures (from top):
1 - the current state of the engine. No vacuum pump, no water outlet. holes stuffed with rags.

2 - engine in with tank before tank was strapped down, and before the problems were discovered.

3 - engine on the adapter. works better than expected.

4 - finger showing where the badness is with the vacuum pump.

5 - my hacked-down flange after I removed 3/4" of pipe from the mount point to the pipe. I RTV'd the parts together to see if a flange like this would work. Unless something unexpected happens, this is not the permanent solution.