Showing posts with label K2. Show all posts

Tuesday, April 4, 2023

We're Out

Similar to a prior post (We're In), this post serves as another major milestone, marking when we got the last of our things out of what we have been calling "existing house" and leaving it for the last time. I posted about moving the garage to the ToolShed (see Shop to ToolShed) and about moving the vehicles (See 4-Wheeled Friends...), so I'll skip that here. Those significant steps completed while the things below were happening. The first 2 pictures dramatically depict the significance of what has been resolved with the current state at the top and those same 2 rooms after we had them 90% empty only to receive a 1-bedroom apartment's worth of belongings.  

Moving Flotsam
living and dining ready
The end of a move can be incredibly elusive. You move the big things, and the boxed things and think you're practically done. Then, there are all the things you had not boxed for various reasons. That stuff ends up taking 80% of the time. At least, that's the way it's always been for me, but that could be because I don't buy, like, 100 boxes and box everything up ahead of time. We box and move the critical, or the rarely used, leaving everything else to be solved in a subsequent pass. In our case, our level of flotsam was increased by the influx of all of my parents' stuff and my siblings taking so little of it (no judging, of course. Is what is). Regardless of how it appears, it takes forever to get it all moved. Of course "moved" does not mean "relocated" in that we have stacks of things that need resolution in NewOldHouse. It doesn't matter. It is no longer at the other (once called existing) house so we are taking the win.

Clutter Peak 
Overall, we donated at least 5 pickup truck loads to GoodWill. 2 truck loads went to family friends and our sectional couch was taken by niece J and significant other C down to LeisureLand in the coast range west of Eugene. We recycled a considerable amount of paper, plastic and glass, leveraging containers at both houses and still occasionally having piles next to the bins on garbage / recycling day. Another 2 or 3 pickup truck loads of larger items were moved to the back of NewOldHouse to eventually route to metal recycling or the waste processing center.

NewOld Attic
One thing this new place has that our old house didn't is a real attic. The old house had small cubby-style attic crawl accesses where small things like banker-boxes could be stored, but they were spread around the upstairs, preventing central organized storage. NewOldHouse has an attic that runs the width of the house. It is not very tall (I have smacked my head multiple times), nor fully floored, however. Still, we can store things up there. In an earlier post, I mentioned that all of the sporting goods, like camping gear and ski/snow stuff went up into the attic. In truth, almost everything which used to line the wall next to Oliver ended up in the attic as well as some of the things from the ShedRoom which hadn't found another home. Even with all that has been moved up there, we have considerable space remaining. We don't intend to fill it, of course, but better to have the space and not use it than the alternative.

Big Pile of Shame
Pile of Shame
In the end, there seems to always be a big pile of stuff that is moved near the end which doesn't have a clear destination. Or, lack of time forces an additional level of chaos leading to the pile. In all of my moves, one or both have happened, and I think in each case the pile has had different stuff but the Pile of Shame has appeared in the same place every time: the garage. "But wait," you say. "Isn't NewOldHouse garage already full of new-to-you kitchen cabinets?" Yes, it is. So, our pile of shame is on top of those cabinets in one of the least attractive, least manageable piles of any of my moves. It includes things like the white metal rack which used to hold laundry supplies, some building materials, some cleansers, yard chemicals, a traffic cone? Yeah, the picture really tells the story, complete with a shelving unit all catawampus. Not my best work.

If this move were like my prior ones, this pile would be among the last things solved for. Since it is the most significant eye-sore that we get to walk past every day, this move is different. In truth, between the time I started writing this post, and it's completion, the mess has been mostly resolved. It needed to be early in the organizing process because it was preventing the kitchen cabinets from being installed, and we cannot live with the camping-kitchen indefinitely. I felt that we could not in-earnest return to the kitchen work until this was solved. I organized some of the pile of shame up into garage shelving, sorting the rest into logical places (garden chemicals to the garden shed, eg).

Repair, Clean and Paint
closet repaired
Once the last of our things were moved, the house had to be readied for whoever lives there next. While I completed the evacuation of our stuff, Boo focused on painting, starting with the first floor baseboards. Then, she re-painted all 3 bathrooms, the master bedroom, another bedroom and the front door. I cut-in one of the rooms and did the super-high work in the entry, but she did everything else. Meanwhile, our friends Lana and John completed the closet repairs in the upstairs hallway closet, started and abandoned by the mess-making handy-person I mentioned in the garage lament in Shop to ToolShed. For background, Boo and I had done the demo to install a stackable washer/drier in the hallway prior to the NewOldHouse saga starting. Walls were gone so we needed to enclose things again. With the painting completed, the closet complete and our stuff out, we set to cleaning the place.

We figured that we could save some house-cleaner money if we did some of the more time-consuming things. This list started with dusting the walls, mopping the hardwood and cleaning windows. Before we knew it, Boo had cleaned the bathrooms (down to disassembly/re-assembly of the shower doors), the kitchen (cupboards, fridge and oven too) and the hot tub. We contracted out shampooing the carpets, but Boo did an incredibly thorough job. Last, there is considerable concrete around that house, from the long driveway (flag lot) to the back patio, the opportunity for moss to grow in western Oregon is significant. So, John, Lana and I power-washed the patio and the worst of the driveway.

Reflections
ShedRoom ready
With the house in the best possible shape we could have made it, we handed the keys over to a rental management company. This has been a very long slog. We were not ready nor really thinking about moving when NewOldHouse came to us. I imagine most folks who consider a move do some elimination of things they are not moving prior to the start of the actual move. We had the inverse happen: a 1 bedroom apartment's worth of stuff arrived maybe a month after we started that "elimination of things" and months after the move was decided.

I don't think the emotional impact of leaving a place we called home for 6 years has really hit us yet. When we started to move in, we had 4 sons and a niece moving with us but our family shape seemed to change every 6 months. By the time our things moved, son K had decided to live with his girlfriend instead, so we were already in flux. By the end of that first Summer, our niece had returned to Montana. Shortly after that, C decided to live with his mom full-time and did so for 2-1/2 years before returning at the end of the 2018 school year and then stayed with us until Fall 2022 when he retuned to his mom's to attend Portland State. In the middle of that, T continued to bounce between homes, staying with us increasingly. Then, he went to University of Nevada, Reno for a year and returned to stay with us full-time for a year before heading to Eugene and then LA. Barely missing an overlap with C, K2 shifted to living with his father full-time at the end of the Summer of 2019. That's a lot of moving pieces, and the amount of overlap between them was very light. After that first summer, we rarely had more than 2 kids with us at any time.

master complete
Boo and I had moved into that house to create a stable home for our 4 boys where they could really become brothers. We didn't achieve that goal; there were too many changes of who was there for large periods, and even at the week-to-week level, we lacked fixed periods together as all of them would do short periods at their other parent's house. Boo's ex-husband was very supportive of our create-brotherhood effort as he also recognized the gift of 2 brothers to his sons. He was quite flexible to accommodate days/nights/weekends/holidays to allow for more overlapping time with all 4 boys. Unfortunately, my ex-wife only saw our brother-building effort as some kind of a threat to her. She had and has an all-too-common misbelief that love, joy, happiness and contentment are all constrained resources to be horded for one's self, and thwarted for others. So, she actively undermined our efforts both in words and in actions. She would purposefully schedule things that would force the kids apart, and was completely unwilling to shift things unless we sacrificed additional days/nights/weekends/holidays for the favor. It is unfortunate she was unable to rise above the petty for the benefit of our children, but that's just who she was. Perhaps she has since grown.

One might think that leaving a place where our boys lived their last years together would be difficult. Honestly, we are leaving a constant reminder that we failed to create that nurturing space for them, but not from a lack of trying. Today, their relationships span from strained to non-existent. So, we have a sadness, but not for what was, rather for what we could not manifest.

As winter tries to turn into spring (we had snow flurries on the morning of 3-April), Boo and I both remain positive that the NewOldHouse is and will be a great place for the 2 of us. Going forward, our attention will be split between (a) getting the random stacks resolved and (b) the demo and construction of the kitchen. Of course, I have some cars which need attention as well, and I expect I will get some time very soon.

Thanks, as always, for following along. This move has been an incredible, and unexpected, journey. I hope to be returning to more typical activities (and blog topics) very soon-

Tuesday, October 4, 2022

If It Doesn't Move, Paint It (Part 1)

Our youngest son, K2, started his service in the Navy recently, so I am borrowing from an old armed forces adage for today's title. Following seas, K2. On topic, Boo and I are continuing on our NewOldHouse journey, and today's post is about preparing for paint. I say preparing because we haven't gotten to the actual painting part yet. Maybe next week? Who knows, but I'll post part 2 when it happens.

Interior Cleaning
I have mentioned a few times just how grody the NewOldHouse is, or was. After the crawlspace was cleared of rubbish and new vapor barrier installed, things were decidedly better. Then, the floors were cleaned, sanded, stained and sealed. More better. Next for the interior (excepting the kitchen and bathroom), is painting the walls and ceiling. I used to paint houses for a living, so I know how to do this, but before we could paint, we wanted to clean and clear the space. This starts with protecting the floors with paper and plastic so the nice new floors are not damaged. Then, we removed all of the electric outlet and switch covers. Those steps are fast. Next, we started washing the walls and ceiling with TSP (or some similar cleanser). Since this house was so gross, we went with the more industrial TSP rather than something weaker. YMMV. Regardless of what you use, it takes a long time to mop walls and ceilings.

Exterior Scraping
After all that inside-focus, I felt the weather change looming. I have written about this feeling before, and how it effectively drove the effort to get Zed painted before mid-Summer. Well, here we are in autumn and we have a beater-house with peeling 30+ year old paint on it. I hit it hard with the power washer, and thought that would have loosened the paint. I did remove some, but there was more remaining than I expected. I focused on the front and sides for my first weekend of scraping, and after about 10 hours, I had those 3 sides mostly scraped. I did the rear over the course of a few week-day evenings that following week and finished everything the following weekend. I used 2 tools: first what I call a "5-way" that has a sharp-ish blade perpendicular to the handle that is bluff on one end and pointy on the other. I used this tool to pick at paint bubbles and splits to try to lift the paint. If I could, I would grab the edge with a gloved hand and pull the paint off. Regardless, once I got what I could in an area with the 5-way, I would use an old-skool scraper. A classic paint scraper has a handle that's about a foot long with a rectangle on the end in which sits a 2-sided scraping bar. That bar will grab paint edges, peeling or chipping it away -or- it will grind down a paint edge, if it is holding to the siding. The end result is the loose paint comes off and the transition from not-painted to painted is smoothed. Once paint is applied, these transitions are far less visible afterwards. This is strenuous work, however. After spending 2 weekends pushing scrapers, I load up on Monday with ibuprofen for recovery.

5-way on steroids
I found that some areas would have a great deal scraped off, like in the picture on the above right. Other areas, the paint adhered very well. A neighbor offered that the paint came off in areas where moisture could appear from behind, like an uninsulated garage wall (image above is a garage outer wall). I found, too, that the walls which were hit by significant direct sunlight peeled more. In the picture, the top 2 runs of siding were almost perfect; I could not remove paint without more severe steps. This part of the siding is sun-protected by the roofline. The siding further away in the picture is shaded by a large tree. I guess that's one more advantage to surrounding your house with trees: paint lasts longer.

Delaying Exterior Repairs
When you get close enough to your siding to scrape it, you really see every imperfection. Regardless, I knew I had another day of driving nails and shooting caulk before I can cover windows and doors with plastic for shooting paint. I also found some failing areas that will need more attention. I expect that I will get the siding good enough and paint-shot to protect the house this year and will repair wood areas next year, and hand-brush the repairs as I go. The alternative could push the whole painting effort into the rain, and that changes the paint material choices since you can't paint water-based paint in the rain and expect a decent result. The soffits have some rot and the roofers did not clean above the soffits before installing the new roof, so there is work there. I will not get to this due to time constraints. I also found at least one lower window sill with some rot damage (see image on the right). Again, I do not have the time to fully resolve, so I will protect the damage as best I can with a plan to perform more major repairs when the weather changes (or when I can afford to pay someone else to do it).

I was able to walk the outside with a box of nails and a framing hammer, however. I re-set every nail that I could see, to get the siding to sit as tight as it could with the existing fasteners. When I could still hear a hollow thump when I struck the siding with the handle of the hammer, I sent in another nail. I repeated this until the thumps were solid. I also replaced all of the missing corner pieces as I went. 

Next, I will caulk the windows and doors, and eventually get to hanging plastic and shooting paint. Fortunately, the weather forecast is holding for the next week. So, I figure I will spend a few after-work evenings caulking this week, and if all goes well, next weekend I will mask and paint.

Thanks, as always, for following along. I know this isn't car content. Once the house is done enough for move-in, I will be getting to car projects again. All good things in all good time-

Tuesday, July 20, 2021

Shade Tree with Gramps

Today's post is about some efforts on cars that are not mine, around the cycles of applying Bondo, sanding it down, applying a guide coat of sand-able primer and repeating. This is all so I can get the panels as smooth and flat as I can before I get into the paint. Recall, I am still waiting for the body kit, so I am in a holding pattern anyway.

Shade Tree
I have mentioned in passing a few times that one of more of the kids we know will drop by to work on their cars in our driveway. They are new to car ownership, have few tools and a little experience. Boo and I call it our "Shade Tree" where they or their friends can come to get after some work on a car in a safe place with the tools they need, WiFi and an extra pair of hands. We bought a couple of car port canopies last year, and those serve as the base for this Shade Tree concept. Nearby, we have parked Hapy, and set up like DriveWay Fest: lot couch pulled out, seats strewn about, camping table set up. So, when you need to take a break, there's shade, a comfy seat and a cold beverage.

For me, this is an opportunity to hang out, wrench on some cars and help a friend or two out. If I could, I would do this every day. Fortunately, as the kids get more into their respective cars, this is happening more often.  I have not posted about these moments, but with my time dedicated to the Bondo cycles, I am not generating material... just lots of dust. So, today's post is about a weekend afternoon spent with a couple of kids and their cars.

K2 - Gramps
stock image, not Gramps
K2 got my parent's old Jetta3 when they decided that they should not drive anymore. That was a great decision, and for a base grocery-getter Jetta, Gramps was a pretty good little car. It does not have air conditioning, and it suffers the 2-dot-slow engine (non-turbo), but that should make it easier to work on, since there are fewer parts. Still, those parts which remain can be a PITA. Case-in-point, K2 wanted to do a simple tune-up, replacing the spark plugs. Well, to do that, you need to remove the intake plenum because the sadist engineers at VW located the sparkplugs on the fire-wall side of the engine, underneath the big air intake. To remove the plenum requires considerable flexibility, so this basic maintenance has not been done.

With that backdrop, we learned a couple of weeks ago that Gramps was not running. It turned out that Gramps was running, but he would go from everything-is-fine to suddenly overheating within a few minutes after achieving normal operating temperature (NOT). So, K2 drove Gramps over and pulled him into the front spot in the driveway nearest Hapy. He explained that he was sitting in a drive-thru and steam started billowing out from under the hood. After popping the hood and noticing a new hose clamp near the outlet flange, we learned that shortly before the overheating, he had removed and replaced that clamp. Why that was done was not explained, however, we concluded that maybe it was related.

The symptoms were interesting. Like I said above, the engine would run fine for a while and then water would start bubbling out of the overflow bottle as the engine temp climbed above normal. I felt the hoses. The top hose heading into the radiator was hot. The radiator was not, nor was the lower hose. That indicated water not moving, so I figured that there's either a blockage or the pump isn't working. Once the engine cooled down a little bit, we added water, but the issue repeated. I thought maybe there was an air pocket stemming from the prior hose clamp removal, so we remove the upper hose from the radiator. No water came out. I was able to run 1/2 a gallon of water into the top of the radiator before it was full, so I felt like we were approaching the solution. With the upper hose removed, and the open end held below the top of the radiator, we continued to put water into the over flow bottle, squeezing the hoses by hand to force water through. Eventually, water started to drip out of the upper hose, so we re-connected it. Then, we performed a repeating process of adding water, running the engine to get the bubbles out, turning off the engine, adding water, etc. We discovered very early that the radiator was now getting warm, so the circulation had solved. The fans, however, were still not firing. Still, the car was able to not overheat enough for him to drive it home and on short trips until he had time for another visit and diagnose of why the fans were not coming on.

G - unnamed
sort of what G wants
it to look like
K2's best friend, G, recently bought a late-model Jetta. I don't know the exact year, but it's possibly the newest car among those we have clowned on. A few months ago, I helped him remove his old stock muffler to install a fart-can. He knew then that he would need a cat-back exhaust system to get the sound he wanted. Since that time in the driveway, he got and installed a cat-back system. It has a sporty rumble to it now. On this visit, G wanted to replace his coolant, and do a little customization of the front grille. G had found a step-by-step online where you could cut and fab lower grilles from wire mesh as a replacement for the little slotted-looking vent things. He had built and installed them, but they looked kind of weak. To improve the look, he first removed the front bumper cover. G taped around the little grilles and then shot the grilles and the bumper covers inside the grilles with black spraypaint. We talked about cutting the fog-light supports out, but decided that just shooting black was enough to hide the body color and now he had the option of installing fog lights later. The coolant was fairly straightforward. He loosened the lower hose from the radiator, and drained into a pan. He re-connected the hose and filled the overflow bottle. So simple. These take about 1.5US gallons of 50/50 G12 (or G40) when completely emptied. Since he had not opened up his heater, that coolant did not get drained. So, his refill only used about a gallon. After driving it around, the level didn't drop, so we're confident that he filled it.

Zed
Of course, I continue to perfect Zed's body. I had a mishap with the Bondo where I believe I mis-mixed the hardener in. The symptom: it never fully hardened, and when I sanded on it, the Bondo came off in rubbery strings. I ultimately had to remove all of that layer of Bondo, and start over. Fortunately, I have been mixing smaller and smaller batches, since the areas which need attention are also shrinking. So, much of the areas I fixed that day were quite good. I mentioned at the start that I used a guide-coat. It was after this cycle of Bondo that I did that. I shot a light coat of sand-able automotive primer on top of the areas I had just sanded and then scuffed with 220 grit paper. I found 4 spot that I had not sanded sufficiently and about a dozen small imperfections (dips or gaps) that needed another round of filler. Around helping K2 and G, I sanded down the handful of high spots, vacuumed and re-shot with primer. I will scuff that guide-coat and fill the tiny spots next.

I am starting to wonder if that body kit will arrive after I am past ready for it. I expect I will focus on the hinges and other stuff, as well as shooting primer on the parts that will not be impacted by the kit (like the hood, doors, tailgate).

If you're in the area and need a place to tweak your car, come on by. We'll help as best we can. All we ask is that you lead on your work, the car leaves (but my tools don't) when you do and you check your politics at the curb. So, that's it for this week. Thanks, as always, for following along. 

Tuesday, April 13, 2021

Injector-Go-Round (Part 2)

Today, we continue and complete the efforts to get old used stock injectors from Hapy to work in Flash, and then brand new higher-performance injectors installed into Hapy. Fun with injectors starts.... now.

Injector-Go-Round
Now comes the fun part. With the wedged-nut extractor tool I mentioned in part 1 (See Injector-Go-Round Part 1), I pulled the injectors out of Hapy, Then, I pulled the old injectors out of Flash and installed Hapy's old injectors into Flash. That sentence took less than 10 seconds to type, and I feared it would take all weekend to do. It was actually fairly uneventful and quick. On Friday night, I set myself up by putting Hapy and Flash near one another, and then shooting the injectors where they enter the head with the trusty old Kroil penetrating oil. The next morning, I cleaned around the injector-to-head points, took my slap-together injector puller / slide hammer and all 8 injectors popped out with little effort. Seriously, each injector took fewer than 5 pops with the slide-hammer, and none of the "pops" had much force at all behind them. Honestly, I was being gentle because I didn't want the wedged nut to fall off the hammer. So, I held the slide between my index finger and my thumb and gently pop-pop-popped, moving the slide less than 4 inches each time with a flick of my wrist. I think the Kroil really helped, though I expect there will be some who bristle at the thought of letting some penetrating oil slip into the engine. 

I carefully arrayed the brackets, bolts and washers (excepting the one I lost) so I could re-install them in the same spots. In Hapy, I left the injectors loose, but still in their respective holes while I completed the extract on Flash, cleaned the holes and the head mating surface. Then, in one move, I pulled the injectors from Hapy, carried them across the driveway like a cat's cradle and set them into Flash's head. Ideally, I would have replaced the copper crush-washers on the injectors, but I didn't have replacements on hand, and this was the day I had to do this. *Dumb short-cut actually taking more time warning*

The install of the new-to-Flash injectors was fairly straightforward. Once the injectors were set in, I cleaned each bracket, rested it into place, and then lightly threaded the bolt through. Once I had all 4 in place, I threaded them down finger tight. I plugged in the 3rd-injector plug, set the glow-plug harness under the hard-lines and then re-connected the hard-lines to the tops of the injectors, but only barely threaded on. Once the lines are in the right spot, the compression fittings on the pump can be tightened down. Then, I wrenched down the brackets to around 10 foot-pounds (spec says ~15), snapped the glow-plug harness onto the glow-plugs and connected the return line to the injection pump.

Drift, Torque, Repeat
At this point, I test-cranked the engine to force air out of the hard-lines. There are a few ways to do this, of course, and the video I mentioned in part 1 is as good a way as any. He did the injectors in pairs while I did them one at a time, tightening the hardline at the injector end as each injector-to-hardline point spat out fuel. My one-at-a-time method moves from injector to injector based on the way they are connected to the injection pump: closest-to-the-ground one first, highest one last. My thinking is that any air in the pump will work its way up that way. By the time I was on the last injector, the engine was trying to fire.

I got that last line done, and Flash started right up. I could see some vapor puff-puff-puffing above the head, and could hear a "psst-psst-psst" noise, so I knew there was a leak. Boo helped me here, by jumping into the driver-seat and starting the engine while I looked and felt for the leak. It was around the #2 injector, but not at the hard-line mate point. It was around the injector near the head. Engine off, I grabbed a socket extension to use as a drift. I lightly smacked either side of the #2 injector bracket near the injector. Then, I re-torqued the bolt. I was surprised by how much more I could turn the bolt (like 3/4 a turn), so I repeated the process on the other 3, and continued to do this until the bolts torqued down at 15 ft-lbs and would not accept more after more drift-smacks.

This process worked very well. When we test fired it again, Flash started right up, made no funny noises (nor puffs of vaporized fuel) and ran strong during the test drive. The biggest indicator of our success was the near-immediate start the following morning and no cloud of smoke. He had been getting harder and harder to start in the morning. I now conclude that his old injectors were leaking (evidence of that was found upon their removal, as they leaked all over the paper shopping bag I set them on), and the fuel system needed to prime every morning, causing the long hard-start effort. I decided to change his oil immediately, while waiting for the delivery of the new injectors from KermaTDI.

Priming the Injection Pump
During the oil change, I discovered that the #2 injector had actually leaked at the head again during the test drive, and concluded that replacing the copper crush-washers (or injector seals) is not optional. I got a replacement set from the local parts store (not DIP, still bummed about that) and re-did the removal / install. This time, I did a pair of injectors at a time, starting with #1 and #2. Oddly enough, the injector pump lost it's prime in the few minutes the system was open this time. Half as many injectors, loosened the lines less and it still lost prime when it didn't the last time when I did all 4. Ah well; just shows that luck is a factor. With the MityVac, I applied vacuum on the low-pressure return side (no more than 7 pounds so the seals inside the pump were never in jeopardy, and more vacuum would not have tangibly sped the process) of the injection pump until fuel appeared in the MityVac collection cup. Then, I buttoned things up, cleared the hard-lines of air by cracking the connections one at a time (bottom to top, like above) until Flash started. Again, I see no puffs, but I did the #3 and #4 injector seals anyway. Fool me once. After letting Flash sit for a few days, he lost prime again.

So, I ran another round of MityVac priming and got him running. I let him sit an idle while I got a really close look at the injectors. I noticed that #1 had fuel appearing around the injector mount-point into the head. The #1 injector is unique in that it has a cap on one of the return bibs. That cap was leaking. I didn't have a real one, so I made one from low pressure hose and a bolt. This helped, so after letting Flash sit for a few days he would start, albeit roughly. Believing that the low-pressure return lines I moved from Hapy were no longer viable, I considered my options for replacement.

Hapy Injected
Once KermaTDI had the injectors set up, they FedEx'd them over with a new set of copper seals. They arrived mid-week, but with the dicey weather, I waited to until the weekend so I could have a nice big block of time. Hapy's head had been cleaned when the old ones were pulled and I had stuffed rags into the injector holes so it would stay clean. With the injectors in-hand, I could at least prepare them for install by removing the "T" fitting from Flash's old #3 injector, and moving the low-pressure return lines onto the replacement set. The kit from KermaTDI delivered with brand new low-pressure return lines so the set up of the injectors was that much easier. With the injectors set up, and a new weekend day, I followed the same process I did with Flash, except for skipping the test-start parts. I am having issues with Hapy's ECU, so this is as far as I could really get.

I'll describe the test-drive once I have Hapy buttoned back up. Between then and now, I need to get his ECU sorted but at least the exhaust is back on. There's never a shortage of things to do. Couldn't be Hapy-er.

Thanks, as always, for following along.

Tuesday, March 23, 2021

Injector-Go-Round (Part 1)

I got back outside and started playing on the TDI's (Hapy the camperbus and Flash the daily Jetta) as the weather has been somewhat hospitable, though not consistently so. Since Hapy is running so well (still no codes, accelerator responding as one would expect, etc.), I decided to step up his injectors and get that Malone Tune I had dreamed about for years. In contrast, Flash has been making a plume of black smoke when he starts in the morning (after a long start cycle), so I figured his injectors had gotten pretty clogged up. My thinking: I can upgrade Hapy's injectors and put his under-100k miles injectors onto Flash to extend his life. Today's post is about picking, and removing injectors. I'm still perfecting both Flash and Hapy injector installs, so I'll post part 2 on that once at least one of them is running right. Good times.

Injector Selector
PowerPlus 764
For the uninitiated, like me, the world of diesel injectors or nozzles is cloudy and the choices not clear. For one thing, the manufacturers all suffer with varying quality because of their efforts to get them constructed at lower costs. As is true with any market, there are always new players. Some new players build good stuff, but have little recognition. Others are simply trying to turn a dime and build garbage, but have flashy advertisements. Like I said, all markets are like this, but for a product about which you know little, how do you avoid overpaying or getting garbage? This is where your trusted vendors are so important. For TDI stuff, I go to KermaTDI and IDParts first and then some others like PartsPlace or TuneMyEuro to see what they are selling. When they are all selling the same subset of the market, you can be fairly sure those are the better quality-to-price. In many cases, your greatest gains from an injector upgrade require an ECU tune, a turbo upgrade, or both. Regardless, my research indicates that they need to be balanced / pressure checked / set-up or you will probably not get the performance you were expecting.

To help me through the maze, I worked with the folks at Malone Tuning and researched my 2 usual forums: TDIClub and VWVortex. There really is nothing better than true end-user feedback, but in most cases, the folks who replaced their injectors were going from clapped-out original stock injectors to something new, so, of course, they worked way better. And, they only did that one set ever, so they only had the old crappy ones to compare against. Still, the forums helped steer me where KermaTDI and TuneMyEuro were already taking me: Bozio injectors are the market leaders right now, but even they have quality issues. So, having them set up will best ensure a high-performing set. I decided to have mine set-up by our friends at KermaTDI since that brought with it better guarantees and some things are just best done as a unit.

DLC 1019
I spent considerable time toggling back and forth between the DLC1019 and the PowerPlus764. I ultimately went with the PP764, but, in retrospect, they are both great injector nozzles from everything I have read. Here is another write-up of the PP764. Both injectors appear to have the DLC protective coatings that extend the nozzle life against lower quality and low-sulfur fuel. Knowing that the quality of diesel fuel varies across the country, this is important. The PP764 also has hardened surfaces, etc. to extend its life relative to the stock injectors (the DLC1019 probably does as well), and have a higher upside in terms of HP potential with additional upgrades. Ultimately, the TDIClub seems to feel that the PP764 may produce more smoke, but more power than the 1019, but again, as in so many things, your mileage may vary, and with all the other variables at play, it is very hard to distinguish between these nozzles... except for which one can handle larger modifications: the PP764.

I had Kerma set them up at the lowest "pop" stage, so they are fairly tame, which parallels the stock-for-now turbo. I should be able to replace the original VNT-15 turbo with a stock-in-some-VW's VNT-17 and the PP764 injector set up can remain the same. The 1019 may not embrace the higher boost as well as the PP764. Again.. who really knows? This feels like a job for MotorTrend's Engine Masters, if they ever give a whiff about performance in otherwise not monster engines... and diesels in general.

Injector Removal
still from KermaTDI vid
I had a rain-free, beautiful Saturday morning, with a forecast for decent March weather (read: spotty rain) all weekend, so I had my opening. KermaTDI co-hosts a great video on YouTube for how to remove / replace the injectors which I mostly followed. So, I am not going to go through all those steps in great depth here. Instead, I will highlight what I found particularly interesting. In the video, the glow-plug harness was removed at the very beginning. It was easier to remove once the injector hard-lines were moved out of the way. Getting a good angle on the bottom compression fittings on the injector pump was difficult, but not impossible, especially during initial removal. With the hard-lines out of the way, for the Hapy removal, I then had to remove the vacuum ball and the bracket holding it to the head in order to get to the clips for the 3rd injector plug-wire. This bracket did not interfere with the plug in Flash, but his plug was very difficult to get out of the bracket. With that unplugged, I shifted to the injector-hold-down brackets. On Hapy, I lost concentration for a second and pulled the bolt out of the 4th injector bracket independent of the bracket, causing the dished washer to disappear into the engine bay. This momentary lapse cost me some time searching.

I never found that washer, but it was nowhere near the injector so I moved on. Finding a single replacement washer took some time, though. For posterity, it is either part number N0231312 or N0237314. With the brackets removed, the injectors would not budge (no surprise). So, I cleaned up around them as much as I could with brake cleaner and a slotted screwdriver, getting as much black gunk off as I could. I felt this would minimize the risk of that hard yuck falling into the open injector port once the injector came out. I applied a short burst of Kroil penetrating oil around each of the injector-to-head mating surfaces to help in the extraction.

Injector Removal Tool
no worky
The injector has a M14-1.5 thread where the hard line injector fitting attaches. Metalnerd makes a slide-hammer specific for removing this injector that threads right on. As of this writing, they cost around $45US. Back when I was working on the dents on Zed (the 1978 Datsun 280ZX), I got one of those stud welder / dent slide hammer kits from Harbor Freight. This kit includes a 2-pound slide hammer with a single thread-on attachment that is designed to grab onto one of those studs. The thread on the slide hammer is M14-2. Soooo close to the injector thread, but not. I would rather re-use a tool in-hand rather than buy another rare-use tool. So, I got 2 nuts from the hardware store (M14-1.5 and M14-2) and JB Weld'd them together. I would have Mig welded, but welder one I used on Oliver's floors has disappeared into the tool collective of Travis' friends and I didn't want to wait. Besides, I'm not sure welding these nuts would have been a slam-dunk anyway. Turned out, the JBWeld failed on the first injector, so my tool became just the one M14-1.5 nut: I force-wedged it onto the slide-hammer and threaded the other end into the injectors. Yes, this cross-threaded the nut at the slide-hammer end, but it served it's purpose.

I'm going to stop here, and pick up the actual removal and install experience in the next post. Like I said above, the removals were actually quite easy. Like so many things, destruction is easy; construction is hard.

Gramps Clutch
Unrelated, I mentioned the clutch replacement for Gramps (2-dot-slow Jetta 3) a few weeks back when I was considering what work to do next. K2 decided that he wanted to hire that out, so we called up Courtney over at MobilePdx. We have called on these guys a few times over the years when our workload was more than we wanted to handle at once, and they have never disappointed. He and his guys (Lou and Joe) knocked it out, replacing the clutch, flywheel (old clutch blue'd the friction surface), throw-out bearing, the throw-out bearing cover, etc. Before they started the tear-down, the engine got a de-greasing. Once everything was apart, they replaced the rear main seal on the engine. With everything clean, they were able to lubricate things (like the shift linkage), and confirm the oil leak was the rear main seal. All in, it was a ton of work, but Gramps is running like a champ again. And, he is no longer marking his spot every time he parks. Thanks MobilePDX!

Last, an early shout-out to my local-to-NW Oregon friends: Hapy turns 50 on 3-September-2021, so to celebrate, we will be camping at LL Stub Stewart State Park that weekend. If you have little else to do for US Labor Day weekend, we (Hapy, Boo and I) would love to see you.

Thanks, as always, for following along and I'll post again once at least one of the 2 injector beneficiaries is running right.

Tuesday, November 13, 2018

Z Progress

It's been quite some time since I posted an update on the 280ZX project. Today, I'll catch everyone up. For my US former military readers, Happy belated Veteran's Day and thank you for your service.

Tear Down Blocks
shedroom
In my last post about the Zed in March (See Strip Tea Z), I described the tear down of the donorZ, and even posted the link to the craigslist sale of the picked-over shell. We found a buyer, a guy who rebuilds old 240's, 260's and 280's, and he knew there was some remaining value in what we sold him. To make the sale work, I had stripped lots of good stuff, and stashed them wherever I could find a place in the small garage. Mostly, these parts were set inside the keeperZ (Zed). This had the unfortunate side-effect of reducing the interest in working on the Zed. So, this past weekend, K2 and I emptied the Zed of all of the parts we were storing in there. This created a need to deal with the shedroom.

Shedroom
inspected
When it was conceived, the shedroom was a "couple months" solution (See 280ZX * 2 = Y). Now, over 9 months later, it has persisted. Boo and I decided that we needed to embrace the shedroom, and set it up better than the basic pile of parts on the floor that it had become. Otherwise, the work which has stagnated will never restart. So, similar to the interior of the Zed, we moved all of the parts out... into the hallway. Then, we installed a set of monster shelving and organized the parts onto it. This made the space much larger, and more useful... and allowed for all the other parts from the inside of Zed to fit. So, now we have the Zed empty of spares, and parked in the driveway (under a 10x10 canopy), ready to be worked on.

Auto Shop Class
K2 has started an auto-shop course in high school. This is the only such course available in the state of Oregon, and has a class size of less than 20, so it's kind of a big deal. Gone are the days of every high school having a shop like this. As I said, Oregon only has one. From this class, K2 is learning things that he is now teaching us. Included in this growing list of teachings is the multi-point inspection.

Inspection
stripped
K2 wanted to do some work on the Zed after we emptied it of spares. The auto-shop class is much more focused on mechanical than body or interior stuff, and he felt that doing classwork stuff would help him retain the teachings. So, he set to doing a full inspection of the Zed, recording his findings for us to evaluate. My sole influence was for him to write everything down, and not to filter anything out due to concern that we wouldn't want to do the fix. Similar to having the boys decide if a car was purchase-worthy, I want the boys to drive what is or is not in need of repair, based on diagnostics not cost or convenience. The list was pretty long, including the brake booster and radiator replacements, and a full tune up. That's totally fine. I tell them that money should only guide "when" not "if" something should be done. If it is a safety item and you can't afford to fix it, get a bus pass until you can.

Strip
Sunroof Returns
With weather changing, our window for getting the grinding done before winter arrives is closing. I don't think we're going to get the exterior paint-ready before then, but I think we can get the old paint off before pushing Zed back into the garage for body-fill. How we manage the sanding of that body-fill will be the adventure that follows. With K2's preference for mechanical, I expect he'll get after the tune-up and radiator replacement completely independent of the exterior work. After another weekend day dedicated to the paint, we have stripped the fenders, hood, driver door, rear quarter panels, and roof. All that's left is the rear hatch and the passenger door: both of which can be done on the front porch. So, we are ready for the seasonal rains and the winter that follows. We can figure out body filler along the way.

Sunroof
the grind
The early 280ZX delivered with a sunroof. The donorZ was a late 280ZX, and it shipped with T-tops. Our early model, however, arrived without the sunroof. The prior owner who made such memorable decisions as removing the less-than-one-pound rear speaker panel, gutting the interior for weight and hacking the wiring so the fuel pump and ignition were triggered by switches also decided to remove the glass sunroof and weld on a patch panel. And weld it poorly with gaps and burn-thru. To resolve the leaks, the seam was "sealed" with duct tape. Neat. I had a couple of hours on a Saturday, and the sky, while threatening, wasn't supposed to open up with rain for a couple of hours. So, I backed the Zed into the driveway. The duct tape removed with a razor blade, and within about 15 minutes I was able to knock the patch panel free simply by hammer a wedge into the spotty gap, focusing on the welds. I cleaned up the edge with my angle grinder and then switched over to my wire-brush. I cleaned up all the spots where I'd used the chemical stripper, removing the flash-rust that appeared in the time since. It is interesting how the steel wire brush stripping doesn't leave the surface susceptible to flash rust, but the chemical does. One more factor to include in the mental-math when I look at paint removal in the future.

That's it for today. Thanks, as always, for following along-

Tuesday, October 23, 2018

MGB Exhaust Re-Do (Part 2)

Picking up where I left off, we have the MGB front end on jack-stands and the old exhaust sitting in a heap in the driveway. Today's post will be about getting the new exhaust installed. Recall, it is a ceramic-coated stainless steel Bell system. I left the packing plastic bags on the pipes as I handled them to protect the finish, removing the plastic as I installed them.

Setting The Scene
exhaust hammer example
from streettechmag.com
With break time over, we set to trying to install the new exhaust. The Bell system has 5 pieces: the header, a straight-ish pipe, the center resonator, another straight-ish pipe with a support bracket attached and then the tail muffler. They go on in that order. The hardest part, like with any car, is getting the header to fit around all of the various other things in the engine bay. I watch car shows on Velocity and some of those installs require hammering on the pipes to get them to fit. That would really suck. Spend all that money for a "bolt on" set of pipes and then have to dent the snot out of them to fit an otherwise stock engine and compartment. Doesn't seem right, but does explain the custom fabrications they do on some of those Velocity shows. Even then, it's usually because they're slamming a huge non-stock engine into a classic-ish car. For a built-for-stock engine, hammering dents into the pipes shouldn't be necessary. Anyway...

From Below?
For the MGB, this saga starts with getting the front end way up in the air. We had a good 18" of clearance and still couldn't feed the header up from below. Some internet posts I've read indicate this is super easy, but I suspect anyone who installed that way had a lift or a pit. We have neither so we switched to going in from above. That meant removing the bonnet.

From Above
attached for fitting the rest
of the pipes
The bonnet is held to the hinges with 2 bolts per side, but remove the hood prop first. Once the prop is off, one person holds the hood still from the front while another person (K2 in this case) loosens all the bolts, and removes one from each side. At this point, it would be wise to put a shop towel or something soft under each rear corner of the hood. Then, remove a final bolt from one hinge. Balance the hood on your shoulder and let it slide down onto the towel. Repeat with the other side and then each person grabs a side of the hood and walk it off the front. For fun, we set it (on pads) on top of the 280ZX hood. The MGB hood looks like a toy hood compared to the Zed hood. The MGB hood is at least 6 inches smaller all the way around.

center-mount bracket
With the hood removed, you next loosen the driver side engine mount. The two nuts which hold the engine to the mount are the easiest to get to, and present the least necessary to separate the engine from the frame rail. With nuts safely stowed, place a wood block on a floor jack and slide it under the driver-side of the oil pan / engine block. Carefully lift the engine from below (setting the block of wood so the oil pan and other parts are not damaged) an inch or so. Once you feel considerable resistance to the lift, stop lifting. Now, have your helper fit a pry bar between the engine mount and the engine and then apply pressure to shift the engine slightly towards the passenger side. The engine will more roll anti-clockwise than slide left-to-right, but this creates enough space. Hold the header vertically, with the head-tips pointing across the top of the engine. Slide the header as far down into the largest space you can go before rotating the header so the head-tips point up and away from the firewall. On this particular header, there are pinch-welds along the sides of the collector. These pinch welds wanted to hang up on pretty much everything on the way down. With some gentle and some not-to-gentle persuasion, the header pushed past the space between the block, the steering column and the frame allowing us to wiggle it into the right spot near the head. At this point, the pry-bar leverage can be released and the floor jack released, letting engine rest back on the mount. We had to wrestle it a little bit, but it settled. Our header ended up with a couple minor scuffs, but no scratches.

To get everything else to align, K2 bolted the header onto the head. K2 was done for the day at this point, and the rest of the install was not going to be as straightforward, so I cut him loose.

Body Brackets
header from below
While K2 attached the header to the head for fitment / alignment, my focus was on the 2 mounting brackets. The center mount reuses the original body mount holes with a new steel and rubber mount that simply threaded in with new bolts (in the kit). The rear mount also reuses the original body mount holes. If yours are still in great condition, you could reuse them. With the body brackets on, I could start lining up the pipes, and get a feel for what went where.

The fourth pipe (second straight-ish) had a bracket that was a simple flat bar wrapped around the underside of the pipe with a round hole at each end. The center-mount kit provided a bolt, 4 large flat washers, 2 plastic sleeves, a bit of metal flashing with holes and some small nuts and bolts. There were no instructions, but you could tell that the bolt went through the holes in the flat bar. A flat washer went between the flat bar and anything else that touched it. Between the ends of the flat bar, on the bolt, went the plastic sleeves and the nut went on the end. Neat. With some careful bending of the flat bar with my channel-lock pliers, I was able to get the operation together. The bit of metal flashing was to wrap around the plastic sleeves and then bolt to the center-mount bracket I had just attached to the car.
second straight-ish pipe mounted

To get the fourth pipe and centermount to align and fit, all of the pipes between that mount and the header need to be in place. Start with getting the pipes in the rough spot you expect them to be. A straight-ish pipe (one that has a gentle bend or two) has those bends for a reason. Align them with the path of the original pipes. Once set in the right location, fit a pipe clamp between the pipes and then slide them together, wiggling the fit so they stay together and are in the right alignment. With careful use of a rubber mallet, I was then able to drive the various pipes together. Remember to set a pipe clamp at each junction before you start pounding things together or you won't have a way of clamping things together.

Rear Muffler
The final hurdle was figuring out the rear muffler mount. The old mount was a real hack job where a prior owner had taken a u-bolt that roughly fit the original body mount and threaded a nut on each end. So bad, but I really shouldn't judge. The original mount was almost German in it's over engineered solution. To the bracket is attached 2 rubber mounts pointing away from the exhaust pipe. To these rubber mounts, a hexagon bracket (with one leg removed) is attached, with the missing leg on the bottom. The missing leg has a pair of holes, one at each end, for attaching a pair of semi-circular clamps. These clamps hold the pipe in place. Unfortunately, they are sized such that if you put them on without any spacers (not included) they will either pinch the exhaust pipe because you tightened them too much or the lower clamp will fall off because you didn't tighten them enough... because you didn't want to pinch the pipe. To remedy, I found a pair of oversized nuts that would slip on, acting as spacers, so I could tighten everything down without pinching the pipe.

Header to Head
see the gap?
Once I had it all assembled front to back, I moved from back to front, tightening the mounts and pipe clamps. Once snug, I shifted to the very front to consider the mating of the manifolds to the head. The MGB came with a few types of exhaust, with 2 particular versions for the models before emissions standards became so tight (in 77) that the exhaust manifold needed to be redesigned. These 2 types have a different thickness of the material through which you send bolts to attach it to the head. The older one (#12H709) is thicker than the newer one (#12H3911). This is important because the intake and exhaust share studs and corresponding nuts. If the thickness of one manifold is not a match for the other, there is not a uniform amount of torque on the various manifolds, creating leaks. This applies to pretty much any combination of intake and exhaust, unless you stay completely original stock. Since the prior owner had replaced the dual carbs on my MGB with a side-draft Mikoni carb, and hacked together a home-grown exhaust, I was going to have to deal with this regardless.

When the header was attached for fitting the other pipes, I didn't look very closely. It didn't matter. With a closer look, you can see the washers were not sitting flush. Adding insult, only two of the thickness differences for the 4 shared studs were the same. To remedy, I grabbed some fender washers of varying thickness, and cut them in half (across the hole) to use as spacers. To hold the spacer in place during install, I used a very thin smear of the copper gasket maker I used on the header gasket. This plan worked great. In about 30 minutes I had spacers in place, and the header torqued down with washers sitting flush.

gap gone
Testing
All of this, nearly 2 full days of effort, lead up to the test fire. Of course, I had to re-assemble the air cleaner, and the hood is still off, but after verifying everything was back together, it was ready. I had been trickle-charging the battery, too, so I was pretty confident it was going to start right up. Fortunately, it did. It sounds great. It has a nice deep tone without being too loud. The biggest difference, I think, is that all of the growl sound comes from the rear of the car now. It must have had leaks before. With all of the rust, that's not a surprise. I wound the engine up to 3000RPM to get a sense of how it will sound on a power pull and it sounds pretty awesome. With the top down, the garage doors open and the rev counter around 3k, I still hit 90+ dB. So, it is no quieter... in the garage with the doors open. On the road, it is quieter in the seat, but I don't have dB numbers to prove it. Just my ears.

That's it for today. I had started reading about how to do automotive interiors (trimming) in preparation for doing the seats and cards on the MGB. I have parts on-order to complete the trunk and woofer box as well. Once those are complete "major operations" will have completed and I will be shifting focus onto the Zed... and then back to Hapy. Thanks, as always, for following along-

Tuesday, October 16, 2018

MGB Exhaust Re-Do (Part 1)

Earlier this year, I described the slap-together exhaust solution I did to get the car through Oregon Department of Environmental Quality (DEQ) testing. I had a head-to-tail system waiting to get installed since before US Independence Day that had been sitting in the garage walkway, just waiting to get stepped on. Today's post covers the rip-out of the old exhaust and some explanation of the new Bell exhaust.

Mild, Stainless and Coatings
I should probably start by pointing out that I purchased a stainless steel exhaust and then had it high-temp ceramic coated in flat black. I arrived at this combination after listening to various exhaust systems available for the stock MGB through YouTube videos. I knew exhaust paint is temporary, and that it eventually chips and scratches to reveal the metal underneath. I wanted a system that didn't exist anymore: Peco. a mild steel exhaust, but then ceramic coated. Ceramic coating can scratch off too, but it is much harder to do and the finish is much hardier than paint. Especially if the people applying it know what they're doing, and prepare the surface correctly.

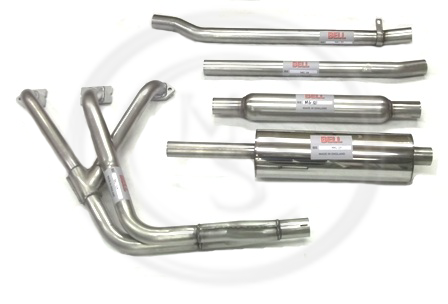
Bell system with center "bomb"
Since the Bell system was built on the same jig as the Peco, but out of stainless steel, I held to my plan. I thought it would cost more, but since the original Peco mild-steel systems are disappearing from inventory, they are really quite expensive now. The image to the right, here, is similar to what I bought. The sole difference is the system I got has a larger center resonator (third pipe down).

I have read that stainless exhausts, while they have an initial higher register note mixed into the lower overall sound, that higher pitch goes away as soot lines the insides of the pipes. So, when I selected my powder-coater, I selected a company that coated the insides of all of the pipes as well as multiple coats on the outside so the exhaust would have that ripened sound from the moment of install. The inner coat also serves an additional purpose of providing a slickery smooth surface so soot will not build up over time. Last, this ceramic coating has some kind of thermal barrier as well so less heat will transfer through the pipe walls, sending it out the tailpipe instead. This should help keep the cabin cooler in the summer.

Old Manifold Off First
The existing (not original) system was welded in from the exhaust manifold through to where I had soup-canned on a muffler. Yes, I used a soup can (See MGB Muffled) to connect a recycled muffler to the rusty pipes to get through DEQ without attracting attention. It worked, but as one would assume, the integrity of a soup can is no match for the stresses of an exhaust system, and it split apart at some point shortly after that. With all the other action this Summer, I didn't really have time to do the full exhaust replacement, or I'd not have the convertible to play with while the weather was nice. Well, the weather turned to cold and rain early this year, so with an uncharacteristically empty autumn Saturday, I grabbed K2 and set to it. First things first: get the front end as high in the air as you can (safely) on jack stands and make sure it does not budge when you shake the car.

old system sans catalytic converter
K2 got the fun job of removing the exhaust manifold from the head while I worked on the other end, figuring we would meet in the middle. I had just replaced the manifold gasket, so I knew that process well enough to give directions from underneath. There are 2 bolts, one on each end, and the other have nuts holding onto 4 studs. All are 1/2" but there is not sufficient room for a socket for most of the nuts, so K2 worked them free with an old-skool combination spanner.

Just as a point of reflection, he was using the Sears Craftsman wrenches that I got for Christmas when I was his age. 30 years later, they have hardly aged. RIP, Sears; it is truly ironic that you, a company rooted in catalog mail-order, met its demise due to Amazon, an internet-order company. You were the one rare store where product quality remained relatively high while prices stayed reasonable. Sears never felt cheap (like Target does), and you offered practically anything a shopper might need other than food. The store closest to me is closing, bringing our 30+ year relationship to an end. Sadness.

Anyway... with the nuts and bolts off, K2 carefully slid the intake and exhaust manifolds off of the head, taking care not to disturb the gasket. The gasket still looked new and the copper sealant between the gasket and the head looked like I had just put it on. Honestly, since I'd only driven the car a couple of miles since I did it, I'm not sure the gasket and sealant ever got all the way up to temperature. So, yeah, that gasket is basically new.

Tail End Removal Next
Meanwhile, I was working on the other end. I noticed the split in the soup can, and figured that the tail-end would just come apart with a good yank once the tail mount was removed. I gave the muffler a hardy tug and it came right off. With a clatter I tossed the muffler into the driveway exclaiming "the first of the exhaust is off". Once K2 had the manifolds clear of the head, we figured out that the pipe needed to be cut to get free. I grabbed the angle grinder (and gloves and a face-shield. Safety First!) and cut the pipe just aft of the collector (and in front of the catalytic converter). With the mid-section now free, it rested on the garage floor. It soon joined the muffler in the sprinkling drizzle on the driveway. K2 was now able to pull the manifold free up through the open bonnet and set it on the rust pile in the driveway.

look at that non-transition
With the old system in pieces, we were able to take a better look at the custom exhaust manifold. The center pipe, which carries 50% of the load was no larger than the other 2 pipes, and had such a horrible flow to it that there was soot collected at the entry point. The soot was so thick, I could barely get my index finger in the hole without touching soot all the way around. The pipe had a 80* or sharper angle at the mate-point with the flange (check the picture to the right). Such bad flow. Just addressing that alone will improve the exhaust flow and behavior of half of the cylinders.

Tossing the rusty bits to the driveway, we chose to take a break. I quickly cut the catalytic converter free from the other debris, and slid it under the 280ZX for later use.

This post got super long once I wrote about the install. So, I'm stopping here and will continue in the next post. Thanks for following along-


Monday, July 21, 2014

Dead Head Meet-up at the Movies 2014

There have been happenings in the car/bus space, but in the interest of space and a single focused post, today's post will just focus on going to the movies last Thursday.  

Dead Head Night at the Movies
Thursday, July 17th was the annual Dead-head night at the movies.  In previous years, these events have aired full-length concerts.  For example, last year (or the year before that) we saw the Sunshine Dairy benefit concert from Veneeta OR from 1972 called "Sunshine Daydream".  Having been too young to have been there at the time, it was great to see what the scene was like and watch them play a great show.  This year, the producers found the raw footage from the Europe '72 tour when they played in a tv studio for about 80 minutes.  A portion was later aired on UK's Beat Club tv show.

Beat Club
As a movie, it wasn't that great, but as a music fan it was really interesting to watch them as if they were working in a studio.  For example, they stopped "Sugaree" after the first verse because Phil missed a change and played "Playin' in the Band" a second time because Donna howled too loudly on the first take.  In both cases, the second run was better, so it was the right call.  I base my theory on the second "Playin" on a background conversation you can see between Jerry and Donna about standing further away from the mic.  Seeing Pigpen in such a diminished role was curious too.  Considering his health at the time, I wondered how he contributed in his last year while his "replacement" (Keith) took over and established himself.  Keith was almost inaudible through most of the film, only really peeking out sparingly on the later songs.

Beat Club Sound
The sound was very good and well balanced.  The film started with them checking the mic's and having side conversations.  Then, without much prompting, Bob shouts out a band introduction and they're off.  Like a show, it didn't seem as though they had a plan for what they were going to play.  In fact, they called Donna out to the 'stage' to sing on "Playin' in the Band" with a vague "how bout you come on up and sing on this" kind of vibe.  At the very end of the film, the band is playing a holding pattern coming out of a "the Other One" while Bob replaces a broken string.  Just as he gets it tuned in and the band starts to turn into a jam that's moving into a clear direction, the film suddenly ends.  Like a brutal cut in an old bootleg, the credits roll and you're left with that wondering of what came next.


Beat Club Filming
Staged in front of a green-screen showing tie-dyed sheets, the band was set up much like they would for a live performance (see picture).  Based on the staging, though, it seemed like they didn't know what to do with Donna.  When she was singing, she stood in front of Jerry, using his mic but forcing him back to his Wah pedal but out of direct line-of-sight with Bob and Phil.  When she wasn't singing, she stood in front of Pigpen's organ, blocking him from the cameras.  Still, considering it was 1972 and capturing live music on camera was still in its Woodstock-ish early years, it captured the band well.  Kieth didn't get much camera time, but Billy and Phil did, even though they didn't sing much (or at all in Billy's case).  Jerry and Bob were, of course, the focal point of most of the camera work, but that makes sense considering their lead vocals and guitar work.  It didn't appear that the band knew the cameras were rolling the entire time.  Prior to a few song starts, you could hear one or more of the members say "we're rolling" before they started counting into the song.

Full Bus
Unlike previous years, Boo and I piled all of the boys into the bus (Hapy drove great again) and shared Dead-head movie night with them.  Unexpectedly, they all took something positive from it.  T, for example, gained an appreciation for how Garcia approached and played the instrument.  He's heard their music before (obviously), but hadn't gained that understanding until he saw him play.  Interesting.  C appreciated what Billy could do on such a simple kit.

I was disappointed in the size of the crowd.  It was much smaller than the "Sunshine Daydream" year, but maybe there was a different local showing deeper into Portland which attracted some of that crowd.  If not, I'm afraid the numbers may not warrant airing something next year.  That would be a shame.  With all of the simulcast concerts from the 80's and 90's, there are many years worth of material left.

That's it for today.  I'll try to get another post in before the weekend.  Thanks for following along!!