Showing posts with label shifter. Show all posts

Thursday, May 14, 2026

Building a Shop - Construction Permit Complete

For a project that started in December of 2024, I am surprised it took so long for the shop to reach "complete" for it's initial build permit. Today, I'll review some highlights and touch on a Hapy adventure.
 
The Doors
shop permitted
I had an entire post about the doors (See Building a Shop - Doors) where I detailed almost buying the wrong size big door. Then, we got things right. That big door faces north. Next to it, our contractor guy Ray installed a basic HomeDepot-special 36" (1 meter) wide person door. That door is the only door with an external-facing lock. Moving around to the west side, we have a 10-foot (3.3m) wide opening. In the Ghost of GoRo post, I mentioned the west-facing barn doors that Ray built. I will give them more detail below. The southern opening also got a barn-door style install, though the actual doors are a little different.
 
Ray's Custom Doors
barn doors by seating area
I'll start with the west-facing big barn doors. First, we sourced an external barn door rail system (~$300US) capable of supporting a few hundred pounds. The opening had a double header, so most of the rail was mounted to that, through the exterior skin. In order to create sufficient space for a door to hang, the rail install includes a small block of 2x4 between the rail and the outer skin at each bolt-point. The header only spanned the opening, so on either side, from the inside, Ray added a 2x4 on the inside for the mounting to attach to. The south-facing smaller doors had a similar barn rail system installed. We followed the pattern of using 2x4 blocks to create the offset, and using 2x4 planks inside for the mount to attach to. Unlike the west-facing door, the south-facing did not have a double header, so the entire rail needed the 2x4's installed.

southern doors
With the rails in, Ray shifted to construction of the doors. All 4 doors were framed with Sun-wood. This is exterior-qualified wood, but lighter than cedar and not chem-y like pressure treated. Because the west-facing doors are bigger, they were assembled with brackets to hold them square. And, they had angled planks added for strength against twisting or flexing. The south-facing doors were joined with biscuits, and did not have the angled planks added. Once the frames were ready and test fit, the west-side doors had siding attached so they match the building. The southern doors were skinned with clear plexiglass. This will allow the little bit of winter light we get from the southern sky to leak into the shop.

Once the doors were assembled, Ray re-hung them, and installed interior grab handles to operate them. On both sets of doors, we added guides into the concrete so the doors would not move away from the building while in place or traveling. Last, I added a lock to each door so they could not be opened from the outside. I need to prime and paint the south-facing doors, but they are operational as-is.
 
Inspected
southern doors
When I had the building inspected in August of 2025, the inspector asked for 2 things: install the doors and add a landing for the person-door. With the doors now complete, and the landing added in September (See Building a Shop - Steel Building Erected), I was ready for an inspection. So, on Monday I ordered the inspection. The inspector checked the boxes on Tuesday and now I have an officially completed building (per drawings, spec's and inspections). What does this really mean? Well, in terms of the permit and inspections, it means I get to pay taxes on the land improvement, and my home owner's insurance just went up. It also means that anything contained within that shop is now covered under my home-owner's insurance and if something catastrophic happens to the building, I'm covered insurance-wise.
 
What does this mean in terms of my personal use of it? Very little, frankly. I needed the doors so I could lock it. Once lockable, I can start storing tools out there, so I can work on a car in the shop and not walk the 40 meters from the shop to my tools in the garage and then the 40 meters back again. I have already repaired 3 cars in that shop with a 4th (Astra needs her alternator replaced) heading in on Friday. having a lockable shop means I can do that work that much faster because my tools will be right there.
 
Retrospective
where we began
Being an advocate of both Agile and Continuous Process Improvement (CPI), I believe that some kind of look-back when a project reaches its end is healthy and helps you and others make better decisions in the future. So, with that in mind, what did I learn that I haven't already mentioned?
 
     Permits: I covered most of the discoveries along the way in the linked permits post. Get Clean Water Services involved early and make sure you manage both erosion during the construction as well as any mud getting tracked into the street. Either can got your job flagged and then things get much harder.
 
    Survey: The "106" inspection is all about proper placement of the building relative to your plan and the property lines. If you don't know where your lines are and can't figure it out, you will need a survey, or you may not pass the first inspection. I split this inspection into 2 visits, with the first being informal wholly focused on the site location. This was Vai-the-concrete-guy's idea and he was 100% right.
 
excavated
    
Bidding: get lots of bids. I had 3 and had I gone with one of them, it would have cost me ~$5k more for the flatwork. Part of every conversation about the flatwork included a conversation about the excavation. For every bid, the excavation was a meaningful amount, even though it's not terribly time consuming, especially for out project. This might be something we could have done ourselves, but the schedule worked out better having Vai do it all. Last, make sure every bidder fully understands all of the parts of the plan. Vai had a brain-fade about the carve-outs for the lift and had I not asked about it after they ran the compactor, there could have been an issue. This served as a reminder that without a designated general contractor, YOU are the GC.
 
    Inspections: While Clean Water Services did verify that the erosion control measures were in place, and made sure that the storm outflow was planned for, the adherence to that plan was not in any inspection.Does this mean it isn't needed? No, nor does it mean that it won't be part of your project, it just wasn't part of mine and I managed the storm water with french drains once I was unable to attach gutters. So, I have a rock pit in my yard without purpose. The inspector can be your friend. Case-in-point, I would not have even known about an "Ufer" if the inspector had not mentioned it and then approved it. I now have a passing-electrical ground because of the inspector.
 
cleared and framed for concrete
    Concrete: I asked the concrete contractor specifically what, if anything, I needed to do once the concrete was poured. He said "nothing", and I got surface cracks because it did not cure uniformly. The correct answer is "try to keep the surface wet with a garden hose for a couple of days". Then, the top does not dry too fast relative to the concrete beneath. 
 
    Oregon Carports: these folks were great from start to finish. They were easy to work with, the plans were spot-on for the permits and inspections and the installers were fast and nice guys. It would have been nice to know that a gutter could not be installed without retro-fitting, but at this point we have weathered a full wet season easily.
 
    Driveway: When I planned the shop, I knew that the ground sloped downhill south to north but I did not account for the west-to-east down slope. Topology matters. After the steel building was up, I had over 1/3m (an American foot) drop off at the southeast corner. This led to many hours of hauling and spreading rock. Since my labor is free, this did not factor into final costs, but it may factor into your plans.
 
    Overhead Doors of Portland: Similar to Oregon Carports, the overhead guys were great to work with. They found us a door that just smashes for less than half of what I would have paid for new. They stopped by late last week to install a header board over the door and install the weather seals. Both after my check had long cleared. We will be using these guys again.
steel skeleton
 
    Ray: Ray is a star. He has been a contractor building things since he was a teenager. Now, he's getting near retirement and is not taking on any new customers. So, those of us lucky to have worked with him in the past are blessed to still have him, at least for a little while. One of Ray's greatest strengths is looking at a project without filters. He can imagine what you are looking to do and make it happen. He built the barn doors, yes, but he also built our kitchen with salvaged cabinets. 
 
Timeline
For history's sake, and in response to my "how did this take so long?" question above, here's the time line for the build, start to end. There was a break in the action over the winter Oct2025-Mar2026 while we financially recovered a little bit from the costs incurred so far. We needed to get onto Ray's calendar and figure out the doors a bit too.
 
2024-AugustBoo and I decide to build a shop and figure out about where we want it
2024-December: steel building ordered from Oregon Carports
2025-January: permit started with Washington County (WC) ($700)
2025-March: Clean Water Services (CWS) involvement in plan
2025-April: permit accepted, initial payment of ~$1k
2025-May: self-performed survey, soliciting concrete bids; locating and placing "straw wattle"
2025-June: CWS inspection, excavation, WC site inspection, concrete poured, WC "106" inspection 
2025-July: steel building installed on foundation
2025-August: french drain install around foundation, WC "199" inspection fail
2025-September: rock and gravel of drain, north-side access
2025-October: move 4 cars before rains hit
-- work suspended to save some money -- 
2026-March: west-side barn doors, north-side person door installed
2026-April: north-side overhead door installed
2026-May: south-side barn doors installed, WC "199" inspection pass
 
Costs
Similar to the timeline, I'll detail the costs as I can find them. Of course these were all in as-of-that-day US$. With TrumpTarrifs and trumpflation, your numbers may vary widely from these.
        0: Advise from WashCo, inspectors and Clean Water Services
  1800: Permits with Washington County
23000: steel building from Oregon Carports
15500: excavation, framing, concrete pouring, incl $500 for the concrete pump rental
  7500: north-facing big door from Overhead Door of Portland, incl install and opener
  4800: all other doors, incl hardware, custom build, installs
    800: french drain materials, gravel
    500: large rocks for storm outflow
53900: TOTAL
 
From these numbers, I conclude that when you think about building a shop, the cost of the building itself could be less than half the overall costs. I paid more for permits than I did for rock and gravel, which is also interesting. The 4 doors cost almost half of what the overall building cost too. I could have had fewer openings, or installed a solid overhead door to lower costs, but I'm glad I didn't. Also it is worth noting that this shop has no electrical yet. I expect that will be a 5-figure as well since I will need a trench to run power, a panel, and then lots of cabling contained in conduit. Eek. I do not expect that work to take place any time soon. Instead, I will operate with a long extension cord from the house for as long as I can manage.
 
Hapy Shifting
In my last post, I celebrated Hapy shifting so well. That turned out to be premature. The next day, I lost the ability to put Hapy into gear and had to limp home in rush hour from around the corner.. in 3rd gear. One hot clutch later I was back in front of the garage and there he sat for a few days until I could get a look at him. Of all the things that could come apart, I did not expect the bolt going through the pin in the shift linkage at the front of the transaxle. In the image on the right, it's the screw in sub-component "P". I expected the grub-screw ("R" in the image) to have fallen out because I could not remember if I had run the bailing wire through or not. Turned out I did, and the grub screw was doing fine.
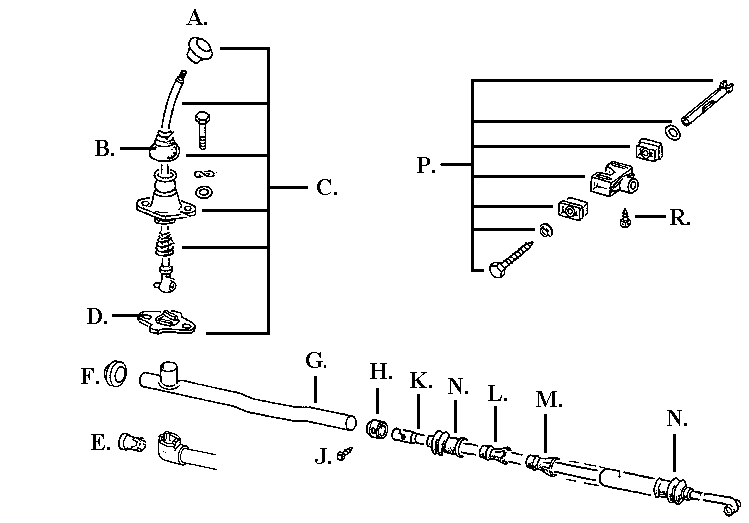
 
shifter diagram
I pulled the pin out and rummaged through my drawers of fasteners and found a 11mm bolt that fit. After around 20 minutes of wrestling, which consists of slightly moving the shifter in the cab, getting back under the bus, test fitting and repeating until you can muscle the pin through the hard plastic bits in the cage AND through the end of the linkage running from the front. This time, I put blue thread-lock on the bolt added a washer and sent it into the pin. I torqued it down as best I could considering my body position and the lack of something firm to grab on the opposite end. I used a pair of pliers to hold it.
 
Hapy is back to shifting normally again.
 
Wrap Up
After Ray finished the doors and I had locks on them all, I sat in one of the rear seats from C's new mini-van / stealth-camper we set in the shop as a seating area. I took a moment to just absorb. We so often will not take those minutes, choosing instead to rush off to the next thing. I sat for a few minutes, radio playing softly in the background and simply looked around at my shop. I really can't believe it. After so many years of lying in puddles, sliding on my back on wood chips or just outside in the rain, I cannot imagine what it will be like to work inside, on a hard dry surface come winter. Even now, as we head into summer, I will be working in the shade, on cool concrete, not hot tarmac. Of course, between then and now, I have a great deal of stuff to move and organize, but as of today, the shop is open and I can't wait to get out there.
Thanks, as always, for following along- 

Friday, May 1, 2026

Hapy Shifting

In my last post (Hapy not Spittin Fuel), I described a stressful drive home without turbo and then losing access to my 2 lower gears. Today's post covers the install of the Gene Berg shifter, and some other little bits on the bus as well as the replacement of the throttle cable on Oliver the 1978 MGB.
 
Before I begin, especially to my union brothers and sisters, Happy International Labor Day. Employee protections were and remain hard-fought; from a legally defined "work week" to overtime pay and safer working conditions, we have our unions to thank.
 
Throttling Oliver
Gene Berg shifter
I'll start with Oliver, even though I did this cable replacement in the middle of the Hapy stuff. Recall, I moved Oliver out of the shop so the overhead door crew could install the door. At that time, I got Oliver to start, mostly by cleaning and re-gapping his spark plugs and otherwise being patient. Since Oliver does not have a stock carb set up (side draft SK Racing carb), the stock throttle cable is not an exact fit. The old cable had a much longer hard "pipe" to fit the cable through near the carb than the stock one I had ordered. I thought about simply removing the braided cable and sending it through the old sheath, but the points where the plastic sheath met the hard pipe was failing. I think the way the hard pipe was attached to the carb was a little hinky too, so the whole cable, hard pipe combination went in the bin.
 
Both the new and old cables attached to the pedal the same way: round ball on the end of the cable fits into a nook on the underside of the pedal. So, once you pass the cable through the slot, the springs on the carb effectively hold the pedal up through steady tension through the cable. The other end of the stock cable has a fitting on it which presumably fits onto the old carb with a c-clip or similar. I had to cut that off so I could thread the raw cable through the more common hole with a bolt model. Cutting the cable left wire shrapnel at the end, so it would not easily fit through the hole. Ultimately, I had to remove the actuator arm and the spring arm from the side of the carb so I could more directly feed the wire into the hole. While this was more destructive initially, I was getting nowhere trying to send a cable through a hole I could barely see.
 
One the cable was through the hole and bolted down tight enough so it would not fall off, I put the arms back, and re-added the spring. I got Boo to sit in the driver seat and move the pedal through it's full motion so I could set the depth of the hard tube and the cable length. I had other things to get after, so I did not test fire and drive Oliver. In retrospect, that may have been a missed opportunity.
 
Gene Berg Shifter
shifter diagram
I don't know when I first installed the Scat chrome shifter into Hapy. It seems like it was always there, so it may have been one of the first things I did. Back when I first bought Hapy, he did not want to go into gear at all because the shift coupling at the front of the transaxle had lost the little plastic bits. Note the picture on the right, here. In sub-component "P", there are 2 rectangular things. Those are the plastic bits which were gone when I bought the bus. If you threw the shifter in the direction of the gear you were seeking often and hard enough, the long-ish bar thing (top of sub-component "P") would move the cage (center of sub-component "P") and eventually you might find a gear. The prior owner had beaten on the original shifter so much, it wasn't straight anymore. It was literally bent. Once I got the cage resolved, the bent shifter was just too strange to use, so I bought the upgraded shifter. Or at least it was. Over 15-20 years of use, I think it slowly may have moved, though there is no facility to adjust it -or- the limited-throw bits wore down over time. Since most folks think somewhat highly of Scat products, I'll assume it wore down or moved over the years. I will say that in recent years, Hapy has predictably popped out of 2nd gear every time, and I don't remember when that started.
 
greased up
The loss of both 1st and 2nd gear on the drive home was enough for me to do something drastic. After removing the Scat shifter and discovering the rust and what looked like some wear on the plastic bits, I decided to find the Gene Berg shifter I bought a few years ago. The Gene Berg shifter is simply bad ass. It is 3 or so inches longer (Scat is 21 inches, Gene Berg is almost 25) which puts the shifter in my hand without having to bend over like I did with the Scat after adding the Sprinter seats. The picture at the top shows how high it is. One drawback: when I put it in first, I hit the rear of the cup holder. The reverse lockout is a button on the side rather than a "T handle to pull up on. I like that better too, since there is less to think about and backing up a bus requests all of the focus you can. It uses a shift plate like item "D" in the diagram above so for the more stock-familiar, this vibes well. Perhaps the most important, the attachment of the pieces has adjustment capability engineered into it.
 
I test fit everything first, and finger-threaded the supplied bolts into the respective holes, just to be sure everything would fit. Then, I took it apart and greased everything: the ball, the slides, the shift plate, and the cup the shifter tip sets into. Then, I installed it again. One thing about a test fitting is the second time around, you know how it all goes together, making the final fitting much faster. Because of the adjust-ability factored into the shifter, it was easy to wiggle the shifter and the mounting footing to get it seated squarely and threaded snug. I tested the movement of the stick and did not feel a need to adjust it. I figure after some longer test drives, I will know for sure and then execute the minor adjustments. For now, though, I fired up the engine and backed Hapy out of the shop and drove him up and back on the laneway. At this point, I have all my gears.
 
Seasonal Scrubbing
I ended my weekend of yardwork and playing on cars by giving Hapy his spring cleaning. I have documented this in the past, but in brief: I use SoftScrub bathroom cleaner and a soft brush to clean the fiberglass top. This gets all the black ick from organic material removed. Prior to this step, I will clear out the luggage rack of leaves and such. It was especially bad this year so I need to circle-back, remove the rack and clean the metal top. Once the top is SoftScrub'd, I wash the entire bus (top again) with car wash like any other car. The end-to-end process takes 2 or 3 hours, but if the sun is out and it's not too hot or cold, it is a great way to spend a Sunday afternoon. I hope to get the luggage rack removed and the tin-top cleaned next weekend. That will also give me the opportunity to repair any part of the luggage rack which needs attention. In the meantime, I swapped the vehicles around, setting Hapy up as my daily driver and the lower mpg truck for specific-use-only. As of May 1st, regular 87 octane gas is $5.70/gallon here, and diesel is $6.20 but with the mpg difference, Hapy is less expensive per-mile.
 
Wrap
Around that work, there's the usual clearing brush, mowing lawn, etc that comes from living in a house, and spring growth. Our favorite construction contractor was over on Saturday to experiment with the south-facing doorway in the shop. After some large thinking, we are going to put in barn-door style doors, but with fiberglass so the little bit of winter light we get will make it into the building. That's it for this week. Thanks, as always, for following along-

Wednesday, April 22, 2026

Hapy not Spittin Fuel

I managed to get Hapy, the 1972 TDI-powered microbus, over to Justin to get the injection pump re-sealed this weekend. Today's post covers that adventure as well as a quick trip thru a K'Lack (2004 VW Jetta Wagon) issue.
 
Getting There
head seal complete
It has been 2 years since Hapy really went much of anywhere. Most of that time, he sat waiting for attention either in an unknown, but unstartable state or in pieces. Once I had him re-assembled with a new flywheel/ring gear and had a test drive, the original reason for him to have starting problems re-appeared: Injection Pump losing prime. I was able to prime the pump with a MityVac and then crack the injectors to get him running. And, in that way I took him on a short test drive, found some issues with the lights, etc. There remained many other issues, but at least I could get him running, stopping and had my lights so I could drive him an hour and 20 minutes to Justin's shop.
 
The night before our start-of-day appointment, I got Hapy out of the back and filled with B-20 biodiesel ($6.40/gal. same as dinoDiesel. Thanks, Trump). That morning, I filled up with coffee and hit the road. Most of the drive from West Beaverton to Justin's shop is on back country roads with few other drivers on an early Saturday morning and even fewer traffic lights. It was in the 50's (F low-teens C) and clear, making the drive very pleasant. At some point after I fixed the rear speakers, the stereo lost access to 12V so I drove in silence, a familiar scene for Hapy. The road was so easy, the thermostat never opened. I had the cabin heat on, so I may have been pulling just enough heat off the engine to keep the thermostat closed. Based on the UltraGauge, the engine temp was hovering around 180*F so running "cold". When I pulled into town off the country roads, I had a few cases of not finding 2nd gear. I noted that for followup later. When I arrived, Justin and I hung out for a bit before getting started. He has so many interesting projects all going at once, you have to absorb it all. I mean, who puts a TDI in an Audi TT while also putting one into a Rabbit pickup? Love that! The way he scraps discards and re-uses them for the basis of tools is pretty awesome too. He's even teaching himself TIG welding. Small crush, maybe. Okay, fine. He does do some impressive stuff.
 
Injection Pump (IP) Reseal
hammer mod perfecting IQ
Justin had encouraged me to get the seal kit from Cascade German, since they are local-to-Oregon, when we first set the apointment. I had already purchased the deluxe kit from DieselGeek. I didn't understand the difference. These 2 kits definitely vary in their intended purpose, so they have some meaningful differences. The Cascade German version is actually less expensive, but it includes all of the little seals usually replaced when a legit shop does the re-seal. The DieselGeek kit has far fewer seals (just the 2 on top and the head-to-base seal) and it is designed for the home-mechanic to re-seal the pump in their garage without removing the pump from the vehicle. The DieselGeek deluxe kit is more expensive because it includes specialty bits a car owner probably does not have, but are needed for the job. This differentiation is important and your case may lead you to the larger kit even if you do not intend to replace much more than the 3 included in the DieselGeek deluxe.
 
Once Justin discovered the gap, we made-do with the smaller kit. Justin replaced the top 2 seals first and then moved onto the head-to-base seal. Rather than use the included "retraction limiting bolt" and try to fit the new head seal over the top of it, the head was removed, and I held the guts of the pump in-place while Justin cleaned all the surfaces and installed the new seal onto the head. Once installed, he hooked up the VagCom and hammer-mod'd (link to Hammer Mod thread on TDIClub) the injection quantity (IQ). Justin was aiming for 6.0 mg/stk because the engine was cold (54*C).
 
The engine bay was pretty dirty, so lots of time was spent getting the IP clean before we began as well as afterwards when the whole engine got a cleaning. After it dried off a bit, we let the engine idle and we looked for leaks. None found. Justin did ask about how the starter was mating to the flywheel. It does sound loud, like it may not be meshing quite right. I'll need to remove and reinstall the starter and the starter adapter to see if I can get things to sit right. The original adapter and starter that I put in just worked for years. I would expect the new-also-stock starter would fit the same. Since this is a new adapter, that is actually designed for the application, versus one I dremel'd to fit, I would think it would fit better. It's a puzzler, but one I will consider carefully as I remove/reinstall (R&R) the starter to get it to hit the ring gear more cleanly.
 
Getting Home
If there is anything we have learned over the years about Hapy, its that he loves going places and really does not like going home. How many times have I left home and the road trip to 4 Peaks or some camping spot went great and the drive home was either very challenging or partially performed by a flatbed? Too many. This trip was no different. At first, Hapy ran great. The engine was responsive and stayed cool. Somewhere around McMinnville a charged air pipe popped off, leaving me running naturally aspirated the rest of the drive home. This served as yet another reminder to never leave home with Hapy without some tools. While the turbo is great for the overall power-band, its absence is really noticeable when trying to leave the line and get up to traffic speed. Now that it was about noon on an absolutely stunner of a day, the roads were busy where they had been empty a few hours before.
 
By the time I was approaching the Dundee Bypass, I was having increasing difficulty finding 1st and 2nd gear. Sometimes, one or the other would be right there. Other times, it was a "can't find it, grind it" experience. This persisted all the way home, forcing me to sometimes leave a stop line in 3rd. When you add in the no-turbo, I had some dissatisfied fellow travelers around me. I did get home, however, and I drove Hapy all the way into the shop so I can chase these issues.

K'Lack
After having something to eat, I switched over to K'Lack, the 2004 TDI Jetta Wagon with a BEW motor. It had been throwing a crank position sensor error, lighting up the check engine light (CEL), preventing it from passing smog. I had ordered a replacement from Cascade on Thursday, and it was in the morning mail on Saturday when I got home from Justin's. The removal/replacement of these is not complicated (remove bolt, unplug from harness, install is reverse), but getting to the sensor and the weird bolt head complicate things. The sensor sits right behind the oil filter on the front, when the engine installed transverse like normal. The bolt head is a 9mm 12-point. Half of my sockets are 6-point and the other half are 12's, designed, I think, for easier application onto hex bolts. In this weird case, that socket set perfectly onto the 12-point bolt head. With the right socket, short extension and ratchet the bolt comes out fairly easily. The plug end is fitted into a metal tang, but otherwise once unplugged, the whole thing can just get dropped through the gaps onto the ground.
 
To install, I plugged it in first and then covered the sensor with a rubber glove to lower it past the engine ick and then below the car. Could I have cleaned the engine bay before starting? Yes. But then I would have been lying in mud since the car was on my front lawn, not back in the shop and I didn't want to lay in a puddle. At this point, I found having another person to be your eyes is very helpful. I got under the car, un-gloved and suspended sensor in hand and had Boo tell me east-west, up down until I was able to send the sensor into the hole. By doing it in this order, the sensor wanted to be oriented such that the bolt holes lined up naturally. I sent the bolt thru, tightened with the socket/ratchet combo and I was done. Since I cleared the code we need to run a few cycles until it is ready to smog.
 
For the legal-minded, Oregon cops are interested in registration violations after years of looking the other way post-CoViD. K'Lack got a registration-violation ticket while legally parked in downtown Portland. Drivers beware.
 
Hapy Wrenching
Feeling confident, I switched back to Hapy, and re-connected the charged air hose. As I suspected, it was one of the rubber-to-metal bits. I cleaned both the outside of the metal pipe and the inside of the rubber with brake cleaner so they were more apt to stay together and then tightened the clamp down.
 
I next wanted to chase why the lower gears were sporadically missing. I checked the front of the transaxle to see if it was out of position at all. Nope. Right before Boo and I bought this house, I bought a Gene Berg shifter. The new-at-that-time seats were higher than stock, moving the approximately-stock-length Scat gear shift further away. The Gene Berg shifter is a few inches longer, so I figured there would be less leaning. I had not gotten to installing it before the house was bought and life took a turn. Anyway, at this point I looked at the Scat shifter I had installed, probably over 15 years ago and slid the vinyl boot up the shifter. The plastic bits on either side of the shifter appeared to be allowing more play than I remembered. Hmm. Then, I looked at the rest of that mechanism. It was very rusty, especially the foot that rests on the floor. I shot the bolts with Kroil and after waiting a couple of minutes, removed them with a 13mm spanner/socket combination.
 
rust under shifter
The floor under the shifter had meaningful rust to match the rust on the shifter foot. I don't know how much play was created by the plastic bits, nor how much may have been introduced by the rust. I do recall, however, that the Scat shifter instructions did not account for adjusting the placement of the shifter front/back nor left/right. When looking at the foot profile, it looks very much like it is designed to sit squarely in the oval without any adjustment at all. I don't know if this was a terribly good design, but I will be installing the Gene Berg shifter which does allow for adjusting. I cleaned up the rust dust, shot the floor and the shift-rod end with brake cleaner and got everything as clean as I could. Then, I painted the area with Eastwood's Rust Encapsulater (the new stuff is even better than the original) and called it a day. I still need to treat from below. I shot the picture on the right here as I was almost done applying the paint.
 
Wrap
Well, that's where we stand right now. I have been in and out of the shop a few times since Saturday and there is not a single drop of fuel on the floor under Hapy. So, we can close the book on the IP leak. I intend to complete the shifter swap and then R&R the starter next. I hope that will be the end of both issues, but I suspect there will be more to do than that. Then, of course, there are all the other things like a fuel level gauge, the radio, and the diesel heater just off the top of my head. There are many incomplete items on Hapy. Now that I have a mostly-inside (one doorway remains), concrete floor'd space to work, my desire to work on these cars has really kicked into a new level.
 
Thanks, as always, for following along and more next time-

Wednesday, May 27, 2015

Now seating

Today's post continues on the theme from the last few: getting the bus re-assembled in time for the Hoot. We have the glass in. We have the lights and bumpers working. Next, it's seating, seat belts, carpeting and the shifter.

Front Seats
Scat shifter, seats in
During the demo, I removed the seat pedestal carpet. I wanted to see how bad the rust had gotten in the hidden places. I'm glad I did. There was lots of surface rust starting both directly under the carpet as well as in the dry well between the seat pedestal and the top of the wheel wells. This rust has been hard to address, and I mostly left the dry well alone other than some cleaning. I didn't paint it, and I didn't recover it with carpet. I'll come back around as time and the mood strikes. Getting a small grinding wheel in there is virtually impossible, so attacking that rust may need to be a combination of muscle power and chem.

The actual seat install is very simple. The passenger seat locks in at the rear first. Fold the seat and push the back rail into the 'C'-shaped brackets. Keeping the front edge raised, set the hook on the rear of the seat into the bracket on the mid-wall. Easy. The driver seat slides in from the front. Once on the rails, It slides back by lifting the lever and pushing with your feet (when you're sitting in it). I've toyed with the idea of applying lithium grease to the rails, but decided it would just increase the gunk longer term.

Seat Belts
I dug through all of my old posts, but it doesn't look like I ever posted when I changed my seat belts. way back when I bought the '74 seats, I also got some old retractable seat belts from the rear of an old Mercedes. These were the only non-VW parts on the bus besides some random non-metric fasteners. Well, on one of our multiple road trips, the driver's belt simply stopped locking into the clicky thing. So, I was effectively driving without a belt. In other countries, that's not a big deal, but here in the United Police-States of America, that's a ticketing offense. Add in the profiling standard of a VW bus, and that's some measurable risk. So, I ordered this pair from CIP1 that have chrome clicky things. They bolt right in with 16mm and 17mm sockets, look great and don't cost $200 for the pair (more like $140).

Pedestal Carpet
fancy CIP1 belts, no carpet
I decided to not re-install carpet over the front seat pedestals. Instead, I chose to leave the rust access, and consider what I could do with the dry wells. I could cut one of the supports, weld in a cross-bar along the top and create a little hidey-hole for books or something. Maybe a place to put CD's? I dunno. Either way, I left the dry well exposed and the pedestal uncovered. I was unable to discern a notable difference in the noise during my recent drives, so I'm not inclined to rush to changing it.

Shifty
Finally, I got the shifter and cab carpet in. The cab carpet is really easy... once the shifter is in. So, I'm not going to go into that. The shifter, though, can be tricky. On the bottom, there's a ball with a little spring'd shaft on it. The ball fits through the floor into a cup that connects back to the tranny. In the front of the cup is a cut-away for the spring'd shaft. The spring, though, wants the shaft to go the other way. This makes for one of those spots where you need more hands than you have and eyes that can see through steel to make it work. Assuming your equipment isn't so old that it just stopped acting properly. After 4 hours of wrestling with that shifter, I gave up and grabbed the old chrome short-shifter I bought shortly after buying the bus. Much to my surprise, I was able to get that chrome shifter in with very little effort.

Like any shifter, set the ball into the cup and tighten the 2 13mm bolts until the shifter doesn't move around when you move it. The tranny should have been in 2nd gear when you started, but in case it wasn't, get it into 2nd now. Without the engine running, test moving from gear to gear. Any 2 harder to get to than the others? If 1&3 are harder, the shifter (or adjust plate if you're going stock shifter) needs to slide forwards. tap with a rubber mallet and re-try. If 1&2 are harder than 3&4, it needs to move left. Tap with a rubber mallet. For moving the stock plate, you'll need to get a bladed screw-driver against the plate so you only tap it and not the whole operation. You'll need to test it out with the engine running as well, and possibly repeat the adjustment process. When I did this, I didn't need to adjust the shifter again. I just torqued the bolts down.

That's it for today. Thanks, as always, for following along.

Wednesday, September 10, 2014

Removing an Input Shaft Seal

I have a bigger post in the works for the engine drop, transaxle input shaft seal replacement, etc.  For now, I have the engine lowered onto an ATV jack, and the transaxle in pieces on my garage floor.  I removed the old input shaft seal in a unique way.  Everywhere I looked, the advice was to get a seal removal tool, hammer it into the rubber seal and pry away.  I did something else, and that's what I cover in today's post.

Identify the Seal as the Problem
After separating the engine from the transaxle, and before moving the transaxle into a clean location, look at the inside of your bellhousing.  Does it have a bunch of oil residue lining it?  Maybe a small pool of oil?  Dip your finger in it and sniff it.  Does it smell like your engine oil?  Does it look like engine oil?  Lighter color?  Maybe slightly different smell too?  Yep, you have a leaking input shaft seal.  Now, remove the throw-out bearing like everyone says.  If you have the sleeve behind it, remove that too, exposing the input shaft seal.  Look at the seal.  Wiggle the input shaft a little bit.  Does the seal cling to the shaft or do gaps appear?  Is the seal smooth or does it have a pinch in it?  Mine had 2 small pinches along the outer edge and the shaft did not cling to the seal.

Removing an Input Shaft Seal
This is the point where everyone else says to remove the seal the brute-force way.  For some transaxles (those without a seal housing), it may be the right method.  I took a different tack.  Remove the bellhousing.  Its held on with 13mm bolts.  3 on each side inside the bellhousing and 2 on the bottom.  With a rubber mallet, lightly smack the bellhousing to free it from the transaxle body.  Mine had been silicone sealed but the seal didn't hold up much.  Place the bellhousing engine-side down on top of a shop towel.  Pointing up, you will see the seal housing.  Smack it with the rubber mallet and out pops the input shaft seal.  Easy peasey.  EDIT: Through further research, I believe the housing should not separate from the bell housing.  If you were able to get your seal out this way, by lightly tapping on the housing (like I did), you have a new problem: how to get the "housing" (some call it an oil-slinger) re-attached to the bell housing so that it doesn't re-free itself.  I'll post a picture of what my driveshaft looks like after less than 2 thousand miles like this.  I am assuming it wasn't like this when I got the transaxle from AA. End EDIT.

New Seal, Torn Seal
I have been unable to successfully get a seal back into the transaxle, to the point where I tore the only replacement I had.  All of the advice on the interweb seems to exclude transaxles with a seal housing, making their "slip it over the input shaft and drive it in by alternating sides" unusable.  I have tried setting the housing first, but that hasn't worked.  I got close, though, using a 13mm socket to press the seal.  I made the mistake of trying a larger socket and tore the seal.  I need to hit Discount Import Parts (DIP) for another one.  Once I get the seal onto the housing and into the transaxle, I'll close the loop on how I did it.

That's it for today.  I picked up a pilot bearing and a replacement mounting stud for transaxle re-install at the local FLAPS during lunch today.  They didn't have a suitable input shaft seal.  Off to DIP when the next opportunity presents itself.  Thanks for following along, and Hapy Birthday, C!

Monday, July 14, 2014

Fun Family Functions

We all have family functions.  For lots of families, these are not exactly fun.  There are expectations and history that create stress.  We're pretty lucky.  My brothers, sisters, in-laws and parents all get along, for the most part.  In my last post, I mentioned the road trip to Nye Beach, but failed to mention that my younger brother and sister (as well as their families) and my parents were meeting us there.  I'll touch on some of the family fun today and wrap it up with home-garage stuff.

Who's Who
My sister, M, moved to Austin a few years back.  She and her husband, S, have since bought and sold a house, bought and performed construction on a second, had a couple of kids, etc.  They are very much Texans.  I hadn't seen their daughter (I) for a couple of years and had never met their 2-year-old (K3).  K3 is a pistol.  OMG, he is such a joy.  We played soccer, and laughed.  What a sweetie.

My brother, R, has been living in the greater Portland area since the late 90's, met and married a local (KG) and has a girl (A) and boy (N) of his own.  They are both very articulate for their ages, and can engage conversationally with adults with little difficulty.  A and I are great friends who Skype when they're apart.  Unfortunately, we're apart more than we'd all care for.  N and K3 became buddies too, though, playing toys together.  So, with that backdrop, we add 3 beach-side condo's and Newport's offerings.

Watching Whales, not the Temperature
low tide
Unlike the Oregon inland, once you cross the Coast Range, the temperature remains much closer to the 40*F-60*F range.  In Winter, while we're looking at snow temperatures, the coast rarely gets that cold (though the wind is brutal).  In Summer, we may be sweating 80*+ days while the coast is a mild 65*.  The 5 days we were in Newport were incredible weather-wise.  High's in the mid 70's and overnight lows in the 50's.

As the title suggests, we saw whales.  There's a pod of about 40 grey whales who live year round in the waters just off the coast between Newport and Lincoln City.  On 3 successive nights (July 2nd, 3rd and 4th) from the condo balcony we saw whales spouting at high tide.  The first night was particularly spectacular with multiple spouts blowing simultaneously and at least 5 different whale-back sightings over the course of about 30 minutes.  KG had been coming to this spot for over 30 years and had never seen whales.  Upon hearing this, we were all the more appreciative of the sight we'd witnessed.  Of course, we were so awe-struck, none of us thought to take a picture.  Drat!

Sand Castles and Sand Sliding
Below the balconies, was a beach of duned sand.  Apparently this was somewhat rare too, for the beach was usually flat.  Back from the highest tide's edge, the sand had been shifted by wind into what looked like a series of trenches with steep sides, but only a couple of feet tall.  These created effective, but sandy, wind blocks that we and others used for building beach fires.  With all of the boy energy being fed into air-soft guns, Boo and I expected them to use the trenches and play guns.  Surprisingly, they didn't.  They used the trenches as starting points for elaborate sand castles.  So, with garden shovels instead of toy guns in hand, all of the boys (K, K2, K3, T, C, and N) set to building things.  The bigger boys also discovered a steep bank of sand that stood over 30 feet high a little further north.  They would one by one jump from the top and do their best ski/board imitation down the bank.  Apparently, K2 was hitting 360's by the time they stopped for good.

Hatfield Marine Science Center
HMSC
We spent a day at the Hatfield Marine Science Center too.  We all highly recommend it.  It is officially free (though donations strongly encouraged), and about 1/3 of the space is dedicated to interactive exhibits.  The remaining contains tanks of sea-life and presentations on waves, oceanography, climate change impacts, etc.  I hadn't been to the science center since NOAA moved in next door.  NOAA's influence can definitely be felt now, and its a good thing.  All of that research now has a available-to-the-public outlet at the Science Center.

Devil's Lake
In my last post, I mentioned the Devil's Lake day-trip.  Devil's Lake is a small lake (3 square miles) and seemed to be for boating than beach/swim access.  R & KG found a city park that had a boat launch, but more importantly a lake-beach and a huge playground to play in/on.  The younger kids had a blast.  It was fun, but it was after K and K2 had left.  This made T and C sad, and less active.  We truly have become a completely blended family when we don't feel complete because some of the boys aren't there.  I had heard that this was a family maturity state, but I hadn't seen it coming.  The boys are back together again after a week apart, and it really is a homecoming.


Home Garage
bulb on left has lost its dimple
After coffee Sunday morning, I wanted to find the oil leak and solve the persistent tail-light issue.  Starting with the tail light, I discovered that when I installed the battery I must have bumped the tail light assembly.  This bump flattened one of the dimples in the brake/running light dual-filament bulb.  So, the bulb wouldn't sit in the holder correctly, causing a short across the positive contacts of the bulb.  By swapping out the bulb, the problem went away.

The oil leak still escapes me.  I cleaned the underside of the bus engine with brake cleaner.  It seems like the oil is coming from the turbo-side of the engine, maybe from the low-pressure oil return?  Since the oil level isn't meaningfully dropping, I'm not convinced its the problem.  Next, I checked the oil level in the transaxle.  On the transaxle, "full" means the fluid level is just under the fill hole.  I opened the fill hole while the rear of bus was up on ramps and none dribbled out.  No bueno.  I shot in about 1/3 of a bottle before it started dribbling.  I think we have our oil source.  The trick is figuring out where it's coming out.  I don't see a source on the outside, and the clutch doesn't seem affected, so if it's coming out from the output shaft end, we haven't noticed it yet.  Curious.  I may need to drop the engine and separate the tranny and engine to be absolutely sure.  Since everything is running fine now, though, it will wait until camping season ends.  Of course, that's how adventures begin.

More next time...


Tuesday, January 28, 2014

Front Bumper (part 1)

In my last post, I celebrated returning Flash to drive-able Hapy to daily-driver status.  With one extra car than I need, I immediately returned Hapy to the garage to start improving his looks.  Today, I'll cover what I'm getting into, but none of this changes my re-set expectations.  I'll have some or all of the front bumper back on the bus in the next 2 weeks or I'll drive him to the mountain without it.

Bigger Plan
front bumper in pieces
I have visions of a new (albeit amateur applied) paint job.  I thought about getting a nice one, but this isn't a car-show vehicle.  I take him camping... where branches scrape the sides... and state parks put short unexpected tree-colored posts around camping spots that dent bumpers.  I plan to take him into the snow where skis, poles, boots and boards will bang against the sides, doors and floor.  In the end, a nice paint job would just get destroyed.  So, I'm at the other end of the spectrum; the $50 paint job end.  Okay, not really $50, but pretty close.  I bought a can of white Rustoleum at Home Depot for $20 and I painted the poptop with it 2 years ago.  I intend to bring that bright white down to the belt line as well as paint the bumpers and camping outlets.  For the rest of the body, I'm looking at Neptune Blue (thanks Wolfsburg West for the color image) or something in a darker blue.  I haven't decided on whether I'll paint with colored Rustoleum or use a truck-bed paint without the non-slip agent.  The bed paint would withstand more punishment, but would probably look worse and would definitely cost more.

Front is First
rubber step: what lies beneath
I started down this path on Sunday after adjusting the shifter.  I set aside the afternoon, and it took me about 15 minutes.  So, I grabbed the plain wood panels I had cut for the rear driver's side window and quickly painted them with the white Rustoleum.  I'll get into that plan another day.  Regardless, I had now stepped into make-it-look-nice mode, which is nothing but trouble.  I found some sandpaper and cleaned up the windshield wiper arms.  "They need paint," I thought and then I looked down at the haggard front bumper.  Dented and scratched, it still had a political bumper sticker from the Bush-era.  So, I grabbed my ratchets and removed it.  4 13mm nuts hold cap-bolts to the bumper mounts.  4 15mm bolts hold the bumper mounts to the body.  On the ends, 2 pairs of 13mm bolts hold the steps to the body.  Last, 2 pairs of 13mm nuts mate the steps to the front bar.  The license plate is held on with square nuts backing bladed-screws.  Lastly, on the passenger side there is a tow hook bolted to the body with the same bolts as the bumper mount.

Banging Around
smashed tow hook
Once separated, I looked at the rubber bits.  They're all original, so 40 years old.  The steps were hiding 40 years of water seepage and the seam-rubber had hardened to stiff plastic.  Once the steel was exposed, I could start getting a sense for how much work there is.  There's a bunch.  I focused on the dents.  Even the small ones were easy to find: there was a corresponding rust mark on the inside of the bumper.  Someone with skills or access to good tools will probably cringe at this, but I grabbed by framing hammer and started backing out the dents.  With one hand behind the dent to feel for progress, I slowly moved the steel back to around where it was supposed to be.  I'm not going to make it sound like I got it all perfect, but in a couple of hours my bumper went from moonscape to dimpled.  I'm not done yet, though.  There's one more big dent and the lower lip near the driver's mount still needs wrangling.  Overall, though, it should look a lot better.  Next, I'll grind out the rust, prime and paint it.

Parting Thoughts
My tow-hook was completely flattened (see picture).  I have feelers out for a viable replacement, but I think its pretty common for them to get smashed.  When I removed the driver-side bumper bracket, I broke-off one of the bolts.  Overall, some part of every nut-washer-bolt combination was rusty.  In some cases, the entire bit was heavily rusted.  I chose to order a full bolt-set from Wolfsburg West for $21 as well as the new rubber steps and seam-seals.

In my last post, I said that I'd upload pictures of the parts we removed.  Well... Boo was very helpful and got rid of all those parts before I could photograph them.  So, you'll have to take my word for it that the coolant pump had all this sealant all over it and the rollers looked heavily worn.  That's it for today.  Thanks, as always, for following along.