Showing posts with label door. Show all posts

Thursday, May 14, 2026

Building a Shop - Construction Permit Complete

For a project that started in December of 2024, I am surprised it took so long for the shop to reach "complete" for it's initial build permit. Today, I'll review some highlights and touch on a Hapy adventure.
 
The Doors
shop permitted
I had an entire post about the doors (See Building a Shop - Doors) where I detailed almost buying the wrong size big door. Then, we got things right. That big door faces north. Next to it, our contractor guy Ray installed a basic HomeDepot-special 36" (1 meter) wide person door. That door is the only door with an external-facing lock. Moving around to the west side, we have a 10-foot (3.3m) wide opening. In the Ghost of GoRo post, I mentioned the west-facing barn doors that Ray built. I will give them more detail below. The southern opening also got a barn-door style install, though the actual doors are a little different.
 
Ray's Custom Doors
barn doors by seating area
I'll start with the west-facing big barn doors. First, we sourced an external barn door rail system (~$300US) capable of supporting a few hundred pounds. The opening had a double header, so most of the rail was mounted to that, through the exterior skin. In order to create sufficient space for a door to hang, the rail install includes a small block of 2x4 between the rail and the outer skin at each bolt-point. The header only spanned the opening, so on either side, from the inside, Ray added a 2x4 on the inside for the mounting to attach to. The south-facing smaller doors had a similar barn rail system installed. We followed the pattern of using 2x4 blocks to create the offset, and using 2x4 planks inside for the mount to attach to. Unlike the west-facing door, the south-facing did not have a double header, so the entire rail needed the 2x4's installed.

southern doors
With the rails in, Ray shifted to construction of the doors. All 4 doors were framed with Sun-wood. This is exterior-qualified wood, but lighter than cedar and not chem-y like pressure treated. Because the west-facing doors are bigger, they were assembled with brackets to hold them square. And, they had angled planks added for strength against twisting or flexing. The south-facing doors were joined with biscuits, and did not have the angled planks added. Once the frames were ready and test fit, the west-side doors had siding attached so they match the building. The southern doors were skinned with clear plexiglass. This will allow the little bit of winter light we get from the southern sky to leak into the shop.

Once the doors were assembled, Ray re-hung them, and installed interior grab handles to operate them. On both sets of doors, we added guides into the concrete so the doors would not move away from the building while in place or traveling. Last, I added a lock to each door so they could not be opened from the outside. I need to prime and paint the south-facing doors, but they are operational as-is.
 
Inspected
southern doors
When I had the building inspected in August of 2025, the inspector asked for 2 things: install the doors and add a landing for the person-door. With the doors now complete, and the landing added in September (See Building a Shop - Steel Building Erected), I was ready for an inspection. So, on Monday I ordered the inspection. The inspector checked the boxes on Tuesday and now I have an officially completed building (per drawings, spec's and inspections). What does this really mean? Well, in terms of the permit and inspections, it means I get to pay taxes on the land improvement, and my home owner's insurance just went up. It also means that anything contained within that shop is now covered under my home-owner's insurance and if something catastrophic happens to the building, I'm covered insurance-wise.
 
What does this mean in terms of my personal use of it? Very little, frankly. I needed the doors so I could lock it. Once lockable, I can start storing tools out there, so I can work on a car in the shop and not walk the 40 meters from the shop to my tools in the garage and then the 40 meters back again. I have already repaired 3 cars in that shop with a 4th (Astra needs her alternator replaced) heading in on Friday. having a lockable shop means I can do that work that much faster because my tools will be right there.
 
Retrospective
where we began
Being an advocate of both Agile and Continuous Process Improvement (CPI), I believe that some kind of look-back when a project reaches its end is healthy and helps you and others make better decisions in the future. So, with that in mind, what did I learn that I haven't already mentioned?
 
     Permits: I covered most of the discoveries along the way in the linked permits post. Get Clean Water Services involved early and make sure you manage both erosion during the construction as well as any mud getting tracked into the street. Either can got your job flagged and then things get much harder.
 
    Survey: The "106" inspection is all about proper placement of the building relative to your plan and the property lines. If you don't know where your lines are and can't figure it out, you will need a survey, or you may not pass the first inspection. I split this inspection into 2 visits, with the first being informal wholly focused on the site location. This was Vai-the-concrete-guy's idea and he was 100% right.
 
excavated
    
Bidding: get lots of bids. I had 3 and had I gone with one of them, it would have cost me ~$5k more for the flatwork. Part of every conversation about the flatwork included a conversation about the excavation. For every bid, the excavation was a meaningful amount, even though it's not terribly time consuming, especially for out project. This might be something we could have done ourselves, but the schedule worked out better having Vai do it all. Last, make sure every bidder fully understands all of the parts of the plan. Vai had a brain-fade about the carve-outs for the lift and had I not asked about it after they ran the compactor, there could have been an issue. This served as a reminder that without a designated general contractor, YOU are the GC.
 
    Inspections: While Clean Water Services did verify that the erosion control measures were in place, and made sure that the storm outflow was planned for, the adherence to that plan was not in any inspection.Does this mean it isn't needed? No, nor does it mean that it won't be part of your project, it just wasn't part of mine and I managed the storm water with french drains once I was unable to attach gutters. So, I have a rock pit in my yard without purpose. The inspector can be your friend. Case-in-point, I would not have even known about an "Ufer" if the inspector had not mentioned it and then approved it. I now have a passing-electrical ground because of the inspector.
 
cleared and framed for concrete
    Concrete: I asked the concrete contractor specifically what, if anything, I needed to do once the concrete was poured. He said "nothing", and I got surface cracks because it did not cure uniformly. The correct answer is "try to keep the surface wet with a garden hose for a couple of days". Then, the top does not dry too fast relative to the concrete beneath. 
 
    Oregon Carports: these folks were great from start to finish. They were easy to work with, the plans were spot-on for the permits and inspections and the installers were fast and nice guys. It would have been nice to know that a gutter could not be installed without retro-fitting, but at this point we have weathered a full wet season easily.
 
    Driveway: When I planned the shop, I knew that the ground sloped downhill south to north but I did not account for the west-to-east down slope. Topology matters. After the steel building was up, I had over 1/3m (an American foot) drop off at the southeast corner. This led to many hours of hauling and spreading rock. Since my labor is free, this did not factor into final costs, but it may factor into your plans.
 
    Overhead Doors of Portland: Similar to Oregon Carports, the overhead guys were great to work with. They found us a door that just smashes for less than half of what I would have paid for new. They stopped by late last week to install a header board over the door and install the weather seals. Both after my check had long cleared. We will be using these guys again.
steel skeleton
 
    Ray: Ray is a star. He has been a contractor building things since he was a teenager. Now, he's getting near retirement and is not taking on any new customers. So, those of us lucky to have worked with him in the past are blessed to still have him, at least for a little while. One of Ray's greatest strengths is looking at a project without filters. He can imagine what you are looking to do and make it happen. He built the barn doors, yes, but he also built our kitchen with salvaged cabinets. 
 
Timeline
For history's sake, and in response to my "how did this take so long?" question above, here's the time line for the build, start to end. There was a break in the action over the winter Oct2025-Mar2026 while we financially recovered a little bit from the costs incurred so far. We needed to get onto Ray's calendar and figure out the doors a bit too.
 
2024-AugustBoo and I decide to build a shop and figure out about where we want it
2024-December: steel building ordered from Oregon Carports
2025-January: permit started with Washington County (WC) ($700)
2025-March: Clean Water Services (CWS) involvement in plan
2025-April: permit accepted, initial payment of ~$1k
2025-May: self-performed survey, soliciting concrete bids; locating and placing "straw wattle"
2025-June: CWS inspection, excavation, WC site inspection, concrete poured, WC "106" inspection 
2025-July: steel building installed on foundation
2025-August: french drain install around foundation, WC "199" inspection fail
2025-September: rock and gravel of drain, north-side access
2025-October: move 4 cars before rains hit
-- work suspended to save some money -- 
2026-March: west-side barn doors, north-side person door installed
2026-April: north-side overhead door installed
2026-May: south-side barn doors installed, WC "199" inspection pass
 
Costs
Similar to the timeline, I'll detail the costs as I can find them. Of course these were all in as-of-that-day US$. With TrumpTarrifs and trumpflation, your numbers may vary widely from these.
        0: Advise from WashCo, inspectors and Clean Water Services
  1800: Permits with Washington County
23000: steel building from Oregon Carports
15500: excavation, framing, concrete pouring, incl $500 for the concrete pump rental
  7500: north-facing big door from Overhead Door of Portland, incl install and opener
  4800: all other doors, incl hardware, custom build, installs
    800: french drain materials, gravel
    500: large rocks for storm outflow
53900: TOTAL
 
From these numbers, I conclude that when you think about building a shop, the cost of the building itself could be less than half the overall costs. I paid more for permits than I did for rock and gravel, which is also interesting. The 4 doors cost almost half of what the overall building cost too. I could have had fewer openings, or installed a solid overhead door to lower costs, but I'm glad I didn't. Also it is worth noting that this shop has no electrical yet. I expect that will be a 5-figure as well since I will need a trench to run power, a panel, and then lots of cabling contained in conduit. Eek. I do not expect that work to take place any time soon. Instead, I will operate with a long extension cord from the house for as long as I can manage.
 
Hapy Shifting
In my last post, I celebrated Hapy shifting so well. That turned out to be premature. The next day, I lost the ability to put Hapy into gear and had to limp home in rush hour from around the corner.. in 3rd gear. One hot clutch later I was back in front of the garage and there he sat for a few days until I could get a look at him. Of all the things that could come apart, I did not expect the bolt going through the pin in the shift linkage at the front of the transaxle. In the image on the right, it's the screw in sub-component "P". I expected the grub-screw ("R" in the image) to have fallen out because I could not remember if I had run the bailing wire through or not. Turned out I did, and the grub screw was doing fine.
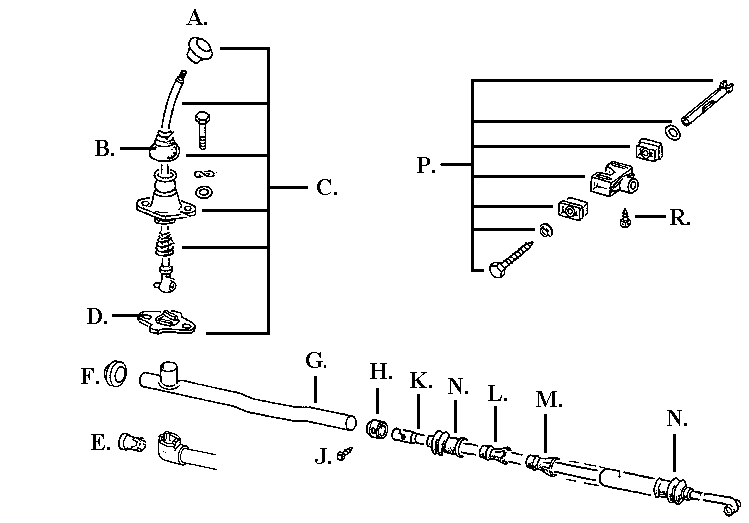
 
shifter diagram
I pulled the pin out and rummaged through my drawers of fasteners and found a 11mm bolt that fit. After around 20 minutes of wrestling, which consists of slightly moving the shifter in the cab, getting back under the bus, test fitting and repeating until you can muscle the pin through the hard plastic bits in the cage AND through the end of the linkage running from the front. This time, I put blue thread-lock on the bolt added a washer and sent it into the pin. I torqued it down as best I could considering my body position and the lack of something firm to grab on the opposite end. I used a pair of pliers to hold it.
 
Hapy is back to shifting normally again.
 
Wrap Up
After Ray finished the doors and I had locks on them all, I sat in one of the rear seats from C's new mini-van / stealth-camper we set in the shop as a seating area. I took a moment to just absorb. We so often will not take those minutes, choosing instead to rush off to the next thing. I sat for a few minutes, radio playing softly in the background and simply looked around at my shop. I really can't believe it. After so many years of lying in puddles, sliding on my back on wood chips or just outside in the rain, I cannot imagine what it will be like to work inside, on a hard dry surface come winter. Even now, as we head into summer, I will be working in the shade, on cool concrete, not hot tarmac. Of course, between then and now, I have a great deal of stuff to move and organize, but as of today, the shop is open and I can't wait to get out there.
Thanks, as always, for following along- 

Wednesday, April 15, 2026

Building a Shop - Doors

Ia accept that putting a garage door on your shop is barely car-content, but it is the big deal around here, and it is at least tangentially related to cars. Recall, the shop was designed with 4 openings: on the North, the big door and a person door; facing West, a barn door and facing South a to-be-determined door. I lightly described the barn door in the Ghost of GoRo. Today's post is about getting a big door for the front of the shop and all the stuff around that.
 
Before I begin, for my US readers, happy tax day. I recognize there are very curious ways this administration and his congress are choosing to allocate money, and today of all days, that "curious" feels more acute. You may not be able to influence their choices, but you can choose to vote with your wallet every day. Please direct your purchasing choices into small businesses. Those mom and pop operators are your neighbors. When you invest in them you are investing directly into your community, and not into some corporation which takes from it.
 
Measure Twice
This is so obvious and yet, this was almost my biggest mistake. When I first was designing the shop, I had the front of the shop (facing north) almost completely open for a massive door: 6 meters / 18 feet wide by 3.3 meters /10 feet tall. My thought at the time was that 6 meters would easily allow me to move 2 cars side-by-side without having to get either too deep into the shop. Like, I could have one sticking halfway out and still get a car in. This was great thinking until I decided I wanted a way to get in/out through a "man" (I say "person", but I'm not pronoun-hostile either) door. I also wanted this facing North, next to the big garage-style roll-up door. This way I could leave the big door closed and still come and go through a door with a lock on it. Consider the barn door is locked from the inside, and that was always the plan. I have no idea what the southern door will be like, but it may not have an externally-facing lock on it.
 
no wind inside
Anyway, fast-forward to after it is built and I am looking for a tracked roll-up door. After spending weeks looking for a 18' x 10' door, I have a site visit by a local door company (Overhead Door of Portland) who has a used door that big. We run the tape and sure-enough the opening is 10' high, the clearance above is adequate. Then we check the door width and it's only 16' (5 2/3m). Duh. When I added the person door, I reduced the size of the roll-up door and completely forgot. Ultimately, this saved me a bunch of money, though, because a standard residential tracked roll-up door is 5 2/3m (16 feet). When I say a bunch of money, the used door he had would have to cost me $14k US including install and an opener. The larger opening also would have pushed me into a commercial-grade door, so it would have weighed nearly double the residential door.
 
Patience Pays
open, windy inside
With the more accurate measurement, the fine folks over at Overhead Door of Portland dug into their stock of used doors. After a few weeks, they had a suitable door. Boo and I want a glass door, to maximize the light coming on for cold daytime work (think: winter weekends) and to not block overhead lights when it's open. We both also thought that a clear door would more closely approximate an old filling station look that we both had romanticals about. These glass doors, though, are less common and more expensive. The door they have is undamaged, but whoever had installed it chose to mask off the glass and then rattle-can paint the doors and rails with black Rustoleum paint. That decision would have been totally fine, had they prepared the surface for paint. At bare minimum the doors needed to be scuffed with 300-grit to 400-grit sand paper (or a red ScotchBrite pad) so the paint would have something to bite into and then wiped down. They did not and the paint did not. Instead, the paint is flaking off and is not presentable to most. For our purpose: make opening clear, yet lockable while looking old-Skool... it is perfect. We may change our minds and fix the paint, but for today, we are happy with it.
 
Car Mad Dash
Hapy's spot
As is so often the case, this was a full-on hurry up and wait. Well, really, it was more of a wait and then hurry-up. I have been looking for a door since the shop was built and now that we found one, the install was planned for less than a week later. From my prior post, you know that Oliver is against the east wall, right up against the big door opening. And, he was not running. Next to him is Hapy, barely jutting out the big opening and barely running. I needed to get both cars out the way and the lane way clear so they could get in there with the doors and equipment to get the door installed.
 
Getting Hapy out was easy: re-prime the Injection Pump with the MityVac, crack the injectors, pop the starter to a count of 5, re-tighten the injectors, start and back him out. This took less than an hour and I parked him in his longer-term designated spot where we can more easily visit and drive him. Yeah, I said visit; he's family.
 
Oliver drove!
Moving Oliver was a bigger deal, but only because I made it so. I wanted him to leave the shop under his own power. So that meant getting him running. In my last post, I described solving his fuel system. I don't know if it was insufficient patience or if I flooded the carb, but he would not start that day. A week later, and I have Hapy out of the way, I was ready to push Oliver out if I had to. First, I checked his spark plugs. They smelled like gas and were fairly black (fuel mixture probably too rich). I hit them with a wire brush and then re-set the gaps (0.033", internets recommend between 0.025" and 0.038") depending on lots of factors. I turned the key, got the fuel pump to prime and then quiet way down. At the carb with my hand, I "pumped" the accelerator a couple of times. At the wheel, I pulled the choke and tried to start him. After a few seconds, he started to act like he wanted to and after a few more tries, he fired up and held idle. This was the first time he ran since I rebuilt the carb, so an historic moment. Attempts to vary the engine speed with the accelerator pedal were fruitless, so I idled out of the shop, down the inclined gravel drive, and parked him in front of the person door. I was able to confirm that the throttle cable was junked. It would not stay on the pedal arm and then I was unable to move it consistently by hand. I'll be replacing that soon.
 
Final Prep
installers getting started
With the cars out of the way, I could get the last bits done for the door installers. I had strung outdoor patio lights around the inside of the shop, extending across the large door opening. So, half of that strand needed to come down. Last, I swept the floor which had not been really looked at since I moved the cars in last fall. With Oliver and Hapy out of the shop, I was able to really appreciate the size of my new workspace. It's really nice, and I will need to make a focused effort to leave myself room to work by not housing all of the cars inside all the time.
 
Door Install
The 2 installers from Overhead Door of Portland arrived as-scheduled around 10AM. They backed most of the way down the lane-way so the distance to carry the panels and runners was shorter. In half an hour, the doors were off the truck and positioned for installing (picture on the right). By 1130AM, 4 of the 5 door panels were installed on the runners and they were a-fixing the runners to the building. By 1PM, the door was in, the runners set, and the spring installed. Within the next hour, the install was complete, and Chris and Chase were showing us how the various controllers worked. With the door open, obviously, its almost like being outside. Well, its exactly like it was before the door was there: Full wind and misty rain on my face. Overhead, once lights are installed, the door will not block the light from reaching us beneath. That's huge. When the door is shut, the sound, wind and rain all stop. I did not expect the degree to which the air movement and sound would change. It is significant.
 
Wrap
Well, that's it for today. Next, I will be replacing the rear brakes on K'Lack (2004 Jetta TDI driven by my niece), replacing the throttle cable on Oliver and bringing Hapy over to Justin's to have the Injection Pump resealed. I don't know if any of those are really blog-post-worthy. Summer is coming, and having a safe vehicle (or a few safe vehicles) for Summer adventures starts now. As always, thanks for following along-

Thursday, March 26, 2026

The Ghost of GoRo

I have been coming off of an illness, having been sick for almost a month. Yeah, whatever that thing is going around got me good. In the meantime, we have gotten some headway on the shop doors and I got to start thinking about what's next on Oliver to get him on the road for the Summer. Today, though, is a cautionary tale about selling a car, no matter who you sell it to.
 
What's GoRo
GoRo
I'll back up a little bit first. Back in June of 2023, in my "Small Fence, Big Difference" post (link here) I mentioned in passing that we had sold GoRo, our 2009 Audi A4 to a guy down the street. We told him multiple times prior to closing the sale that he really did not want the car, that there were weird issues with the transmission, interior plastic bits were breaking off and that it was a generally crappy car. He would not heed our concerns, saying it was for his daughter, he could get the mechanicals fixed up fine, etc. There was still a couple of months left on the existing registration, and he was going to have to drive it to his mechanic, and then over to Department of Environmental Quality (DEQ) to get registered. So, Boo with her ever generous heart, let him take the car with the tags on it. We went inside and recorded the sale with the state of Oregon immediately.
 
Sales Daisy Chain
Of course, we were right. He took the car and within a couple of weeks he had sold it. But, he didn't tell us, nor did he remove the tags that we had left on there for him. In Oregon, you have a month after buying a car to change the registration. Since he hadn't had the car for a full month, he was officially in the clear, but whoever he sold it to also sold it within a few days, and we lost the handle on the ownership after that. 
 
Ticket Parade 
Why is all of this important? Within a few days after our
barn door
neighbor sold the car, we got our first of many speeding or other moving violation caught-on-camera ticket, followed by parking tickets and toll-lane charges. We got tickets from Montana, Texas, California and Colorado. In each case, we sent copies of proof that we no longer owned the car. For the tickets which came from legitimate state, county or city governments, the tickets were waived. In the case where the ticket was for not paying a toll on a "private road", the charging entity did not care that were were not the owners and could prove that we were not even in the state at the time of the violation. Instead, they sent the ticket to collections, dinging our credit. To prevent further damage to our credit, we paid that one. Most of these tickets arrived within the first 6 months after the car was sold.
 
Final Straw
This week, we got what we believe to be the final ticket. GoRo had been impounded in the City of Merced and would remain in their custody until we came down to their office and paid the bail on parking tickets. We don't care and after a while they will put the car up for auction, and it will be someone else's problem. I just hope the auction house or the City of Merced removes the license plates before handing it off to another sucker.
 
Buh Bye GoRo
barn door, inside
By the time we sold off GoRo, Boo and I pretty much hated the car. The seats were stiff like bleachers, increasing internal switches were failing, plastic bits were falling off, the transmission shifted funny, etc. It outside looked great, but wow, what a lemon of a car. The lesson here for us and for you: even if you're selling the car to your friend, remove the tags. If you are all down for the sale and want to be generous, drive over to DMV and remove the tags while your friend is getting temporary plates. Once that car leaves your possession, there is no telling what will happen to that car. You could find yourself with a big pile of tickets from uninterested parties who only want money, and are willing to hammer your credit to get it.
 
Car and Shop Stuff
I mentioned at the top that we have made headway on the doors on the shop. Recall, I have 4 openings which need closings. Over the past month, our friend Ray has built barn doors for the large opening facing west using extra siding I had added to the order for the shop so those doors could get made. It is a 10 foot wide opening, so the doors are each just over 5 feet wide. They totally look the part and glide open/shut easily. We also installed a "people door" on the north elevation or facing the farm house. This leaves a 8 foot wide doorway on the backside and the main large garage door next to the people door. I have been saving for the big door. While that doorway is a standard 16' wide, it is 10' high (just in case someone comes along with something really big, I guess). So, it is a semi-standard door.
 
On cars, I have Hapy about as ready to visit Justin as I can make him. Since he hasn't really driven since I put him back together, I really would have liked to have driven him a little more. With Diesel hitting $6/gallon around here, I all the more do not want to be driving with a fuel leak. So, his next drive will be to Justin's place.
 
voltage gauge upper right
To keep my hands busy, I have been looking at Oliver, the 1978 MGB. I couldn't get him to start when I went to move him into the shop and I didn't really look into why at the time, I just hauled him. I slid under the rear end and discovered why: I had drained all of his fuel out the last time I parked him. If I remember right, I put that fuel into the lawn tractor and the rest into Astra. Antyway, I test-fired the fuel pump with 12V directly from the battery and the fuel pump works. So, if it does not come on with the ignition key-turn, it's a wiring issue. After messing with that, I removed the voltage gauge from the dash and will be sourcing switched power for that. I had simply used the always-hot 12V for the clock I had replaced, but that runs the battery down eventually. I hope to have some time this weekend to finish the voltage gauge, put some gas in and see if I can get him to run, and idle. Then maybe I'll back him out and give him a long overdue bath and a drive-around.
 
Well, that's it for today. Keep your license plates when you sell your cars, and thanks, as always, for following along- 

Tuesday, July 16, 2024

Door Cards

Today I will be picking up where I left off regarding the doors. As I described in my last post, the front doors now open, close and lock like a real car. No slamming, not funny jiggling of the handle, etc. Just open, close and lock. Well, the passenger door lock is different from the driver, but I'll swap that out once I find all my parts. Anyway, since I had to remove the cards to fix the doors, I thought I would take the opportunity to improve them.

Door Cards As-Was
foamed card installed
With operational doors, I got to thinking about how to get the door cards to hold to their respective doors. The Arizona gentleman who ran the business creating and selling these ABS door cards was looking to sell off the business a couple of years ago, so I imagine that has happened by now. He had a mixture of molly-based fasteners delivered with the cards. Either the fastener was a screw that dug into the molly which was pushed through the card into the original mounting hole or it was a push-to-hold plastic bit. Regardless, the molly's did not hold in all of the original mounting holes on my bus (YMMV). This could have been poor implementation on my part, something particular about Hapy or just less-than-ideal engineering on the fasteners. It doesn't really matter; for Hapy, they did not work. When combined with the slamming doors, the door cards would rattle and Hapy had a very junky vibe. Now that the doors no longer need to slam shut, improving the cards adherence to the doors will help un-jalopy Hapy that little bit more.

Door Cards, Mounting Upgrade
broken M4 riv-nut bit
To remedy the floppy door cards, I tried a more permanent solution: Riv-nuts and bolts. The plan: into each original mounting hole in the door, I attach a riv-nut (it's a nut that is applied with a rivet gun, basically), and then send a bolt through a washer and then the card, into the riv-nut. Such a simple plan, and while a little time-consuming, it was easy to do. Of course, I found that not all of the original holes were the same size. To fix, I used some as large as an M6 or as small as an M4. I think this is why the supplied molly-based fasteners did not work as well: the M6-sized holes were simply too big for the molly and they fell out. As shown in the picture here, too much pressure with the riveting tool and you can break it. Once I had all of the riv-nuts set, I shifted to the cards themselves.

Noise Abatement Revisit
setting riv-nut
While I had the door cards out of the bus for repairs, I applied a thin noise-absorbing closed-cell foam to the 3 cards. This material was among the things I got a few years ago when I did the sound deadening effort, and it's application to the door cards was part of that plan. At the time, the research I did (See Hapy Noises - Part 2) indicated that multiple attack vectors would bring the best result: Constrained Layered Dampener, an open cell sound deadener like Jute Thermal and then Mass Loaded Vinyl. These all really address reducing the impact of external (and mechanical) noises transferring into the cabin. Any noises or sound that make it into the cabin which are not absorbed by the seats are prone to bouncing around. I placed some larger acoustic panels (these) under the upper bunk, in the slot where the original sunroof used to go. I believe they are helping absorb some ambient sound. I also covered the ceiling with Mega Zorbe to address the sound reflection and ambient sound absorption. In the picture on the right, here, you can see the MegaZorbe applied to the inside of the outer door skin. 

Based on the tests I did at the end of the effort, the only real gains as-measured were in the "around town" (under 40mph) zone. Decibels at idle or on the highway appeared about the same. In practice, however, using a less complex "measure" like how loud we have to run the stereo to hear it on the highway, it is definitely quieter. An even less precise indicator is how loud we need to speak to each other to have a conversation: barely louder than we talk at home, which is quiet (no yelling house) where we used to have to almost yell without the stereo on. So, I am setting aside the scientific evidence and embracing the anecdotal: this implementation of the sound abatement absolutely and significantly improved our road tripping experience. I may take more readings because the numbers I took before continue to bother me.

Door Cards, Reflective Sound Absorption Added
applying the foam
So, with all that context, I decided to press forward on my original plan to apply the thin foam sheets to the hard plastic cards. I started with the cards along the sleeping deck, running from the rear hatch forward along both sides under the windows to the rear of the rock-n-roll bed (1 foot tall by about 4 feet long). I started here for 2 reasons: it was very easy and the plastic cards were jarring-cold when bare skin pressed against them while sleeping. The foam definitely improved that.

For the slider and front doors, I simply traced the door shape on the peel-off paper side of the peel-n-stick foam and cut along the line with scissors. I aligned the cut along the card and peel-stuck them down, working from one corner, down along one side and then across. I will be applying carpet later, but felt that the foam might help reduce the reflected sound while also providing a cushion under the carpet.

With the foam applied to the cards, I considered the game of "which bolt fits" for each mounting point. I could have just started trying bolts, but that felt like an exercise in frustration. So, instead, I grabbed some painters tape and marked to the outside of each hole (where the card would not cover) which bolt size to use. I set the front door cards in place using the door pull to hold the card in the right spot. Then, I simply sent bolts through a black vinyl washer and then the card into the door. Once mounted, I removed the tape. Easy-peasy. If you do this, I suggest that you do the corners first, and only threaded enough to hold. Then, skip around the card, and have all of them like that before you start tightening. Then, again, start with the corners and pay close attention to the bottom edge near the vent. These ABS cards fit perfectly, but the one hole near the bottom align the trailing edge of the door did not line up for me and I had to skip it. YMMV, of course.

slider door foamed
The door card kit included panels for the wall under the driver-side jealous window and for the partitions behind the front seats. I have yet to do those cards, but I am holding off on doing those until I am ready to fast-follow with carpet. The foam is not as scratch-resilient as the hard plastic, and those cards take the brunt of the abuse when camping or music gear is loaded, unloaded and in-motion. So, I will apply the foam and the carpet at the same time. All of that will happen at some point in the future. As it is right now, there is that little bit less noise reflection happening and when bare skin touches the side of the sleeping area, it no longer triggers a shuddering wake up. We are taking the win.

---

That's it for today. Thanks, as always, for following along-

Tuesday, July 9, 2024

The Doors

Yeah.. not the band, but I really like Ray Manzarak's keyboard. It has been a very busy year, and I have not been playing with cars much until very recently. Zed, the 1979 Datsun 280ZX remains covered and completely unchanged since we moved into the farmhouse. Oliver, the 1978 MGB, on the other hand, has received some of my focus. I'll start there, and then get after the original topic. 

MGB Carb Dis-Assembled
carb tear down
I arrived at the conclusion that a participating reason for Oliver running so badly (and getting worse) could be that the carb was a little gunky when I bought him, and he has gotten little use, making it worse. So, I removed the carb, took it apart and ran it thru a sonic dip / cleaner. I ordered a comprehensive rebuilding kit from Japan, and will re-assemble the carb with those bits and gaskets. I hope this will resolve his issues so we can drive him around this summer.

Door-Slamma-Slamma
Over the course of the last few years, all 3 of the regularly used doors (driver, passenger and slider) on Hapy, the 1972 VW Bus, have become harder to open and/or close. Each had their own unique issues. Starting with the slider, it suddenly refused to close outside a venue after unloading gear for a show. It would slide as far as about an inch from being actually closed and then bang on something. I couldn't tell if it was the front edge or the trailing edge, but did not have time to really resolve. I forced it closed by pushing with steady pressure against it straight towards the bus (not pushing towards the front). Fortunately, it opened and shut with similar assistance until I fixed it.

foaming doors
The driver-side door would not close consistently. I would have to bang-bang-bang it shut until it finally latched. The lock was another issue; once locked, it would not easily become unlocked, especially if anyone touched the door handle when the door was locked. This condition only worsened to the point where the lock started to fail entirely and banging the door was not holding the door shut well enough. I had the door fly open while taking a right turn and the swinging door almost hit another car.

Of the 3 doors, the passenger door was the easiest to solve, but it was the last. That door would not shut easily because the seal in the front lower corner was tweaked. This put pressure on the door handle, which also was hard to depress, so opening the door took a firm grip. The inner door cards were not holding in-place as well as they had when I installed them, so I decided to tackle the door operation and the cards as one effort.

Slider Door Adjustment
None of these issues were stuck-on-the-side-of-the-road level, but they were all annoying and reducing the joy. I started with the slider since I had to have that door open consistently for gigs. I first considered the leading edge latch mechanism. I shot Kroil into the latch, but discovered very quickly that the leading edge latch was not the issue. After shooting Kroil into and around the trailing latch, I concluded that this also was not the issue. Still, this lubrication was long overdue. I could tell that the upper hard-bar, that applies the trailing latch was misaligned (too loose). I tightened it and that seemed to resolve the closing issue, allowing the door to close consistently. Opening the door was still inconsistent. I started looking at the lower sheathed-wire that opens the trailing latch. That sheathed-wire is similar to a bike handbrake cable with an adjustment collar near the leading edge latch. This wire was dangly-loose so I tightened it until it was taught and adjusted from there until the door would easily open from working the handle.

Driver Door Fix
'74-'79 left front door latch
Repairing the driver door operation was next most important. Once the door lock was un-unlockable from the outside, the only way into the bus was through the rear hatch. So, if the bus was loaded with gear, it was an army crawl over stuff and under the headbanger to get to the front door or even the slider. Following the instructions in the Bentley manual to remove the door latch mechanism (remove outer handle, disconnect activation bar, remove inner handle, remove lower bolt in window guide, remove bolts holding latch, wiggle free), I spent a few minutes orienting to it and figuring out how it works. Since it was not working correctly, it was not easy to determine neither what was preventing it from working correctly nor how it was supposed to work. The image to the right, here, is for a later bay bus (the early bay latch does look a little different, especially in the area of greatest interest), but it should work well enough to illustrate. For orientation purposes, the side facing away in the image faces rearward when installed in the door so what we can see are the inner guts usually hidden inside the door. Consider the part furthest to the left; that is the lock/latch mechanism which connects to the activation bar. There are 2 circled springs: one larger spiral facing up (marked 1) and a smaller one partially hidden by a tab (marked 2). On the early Bay, spring #1 is not a spiral, it looks more like a "C", but on Hapy that spring was missing. Spring #2, however, was there, and it was kinda mangled.

I attempted to un-mangle spring #2, and instead it launched from the latch into my yard. Distressed, I cleaned the latch with brake cleaner while trying to arrive at a solution. Once clean, I shot the moving parts with Kroil and worked the latch. I started to come to the conclusion that without those 2 springs, the latch and lock actually worked much better. In fact, they worked great. Curious, I re-installed the latch by literally reversing the steps. I found positioning the latch inside the door and then getting the window guide in place were the challenges. I lowered the window and started testing the latch: open, close, open close, lock, try the latch, unlock, etc. It worked like any other car door latch. I can close the door with very little effort, and it stays latched. I can lock it, it stays locked and will unlock by pulling the lock tab inside the or from the key on the outside. Attempting to open the door when locked no longer fouls the lock. I mean, I can try the handle and then immediately unlock it. Even unlocking it no longer requires moving the key like I was locking it first (which I had to do even if no one tried the handle).

Passenger Door Fix
This was the easiest fix of the 3. The Passenger door resisted closing and the handle needed Herculean grip. I repeated what I did on the driver side first: remove the latch, clean and Kroil it. Then, I re-installed. This resolved the Herculean grip issue. The door resistance stemmed from the door seal not being correctly place in the forward lower corner of the door. It was hanging on the inside edge of the door. I still intend to paint Hapy this summer, so I applied a little carpenter glue on the seal rather than the super-strong black seal adhesive. I held it in place by hand until it seemed to hold and then shut the door to really hold it in place while the glue dried. This totally fixed the close resistance.

I started on the door cards, but didn't complete that. I will post about the door card improvement once they are back in Hapy.

---

That's it for today. There have been many adventures and experiments over the last few months. I'll get to posting them as time makes itself available. Thanks, as always, for following along-

Tuesday, January 30, 2024

NewOld Floored

It has been an unusual start of the year and as such I have not been posting much. Today's post is a quick update of the swirling chaos with NewOldHouse.

On the Level
finished floors
As we started to approach a return to getting the kitchen done, Boo and I realized that if the floors are not level then any cabinet install will be crooked. Then, when we get around to getting the house leveled, the cabinets would not be anymore. So, we had a foundation company come out. They added 2 beams and a bunch of house jacks to get the main house and the 1960's addition leveled. Prior to their work, I had to completely clean the crawlspace as they would not enter a space that had a suggestion of asbestos or rodent. To remedy, I added a 30-foot (10 meter) hose on old PigPen (shopvac). I set the PigPen outside and crawled around under the house for literally 3 hours vacuuming the entire vapor barrier and collecting other debris into a thick plastic garbage bag. The foundation guys were here for 2 days, and now the house is level. A couple of doors which didn't ever close right now close properly and when I sit on an office chair in one of the back bedrooms I no longer unintentionally drift across the floor.

Add Laundry
The prior owners had their laundry machines in the garage. When we moved in, we brought a set of stacked machines and set them next to the large concrete sink just outside the kitchen where the prior owners had theirs. This worked fine, but with where the sink was located relative to the garage door, placing machines near the sink effectively prevented the garage from storing a car. So, we removed the sink and built a small platform (in-process picture below, right) just outside the kitchen-to-garage door. With the machines on the platform, the full width of the garage door is available, so we can one day park a car out there. We hooked the machines back up to the original sink fixtures, routing the waste into a temporary waste-stack. We haven't decided how we are going to finish this space. We will probably frame in walls around the area where the machines are, complete with a ceiling, so they are at least visibly separated from the garage. Around while this was getting built, the garage door was fixed so it opens and closes again.

Kitchen Plumbing
laundry platform framed
We knew the kitchen install was coming, so we went searching for a plumber. The plumbing trade, like so many, are significantly stressed by the current labor environment. I suppose, a couple generations of convincing every high-school student that they need to go to college and not explore trades has not helped, but finding a plumber or electrician who can start the work reasonably soon is virtually impossible. It is reasonable to expect at least 2 months delay. When we contracted our plumber, we indicated that we were 100% flexible and they could send someone over as a schedule-filler even if our project had to be left part-done for weeks. Having this kind of flexibility proved to be a real winner: a plumber arrived the following day, mid-morning, having to leave a job where they weren't ready. 2 days later, our kitchen and attached laundry were rough-plumbed in, and the laundry machines were again operational.

NewOld Floor
Before we moved into this old farmhouse, we had the floors in most of the house redone. The kitchen was still in a semi-demo state, so that area was left alone. Once the demo was completed, and the furnace moved, the floors in the front half of the house could be addressed. Since we now lived here, we needed to further compress our living. So, for about 2 weeks (there was an ice storm in the middle that delayed the flooring work) we used a 10' by 10' space for living, dining and cooking... and the space also held our piano and refrigerator. Needless to say, it was some cramped living, like you couldn't turn around it was so tight. Seriously, you could walk in, but then had to back out.

The flooring guys were pretty magical. They sourced 2-1/4" rolled red-oak flooring matching what was already in place and then feathered it into the existing floor. They repaired in the hole where the furnace used to be, and added a clean crawlspace-access where I had cut the big hole to send the furnace. They spent 2 full days getting the floor installed, filled, stained and clear-coated. The finished floor looks like it was always that way.

Back Door
back door
Before the flooring guys could start, Boo and I needed an escape route. Their work was going to cover the front half of the house and our only egresses would be blocked. We had intended to add a back door eventually, but needing a means of getting in and out of the house moved it to the front of the list. For a hot minute we thought about climbing in and out of a bedroom window. Once the ice storm hit, we were grateful we did not go that route. We added a basic large-windowed (double paned) door that allows a considerable amount of light into a part of the house that had been rather dark. Outside the door, we added 3 steps down to an odd sidewalk that runs along the back of the house. Eventually, we will add a permeable patio back there, but for now, it's where Zed and Oliver are parked (on top of tarps and patio blocks, covered with fairly high-end car covers). The picture on the right, here, shows the after affect; there used to be a built-in bookcase where that door now sits.

All of this activity has been consuming most of our energy. Around these larger items, we had insulation blown into the attic space and I have had to make a few adjustments to the heat distribution as the power of the fan has blown off a connection or 2. I also moved the thermostat so it passes up inside a wall and is attached in it's permanent location opposite the front door. 

Next, the kitchen install work starts with some wall insulation, drywall, and electrical followed by cabinet installs and some appliances. At this rate, we could be making meals in the new space by Easter. 

Thanks, as always, for following along-

Tuesday, September 5, 2023

Kitchen Trap Door

In my last few posts, I have been walking through the slow process of kitchen and furnace demo. Today, our destruction continues with the creation of a hole in the kitchen floor, which will become a crawlspace access. Let's start with the obvious questions: why, how large and where. Before I begin, for my US readers, Happy first day after Labor Day; so starts the most productive period of the year (until ThanksGiving in late November). If you feel like you're working "so much more than", that's because you are. Now, where were we? Oh, yeah, cutting a hole.

Why
its a hole
Recall, this is a 1948 farmhouse. This house pre-dates most modern design like an inside access to the crawlspace. Instead, there are large openings around the outside of the foundation, which are blocked off with framed wire rectangles (to keep critters out). So, when under-house maintenance is needed, one of the frames is pulled off the house and the worker-person crawls under. When it is nice outside, this is clumsy, but not terrible. Add in rain, snow, cold and/or wind and this quickly becomes much less pleasant. Consider, between readying tools and parts in the rain near the crawlspace access, you will be fairly wet before you slide under the house... into the dry dust and dirt. Being wet, that dust and dirt clings to you. Yeay. Having an ongoing internal access would address this, but honestly, if a furnace could fit through the existing foundation opening, we would not have taken on the scope increase. Whether we were to buy a new electric furnace or reuse our existing furnace, the hole is too small to fit a furnace that is large enough for the home size.

How Large
So, answering the question "why" above, I shift to "where", with an eye on "how big". I took measurements of the in-hand gas furnace, and I swear the designer had standard US housing standards in mind when they considered the size. The most narrow side is just over 14 inches wide. Standard framing width is 16 inches-on-center, so the just over 14 inches wide will just slide between. The floor joists in this house are standard width (I was shocked, honestly), so the furnace can fit between. The next most-narrow side is around 27 inches. This is important for install as well, but this next-shortest side drove us to the size and shape of the hole. In short, the hole needs to be at least 14 inches by 27 for the furnace to slide through.

Where
stripped clean
I touched on where we were thinking about putting the access in my last post. Since we have not fully decided where things would go in the kitchen, cabinets and appliances -wise, we had to make some informed guesses. We recognize that the smart place to put food storage (fridge and pantry) is close to the door where you bring groceries into the house. So, we figured the if we set the trapdoor inside the door to the garage, the limit to how far into the room it can go will be constrained by the space consumed by food storage. Knowing the width of the pantry (sitting in the garage, waiting for install) is 24 inches and a standard-sized US fridge is 33 inches, we can measure off the not-moving-chimney towards the door to the garage, and mark where the closest edge of the fridge will be.

Along the adjacent wall (the wall with the door in/out of the garage), we intend to put cabinets with a sink. Similar to the pantry cabinet, we know the width of that standard-depth cabinet (82 inches). By marking that off on the floor, we could see that there was about a foot and a half between the end of the cabinet and the start of the door frame, leaving ample space for garbage/recycling bins by the door. For this purpose, though, it gave us a large space where the hole could go.

With these parameters, we needed to know where the joists and beams were so we could cut a hole that met the various needs. To get exact locations, someone had to go under the floor.

Mark Your Spots
old access
Boo has a very healthy sensitivity to rodent waste and what the dust that waste creates can do to your lungs. Because of that healthy sensitivity, she has always taken on the role of under-house-slider, wearing a full respirator. For this task, it was no different. She took a flashlight, a measuring tape and a cordless drill with her. Shouting to each other through the floor to arrive at an approximate location, Boo sent the drill through 6 different locations to indicate for us where the joists were. Beyond the drilling the holes, Boo had a clear understanding of what barriers or hurdles exists beyond the joists. It was with that info plus the drilled holes we were able to plan the rectangular cut.

Cut Once.... Or Twice
Based off of the holes, we drew an initial rectangle. I opened up the holes with a larger bit so the jigsaw would fit and then cut the lines. Once we had the initial hole, Boo and I got to thinking, did some more measuring and more talking. It was at this point that we realized that the furnace could fit between the joists. Could we have figured this out earlier? Maybe. Sometimes, you need to see things in real-time before you have a flash of realization. Once we could see where the cabinets and fridge were going, we could see where we could re-shape the hole parallel to the door to the garage. The furnace would fit and we would not have to cut and frame-fix any joists. So, we measured and cut another small section of flooring out, reshaping the hole.

Furnace Prep
While this was going on, I removed all the bits that were attached around the furnace, to get it's dimensions down to the size of the outer frame. This included removing the stove-stack out the top, the gas line from the side and the emergency electric shut off box. With these gone, the furnace is actually the measured dimensions, allowing it to pass between the joists. In my last post, I walked through our logic to try to reuse our in-hand furnace. We are continuing with that thinking, as you have probably surmised from how we approached the size of the hole. While Boo was under the house, she crawled over to the chimney and confirmed there is a soot clean-out. So, with that variable solved, we could commit to reusing the furnace whole hog.

A hole in the floor just inside a regularly used door is very unsafe. As you can see in the first image, we temporarily covered the hole with some waste from the first cut. Once the furnace is through the hole, we will nail-down some plywood until the flooring company can fit us into their schedule. At least the visible floor in the kitchen is getting replaced; we don't know about the rest of it. Regardless, this trapdoor will persist, and while the extra cut will create some subfloor repair by the flooring company, this access will be an incredible upgrade long-term while creating a means of moving the furnace where we want it. That's next.... and a future post.

Thanks, as always, for following along-

Tuesday, September 27, 2022

Floors and Door

Today, I am continuing the ongoing efforts on the NewOld house, that farmhouse around the way that Boo bought. Similar to the Creepy Crawl Space, we hired for skill for the floors. So, this post is really just before and after shots. We also replaced the front door. Something that relatively insignificant didn't really warrant it's own post, so I tacked it onto the end of this one.

Clean
cleaning
I regret that I do not have pictures of the floor before we got the house. We saw them and they were scary. Once the place was fully vacated, we could see what we were up against. There were historic pet stains. There was water damage. There were sticky spots, discoloration, kitty litter dust and general filth throughout. So, while Boo was cleaning the kitchen and bathroom for the second time (the first was while I was power-washing the outside), I took a first run at mopping the floors. I found that I was able to rinse the mop two or three times before the water was gray and needing changing. So, I started nearest the water source to shorten my trips. I spent a few hours doing this, and never really got the water to stay mostly clear for more than a few rounds with the mop.

Once the overall mopping appeared to be becoming fruitless, Boo switched to focusing on the worst spots first. This improved the spaces, but, again, there was a lot of floor, and simply getting them cleaner was not going to make them good enough. We needed them to be sanded and clear-coated. This is not a skill I have, nor is it one I want to learn on a floor I intend to see every day. So, we hired the guy who did the floors in the house we're currently in.

Sand and Stain
sanded
Thomas and his crew arrived on a Monday. By the middle of the afternoon, all of the quarter round was removed, the plastic was up to seal off the kitchen and half of the floors had already been sanded. It really makes sense to pay for others' expertise on some things, and, in my opinion, this is one of them. They hit the main floors with an upright belt sander, and did the tighter areas by hand. Once sanded, they vacuumed the entire floor and them applied a thin veneer of putty to fill the imperfections and fill the seams between the boards. The next day, the putty was dry, so they hit the floor with a sander again, vacuumed again and then applied a stain. Why a stain? Well, even after sanding there were some stains that just would not come out. Some of the animal waste and water stains were too deep. By using a uniform darker stain, those inconsistencies disappeared. Our current house is very dark in the winter, so we were really hoping to not have dark floors, but the alternative would be an inconsistent "distressed" look which might look interesting, but may not appeal long term.

Cleared
stained
After letting the stain sit for 2 days, they returned to apply the high gloss clear coat. This is applied with what looks like a long, thin, flat mop. The resulting coating stands up to animal claws, dragged furniture, etc.. all within reason, and has a brilliant shine to it. Boo and I were not thrilled with a darker stain, bit the high gloss may help offset the darkness.

Close the Front Door
When we acquired the house, it was apparent that someone busted the deadbolt on the original / existing front door. The door frame was damaged to the point where a good shove with your shoulder would open the locked door. The existing door was effectively a "contractor grade" door intended to be the door during construction that is later replaced with a fancy door. Back when I painted houses, the reason for this was obvious: we sub-contractors banged into everything, especially if it was nice. It's not like we looked for that stuff, it was just always right in the way.. like the front door. So, one of the last things done before handing the house over to the owners is to hang the fancy front door. Unless they didn't buy one, in which case the construction door remained. Such is the case here. 

Anyway, We hit the Habitat for Humanity rebuilding center and bought a replacement pre-hung used solid wood front door for $65US. It is not perfect in that it does not close perfectly, but it will keep the bad guys out when locked, and it hangs level so it will not swing open or shut without someone moving it. The upper leading corner (the end with the handle, not the hinge) and lower leading corner do not sit all the way into the frame, so we will need some thin foam in the door jam to keep the wind out. Or we may need to fiddle with the middle section so that sits deeper in the frame to help seal the edges. Regardless, it is a much nicer looking door and it locks.

That's it for today. Thanks, as always, for following along-