Showing posts with label deaden. Show all posts

Tuesday, July 16, 2024

Door Cards

Today I will be picking up where I left off regarding the doors. As I described in my last post, the front doors now open, close and lock like a real car. No slamming, not funny jiggling of the handle, etc. Just open, close and lock. Well, the passenger door lock is different from the driver, but I'll swap that out once I find all my parts. Anyway, since I had to remove the cards to fix the doors, I thought I would take the opportunity to improve them.

Door Cards As-Was
foamed card installed
With operational doors, I got to thinking about how to get the door cards to hold to their respective doors. The Arizona gentleman who ran the business creating and selling these ABS door cards was looking to sell off the business a couple of years ago, so I imagine that has happened by now. He had a mixture of molly-based fasteners delivered with the cards. Either the fastener was a screw that dug into the molly which was pushed through the card into the original mounting hole or it was a push-to-hold plastic bit. Regardless, the molly's did not hold in all of the original mounting holes on my bus (YMMV). This could have been poor implementation on my part, something particular about Hapy or just less-than-ideal engineering on the fasteners. It doesn't really matter; for Hapy, they did not work. When combined with the slamming doors, the door cards would rattle and Hapy had a very junky vibe. Now that the doors no longer need to slam shut, improving the cards adherence to the doors will help un-jalopy Hapy that little bit more.

Door Cards, Mounting Upgrade
broken M4 riv-nut bit
To remedy the floppy door cards, I tried a more permanent solution: Riv-nuts and bolts. The plan: into each original mounting hole in the door, I attach a riv-nut (it's a nut that is applied with a rivet gun, basically), and then send a bolt through a washer and then the card, into the riv-nut. Such a simple plan, and while a little time-consuming, it was easy to do. Of course, I found that not all of the original holes were the same size. To fix, I used some as large as an M6 or as small as an M4. I think this is why the supplied molly-based fasteners did not work as well: the M6-sized holes were simply too big for the molly and they fell out. As shown in the picture here, too much pressure with the riveting tool and you can break it. Once I had all of the riv-nuts set, I shifted to the cards themselves.

Noise Abatement Revisit
setting riv-nut
While I had the door cards out of the bus for repairs, I applied a thin noise-absorbing closed-cell foam to the 3 cards. This material was among the things I got a few years ago when I did the sound deadening effort, and it's application to the door cards was part of that plan. At the time, the research I did (See Hapy Noises - Part 2) indicated that multiple attack vectors would bring the best result: Constrained Layered Dampener, an open cell sound deadener like Jute Thermal and then Mass Loaded Vinyl. These all really address reducing the impact of external (and mechanical) noises transferring into the cabin. Any noises or sound that make it into the cabin which are not absorbed by the seats are prone to bouncing around. I placed some larger acoustic panels (these) under the upper bunk, in the slot where the original sunroof used to go. I believe they are helping absorb some ambient sound. I also covered the ceiling with Mega Zorbe to address the sound reflection and ambient sound absorption. In the picture on the right, here, you can see the MegaZorbe applied to the inside of the outer door skin. 

Based on the tests I did at the end of the effort, the only real gains as-measured were in the "around town" (under 40mph) zone. Decibels at idle or on the highway appeared about the same. In practice, however, using a less complex "measure" like how loud we have to run the stereo to hear it on the highway, it is definitely quieter. An even less precise indicator is how loud we need to speak to each other to have a conversation: barely louder than we talk at home, which is quiet (no yelling house) where we used to have to almost yell without the stereo on. So, I am setting aside the scientific evidence and embracing the anecdotal: this implementation of the sound abatement absolutely and significantly improved our road tripping experience. I may take more readings because the numbers I took before continue to bother me.

Door Cards, Reflective Sound Absorption Added
applying the foam
So, with all that context, I decided to press forward on my original plan to apply the thin foam sheets to the hard plastic cards. I started with the cards along the sleeping deck, running from the rear hatch forward along both sides under the windows to the rear of the rock-n-roll bed (1 foot tall by about 4 feet long). I started here for 2 reasons: it was very easy and the plastic cards were jarring-cold when bare skin pressed against them while sleeping. The foam definitely improved that.

For the slider and front doors, I simply traced the door shape on the peel-off paper side of the peel-n-stick foam and cut along the line with scissors. I aligned the cut along the card and peel-stuck them down, working from one corner, down along one side and then across. I will be applying carpet later, but felt that the foam might help reduce the reflected sound while also providing a cushion under the carpet.

With the foam applied to the cards, I considered the game of "which bolt fits" for each mounting point. I could have just started trying bolts, but that felt like an exercise in frustration. So, instead, I grabbed some painters tape and marked to the outside of each hole (where the card would not cover) which bolt size to use. I set the front door cards in place using the door pull to hold the card in the right spot. Then, I simply sent bolts through a black vinyl washer and then the card into the door. Once mounted, I removed the tape. Easy-peasy. If you do this, I suggest that you do the corners first, and only threaded enough to hold. Then, skip around the card, and have all of them like that before you start tightening. Then, again, start with the corners and pay close attention to the bottom edge near the vent. These ABS cards fit perfectly, but the one hole near the bottom align the trailing edge of the door did not line up for me and I had to skip it. YMMV, of course.

slider door foamed
The door card kit included panels for the wall under the driver-side jealous window and for the partitions behind the front seats. I have yet to do those cards, but I am holding off on doing those until I am ready to fast-follow with carpet. The foam is not as scratch-resilient as the hard plastic, and those cards take the brunt of the abuse when camping or music gear is loaded, unloaded and in-motion. So, I will apply the foam and the carpet at the same time. All of that will happen at some point in the future. As it is right now, there is that little bit less noise reflection happening and when bare skin touches the side of the sleeping area, it no longer triggers a shuddering wake up. We are taking the win.

---

That's it for today. Thanks, as always, for following along-

Tuesday, March 22, 2022

Noise Control Update

I started working on the sound abatement/control/contain effort in fits and starts over the last couple of months. Since I have been making some progress, I figured an update was due. I have only started the Constrained Layered Dampener (CLD). At some point I will be done with the CLD, and ready for the next layer. For more about my plan for noise control, see Hapy Noises Parts 1 and 2.

Sound Deadening
high-cost / high-value CLD
Sound deadening is slow-going stuff, even when you have time. The actual application of the CLD is fast and easy; getting access to the spots where you want to apply it is what takes a while. Some areas are virtually uncovered; like under the carpet in your trunk, the rear under the mattress of the camper bus is open bare steel. The metal gets cleaned with oil/grease remover, the largest square/rectangle of the highest quality deadener you can find is carefully applied and then you roll out any bubbles for a firm bond. In this way, the exposed steel was relatively quick work. I suggest you wear thin protective gloves because the edges of the foil layer can make tiny cuts in your fingers.

Accessing the Ceiling
To get to the largest sections of steel (the ceiling), I needed to remove the wood (Baltic Birch) headliner. The headliner is actually 4 distinct pieces: the rear, the front and 2 sides. Between the sections are channeled aluminum bits to hold the pieces together. Then, around the opening in the middle of the bus, a plastic pinch-surround holds the lip of the wood against the steel. The plastic pinch-surround removes with little effort: just grab and pull. In fact, getting this thing to stay put had been a bit of a challenge over the years. With some channel-lock pliers, tug on the aluminum channels, pulling towards the center of the bus, to remove them. With the channels and pinch thing gone, the rectangular piece over the sliding door fell right off. The one of the opposite side was held on by the '79 Westy interior 2-way light. Two screw removals later and the light and ceiling bit were free.
not quite done, but getting there

On Hapy, the rear section had been falling down for years, and I had resolved it long ago with self-tapping screws, through the metal ceiling. Recall, the westy was built on a "sunroof" bus model, so there are actually 2 ceilings (well, 3, if you count the Baltic Birch) with a gap between them where the sunroof would slide when open. Once I pulled the screws, the wood hung down in a familiar way. I simply helped what gravity had been doing by giving it a wiggle, and it fell onto the rear deck. This left the front section, which was quite snug. The internet instructions indicate that you simply need to remove the dome light and use that opening as a grip to pull the ceiling free. This did not work for Hapy, even after I removed the front shelf (See Sunshade to Shelf) I added, like, 6 years ago. Recall, the shelf was attached by re-using the sun-visor mounting points so it was a simple matter of removing some screws. With the shelf out of the way, I could get to the screws holding the 12V accessory plug, and then there were some very small screws along the front edge of the Baltic Birch which held the front lip snug against the front of the bus. After removing all the fasteners I could find, the ceiling still did not want to come down. I had to force it, and I accidentally split the driver side. I had no intention of reusing the old wood ceiling, but it would have been nice to give it to someone who is restoring theirs. Oh well.

Ceiling CLD
Once the front bit was down, I could see old-style fiberglass insulation had been installed between the drop ceiling and the steel, but only on the driver side. Perhaps the passenger side had been removed long ago. Regardless, I was not intending to keep it, so I pulled it down (wear gloves or you may get tiny fiberglass particles embedded in your skin. Ouch.), and scraped the glue residue off the metal with a putty knife. Similar to the rear floor, I cleaned and scraped and cleaned the metal in preparation for CLD. I used a combination of ResoNix (high cost / high-value) and the leftover Noico (cheap / lower value), hoping to maximize the vibration noise control. I may have overdone it, but I figured an extra pound of CLD might make a difference on the steel closest to my head.

rear half under top bunk
The ceiling in the rear had not been insulated nor had anything glued to it, so it was pristine metal. Still, it got the oil/grease cleaner treatment, and then multiple squares of ResoNix CLD. Recall that the sunroof model has 2 rear ceilings, and I had only addressed the bottom one at this point. The upper ceiling was much harder to get after. From above, it is covered with the floor of the Riviera-sourced upper bunk. From below, it has less than 2 inches of space between it and the lower ceiling. After mentally wrestling with how to deaden it, I decided to remove the plywood floor of the bed so I could apply material. There was simply no way to get good coverage 5 feet deep through a 2-inch tall gap.

The bed is supposed to be nailed down to the side rails with many tiny finish nails. In Hapy's case, I, uh... kinda didn't nail it down much. So, it would have been easy, had I not parked the bus where the pop-top would not open all the way. Instead, I could only get it halfway. So, I lifted the bed, pulled it as far forward as I could and then dealt with the noise suppression in 2 steps (rear half / front half). I took one extra step during the re-install, and added small squares of foam on top of the rails before setting the bed back in place. My thinking was that there would be less vibration and squeaking compared to the stock wood-on-wood. I will be adding sound absorbing material into the 2-inch tall cavity rather than on top, so I am hoping that I will not need to get under there again. Once I have confirmed that, I will send some thin screws through to hold the bed to the frame.

Exposed Metal
some easy-to-access steel
The last area, well, in terms of timing, this was actually my first, I addressed with CLD is the bare exposed steel around the bed along the sides. The keen eye will see that this is the Noico stuff. Yes, I did this area before I took the plunge on the ResoNix. Still, the tone of the tool-tap implies that the end result is less ring-y than without. Would the ResoNix had been more effective? Probably. Anyway, I mentally wrestled with applying material here at all because the rounded metal interior is part of the signature of an old bus. Arguably, so is the incredible racket you hear while driving. In fact, I used to drive by ear, listening for bad sounds from the original engine because the lack of instrumentation kind of forced me to. Anyway, the area below the window will ultimately be covered by a door/interior card. I intend to apply a headliner of some kind down to the tops of the cards, so the CLD you see in this picture will be hidden longer-term. 

Well, this is as far as I have gotten on the noise control stuff. Some of these steps were taken months ago, and others I just completed. That's just how life is these days: take many little steps and eventually you look around to discover that you have made some progress.

Thanks, as always, for following along-

Tuesday, April 10, 2018

MGB - floor pans (Part 4)

When I completed the last segment of the floor pans (MGB - floor pans (Part 3)), I mentioned that I was going to get some seam sealer and some paint on the floors, and that it may not warrant another posting. Well... now that it's been a few months, I think maybe it is.

Seal the Seams
Seam sealer is this sticky black goop that makes sure the seams are weather sealed. I guess that's kind of obvious. Anyway, it comes in a caulking tube and is applied like caulk around a window in your house. Except its not that easy. And you're probably outside. And you're all scrunched into some crazy twisted body contortion because getting the tip of a caulking gun against the underside of a little British sports car is virtually impossible without a lift. Like caulk, you need to press it into the seam with the tip of your (gloved?) finger, and make sure the edges are tapered down so there's not a spot for water to collect. I did this on both the underside and the topside of the floors. It was actually kinda fun.

Flex Seal

You've seen the commercials. "I cut my boat in half!" he cries as he completes the cut from stem to stern with a cut-off wheel on an angle grinder. In an older advert he replaced the bottom of his boat with a screen door, painted it with some clear stuff and then by the end of the ad he's paddling around while sitting on a screen door. Yeah, that's pretty crazy, but the picture here shows it. I thought I'd experiment with it, since I guess that's what I do. So, once the seam sealer dried, I got a quart of the black Flex Seal and painted the edges and then the floors and then up the sides of the MGB tub. I made sure to keep the drains cleared, and the areas around the plastic plug-pulls cleared as well. I wondered if it would meaningfully change the amount of noise. I found that banging on the floor with my knuckle before and after did see a reduction of around 10dB. From that, I've concluded that it would suppress the noise from a rock hitting the underside. All of the interweb sites dealing with noise reduction insist that the noise associated with vibration is a very special animal not to be caged by simple things like a rubber-y paint. Okay fine. I tried it anyway and there are noise reducers in paint form now too, so I don't know what to make of that. I guess the interweb can't agree on it.

Sound Deadener
Once the Flex Seal paint was dry, I thought I'd go after the traditional asphalt, rubber or butyl sound deadener. I've used a couple different things before, and had leftovers of both. The foil-backed stuff costs more than the plain rubber-ish mats available from McMaster-Carr, but back when I experimented with them before, I couldn't really tell how well they worked because I didn't have a decibel tester. This time, I put the McMaster-Carr stuff on the big open spaces in the trunk, and tried the knuckle banging test. It didn't deaden the sound nearly as much as I expected. If memory serves, it was within the margin of error for my inconsistent banging force. Same went for putting the foil-backed stuff on the floor of the cabin. But then I noticed something: the foil backed stuff wasn't really sticking to the Flex Seal. Grr.. Piece by piece the foil-backed, expensive sound deadener lifted off the floor, no longer sticky. I decided I didn't want to deal with it right then. So, I installed the seats and moved onto other things for the winter.

Paint Again
Now, many months later, I'm back with some time and interest in the little car. I've spent many weeks clowning with rims and stripping parts of a 280ZX, so I'm ready for something a little more satisfying. I have a bunch of interior bits and a new convertible top on order from the UK, so I figured I better get the steel and noise containment solved. Knowing that the noise reduction won't stick to the Flex Seal, I concluded that a coat of regular paint on top of the Flex Seal might work. In my gut, this felt like putting lipstick on a pig or just throwing darts in the dark. Still, the thinking was that if regular paint gripped the Flex Seal and the noise reducer sticks to the regular paint, then it worked. Of course, will the noise reducer actually work? First, let's get the paint and the deadener on there, eh? For paint, I used some black paint I had in a touchup can. As described by the Flex Seal folks, the paint adhered very well. In retrospect, the problem could have been that the old noise deadener was just that: old. Maybe it didn't stick because it's stickiness had dried out or faded over time.

Deaden Again
Since I was effectively out of the 2 kinds of sound deadener, and I wasn't terribly impressed with their noise reduction anyway, I bought a third kind: Noico 80 mil butyl automotive sound deadener. With a focus on just doing the parts of the car that were going to be covered with carpet, I bought 18 square feet, their smallest ship-able size. I eventually will want to cover more area, like inside the doors, but I'm not going to do new door cards yet, so why make this project any bigger than it already is? I'm not sure this is the right stuff for under the hood (the manufacturer, of course, says it's great anywhere that doesn't get super-duper hot like a muffler), so I'll probably do a test-stick of a small piece to see how it handles the heat and vibrations under there.

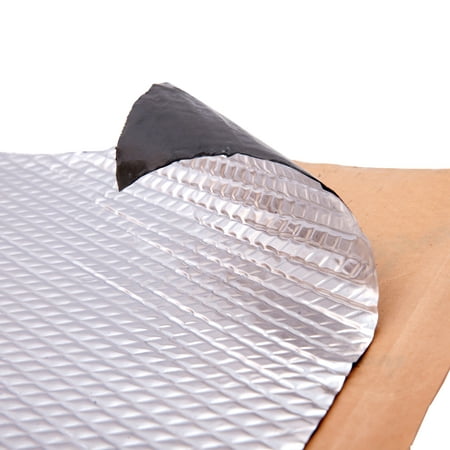
For the tub, though, it gripped very well. In my usual experimental fashion, I didn't paint over the top of all of the Flex Seal. In some of those other areas, I lightly sanded with 220 grit sandpaper and in others I left it just as it was. The butyl stuff I bought was a little different in that it had diamond embossing (see picture). The directions indicated that an area installation was complete when the diamonds had been pressed flat, preferably with a roller. I hadn't a roller. I looked at Harbor Freight and they didn't have one. I could order one online for $12US or more, but then I'd have to wait for it to arrive. So... I tried some other things I did have in the garage.... and one from the kitchen.

Sticky Tuna
I found 2 tools were very effective at getting the butyl to adhere and the diamonds to flatten out. First, I used a can of tuna. Yeah, that's right. It's round and flat like a hockey puck, so it was able to flatten the bigger areas pretty quickly. For pressing on edges and tight spots, I used the plastic handles on the scissors I was using otherwise to cut the sections. I didn't do other things exactly like the directions either. For example, the manufacturer (and the interweb) say to draw a template on paper and then translate that template onto the paper-backing of the sound deadener. That's a lot of time and paper. Instead, I used a sheet of aluminum foil over and over again. I would take the piece, press it into the spot where I want the material to go and then drag my fingernail along the edges. I would then transfer that edge to the backing, cut and apply. For applying, it is recommended to pull the paper as you install, and I followed that advice. I also followed the advice of cleaning the area with a degreaser (I'd cleaned these spots so many times, I just used window cleaner as a final check) before fitting deadener. Even with the foil time-saver, this is quite time consuming even on a little car. I spent over 4 hours and got 2/3 of the driver side done and about 1/3 of the passenger side before I ran out of material. Of course, getting down behind the pedals on this thing takes some doing, so there's time lost there. I expect the trunk will be much faster.

I'm waiting for more material, and I'll be finishing up the floors once it arrives. After that, it's carpet pad and carpet, unless I discover something else that needs to be done to the floors first. I really can't imagine anything, but I'll continue this thread if it does. Otherwise, that's it for today. Thanks ,as always, for following along-

Apologies for the post-fail where an early draft of a future posting got released. That post (about replacing the radiator in the TDI-powered microbus) will appear later on, once I've re-written it a few times.