Showing posts with label pop top. Show all posts

Tuesday, March 29, 2022

Refresh the Luggage Tub

Over ten years ago, I purchased and installed the Riviera pop top, bed and luggage tub. In an Agile-like spirit, some of the steps I took were good enough to demonstrate the feature, but not great for the long haul. Today, I re-approach the luggage tub.
 
Why Now?
finished work
A logical question to ask when you take apart something that is functioning is why now? This is an especially good question since I am in the midst of a significant noise control effort already. Well, it was the noise control effort that brought this to my attention. When I was working on the cab ceiling, I discovered that some of the original 1972 Westfalia stuff was not keeping the ceiling sealed. To access the leaks, I had to remove the luggage tub, and things kind of grew from there.

Ceiling Repairs
I mentioned that there were ceiling seal issues. Consider that the hinges and the front-center latch for the original 1972 Westfalia pop-top attach to the top of the bus above the front seats. These are mounted by passing bolts through the ceiling and then threading into some flashing which have embedded nuts. The bolts had been removed, or broke off, but the leaks were coming from where the flashing/nut bit touched the ceiling. These had broken down over the last 10 years and were weeping. So, I removed the flashing, the nuts, and anything else remaining related to the old pop top mechanisms, leaving six holes.
 
cleaning under the luggage tub
In an ideal world, I would have used no-longer-with-us Travis' welder and repaired the holes the correct way with replacement steel cut into small circles. Unfortunately, when Travis passed, a grave-robbing vulture (Bob) swooped in, claimed he and Travis were "like brothers" (say it all deep and blubbery to get the effect), and took everything he could fit into his truck and trailer over multiple trips while my sister-in-law worked through her grief. Bob the vulture took all 4 of Travis' welders. Yes, that's right; all 4 of them (Travis was a pipe-fitter by trade so welded pretty much anything) and a TON of other things, like all of Travis' other tools, for example. Like the Grinch, Bob disappeared as quickly as he had appeared and cleaned out all of Travis' valuables. Just as he was a non-entity before Travis passed, no one has heard from him since. May you die alone, Bob; you are the worst. I was suspicious of you then, and deeply regret not honoring Travis' memory as you cleaned out his legacy. I digress, but suffice to say I do not have access to a welder anymore, so I solved in a more ShadeTree way.
 
heat shrink before/after
First, I closed up the holes from below with the Constrained Layered Dampener (CLD) since I was applying it anyway. This left small, shallow, circular indentations, about the size of a US dime (in diameter) in the top. I filled the indentations with FlexSeal. Once dry, I painted over the FlexSeal and the rest of the top with the same white Rustoleum. Of course, around this work, I removed the tub, cleaned the top (picture above-right shows how filthy it was), and addressed the surface rust with converter and then encapsulator, both from Eastwood. With the tin-top good enough for another 10 years, I shifted to the luggage tub.

Tub Cleanup
The luggage tub needed it's own help. The rack bars were starting to show some rust, and one of them had become disconnected at one end. 10 years ago, when I initially installed the tub, I quick painted it with the white Rustoleum and attached it to the top with 4 long wood-screws. I had completely forgotten I had done that, but it had held on without issue. To my surprise, all 4 screws threaded right out of the metal top when I went to remove the tub. These holes served as the starting point for the more robust mounting I did later.

doing the doing
With the tub now on the floor of my garage, I drilled out the rivets holding the bars to the fiberglass. Over the course of many hours, I sanded them down to bare metal, and got off most of the rust. What remained got the converter/encapsulator treatment and then some white Rustoleum. Unlike the bars, the metal supports that run from side-to-side were in perfect rust-free condition, after sanding off the paint. I chose to leave them unpainted, and polished them with steel-wool before shooting them with clear-coat instead. When I purchased the top and tub, one of the luggage cleats was missing. I chose to replace all of them with stainless steel cleats (footman loops) which I bolted (M3 Allen bolts) instead of rivet'd in place. Incredibly, the footman loops that I used to mount the big speaker box into Oliver, the 1978 MGB, were a perfect fit. While everything was apart, I hauled the tub outside and applied a fresh coat of white Rustoleum to the fiberglass tub. Once the paint was dry, I set the tub on some old carpet bits to protect the finish a little bit.
 
Before I bolted (rather than rivet'd) the now-rust-protected-and-white bars back to the tub (M4 hex bolts), I tried 3/4" inner-diameter clear PVC/Vinyl tubing onto the round part of the bar. I thought this might help the paint last a little longer as well as soften the rack for things placed onto it. Unfortunately, the tube is just a shade too loose. I did not want moisture to wick underneath, and the gaps at the ends just didn't look that great. So, I pulled that off and used 3/4" inner-diameter clear heat-shrink instead. I warmed it carefully with a propane torch, just enough to engage the shrink and have it snug up on the bar. The picture above on the right shows how well the heat shrink sealed the bars. Honestly, FlexSeal probably could have done the same thing.
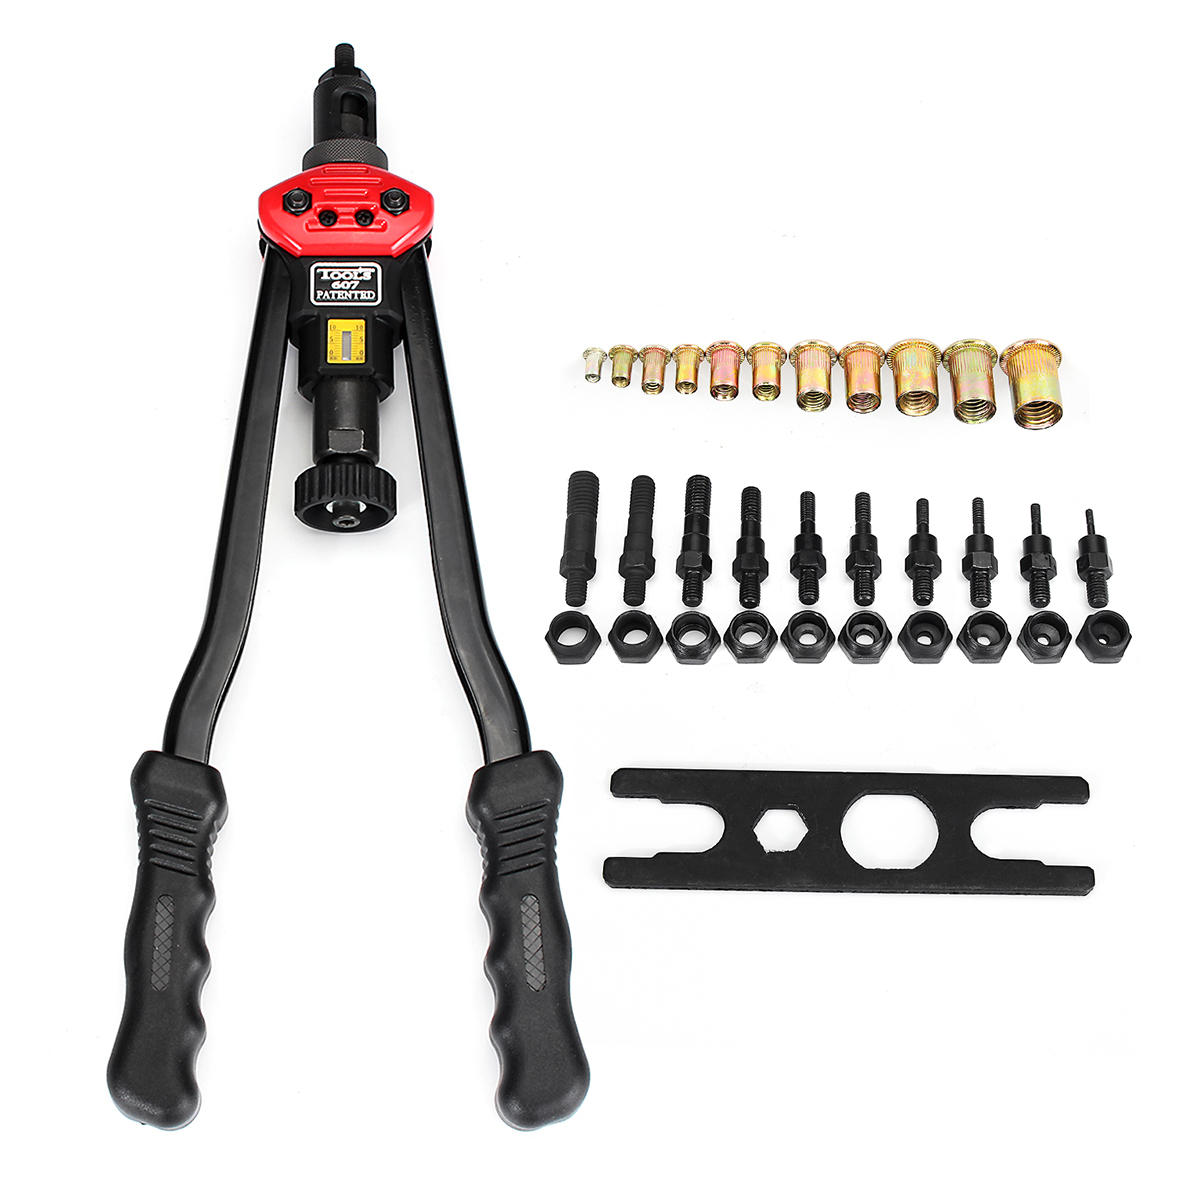
riv-nut tool set

Keeping with the whole noise reduction thing, I added some Noico to the hidden inside of the tub. I figured that it would reduce the vibration noise a little bit. Similar to the effect of adding this stuff to metal, the sound from tapping on the fiberglass changed to a much deeper note after the Noico was added. There is no way to know if this helped at all, but it seemed at least a little logical. The addition of the Noico added maybe a couple of pounds to the luggage tub, but if the noise on the highway is meaningfully reduced, this could be a contributing factor. Something is increasing the noise once we get up above 50mph, and since the luggage tub is right above our heads, it is a reasonably assumed source.

The last thing I did before installing the tub, I added a white pinch-edging around the outer edge. Originally, the Riviera pop-top shipped with a white edging like this. When I purchased this top, it did not have one. I don't think it really does much other than dress the edge a little bit. I could reduce some vibration transmission into the roof from the wind-whip at higher speeds, though. Again, like with the addition of the Noico on the underside of the tub, I'll take every fraction of a decibel reduction I can get. For those thinking of doing this to their luggage tub, it took 15 feet of piping. I had purchased 30 feet, thinking that woudl be enough to do the luggage tub and the pop-top. Clearly my guestimates were way off. I'll need to get more to do the pop-top, and I have enough left over for someone else to do just their tub. 

Tub Install
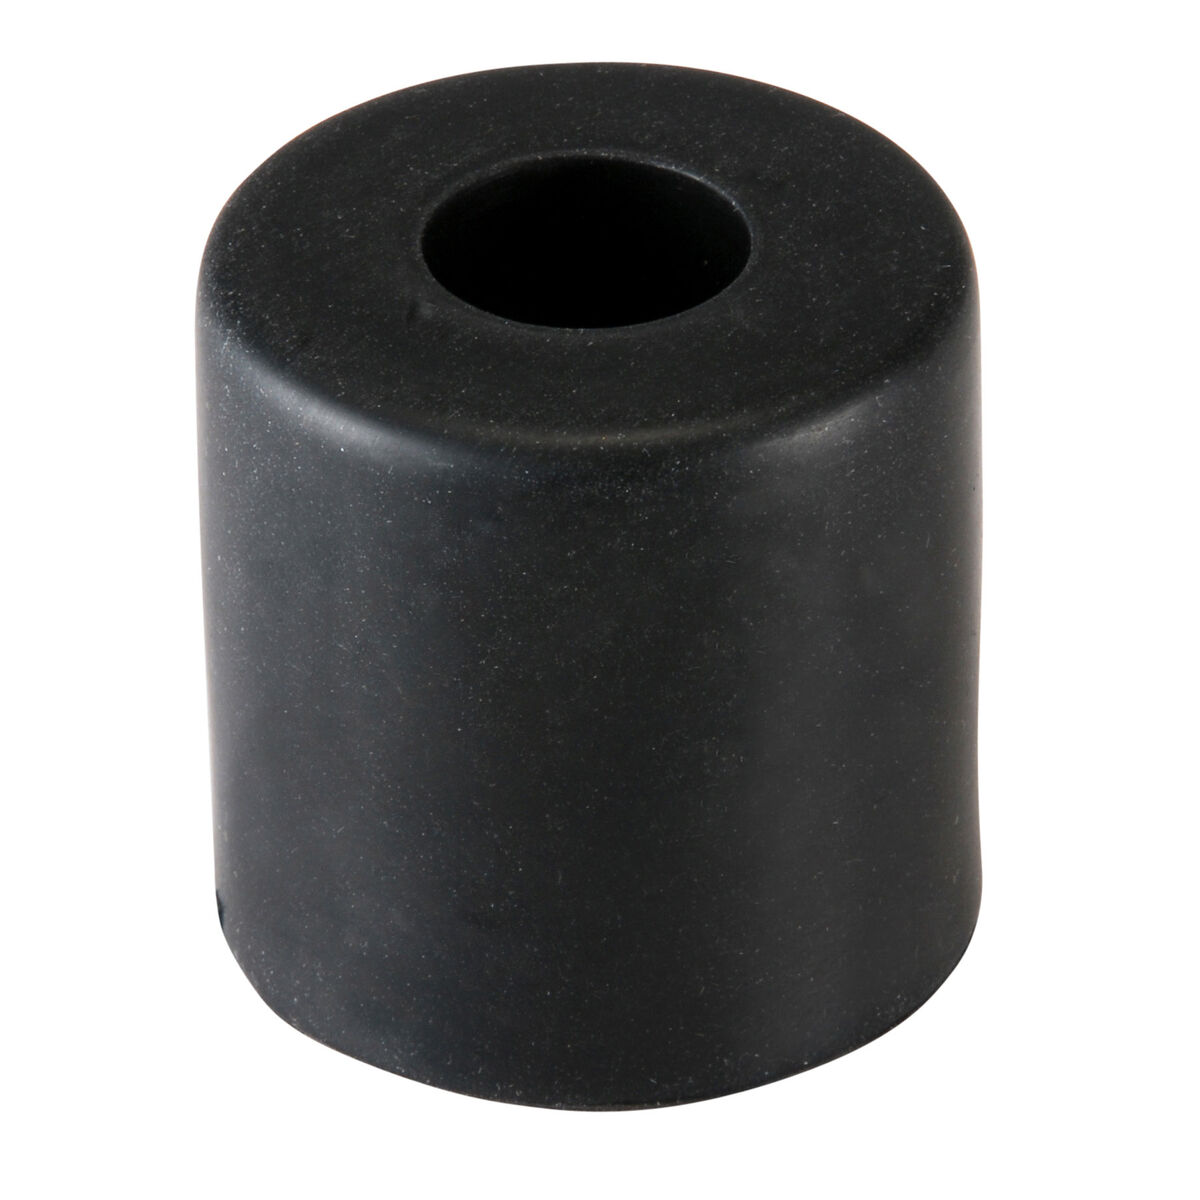
parts-express foot
Of course, I did not want to return to 4 long wood-screws holding the top on. While that appeared to work for 10 years, I did not want to press my luck. In a traditional install, the ASI/Riviera folks would bore 4 holes into the top and weld nuts in place from the underside. The top install would consist of 1 bolt per corner from above, passing through a thick rubber puck into the welded-on nut. Again, I do not have access to a welder, so I could not exactly repeat the original design. I could, however, pop in riv-nuts. A riv-nut installs like a pop-rivet: using a squeeze gun that has a mandrel and riv-nut sized for the job, you put the riv-nut on the installed mandrel, set it through the hole and pop it like a rivet. For the rubber puck, I found 4 rubber feet at a stereo-supply place (parts-express) that are 1-1/2" tall by 1-1/2" across. These feet have a central hole through the center.
 
I drilled out the old mounting holes large enough for the M5 riv-nut to fit. I applied the riv-nut from below: Since the riv-nut has a flush side (side where it is installed from) and a sticks-out side, it would be better for the sticks-out side not to be pointing down towards my head. As you can see from the stock picture of the foot, one end is wide, allowing the sticks-out side of the riv-nut a ready-made home inside.
 
view with the edging
I thought I could counter the Riviera install, and I run M5 stainless steel bolts from inside the cab up through the stereo-supply feet. This did not work for a reason I could not determine. So, I followed the original model with the bolts heading down from above instead: bolt through a fender washer, then the tub, through the rubber foot and into the riv-nut. Fortunately, the bolts I had were long enough to reach the riv-nuts but not so long that they protrude past the flush-side.

This whole affair became an incredible time consumer that I did not plan for. Once I saw the holes, I had to solve. Of course, I did not have to repaint the tub/top, nor swap out the cleats, replace the pop-rivets with stainless hardware, etc. This finished product looks better, will work better and is set up for seasonal maintenance. Which prompts me to encourage you to consider when was the last time you removed any of the plastic bits off your ride to clean up accumulated organic material. Your paint, and perhaps the integrity of your ride, will thank you.

Well, that's it for today. Thanks, as always, for following along-

Tuesday, July 9, 2019

4Peaks 2019 - Festival Report

Ah yes, the annual report on what happened at 4Peaks. Before I start, I have to say that 4Peaks is an annual tradition for a reason. We absolutely love 4Peaks. So, please read any criticisms through that lens; we love it and we want it to be as great as it can be. I already posted on the travel adventures, and I'll post about the music next, so this post is just about the festival itself.

Attendees
This year, Boo and I were joined by GratefulEd and our old friend Mayhem. As I mentioned in the Road Report (See 4Peaks 2019 - Road Report), we crashed at Mayhem's ranch the night before the gates opened. The following morning, we carabused to the lot with GratefulEd's Belle leading our 2-bus parade. Recall, Belle is a 1973 VW camperbus with a Riviera pop-top, but a fairly custom interior. Similar to Hapy, Belle is not really a looker, in that she was painted with dark green fence paint. She does have lots of cool old stickers and flags, though. This year, GratefulEd added an observation deck on top of his luggage rack, so he (or anyone else) could sit in a deck chair and look out across the festival grounds high above the cars. You can see the ladder access to the deck in the picture on the right, and me testing it out in the picture below that.

Who's Bus?
Between the stickers, flags and the observation deck, GratefulEd had lots of folks asking questions about Belle. Based on the way we were set up, I think Hapy just disappeared into the back ground. No, I'm NOT jealous; it's actually the way we prefer it. I didn't get many questions about Hapy; in fact, I think the only questions were out of reference to Belle, like after learning Belle was a '73, they would ask what year Hapy was. If I get around to painting his lower half over the winter (like I originally planned 10 years ago), it will be interesting to see if suddenly there is interest. Again, that's not what I want necessarily, it would simply be an interesting sociological experiment.

Last year (see 4Peaks 2018 - Festival Report), I said that I wasn't a huge fan of the GoWesty designated lot because it felt like we were hanging in an art gallery with a bunch of really nice looking art. Hapy is built for camping, not gawking, so he attracts very little attention, even when we're all by ourselves. This year, though, the GoWesty lot was not as formally laid out, so it didn't feel nearly as much like a car show. Maybe Ziggy heard some feedback after last year and changed it up. I dunno. Either way, I didn't overhear the "I like that one better" comments like I did last year, and we had far more passersby drop in, so regardless of why, it was better.

Arrival and Set Up
sunset by Peaks, Hapy nose on left
Anyway, we arrived at 4Peaks around 11:30. All printed and internet documentation said that early entry (before noon) was reserved for the "GoWesty" folks like us. That clearly wasn't the case, though, as we entered a scene of camps getting set up all over the grounds. Regardless, we found our way to the GoWesty zone, and parked in a "L" shape with Belle. Belle was parked facing head-tail perpendicular to the fire lane while Hapy was parked parallel, with his nose pointing towards the stage. This put our privacy screen where passersby on one of the main roads could see it. More importantly, this placed the observation deck pointing at the mountains, so GratefulEd could sit with a book, listen to the music and when he raised his eyes, he was looking at the 4Peaks for which the festival was named.

Central Oregon can be windy, and this year, the wind was fairly consistent. When the sun was out, the wind was blowing at least 10mph steadily, gusting higher. The predominant direction was from the stages up towards us striking Hapy's windscreen, so shortly after we had the Busdepot canopies up, GratefulEd and Mayhem put up a double-king size tie-dyed sheet along the wind side. We zip-tied the canopies together, and zip-tied the sheet to the poles, creating a mostly-wind-blocked zone. Within 30 minutes we had pop tops and canopies up, the lot couch out, carpets down, and beverages opened. Since it was barely past noon and the first band didn't start until 5, we had all afternoon to settle in and meet our neighbors.

Weather the Weather
While the wind was strong when the sun was up, the temperature was low most of the time (barely scraped into the mid-70F's on Saturday as the 4-day high) and very cold at night. The first night, it dropped into the upper 30F's, and the wind didn't entirely disappear. Fortunately, I had brought our Little Buddy heater, so we fired that up to semi-warm our living room space. It never rained, and after that first night it wasn't quite as cold, but it still got down to or below 40F overnight every night. Boo and I planned and packed for cold, so between lined pants, knit hats and a warm jacket, we held our own against the cold, and it didn't get us down. That first night, we made hot chocolate for the 4 of us to put some warm inside. Otherwise, we required no heroics. Turns out dancing is a great way to warm up.

Friends Found
Within the first hour, we found Mike-and-Suzie from last year. They, again, volunteered a couple of early shifts, but otherwise we didn't see them much this year. They brought a friend from their hometown who hadn't been to a festival before, so they spent most of their time separated in their own space. We met Jay and Alice from Bellingham, who told us about a small 2-day festival they have there. Alice was fighting a cold, so we didn't see her much, but we ran into Jay everywhere. Our next-door neighbor, JerseyPaul, was a chronic vagabonder, spending months on the road at a time. He had a story for every occasion. Boo played a round of corn-hole with a guy named Bip who we are fairly sure we met at the Black Sheep Family reunion a few years ago. He had an amazing energy.

I was able to connect with Chris the coffee-roaster from last year and give him a pint of Kahlua I had made with some of the coffee beans he gifted us last year. He gifted more beans this year, so we may have started some kind of quid-pro-quo thing. NewTrailerRussel was set up across the fire lane from us. He turned us on to some really good, kinda trippy music from a band named Beirut and showed us the inside of his trailer. It is amazing how light and well-considered new trailers are. He had adorned the walls with little electric candles giving the entire space a terrific warm glow. So nice.

We met lots of other folks too, whose names escape me. For us, the personal connections are why we go to smaller festivals, so having had so much time to meet and connect was especially important to us. We head for the festival with the intent to "see more music this year", but what we clearly really want is more personal connections, so that is ultimately how we direct our time. We vote with our wallets, and we vote with our feet. Everyone does. Sometimes, it takes some thinking to realize what you voted for.

The Junction
Similar to last year, we were within 15 meters of the major intersection at the center of the camp zone, called "The Junction". Many of the complaints I had about last year's Junction were resolved. The coffee place actually sold coffee. The Dump City Dumplings were not located at The Junction, they were inside. There was a caged trailer for axe-throwing. That's right. $5US for 5 throws. We didn't see many takers, but the proprietors were in good spirits. Boo and I met with a guy who drove from Central America and back again twice a year, hauling clothing for selling at festivals like this one in an old Ford Econoline van (picture on the right). We bought a couple of gifts, but it was the getting to know him, and how he approaches life that was the gift to ourselves. He lives in central Oregon, working a "normal" job for 6 months to support his other life of 6 months in Central America where he acquires cloth and clothing to sell.

It wasn't all perfect, though. The coffee cart only had coffee, so requests for anything requiring espresso was not available. Also, there was a Subaru dealership set up right at the corner who would set up this massive super-bright light as they were leaving for the night. Presumably, this was so that passersby would look at their table of pamphlets when the dealership representative left. It was so bright, it disturbed the light-art installation across the street, detracting from it such that you really couldn't see the lights. It was awful, so, we solved that problem for everyone by unplugging the light each night after they left. The twilight that remained was from the light glow of the art installation. Ahh... that's right.

Porta-Potties
It's rare to comment about the row of plastic cubicles at festivals. When it happens it usually isn't good. So, mark this: the porta-potties at 4Peaks this year were the best managed, cleanest services I have ever experienced. When freshly cleaned, they smelled like Bubble Yum bubble gum, and that smell lasted well into the cubicle being heavily used. Only on the very last day as we were leaving did they start to resemble porta-potties pretty much everywhere: gross.

Vendors and Food
Kidlandia tent
For the most part, we bring our own food and drink. This year, we were each given a Silipint cup so we festival-goers would produce less waste. It will be interesting to see how well that shook out, once they tally the garbage costs. I visited the Silipint booth at The Junction (their booth was a Unimog), but they were il-prepared to talk about their products, nor did they have any for sale or even for show. I'm honestly not sure why they were there.

Within the venue, there are many craft and food vendors. We usually check them all out a little bit, and sometimes we buy something. This year, we were less generous after the trump tax bill killing our finances, but the wares were pretty amazing.

more Kidlandia
For food, there were local restaurants and farms represented. We got peaches and kettle corn from a Tumalo Farm, and got tacos from a Bend taco stand. With Taco's in hand, and Andy Frasco cranking on the tent stage, Boo and I walked through the scattered tables looking for a place to sit. One table was occupied by one person, Brenda, so we asked to sit. We talked as we ate, and learned about another festival at the end of July (Newberry Event) that we are going to try very hard to make. Brenda's friend Alisa joined us and was super-passionate about it. Brenda shared that getting the word out about that festival had been difficult, so it was no surprise that we hadn't heard of it. Since it is a MS benefit, the lack of awareness is all the more important to solve. She decided to post handbills by the end of our conversation, but I wonder if we would have heard about it at all had we not joined her at her table to eat. To me, again, it is the interpersonal connections which draws us to 4Peaks every year.

Overall, this year's 4Peaks was a total hit. I'll get to the music in my next post, but the vibe and the people we met were fantastic. We didn't want to leave, when the time came, but we could feel the draw of home. We stayed almost to the end of the final performer before dropping the pop-top, loading up the last few bits of gear and firing up Hapy's engine for the drive home. Of course, we plan to go again next year. I expect GratefulEd will again, perhaps with his wife. I suspect that Mayhem will join us again; perhaps he will bring his family with him.

1... 2... 3... 4Peaks!

Tuesday, July 2, 2019

4Peaks 2019 - Road Report

Time for our annual adventure to Bend for our favorite summer festival. This year marked our 5th, so that would make this my 5th road report about getting to/from the greater Bend area. No, my 7th, since my first Bend road trip post was nine years ago (See Hot Tub, Hot Thai, and High Desert Snow) and then there was the trip in 2015 with the boys (See No Trip is Complete without a Snag). I guess I like driving to Bend.... and then writing about it.

Post-JRAD Resolutions
2 of my favorite things
in one shirt
Before we could leave, there were a few things I had promised Hapy that I would address before we took another drive. Recall, that our speed was getting artificially limited on our way home from seeing JRAD in Eugene (See JRAD - Eugene Road Report). I concluded that this was probably caused by a clogged fuel filter or possibly because of the fuel. To remedy, I replaced the old disposable plastic filter with a new, larger one. I thought the old one was good for both gasoline and diesel. I'm not sure that actually was the case, though. When I went to buy a replacement, the online vendors indicated the old one was gasoline only, and recommended a different, bigger, steel-meshed one for diesel. Cool.

Replacement was easy: first, put a vice-grip on the fuel line on engine side, then loosen the clamp. Remove the filter from the line and let the fuel run out of the filter back through the supply line to the tank. Hold the filter high enough that fuel doesn't dribble out, and put another vice-grip on the fuel line below the filter. Remove the clamp, remove the filter, put the new filter in, clamp it. Remove the supply-side vice-grip and let some fuel into the filter. Once it is mostly full, connect the other fuel line, clamp it, and remove the vice grip.

I also put some star-tron into the tank (following directions) to combat any old fuel issues. Last, I removed, cleaned and re-attached the air cleaner. This, I felt, solved the speed limiting.

I felt like I didn't have the stopping power I had expected, and believed that the rear brakes were not doing much. So, I re-adjusted them. When I did the wheel removal and replacement (see Hammered Rims (part 3)), I purposely left the rear brakes a little loose. Perhaps too loose; I didn't want them dragging, potentially overheating things. While I understand the thought, it wasn't a good one. Brakes need to be adjusted properly. So, I followed the common procedure for adjusting the rear brake shoes found in Muir's Keep your Volksie Alive book (pdf found here) pages 169 and 170. I found his reference for my rear shoes to be upside down, but that could be more of a Hapy thing and less of a John-Muir-had-it-wrong thing.

Regardless, once the rear brakes were making scraping noises, but not slowing the rotation meaningfully, I figured I had them set, and I took a test drive. Hapy's acceleration was back. I was able to get him up past 50mph in the 11 blocks between my turn on and off the local main street, so that's a win. I also did a quick-stop test on the side street to make sure the brakes were grabbing better. They were. I touched the drums when we got back and they were warm, but not hot to the touch, so I figured I got it right. So, Hapy was ready to roll.... after updating the privacy screen with our new destination and a couple of new "ticket" stubs.

privacy screen ready for 4Peaks
To Sisters
The route to 4Peaks doesn't usually change, just the weather, road conditions and Hapy's attitude do. Okay, once we tried coming home the north route through Madras and over Mount Hood. I think that way feels longer and hotter, but it has some great views, has less superhighway and I think the westbound US-26 route over the Cascades is not as steep. Anyway, we usually take OR-217 south to I-5 and head south to Salem before turning east on OR-22. We take that into the Cascade Mountains, joining US-20 along the way. Rather than camp at the vagabonding spot we found last year (44.767381, -122.533192), we were invited to crash at Mayhem's family place outside Sisters. This would put us much closer to the venue the following morning, for a much easier pace into the festival grounds, but also put us on the road for another 90 minutes of driving after a day of work, so we had some fatigue concerns heading into our departure. Still, with a plan to see Mayhem and GratefulEd in mind, we loaded up the remaining bits of gear, filled our coolers with food and beverages, and headed for the highway. We left later than anticipated due to personal interference I won't go into, but that delay allowed us to avoid rush hour, setting our tires on highway around 7.

Clock Turns
Hapy reborn
We topped the tank with $20US, putting our Eugene trip solidly in the low 30's for miles-per-gallon. Since we are now running larger tires, the odometer will read low, so all mpg calculations and mph announcements will have a little asterisk from now on... until I can figure out how to calculate the true distance covered. Still, the odometer still clicks along. In fact, just south of Tualatin the odometer flipped over, setting back to 00000.0. Since we were on the highway, traveling at 55*mph, capturing it on video was a 2-person affair. Still, it was neat to watch through an iPhone afterwards.

The drive itself was fairly easy. We were still feeling the wind gusts, making the wind more of a speed limiter than the engine heat or available power. Hapy seems to have power on-demand, and the Mishimoto radiator (see Back to the Bus - Rad Swap 1 and 2) with twin-fan cowling (see Cowling the Hapy Radiator) are proving very effective at removing excess heat.

We noticed many construction vehicles on the northbound side of I-5 and saw signs portending of nightly paving through Sunday. We mentally filed that for later. Once we left I-5, there is a stretch of maybe 20 miles of open valley before you enter the foothill forests of the Cascades. At that point, the winds subside, and the twisting climbing road starts. By the time we got there, we had stopped for a bag of grease (fast-food burger joint), and the traffic had thinned so much, we had the road to ourselves. The forest was dark, shortening our perceived evening, so Boo set up with a pillow and blanket. While she napped, I drove our usual route, sharing recently passed landmarks when she stirred. The night cooled as we crossed the summit, and the Hoo Doo Ski Area, and Hapy stayed nice a cool, with a peak temp around 196*F. We caught a tailwind coming down into the high-desert outside Sisters, allowing us to easily reach 65*mph without the engine temp creeping above 185*F. After a minor dead-cell-phone issue was solved, we found Mayhem's ranch.

The approach to the venue was uneventful as we followed GratefulEd and Mayhem in Belle. I'll post on the entry, camping, etc in the festival report post.

Getting Home
outside Sno-Cap
Usually, this is the part of the review when things go sideways. Last year, our ignition switch and related wiring went up in smoke. The year before, we took the longer flatter (US-97 to US-26) way home to avoid overheating only to have to pull over what seemed like every 20 minutes and then take an extended break at Ski Bowl to let Hapy cool all the way down. We are grateful that Hapy usually does what he needs to do to get us to our destination, and saves the issues for the ride home. So, with this in mind, Boo and I caravan'd with GratefulEd and Mayhem to Sno-Cap in Sisters before the drive home. With an old-skool hamburger in our respective bellies, Boo and I jumped back onto US-20 while GratefulEd took Mayhem back to the ranch. Boo and I were relieved to have GratefulEd trailing, just in case something went poorly. We checked that the radiator fans were spinning (this has been an issue after 4Peaks in the past), and hit the road.

US-20 is the sole thoroughfare south of US-26 from Bend, Sisters, Redmond and other localities in Central Oregon through to the Willamette Valley. It is widely regarded as the "faster" way to Portland, though, depending on where you live, there may actually be no difference. That is still enough for most folks to drive US-20 rather than head north on the US-97 to US-26. For someone driving a nearly 50 year old vehicle shaped like a loaf of bread into a headwind, any extra traffic on a Sunday afternoon was not exactly welcome. We simply ignore them, stay right as best we can, and enjoy the scenery. Honestly, the overall traffic load wasn't too bad, and we didn't receive any honking horns nor obscene gestures.

In years' past, we have turned off at a viewpoint about 1500 vertical feet above Sisters. We did that again this time, because the engine temp reached 205*F. I concluded that the strong and steady headwind was a greater factor this year than years past. Regardless, the temp dropped very quickly once we were idling at the viewpoint. Within 10 minutes, we returned to the uphill climb, and reached the summit without the temps breaching 200*F again. Once over the summit and past Hoo Doo, the drive is predominantly downhill. Alpine shifts to conifers, and the land becomes less arid. The views are spectacular, and the twisting nature of the road limits just how fast anyone could reasonably drive, so we were not experiencing much pressure from behind. US-20 has many passing lanes as well. In fact, we wouldn't see more than 2 or 3 cars behind us before a passing lane would appear. I would pull right and slow down to encourage everyone to pass, and then the road would be all ours again... for a little while. We found that travelling at 60*mph keeps Hapy's temperatures at 190*F. So, that has become our pace, until we hit inclines.

Detour
the journey is the destination


Once we got west of Detroit Lake, we remembered the paving. By now, it was after 6 on Sunday, and we didn't know what the Oregon Department of Transportation (ODOT) considered "night" for paving purposes. Preferring to not sit in creeping construction traffic loaded with weekenders fighting their way home, we pulled off at Sublimity and took a road less traveled. We passed through Silverton, Mt Angel, Woodburn and Hubbard before turning towards the I-5 just south of Aurora, but well north of the paving zone we passed 4 nights earlier. This was some beautiful country, mostly farms, with a couple vineyards and hops-stands mixed in. The farmland was just so beautiful. Every time we take a "Blue Highway" instead of an interstate, we rediscover just how amazing the land is. We were so taken with the moment, we failed to snap any pictures, so we'll have to drive it again. Based on the map software, our detour shaved 25 miles but cost us 10 minutes, if there wasn't a construction slow-down. I think there was one, though.

Final Surprise
We drove almost 7 hours round trip and did the whole thing on one tank of fuel. Since we can't rely on the odometer, we can make estimates about for many miles it was. Figure around 200 miles to get there. Based on electronic maps, the drive back was around 175 miles, so we covered at least 375 miles. The odometer reads 303.5 right now, so with the larger tires, etc, the 375 is probably about right. With this context, at the last major intersection before arriving at our house something electrical happened. It caused the headlights to go out, the little computer monitoring device to stop working, and the radiator fans to stop. Hapy has such a great sense of humor! It turned out we blew a fuse in the original front-of-bus fuse box (confused? See Hapy Rides Again for a decode). One 8A fuse replaced the following morning, and everything has returned to normal. The fuse blew because the original cigar lighter unit was left dangling when I installed the gotta-get-it-started ignition switch in the cigar-lighter hole in the dash. Sigh. When will I learn to put away ALL of my toys when I'm done with them? I disconnected that cigar lighter, and taped off the wire. I intend to move that second ignition switch, so the cigar lighter (used as 12V power source for charging a phone or whatever) will go back in it's original location.

When I fill the tank, I'll calculate the mileage assuming the 375 miles as the range traveled. I may need to dust off the old Garmin so I can start calculating my mileage and speed with greater accuracy. When we got home, and we were unloading, I noticed a hum in my ears which I attribute to the drone of the engine. I will be exploring options for containing the engine noise, starting with a basic TDI engine cover. More to come on this, as I discover things.

Thanks for following along. I'll post on the music and the overall festival soon. For my US readers, Hapy Independence Day. I hope this year we find ourselves less dependent on new things and more dependent on each other.

Follow-up....
I re-checked the maps, and the route to the festival was 180 miles. So, assuming there were a few miles here and there added in, plus the 175 miles home, plus driving back to the fueling station (about a mile away), we'll use 360 miles as our mark. When I filled up, I filled until it popped, and then squeezed in a few extra tenths to get to exactly 10 gallons. So.. we got 36mpg*. That is pretty damn amazing.

Wednesday, July 15, 2015

Fare Thee Okay

Independence Day was observed here in the States a little over a week ago. For Dead-heads, it was the celebration of the Grateful Dead turning 50, so there was a little extra celebrating. Today's post hits that. Beware: limited bus content.

Not Exactly Chicago
Mayhem's Further 2012 shirt
Similar to the pair of shows performed in Santa Clara, 70k people who could come up with the scratch to fly, hotel and see the "Core Four" (Phil, Bobby, Billy and Mickey) in Chicago jammed the city for the 3 day weekend. Like the weekend before, I connected with my friends Mayhem and GratefulEd for a camp-in viewing of the simulcast. Rather than haul out to Wheeler, this time we were in the swanky confines of Lake Oswego: a much shorter drive. GratefulEd, however, had set up The Wall of Sound - the home edition on his back deck. We had a projector beaming the visuals and a much larger crowd than had been in Wheeler tuning in. There were no arrests, no staff pro's or GDP uncover agents. Instead, we had meat snax, liquor and no-wait restrooms. Kidding aside, GratefulEd and his family were wonderful hosts.

Similar to the Wheeler shows, I arrived early, set up Hapy for the lot scene / camping and cracked a beer. After all the festivals and events, I've gotten it down to less than 30 minutes from pull-in to fully set up, complete with awning, middle row pulled out as a lot-couch, bed set up with curtains, etc. Mayhem joined me for some classic lot-style pre-func'ing and then we headed around back for the main event. Boo arrived late, missing part of the first set.

... but Not Exactly the Grateful Dead either
lot ready, 2-bus style
Once we got everything set up, it was up to the Core-Four-plus to provide the evening entertainment. Like the Wheeler review (see: Santa Clara by way of Wheeler), I won't bore you with set lists or a review. The fine folks at JamBase have a more than sufficient rose-colored-glasses review to read. All three shows were better than Santa Clara, but that's really not saying much. None of the three shows were on-balance better than the Furthur shows I'd seen. The last show was probably their best, giving reason to believe that if they kept at it, they could probably sound pretty good. Trey just wasn't as connected as he should have been, and the band wasn't as cohesive.

I trolled around JamBase between the Santa Clara shows and Chicago. I noticed that only Phil from the Core Four had tour dates. Billy and Mickey haven't been playing much in a while so, to me, this just further supports my belief that Bobby has a health issue that he hasn't disclosed, and that's why Futhur stopped touring. JohnK and Jeff are touring under the Golden Gate Wingmen, additionally supporting that Bobby isn't playing anymore (Jeff was his long-time keyboardist). That's really too bad. Love you Bob.

Chong
left-side rear-window blind
No Grateful Dead related music venture is complete without some side adventure. With a venue like Lake Oswego, I didn't expect much in this arena. I actually brought a book so I wouldn't get too bored. Luck smiled on me, though. For those not in Oregon nor a part of any marijuana legalization effort, you may not know that pot became legal for individual use on July 1st. Since we were celebrating "the 4th", weed had been officially legal for 3 days. 3 days, man. 3 days. As I turned Hapy off the freeway on my way into town, I saw a sign announcing a visit from Tommy Chong at the functional glassware shop just outside Lake Oswego. And just like that, we found our adventure: let's meet Tommy Chong.

Mr. Chong has been on tour himself, in a way, doing personal appearances at head shops in support of some personal-use products with his name on them. Neat. On the 5th, he was scheduled to appear at Mary Jane's House of Glass, and he did. The scene was, in a word: weird. The parking lot was roped off for pedestrian traffic, so many people were parking at the Taco Bell next door. In the center of the lot was a circus tent where beverages could be purchased and consumed, and a band was tuning up to play. Between the tent and the front door of Mary Jane's, there was a queue forming for pictures with Tommy Chong. Curious, we passed the queue and entered Mary Jane's. If you've never been in a functional glassware shop, it's hard to explain. Picture a 50' by 50' square commerce-space with glass cases pointing in various directions, all filled with glass pipes. No objects d'art, no brass, no wood, nothing else. Just pipes. Oh, and some incense in the corner. In the corner along the front wall, but opposite from the front door was a table behind which sat Tommy Chong. "$40 a picture," a young woman exclaimed as we entered. Yeah, I'm not paying $40 for a picture with Tommy Chong. No offense, Mr. Chong. We just stopped by to say "hi", so we did.

Mayhem took it one step further. Concluding that Mr. Chong probably didn't have a place to watch the final show featuring the "core four", Mayhem tried to engage is a simple conversation with Mr. Chong. Apparently, that was outside of what the Mary Jane's folks knew how to handle: so, you don't want a picture with him, so you must need to be in the autograph line. No, we don't want an autograph. "Would you take a picture with him if it was free?" Sure, so long as we get to ask him a question. Well, that proved quite difficult, but Mayhem got Mr. Chong invited to our streaming picnic thing.. and found himself in a rather awkward picture with Mr. Chong. Neither of them looked like they wanted to be in a picture. Afterwards, I noticed the look on Tommy Chong's face was the same in every picture. He was a perfect look of "really? this is where I ended up? how did this happen, man? can you help me outta here?". Sorry, Mr. Chong. We tried to spring you for a few hours.

Bid You Goodnight
The final show was just that. For those who were there, I'm sure it felt like closure. For those of us watching from home, we got an extra special post-show interview with Bobby. In answer to the question of will we never hear you guys again, he responded without hesitation that we'll see it again, or something very similar some time real soon. Thanks for stringing us along, Bob. We hope you're serious and we'll see you and Phil on stage together again. We'll have the bus ready to go whenever you declare the next Furthur show... please make it on the west coast :)

Bus Content: I adjusted the windshield washers with a push-pin in the tiny washer nozzle. Now, it streams into the upper half of the windshield dead-center of the wiper path. Perfect.

That's all for today. Thanks, as always, for following along.

Saturday, November 1, 2014

300

Somehow, I've managed to work my way to 300 posts over the last 7 years.  Rather than a real-content post today, I'm going to reflect back kind of like when TV shows do a "best of" episode.  Frankly, I hate it when TV shows do that, and promptly switch the channel when they do, so my following that model is actually kinda funny.

0 - 100: The Start of Many Things
Ranging from January of 2007 to September of 2009, my first 100 posts ran the gamut of topics.  That's probably true of any cross-section.  In looking at what was happening with the bus, the blog starts with him running the original type4 engine, but I soon started the TDI work.  Early posts ranting on some old air-cooled vehicle abuses like removing the cooling system shifted to engine options and then to solving the install of a water-cooled plant into an air-cooled body.  Deciding on the engine was recorded on April 13th, 2007 (see Engine Decided) and a year later, the engine was still sitting on my garage floor, a failed first attempt on both the fuel tank relining and the engine mount had slowed me.  That winter was spent getting the engine and transaxle to mate for the first time (see first and second attempts).  I broke an adapter plate, and my spirit over that winter.  It took going on the road to see the Dead and starting the separation from my ex-wife to get the project going again in early 2009.  The first 100 posts ended with the new rear engine mount being fabricated, the starter adapter solved (see starter adapter corrected...), the vacuum completed (see what's that soft sucking sound) and the fuel fill set up.

101-200: Transitions
Starting in September of 2009, this block of 100 posts carried through late July of 2011.  I started this period sleeping in a spare room at my now ex-wife's house and ended this period completing a divorce and living in a townhouse apartment.  Still, the middle section of 100 posts started with the same urgency which the first 100 had at the end, in terms of bus work.  The fall of 2009 included the fuel tank (see Fuel Tank Solved) shape / vacuum pump issue, buttoning up the turbo, vacuum, starter, CV joints and moving the bus off the mud and onto concrete for winter work.  Over the Winter, the radiator/cooling was addressed (see Radiator test-fitted, shrouded and Installed) and the bus project really started to roll.  The hatch was finished, intake routed, electrical, clearing codes, finishing the coolant routing, primary electrical, etc.  By December of 2010, my ex- and I had decided to call it quits.  I spent January through March staying on my parent's couch trying to get the bus into a will-travel-under-own-power state before the divorce finalized.  I was able to get him running-ish, and had a muffler installed by Meineke (see Exhausted) during that working-remotely period.  By April, I had a townhouse-style apartment with a dedicated garage space and focused a considerable amount of free time into the bus' interior.  I swapped out the fridge for storage, applied more sound killer, installed an accessory battery and fuseblock (see fused) and ended the late July with installing a Riviera pop-top in place of the original ripped-up Westy top.

201 - 300: Moving
Picking up in late July of 2011, the final 300 posts carry us to today (early November 2014).  I started this period as a divorced father of 2 boys and an old bus, and I now conclude this period remarried father of 4 boys and an old bus.  We moved out of the townhouse apartment when they raised my rent past the point I could afford, and into Boo's condo.  From the condo, we moved into the house we've been in for 18 months now.  Frequency of posts dropped during that housing change and life settled into a very different pattern of family play versus self mechanic'ing.  This period, though, marks the time when the bus went from stationary project to daily driver.  In August, we camped in him for the first time in years (see One Small Step for Van).  Later that Fall, we hit the road to Eugene for Furthur but needed a tow home.  Like I've said before, the journey is the destination, and we had to pull the tank to get re-lined.

I returned the original engine harness to service, and struggled with coolant leaks while trying to keep him on the road.  I discovered a new love of snowboarding, and bonded with a new family at Mt. Hood.  The bus underwent more transformations as well.  He has a middle row bench seat (see Vanagon Seat Install, no longer has a grossly underused kitchenette (see Enter Summer, exist posting) and has a rebuilt jalousie window (see parts one and two).  I dropped his engine 3 times in this stretch of posts, twice having to separate the engine and transaxle.  Both of his bumpers have been hammered straight-ish and painted to an almost good-looking state (see front 1,2,3,4 and rear) and he now sports door cards as well as cards for most of the interior.  The ceiling doesn't sag anymore.  This past Summer, we had 3 flawless road trips to Nye Beack on the Oregon coast, Horning's Hideout and to the Black Sheep Family Reunion.

So, What's Next?
I guess that's always the question when you don't draw a map ahead of time.  I honestly don't know.  Frankly, I couldn't have drawn a map to this point and I wouldn't have ended up here if I'd tried to.  I look forward to many sights like the one below, simply driving the posted speed and enjoying the sights out the front windscreen.  As before and always, thanks for following along.


Wednesday, April 16, 2014

Spring Sprang Sprung

I played with the bus a little bit this past weekend.  I made some headway on a few things, but only really completed one thing, so I'll post about that today.

What's that Racket?
sprang-sprang-sprang
Now that the jalousie / jealous window in the sliding door has been rebuilt, I thought the noise in the bus would have been greatly improved.  It isn't.  Okay, well, it isn't as improved as I thought.  When I'm at idle at a stop light, the engine drops to around 900RPM.  At any speed, there's an harmonic vibration, but at 900, the helper-springs in the Riviera pop top really get going.  They bang against the scissor supports and make a terrible racket.  It sounds like "sprang-sprang-sprang...".

Silence the Din
muffling the noise-maker
Now, I could remove the springs.  That would make the pop top much harder to lift.  The pop top has 6 springs, though only 2 are easily visible.  The other four are way up near the top, but still on the outside of the scissor supports.  There are no springs on the front or rear.  They are all just less than 1" in diameter and just less than 2' long when the top is up (and springs at their shortest length).  I've seen pictures of pop tops where the spring over the slider door had a cover that looked like it was made of cloth, which got me thinking about other options.

It was a beautiful Spring day and Boo had been spending the afternoon waging
slight bowing over drip rail
 a war on the dandelions in our yard while I clowned around in the garage.  About the time I was considering the springs she realized she needed some grass seed for the holes she was making, so we headed for Home Depot.  She headed for the lawn/garden stuff and I had this spring-silencer idea and headed for pipe insulation.  I got 2 6' lengths of the cheapest pipe-insulation they had for 1" pipe, costing about $2.25.  I figured I could cut them into 2-foot lengths and wrap the springs so they wouldn't make that racket any more.  I simply cut them into thirds, and slit their lengths so they could slide on.  I quickly had a muffler for each spring.  They installed in a couple minutes, and very effectively stopped the noise.  I didn't have the time to make a full test drive, but simply idling the engine in the driveway was much quieter.

The one drawback I've noticed is that the pop top doesn't sit as cleanly between the drip rails as it used to.  I may experiment with removing the covers on the the lower springs to see if the loss of noise reduction is made up for by the top sitting properly.

That's it for today.  Thanks for following along-

Tuesday, January 28, 2014

Front Bumper (part 1)

In my last post, I celebrated returning Flash to drive-able Hapy to daily-driver status.  With one extra car than I need, I immediately returned Hapy to the garage to start improving his looks.  Today, I'll cover what I'm getting into, but none of this changes my re-set expectations.  I'll have some or all of the front bumper back on the bus in the next 2 weeks or I'll drive him to the mountain without it.

Bigger Plan
front bumper in pieces
I have visions of a new (albeit amateur applied) paint job.  I thought about getting a nice one, but this isn't a car-show vehicle.  I take him camping... where branches scrape the sides... and state parks put short unexpected tree-colored posts around camping spots that dent bumpers.  I plan to take him into the snow where skis, poles, boots and boards will bang against the sides, doors and floor.  In the end, a nice paint job would just get destroyed.  So, I'm at the other end of the spectrum; the $50 paint job end.  Okay, not really $50, but pretty close.  I bought a can of white Rustoleum at Home Depot for $20 and I painted the poptop with it 2 years ago.  I intend to bring that bright white down to the belt line as well as paint the bumpers and camping outlets.  For the rest of the body, I'm looking at Neptune Blue (thanks Wolfsburg West for the color image) or something in a darker blue.  I haven't decided on whether I'll paint with colored Rustoleum or use a truck-bed paint without the non-slip agent.  The bed paint would withstand more punishment, but would probably look worse and would definitely cost more.

Front is First
rubber step: what lies beneath
I started down this path on Sunday after adjusting the shifter.  I set aside the afternoon, and it took me about 15 minutes.  So, I grabbed the plain wood panels I had cut for the rear driver's side window and quickly painted them with the white Rustoleum.  I'll get into that plan another day.  Regardless, I had now stepped into make-it-look-nice mode, which is nothing but trouble.  I found some sandpaper and cleaned up the windshield wiper arms.  "They need paint," I thought and then I looked down at the haggard front bumper.  Dented and scratched, it still had a political bumper sticker from the Bush-era.  So, I grabbed my ratchets and removed it.  4 13mm nuts hold cap-bolts to the bumper mounts.  4 15mm bolts hold the bumper mounts to the body.  On the ends, 2 pairs of 13mm bolts hold the steps to the body.  Last, 2 pairs of 13mm nuts mate the steps to the front bar.  The license plate is held on with square nuts backing bladed-screws.  Lastly, on the passenger side there is a tow hook bolted to the body with the same bolts as the bumper mount.

Banging Around
smashed tow hook
Once separated, I looked at the rubber bits.  They're all original, so 40 years old.  The steps were hiding 40 years of water seepage and the seam-rubber had hardened to stiff plastic.  Once the steel was exposed, I could start getting a sense for how much work there is.  There's a bunch.  I focused on the dents.  Even the small ones were easy to find: there was a corresponding rust mark on the inside of the bumper.  Someone with skills or access to good tools will probably cringe at this, but I grabbed by framing hammer and started backing out the dents.  With one hand behind the dent to feel for progress, I slowly moved the steel back to around where it was supposed to be.  I'm not going to make it sound like I got it all perfect, but in a couple of hours my bumper went from moonscape to dimpled.  I'm not done yet, though.  There's one more big dent and the lower lip near the driver's mount still needs wrangling.  Overall, though, it should look a lot better.  Next, I'll grind out the rust, prime and paint it.

Parting Thoughts
My tow-hook was completely flattened (see picture).  I have feelers out for a viable replacement, but I think its pretty common for them to get smashed.  When I removed the driver-side bumper bracket, I broke-off one of the bolts.  Overall, some part of every nut-washer-bolt combination was rusty.  In some cases, the entire bit was heavily rusted.  I chose to order a full bolt-set from Wolfsburg West for $21 as well as the new rubber steps and seam-seals.

In my last post, I said that I'd upload pictures of the parts we removed.  Well... Boo was very helpful and got rid of all those parts before I could photograph them.  So, you'll have to take my word for it that the coolant pump had all this sealant all over it and the rollers looked heavily worn.  That's it for today.  Thanks, as always, for following along.

Saturday, August 17, 2013

Rack 'em, Snow Bum

Sure, I know its August.  Yep, most folks are taking vacations or at the least thinking about the sweltering heat.  Even here in usually-temperate Oregon, the humidity has been over 65% (which is downright humid for these parts in August).  Sweaty.  It reminds me of my old lawn-mowing days in upstate New York with 80%+ humidity, 80*+ temps.  To combat the weight of the dog-day heat, I think cool thoughts.  T and I will talk about the drop into the bowl on the Thunder run at Timberline or Ski Bowl's Lower Surprise trail.  It's funny how talking about losing an edge and cartwheeling downhill in deep powder can cool you off.  I spent yesterday afternoon in my 90* garage building a ski/board rack for the bus.  I'll detail that today.  Stay cool my friends.  2013-2014 Fusion season passes go on sale in less than 3 weeks (Sept 3rd!).

Starting with What?
thinking about it
The bus was a 1972 Westy when I first bought it.  It ran a 1700CC air-cooled non-original engine with a Weber 32/36 Progressive carb, 009 dizzy and a worthless heat-exchanger exhaust (65HP, 18mpg @best).  It had the original 1972 Westvalia interior and canvas bellowed pop-top.  Today, it runs a 1.9L TDI from a 1998 New Beetle (90+HP, 30mpg).  Inside, it has the rock-n-roll bed, rear closet and refer cabinet from a '79 Westy plus a middle row seat from a Vanagon.  Up top, it has a 1972 Riviera (straight up) poptop and bed.  That may sound crowded inside, and it can be.  Since I've been working on the engine, I have had the rear closet (left side with a front-facing door and cubicles at the rear) out of the bus and sitting in the garage.  This leaves the engine electronics, which sit in the spare wheel well, exposed.  I have a solution for that, but that's for another day.  Anyway, I started looking at the 14" gap between the left side wall and the middle row / rear seat, thinking.... "couldn't we put our ski stuff there?"....

Think, Measure, Think
aligning the rails
I started simply by setting a shoe box on top of the refer cabinet and putting my snowboard on top.  Surely I could make something work there.  I grabbed a set of skis and held them above.  "Yep, I should be able to make 3 racks, each holding either 2 boards or 2 sets of ski's," I thought.  The racks need to be far enough apart so snowboard bindings fit between them, but close enough together so our youngest ski's fit.  That last part proved too much, but he needs new planks anyway, so it should all work out.  Holding the ski's in the air, I made pencil marks on the wall to give me a sense as to where the rails should sit.
I wanted the rack to have some give, so I chose to connect the rails to the side supports with hinges rather than angle braces.  On the other end, I thumb-screwed eye-hooks so we could pull one-to-all of the racks upwards, suspended from another eye-hook in the ceiling by a length of chain.  I haven't completed that part yet.  Last, the equipment needs to stay put.  To address that, I replaced one hinge wood-screw on each rail with a eye-hook bolt run through to the bottom.  On each rail, a 12" bungee is attached from hinge eye-hook to rail-end eye-hook.  I am waiting for the arrival of some bath-tub tread material that I will apply to the rails to make it complete.
parts list

Material List
2 6' lengths of 1x3 cedar for the side supports and rails.
3 packs of 2" utility hinges (2 in each pack)
3 packs of #8-32 x 1-5/8" eye-bolts (2 in each pack)
3 packs of #208 Screw Eyes (2 in each pack) - for rail ends
1 pack of #206 Screw Eyes (2 in pack) - for ceiling
1 8-pack of mini bungee's
some #10 washers

Cuts and Drills
I started with a clean-up cuts on the ends of the cedar.  Lumber yards don't make perfect square cuts, so this is always a good idea.  I cut 2 24" long pieces for the supports and 6 12" long pieces for the rails.  I set one of the supports against the sidewall to consider rail placement.  To make it simple, I pressed the support against the headliner support.  I transferred the pencil marks on the wall to the support. Recognizing that we need 9" between each rail (our tallest binding was 4-1/2"), I lined up the rails 9" apart, adjusting the pencil marks.  Once I had a plan, I set the support back against the wall, held the rails up to see how it would feel.  Then, I pre-drilled the holes for the hinges (making one on each rail large enough for the eye-bolt) and assembled.  I also pre-drilled holes at the top and bottom for wall-mounting.

Installation
testing installation
Once the rack was put together, I wanted to see it in-place.  I discovered that the bottom rail was so low that I had to remove the eye-bolt so the hinge would open enough for me to access the mounting holes.  Hmm.. opportunity for model improvement.. I pre-drilled one hole in the wall and mounted the rack with a 1" sheet metal screw.  This held the rack in place so I could pre-drill the remaining holes without the rack slipping.
A test installation wouldn't be complete without filling it with snow equipment.  I put 2 boards (mine and T's) on the bottom rack, 2 sets of ski's (K's and C's) and Boo's set on the top rack.  K2 gets new-to-us ski's this year, so I left his off.  With the bungee's, the equipment sits well.  I will apply bathtub treads to help hold things in place, but it looks like the passengers will be comfortable and safe, and the equipment a-fixed.

That's it for today.  I still have some clean-up to do, but in just 4 hours this went from concept to installed.  We may use the racks as garage wall-mounts too.  Each one attaches with 4 screws.  Neat.  More next time, and thanks for following along-