Showing posts with label biodiesel. Show all posts

Tuesday, December 10, 2019

TDI install retrospective: Air, Intercooler and Exhaust

Continuing the process of back-documenting what I did to put a TDI engine into an old (1972) air-cooled VW bus. Today I cover the air intake, the inter-cooler and the exhaust. Arguably, these could be addressed independently, but in my mind, it is all one system, with the turbo linking it all together.

Exhaust
I'm starting with the easiest part: the exhaust. When the TDI is installed longitudinally (versus transverse), the exhaust output of the turbo faces towards the front. This doesn't make it harder, it just means that the exhaust that was originally on the car won't work. I brought it with me to the muffler shop, though, so the shop could re-use parts of it. They used the mounting flange, but did their own thing from there. From the flange, it curves down and then rearward, leveling off at the oil pan lip at the bottom of the engine block. Here, the pipe runs straight back and curves 90* towards the driver side where it enters a not-terribly-interesting muffler. The muffler exits into a 90* bend out the rear. Not fancy, nor expensive. I had asked for something bigger, but this has served the need. Perhaps, if I do that Malone tune I've thought about, I'll upgrade the exhaust to a wider pipe.

Air Intake
air filter example
The fresh air intake is very simple as well. I re-used much of the TDI-donor plastic pipes, which route along the driver side of the engine. I attached a small silicone sleeve to the end, where the mass air flow (MAF) sensor housing attached to the plastic, and to that, I connected an extra MAF housing which I retrofitted with a vacuum nipple. This is the source of filtered air for the vacuum system. For the nipple, I simply cut up a small square of metal flashing and bore a hole through it large enough to press a vacuum nipple. I sealed around the nipple with RTV, cut some gasket material to go between the flashing and the housing and threaded it into the spot where the MAF sensor bolts in. Attached to that MAF housing is a large washable B-and-M air filter. I have cleaned the filter at least annually, after each trip into the Central Oregon desert. I have thought of adding more pipe and routing the filter up into one of the high louvered vents. I considered it, but felt that I would need to block off the vent from the engine compartment to really get "cold" air. I'm not sure there is considerable ROI for that effort, but I encourage you to think about it. I still might.

Inter-cooler
The inter-cooler is probably the most complicated part of this effort. Still, it isn't that complicated. First, the inter-cooler on the TDI is an air-to-air, so it needs to be in the air flow to really reduce the temperature of the compressed air. The air flow around a bus is not well designed for passive cooling like this, so I added a motorcycle radiator fan to the rear side of the inter-cooler. This fan is controlled by the same switch as the radiator, pulling air through the inter-cooler. At this point, this fan is the only truly non-VW part I used for this project. Sure, there are aftermarket things, but they are all designed for a VW. This fan isn't, but it was the only thing like it for this conversion... until 2 paragraphs down.

With the reuse of as much of the plastic plumbing as I could, the inter-cooler ended up in a not-so-great location as well. In my case, it hangs from the engine support bar, so the heat radiating from the turbo is kind of heating the air that enters it. I have thought about how to resolve this, but nothing elegant has come to mind yet. Regardless, the length of the run of pipe from the turbo to the inter-cooler inlet is less than 5 inches so there is little opportunity for boost loss. From the inter-cooler outlet, the charged air uses a short run of silicone hose before returning to the original donor plastic pipe up to the intake. I omitted the EGR, so between the intake and the inter-cooler there is the shiny race pipe. This post has some deeper detail.

In order for this layout to work, I needed to replace the inter-cooler from the stock NewBeetle inter-cooler. The stock has the inlet and outlet on opposite sides (one on the top, one on the bottom). This would have forced the inter-cooler to either sit much higher in the engine bay, or have one of the charged pipes hanging way down low. Or, the pipe routing would have required more plumbing. I didn't like any of these options, so I purchased a Saab Blackstone inter-cooler where the inlet and outlet were both on top. This is a fairly common choice for Vanagon conversions which I learned about on the TDIClub forums. Once in-hand, I had to retrofit the inter-cooler with a boost pressure sensor. That meant cutting into it. Not my favorite thing to do to an otherwise functioning thing, but the ECU needs a boost reading. This was simply a case of tracing the lines and carefully cutting them with the Dremel. Once set, I drilled 2 holes for the mounting screws and it's set.

One thing I learned along the way was to make doubly sure that the inter-cooler is being held up entirely by something other than the charged-air hoses. Otherwise, the hoses will eventually work themselves free of the inter-cooler.

appendix:
Prior related posts:
Preparation
Fuel System
Physical Mounting
Vacuum System

Next related posts:
Primary Electrical
Cooling
Secondary Electrical
ECU, dashpod and Sensors

Tuesday, November 26, 2019

TDI install retrospective: Vacuum System

Continuing the process of back-documenting what I did to put a TDI engine into an old (1972) air-cooled VW bus. Today's post is all about the vacuum system. It is super short, because there really wasn't much to it. Before I start, Hapy ThanksGiving and White Friday to my US readers.

Bus Needs
The TDI has a few things that require vacuum, and the bus has one: the brake booster. The original engine supplied vacuum from the manifold through a pipe that runs along the driver side to the brake booster underneath and behind the driver seat (under the bus). Fortunately, 30 years of engineering marvels later, the brake booster in the modern car is supported by a very similar vacuum. It is so similar, in fact, I just needed to plumb the brake booster outlet on the vacuum pump to that pipe and that need was solved. Power brakes? Check.

TDI Needs
from TDIClub
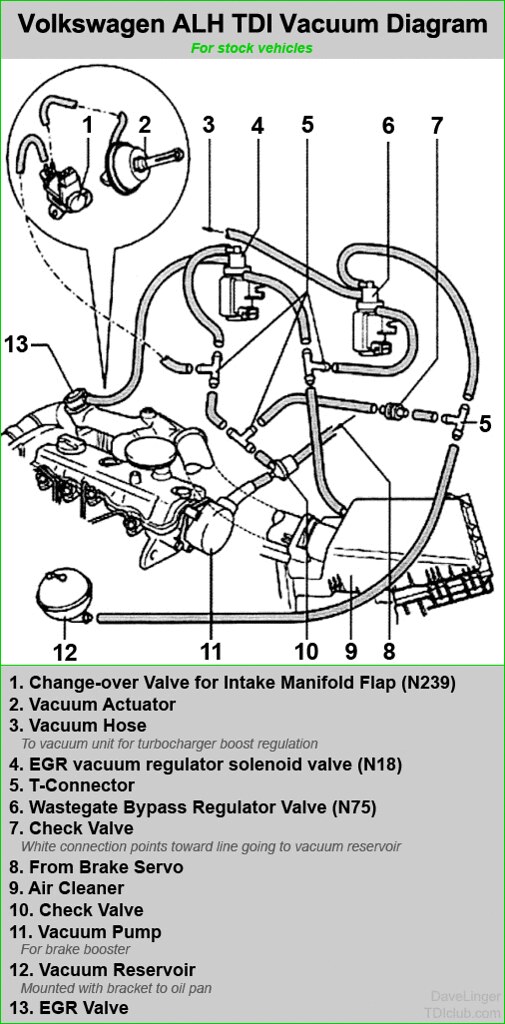
The TDI engine has it's own needs. The turbo needs a signal to dump boost. That actuator is vacuum powered. The EGR is vacuum signaled as well. Each of these have a different valve triggered by a signal from the computer (the N75 and N18 respectively). Since I pulled my EGR equipment, I simply blocked the signal line leaving the N18 and left everything else in tact. I mounted the control valves to the floor support that runs just to the inside of the spare tire well. The system needs the vacuum ball, the pump, of course, a bunch of T fittings and a source of clean air. I source the clean air from the main air intake. I will get to the air system later, but simply put, I took an old air-flow metering (MAF) housing and replaced the sensor with a simple vacuum nipple. This air flow metering housing was the same size as the rest of the fresh air intake, so it was just one of the components that were strung together after the air filter.

I spent a great deal of time drawing and diagramming before I did this. Ultimately, that was unnecessary; I was working from fear. So many systems work the other way: air pressure, water pressure.. the direction of the media is the same as the force, so when you look at a vacuum diagram, its all upside down. Air goes one way, the force of the air used to open and close things goes the opposite direction. Basic vacuum versus pressure, like the switch on your MityVac. It is the media (air) leaving that is the force, not it arriving.

With that perspective, I could made a plan. Ultimately, all I was doing was changing the lengths of the hoses, so this turned out to be pretty easy. I set the pieces out and started replacing lines with new vacuum hose. In many cases, I cut a different length than what was originally in-place because my placement required it. I retained all pieces of the system with the sole exception of the EGR (which I may re-introduce). The hose that would have gone to the EGR was simply terminated with a cap.

Prior related posts:
Preparation
Fuel System
Physical Mounting

Next related posts:
Air, Intercooler and Exhaust
Primary Electrical
Cooling
Secondary Electrical
ECU, dashpod and Sensors

Tuesday, October 29, 2019

TDI install retrospective: Fuel System

Continuing the process of back-documenting what I did to put a TDI engine into an old (1972) air-cooled VW bus. Today's post is all about the fuel system. There was very little that needed to be changed with the TDI. Most of the work was on the bus side.

Tank Preparation
Because the coolant outlet flange and the vacuum pump on the TDI hang over the top of the transmission bell-housing, the TDI cannot be installed without modifying the fuel tank. OR, you will need to change how the coolant flows (super hard to get right) and the source of vacuum. For vacuum, there are belt-driven systems and electric pumps, but the coolant exits the head right there, so there are only so many ways around that. I looked into a custom flange that would route the coolant elsewhere, and even cut up a plastic one in an attempt to make one. I was, and remain concerned about fluid dynamics and whether I would create a situation where the coolant could not escape the engine at the right speed, causing overheating. So, I cut the tank instead. Well, I had someone cut and weld it. I didn't want to blow up.

The cut is 8-sided: straight across (left-to-right) on the top and bottom, straight up-down on either side and then 4 diagonals to join the other cuts. The measurements are at the bottom of the post. Once cut, a new piece of thin steel was welded in to close it off, leaving a depression into which the vacuum pump and outlet flange could nestle. I set the depression deep enough so that my hand could reach between the coolant flange and the fuel tank, so maintenance on the flange or the coolant sensor could take place without dropping the engine. This proved very fortuitous later. Since the old fill-vent is part of the sacrificed part of the tank, be sure to have a new one added.

After a failed attempt at lining the tank myself, I had the tank stripped, steamed and lined by Mac's Radiator. I think it cost me $100US, and it was returned painted with primer. I shot it with "Tank Tone" silver.

After the fuel tank is cut, welded, cleaned, painted and lined, it can be re-installed. The fuel tank install is fairly straightforward. Put the filler hose on the tank before you try to put it in the bus, but omit the clamp. Once the tank is settled in place, strap it down and then connect the fuel level sender and connect the other end of the filler hose. Clamp both ends.

Vent and Fuel Lines
I used Viton fuel lines from the get-go so I could handle BioDiesel. I encourage you to consider the same. The early bus was not shipped with fuel injection, so there was no facility for a return line. I didn't get one installed when I had the tank cut, mostly because I wasn't 100% sure where to put it. I'm still not 100% sure where I'd want it. Instead, I used the passenger side tank vent line for returning unused fuel from the injection pump. If you are similarly converting a non-fuel-injected bus, only re-connect the left side tank vent to the old vent system.

To the bottom of the tank, a nipple is threaded into the lowest point on the tank. The original nipple is quite small. I upgraded to a wider metal pipe insert so it did not limit the fuel flow. To this, I connected a fuel line and routed it along the original fuel line path back to the engine compartment. I was unable to find any pictures of the larger metal pipe; my apologies.

The low pressure lines between the injectors should be considered. If you don't know how old they are, replace them now. I used Viton for all but the stubby on the end which for some reason wasn't available in Viton. Not that it matters, it basically acts like a plug anyway.

Filtration
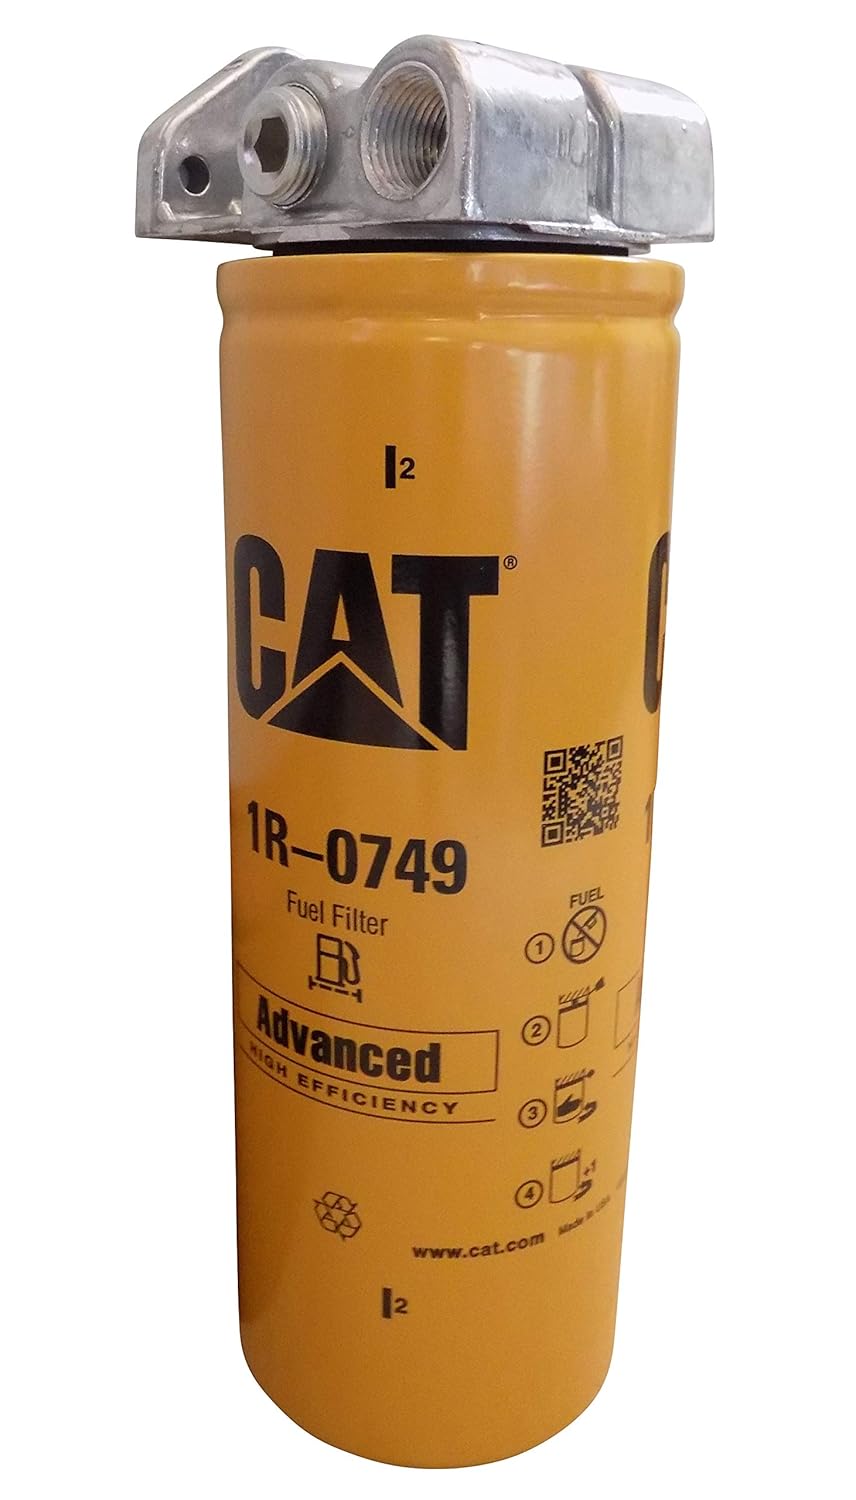
When I first did the conversion, I connected a clear plastic filter to the hose leading from the tank, and routed the output from the filter to the original fuel filter. Since then, I have replaced the little clear plastic filter with one that is diesel fuel rated and replaced the original TDI filter with a Caterpillar upgrade (See Green Diesel isn't BioDiesel). The original TDI routes unspent fuel back through the filter, increasing the fuel temperature along the way. Depending on your intended use, this could be a good thing. I have routed the unspent fuel directly back to the tank instead, in hopes of keeping the engine and fuel-related parts that little bit cooler.

That's it for the fuel system. It's actually very simple: tank to fuel line to cheap plastic filter to fuel line to big filter to injection pump. The biggest deal is/was removing, cutting and re-installing the tank. It is worth noting that after the cutout, the tank still holds 15 US gallons of fuel. At 30+ miles to the gallon, that is an effective range of 450+ miles per tank.

Tank cutout measurements:
across the top (and bottom) : 9"
top-to-bottom on the left and right sides: 7"
distance from right edge to right-side vertical cut:12-1/2"

Prior related post: Preparation

Next related posts:
Physical Mounting
Vacuum System
Air, Intercooler and Exhaust
Primary Electrical
Cooling
Secondary Electrical
ECU, dashpod and Sensors

Tuesday, October 22, 2019

TDI install retrospective: Preparation

For those who have read this blog over the years, you will recall that I intended to put together posts about how I did the install of a TDI engine into the air-cooled bus. Now, 8+ years later, just about all of the quirks have been solved. So, I think I can actually start producing those posts.

TDI
So, you want to put a turbo-diesel into your bus. I think that's a great idea... so much so, that I did it. I enjoy 30+ miles-per-gallon, power to spare and I could burn 100% domestically created bio-diesel. So, whether you're looking for more power, better mileage, safety in case of an accident or for political / environmental reasons, putting a TDI into your bus is a super idea that will deliver on those goals. Before you break out your angle grinder and sell your old engine, you need to plan a little bit.

Cost and Payback Realities
First, some sobriety. This post contains the lion's share of the costs. They are big and almost all of them are up-front. $3500 for the engine, another $2100 for the transaxle, $400 for the adapter plate and clutch/pressure plate, and another few hundred for other bits. For most of us, this represents a significant outlay (lets say $7kUS). For some perspective, I ran some calculations in a spreadsheet. If we assume that the old engine got 14mpg and the new one gets 32mpg, how many miles would it take for this job to pay for itself? Gas prices are always moving around and when I started this project they were higher than they are now, but let's assume they are $3.30US for a US gallon. B20 has been steady at $2.99US per US gallon for a few years. So, when we smash all that together it will take 50k miles before this job pays for itself. That's a lot of festivals. When I first ran my justification, I was still making a car payment. So, I factored selling off that car into my logic, and that brought the payback down to about 20k miles, which I have not yet passed, so I guess I am still paying this project off. I liek to think that this project keeps me out of the bars, so I guess I could factor that in too. Your project; your choices.

Guideposts
When I did this conversion there were examples of Vanagon's getting swapped out, but there were no examples of an air-cooled type2 microbus getting a TDI. As a result, I did this with advice and wrenching from some online Vanagon converts and local friends, but without the benefit of someone else completing the job. I do NOT believe mine is the only operating example anymore. I'm not arrogant enough to believe that my efforts in any way influenced those other projects. This is just how I did it. Your mileage, as they say, will vary. I encourage you to look at the TDIClub, and TheSamba. Those were my 2 most fruitful forums. While they have their own personalities, they are both significantly rich in content.

Sourcing
ALH TDI on a home-made scoot
Still up for it? Okay! The first step in your planning is the acquisition of your new engine and the Bentley shop manual that corresponds to it. I went with an early-model ALH out of a 1998 VW Beetle. Any of the early ALH years would work, though the accelerator pedal on anything after the 1998 New Beetle is better than the 1998. Once you get past 2000, though, you will start encountering the interlock/immobilizer. This can be routed around with a Malone tune (See here). Depending on your goals, you may have intended on a tune anyway. I have definitely thought about it and now that the system operates as intended, I may treat Hapy to a tune one of these days. Once you get into more recent years (after 2004), the ability to use bio-diesel may become constrained. I have heard that the Pumpe Duse (PD) models are less tolerant of fuel anomalies, making B100 not-recommended for those engines. I could be mistaken, so I encourage you do your own research if you are going to use a Pumpe Duse or later model. When I did this, a 1998 engine was less than 10 years old and the PD was the "new fangled" one.

FastForward used to have a donor parts list on their website, but they don't anymore. So here is a list of things that I know I needed from the donor car. You need the...
 - fully dressed, as in all parts attached, engine with the overflow bottle (tho replacements are not too expensive) and all of the hoses, belts, etc
 - complete vacuum system, with the valves,vacuum lines and vacuum ball
 - fuel filter and fuel filter mount
 - passenger-side engine mount (I didn't need the dogbone mount, but you might)
 - dashpod and complete accelerator pedal with rheostat (cut off the pigtail leaving yourself a few inches of wire, you'll need that to wire it back up later. label well, it might be a while before you put this back together again)
 - in-car fuse-box and battery-top fuse-box
 - computer with both plugs. The smaller plug (which goes to engine management) is best uncut. The larger plug can be cut, but you must be very careful where. Any accidentally cut wire (like to the dashpod, eg) will create headaches and repairs later
 - starter. grab the pigtail that's plugged into it too
 - intercooler and all related pipes

There are pieces you can choose to include on top of this list. For example, if you are going to try to do cruise control, you will need the control arm from the cockpit, the speed sensor from the wheel and the brake sensor from the brake pedal. If you intend to use the dashpod for all gauges, you will need the speed sensor regardless. And, eventually, you will need to plan out how to get the right resistance range from your fuel level sender. I didn't do this, but I have thought about it. Do you want to try to get air conditioning running? I didn't but, if you do, you'll need that complete system (compressor/pump, hoses, the condenser on the radiator, etc) too.

I found a donor with a little over 50k miles on it with all of those accessories plus some stuff I didn't need, shipped from GA for around $3500. The price has probably come way down, but the miles have probably gone way up. You may need to rebuild or replace some expensive systems (turbo, head) so plan accordingly. If your donor engine is coming from a wrecked car, you will probably need a $80US Van Gogh bracket (available from DieselGeek) since most of the time this point in the engine block is weakened or broken in a front-end collision. You will need a $70US starter adapter so the TDI starter can fit into your bellhousing. You can find them here. I suggest getting the OEM plug unless it is in the bundle of wires from your donor as I suggested above.

Engine Preparation
Once you have the engine on hand, I strongly suggest you go through it. If you aren't an expert, employ one. I had my friend Justin, the local TDI guru, go through it and then he did a timing belt job on it. By go through it, I mean really go through it. Pull the turbo and check for play. Pull a valve looking for burn marks. Shine a light into a cylinder (or all). Pull the oil pan looking for metal bits. Unless you knew the engine before you got it. Hours spent now will save days (and possibly an engine replacement) later.

I removed the exhaust gas re-circulation (EGR) stuff, and installed a "race" pipe. These currently run for around $150US, though I'm pretty sure I paid much less than that. You can find them here.  Making changes like this are easier when the engine is on the ground versus in the bus. Depending upon your application, and emission needs, you may not be able to meet your target without the EGR. I know that with B20 my bus produces far less pollution than it did with the old engine, but threads like this one have me considering putting it back in. Since this uses coolant to reduce the temperature of the exhaust gasses re-entering your engine (or uses exhaust to heat your coolant, depending on your perspective), this could be an issue if you are concerned about keeping the engine/coolant temperatures down. Your experience may vary; the only wrong choice is the uninformed one.

At this point, I would encourage contacting Kennedy Engineering (KEP) for an adapter plate and stage 1 clutch. When I bought them, the conversion kit (included flywheel) was $400US. It could very well have doubled by now, but the Van Gogh and starter adapter are about what I paid, so who knows? I am unable to see prices on the KEP website. If you are going to go big, with new nozzles and a bigger turbo, you may want to step up to the stage 2 clutch. The clutch will be heavier than the gasser clutch regardless, so consider your left leg and the stress on your clutch cable when you choose. I have no regrets with my selection (Stage 1).

Transaxle
When I first did my conversion, I didn't have any extra scratch around to think about the transaxle. I used the stock one. The gearing, especially at higher desired speeds, is way off. After I had the bus moving for a couple of years, and finacially recovered a little bit from my divorce, I had a transaxle built by AA Transaxle in Seattle. Darryl built me a trasnaxle based on the "CM" code from a 1975 bus with a taller 4.86 ring/pinion (like the Vanagon’s have) that is good for the Diesels with taller 3rd and 4ths. Into that case, we installed 1.14 and .73 gears for 3rd and 4th respectively. At the time, the prices were $500US for the core plus $320US per gear set plus $895US for the full rebuild for a total of around $2100 including shipping.

Bus Preparation
hatch. note notch cut out of support
With a known-viable engine on your shop floor (or sitting on a cart / tire / stand / scoot / whatever), you're ready to go after the recipient. Remove the old engine and transmission as a unit. This is documented in the Bentley and the Idiot's Guide in far better detail than I could provide. I recall the significance of draining the gasoline out of the tank when I hit this point, knowing that it was the last time gasoline would be in there. You may have a similar moment of realization. Whatever your motivation, this is a special moment. Separate the engine and transmission. Remove the battery and the starter. These will join the engine in the will-sell-later pile. You won't need the voltage regulator, so that can also go into that pile. But, you will want to keep track of (read: label well) the wire that feeds power to the reverse switch as well as the power source that leads to the front of the bus from the starter. I suggest leaving the starter trigger wire with the plug on it so you can easily identify it later. Or, cut it off and label the remaining wire well.

With the engine and transmission set aside, remove the fuel tank (See Pulling the Fuel Tank). If you retain the stock TDI location for the vacuum pump and don't modify the outlet flange (I recommend both after pursuing alternative solutions), you will need to modify the fuel tank (See Fuel Tank Solved). Since you are shifting from gasoline to diesel, you will at the very least want to have your tank cleaned and lined. You may not have a firewall anymore, so you may want to consider cleaning and painting the fuel tank bay and putting some paint on the tank itself.

When I did this conversion, I cut a large access hatch from above the engine bay. You don't have to do that, but I think you'll find maintaining the engine, even checking the oil and coolant levels far easier. Whether you do or don't, you will need to cut out a short section (less than a foot) of the support that runs across the underside of that back deck. Otherwise, the intake manifold will hit it once you have the engine installed. You can see the section cut out in the picture above. I intended to stiffen it, but never got to it. I have loaded tons of stuff onto the back deck and have never stressed this "lid" to the point where I thought about it. Your bus; your choice.

TDI meet Transaxle
adapter on with studs still in
Once the TDI has the flywheel off, the adapter can be attached and the transmission connected. The adapter can only go on one way, and it goes on first. Then, the pilot bearing goes into the flywheel and it is attached to the block. Add the pressure plate and clutch. Remove all of the pins and studs from the adapter plate. Now, mate the transmission, twisting it so the output shaft slides in and then rotate the transmission to align to the holes. Then, set the pins and studs through. I tried lots of other ways, but this was the only consistent way, and I have done this multiple times. This way takes a few minutes. Leave the studs in, and you'll be at it all day.

I'll stop here for today.

Next, I'll go through the various systems and how they were solved. As the posts are produced and released, I'll return to this post and hyper-link them below, and cross-reference as best I can.

Fuel System
Physical Mounting
Vacuum System
Air, Inter-cooler and Exhaust
Primary Electrical
Cooling
Secondary Electrical
ECU, dashpod and Sensors

Tuesday, September 10, 2019

Green Diesel isn't BioDiesel

In my last post, about getting home from the Newberry Event (See Newberry 2019 - Getting Home), I described my stop for fuel and that Hapy started acting funny within 20 minutes of that fill up. Today's post covers my investigation into the acting funny. I now had 4 codes getting thrown by the computer. I was getting just one code before (P0121), so with the extra codes, I feared I had bigger problems.
Before I start, today is C's 18th birthday.... C, it has been an honor being part of your life, and I greatly look forward to our years together as our relationship shifts, grows and deepens; you truly are an amazing person.

For posterity, the codes were:
p0121 - accelerator pedal position sensor getting funny readings. Causing a version of limp mode where we lock in at 1200 rpms
p1562 - injector pump quantity adjuster. Could be caused by the bad fuel, could be my timing is suddenly off
p1550 - discharge pressure is off. This is usually caused by a leak in the charged air system or in the vacuum lines.
p1403 - EGR malfunction. My vacuum for the EGR is closed off, since I removed the EGR for a straight pipe.
Remember, this is a '72 bus so emission control devices are not required. Before my fellow tree-huggers get all spun up, recognize that I run B20 so mathematically my emissions without the EGR are cleaner now than this bus was with the original gasoline engine. So... back off! Still, could be a loose vacuum hose.

Tank Blockage
I figured I would approach the fuel system from front to back, meaning from the supply hose through to the injection pump. So, my first stop was the supply line coming out of the tank. Remember, back in 2011 on my drive home from Further, I was stopped by a blockage in my fuel tank (See Further - the Return), so I'm fairly familiar with this experience.. First, I put vice grips on the fuel lines to prevent fuel from going everywhere. Then, I disconnected the line from the clear filter and pointed the line at a fuel can. I removed the vice-grip from that line and fuel flowed easily out of the tank into the can. Gravity-feed tank checks out.

Check the Filters
While I was re-connecting things, I took a look at the clear filter. It was still clear-ish. Well, there weren't any cloggy-bits in it. So, with the fuel lines reconnected, I removed the feed line from the injection pump, leading from the "original" fuel filter. With the MityVac, I checked the fuel flow. Again, the fuel came out with very little vacuum applied. So, we have fuel making it to the injector pump easily. Hmm... So if the fuel filters are clear, and everything was running great up until it suddenly wasn't, I had to conclude that the fuel I got in Oakridge was the problem.

Drain the Tank
I raised the rear end of the bus enough to fit a 5 gallon bucket in front of the right rear axle (and under the fuel lines). I disconnected the supply fuel line at the "original" fuel filter, and routed the fuel into the bucket. While the bucket slowly filled, I removed the "original" fuel filter and drained it into the bucket as well. Once full, I clamped off the line, and swapped a second bucket underneath. I filled that bucket as the tank ran dry. I moved the buckets into the sun, and you could see the first bucket had cloudy green fuel in it. The second bucket was much more clear and less green. I interpreted this as the bad fuel settled to the bottom of the tank, leaving the older-to-me fuel floating on top.

So, what's this green fuel? I think it took this fuel those 20 minutes to settle to the bottom of the tank and then feed into the injection pump. I ran on that fuel for the remaining 150+/- miles home. By why green? Well, an underground tank can get water in it, either through condensation or seepage. If this happens for a long enough period of time, algae, fungus or other microbes can form. This usually happens at fuel stations with little traffic. I had ruled this out initially because this was a busy fueling station and there was someone getting diesel right next to me. Clearly, that doesn't matter. Whether this fuel simply had lots of water in it, causing the cloudy, or also had other matter in it, causing the color change, it had to go. The 2 buckets have been securely lid'd and will be taken to the toxic's section at the waste transfer station. I'm sorry I don't have a picture of the green fuel; I put the tamper-proof lids on before I thought to take a picture.

Current ongoing cost: $28 for the full-up. The toxic dump will be another $27. Replacing the fuel will be another $30.

New Filtering
Since the "original" fuel filter is quite literally the original fuel filter that delivered with this engine over 10 years ago, this filter was long overdue for replacement. Yeah, bad owner. I had a pre-filter on there to help it last longer, but still... So, I looked around for a replacement, and noticed that all of the replacements needed one of those plastic thermotatic "tees". These things will re-route unused fuel from the injector pump back into the tank until the fuel reached 85* and then it sends it back to the fuel tank. My "original" always routed it back into the filter. This is to help the engine warm up in cold weather, and since I don't drive Hapy in cold weather, I decided I could look at the thermostatic "tee" style. For the filter plus the tee, it was around $70US. Or, I could upgrade the whole thing.

Upgrade? The standard filter filters down to 10-15 microns. That's great for most applications. If you drive in lots of dust (read: central Oregon where 4Peaks is), that may not keep everything out. For bulldozers and large construction diesels, they have filters that go down to 2 microns. Something that fine would protect the injectors from getting destroyed by particles in the fuel. Particles of, oh I don't know... algae or water or fungus? Anyway, I looked at a combination filter housing and filter, and I was able to upgrade for $75US, so $5US more. And, it's all made in the US. Of course, it's mustard yellow has this big CAT symbol on it, but it's hidden so I don't really care. For those shopping, the extra $5 was for the little barb/nipples that the hose fits onto. They are not included in the $70 kit.

The housing has dual source options, and a feed/return configuration. I went with the most simple: one feed, no return, and routed the injection pump overflow straight back to the tank. If the day comes that we want to drive Hapy in cold enough conditions where having the fuel get warmed up is necessary, I'll deal with that then. We will need to solve for his got-no-cabin-heat challenge before that.

Resolved
While I was in the engine bay, I noticed that the straight pipe which replaced the EGR had an issue. The pipe came with a nipple for attaching a gauge, and the little rubber stopper had split. This was letting out charged air, a potential source of the p1550. I replaced that stopper. After a few hundred miles of driving since, the code has not returned.

I expect the p1403 may reappear. I thought one of the vacuum lines around the "N18" vacuum valve / box came loose, but I didn't notice anything around the vacuum valves. I removed and re-connected the vacuum lines just to be safe. The p1403 code has not returned.

Now, with everything hooked back up, I cleared the codes and started up the engine. After some rough running, it settled down within a couple of minutes and sat idling at 900rpm. After a few minutes I got the check engine flash, but there is only one code (the one I had before): p0121 - the persistent accelerator pedal issue. I think it is a wiring issue where one of my splices is becoming inconsistent. I'll deal with that another time. The p1562 code has not returned.

So, that's it for the fuel system / bad fuel issue. Total cost: $165, but one of those fills should be considered part of just driving, so it's really $135. Since bad diesel can destroy injectors and injector pumps, the $135 is nothing compared to what it could have been. For example, a single injector could cost that much and a new pump could be up to 10 times that much. Of course, if the only damage was the injector nozzles, I could use this as an excuse to upgrade to bigger tips (like these) for around $180US. I'll be watching the engine behavior, regardless. There still could be an issue lurking.

Thanks again for following along-

Saturday, November 1, 2014

300

Somehow, I've managed to work my way to 300 posts over the last 7 years.  Rather than a real-content post today, I'm going to reflect back kind of like when TV shows do a "best of" episode.  Frankly, I hate it when TV shows do that, and promptly switch the channel when they do, so my following that model is actually kinda funny.

0 - 100: The Start of Many Things
Ranging from January of 2007 to September of 2009, my first 100 posts ran the gamut of topics.  That's probably true of any cross-section.  In looking at what was happening with the bus, the blog starts with him running the original type4 engine, but I soon started the TDI work.  Early posts ranting on some old air-cooled vehicle abuses like removing the cooling system shifted to engine options and then to solving the install of a water-cooled plant into an air-cooled body.  Deciding on the engine was recorded on April 13th, 2007 (see Engine Decided) and a year later, the engine was still sitting on my garage floor, a failed first attempt on both the fuel tank relining and the engine mount had slowed me.  That winter was spent getting the engine and transaxle to mate for the first time (see first and second attempts).  I broke an adapter plate, and my spirit over that winter.  It took going on the road to see the Dead and starting the separation from my ex-wife to get the project going again in early 2009.  The first 100 posts ended with the new rear engine mount being fabricated, the starter adapter solved (see starter adapter corrected...), the vacuum completed (see what's that soft sucking sound) and the fuel fill set up.

101-200: Transitions
Starting in September of 2009, this block of 100 posts carried through late July of 2011.  I started this period sleeping in a spare room at my now ex-wife's house and ended this period completing a divorce and living in a townhouse apartment.  Still, the middle section of 100 posts started with the same urgency which the first 100 had at the end, in terms of bus work.  The fall of 2009 included the fuel tank (see Fuel Tank Solved) shape / vacuum pump issue, buttoning up the turbo, vacuum, starter, CV joints and moving the bus off the mud and onto concrete for winter work.  Over the Winter, the radiator/cooling was addressed (see Radiator test-fitted, shrouded and Installed) and the bus project really started to roll.  The hatch was finished, intake routed, electrical, clearing codes, finishing the coolant routing, primary electrical, etc.  By December of 2010, my ex- and I had decided to call it quits.  I spent January through March staying on my parent's couch trying to get the bus into a will-travel-under-own-power state before the divorce finalized.  I was able to get him running-ish, and had a muffler installed by Meineke (see Exhausted) during that working-remotely period.  By April, I had a townhouse-style apartment with a dedicated garage space and focused a considerable amount of free time into the bus' interior.  I swapped out the fridge for storage, applied more sound killer, installed an accessory battery and fuseblock (see fused) and ended the late July with installing a Riviera pop-top in place of the original ripped-up Westy top.

201 - 300: Moving
Picking up in late July of 2011, the final 300 posts carry us to today (early November 2014).  I started this period as a divorced father of 2 boys and an old bus, and I now conclude this period remarried father of 4 boys and an old bus.  We moved out of the townhouse apartment when they raised my rent past the point I could afford, and into Boo's condo.  From the condo, we moved into the house we've been in for 18 months now.  Frequency of posts dropped during that housing change and life settled into a very different pattern of family play versus self mechanic'ing.  This period, though, marks the time when the bus went from stationary project to daily driver.  In August, we camped in him for the first time in years (see One Small Step for Van).  Later that Fall, we hit the road to Eugene for Furthur but needed a tow home.  Like I've said before, the journey is the destination, and we had to pull the tank to get re-lined.

I returned the original engine harness to service, and struggled with coolant leaks while trying to keep him on the road.  I discovered a new love of snowboarding, and bonded with a new family at Mt. Hood.  The bus underwent more transformations as well.  He has a middle row bench seat (see Vanagon Seat Install, no longer has a grossly underused kitchenette (see Enter Summer, exist posting) and has a rebuilt jalousie window (see parts one and two).  I dropped his engine 3 times in this stretch of posts, twice having to separate the engine and transaxle.  Both of his bumpers have been hammered straight-ish and painted to an almost good-looking state (see front 1,2,3,4 and rear) and he now sports door cards as well as cards for most of the interior.  The ceiling doesn't sag anymore.  This past Summer, we had 3 flawless road trips to Nye Beack on the Oregon coast, Horning's Hideout and to the Black Sheep Family Reunion.

So, What's Next?
I guess that's always the question when you don't draw a map ahead of time.  I honestly don't know.  Frankly, I couldn't have drawn a map to this point and I wouldn't have ended up here if I'd tried to.  I look forward to many sights like the one below, simply driving the posted speed and enjoying the sights out the front windscreen.  As before and always, thanks for following along.


Thursday, May 8, 2014

Hanging Cards

Today, I'll cover getting the door cards hung.  They still need vinyl or carpet, but they are now hanging on the doors.

Clarity, maybe
I re-read some of the posts about the door cards.  While my detail was accurate, I don't think the high-level explanations were very helpful.  So, first, I want to fix that.  I bought a bag of 100 rubber door clip-seals and clips from BusDepot so I can hang the door cards properly.  Like it says on their website, the bus-specific seals and clips aren't available any more, so the common-use ones for all the other same-era VW's are all they sell.  These are a little larger, so the holes in the door need to be opened up a little bit with a drill.
vapor sealed

I used kitchen garbage bags as a vapor barrier between the door card and the steel door.  To attach the vapor barrier, I used 3M's version of BlueTak (available at Office Depot) spread in 1/4" wide strip around the edge.  A circle of sticky stuff was run around every door-clip mounting hole as well as the pull handle mount holes, the window winder and the latch pull.  After the vapor barrier was in place, I pressed the door seals (cone-shaped rubber bits) through the vapor barrier into the holes.  The barrier, because it was a kitchen trash bag, stretched, but didn't break.

The door cards were cut with a Dremel from 1/8" MDF I bought at Home Depot.  I drew the shape of the door card using the old worn-out and beat up card I had lying around.  I traced the holes for the window winder, door pull and latch.  Last, I drilled out the holes for the door card clips by driving a 3/8" drill bit through the original card and into the MDF.

Clipping Cards
MDF card clipped in
Once the cards were cut, the vapor barrier set and the seals inserted, it was time to get the card installed with the clips, starting with the passenger door.  Based on orientations I'd seen on the internet, the clips should have slid into the MDF so the clip was on the point closest to the edge.  This was mostly true, but each clip setting required some tweaking to get it perfect.  I mirrored the clip placement from the passenger door onto the driver door card, and it required tweaking anyway.  Once on the door, I attempted to get the door pulls, etc installed, but the holes didn't align perfectly anymore.  They are close, and with a little shifting, they fit.  I recognize, however, that the pulls and such won't fit so perfectly once a material is on top of the MDF, so the holes will need to be increased a little bit.  More fun for later.

Anyway, the cards are now in, and I found and installed the old foot-kicks against the front of the cab.  The front area looks a lot better.  The old kicks are in pretty horrible shape, though, so I'll probably get a new set of all-plastic from BusDepot.  I may cut new ones by tracing the old ones, but I'll need to figure out how to keep them from getting wet.
9th & Salmon, Portland

Its been an interesting few weeks.  NHL playoffs, the Premier League is winding down and T worked through getting his driver's license.  Last, T had prom this past Saturday.  Through a fluke of events, I met his group of friends between the limo and the restaurant.  The blurry picture on the right, here, is of him and his date as they enter the restaurant... as viewed through my rain-drenched windscreen.  They are the blurry black spots in the center of the picture.  I posted it in the spirit of the name of the blog, its a view from a bus-driver sitting in a VW Jetta :)

Thanks for following along.

Sunday, October 13, 2013

Flash Lives!

Since the trip to WA, the Jetta (Flash) has sat where the tow truck dropped him.  Today's post is about my successful efforts to get him operational.  I did want to update on the MPG we got on the Eugene run: a few tenths over 30 MPG burning around 7.5 gallons door to door.  We probably could have done better had we not been cruising over 65mph on the way down.  Still, that's almost twice the miles per gallon (used to get ~16), a more responsive throttle, more power and, of course, non-explosive made-in-the-US bio-fuel.  Sweet.
Now, about that Jetta with the electrical failure...

Get Back to Base-line
Before you can diagnose anything electrical, the battery needs to be at operating voltage first.  I've gotten so much mileage out of my battery charger.  It is the one non-tool appliance I simply couldn't be without.  After charging overnight, and holding charge for a few days, I felt confident the battery was not the problem.  Moving on to the next likely suspect...

Verify Wires
Old Alt on left. New on Right
So, if you think your Alternator is bad, its wise to first make sure that its not simply a case of the alternator not getting the message to generate power.  On the original engine in the bus, an external voltage regulator would figure this out.  By simple comparing the voltage on the battery against a target 12V, the voltage regulator tells the alternator to produce juice until the battery is at 12V, and then it dumps the power.  So simple.  In the modern engine, determining whether power is needed doesn't fall on the voltage regulator.  There's a computer involved now, so the new alternators have an additional plug on the back.  Tapped into that plug is a 2-wire clip-in.  With the key tuned to the "run" position, both of the wires should register voltage above 5V.  In my case, both wires showed 11V, so the risk of damaged wires under the battery (there's a junction there that can get damaged) was averted.  As "easy" as a wiring problem may sound, knowing its the alternator was actually a relief.  I've found that re-wiring stuff is error prone.

Access the Alternator
Serpentine belt path in TDI
It isn't exactly easy to get an Alternator off of a TDI engine.  The old aircooled bus engine was, though: 2 bolts, a single dedicated belt and a backing plate.  The only hassle with that set up was the small rubber "hose" that routed cooling air into the alternator.  It was easy to tear, hard to get to and difficult to source.  The new TDI engine is another whole deal.  I followed this process over the course of 2 days: one to remove and one to install, spending about 3 hours each.  While the process is correct, the poor visibility into the area where all the bolts are makes it harder than it reads.  I found looking at the engine in the bus was useful for showing me were the bolt-heads were.  Funny, I thought having 2 of the exact same engine would make it easier to work on the bus.  Lately, the opposite has been more the case.  Remember, when playing with electrical, disconnect the battery once you start taking stuff apart.  Creating an electrical short with those thick wires can go very badly.

DSO in PDX
Autumn approaches.
taken on Nike campus
Between the removal of the old alternator and getting the new one, Boo and I caught Dark Star Orchestra at the Crystal Ballroom.  They started strong with a "Music Never Stopped" -> "Going Down the Road" -> "Good Lovin", but the crowd energy didn't reflect the energy coming from the stage after that.  Maybe it was the "Mission in the Rain", but after the first 3 songs, the crowd energy turned negative.  I don't mean bad, I mean polarity: negative.  On a whole, more people were pulling energy from the scene than were feeding into it.  Boo and I left early, during the segue from space into Unbroken Chain.  I haven't left early since Jerry died, and even then it was just bailing on encores to get coolers of beer ready for the post-show sales.  I don't think that's DSO's fault; I put that on the Portland crowd, though DSO was crowd-detached too.  Some of this is their fault, but I think they picked up on the same thing we did.  Too many hipsters sucking all the groovy out of the room and not enough hippies to put it back.  Polarity Negative.
While I'm glad DSO has a new full-time dedicated bass player, he's just okay.  Skip seems nice enough, but he doesn't approach the instrument like Phil Lesh does, remaining on the root of the chords most of the time, and only putting in the fills that have been baked into the original songs.  Come on, Skip!  Bring that creative side to the masses!
EMPI replacement ignition lock

That's about all I have for today.  After monitoring the serpentine belt, I changed the oil & filter, and Boo and I took a test drive to dinner.  The Jetta is back to operational.
Next, I'll be looking at the ignition lock on the bus.  The original has a lockout bit that has become increasingly temper-mental.  Replacing it requires removing the steering wheel, tearing down the steering column, and then some careful surgery on a work bench.  Should be time-consuming, but well worth the effort.

Tuesday, October 18, 2011

Furthur - the Lot

I'll cover the experiences from the parking lot over the 3 days of the shows in Eugene.  In the greater scheme, this makes more sense.  Besides, the days kind of run together, so going chronologically isn't really possible.

Shakedown Street
typical owner disposition
The Saturday morning print of the Eugene newspaper declared a successful "bust" of the vending along Shakedown Street.  Now, if you've been to a Grateful Dead-like event, you know what this area is.  For those who have not been so exposed, Shakedown Street is a zone somewhere in the parking lot where a large percentage of the vending takes place.  This zone is usually close to the arena, and is where the highest foot-traffic would naturally happen.  This is not a space designated by anyone.  In fact, it springs up on its own where the first-arrivers think it makes the most sense.  This "bust" had a little effect on the vending scene, though, and actually created multiple mini-Shakedown's as well as walk-about vending.  I liked the walk-abouts.  But even in my touring days, that was how I sold things before dark.  Laying out a sheet or a cooler on Shakedown Street was too high-risk for me back then.  One GDP (Grateful Dead Productions) violation cop, and you could be out hundreds of dollars.  Staff-Pro's usually targetted illegal liquor or drug sales, but from the article in the paper, they were busting everybody for selling anything... except tickets.  Funny how that's turned.

Wares without Art

One of the great contributions the "illegal" vending brought to the event used to be the iconic artistry placed onto T-shirts through 2-4 color silk screens.  This artistry would take a modern icon and "Deadify" it.  For example, one of my favorite shirts from years ago was a Bart Simpson T-shirt where Bart was wearing a tie-die and cut-off shorts.  Under the cartoon drawing was the phrase "Bart it on Down the Line" - playing on the song title "Beat it on Down the Line".  These types of shirts no longer appear at Dead-related shows, and I find that very disappointing.  Disappointing to the point, in fact, that Mike, Ed, Boo and I talked about different creative ideas taking modern cultural references and making T-shirts out of them.  We may just get into the T-shirt business, if we can isolate some time for it.  In the end, I did buy a couple of wood coasters.  These coasters have a Steal-Your-Face in the center or a Tour poster-looking image inside.  I like the creativity in creating a coaster, and they are totally functional!
Belle and Hapy wait for us to return from the show

Tire-kicking
As you may imagine, rolling into the lot as part of a microbus caravan, Ed and I attracted a little attention.  Belle was festooned with a big flag in her luggage rack on the way in on Sunday, and Hapy remained his usual sleeper-looking self the 2 days I drove him in (Fri & Sat).  The looks on the faces of those in-the-know when I passed, though, was pretty funny.  ACVW (Air Cooled VolksWagen) fans know what an ACVW sounds like.  So, when my city-bus sounding microbus passed, a look of confusion followed.  Funny stuff.  By the time we parked, there was usually at least one person wanting to check out our sleds.  As I may have mentioned in the previous post, Ed would park nose in and I'd back in next to him so our sliders faced each other.  This made for a nice little sitting area as we enjoyed our beverages... (yes, staff-pro official, these are coffee's in our coffee cups)...

We met a number of VW folks, over the course of the 3 days.  From the TDI-transplant curious, to BioDieselers, to purists.  The purists wanted to talk to Ed.  I popped the rear hatch a few times, and talked at great length with a guy from Corvallis who is working on a production-able nose-mount radiator for water-cooled engine conversions.  Cool!  I hope to hear more from him about his project.  I may not ave the stomach for moving the rad, but having these kinds of conversations is a great way to learn about improvement ideas.

It was a beautiful 3 days, weather-wise, crowd-wise and music-wise.  The lot wasn't over-burdened with booming stereos, had good Microbus, Vanagon and Eurovan representation and had a good positive energy.  More next time about the ride home....

Tuesday, June 17, 2008

Cleaning a TDI Intake

Shortly after I posted my last entry, I cleaned the intake manifold from the TDI. Removing the EGR and the intake was very easy, actually. the only trick was not shaking it on removal - you don't want any soot particles to fall into the combustion chamber. Now, you'd think the engine gets rattled all the time just running, and there's pressurized air running through there, so "how could a chunk of soot just fall into the intake?" I don't know, I'm just doing what the mechanic-man said: don't let any chunks fall into the head. I ran a quick vacuum against the head to make sure I was clean, and cleaned up the exposed head with some solvent. Nice and shiny now.

Cleaning the intake was a dirty job. First, dug around with an assortment of screwdrivers and chisels, getting as much of the gunk out as I could. Then, I reamed it out with a short stretch of cable attached to the end of my drill. If you're thinking of doing this, get a stretch of vinyl covered cable about 18" long and cut about 3" of the cover off the end. Home Depot sells 2 kinds of cable and I suppose both could work. I used the thicker one, but I don't think it makes much difference. Anyway, thread the cable through a short section of steel pipe. I used a 6" stretch that I had lying around for when I eventually build my BioDiesel reactor. Using the pipe as a handle, you move the cable around the inside of the intake, being careful of the drill speed. I had the cable run a little too fast a couple of times and it almost bit me. Do this job in disposable clothes and put the intake inside a cardboard box when you're running the reamer. Black goop flies everywhere otherwise, and its really hard to clean up afterwards.

After reaming it out, I submerged my intake in grease-cutting soapwater for a week while I flew off to Boston to help my folks move. This proved to be a waste of time and soap, but I think it might have softened up some of the baked-on stuff. After multiple washes in a soap-water bucket, I went a different route. I had a gallon of diesel in a travel container, some carb cleaner from when I was trying to get the old air-cooled engine running and brake cleaner. Of the 3 which do you think was most effective? The BioDiesel.

First, I soaked it for a couple of days in pure carb cleaner. At one point I was afraid that it could damage the intake, but it just removed some of the gunk. Quick wash in soap-water, and I started spraying brake cleaner. That got the outside nice and clean, but had almost no effect on the remaining black residue inside. Then, I tried that container of diesel. I poured some in, swished it around, and poured it off - black. The inside of the intake, however, was getting shiny. I did this a couple more times and then washed it in soap-water again. There were a few little crud-balls that I worked out with a rag afterwards, but 90% of the intake inside was shiny under a light. I wonder how effective this would have been from the get go - just drop it in a gallon of BioDiesel and let it soak for a while. I still want to thread strips of rag through the intake and buff out any little bits, but I think its pretty much clean.

I have to re-direct my time again. This time, its to the old Mercedes wagon (w123) my wife drives. Its time for the valve adjustment, replacing the valve stem seals, a couple of vacuum actuators are bad, etc. So, since cleaning the intake, I've been diagnosing problems on the wagon, and have spent no more time on this. I'll be spending all of next weekend on that car, but then I should be able to refocus on the bus again. Last weekend, we went to Seaside and experienced their "Muscle Beach Weekend". I'll post on that later--