Showing posts with label muffler. Show all posts

Tuesday, February 17, 2026

Hapy Runs Again

Picking up where I left off last time, we had Hapy mostly in one piece, needing coolant. His exhaust was still in pieces, rear bumper on the ground and he had not started since June of 2024.
 
Coolant
full moon down the street
There is really no adventure here, but in the interest of being thorough, I topped off Hapy's coolant with some G40. I worked air bubbles out of his system by squeezing hoses, but they won't really fully work themselves free until the engine is running. So, after a couple more top-offs, I called it good and capped the overflow and coolant bottles.
 
Exhaust
The not-my-favorite, too-small-diameter, cheap exhaust installed on this engine all those years ago went back on. This was not my first choice, but I want Hapy running, so I'll circle-back on a new exhaust later. The old one came apart where the piping enters the muffler. I think the cheap muffler failed allowing the section of pipe to which the exhaust "downpipe" (we'll call it that: it's the pipe that leads from the turbo, but it does make it sound awfully grand) was welded to fall out of the muffler body. The weld is a good 4 inches from the end of the pipe which clearly fits inside the muffler body and sets inside an inner pipe within. I regret not taking a picture here; apologies.
 
ShadeTree mechanic'ing
So, I hung the muffler body by the support hook and then set to attaching the downpipe. There is one stud attached to the turbo that the 3-holed flange hangs on. Then, you swing the rest of it into place, square the gasket and send the other bolts (with washers) through. A 13mm spanner is needed for the lower bolt, but the other 2 can be approached with a socket. With the muffler swinging on its mount and the downpipe firmly a-fixed, I set the pipe into the muffler and literally hammered the muffler into the pipe with a rubber mallet. These parts will easily work themselves apart again, if I didn't do something. So, I went full shade-tree, and added a 1" angle bracket, screwed into the muffler and the pipe to hold it together. The picture on the right, here, tells the tale. Not a proud moment but that will all go to the landfill / recycler eventually.
 
Bumper
Feeling confident that Hapy would be a runner again very soon, I installed the rear bumper / tow hitch component. I detailed the original install of the tow hitch in Bus Tow Hitch. Re-install is not nearly as involved. 15mm socket needed. I set the hitch onto the TravisJack and lifted it close to where it would eventually sit and then balanced on the TravisJack while I set bolts. I fingered-on the left (driver) side and then the right (passenger) side, taking care not to drop the unit off the jack and onto me. I discovered that the exhaust pipe leaving the muffler hung in the way, but a solid kick with my boot resolved it without causing any damage to anything. Just needed some sudden blunt force. Once all 6 bolts were finger tight, I set the bumper where I wanted it depth and parallel-to-the rear-wise and torqued them down.
 
Injection Pump Prime
electrical connection cleaner
Any time I let Hapy sit undriven for a while, the injection pump loses prime. I believe this is because of a failing seal, but it's the one that's much harder to get to (and I don't have on-hand). So, I have let that sit to be solved another day. Enter the mighty MityVac. Since I disconnected the large fuel filter for the flywheel replacement, I was unsure if that filter was completely full, so I started with the line which enters the injection pump, moving to the return side of the pump next. This is relatively straightforward: disconnect the fuel line, apply vacuum with the MityVac (using the collection bottle between the pump and the fuel line, of course) until the collection bottle consistently gets fuel. Then, remove the vacuum contraption and reconnect the line. For the return line, I also clamped the return line from the injectors to the pump so I did not lose vacuum through them. Once the pump was full, I cracked the hard lines at the injectors with a 17mm spanner. This last bit of priming needs to be done by turning the ignition and counting to 5. Well, that's how I did it. When I returned to the engine compartment, each of the 4 injectors had some fuel sitting on top where the hard line connected. I snugged them back tight.
 
DeOx-it D5
Before I ran to the cab to give the engine a try, I wanted to make sure all of the plug-in bits were set. So, I went around the top of the engine, disconnecting, shooting-DeOxit D5 into the connectors and clicking them back together. This served 2 functions. First, a simple survey of the top of the engine allowed me to see if I had missed anything. Second, every electrical connection was confirmed a good-click connection and it was cleaned/deoxidized for a better connection. Having done this, and it only taking literally a minute, I intend to include a similar final survey when doing top-side maintenance going forward. Its so easy, and removes many possible variables to failures.
 
And Then It Happened
At this point, I felt that I had done everything I could to set up for a successful first start since June of 2024. I put the trans-axle into neutral turned the key to run and saw the familiar lights. With an inhale, I turned the key to start and after about 3 seconds he fired up. I didn't expect immediate, since fuel still needed to get pushed down into the injectors, but he started well and ran strong, arriving at a comfortable idle almost immediately. I left him run for a while, sitting in my shop in neutral while I checked for leaks and drips. There were none, which was little short of a miracle.
 
I thought about giving him a little test drive, but I have not solved for the electrical cord for the FrostHeater yet. Curious, though, I tried to ease him into gear, but he wouldn't. Knowing that he easily moved in and out of gear when the engine was not running, I concluded that the clutch cable needs adjusting.

Clutch Adjustment
This adjustment took a little bit of effort, but with a thicker spacer where the Bowden tube meets the mount on the transaxle, and another spacer on the adjuster, I was able to get the clutch to engage and disengage properly. The Bowden tube needs a curve in it to reduce clutch chatter, so this was needed regardless. The fact that I needed a spacer on the adjuster tells me that the cable that I replaced.. jeez.. almost 20 years ago... may be stretching. This is often a warning that the cable will fail soon. So, time to order a replacement.

I used a Velcro ties to hold the FrostHeater cable up and out of the way. But, before I wrapped it up, I tried the FrostHeater, and I think it might be broken. I'll have to do some research, but I expected the unit or at least the top hose to warm up to the touch a little bit. I did not notice any warming, so that effort may have been for nothing after all. Again, I will look into it and I may get a replacement unit, but I'll be pretty bummed if it was really only used a couple of times before it got damaged.

Here's a video of him running, probably 3 minutes after his first start in like 18 months.


I noticed that the rear lights were acting all weird, but a different kind of weird than usual after messing with the battery. So, I did not want to risk a drive-about. It seems like every time I touch the battery, the tail lights short-out such that stepping on the brakes completes an unexpected circuit. That's the usual. This time, the reverse lights were lit up and the blinkers were acting all strange, but only the rear. I think I may have done something with the reverse lights, like reversing the plugs when I wired up the switch, but I ran out of daylight before I could get after it. I'll diagnose and attempt to fix it next time. 

Thanks, as always for following along, and I'll post with any test-drive observations, and other improvements as they happen. At this point, I am thrilled that Hapy self-starts and can move around again--

Tuesday, October 23, 2018

MGB Exhaust Re-Do (Part 2)

Picking up where I left off, we have the MGB front end on jack-stands and the old exhaust sitting in a heap in the driveway. Today's post will be about getting the new exhaust installed. Recall, it is a ceramic-coated stainless steel Bell system. I left the packing plastic bags on the pipes as I handled them to protect the finish, removing the plastic as I installed them.

Setting The Scene
exhaust hammer example
from streettechmag.com
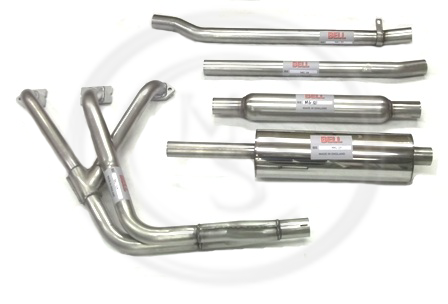
With break time over, we set to trying to install the new exhaust. The Bell system has 5 pieces: the header, a straight-ish pipe, the center resonator, another straight-ish pipe with a support bracket attached and then the tail muffler. They go on in that order. The hardest part, like with any car, is getting the header to fit around all of the various other things in the engine bay. I watch car shows on Velocity and some of those installs require hammering on the pipes to get them to fit. That would really suck. Spend all that money for a "bolt on" set of pipes and then have to dent the snot out of them to fit an otherwise stock engine and compartment. Doesn't seem right, but does explain the custom fabrications they do on some of those Velocity shows. Even then, it's usually because they're slamming a huge non-stock engine into a classic-ish car. For a built-for-stock engine, hammering dents into the pipes shouldn't be necessary. Anyway...

From Below?
For the MGB, this saga starts with getting the front end way up in the air. We had a good 18" of clearance and still couldn't feed the header up from below. Some internet posts I've read indicate this is super easy, but I suspect anyone who installed that way had a lift or a pit. We have neither so we switched to going in from above. That meant removing the bonnet.

From Above
attached for fitting the rest
of the pipes
The bonnet is held to the hinges with 2 bolts per side, but remove the hood prop first. Once the prop is off, one person holds the hood still from the front while another person (K2 in this case) loosens all the bolts, and removes one from each side. At this point, it would be wise to put a shop towel or something soft under each rear corner of the hood. Then, remove a final bolt from one hinge. Balance the hood on your shoulder and let it slide down onto the towel. Repeat with the other side and then each person grabs a side of the hood and walk it off the front. For fun, we set it (on pads) on top of the 280ZX hood. The MGB hood looks like a toy hood compared to the Zed hood. The MGB hood is at least 6 inches smaller all the way around.

center-mount bracket
With the hood removed, you next loosen the driver side engine mount. The two nuts which hold the engine to the mount are the easiest to get to, and present the least necessary to separate the engine from the frame rail. With nuts safely stowed, place a wood block on a floor jack and slide it under the driver-side of the oil pan / engine block. Carefully lift the engine from below (setting the block of wood so the oil pan and other parts are not damaged) an inch or so. Once you feel considerable resistance to the lift, stop lifting. Now, have your helper fit a pry bar between the engine mount and the engine and then apply pressure to shift the engine slightly towards the passenger side. The engine will more roll anti-clockwise than slide left-to-right, but this creates enough space. Hold the header vertically, with the head-tips pointing across the top of the engine. Slide the header as far down into the largest space you can go before rotating the header so the head-tips point up and away from the firewall. On this particular header, there are pinch-welds along the sides of the collector. These pinch welds wanted to hang up on pretty much everything on the way down. With some gentle and some not-to-gentle persuasion, the header pushed past the space between the block, the steering column and the frame allowing us to wiggle it into the right spot near the head. At this point, the pry-bar leverage can be released and the floor jack released, letting engine rest back on the mount. We had to wrestle it a little bit, but it settled. Our header ended up with a couple minor scuffs, but no scratches.

To get everything else to align, K2 bolted the header onto the head. K2 was done for the day at this point, and the rest of the install was not going to be as straightforward, so I cut him loose.

Body Brackets
header from below
While K2 attached the header to the head for fitment / alignment, my focus was on the 2 mounting brackets. The center mount reuses the original body mount holes with a new steel and rubber mount that simply threaded in with new bolts (in the kit). The rear mount also reuses the original body mount holes. If yours are still in great condition, you could reuse them. With the body brackets on, I could start lining up the pipes, and get a feel for what went where.

The fourth pipe (second straight-ish) had a bracket that was a simple flat bar wrapped around the underside of the pipe with a round hole at each end. The center-mount kit provided a bolt, 4 large flat washers, 2 plastic sleeves, a bit of metal flashing with holes and some small nuts and bolts. There were no instructions, but you could tell that the bolt went through the holes in the flat bar. A flat washer went between the flat bar and anything else that touched it. Between the ends of the flat bar, on the bolt, went the plastic sleeves and the nut went on the end. Neat. With some careful bending of the flat bar with my channel-lock pliers, I was able to get the operation together. The bit of metal flashing was to wrap around the plastic sleeves and then bolt to the center-mount bracket I had just attached to the car.
second straight-ish pipe mounted

To get the fourth pipe and centermount to align and fit, all of the pipes between that mount and the header need to be in place. Start with getting the pipes in the rough spot you expect them to be. A straight-ish pipe (one that has a gentle bend or two) has those bends for a reason. Align them with the path of the original pipes. Once set in the right location, fit a pipe clamp between the pipes and then slide them together, wiggling the fit so they stay together and are in the right alignment. With careful use of a rubber mallet, I was then able to drive the various pipes together. Remember to set a pipe clamp at each junction before you start pounding things together or you won't have a way of clamping things together.

Rear Muffler
The final hurdle was figuring out the rear muffler mount. The old mount was a real hack job where a prior owner had taken a u-bolt that roughly fit the original body mount and threaded a nut on each end. So bad, but I really shouldn't judge. The original mount was almost German in it's over engineered solution. To the bracket is attached 2 rubber mounts pointing away from the exhaust pipe. To these rubber mounts, a hexagon bracket (with one leg removed) is attached, with the missing leg on the bottom. The missing leg has a pair of holes, one at each end, for attaching a pair of semi-circular clamps. These clamps hold the pipe in place. Unfortunately, they are sized such that if you put them on without any spacers (not included) they will either pinch the exhaust pipe because you tightened them too much or the lower clamp will fall off because you didn't tighten them enough... because you didn't want to pinch the pipe. To remedy, I found a pair of oversized nuts that would slip on, acting as spacers, so I could tighten everything down without pinching the pipe.

Header to Head
see the gap?
Once I had it all assembled front to back, I moved from back to front, tightening the mounts and pipe clamps. Once snug, I shifted to the very front to consider the mating of the manifolds to the head. The MGB came with a few types of exhaust, with 2 particular versions for the models before emissions standards became so tight (in 77) that the exhaust manifold needed to be redesigned. These 2 types have a different thickness of the material through which you send bolts to attach it to the head. The older one (#12H709) is thicker than the newer one (#12H3911). This is important because the intake and exhaust share studs and corresponding nuts. If the thickness of one manifold is not a match for the other, there is not a uniform amount of torque on the various manifolds, creating leaks. This applies to pretty much any combination of intake and exhaust, unless you stay completely original stock. Since the prior owner had replaced the dual carbs on my MGB with a side-draft Mikoni carb, and hacked together a home-grown exhaust, I was going to have to deal with this regardless.

When the header was attached for fitting the other pipes, I didn't look very closely. It didn't matter. With a closer look, you can see the washers were not sitting flush. Adding insult, only two of the thickness differences for the 4 shared studs were the same. To remedy, I grabbed some fender washers of varying thickness, and cut them in half (across the hole) to use as spacers. To hold the spacer in place during install, I used a very thin smear of the copper gasket maker I used on the header gasket. This plan worked great. In about 30 minutes I had spacers in place, and the header torqued down with washers sitting flush.

gap gone
Testing
All of this, nearly 2 full days of effort, lead up to the test fire. Of course, I had to re-assemble the air cleaner, and the hood is still off, but after verifying everything was back together, it was ready. I had been trickle-charging the battery, too, so I was pretty confident it was going to start right up. Fortunately, it did. It sounds great. It has a nice deep tone without being too loud. The biggest difference, I think, is that all of the growl sound comes from the rear of the car now. It must have had leaks before. With all of the rust, that's not a surprise. I wound the engine up to 3000RPM to get a sense of how it will sound on a power pull and it sounds pretty awesome. With the top down, the garage doors open and the rev counter around 3k, I still hit 90+ dB. So, it is no quieter... in the garage with the doors open. On the road, it is quieter in the seat, but I don't have dB numbers to prove it. Just my ears.

That's it for today. I had started reading about how to do automotive interiors (trimming) in preparation for doing the seats and cards on the MGB. I have parts on-order to complete the trunk and woofer box as well. Once those are complete "major operations" will have completed and I will be shifting focus onto the Zed... and then back to Hapy. Thanks, as always, for following along-

Tuesday, October 16, 2018

MGB Exhaust Re-Do (Part 1)

Earlier this year, I described the slap-together exhaust solution I did to get the car through Oregon Department of Environmental Quality (DEQ) testing. I had a head-to-tail system waiting to get installed since before US Independence Day that had been sitting in the garage walkway, just waiting to get stepped on. Today's post covers the rip-out of the old exhaust and some explanation of the new Bell exhaust.

Mild, Stainless and Coatings
I should probably start by pointing out that I purchased a stainless steel exhaust and then had it high-temp ceramic coated in flat black. I arrived at this combination after listening to various exhaust systems available for the stock MGB through YouTube videos. I knew exhaust paint is temporary, and that it eventually chips and scratches to reveal the metal underneath. I wanted a system that didn't exist anymore: Peco. a mild steel exhaust, but then ceramic coated. Ceramic coating can scratch off too, but it is much harder to do and the finish is much hardier than paint. Especially if the people applying it know what they're doing, and prepare the surface correctly.

Bell system with center "bomb"
Since the Bell system was built on the same jig as the Peco, but out of stainless steel, I held to my plan. I thought it would cost more, but since the original Peco mild-steel systems are disappearing from inventory, they are really quite expensive now. The image to the right, here, is similar to what I bought. The sole difference is the system I got has a larger center resonator (third pipe down).

I have read that stainless exhausts, while they have an initial higher register note mixed into the lower overall sound, that higher pitch goes away as soot lines the insides of the pipes. So, when I selected my powder-coater, I selected a company that coated the insides of all of the pipes as well as multiple coats on the outside so the exhaust would have that ripened sound from the moment of install. The inner coat also serves an additional purpose of providing a slickery smooth surface so soot will not build up over time. Last, this ceramic coating has some kind of thermal barrier as well so less heat will transfer through the pipe walls, sending it out the tailpipe instead. This should help keep the cabin cooler in the summer.

Old Manifold Off First
The existing (not original) system was welded in from the exhaust manifold through to where I had soup-canned on a muffler. Yes, I used a soup can (See MGB Muffled) to connect a recycled muffler to the rusty pipes to get through DEQ without attracting attention. It worked, but as one would assume, the integrity of a soup can is no match for the stresses of an exhaust system, and it split apart at some point shortly after that. With all the other action this Summer, I didn't really have time to do the full exhaust replacement, or I'd not have the convertible to play with while the weather was nice. Well, the weather turned to cold and rain early this year, so with an uncharacteristically empty autumn Saturday, I grabbed K2 and set to it. First things first: get the front end as high in the air as you can (safely) on jack stands and make sure it does not budge when you shake the car.

old system sans catalytic converter
K2 got the fun job of removing the exhaust manifold from the head while I worked on the other end, figuring we would meet in the middle. I had just replaced the manifold gasket, so I knew that process well enough to give directions from underneath. There are 2 bolts, one on each end, and the other have nuts holding onto 4 studs. All are 1/2" but there is not sufficient room for a socket for most of the nuts, so K2 worked them free with an old-skool combination spanner.

Just as a point of reflection, he was using the Sears Craftsman wrenches that I got for Christmas when I was his age. 30 years later, they have hardly aged. RIP, Sears; it is truly ironic that you, a company rooted in catalog mail-order, met its demise due to Amazon, an internet-order company. You were the one rare store where product quality remained relatively high while prices stayed reasonable. Sears never felt cheap (like Target does), and you offered practically anything a shopper might need other than food. The store closest to me is closing, bringing our 30+ year relationship to an end. Sadness.

Anyway... with the nuts and bolts off, K2 carefully slid the intake and exhaust manifolds off of the head, taking care not to disturb the gasket. The gasket still looked new and the copper sealant between the gasket and the head looked like I had just put it on. Honestly, since I'd only driven the car a couple of miles since I did it, I'm not sure the gasket and sealant ever got all the way up to temperature. So, yeah, that gasket is basically new.

Tail End Removal Next
Meanwhile, I was working on the other end. I noticed the split in the soup can, and figured that the tail-end would just come apart with a good yank once the tail mount was removed. I gave the muffler a hardy tug and it came right off. With a clatter I tossed the muffler into the driveway exclaiming "the first of the exhaust is off". Once K2 had the manifolds clear of the head, we figured out that the pipe needed to be cut to get free. I grabbed the angle grinder (and gloves and a face-shield. Safety First!) and cut the pipe just aft of the collector (and in front of the catalytic converter). With the mid-section now free, it rested on the garage floor. It soon joined the muffler in the sprinkling drizzle on the driveway. K2 was now able to pull the manifold free up through the open bonnet and set it on the rust pile in the driveway.

look at that non-transition
With the old system in pieces, we were able to take a better look at the custom exhaust manifold. The center pipe, which carries 50% of the load was no larger than the other 2 pipes, and had such a horrible flow to it that there was soot collected at the entry point. The soot was so thick, I could barely get my index finger in the hole without touching soot all the way around. The pipe had a 80* or sharper angle at the mate-point with the flange (check the picture to the right). Such bad flow. Just addressing that alone will improve the exhaust flow and behavior of half of the cylinders.

Tossing the rusty bits to the driveway, we chose to take a break. I quickly cut the catalytic converter free from the other debris, and slid it under the 280ZX for later use.

This post got super long once I wrote about the install. So, I'm stopping here and will continue in the next post. Thanks for following along-


Tuesday, June 12, 2018

MGB muffled

Continuing the saga of getting the MG summer-weather ready, today's post covers some fun with the exhaust system. I started this post a few months ago and forgot about it, so recognize this was before I got through DEQ. So, I was doing things that were lowest possible cost in case I needed money to get through DEQ (think engine rebuild, etc).

Quiet You
In each of the test drives where I verified my fixes, I couldn't help but notice 2 things. First, the MG was loud as #$%!. Second was the unmistakable sound of an exhaust leak (pop pop pop). Out of curiosity, I pulled out a decibel tester app on my phone and checked. Parked in the garage with the doors open, sitting in the driver seat, I started the engine, and pushed the revs up to 3k and back down. I peaked at just shy of 100dB. According to the application, that's as loud as a blender. In the driver seat.

When we had the donorZed, I noticed that the exhaust was the same smaller-diameter piping as the MG had: 2". In the interests of getting every usable part off that thing, I cut off the rear muffler (which was surprisingly not that rusty), and the catalytic converter (cat). I figured that one of the two cars could use one or both of those parts, and with DEQ smog a part of ownership of these cars for the foreseeable future, one of them would eventually have use for the cat.

So, with the blender-loud exhaust reality in my face, I decided to start with the muffler going onto the MG. One would reasonably think that the crazy-bending exhaust plus muffler wouldn't "just fit". And, it sort of did.

Soup Can Exhaust
Most of the exhaust system on the MGB is coated with rust. The pipes, the little cherry-bomb mufflers, even the exhaust manifold. There is deep rust everywhere. This makes welding replacements all the more difficult because you have to get to clean steel to have a good strong weld. Fortunately, there are no-weld joiners available for most standard diameter sizes. These are somewhat simple in their design with a straight section of pipe with an integrated band clamp at each end. You put 2 cut ends of pipe into each end of this thing and tighten. Simple. It reminds me of the old-skool way to patching a hole in the exhaust: cut a soup can into a patch and get it to hold on with hose clamps.

All of this leads us to my noise reduction. The MGB had 2 cherry bomb mufflers in sequence which were not really muffling noise at all. So, I cut off the one on the back and fitted the one from the donorZed. With some careful cutting, I was able to get the 2 straight sections to abut, but there is not an off-the-shelf no-weld joining thing to connect them. So, I went back to the old-skool roots and cut up a small can, and hose-clamped it together. Yeah, I'm not that proud of that, but remember, this was done before I got through DEQ.

I re-used the hangers that were there from the cherry-bomb muffler, and it was ready for testing. Total cost: $0. I tested the noise level the same way: car in with the garage doors open. dB levels hovered in the low 90's, so I shaved up to 10% of the noise just by putting a bigger muffler on. Truth-be-told, the muffler from the donorZed looks an awful lot like the stock MGB muffler. During the test-drive, it became clear that the rubber had completely dried up, so I had to resort to holding the center section of pipe off the ground with bailing wire. Yeah.. not too proud of that either.

I'll get after the backfire in another post. For now, the exhaust is quieter, if not in a better long-term disposition. My thinking: don't attract unwanted attention by the tester at DEQ. That includes disconnected things under the bonnet and a super-loud exhaust which might imply something non-stock is going on.

Anyway, that's it for today. I'll post on my attempts to solve the backfire and other developments as I do. Thanks, as always, for following along-

Saturday, January 15, 2011

Exhausted

So, we have ourselves a nearly road-ready bus. I said I was going to get the exhaust put on in my last post. Add to that, the kids' mom is home from Las Vegas, so the celebration continues.

Plumb that Thing
Around 9:30 Thursday morning, the exhaust guys at Meineke started their efforts. By 11:30, they were done, and Hapy was ready. Between work and single-parenting, I couldn't pay for it until after 5 and pick it up until after the kids were in bed. The guys are Meineke were as curious about this conversion as most folks I've encountered along the way. They had the misfortune of trying to drive it, though, and they gave me warnings about the linkage. Yeah, I knew it was a little wonky, and the clutch made some horrible noise when trying to get the thing in gear. Still, they came out when I fired it up, and we all got a chuckle out of how it runs - really freakin' good. "Sounds like a bus," the guy says. He's no VeeDubber, so he meant city bus, but I took it as a compliment. He added,"careful not to pift the front end off the ground with all that torque." Hahaha... yeah, like anyone has ever said that about a street-legal bus before. Anyway, we checked the rear lights, and the ground in the passenger side tail light is disconnected: none of the light illuminate. I paid the $320 (lifetime warranty), and hopped back into my other TDI and drove off to pick up the boys.

Lookee Here
After the usual round of dinner making and clean up, assembling lunches, running the kids through showers and bedtime routines, I contacted my good friend Ed for a ride to the muffler shop. I didn't mind riding home in the sprinkling rain that morning, but I wasn't up for riding in the heavier drizzle in the dark. We fired it up (once we got there, of course), and we surveyed the install a little bit. From the rear, it almost looks stock with that cylindrical left-to-right muffler routing the exhaust out to the rear. I haven't gotten underneath yet, to see it from end to end, but it looks like a relatively simple design: from the turbo, it gently curves down and to the rear until it approaches the bellhousing where it runs straight to the rear. Once it reaches the side-to-side engine support bar, it bends right and enters the muffler. From the muffler it hits a simple 90* bend out the rear. It all looks like basic mild steel, so I'll probably remove it and shoot it with some exhaust paint to inhibit rust. I suspect the warranty only applies to the muffler, not the piping.

What Gear You In?
After the lookee-loo, we fired it up. The look on Ed's face was priceless - yeah... that's power baby. Finding reverse had always been easy, but the rest of the gears have been a little evasive. I found myself pulling out of the parking lot into traffic in 3rd. Still, he drove really nice, the brakes were nice and responsive / firm. By the time I was off the main road, I was able to find and use 1st through 3rd. There is a straight-shot street that sees very little traffic that I use to get home. For fun, I took the corner at low speed (in second) and stood on the pedal. Hapy took off like a shot. I heard the turbo spin up, rode it up a litle bit, slammed it into 3rd and stood on the pedal again. Shazam, we're off to the races! Now, I disconnected the speedometer cable, so we probably weren't going that fast, but the sheer acceleration was something I'd never felt in any bus before. It didn't feel forced either, it sounded and felt like it was business as usual for this engine - which is just flat out scary. So, add in some larger tires or a properly geared tranny and this could get crazy. I think the hard-to-find gears thing is more of a result of lack of use, and needing to get the gear oil up off the bottom and into the synchro's. We'll see.

Home Again, for now
I pulled into the driveway as the heat from the defroster was really getting warm. Now, I mean warm for a 1972 air-cooled bus (my frame of reference). The windscreen was nice and clear since the straight-shot street, but now there's tangible heat. I'll need to integrate a temp gauge so I can audit the radiator effectiveness. I can't see the TDI dashpod, so I'll either have to take it back off the road to extend all those wires, buy a water temp gauge or buy a real OBDII cable and use my laptop. I have basically no money, so I'll probably go with the gauge.
The kids' mom arrived this afternoon after 2 weeks in Las Vegas. Between the boys staying at friends' houses after school, and my parents dropping by, I have been able to work. Still, being the only parent in one town while working in another is not easy. Especially when you don't want to use after-care (day-care).

I won't be able to do much on the bus over the next couple of months. I won't go into details, but Hapy and I won't be near each other much, so there is only so much I can do remotely. I'll be working through my bad-ground engine harness with a multi-meter when I can. Anyway, after all this recent progress, this blog may fall silent, or take a departure from the usual "bus progress" theme. It seems a shame, but that's how these things go. I greatly appreciate your interest and feedback (both as comments and via email), and I will post as interesting things happen.

pictures:
top - the down-tube from the turbo (unpainted)
middle - view from the back see how the muffler looks kinda stock-ish
bottom - from inside the engine compartment along the engine. That's the serpentine on the right, the engine support bar on the left and the muffler in the middle

Saturday, January 30, 2010

Exhausting

Today's post covers a few things. First, I ordered some more hose, and spent more cycles thinking on the cooling system. Then, today, I did some time under the rear end working on the exhaust. On to the post...

Cooling off on cooling
After dwelling on the radiator and other aspects of the cooling system for most of the Winter, I've grown tired of that part of the project. It's pretty close to done, but there are a few holes left.
First, I need to find a pair of 90* 1-1/4" elbows and a short (say 1') stretch of straight 1-1/4" coolant rubber. I'd like to get a more dramatic bend at the radiator, and those parts are needed for that. I haven't been able to find a local source for the 90* bends, so I may have to order online for those :(
Second, I have the cabin heat circuit. I'd going to punt that whole system into next Summer. So, in order to tie that off, I need to get some things done anyway. For example, I am running the ALH engine "without glow plug heater", so the hose that runs from that flange is different (hose p/n is 1C0121157A). For some reason, VW thought it would be a good idea to have the flange just a little fatter than the hoses, so you need a VW hose that has a fat end on it. There's a picture of it on the left here. That hose ties into a plastic "T" that routes to the cabin heater and to the fill bottle. I plan to do everything except the cabin heat, but I need a closed system.
Since I need those parts, I'm moving on from the cooling system for now. I'll get back to those later.

Not Exhausting
When I bought this engine, I got the old exhaust run with it. I was sent the catalytic converter, a long stretch of pipes, one of those flex things, etc. Handy stuff. I didn't get a muffler, but I found a guy that was unloading one of those soup-can mufflers on craigslist for $10. Love cl. It had a short stretch of bent pipe on it.
So, today, I got under the bus to think through how it route the exhaust. The section of pipe from the turbo was about 6" of bendy pipe connected to a flexi-pipe, and then another short section of pipe that was then connected to the cat. I cut-off and sold the cat a while back, but I kept the rest of it. I hung the remaining pipe onto the turbo and discovered that it ran straight under the driver-side frame. I put the rear bumper in its approximate location, and lined things up. I discovered that I had all the necessary pipe in-hand; I just needed to cut it into pieces, clean them up a bit and line it up. In the end, I was able to align things so the exhaust line will run from the turbo straight to the bottom of the left wall and turn to the rear. Immediately after the turn, it will enter the muffler. The tip will be just past the bottom edge of the bumper, and about an inch below. I should have taken a picture in-place, but the picture to the right, here, shows where we're at. I cut up the pipe, fitted it together, sharpie'd lines for alignment, and pulled it down. I was able to break out the welder and tack-weld the flexi-pipe to the bend, but I couldn't get the muffler to weld to the bend. Its probably user-error. I'm looking forward to Hal's next visit so this can be finished up. In the meantime, I know where the muffler and exhaust lines will be, so I can move on to other things.

I should have some more time tomorrow. So, I'm going to hit the induction / intake side. I have all of the old plastic tubing from the original install of this engine, so I may be able to just juggle those into a usable system. The exhaust is nearly done, the coolant system is nearly done, and, if all goes well tomorrow, the intake side will be well under way.

More next time...