Showing posts with label catalytic. Show all posts

Tuesday, July 26, 2022

Nemo Time

Remember Nemo? He's the 1997 Audi A4 (B5 body style) that T bought and wrestled with for a few years, replacing the clutch and brake master cylinders as well as the clutch slave cylinder and repairing so many other things. I also did a TON on this car (just what I posted on), so the fact that he needed more was a little, well... frustrating. When T moved to LA, he signed Nemo over to me, and then we thought we had sold it within the family, after replacing the driver-side rear axle and wheel bearing. Only to have the power steering fail... ending that transfer. So, Nemo has sat in my driveway. He has many little issues: a water leak into the driver's footwell, a broken front passenger window regulator, a big hole in the exhaust, a sunroof that won't open, some other little missing bits, and, of course, the failed power steering. Today's post covers my efforts to resolve enough of these items so he can be registered and driven again.

Before I begin, the sanding on Zed continues. I will post an update next week, hopefully, with some meaningful progress. In the meantime, I have slowly crawled along with Nemo over the last few weeks, so I thought an update was in order.

Water Leak
Schmidty sniffing the ECU box
I believe I solved the water leak when I discovered that the plastic box that holds the ECU was not entirely attached. There is an obvious nut on the outside, near the driver fender. There is a second nut inside the box closer to the engine, back near the fire wall. Underneath the ECU, is a large (like 1 inch by 3 inch) rectangle opening into the footwell. This hole has a gasket, but if the box is not held down firmly enough to engage the gasket, water which finds its way under the box (which is a for-sure here in rainy PacNW) will run straight into the driver footwell. In Nemo's case, the inner nut was simply not there. I found one, and snugged it down. Problem solved. I hope.

Accessing the Exhaust
big old rusty dirty cat
The big hole in the exhaust has been a major pain to solve. The aftermarket cat-back exhaust installed by a prior owner did not have any support between the end of the header and the rear axle. It did, however, have a section of flex-pipe immediately after the header, creating the car's lowest point. So, when the car drove over speed bumps or dramatic driveway transitions, it was the flex-pipe which hit the ground. Eventually, that flex-pipe failed. With the failure came a Check-Engine-Light (CEL) preventing a DEQ pass. To resolve, I removed the catalytic converter, downpipe and mid-pipe so I could replace the failed flex-pipe. This removal is challenged by the usual issues with exhaust hardware, but the Audi has additional things, like heat shields, in the way. So, the air box needs to come out, and the passenger front wheel comes off so you can access everything. Even then, Audi engineers seem to like to use different fastener types and sizes pretty much everywhere. Of course, the owner plays a role here too.

Cat Away
cat out
After trying a wide array of tools, I ultimately needed a hacksaw blade to cut through the rusted bolts between the catalytic converter and the down pipe. The PO had used regular steel fasteners to attach them, and even after multiple days of spraying Kroil on them, they were rusted tight. I cut the bolts, sending the hacksaw blade between the opposing flanges, at least far enough for the bolts to snap in half when I applied torque to one end with a socket-wrench. This took some time and patience, and because of how the bolts are oriented in the engine compartment, I was only able to sever 2 of them. This loosened the connection enough for the downpipe to rotate on that last bolt, allowing me to pull the 2 out the top of the engine as a unit. I cut the other bolt off, separating the 2 pieces, on the driveway. Holding the downpipe still with my boot, I cut the lip of the flex-pipe from it using my angle grinder.

Before I started, I ordered a brand-new catalytic converter, thinking that the one that was on there was 10+ years old, and of unknown working condition. After spending many hours cutting through rusty bolts with a hand-held hacksaw blade, I do NOT want to do this R&R again even if the fasteners are new. So, I'm grateful I made that purchase decision. After I got the cat on the ground I could see the Audi symbol on it, so either it was replaced at a dealer a long time ago or it was the original. Either way, at almost 300k miles, it is unlikely that catalytic converter was still doing its job well. Well enough to pass Oregon DEQ? We'll never know. Besides, the old bolts are rust-attached to that old thing, so re-install would have been considerably challenged.

new cheap hanger
On the other end of the hole in the exhaust, I removed the mid-pipe (2 bolts), cut off the remains of the flex-pipe with the death wheel and re-installed the mid-pipe. I added a support immediately behind where the flex-pipe-to-mid-pipe joint will appear so it is held up and away from the ground better. For the support, I got one of those cheap bolt-on hangers, attaching to the rear of the transmission through an unused bolt hole in the rear of the case.

Cat In
Moving back up front, I installed the new cat first, re-introducing the original O2 sensors as I went. To the cat, I added the down pipe and then finally connected the down pipe and mid-pipe with the flex pipe, fitting things together with clamps and exhaust dope. 

I got Nemo back on the ground to take him for a test spin around the usual neighborhood track. Before backing him off the ramps, I checked the exhaust for leaks, and it looked good, with a little puff of smoke coming out the tailpipe. The exhaust sounded much better, and it doesn't leak. So, around the block we went. It still hangs low, but it is fairly well tucked up under the body compared to before. The rear end ride height is so low, there is a near-constant threat of bottoming out. I will need to resolve that soon. He drove great; plenty of pull from the turbo, and the exhaust was much quieter than he had been on the last test drive. Clearly, the noise and smoke is going out the tail now. I thought I might have heard the rear passenger wheel bearing, though, so there may still be more adventure coming. And, yes, you can drive a car with failed power steering; you just need forearms like Popeye if you need to turn the wheels when the car is not in motion.... like to maneuver it out of a shop bay into the driveway through a 9 point turn. 

Oh Two
Oh Nemo.... O2
Unfortunately, the CEL is still on, with a code (P0134) indicating that the upstream (before cat) O2 sensor is bad. When I considered the smoke puff out the tailpipe when it was sitting on ramps, this makes sense: if the computer doesn't know the air-fuel mixture sent from the O2 sensor, it sends a richer fuel mixture to protect the engine from being too lean, which is why a failing O2 sensor is a DEQ auto-fail. So, I ordered a replacement upstream O2 sensor and now I'm waiting on shipping before I take another test. Since the error code did not include a code for the downstream O2 sensor, one might think that the old catalytic converter was still working. As I pondered this, I picked it up from one end, and I could hear dust settling through it. So, even if it wasn't toast, it was soon to be. When the new O2 sensor arrives, I'll slap it in, clear the code and go for a spin. If the CEL doesn't return, we may take him through DEQ before the next update. 

That's it for today. Like I mentioned at the top, the sanding on Zed continues. After sanding him smooth with the 320-grit, I did not like some of the orange-peel effect I found underneath, so I sanded the primer end-to-end with 320-grit again. Thanks, as always, for following along-

Tuesday, April 14, 2020

Oliver Gets a Cat (Part 2)

This is still not a children's story. Instead, today we finish integrating a catalytic converter into the Bell header-through exhaust system I installed onto our 1978 MGB, Oliver. Since my last post, I have learned that our Summer Solstice music festival, 4Peaks, is cancelled this year. While not surprised, this summer will be our first in years without a trip in Hapy to see some music. Yes, that is a total first-world problem and others have far bigger issues to contend with than some music festival. Gotcha. It is still disappointing for me, my fellow patrons, the vendors, the hosts, and the musicians. Anyway, where was I?

Pipes Arrive
I mentioned last time that I got a replacement section of pipe shipped from Britain. I measured, re-measured, etc that pipe and cut it into 3 pieces, 2 to keep, one to toss. After test-fitting those 2 pieces, I shipped them off to the ceramic coating company I used 2 years ago. The owner got the job done and the pipes shipped back fairly quickly. I had read that CoVid-19 can reside as an active virus on cardboard for up to 24 hours (and steel and plastic for up to 72 hours), so I set the box on the floor of my garage and let it sit for a few days. Once out of quarantine, they were ready to install.

Heat Shield
One of my biggest concerns about this whole project was how to keep the heat (up to 800*F) from cooking my legs on long drives. The MGB originally delivered with a heat deflector that was integrated into the floor, but mine was cut up as part of the floor replacement I did the summer after I got him. I looked into commercial heat shields, but they are awfully expensive and they are generic enough you need to trim them with snips, etc to get them to fit. Next, I looked into fabricating one with a few rectangular sheets of aluminum and a thin sheet of high-heat insulation. I constructed a fairly good model with cereal-box cardboard (one of my favorite modeling mediums), and was just about ready to take that leap when I found the HeatShield family of products. I decided that a known solution was a better choice than my experiment, especially when it came to temperatures that high. Their solution would cover 90% of the catalytic converter. This does not eliminate my concern about accidentally setting tall grass on fire if/when I parked on the side of the road or at a more rustic setting otherwise. Since the ride height of this sled is around 6 inches anyway, the honest truth is this car will not be going anywhere near tall grass. If I park off tarmac, it will still be where I can see the lifts and valleys of the ground.

Shield Assembly
cat hanging by one end
Once the heat shield kit had sat through a multiple-day quarantine, I unpacked everything and started putting things together. I wrapped the catalytic converter with the heat shield pad. These pads are a thick white fibrous material on the inside with a thick aluminum outer shell. At 10" by 12", it was just about the perfect size for the application. The catalytic converter is 11" long, so by wrapping the 12" side around the cat, I was left about a 1/2" of access to the ends of the cat for attaching to pipes. That orientation also left a gap about an inch wide running the length of the cat, which, based on the instructions, was about right. The heat needs to go somewhere, so a gap is needed (usually on the bottom) for the reflected heat to exit. The kit delivered with 3 stainless steel bands to hold the cover on. I installed one in the center to hold it in place while I installed into the car.

Into the Car
center resonator mated to cat
Once the cat heat shield was on enough for handling, I took the front pipe and fit it into the rear end of the header, checking the depth against the originally installed full-length pipe. Similar to the test fits, the cat easily slid over the rear end of that short pipe. I cinched down both pipe clamps, noting that the rear one did compress the edge of the cat around the pipe, and the cat was held firm (absolutely no wiggle). With the shield in place, the cat is now very close to the underside of the car. In fact, it may act as a vibration dampener, it is so close. I continued by adding the shorter pipe into the end of the cat. I did not clamp it down, however. Instead, I maneuvered the center resonator into place, sliding the front opening around the short pipe. I raised the tail pipe onto a short stand (an old car battery), and got the center mount aligned and bolted tight. With the center mount set, I could wiggle and twist the short pipe and the cat to exactly where I wanted them. Then, I clamped everything down snug.

Center Support
basic exhaust hanger added
I wanted an additional support for the exhaust. The Bell system does not have any mounts between the front of the headers where they bolt to the head and the support behind the center resonator. This is a long stretch of unsupported pipe already and one that I wasn't thrilled with when I installed it 2 years ago. Once you add a 5 pound catalytic converter, there is a real threat of the system sagging, and potentially failing, given enough time. So, directly behind the cat, I added a $4US exhaust hanger. This will take the weight of the catalytic converter plus any hang from the front of the center resonator. I tightened the hanger just enough to take up the weight and be snug, but not enough to pinch the pipe.

Finish Up
Once supported, I re-tightened all of the clamps and completed the attachment of the system at the tail pipe. Last, I returned to the heat shield around the catalytic converter, applying the other 2 stainless steel bands at the front and rear angled sections of the cat. Once snug, I snipped the ends of the bands. I hadn't expected it, but the final overall install is closer to the underside of the car than the no-cat header-back system was. I'm not sure what is really different, but the front of the center resonator is higher off the ground. Not complaining. Quite the contrary; just surprised when I expected the opposite.

Test Drive
I now have until the end of May to find a day that is both sunny and when Oregon DEQ is open. Because of CoVid-19, this might be more difficult than your typical late-spring in the soggy Pacific Northwest. That didn't stop me from grabbing Boo, dropping the top and taking a drive to bake-in the heat shield. April is what I call our "donut hole" month where we get nice clear days between the winter wet and the soggy spring. So, we got some gas (masks on!), picked up go food from our favorite Thai restaurant (Rama Thai) and drove home. Oliver drove like a champ. I think he's quieter with the cat than he was before I installed it. Of course, it has been a while. I have greatly missed driving the convertible around, having parked him since we discovered last Fall that there is a leak under the windshield on the passenger side when it rains. For a car living in the Pacific Northwest, where it kinda rains a lot, that's not a good situation. So, once this Summer turns to Fall and the CoVid-19 economic impacts have resolved, I know what I'll be doing on this car: pulling the dashboard and windshield to replace the seal. Knowing me, I'll probably want to do a bunch of other stuff while I'm there, like replace the scratched-up windshield glass and the dried out original surrounding rubber. Maybe I'll replace the foam/vinyl dash pad that's all cracked and gouged up. I don't know. Let's see where we're at when that time comes.

If you haven't talked to the elders in your world lately, consider they have lived a life of relative isolation in the US before CoVid-19. So, they could use a friendly phone call now more than ever. As always, thanks for following along. Be safe, be patient and please be kind--

Tuesday, April 7, 2020

Oliver Gets a Cat (Part 1)

No, this isn't a children's story. Today, I will start to go through the fun of integrating a catalytic converter into the after-market exhaust in my 1978 MGB (named Oliver). Like so many projects these days, I have started some, but I am either waiting for parts or time before I can get it completed. In this case, I am waiting for parts.

Before I Start
In light of everything that is going on with CoVid-19, and the historically unprecedented unemployment and widespread hardship, I recognize that a blog about fixing up an old car or VW bus is fairly frivolous. In fact, some might be offended that I am not focusing my energies on helping our fellow man. That is a fair observation, and I apologize if you're offended. There is so much sobering news out there, perhaps this is my little bubble of normalcy.

In full transparency, for most of the projects waiting for my attention, I acquired 99% of the parts over many years. I am not tossing money around for parts like I have some massive pile of cash. The side marker housings from the last couple of posts, for example, had been in my garage for over 10 years. At the other end of that spectrum, I got the catalytic converter, and the spare exhaust pipe for this MGB exhaust project last Fall. Still, I will need a part here or there to complete the work on these projects, like electrical bits or pipe/hose clamps, etc. Also, there are times when cars fail, requiring a part, as is the case with K'Lack at the end.

I understand there are some who feel life's burden very acutely these days and the cost of a few car parts is a loaf bread and a can of tuna for someone else. Again, I hope this blog doesn't create animosity or frustration; my intent is the exact opposite: a respite from the seemingly endless stream of bad news and personal loss in the form of some guy writing about his often odd-thought ways he tries to keep his old cars running, personalized and comfy.

No Ring in that Bell
morning walk during
CoVid-19 lockdown
Recall a couple of years ago, the exhaust system in Oliver was failing. The head on the MGB has a shared middle exhaust port, and the slap-together exhaust manifold had a very rough angle on it. It looked bad and performed worse. The muffler had failed, so I pulled a full-on shade tree move and hooked up a make-shift muffler with a soup can to get through emissions. (see MGB Exhaust Re-Do Part 1) That was May 2018, and what a hoopdie Oliver was. Shortly afterwards, I purchased and installed a Bell stainless-steel exhaust. Prior to installing it, I had the whole thing ceramic coated. While most might think this was overkill, I did it for 3 reasons:
- to reduce the overall temperatures for more occupant comfort
- help the exhaust quickly flow out of the system because the exhaust stayed hotter and the inner walls are perfectly smooth and
- to change the note of the exhaust so it didn't have that high-piercing ring for months while the soot slowly built up inside the tubes... which is why a "seasoned" exhaust has that nice low note

I went through the fun of the install in MGB Exhaust Re-Do (Part 2).

No Cat Either
The drawback to this set up is that eventually I would have to introduce a catalytic converter to pass the every-2-years emissions test. That test is rapidly approaching, so I had to figure out how to integrate a catalytic converter (cat). Bell does not offer an option. So, I started where I began: lying along side the bottom edge of the driver door, trying to imagine where a cat could fit. In a bit of irony, Schmidty, the shop kitty, was more than willing to lie on top of me while I tried to figure it out. I found a basic catalytic converter on eBay (in early November, 2019): 1-3/4 inch diameter hole, 4-inch diameter stainless steel Thunderbolt cat, legal in 49 states (not CA, of course). This was the shortest and the smallest diameter cat I could find that didn't look like complete trash and had lots of fairly positive reviews. An added personal bonus: it was made in the USA.

Locating a Cat
figuring it out
Knowing that a catalytic converter is more efficient the closer it is to the point where the exhaust is created (due to faster warm up and longer high temps of the cat), I first looked to put it right where the header ends. You can see the end of the header in the left edge of the picture on the right. This, unfortunately, would abut a bit of frame just aft of the end of the header. So, I looked at a spot about a foot further back, where there was about 7 inches between a frame rail and a transmission support. While not as far forward as I'd like, and, instead almost directly under the driver's knees, this is still the best, possibly only, location. I found and ordered a replacement section of pipe for that spot from a small shop in Britain (in October 2019). Once I was ready to get after this project, I checked that the pipe would easily fit into the ends of the catalytic converter. I then suspended it from the original pipe with painter's tape and located where along it's length the cat would fit, and then where I would need to make cuts. I applied wide painters tape around the pipe near those cut points and checked them again and again and again. I marked those spots with a pen, and extended them all the way around the pipe.

Integrating a Cat
confirmed cut-marks
With the cut marks checked and re-checked, I took measurements of where the cuts would go for posterity (see picture). The longer, straight pipe is just over 11-1/2 inches long. The next cut is 18-7/8 inches further down. These measurements are taken from the front-end (front is front) of the pipe. I then took out my hacksaw and cut the pipe into 3 pieces at the marks I had made. To improve the cinching-down of the cat onto the pipes, I cut 4 channels (half-an-inch deep) on each end of the catalytic converter so the end of the cat will slightly collapse when compressed by the pipe clamps. I fit the 2 pieces I intend to keep into opposite ends of the cat and then offered it up to the header. Without clamps or anything, it will be a nice solid fit. I will, however, need a support for the pipe at the rear of the converter since there isn't one already on the MGB until after the center resonator. That would make for a long stretch of unsupported weight.

With a flat file, I took down the burrs where the cuts were made and then boxed and shipped the 2 keeper-pieces to the local coating company I used before (Finishline Coatings in Milwaukie, OR). I didn't necessarily need to get them coated, but I thought that having the whole system the same, except for the cat, would look and perform better. Besides, with the Covid-19 thing killing our local businesses, a little job like this might make a huge difference to a small shop like theirs. Based on the correspondence I had with them, it really did make a difference.

And Now, We wait
So, this is as far as I have been able to get. I am waiting for the pipes to come back from ceramic coating, grateful the owner is able to work through the Covid-19 lock-down. Regardless, I am patient and recognize the health of the fine folks at their shop is more important than a speedy completion of my pipes.

K'Lack Back but Lack
P0183 = fuel temp sensor bad
Before I go, one last item. A few weeks ago, we got K'Lack back from the transmission shop. It had been rebuilt with the wrong kit, and after 10 weeks of waiting and diagnosing, it was rebuilt with the right kit and returned to us. No charge for the rework, but when they re-installed everything, they didn't notice that they broke the evil plastic coolant outlet flange. We would start to drive it only to have the coolant light flash at us. We'd pull over, see the coolant was low, fill and repeat. I replaced the flange easily enough (remove the air filter housing for easier access), and everything seemed fine. Until the check engine light (CEL) popped on to let us know that the fuel temperature sensor, which was throwing codes last Fall, still needs to be replaced. Sigh. So, I pulled Oliver off the road thinking we had 2 viable cars, we really only have one. I will replace the sensor and we'll be back in business soon.

Thanks, as always, for following along. I hope you have found ways of amusing or entertaining yourself while on Covid-19 lockdown / shelter-in-place. Hopefully, the 10 minutes it takes to read through my musings helps entertain. While being at home is a blessing for many of us, it is also a time to be more patient with yourself and your loved ones. That may be easier said than done, I know. I am talking walks, stretching, trying out yoga, etc. to extend my patience. It seems to help. Take care, wash your hands, wear a mask and, as always, more to come--

Tuesday, October 16, 2018

MGB Exhaust Re-Do (Part 1)

Earlier this year, I described the slap-together exhaust solution I did to get the car through Oregon Department of Environmental Quality (DEQ) testing. I had a head-to-tail system waiting to get installed since before US Independence Day that had been sitting in the garage walkway, just waiting to get stepped on. Today's post covers the rip-out of the old exhaust and some explanation of the new Bell exhaust.

Mild, Stainless and Coatings
I should probably start by pointing out that I purchased a stainless steel exhaust and then had it high-temp ceramic coated in flat black. I arrived at this combination after listening to various exhaust systems available for the stock MGB through YouTube videos. I knew exhaust paint is temporary, and that it eventually chips and scratches to reveal the metal underneath. I wanted a system that didn't exist anymore: Peco. a mild steel exhaust, but then ceramic coated. Ceramic coating can scratch off too, but it is much harder to do and the finish is much hardier than paint. Especially if the people applying it know what they're doing, and prepare the surface correctly.

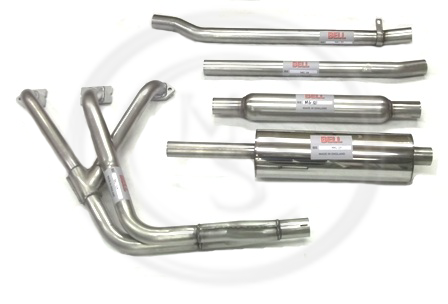
Bell system with center "bomb"
Since the Bell system was built on the same jig as the Peco, but out of stainless steel, I held to my plan. I thought it would cost more, but since the original Peco mild-steel systems are disappearing from inventory, they are really quite expensive now. The image to the right, here, is similar to what I bought. The sole difference is the system I got has a larger center resonator (third pipe down).

I have read that stainless exhausts, while they have an initial higher register note mixed into the lower overall sound, that higher pitch goes away as soot lines the insides of the pipes. So, when I selected my powder-coater, I selected a company that coated the insides of all of the pipes as well as multiple coats on the outside so the exhaust would have that ripened sound from the moment of install. The inner coat also serves an additional purpose of providing a slickery smooth surface so soot will not build up over time. Last, this ceramic coating has some kind of thermal barrier as well so less heat will transfer through the pipe walls, sending it out the tailpipe instead. This should help keep the cabin cooler in the summer.

Old Manifold Off First
The existing (not original) system was welded in from the exhaust manifold through to where I had soup-canned on a muffler. Yes, I used a soup can (See MGB Muffled) to connect a recycled muffler to the rusty pipes to get through DEQ without attracting attention. It worked, but as one would assume, the integrity of a soup can is no match for the stresses of an exhaust system, and it split apart at some point shortly after that. With all the other action this Summer, I didn't really have time to do the full exhaust replacement, or I'd not have the convertible to play with while the weather was nice. Well, the weather turned to cold and rain early this year, so with an uncharacteristically empty autumn Saturday, I grabbed K2 and set to it. First things first: get the front end as high in the air as you can (safely) on jack stands and make sure it does not budge when you shake the car.

old system sans catalytic converter
K2 got the fun job of removing the exhaust manifold from the head while I worked on the other end, figuring we would meet in the middle. I had just replaced the manifold gasket, so I knew that process well enough to give directions from underneath. There are 2 bolts, one on each end, and the other have nuts holding onto 4 studs. All are 1/2" but there is not sufficient room for a socket for most of the nuts, so K2 worked them free with an old-skool combination spanner.

Just as a point of reflection, he was using the Sears Craftsman wrenches that I got for Christmas when I was his age. 30 years later, they have hardly aged. RIP, Sears; it is truly ironic that you, a company rooted in catalog mail-order, met its demise due to Amazon, an internet-order company. You were the one rare store where product quality remained relatively high while prices stayed reasonable. Sears never felt cheap (like Target does), and you offered practically anything a shopper might need other than food. The store closest to me is closing, bringing our 30+ year relationship to an end. Sadness.

Anyway... with the nuts and bolts off, K2 carefully slid the intake and exhaust manifolds off of the head, taking care not to disturb the gasket. The gasket still looked new and the copper sealant between the gasket and the head looked like I had just put it on. Honestly, since I'd only driven the car a couple of miles since I did it, I'm not sure the gasket and sealant ever got all the way up to temperature. So, yeah, that gasket is basically new.

Tail End Removal Next
Meanwhile, I was working on the other end. I noticed the split in the soup can, and figured that the tail-end would just come apart with a good yank once the tail mount was removed. I gave the muffler a hardy tug and it came right off. With a clatter I tossed the muffler into the driveway exclaiming "the first of the exhaust is off". Once K2 had the manifolds clear of the head, we figured out that the pipe needed to be cut to get free. I grabbed the angle grinder (and gloves and a face-shield. Safety First!) and cut the pipe just aft of the collector (and in front of the catalytic converter). With the mid-section now free, it rested on the garage floor. It soon joined the muffler in the sprinkling drizzle on the driveway. K2 was now able to pull the manifold free up through the open bonnet and set it on the rust pile in the driveway.

look at that non-transition
With the old system in pieces, we were able to take a better look at the custom exhaust manifold. The center pipe, which carries 50% of the load was no larger than the other 2 pipes, and had such a horrible flow to it that there was soot collected at the entry point. The soot was so thick, I could barely get my index finger in the hole without touching soot all the way around. The pipe had a 80* or sharper angle at the mate-point with the flange (check the picture to the right). Such bad flow. Just addressing that alone will improve the exhaust flow and behavior of half of the cylinders.

Tossing the rusty bits to the driveway, we chose to take a break. I quickly cut the catalytic converter free from the other debris, and slid it under the 280ZX for later use.

This post got super long once I wrote about the install. So, I'm stopping here and will continue in the next post. Thanks for following along-


Tuesday, April 24, 2018

eMission Control, We Have a Problem

The registration on the MGB runs out in May, so I need to get it through smog testing soon. Today's post covers the discoveries made.

How Works MGB Emission Controls
"the 70's were an interesting time". I find myself saying that any time I look at a building or house constructed in the 1970's. They're just weird. There are strange angles, funky roof lines, sunken rooms and simply unfurnish-able spaces. This experimental period was also the when the first attempts at vehicle emission controls took place in the US. Some of the ideas were decent, took hold and persist in some form today. Others were just strange, and I wonder if they really did anything at all. So today we look at the MGB, circa 1978. When this little car was built, emission controls were mandatory, unleaded gas was prevalent and even now cars this old still need to pass emissions standards in highly populated areas in Oregon.

By 1978, they had figured out that venting crankcase pressure to the atmosphere was bad, so the PCV (positive crankcase valve) idea was born. In the MGB, this takes the form of a hose running from the case to the air cleaner. This is item #57 in the MossMotors image to the right. The oily air gets burned during combustion. By this time, they had also figured out that gas fumes from the fuel tank (and carb) shouldn't vent to the atmosphere, so these gasses are routed to the valve cover (hose #70) to get sucked into the engine while it's running or they settle into the charcoal in a special canister (#60) designed for this.

The 1978 MGB was fitted with a catalytic converter (cat) in the exhaust piping. This simply uses the heat of the exhaust to get really hot and burn off any unburnt fuel that passes into the exhaust. These reduce the hydrocarbons in your exhaust and an emissions failure for "HC" is probably because your cat is failing. Some folks swear by the CRC "guaranteed to pass" fuel additive to effectively clean your cat for a short term, allowing you to pass emissions. This feels a little like cheating, but if it is just to keep you clean long enough to save the cabbage to buy a replacement cat, maybe it's not.

Last, there's the smog pump system. This thing runs on a belt, and effectively pushes filtered air into the exhaust while the engine is running. If you think about it for a minute, this effectively was designed to fool the emissions tests by diluting the amount of pollutants running out the exhaust with fresh air. How this got past the fed's, I don't know.

Missing in Action
When I got my MGB, I really didn't know much about them or what to look for under the hood. Turns out, there aren't emission test needed for cars owned and registered outside a certain seemingly arbitrary line around the greater metropolitan area. The seller lived outside the line, so he made modifications that aligned with his lack of emissions test adherence. These modifications weren't apparent to me until after I got the "B" home, and was well into the front-end tear-down effort last winter.

So, what's missing? Well... all of the under-the-hood stuff. There's no smog pump, nor gulp valve, connecting hoses nor even an access point in the exhaust manifold. The (oil breather) hose that is supposed to run from the crankcase to the air cleaner is missing and there is no facility for a hose to fit in the air cleaner had the hose been present. The vent line from the gas tank ends unceremoniously next to a bracket that should be holding the charcoal canister which is also missing. In all fairness to the prior owner, I think I lost the charcoal canister. The carb set up was changed so there is no vent coming off the float-bowl. At least I have a catalytic converter. Or, at least it looks like one. It doesn't look like the stock one, so it may not be terribly effective.

What to Do?
Looking at all of the missing, I still need to pass this test or I will have a very spendy undriveable car. I started with the most obvious: get a charcoal canister and hook up what I can to it. Bottom line, if the Department of Environmental Services (DEQ) person can smell gas, you fail before they start. So, I bought a used one off eBarf. Next, I'm going to run route the oil breather into the air cleaner somehow. Then, I'll do a full tune-up: oil change with filter, clean the steel mesh air filter, new spark plugs, wires, dizzy cap and rotor. My challenge will be getting a tank of fuel with the CRC stuff through the engine during the rainy season without a convertible top. First things first: fit the charcoal canister, do the oil breather and tune-up.

That's it for today. I welcome ideas for how to get through the DEQ so I can keep this car moving forward with an eye for playing this summer. I'll post a follow-up on what I did and how the DEQ folks responded. Thanks, as always for following along-