Showing posts with label soup. Show all posts

Tuesday, October 16, 2018

MGB Exhaust Re-Do (Part 1)

Earlier this year, I described the slap-together exhaust solution I did to get the car through Oregon Department of Environmental Quality (DEQ) testing. I had a head-to-tail system waiting to get installed since before US Independence Day that had been sitting in the garage walkway, just waiting to get stepped on. Today's post covers the rip-out of the old exhaust and some explanation of the new Bell exhaust.

Mild, Stainless and Coatings
I should probably start by pointing out that I purchased a stainless steel exhaust and then had it high-temp ceramic coated in flat black. I arrived at this combination after listening to various exhaust systems available for the stock MGB through YouTube videos. I knew exhaust paint is temporary, and that it eventually chips and scratches to reveal the metal underneath. I wanted a system that didn't exist anymore: Peco. a mild steel exhaust, but then ceramic coated. Ceramic coating can scratch off too, but it is much harder to do and the finish is much hardier than paint. Especially if the people applying it know what they're doing, and prepare the surface correctly.
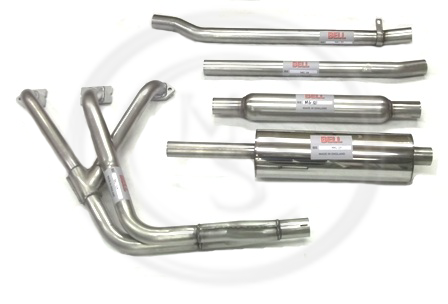
Bell system with center "bomb"
Since the Bell system was built on the same jig as the Peco, but out of stainless steel, I held to my plan. I thought it would cost more, but since the original Peco mild-steel systems are disappearing from inventory, they are really quite expensive now. The image to the right, here, is similar to what I bought. The sole difference is the system I got has a larger center resonator (third pipe down).

I have read that stainless exhausts, while they have an initial higher register note mixed into the lower overall sound, that higher pitch goes away as soot lines the insides of the pipes. So, when I selected my powder-coater, I selected a company that coated the insides of all of the pipes as well as multiple coats on the outside so the exhaust would have that ripened sound from the moment of install. The inner coat also serves an additional purpose of providing a slickery smooth surface so soot will not build up over time. Last, this ceramic coating has some kind of thermal barrier as well so less heat will transfer through the pipe walls, sending it out the tailpipe instead. This should help keep the cabin cooler in the summer.

Old Manifold Off First
The existing (not original) system was welded in from the exhaust manifold through to where I had soup-canned on a muffler. Yes, I used a soup can (See MGB Muffled) to connect a recycled muffler to the rusty pipes to get through DEQ without attracting attention. It worked, but as one would assume, the integrity of a soup can is no match for the stresses of an exhaust system, and it split apart at some point shortly after that. With all the other action this Summer, I didn't really have time to do the full exhaust replacement, or I'd not have the convertible to play with while the weather was nice. Well, the weather turned to cold and rain early this year, so with an uncharacteristically empty autumn Saturday, I grabbed K2 and set to it. First things first: get the front end as high in the air as you can (safely) on jack stands and make sure it does not budge when you shake the car.

old system sans catalytic converter
K2 got the fun job of removing the exhaust manifold from the head while I worked on the other end, figuring we would meet in the middle. I had just replaced the manifold gasket, so I knew that process well enough to give directions from underneath. There are 2 bolts, one on each end, and the other have nuts holding onto 4 studs. All are 1/2" but there is not sufficient room for a socket for most of the nuts, so K2 worked them free with an old-skool combination spanner.

Just as a point of reflection, he was using the Sears Craftsman wrenches that I got for Christmas when I was his age. 30 years later, they have hardly aged. RIP, Sears; it is truly ironic that you, a company rooted in catalog mail-order, met its demise due to Amazon, an internet-order company. You were the one rare store where product quality remained relatively high while prices stayed reasonable. Sears never felt cheap (like Target does), and you offered practically anything a shopper might need other than food. The store closest to me is closing, bringing our 30+ year relationship to an end. Sadness.

Anyway... with the nuts and bolts off, K2 carefully slid the intake and exhaust manifolds off of the head, taking care not to disturb the gasket. The gasket still looked new and the copper sealant between the gasket and the head looked like I had just put it on. Honestly, since I'd only driven the car a couple of miles since I did it, I'm not sure the gasket and sealant ever got all the way up to temperature. So, yeah, that gasket is basically new.

Tail End Removal Next
Meanwhile, I was working on the other end. I noticed the split in the soup can, and figured that the tail-end would just come apart with a good yank once the tail mount was removed. I gave the muffler a hardy tug and it came right off. With a clatter I tossed the muffler into the driveway exclaiming "the first of the exhaust is off". Once K2 had the manifolds clear of the head, we figured out that the pipe needed to be cut to get free. I grabbed the angle grinder (and gloves and a face-shield. Safety First!) and cut the pipe just aft of the collector (and in front of the catalytic converter). With the mid-section now free, it rested on the garage floor. It soon joined the muffler in the sprinkling drizzle on the driveway. K2 was now able to pull the manifold free up through the open bonnet and set it on the rust pile in the driveway.

look at that non-transition
With the old system in pieces, we were able to take a better look at the custom exhaust manifold. The center pipe, which carries 50% of the load was no larger than the other 2 pipes, and had such a horrible flow to it that there was soot collected at the entry point. The soot was so thick, I could barely get my index finger in the hole without touching soot all the way around. The pipe had a 80* or sharper angle at the mate-point with the flange (check the picture to the right). Such bad flow. Just addressing that alone will improve the exhaust flow and behavior of half of the cylinders.

Tossing the rusty bits to the driveway, we chose to take a break. I quickly cut the catalytic converter free from the other debris, and slid it under the 280ZX for later use.

This post got super long once I wrote about the install. So, I'm stopping here and will continue in the next post. Thanks for following along-


Tuesday, June 12, 2018

MGB muffled

Continuing the saga of getting the MG summer-weather ready, today's post covers some fun with the exhaust system. I started this post a few months ago and forgot about it, so recognize this was before I got through DEQ. So, I was doing things that were lowest possible cost in case I needed money to get through DEQ (think engine rebuild, etc).

Quiet You
In each of the test drives where I verified my fixes, I couldn't help but notice 2 things. First, the MG was loud as #$%!. Second was the unmistakable sound of an exhaust leak (pop pop pop). Out of curiosity, I pulled out a decibel tester app on my phone and checked. Parked in the garage with the doors open, sitting in the driver seat, I started the engine, and pushed the revs up to 3k and back down. I peaked at just shy of 100dB. According to the application, that's as loud as a blender. In the driver seat.

When we had the donorZed, I noticed that the exhaust was the same smaller-diameter piping as the MG had: 2". In the interests of getting every usable part off that thing, I cut off the rear muffler (which was surprisingly not that rusty), and the catalytic converter (cat). I figured that one of the two cars could use one or both of those parts, and with DEQ smog a part of ownership of these cars for the foreseeable future, one of them would eventually have use for the cat.

So, with the blender-loud exhaust reality in my face, I decided to start with the muffler going onto the MG. One would reasonably think that the crazy-bending exhaust plus muffler wouldn't "just fit". And, it sort of did.

Soup Can Exhaust
Most of the exhaust system on the MGB is coated with rust. The pipes, the little cherry-bomb mufflers, even the exhaust manifold. There is deep rust everywhere. This makes welding replacements all the more difficult because you have to get to clean steel to have a good strong weld. Fortunately, there are no-weld joiners available for most standard diameter sizes. These are somewhat simple in their design with a straight section of pipe with an integrated band clamp at each end. You put 2 cut ends of pipe into each end of this thing and tighten. Simple. It reminds me of the old-skool way to patching a hole in the exhaust: cut a soup can into a patch and get it to hold on with hose clamps.

All of this leads us to my noise reduction. The MGB had 2 cherry bomb mufflers in sequence which were not really muffling noise at all. So, I cut off the one on the back and fitted the one from the donorZed. With some careful cutting, I was able to get the 2 straight sections to abut, but there is not an off-the-shelf no-weld joining thing to connect them. So, I went back to the old-skool roots and cut up a small can, and hose-clamped it together. Yeah, I'm not that proud of that, but remember, this was done before I got through DEQ.

I re-used the hangers that were there from the cherry-bomb muffler, and it was ready for testing. Total cost: $0. I tested the noise level the same way: car in with the garage doors open. dB levels hovered in the low 90's, so I shaved up to 10% of the noise just by putting a bigger muffler on. Truth-be-told, the muffler from the donorZed looks an awful lot like the stock MGB muffler. During the test-drive, it became clear that the rubber had completely dried up, so I had to resort to holding the center section of pipe off the ground with bailing wire. Yeah.. not too proud of that either.

I'll get after the backfire in another post. For now, the exhaust is quieter, if not in a better long-term disposition. My thinking: don't attract unwanted attention by the tester at DEQ. That includes disconnected things under the bonnet and a super-loud exhaust which might imply something non-stock is going on.

Anyway, that's it for today. I'll post on my attempts to solve the backfire and other developments as I do. Thanks, as always, for following along-