Showing posts with label coat. Show all posts

Tuesday, August 30, 2022

Zed Body Assembled

Quick post today. This past weekend, Boo, C and I put the hood, rear hatch and doors onto Zed, in that order. That's really all there is today, but we did learn some things, as we always do, along the way.

Hood
hood, door on
We started with the hood, not because we thought it would be easiest, but because it was the closest to the car, and we didn't want to trip over it. When I removed the hood to shoot it, the hood was open. Now, that sounds kind of obvious, but earlier, when I had it off, it had been closed. Back then, I could not get the mounting brackets to shift from closed to open position after I removed it. After all the prep work, I installed it to get the fenders and such to line up. When it came time to paint, I opened the hood and removed it vertically. I was by myself, but I figured if I scratched or dropped it as I removed it, it was not a big deal. For install, though, I needed hands to hold it steady or it would get scratched and that would have been super disappointing. I held one side and C held the other while Boo got all bendy, reaching into the engine bay with the bolts. Once they were fingered in, we lowered the hood (still unlatched) to put on the other panels.

Rear Hatch
hatch, door on
The rear hatch was the easiest of all 4 to install. C and I each held it aloft while Boo fingered on the nuts. The hinges were attached to the body, so they wanted to lay down in a way that we could not get to the underside to put on the nuts. C found some scrap foam and stuffed it under each of the hinges so they popped up enough to get the nuts on. The hatch still needs some adjustment to sit a little higher, I think, but I will probably wait on that until after I have the seal installed so I can get it where it needs to go. I figure I would have to adjust it after the seal goes on anyway.

Passenger Door
C and I planning
For the doors, I left the hinges installed against the car, and removed the bolts from the hinges into the doors. I did this for 2 reasons. First, and most obvious, the bolts that run through the hinges into the body are mostly covered by the fenders when they are installed... like they are now. With the body kit epoxied in place, those fenders are going nowhere. Second, the majority of the install wiggle is in the bolts the go into the car body. Once I got the doors where I wanted them before the last tear-down for paint, it is much easier to get them back where they belong with just the hinge-to-door bolts. Still, this is at least a 2-person operation: one holding the door (from the inside: protect the paint) and another threading in the bolts. I held the door, and moved it as requested while C did the threading. Boo, meanwhile, moved car-port supports and such out of the way.

Driver Door
The driver door was probably the hardest. Consider that the person doing the bolt threading needs to reach past the door from the inside, placing your head where the steering wheel is. Still, the process is the same: one person holds the door steady while the other threads the bolts. We took turns and after about 30 minutes we had the door on.

Front Bumper Adjust
bumper not yet adjusted
At this point, I cut C and Boo loose to get after their own Saturday afternoons while I fiddled with alignment of the various panels. I started with and got the hood square and evenly spaced on either side. I had to loosen the headlight bucket on the passenger side and push it outward, but otherwise the hood aligned relatively easily (read: 30 minutes). The doors latch, and they installed right where they were before, so I will probably leave them be until after the seals go in, like the rear hatch. Because of the nature of the latching mechanism for the doors, there really isn't very much forward/aft movement available, leaving just the height that you would really adjust. I am satisfied that the height is spot on, but once the weight of the glass is added, I may need to adjust them upward to compensate.

While standing back, admiring the front end, I noticed that the front bumper was much closer to the bottom of the passenger side headlight bucket than the driver side. It was a noticeable 10mm difference. I loosened the nuts holding the front bumper bar and tried to lower the passenger side or raise the driver side. It made very little difference (maybe 1-2mm). I had to loosen the front bumper brackets where they mount to the car and shim the driver side to make up the difference. They are exactly even now, but it took some doing.

Well, that's it for today. We have some housing things going on, so I'll probably go dark on the blog for a while. We had an unexpected opportunity to grab a small farmhouse on a large lot around the way. So, my time will be taken with home repair projects and then moving. Suffice to day, I will probably not be doing anything major on a car until winter.

Thanks, as always, for following along-

Tuesday, August 23, 2022

Zed Shot

Following the post from last week, I spent this past weekend getting Zed (1979 Datsun 280zx) painted. This has been such a long time coming, it is really hard to believe the painting is over. I may circle-back around and shoot some touch-up clear coat some day, but for now, the painting is complete. I have not color-sanded nor cut/buffed, but that isn't technically painting.... and I'm not going to do that for a while anyway. Unless I change my mind, cuz that never happens. About that painting...

Scrapping Booger Epoxy
base shot
I concluded my efforts the prior weekend with removing the clamps and confirming that the bumpers held in place. This confirmation was simply me tugging on them in various directions. Everything set right. Starting Saturday morning, I got after reducing the epoxy spread along the seams of the front bumper. Recall, I put that clear epoxy all over where you can't see, but wanted to make sure it really held to the fenders on the ends. So, I applied a bunch where you couldn't see and then ran a bead along the seam. this stuff sands off in boogers, so rather than suffer that again, as I did with the side skirts, I tried a different method this time.

Using the razor blade, I etched two lines, one a hair above and the other a hair below the seam. Then, using a piece of 320-grt sandpaper, I worked the edge of the epoxy until it lifted off a little bit. I grabbed that edge and pulled off small sheets that left a clean edge along the seam. This took far less time than straight sanding, and left a much cleaner finish. In the final picture below, you really can't see any evidence of epoxy peeking through.

more base
With the epoxy lines clean, I repaired some masking and performed my usual degreaser cleanse. Next, I set up for paint, laying down my air lines and mixing station, getting the supplies in place, etc. In the past, I did not get 100% ready, leaving things like lacquer thinner or a parts-cleaning brush in the garage. Inevitably I would have to open the garage door, letting all that stink into the house, just long enough to grab something. This time, I had my gun set up with the line drier, paint set out on a sheet of crap plywood, tarps on the ground, walls on the carport, etc before I even thought about mixing paint. Once I was set up, I took a break for food. Figure each coat takes about an hour, and I didn't want to be shooting hungry.

Shooting Base
Once fed, I wiped the car and the detached parts with a tack-cloth. I felt ready to go, but a little anxious after borking it the last time. I had the paint-correct activator this time though, so I was hopeful. Similar to the prior paint shoot, I mixed 20oz at a time, pouring most of the mixture into the hopper on top of the gun, leaving a little in the jar so it wouldn't drip out the air-hole at the top when I'm shooting at a sharp angle. Unlike the last time, I literally used a jar to mix in, versus a plastic measuring cup. The paint would stick to the plastic cup; it doesn't stick to glass. I pre-measured my mix lines (4oz for activator, 12oz on top of that for base), and simply poured in the activator to the first line and filled with color to the second. I hand shake the can of base for a few minutes before each session, and then shake it for a few seconds before each mix into the jar... because this has metal flake in it. I imagine, if this were just color (no flake), I wouldn't need to do that pre-jar shake. I want to make sure there's plenty of flake in each mini-batch.

hood base close-up
Because I failed to set up the gun correctly the last time, I was a little more sensitive this time. I had at least one coat still on the car, so I didn't need multiple coats everywhere, and I didn't have a full gallon left anyway. So, to set up the gun, I roughed-in the pressure by setting the pressure at the compressor to 30. I have read that there is some pressure loss down the lines, so rounding up a couple of pounds is better. I have a pressure regulator with a gauge at the gun plus the pressure control knob on the gun itself. I understand that necking down the pressure only at the paint-gun end of the hose will reduce the pressure, but the volume of air increases. So, by setting the pressure at the tank closer to your end-desired pressure, the volume will not meaningfully change when you lower the pressure at the gun by a few pounds. Anyway, with the pressure set, I hooked up my in-line drier, opened up the paint volume knob and started shooting test fans on one of the replacement hoods I got for ToyoTruck. In my last session, I used some cardboard. I don't know if this made a huge difference, but I figure test-shooting onto auto-steel is probably a better fan-test than paper.

Satisfied I was getting a fan that laid down without orange peel, spitting or thin spots, I set to shooting the arrayed parts (hood, tail gate and doors) and then the main shell. I had thought I had enough paint for 2 coats. I was wrong. When I thought I had enough for 2 coats, I shot the most important stuff first (omitting the door jams), and then did not have enough paint to get the door jams. So, after the weather seals are on, there may be a few spots in the door jams that don't have the coverage the rest of the car enjoys. Since I was out of paint, I just moved on. I figure I can get a rattle can of this paint (9mm metallic) from Eastwood if it really bothers me.

Shooting Clear
hood clear'd
I have read that letting your paint dry for up to 4 hours before applying clear coat is a good idea. Others have said you can shoot it as soon as the directions for the base say you could shoot another coat of base (like 15-20 minutes in my case). I decided that a little extra off-gassing / drying wouldn't hurt so long as I shot the clear coat within 24 hours of the base. Outside of 24 hours, the base needs a scuff for the clear to really adhere. I figured early Sunday afternoon was inside the 24 hour window, since it was now past 4PM. My other options were to shoot right away or wait a few hours and shoot after dark. I didn't like either of those, so I cleaned up the gun, and the work area.

Sunday morning started similar to Saturday afternoon. I already had the walls up and the tarps down. So, I just needed to set up the painting rig. I had chosen Eastwood's Low-VOC High Solids clear. The reviews were not as good as some of their other clear coats, but most of the complaints were about it's ability to flow out the gun. The advice was to include reducer, which I did. The standard mix for the clear is 4-parts clear to 1-part activator. I added about 1.5 parts reducer. Similar to my use of a jar for the paint to get my measurements consistent, I used a different jar for the clear. Otherwise, the process was the same.

rear clear, in the sun
The weather for both Saturday and Sunday was peculiar for the west-of-the-Cascades Pacific Northwest. The sky was overcast, which made painting much easier. When I shot a few weeks ago, it was very sunny. You would think all that light would make it easier to shoot, but it didn't. Seeing the fan and the paint lay down was much harder in all that light. The overcast skies created a flat light that allowed me to see the target and the paint (and clear) much easier. Weeks ago, I used a GunBudd to help me see. This time, I didn't need anything to see. I did, however, have to wait for the weather to warm up to 70*F. It's a really strange feeling, waiting for the air to get above 70* in August, but that's the world we're in, I guess.

front p-side clear'd
The clear laid down very well, and flowed out the gun without issue. I probably could have used a little less reducer, as I suffered a few drips and sags. Still, I was able to get 2 nice coats of clear before I ran out of reducer. As the clear dried, I became less and less concerned about the drips/sags and more pleased with the overall look. From the pictures, everything looks a little wavy, but I'm okay with that. Without the camera, I think it looks amazing and the difference in the way the color looks between sunlit and shadowed is remarkable. In the first clear picture of the hood above, you can see my elbow in the lower right corner reflecting off the hood. My arm is probably 5 feet away, and that's not a shadow (I'm actually facing west); that's the reflection of my arm. I think that describes how deep this paint can look once it's wet sanded, cut and buffed. Thinking of the imperfections, I know I can sand those drips down and the waves will sand flat. I have more clear, so I can re-shoot areas if I really need to. For now, I am going to let everything sit for a few days, and then start gingerly attaching the hood, rear lid and doors.

I don't know for sure what's next. Well, strip the masking, but maybe I'll clean the engine bay and then start re-installing the electrical stuff. Or do I do windows next? I don't know. I suppose the next logical step is to sort through the shed-room and figure out what I have and don't have. Let's not forget, when I inherited this project, it was a basket case. After all the painting, I still have boxes and piles of unlabeled parts. So, I guess the next step is to empty out the jigsaw puzzle pieces and start sorting.

That's it for today. Thanks, as always, for following along-

Tuesday, October 23, 2018

MGB Exhaust Re-Do (Part 2)

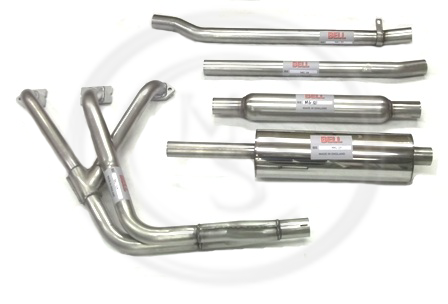
Picking up where I left off, we have the MGB front end on jack-stands and the old exhaust sitting in a heap in the driveway. Today's post will be about getting the new exhaust installed. Recall, it is a ceramic-coated stainless steel Bell system. I left the packing plastic bags on the pipes as I handled them to protect the finish, removing the plastic as I installed them.

Setting The Scene
exhaust hammer example
from streettechmag.com
With break time over, we set to trying to install the new exhaust. The Bell system has 5 pieces: the header, a straight-ish pipe, the center resonator, another straight-ish pipe with a support bracket attached and then the tail muffler. They go on in that order. The hardest part, like with any car, is getting the header to fit around all of the various other things in the engine bay. I watch car shows on Velocity and some of those installs require hammering on the pipes to get them to fit. That would really suck. Spend all that money for a "bolt on" set of pipes and then have to dent the snot out of them to fit an otherwise stock engine and compartment. Doesn't seem right, but does explain the custom fabrications they do on some of those Velocity shows. Even then, it's usually because they're slamming a huge non-stock engine into a classic-ish car. For a built-for-stock engine, hammering dents into the pipes shouldn't be necessary. Anyway...

From Below?
For the MGB, this saga starts with getting the front end way up in the air. We had a good 18" of clearance and still couldn't feed the header up from below. Some internet posts I've read indicate this is super easy, but I suspect anyone who installed that way had a lift or a pit. We have neither so we switched to going in from above. That meant removing the bonnet.

From Above
attached for fitting the rest
of the pipes
The bonnet is held to the hinges with 2 bolts per side, but remove the hood prop first. Once the prop is off, one person holds the hood still from the front while another person (K2 in this case) loosens all the bolts, and removes one from each side. At this point, it would be wise to put a shop towel or something soft under each rear corner of the hood. Then, remove a final bolt from one hinge. Balance the hood on your shoulder and let it slide down onto the towel. Repeat with the other side and then each person grabs a side of the hood and walk it off the front. For fun, we set it (on pads) on top of the 280ZX hood. The MGB hood looks like a toy hood compared to the Zed hood. The MGB hood is at least 6 inches smaller all the way around.

center-mount bracket
With the hood removed, you next loosen the driver side engine mount. The two nuts which hold the engine to the mount are the easiest to get to, and present the least necessary to separate the engine from the frame rail. With nuts safely stowed, place a wood block on a floor jack and slide it under the driver-side of the oil pan / engine block. Carefully lift the engine from below (setting the block of wood so the oil pan and other parts are not damaged) an inch or so. Once you feel considerable resistance to the lift, stop lifting. Now, have your helper fit a pry bar between the engine mount and the engine and then apply pressure to shift the engine slightly towards the passenger side. The engine will more roll anti-clockwise than slide left-to-right, but this creates enough space. Hold the header vertically, with the head-tips pointing across the top of the engine. Slide the header as far down into the largest space you can go before rotating the header so the head-tips point up and away from the firewall. On this particular header, there are pinch-welds along the sides of the collector. These pinch welds wanted to hang up on pretty much everything on the way down. With some gentle and some not-to-gentle persuasion, the header pushed past the space between the block, the steering column and the frame allowing us to wiggle it into the right spot near the head. At this point, the pry-bar leverage can be released and the floor jack released, letting engine rest back on the mount. We had to wrestle it a little bit, but it settled. Our header ended up with a couple minor scuffs, but no scratches.

To get everything else to align, K2 bolted the header onto the head. K2 was done for the day at this point, and the rest of the install was not going to be as straightforward, so I cut him loose.

Body Brackets
header from below
While K2 attached the header to the head for fitment / alignment, my focus was on the 2 mounting brackets. The center mount reuses the original body mount holes with a new steel and rubber mount that simply threaded in with new bolts (in the kit). The rear mount also reuses the original body mount holes. If yours are still in great condition, you could reuse them. With the body brackets on, I could start lining up the pipes, and get a feel for what went where.

The fourth pipe (second straight-ish) had a bracket that was a simple flat bar wrapped around the underside of the pipe with a round hole at each end. The center-mount kit provided a bolt, 4 large flat washers, 2 plastic sleeves, a bit of metal flashing with holes and some small nuts and bolts. There were no instructions, but you could tell that the bolt went through the holes in the flat bar. A flat washer went between the flat bar and anything else that touched it. Between the ends of the flat bar, on the bolt, went the plastic sleeves and the nut went on the end. Neat. With some careful bending of the flat bar with my channel-lock pliers, I was able to get the operation together. The bit of metal flashing was to wrap around the plastic sleeves and then bolt to the center-mount bracket I had just attached to the car.
second straight-ish pipe mounted

To get the fourth pipe and centermount to align and fit, all of the pipes between that mount and the header need to be in place. Start with getting the pipes in the rough spot you expect them to be. A straight-ish pipe (one that has a gentle bend or two) has those bends for a reason. Align them with the path of the original pipes. Once set in the right location, fit a pipe clamp between the pipes and then slide them together, wiggling the fit so they stay together and are in the right alignment. With careful use of a rubber mallet, I was then able to drive the various pipes together. Remember to set a pipe clamp at each junction before you start pounding things together or you won't have a way of clamping things together.

Rear Muffler
The final hurdle was figuring out the rear muffler mount. The old mount was a real hack job where a prior owner had taken a u-bolt that roughly fit the original body mount and threaded a nut on each end. So bad, but I really shouldn't judge. The original mount was almost German in it's over engineered solution. To the bracket is attached 2 rubber mounts pointing away from the exhaust pipe. To these rubber mounts, a hexagon bracket (with one leg removed) is attached, with the missing leg on the bottom. The missing leg has a pair of holes, one at each end, for attaching a pair of semi-circular clamps. These clamps hold the pipe in place. Unfortunately, they are sized such that if you put them on without any spacers (not included) they will either pinch the exhaust pipe because you tightened them too much or the lower clamp will fall off because you didn't tighten them enough... because you didn't want to pinch the pipe. To remedy, I found a pair of oversized nuts that would slip on, acting as spacers, so I could tighten everything down without pinching the pipe.

Header to Head
see the gap?
Once I had it all assembled front to back, I moved from back to front, tightening the mounts and pipe clamps. Once snug, I shifted to the very front to consider the mating of the manifolds to the head. The MGB came with a few types of exhaust, with 2 particular versions for the models before emissions standards became so tight (in 77) that the exhaust manifold needed to be redesigned. These 2 types have a different thickness of the material through which you send bolts to attach it to the head. The older one (#12H709) is thicker than the newer one (#12H3911). This is important because the intake and exhaust share studs and corresponding nuts. If the thickness of one manifold is not a match for the other, there is not a uniform amount of torque on the various manifolds, creating leaks. This applies to pretty much any combination of intake and exhaust, unless you stay completely original stock. Since the prior owner had replaced the dual carbs on my MGB with a side-draft Mikoni carb, and hacked together a home-grown exhaust, I was going to have to deal with this regardless.

When the header was attached for fitting the other pipes, I didn't look very closely. It didn't matter. With a closer look, you can see the washers were not sitting flush. Adding insult, only two of the thickness differences for the 4 shared studs were the same. To remedy, I grabbed some fender washers of varying thickness, and cut them in half (across the hole) to use as spacers. To hold the spacer in place during install, I used a very thin smear of the copper gasket maker I used on the header gasket. This plan worked great. In about 30 minutes I had spacers in place, and the header torqued down with washers sitting flush.

gap gone
Testing
All of this, nearly 2 full days of effort, lead up to the test fire. Of course, I had to re-assemble the air cleaner, and the hood is still off, but after verifying everything was back together, it was ready. I had been trickle-charging the battery, too, so I was pretty confident it was going to start right up. Fortunately, it did. It sounds great. It has a nice deep tone without being too loud. The biggest difference, I think, is that all of the growl sound comes from the rear of the car now. It must have had leaks before. With all of the rust, that's not a surprise. I wound the engine up to 3000RPM to get a sense of how it will sound on a power pull and it sounds pretty awesome. With the top down, the garage doors open and the rev counter around 3k, I still hit 90+ dB. So, it is no quieter... in the garage with the doors open. On the road, it is quieter in the seat, but I don't have dB numbers to prove it. Just my ears.

That's it for today. I had started reading about how to do automotive interiors (trimming) in preparation for doing the seats and cards on the MGB. I have parts on-order to complete the trunk and woofer box as well. Once those are complete "major operations" will have completed and I will be shifting focus onto the Zed... and then back to Hapy. Thanks, as always, for following along-

Tuesday, October 16, 2018

MGB Exhaust Re-Do (Part 1)

Earlier this year, I described the slap-together exhaust solution I did to get the car through Oregon Department of Environmental Quality (DEQ) testing. I had a head-to-tail system waiting to get installed since before US Independence Day that had been sitting in the garage walkway, just waiting to get stepped on. Today's post covers the rip-out of the old exhaust and some explanation of the new Bell exhaust.

Mild, Stainless and Coatings
I should probably start by pointing out that I purchased a stainless steel exhaust and then had it high-temp ceramic coated in flat black. I arrived at this combination after listening to various exhaust systems available for the stock MGB through YouTube videos. I knew exhaust paint is temporary, and that it eventually chips and scratches to reveal the metal underneath. I wanted a system that didn't exist anymore: Peco. a mild steel exhaust, but then ceramic coated. Ceramic coating can scratch off too, but it is much harder to do and the finish is much hardier than paint. Especially if the people applying it know what they're doing, and prepare the surface correctly.

Bell system with center "bomb"
Since the Bell system was built on the same jig as the Peco, but out of stainless steel, I held to my plan. I thought it would cost more, but since the original Peco mild-steel systems are disappearing from inventory, they are really quite expensive now. The image to the right, here, is similar to what I bought. The sole difference is the system I got has a larger center resonator (third pipe down).

I have read that stainless exhausts, while they have an initial higher register note mixed into the lower overall sound, that higher pitch goes away as soot lines the insides of the pipes. So, when I selected my powder-coater, I selected a company that coated the insides of all of the pipes as well as multiple coats on the outside so the exhaust would have that ripened sound from the moment of install. The inner coat also serves an additional purpose of providing a slickery smooth surface so soot will not build up over time. Last, this ceramic coating has some kind of thermal barrier as well so less heat will transfer through the pipe walls, sending it out the tailpipe instead. This should help keep the cabin cooler in the summer.

Old Manifold Off First
The existing (not original) system was welded in from the exhaust manifold through to where I had soup-canned on a muffler. Yes, I used a soup can (See MGB Muffled) to connect a recycled muffler to the rusty pipes to get through DEQ without attracting attention. It worked, but as one would assume, the integrity of a soup can is no match for the stresses of an exhaust system, and it split apart at some point shortly after that. With all the other action this Summer, I didn't really have time to do the full exhaust replacement, or I'd not have the convertible to play with while the weather was nice. Well, the weather turned to cold and rain early this year, so with an uncharacteristically empty autumn Saturday, I grabbed K2 and set to it. First things first: get the front end as high in the air as you can (safely) on jack stands and make sure it does not budge when you shake the car.

old system sans catalytic converter
K2 got the fun job of removing the exhaust manifold from the head while I worked on the other end, figuring we would meet in the middle. I had just replaced the manifold gasket, so I knew that process well enough to give directions from underneath. There are 2 bolts, one on each end, and the other have nuts holding onto 4 studs. All are 1/2" but there is not sufficient room for a socket for most of the nuts, so K2 worked them free with an old-skool combination spanner.

Just as a point of reflection, he was using the Sears Craftsman wrenches that I got for Christmas when I was his age. 30 years later, they have hardly aged. RIP, Sears; it is truly ironic that you, a company rooted in catalog mail-order, met its demise due to Amazon, an internet-order company. You were the one rare store where product quality remained relatively high while prices stayed reasonable. Sears never felt cheap (like Target does), and you offered practically anything a shopper might need other than food. The store closest to me is closing, bringing our 30+ year relationship to an end. Sadness.

Anyway... with the nuts and bolts off, K2 carefully slid the intake and exhaust manifolds off of the head, taking care not to disturb the gasket. The gasket still looked new and the copper sealant between the gasket and the head looked like I had just put it on. Honestly, since I'd only driven the car a couple of miles since I did it, I'm not sure the gasket and sealant ever got all the way up to temperature. So, yeah, that gasket is basically new.

Tail End Removal Next
Meanwhile, I was working on the other end. I noticed the split in the soup can, and figured that the tail-end would just come apart with a good yank once the tail mount was removed. I gave the muffler a hardy tug and it came right off. With a clatter I tossed the muffler into the driveway exclaiming "the first of the exhaust is off". Once K2 had the manifolds clear of the head, we figured out that the pipe needed to be cut to get free. I grabbed the angle grinder (and gloves and a face-shield. Safety First!) and cut the pipe just aft of the collector (and in front of the catalytic converter). With the mid-section now free, it rested on the garage floor. It soon joined the muffler in the sprinkling drizzle on the driveway. K2 was now able to pull the manifold free up through the open bonnet and set it on the rust pile in the driveway.

look at that non-transition
With the old system in pieces, we were able to take a better look at the custom exhaust manifold. The center pipe, which carries 50% of the load was no larger than the other 2 pipes, and had such a horrible flow to it that there was soot collected at the entry point. The soot was so thick, I could barely get my index finger in the hole without touching soot all the way around. The pipe had a 80* or sharper angle at the mate-point with the flange (check the picture to the right). Such bad flow. Just addressing that alone will improve the exhaust flow and behavior of half of the cylinders.

Tossing the rusty bits to the driveway, we chose to take a break. I quickly cut the catalytic converter free from the other debris, and slid it under the 280ZX for later use.

This post got super long once I wrote about the install. So, I'm stopping here and will continue in the next post. Thanks for following along-


Tuesday, February 27, 2018

Around the Rim (Part 3)

Today's post continues the saga of upgrading the rims on the '78 MGB from the crummy chromeys to some mid-90's Honda alloys.

Clean, Clean Again
original Honda rims
After 30 years of use, and very little in terms of care, these new-to-me rims needed some love. First, they needed to be cleaned. I started with some basic car wash, a scrub brush and a hose. This worked some, but there was some stubborn brake dust and other grime on the insides. This took brake cleaner and some 150-grit sandpaper, but I was able to get down to some silver. I washed them a third time, this time with dish soap and a scrubby sponge in my kitchen sink (Boo puts up with so much). Once cleaned up, we could really get a look at what I'd bought.

Assess the Damage
Two of the rims were in fairly good condition. There wasn't much in terns of curb rash around the outer edges, and there were only a few scrapes from what looked like applying snow chains. The other two rims, however, had been in a few fights. There were some small chunks chipped out nearest the rubber, and many many gouges in that outer edge as well. Sadly, there were some deeper wedge-shaped scrapes in the face where, again, it looked like the rubber strap for tire chains had been put on possibly wrong such that the loops dug into the rim.

Plan the Work
The damage, though, was purely cosmetic. I was able to add air, and the air held in all 4 tires. Since the damage was surface, I knew I could repair it, but I felt I would need to paint rather than restore to plain aluminum. I'm sure there are others out there who can repair aluminum such that it looks like the damage was never there. That's not me.

paint concept (upper right)
To fix the chips and gouges, I thought about brazing alumi-weld into the gouges, and then polishing. Alternatively, I could use Lab Metal. I've used that stuff before, and it really does finish nicely, but I'm not convinced that it will leave the exactly right color. I suppose I could mix aluminum dust from sanding the rim into the mix for coloring if I really wanted to retain the all-aluminum look. After looking at the rim on the car, I think adding some color would look better, especially since there is a very limited amount of chrome on the car.

So, I planned to repair the chips and gouges with Lab Metal, and paint the outer lip and the mag-face, leaving an inner rim and the insides of the mags the original aluminum. This would bring out some of the chrome while not having an overwhelming amount of it. I mocked up a few options in paint so I could get a sense of how it would look and then I got started. First, you need to get down to the bare aluminum.

Take off that Clear Coat
on-car paint concept
The Interweb is a great resource, but some advice just isn't that good. While some is wrong, other advice can just be ill-suited to either your skills or project. For example, there appear to be many folks advocating removing the factory clear coat by sanding until what you're removing shifts from white to grey. Then you know you're down to the aluminum. While this does work, it takes an incredible amount of time. If you try to short-cut the time by using a lower grit (like 60 instead of the recommended 100), the car part will get deeper gouges that need to be sanded off with higher grit. In the end, I'm not sure if much time gets saved. I tried this method with one wheel. Since clear coat is not applied uniformly, you will hit grey while also still removing coating. In the end, I think this method was a bust, and don't suggest it.

For the other 3 rims (and I came back and did the sanded rim too), I used airplane stripper. C had some from when he was stripping the paint off the 280ZX, so I knew it worked and worked well. At least on paint. I knew that it didn't damage rubber when little drips got on it. I laid out the three rims, and brushed stripper on one wheel at a time. Once I got done brushing the third rim, the first was about dry, so I applied a second coat. Doing all four wheels would have timed out just about perfectly. Once the second coat was dry, I attacked the rims with steel wool. The clear coating scrubbed right off, leaving the bare rim with little flecks of clear coat left behind. To get completely cleared, I used a razorblade scraper. The airplane stripper was significantly faster and left behind a better surface. I hosed the rims off, and they were ready for the next step: fixing the damage. I'll get into that next time.

Thanks, as always, for following along. More next time-