In my last post (Hapy not Spittin Fuel), I described a stressful drive home without turbo and then losing access to my 2 lower gears. Today's post covers the install of the Gene Berg shifter, and some other little bits on the bus as well as the replacement of the throttle cable on Oliver the 1978 MGB.
Before I begin, especially to my union brothers and sisters, Happy International Labor Day. Employee protections were and remain hard-fought; from a legally defined "work week" to overtime pay and safer working conditions, we have our unions to thank.
Throttling Oliver
 |
| Gene Berg shifter |
Both the new and old cables attached to the pedal the same way: round ball on the end of the cable fits into a nook on the underside of the pedal. So, once you pass the cable through the slot, the springs on the carb effectively hold the pedal up through steady tension through the cable. The other end of the stock cable has a fitting on it which presumably fits onto the old carb with a c-clip or similar. I had to cut that off so I could thread the raw cable through the more common hole with a bolt model. Cutting the cable left wire shrapnel at the end, so it would not easily fit through the hole. Ultimately, I had to remove the actuator arm and the spring arm from the side of the carb so I could more directly feed the wire into the hole. While this was more destructive initially, I was getting nowhere trying to send a cable through a hole I could barely see.
One the cable was through the hole and bolted down tight enough so it would not fall off, I put the arms back, and re-added the spring. I got Boo to sit in the driver seat and move the pedal through it's full motion so I could set the depth of the hard tube and the cable length. I had other things to get after, so I did not test fire and drive Oliver. In retrospect, that may have been a missed opportunity.
Gene Berg Shifter
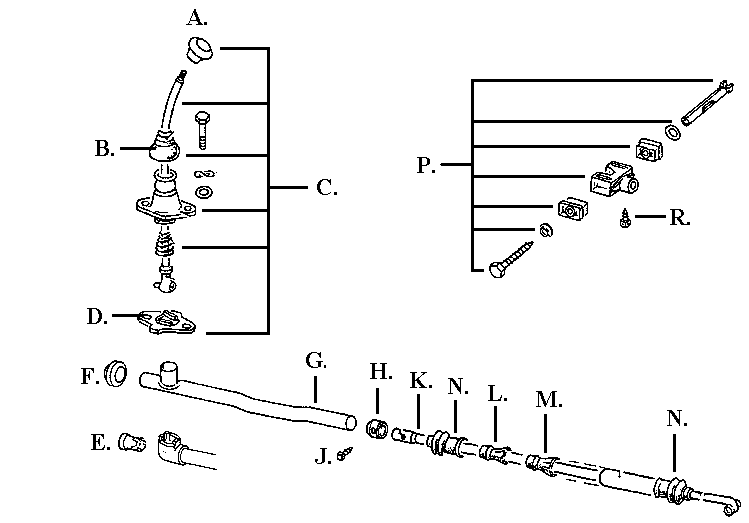 |
| shifter diagram |
 |
| greased up |
I test fit everything first, and finger-threaded the supplied bolts into the respective holes, just to be sure everything would fit. Then, I took it apart and greased everything: the ball, the slides, the shift plate, and the cup the shifter tip sets into. Then, I installed it again. One thing about a test fitting is the second time around, you know how it all goes together, making the final fitting much faster. Because of the adjust-ability factored into the shifter, it was easy to wiggle the shifter and the mounting footing to get it seated squarely and threaded snug. I tested the movement of the stick and did not feel a need to adjust it. I figure after some longer test drives, I will know for sure and then execute the minor adjustments. For now, though, I fired up the engine and backed Hapy out of the shop and drove him up and back on the laneway. At this point, I have all my gears.
Seasonal Scrubbing
I ended my weekend of yardwork and playing on cars by giving Hapy his spring cleaning. I have documented this in the past, but in brief: I use SoftScrub bathroom cleaner and a soft brush to clean the fiberglass top. This gets all the black ick from organic material removed. Prior to this step, I will clear out the luggage rack of leaves and such. It was especially bad this year so I need to circle-back, remove the rack and clean the metal top. Once the top is SoftScrub'd, I wash the entire bus (top again) with car wash like any other car. The end-to-end process takes 2 or 3 hours, but if the sun is out and it's not too hot or cold, it is a great way to spend a Sunday afternoon. I hope to get the luggage rack removed and the tin-top cleaned next weekend. That will also give me the opportunity to repair any part of the luggage rack which needs attention. In the meantime, I swapped the vehicles around, setting Hapy up as my daily driver and the lower mpg truck for specific-use-only. As of May 1st, regular 87 octane gas is $5.70/gallon here, and diesel is $6.20 but with the mpg difference, Hapy is less expensive per-mile.
Wrap
Around that work, there's the usual clearing brush, mowing lawn, etc that comes from living in a house, and spring growth. Our favorite construction contractor was over on Saturday to experiment with the south-facing doorway in the shop. After some large thinking, we are going to put in barn-door style doors, but with fiberglass so the little bit of winter light we get will make it into the building. That's it for this week. Thanks, as always, for following along-
No comments:
Post a Comment