Showing posts with label concrete. Show all posts

Thursday, May 14, 2026

Building a Shop - Construction Permit Complete

For a project that started in December of 2024, I am surprised it took so long for the shop to reach "complete" for it's initial build permit. Today, I'll review some highlights and touch on a Hapy adventure.
 
The Doors
shop permitted
I had an entire post about the doors (See Building a Shop - Doors) where I detailed almost buying the wrong size big door. Then, we got things right. That big door faces north. Next to it, our contractor guy Ray installed a basic HomeDepot-special 36" (1 meter) wide person door. That door is the only door with an external-facing lock. Moving around to the west side, we have a 10-foot (3.3m) wide opening. In the Ghost of GoRo post, I mentioned the west-facing barn doors that Ray built. I will give them more detail below. The southern opening also got a barn-door style install, though the actual doors are a little different.
 
Ray's Custom Doors
barn doors by seating area
I'll start with the west-facing big barn doors. First, we sourced an external barn door rail system (~$300US) capable of supporting a few hundred pounds. The opening had a double header, so most of the rail was mounted to that, through the exterior skin. In order to create sufficient space for a door to hang, the rail install includes a small block of 2x4 between the rail and the outer skin at each bolt-point. The header only spanned the opening, so on either side, from the inside, Ray added a 2x4 on the inside for the mounting to attach to. The south-facing smaller doors had a similar barn rail system installed. We followed the pattern of using 2x4 blocks to create the offset, and using 2x4 planks inside for the mount to attach to. Unlike the west-facing door, the south-facing did not have a double header, so the entire rail needed the 2x4's installed.

southern doors
With the rails in, Ray shifted to construction of the doors. All 4 doors were framed with Sun-wood. This is exterior-qualified wood, but lighter than cedar and not chem-y like pressure treated. Because the west-facing doors are bigger, they were assembled with brackets to hold them square. And, they had angled planks added for strength against twisting or flexing. The south-facing doors were joined with biscuits, and did not have the angled planks added. Once the frames were ready and test fit, the west-side doors had siding attached so they match the building. The southern doors were skinned with clear plexiglass. This will allow the little bit of winter light we get from the southern sky to leak into the shop.

Once the doors were assembled, Ray re-hung them, and installed interior grab handles to operate them. On both sets of doors, we added guides into the concrete so the doors would not move away from the building while in place or traveling. Last, I added a lock to each door so they could not be opened from the outside. I need to prime and paint the south-facing doors, but they are operational as-is.
 
Inspected
southern doors
When I had the building inspected in August of 2025, the inspector asked for 2 things: install the doors and add a landing for the person-door. With the doors now complete, and the landing added in September (See Building a Shop - Steel Building Erected), I was ready for an inspection. So, on Monday I ordered the inspection. The inspector checked the boxes on Tuesday and now I have an officially completed building (per drawings, spec's and inspections). What does this really mean? Well, in terms of the permit and inspections, it means I get to pay taxes on the land improvement, and my home owner's insurance just went up. It also means that anything contained within that shop is now covered under my home-owner's insurance and if something catastrophic happens to the building, I'm covered insurance-wise.
 
What does this mean in terms of my personal use of it? Very little, frankly. I needed the doors so I could lock it. Once lockable, I can start storing tools out there, so I can work on a car in the shop and not walk the 40 meters from the shop to my tools in the garage and then the 40 meters back again. I have already repaired 3 cars in that shop with a 4th (Astra needs her alternator replaced) heading in on Friday. having a lockable shop means I can do that work that much faster because my tools will be right there.
 
Retrospective
where we began
Being an advocate of both Agile and Continuous Process Improvement (CPI), I believe that some kind of look-back when a project reaches its end is healthy and helps you and others make better decisions in the future. So, with that in mind, what did I learn that I haven't already mentioned?
 
     Permits: I covered most of the discoveries along the way in the linked permits post. Get Clean Water Services involved early and make sure you manage both erosion during the construction as well as any mud getting tracked into the street. Either can got your job flagged and then things get much harder.
 
    Survey: The "106" inspection is all about proper placement of the building relative to your plan and the property lines. If you don't know where your lines are and can't figure it out, you will need a survey, or you may not pass the first inspection. I split this inspection into 2 visits, with the first being informal wholly focused on the site location. This was Vai-the-concrete-guy's idea and he was 100% right.
 
excavated
    
Bidding: get lots of bids. I had 3 and had I gone with one of them, it would have cost me ~$5k more for the flatwork. Part of every conversation about the flatwork included a conversation about the excavation. For every bid, the excavation was a meaningful amount, even though it's not terribly time consuming, especially for out project. This might be something we could have done ourselves, but the schedule worked out better having Vai do it all. Last, make sure every bidder fully understands all of the parts of the plan. Vai had a brain-fade about the carve-outs for the lift and had I not asked about it after they ran the compactor, there could have been an issue. This served as a reminder that without a designated general contractor, YOU are the GC.
 
    Inspections: While Clean Water Services did verify that the erosion control measures were in place, and made sure that the storm outflow was planned for, the adherence to that plan was not in any inspection.Does this mean it isn't needed? No, nor does it mean that it won't be part of your project, it just wasn't part of mine and I managed the storm water with french drains once I was unable to attach gutters. So, I have a rock pit in my yard without purpose. The inspector can be your friend. Case-in-point, I would not have even known about an "Ufer" if the inspector had not mentioned it and then approved it. I now have a passing-electrical ground because of the inspector.
 
cleared and framed for concrete
    Concrete: I asked the concrete contractor specifically what, if anything, I needed to do once the concrete was poured. He said "nothing", and I got surface cracks because it did not cure uniformly. The correct answer is "try to keep the surface wet with a garden hose for a couple of days". Then, the top does not dry too fast relative to the concrete beneath. 
 
    Oregon Carports: these folks were great from start to finish. They were easy to work with, the plans were spot-on for the permits and inspections and the installers were fast and nice guys. It would have been nice to know that a gutter could not be installed without retro-fitting, but at this point we have weathered a full wet season easily.
 
    Driveway: When I planned the shop, I knew that the ground sloped downhill south to north but I did not account for the west-to-east down slope. Topology matters. After the steel building was up, I had over 1/3m (an American foot) drop off at the southeast corner. This led to many hours of hauling and spreading rock. Since my labor is free, this did not factor into final costs, but it may factor into your plans.
 
    Overhead Doors of Portland: Similar to Oregon Carports, the overhead guys were great to work with. They found us a door that just smashes for less than half of what I would have paid for new. They stopped by late last week to install a header board over the door and install the weather seals. Both after my check had long cleared. We will be using these guys again.
steel skeleton
 
    Ray: Ray is a star. He has been a contractor building things since he was a teenager. Now, he's getting near retirement and is not taking on any new customers. So, those of us lucky to have worked with him in the past are blessed to still have him, at least for a little while. One of Ray's greatest strengths is looking at a project without filters. He can imagine what you are looking to do and make it happen. He built the barn doors, yes, but he also built our kitchen with salvaged cabinets. 
 
Timeline
For history's sake, and in response to my "how did this take so long?" question above, here's the time line for the build, start to end. There was a break in the action over the winter Oct2025-Mar2026 while we financially recovered a little bit from the costs incurred so far. We needed to get onto Ray's calendar and figure out the doors a bit too.
 
2024-August: Boo and I decide to build a shop and figure out about where we want it
2024-December: steel building ordered from Oregon Carports
2025-January: permit started with Washington County (WC) ($700)
2025-March: Clean Water Services (CWS) involvement in plan
2025-April: permit accepted, initial payment of ~$1k
2025-May: self-performed survey, soliciting concrete bids; locating and placing "straw wattle"
2025-June: CWS inspection, excavation, WC site inspection, concrete poured, WC "106" inspection 
2025-July: steel building installed on foundation
2025-August: french drain install around foundation, WC "199" inspection fail
2025-September: rock and gravel of drain, north-side access
2025-October: move 4 cars before rains hit
-- work suspended to save some money -- 
2026-March: west-side barn doors, north-side person door installed
2026-April: north-side overhead door installed
2026-May: south-side barn doors installed, WC "199" inspection pass
 
Costs
Similar to the timeline, I'll detail the costs as I can find them. Of course these were all in as-of-that-day US$. With TrumpTarrifs and trumpflation, your numbers may vary widely from these.
        0: Advise from WashCo, inspectors and Clean Water Services
  1800: Permits with Washington County
23000: steel building from Oregon Carports
15500: excavation, framing, concrete pouring, incl $500 for the concrete pump rental
  7500: north-facing big door from Overhead Door of Portland, incl install and opener
  4800: all other doors, incl hardware, custom build, installs
    800: french drain materials, gravel
    500: large rocks for storm outflow
53900: TOTAL
 
From these numbers, I conclude that when you think about building a shop, the cost of the building itself could be less than half the overall costs. I paid more for permits than I did for rock and gravel, which is also interesting. The 4 doors cost almost half of what the overall building cost too. I could have had fewer openings, or installed a solid overhead door to lower costs, but I'm glad I didn't. Also it is worth noting that this shop has no electrical yet. I expect that will be a 5-figure as well since I will need a trench to run power, a panel, and then lots of cabling contained in conduit. Eek. I do not expect that work to take place any time soon. Instead, I will operate with a long extension cord from the house for as long as I can manage.
 
Hapy Shifting
In my last post, I celebrated Hapy shifting so well. That turned out to be premature. The next day, I lost the ability to put Hapy into gear and had to limp home in rush hour from around the corner.. in 3rd gear. One hot clutch later I was back in front of the garage and there he sat for a few days until I could get a look at him. Of all the things that could come apart, I did not expect the bolt going through the pin in the shift linkage at the front of the transaxle. In the image on the right, it's the screw in sub-component "P". I expected the grub-screw ("R" in the image) to have fallen out because I could not remember if I had run the bailing wire through or not. Turned out I did, and the grub screw was doing fine.
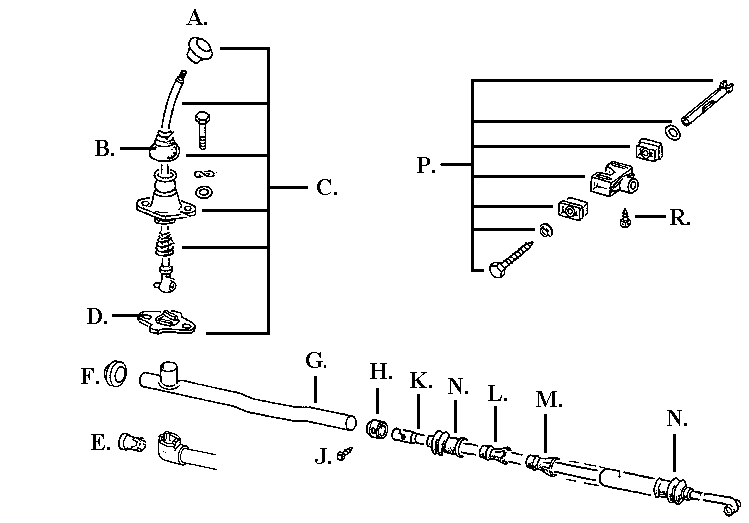
 
shifter diagram
I pulled the pin out and rummaged through my drawers of fasteners and found a 11mm bolt that fit. After around 20 minutes of wrestling, which consists of slightly moving the shifter in the cab, getting back under the bus, test fitting and repeating until you can muscle the pin through the hard plastic bits in the cage AND through the end of the linkage running from the front. This time, I put blue thread-lock on the bolt added a washer and sent it into the pin. I torqued it down as best I could considering my body position and the lack of something firm to grab on the opposite end. I used a pair of pliers to hold it.
 
Hapy is back to shifting normally again.
 
Wrap Up
After Ray finished the doors and I had locks on them all, I sat in one of the rear seats from C's new mini-van / stealth-camper we set in the shop as a seating area. I took a moment to just absorb. We so often will not take those minutes, choosing instead to rush off to the next thing. I sat for a few minutes, radio playing softly in the background and simply looked around at my shop. I really can't believe it. After so many years of lying in puddles, sliding on my back on wood chips or just outside in the rain, I cannot imagine what it will be like to work inside, on a hard dry surface come winter. Even now, as we head into summer, I will be working in the shade, on cool concrete, not hot tarmac. Of course, between then and now, I have a great deal of stuff to move and organize, but as of today, the shop is open and I can't wait to get out there.
Thanks, as always, for following along- 

Thursday, October 2, 2025

Building a Shop - Vehicle Egress

Today, I finish the gravel work and move cars into the shop/barn/garage. I should point out that where the last post ended was where I took some time off from the work and went to Seattle for the weekend. We visited the zoo and went to my grand-niece's first birthday party. Very fun. With Labor Day well behind us, Pacific Northwesterners know that we are now in the short days before the seasonal rains return for the duration. With this is mind, I have been spending whatever energy and muscles I can on getting the broken cars moved into shop before it hits. We have been experiencing overnight lows in the upper 40's and gloomy clouds every day. Some nights have brought rains, giving us all a strong prod to finish out outdoor projects. This past week, we have had rain every day, so I am very glad I was able to get this work done in time.
 
Picking Stones
egress complete
The north east corner of the building is over a foot above the ground and the earth slowly climbs nearly 6 inches moving westward to the northwest corner. If you look at the picture at the top of my last post, you can see how significant the drop is. Since this is where the big doorway is and where cars and trucks will come and go, a 7 to 12+ inch lip is more than most cars and trucks can manage. So, I need a smooth egress. To describe the intended pitch of the ramp, I laid a 10 foot long 2" pipe pointing north from the north east corner (you can see it in the pictures). We had a small pile of rock-wall rocks intended for the storm outfall, so over the course of a day and a half, I moved all of them over to the north edge of the garage/barn/shop. Yes, I know. I need to settle on what I'm calling it. It looks like a barn to me, but it's going to be my shop, so we'll call it a "shop" for now. Anyway, a bunch of big rocks really only showed me how much more I was going to need.
 
Boo went to a couple of rock places on the west side, but no one had softball to volleyball sized crushed stone. The few sources we could find had larger crushed rock for a very high price (pushing $1k for a couple yards). It was the wrong size and way wrong price, tho. So, I hit craigslist and found a guy giving away broken up concrete from a patio demo. Well, the concrete guys used broken up concrete under the concrete they poured and the inspector really liked it. So, if it's good enough for a foundation for a building that's getting inspected, it is good enough to go under a gravel drive up to the shop.
 
before broken concrete
Boo and I drove over to Saint Johns the day the bridge was closed for an over-turned truck (just lucky, I guess) and proceeded to overfill the truck weight-wise with broken up concrete. I had been checking the squat of the truck with my foot, shoving it between the top of the rear tire and the wheel well, and it was fine until the last barrow of concrete. We did not realize how bad it was until we could see the tire nearly pancaked and the truck mostly riding on the bump-stops. Yes, I know this is not good for the long-term health of a suspension; I'll not do this again. We decided we had all day to get home, rolled over to the 76 station around the corner and aired up the tires to 45 pounds (tire listed max is 51). This moved the rims up off the sidewalls and the sidewalls up off the ground as well. Because the bridge was out, traffic getting across the river was a mess anyway, so we were not slowing anyone down. We took our time, but found that the bumps in the road became unnoticeable above 20mph, so I kept our speed just above that as much as I could.
 
Stacking and Shifting 
Once home, Boo flagged me all the way back down the lane-way so the truck's rear bumper was nearly where the concrete bits needed to go. I spent a couple hours moving concrete from the truck bed to the egress, stacking some, wedging others so there was the beginnings of an angle from the dirt to the shop entryway. The picture below right shows what I mean.
 
with broken concrete
Once the broken concrete was gone, Boo headed out to get another 1/2 yard of gravel dumped into the truck bed. I gave my self a break from moving the gravel and instead set the line for where the driveway would be and where it would not be. I marked it with some logs, pointing mostly north from the edge of the step where it meets the big garage doorway. To add clarity, I moved a bunch of foundation digging spill (read: dirt and rocks) from the eastern elevation around to the front of the step. The picture at the top kind of shows the effect: the step will disappear into just a gravel landing with it's north exposure being dirt, wood chips or grass. We have not decided on which yet. With some clarity to the driveway edge, I could return to moving the 3/4=1-1/2 drainage gravel, this time on top of the concrete pieces. Before I got very far, Boo returned. We backed the truck all the way back and I spread that gravel on top of the concrete bits before spreading the last of the original drainage gravel I had piled closer to the house.
 
after much gravel
But we still need more. So Boo went to Cedar Mill Gravel and got another load and then another and another until we had a smooth egress from the northern-most french drain to the edge of the shop. Ordinarily, one would rent a compacter and really bang that gravel down so it was super-firm. I had told Clean Water Services that I was not going to have a compacted gravel driveway. They indicated that to them a compacted driveway was considered "impermeable" and would count against my total "paved area" of my property. Since I was already near the limits, we will go with not-machine-compacted gravel. Instead, I firmed it up by cycling between some hand-packing and light watering. During the multiple moves of the ToyoTruck, I noticed that the tire marks were still noticeable, but the truck did not lose any traction. We will see how well this works for cars, or cars hauled by garden tractor soon enough.Water does not pool at all, though, filtering straight through. So, to me, that's permeable, meeting the expectation set with Clean Water Services.
 
Foundation Details
When I had the foundation done, I planned for a few things ahead of time. I know that one day I will want a loft, for example, for storing larger items like bumpers, fenders, seats, etc. So, I had footings dug down prior to the pour so I have them ready for supporting posts. I also planned for a scissoring lift that would disappear into the floor when not in use. Yeah, that sounds really fancy, but when I looked into 2- or 4-post lifts, they are where they are, taking up space all the time, whether in use or not. I really don't expect to use the lift all that often, and certainly don't expect to leave a car suspended for long periods of time (Yeah, we will probably laugh about this assumption later), so why would I want the lift footprint to always be present? I intend to get an Amgo XL-9F, but the cost of this shop already has given me pause and that lift is another $5kUS (or more) today. I don't have that kind of money these days. With the way the economy, inflation and tariffs are going, I frankly don't know when I will. Still, I had the foundation prepared for a lift install. So, I have 2 large rectangular holes in the concrete ready for a lift, one of which you can see in this picture on the right.
 
I need to do more than simply "cover" the holes, though. The purpose of the hidden lift is that I can drive anywhere in the shop. In other words, I can drive over the top of the lift like there isn't one there when it is not in use. So, I need to be able to drive over the holes while I save up for the lift. I located the lift such that there would be just enough space to get a car around it on either side when it is in use. So, I could technically drive a car up and into the shop and not have to drive where the lift would be, but I would rather not have the standing risk of driving into a big hole.

Cap the Lift Holes
I had a large collection of drainage pieces to return to Home Despot anyway, so I headed there for lumber to build covers for the holes. The amount I got back for the drainage stuff almost completely covered the cost of the lumber, and it would have completely covered it if we hadn't cut one of the pieces wrong, forcing the purchase of another $50US sheet of outdoor grade 1/2" plywood. I had the Home Despot folks cut the sheets so I knew the cuts were straight, and so the chemicals in the "outdoor grade" didn't prematurely wear down my circular saw blade. I have all the scrap from the cuts so we have the start of some outdoor counters or something.
 
Once back in the shop, the assembly was fairly easy. I set the 2x6 boards down into the extended runs on either side and set a piece of plywood on top. Drilled a few holes, sent through some fasteners and repeated for the other hole. Just like that, the shop floor is effectively whole and flat-ish. I do NOT believe the outdoor grade 1/2" plywood resting on top of 2x6 outdoor grade lumber less than 2 feet apart will be able to support a car passing over it. I thought about adding cross supports, etc, but ultimately, I was just very careful about moving cars around the holes. At this point, they will be effective in preventing persons and dogs from accidentally falling into the holes, but nothing heavier than, say, a 200#. If I get a wild hair, I may add some cross supports to extend their use a little bit.

Moving Cars
Zed and Oliver home'd
With the shop ready enough for storing vehicles, I took last Friday (26-Sep) off work and started moving cars which have not moved in a while, starting with Zed, the 1978 Datsun 280ZX. He hasn't moved since I moved him here in November of 2022 (See Zed Moves), so I dealt with things like locked-up wheels, a dead battery, etc. Ultimately, I was unable to get him to start nor easily roll. The engine turned, but did not catch. I think it is a fuel delivery issue. I jacked up and verified that each wheel could turn freely so I snatched him from behind with the ToyoTruck and a trucker's chain. Once I got him out of the sunken holes his tires had been in, I was able to roll him down the slight slope to the lane-way. About this time I took a break and moved the stacks of tires I had stored under tire covers near the cars, moving them into the southeast corner of the shop. Returning to Zed, I moved the truckers chain to the lawn tractor and, with Boo behind Zed's steering wheel, we hauled him to the edge of the gravel where the tractor lost traction. We switched back to ToyoTruck,hauling Zed up the gravel drive into the shop, and sending the truck just out the opening at the far south end. We eventually got ToyoTruck out through some creative Tetris and then pushed Zed into the far southeast corner, lightly touching the stacks of tires. With the one car in place, and taking almost the entire day to get there, I hoped the others would be easier.
 
Oliver (1978 MGB) started and moved around last Fall (See MGB Carb Circle Back), so I had higher expectations for him. I slapped the battery charger on him before calling it a day. The next morning (Saturday), I was unable to get him started. There was plenty of charge and even with fresh gas in the tank, the fuel pump didn't change tone. I applied vacuum to the fuel line at the carb to get fuel up to it, but it still would not start. Again, the pump didn't change tone so I think the pump may be faulty, failing to deliver the pressure needed for the carb. Regardless, I was not going to fix Oliver, I needed to move him. So, again with Boo behind the wheel, we pushed him down into the lane-way and again hauled him to the edge of the gravel with the lawn tractor. This time, we did not use the ToyoTruck to haul him up the driveway. Instead, I used a come-along. Earlier in the week, I had looked at buying a winch at Harbor Freight and by mid-day Saturday I started regretting not buying one. With the come-along, I could move Oliver 4 feet at a time before chocking a wheel, resetting the cables and moving another 4 feet. His final spot is the northeast corner, near the big door opening. With the tires in front of Zed, Oliver just barely stuck out of the west end of the shop. So, I moved the tires over by the southwest corner and shoved Zed and Oliver the extra meter south. By now, it was early afternoon so Boo and I grabbed lunch and made the decision to keep pressing forward rather than punt on moving Nina to Sunday.
 
Nina (1965 VW Beetle) has a stuck engine so I already expected to have to haul her. Of the 3, she was the lightest, and we followed the same pattern: Boo and I pushed her into the lane-way, Boo behind the wheel, me on the lawn tractor, we hauled Nina to the edge of the gravel. Then, she was come-along'd into the shop. Once on the concrete, she was an easy slide next to Zed. While Nina is our newest acquisition, both Boo and I are really enamored with her. We are both very much looking forward to getting her working again. The rain did not appear on Sunday, so Boo and I did all the yard-related work we needed to do before the rains arrived.
 
---
 
Monday, the rains started and it has been intermittent rain ever since. The weatherpersons indicate that the rains are supposed to end by the end of the week with clear weather returning for almost a week. At this time of year, that's fairly rare but I'll take it. I still have gutters to clean and Hapy to move. I have been monitoring the ground around the shop and there is absolutely no standing water anywhere.I will accept that as positive news about the quality of my french drain install. If nothing else, I can recognize that no water is impacting my neighbors from my shop install, and ultimately, that's what most concerns Clean Water Services. Regardless, I am greatly looking forward to solving the various won't run issues on Oliver and Zed, but Hapy is first. I very much want to have him whole and driving again.

Thanks, as always, for following along- 

Thursday, September 18, 2025

Building a Shop - Steel Building Erected

First, my apologies for how infrequent my posts have been. The team I work on lost a team member to a promotion and the replacement has not been very successful. As a result, I have been doing the job of 2 people since the start of the year. This removed pretty much all of my slack time at work so lots of things have fallen by the wayside. Take, for example, Hapy, the 1972 VW Camperbus sitting in my driveway. The transaxle is still out, the engine is still on the ground and he has been that way for weeks. Anyway, this is where we are.
 
Oregon Carports
I will start with a call out to the fine folks who I worked with to get the building in the first place. From start-to finish, everyone connected with Oregon Carports and their parent company US Steel Buildings were great to work with. All communications were prompt, email did not sit unanswered for more than a couple of hours and honestly they spent more time waiting for me than I did for them. We arranged build-day around their other jobs, but the crew arrived within 15 minutes of our intended start time (early afternoon 15-July) even though they were driving from California. A 3 person crew arrived in a crew cab truck hauling a long trailer. They backed into the lane-way along the eastern fence and immediately got after it.
 
We had our fair share of hot days this Summer and this stretch of days was no exception. By 5PM it was over 100*F (38*C), but they were not relenting. I supplied them with ice and water from the fridge and encouraged them to not push too hard. They pushed hard anyway. They left around 7PM and were back the following morning by 7AM. They pushed through and completed the building by dark on the 16th. They did not want to spend another night at a hotel in Oregon and instead pushed towards home when they were done.
 
facing North from inside
In transparency, we did a complete walk-through and before I could spot things, the job lead was pointing things out to his crew to resolve. We had originally designed the building to have a person-door on the front, but when they were doing the work I didn't like the design. So, after a quick call with Oregon Carports, the door was removed, my invoice adjusted and we moved on. Very easy.
 
Rain Water Management
With the building in place, my next challenge was around managing storm water when the rains inevitably return. I had received a coupon for those gutters you don't need to clean, so I had them come over and sell me. To my surprise, they could not design a gutter system that would work. It turns out that the design of the building, or should I say the design of the steel framing of the building does not leave anything near the roof line to attach a gutter that could have any kind of warranty. Sure, they could slap some gutters up there, but if ice forms, or if there is a heavy downpour filling the gutters, there was not enough strength behind the soffits to support and the gutters would fail... and then fall. So.. I needed a new plan.
 
Building Final Inspection
trenching
While musing over the gutters, I thought we were ready to have a final inspection and be done with the county. I was mistaken. I scheduled the inspection and while the building construction passed, he could not pass the job as final. The building did not have any doors, and had large openings where they would eventually go. I explained that we plan to have doors, but everything is so expensive lately, those plans are on hold for a while. He indicated that the building needs doors and the people door on the north face will need a landing or step since the building was a little over 7 inches above grade at that point. He assured me that once the doors were on, final inspection would be a quick confirmation. Meanwhile, the permit stays active and open without penalty. The reasoning around the doors is that the building has certain specs around wind resistance and those numbers do not hold up when it lacks doors / is not sealed. The inspector had no interest in gutters. They were never on the plan, and the plan was approved without them, so that tracks. It just seemed odd.
  
Trenching
I figured that if I could not catch the rain at the roof's edge with a gutter system, I would dig trenches along the eastern and western sides of the building, and install french drains to manage it. That sentence took about 15 seconds to type and the better part of 3 weeks to execute. I started with taking lots of measurements to determine how deep I would need to go, and made 2 sets of plans. Plan 1 was to route the water from the eastern and western edges back to the rear of the building and then into a storm outflow I had dug out when the foundation was done. This plan would have required the southwest corner to be dug down nearly 2 feet to account for the ground pitching from southwest to northeast.

installing pipe
Plan 2 was to dig the trenches towards the front of the building, cut across the future vehicle egress and into an abandoned well on the property about 40 feet away from the northern edge of the building. While this plan involved more linear feet of trench and more pipe, the trenches would not need to be nearly as deep, digging down no more than 9 inches from end to end. I decided plan 2 made more sense, and proceeded to trench 30 feet along each side, 24 feet across the northern edge and then another 40 feet from the north east corner diagonally across the future driveway to the abandoned well.
 
Drain Pipe 
Into these trenches, I laid french drainpipe wrapped with filter sock. The trenches along the sides of the building got the less expensive flexible pipe. These pipes cannot withstand much weight, but being right along the building, I would not expect them to. Across the northern front of the building and across the driveway, I used the hard pipe which is designed to handle considerably more weight. Still, these pipes were 6 inches below grade, so weight would be somewhat distributed. The last 20 feet between the driveway and the well, I used flexible standard pipe (not french drain) as this passed through a garden area. Practically all of the rest of the pipe was french drain wrapped in filter sock. I added a drain clean out in the northeast corner.
 
Grading and Graveling 
graveling
With the pipe down, I could see that there were some spots along the building where water could slip past the pipe and run away from the drainage system. To remedy, I used fill dirt from the foundation dig to build up the downhill areas from the drain pipes. As I layered in silty clay, I watered it in so it would not wash away during the first rain (it didn't). Satisfied, I ordered 4 yards of 3/4=1-1/4 drainage gravel delivered into the laneway, about 75 feet from the building. With a shovel and a wheelbarrow, I filled the building-adjacent trenches and the small valleys I dug along the trenches, creating a gravel stripe about half a meter wide.
 
One Small Step
steppin up
With the trenches done and filled in at least as far as the front of the building, I started after the step or landing that the inspector required. I looked up the code and the step needed to be at least 1 meter square (width of the door, square). I decided to make it bigger, running from the corner of the building to the edge of where the driveway egress would start, and then make it the required 3 feet deep. I used some outdoor grade 1 by 8 we had lying around with a couple of 2 by 4's for corner re-enforcement and drove it into the ground. After checking level and stuffing some rocks underneath to hold it level, I put a layer of melon-sized rock on the bottom and filled it with some of the drainage gravel I had.
 
---
 
This is getting long, so I'll stop here. I will say that the work on shop/barn/building/garage has been my sole focus this summer. So, almost no car work has happened at all after the grand dismantling of Hapy over Independence Day weekend. I did spend a different weekend replacing the oil pan in my niece's Jetta TDI after she drove over a tree stump, but that's just being an uncle. It took a weekend because I had to go get the car from the middle of the woods where it was left, drained of oil, so yeah, it actually took a weekend. I will go into more detail on Hapy's flywheel replacement effort once it reaches a Hapy conclusion.
 
Thanks, as always, for following along. 

Wednesday, June 25, 2025

Building a Shop - 106 Inspections and Concrete

Has it really only been a week? Between the daily news feeds, routines, managing brush and this construction project, days really just zip by. Today (24-June-2025), we got the concrete poured, but we had some inspection adventures along the way.
  
Inspection One
I brushed on the finishing of the rebar in my last post. The guys completed the work on Monday, June 16. In between were a few partial days around other projects to get the rebar set up and to dig out the trench and set in the PVC pipe for the lift controls. Feeling we were ready, I scheduled an inspection for Wednesday, June 18. Since this was the day before a US holiday (Juneteenth), my scheduled inspection was met with multiple other projects trying to get their inspections done before the weekend AND multiple inspectors deciding to call off, extending their respective weekends by another day. The result? The inspector was pissed before he got there, which is never a good set up for an easy inspection. We did not pass for 4 reasons:
  1. rebar lying directly on the compacted gravel, not physically suspended 2" above
  2. overlaps of rebar were not a minimum of 20"
  3. rebar in footings supported by rebar driven directly into the ground 
  4. type of PVC used (white, not grey) for the controls is not rated as electrical conduit

The rebar lying on the compacted gravel, while a fair observation, may not have been entirely fair. I have learned that it is a fairly common practice to lift the rebar as the concrete is poured. I am sure the inspector was right to point it out, remaining within the letter of the regulations. Ultimately, I want / need a floor that will not fail, so now that I've bashed him for not being fair, I'm good with it. I mean, even if the concrete pour-er does lift the rebar as they go, how do they decide how high and keep it relatively consistent? And then, when the concrete is super wet, what is to stop it from floating back down to the bottom anyway? So.. physically suspended makes sense.

Once the inspector explained that the overlap is what creates the strength at the transitions, I understood the 20" minimum overlap. This is especially important in the footings which will be supporting the weight of the building. Then, there's the rebar driven straight into the ground. The inspector felt that this would encourage premature rusting of the rebar as water would be in direct contact with the rebar beneath the concrete and rust would then leach up into the rebar within the concrete, eroding it's strength.
 
The last item about the PVC was 100% my fault. I watched numerous videos by homeowners installing their own lift in their existing garage floor and they used basic white PVC. The PVC is intended to house the hydraulic hoses for the lift plus the low voltage emergency shut off. Because the shotoff is electric, the PVC has to be rated for electrical conduit, which the white PVC is not. So, Wednesday night, I ran off to HomeDepot and got about 7 meters (20 feet) of 2" grey PVC conduit and a corresponding grey 90* bend.
 
Solving For Inspection One
wrong copper wire on left
On the afternoon of Juneteenth, Vai and his crew arrived, dressed for a barbecue, carrying bags of little concrete blocks. While a couple of his guys dug out the white pvc (under and around the rebar) and installed the grey, the other guys were removing the vertical supports and suspending the rebar on top of the little concrete blocks. In less than an hour, they had resolved all of the things that the inspector identified and then left for their family barbecue.
 
One last item that the inspector wrote down, but did not fail me for, was a suggestion to install an "Ufer". The inspector recognized that since I had something that required an electrical conduit, at some point I would need a good electrical ground. While an Ufer is becoming more common, most electrical installations are grounded with two 2 meters long grounding bars driven into the ground 10 feet or more from each other. An Ufer uses the rebar in the foundation as a ground and is an accepted grounding practice, provided the Ufer is tied into the foundation rebar at at least 3 points and the segment tied to the foundation rebar is at least 12 inches long. When I was getting the grey PVC, I got a 2 meter section of thick copper grounding wire for this purpose. I later discovered this was the wrong material.
 
Inspection Two
west footing cleared
I scheduled a follow-up inspection for Friday, June 20th and we had the same inspector we entertained on Wednesday. He knew exactly what he was looking for, so he went straight to the trouble spots. Rebar suspended above the gravel? Check. Overlaps at least 20 inches? Check. No rebar driven into the ground? Check. Grey PVC? Check. Ufer? Not quite. The inspector indicated that the Ufer needs to be rebar and that the grounding wire from the panel to the Ufer is the material that I was using. Doh! Kindly, he indicated that if I did the replacement with rebar and sent him a picture, we would get the approval for the grounding Ufer. He also pointed out that we had too much dirt in the bottom of the western footing. Again, he said if I fixed it and sent a picture of it cleared, we would get approved.
 
I found a section of rebar in the construction rubbish that had a 90* bend in it, was 14 inches long to one side of the bend and about 4 inches on the other. Basically, it was perfect for this purpose, so I tied it into the foundation rebar at 4 points, pointing the short end straight up, about 18" south of the northeast corner of the foundation. So no one tripped over it, I spray-painted it orange. Last, with a hand-held digger and a plastic cup, I cleared the western footing of debris. I sent pictures of these things (along the right side, here), and we got approved.

Concrete Pour
orange Ufer
With the approval in hand, we looked at calendars and weather projections. We wanted to pour on Friday, but we had a strong feeling (that was warranted) that we were going to get hit by rain. It rained on and off all day and the here and there all weekend, so we were right to delay.. to Tuesday, June 24th. The concrete pump arrived at 8, Vai's crew appeared shortly thereafter and the concrete truck arrived around 930. Vai's crew wanted to confirm the placement of the lift forms and they firmed them up with some cross-bracing against the exterior forms so they would not move during the pour. Then, they solved for what I had been referring to as "the wings" on the lift forms. In the drawing, there are 2" wide by 4-1/2" deep by 9" long channels that jut out from the front and rear of the main lift recess. These are for the supports for the ends of the lift when it is all the way down. Frankly, they look like tripping or tool-losing hazards for when the lift is up, so I may create some fills for when the lift is up. To create the 8 recesses, we combined a 2x6 (actual size 1-1/2 by 5-1/2) to an old fence board (3/4 by 5-1/2), cut into 9" sections and then rough-screwed onto the forms. While the wood bits are slightly wider and deeper than required, I felt that was a better situation for the arms to descend into than slots which were either too narrow or too short. If it becomes a thing, I will solve for it then.
 
gettin after it
Once the forms were ready, they started pumping concrete and in about an hour the footings, and floor were poured. I went out to pay the concrete truck and Vai's guys were finishing the last of the floor with barrows of concrete. Somewhere along the way, one of his guys rotated the Ufer into the concrete, so we fished that out. While it's no longer orange.. it's more concrete color.. I am glad I asked about it. This serves as a reminder to check everything as you go. While they are the experts, you ultimately own it. Government inspection is to make sure no one gets hurt and it's structurally sound. Any small error that doesn't get into inspection territory is yours to verify. Anyway, Vai's crew stayed for a few hours floating it smooth and monitoring the concrete. The result at the end of pour-day is pictured at the top. Now, we wait for it to cure and then we can move forward with the steel building on top of it.
 
Wrap Up 
That's it for today. I don't have any car content as I honestly have not had any time to play on the cars this past week. Around managing the concrete work, Boo and I have been clearing brush around the tool sheds and weeds along the eastern and southern sides of the new shop space. I am still waiting for the new flywheel and clutch/pressure plate from Kennedy. I hope to have them in time for Independence Day weekend so I can do the engine-trans R&R over those 3 days.
 
As always, thanks for following along-

Tuesday, June 17, 2025

Building a Shop - Gravel and Form

We thought we were going to be ready to pour this week, but things got complicated. Once they complete the rebar, though, we will be ready for our formal "106" -or- "foundation and placement" inspection. Then, they pour and we wait. What's described below took place last week and the end of the week before.
 
More Framing
Before the gravel could get poured in, another frame inside the initial frame was needed to hold the gravel out of the 1 foot footing. This inner frame is very similar to the outer frame they had done the prior week. It was just 4 inches shorter and 1 foot inside the first one. While a few guys were banging on that, Tim the front-end-loader guy prepared the landing zone in front of the farm house for the gravel by scraping the wood chips out of the way.
 
Graveling
By mid-morning 6-June, a Friday, 2 dump truck loads of gravel appeared. They first moved gravel with a muck cart (motorized tracked walk-behind that looks like a bathtub on treads). The muck cart broke at some point so they switched to the front end loader moving it. After a day of grinding, they got the inner frame filled with gravel, plus a little mound in the center to account for compacting. They had some left over in the truck, and rather than just leave with it, they laid down gravel across the end of the driveway 3 meters in, leaving a 6 by 3 meter rectangle of gravel.
 
Gravel Mop Up
marking the "graves"
The next morning, I was out there with a shovel and a garden rake, leveling the gravel on the driveway. I hosed it down and let it bake in the sun for the day. The next morning, I moved the old wood chips on top of the gravel, approximating the look of the driveway prior to their arrival. We believe the gravel bedding will help reduce mud from appearing at the end of the driveway where delivery trucks and the mail man inevitably park. This part of the driveway has always been the muddiest historically, and when our friends and family visit, it is inevitably where they park and walk. So, this is selfishly important too.
 
Framing
On Monday, 9-June, the guys were back to continue the preparation for the concrete pour. They had planned for compacting and rebar. We discovered a complication after the compacting. One of the items in the drawings from the beginning was accounting for a lift to be set down into the concrete. This required 2" PVC pipe to be run under the concrete in a few spots as well as the recesses for the 2 lift arms. I acquired the PVC over the weekend, but the guys needed to dig some trenches in the gravel after they got the compacting done. Similar to the excavation, lots of measuring and marking came first, to make sure it was where the plan said, and the right size.

Since the gravel had been compacted, this made the digging harder, but the hole retained it's form. Had they not compacted first, digging the rectangular holes for the lift would have been like digging a hole at the beach: the sides would keep caving in. Instead, they dug what looked like a pair of shallow graves. Inside the little graves, they framed in the forms and sent the 2" connecting pipe (for the hydraulics and electrical) between them. Last, they dug the trench and set in the pipe from the lift over to the future wall where the controller will be. All said, this took them the better part of the day.
 
Rebar
The guys were working on another project most of the rest of the week, coming by near the end of the day for a few hours to get after the rebar work. As I write this, there remains a few hours of fit and finish before we will be ready for inspection. The rebar is laid out in a grid with the ends near the framed forms bent down into the trench to give the walls the same stability that the floor will have.
 
The pictures above were taken before the rebar started but the rebar work is not yet complete. Also, I did not have a 2" PVC 45* angle to put at the end of the controller pipe to route into the box near the lower left hand corner of the last picture (into the south east corner of the framed-in form). That has since been remedied but it was not available locally for some reason. Anyway, at this rate, I expect a few more partial days of work by the guys and then we can schedule the inspection. For example, they were here yesterday for a couple of hours laying and tying the rebar into the footings. The actual concrete pour just keeps slipping out in time. I imagine lots of projects are like that.
 
Cars Update
On the cars front, I ordered the flywheel and clutch package for Hapy (72 VW Camperbus) so we are just waiting for production and shipping so I can start the engine/trans drop. I had hoped to do other things while the engine was down, like swapping out a bigger oil cooler or replacing the exhaust, but the longer this leans into Summer, the less I want Hapy in pieces and the more I want to be able to drive him. I may do the oil cooler swap anyway since it is really just swapping out parts, but the exhaust will have to wait. As I watch the shop form, I have increasing difficulty in containing my excitement for getting after Hapy details, Oliver's (78 MGB) final pieces, restarting the Zed project (79 Datsun 280ZX).. and, of course, starting on Nina (64 VW Beetle). I anticipate many fall weekends in there, out of the rain, off the mud, getting my wrench on. I cannot wait.

Thanks, as always, for following along. I'll post the rebar and concrete pour as they happen-

Friday, June 6, 2025

Building a Shop - Excavation

I return to the construction effort today. I expect this to be brief.
 
Measure Twice Dig Once
driveway approach
The concrete company we chose to work with arrived mid-morning and set to measuring and stringing lines. As they started, I talked to the supervisor/owner Vai and we agreed that since the eastern property boundary was 100% confirmed and the west was squishy, we would base all measurements off of the east line. The southern line was not as clear, but the pin in the south eastern corner was still protruding from the ground, so that was a known good point. We extrapolated where the line was, but since the minimum rear setback (distance from rear property line to a permitted structure) is 15 feet and the shop was going to be 50 feet, there was little risk of getting dinged by the inspector for possibly being a few inches off.
 
With stakes and string Vai and his team defined the target space. Using a level, they determined, and then showed me, that the grade from south to north was actually at least as pronounced as the west-to-east grade that sent us down that straw wattle search. Because of the grade, the south west corner will be the closest to the ground, leaving the north east corner (the corner opposite) the highest at nearly a foot above grade. Since the entire building will have a 1-foot tall footer, there won't be gavel spilling out from under the foundation, but it does raise the driveway entry, creating a new problem to solve later: garage access for broken (and working) cars.
 
The Dig
diggin
I will admit that when I first thought about the excavation, I expected to have to manage many yards of dirt. I was grossly mistaken. Because of the grades we discovered, most of the digging was along the southern and western edges with only a slight scrape at the north east corner. The biggest removal of dirt was for the storm outflow at the back (south east direction, but still at least 15 feet from the property lines) and the trench leading from the back of the building to it. The operator lost one of the hard rubber tracks, but otherwise they would have had the dig complete in a couple of hours.
 
Framing and Ground Shaping
With the trenches done, Vai and his team framed in the outer edges of the foundation and leveled it. We could really get a sense of the foundation at that point. They added some large blocks of broken up concrete into the space near the eastern edge, leaving space for the footer. The idea is that having the large concrete blocks is superior to 8 or 10 inches of packed gravel under a foundation pad. That much compacted crushed rock can still shift where having large concrete shapes mixed in underneath the upper layer creates more stability.
 
Preliminary Inspection
south west corner
At this point, Vai wanted to have the county inspector come in and consider the work so far. Since we based all measurements off of the eastern line, we wanted to make sure the location of the structure would be approved before we got gravel and rebar in there. Washington County, while it has its flaws, has been highly responsive to my engagements for this project. Getting a preliminary inspection was no different: go to the website, request a 106 (foundation and locating) inspection and then in the comments explain that you want a preliminary inspection. The inspector arrived first thing and after handing him the packet of permitted plans we walked the property, and I explained how we arrived at the location. He agreed with the process, checked the measurements and approved our progress. He even approved of the use of the broken up concrete and explained to me why it was a good thing. His approval went into the system, attached to the permit and it generated an email to me indicating the the location portion of the inspection has passed.
 
Wrapping Up
storm outflow
This is where we are at this point. The reason our bid was so good was in part because our job was getting fit around other ones. So, Vai and his team are floating concrete on another job and the gravel is due in the new few days. They will be returning to place and compact the gravel, do the rebar and everything else shortly after that. At least that's the plan.
 
car stuff:
Hapy: After talking with the fine folks at Kennedy Engineering, I just ordered a replacement flywheel with a stage1 clutch kit. It will arrive in a few weeks. In the meantime, Hapy is in one piece and could be roll-started into service if needed. I am looking forward to seeing the condition of the old flywheel and clutch once I get things apart and on the ground... which won't start until after the new flywheel/clutch kit arrive.

Thursday, May 22, 2025

Building a Shop - Execution Planning

I get that the topic of building a shop/garage may not be terribly applicable to many folks. There are whole chat rooms and websites dedicated to the topic, so what do I know. I accept that for most people you probably only ever build one, if that. So, for those who are thinking about it, maybe these posts are useful since I am a total noob documenting what I am learning as I go. There wasn't much to take pictures of so I included a shot I took from the roof of the house we rented in Mexico and one of Nina, showing the license plate registration year.
 
Survey?
sunset in Mexico
I mentioned in the last post about permitting that I talked to a senior inspector and he indicated that having clarity in the property line was important for a swift inspection prior to pouring concrete. I started pricing a general survey of the "back 50" and the numbers I was getting were disturbing: high 4 figures to find and mark the monuments (corner medallion perched atop a 3' long iron bar driven into the ground) and lines. I discovered that one of the guys I bang around on guitars with is a surveyor. He hit the county website and identified when the monuments were installed (1950) according to county records. Since this is the back of a few different peoples' properties, one would presume they had not been disturbed. So, he lent to us one of his metal detectors to find the iron bars.
 
When he offered a detector, I had a mental image of a speedo-wearing dude walking around the beach with one of those things with a big disc at the end of a stick, getting waved across the sand as he shuffled past, plucking up lost jewelry. Yeah, that's not a surveyor's detector. A surveyor's detector is purely magnetic, and only registers iron. So, since most of the fences around that part of the yard are wood, I was able to find most of the markers very quickly. The marker in the southwest corner, however, was buried by whoever put the wooden fence in, and that fence intersects an old cyclone fence made back when they had higher grade steel than the ones built today. So, that fence made the readings a little less clear, but I felt confident of what I identified as the corner pin.
 
For each marker that I found, I took one of the many white 10x20 canopy posts I have from the failed canopies and drove it over/around the marker. From these markers we could determine measurements. I could also assess the neighbor's fences and determined that the fence installers who buried the monuments also did not follow a straight line and the fence bows into our property by a couple of inches. Is what is, but it challenged our stringing a line between the posts. I was able to find monuments along all 3 of the sides of the back 50, however, so we can determine the positions for the excavation.
 
Concrete Bids
Nina
I also mentioned at the end of the prior post that we were soliciting bids for the concrete. I was not happy with the 3 bids we had, so I hit Yelp, looking for another one. Yelp has that little checkbox asking to include others, and I hit that too. After clicking send, I had second thoughts, full of visions of getting overwhelmed with spam, my phone blowing up, etc. Those were unfounded, though. I did find myself juggling 6 more concrete companies, but this allowed me to get far more competitive bids. All but one company made a site visit and had a conversation about the work, the distance from the street, and options for various aspects of the work. Including excavation, it will still run us in the neighborhood of $15k, though, so our vision of a concrete slab with a steel building sitting on it has a growing price tag approaching $40k... and it doesn't have a garage door nor lights nor gutters and downspouts yet. I did not account for any of the costs other than the building when I started this. I am learning that while the building is the largest single cost, it might only represent half of the overall cost once complete.
 
Ultimately, we went with one of the companies who did a site visit, and the company was on the lower end of the bid spectrum. Their bid was so competitive, we decided to have them do the excavation as well. We had intended to have our friend Glenn do the machine work while we helped with site lines, laser-level depth determination, etc. When I shared the bid with Glenn, he was very direct: have them do it.
 
Excavation Planning
future shop location
Even though we are hiring out the dig, there are a few things we need to have sorted before the machine shows up. The pitch of the site is only a few inches from west to east, but when the spec for the footer is 1 foot and for the floor to be 4 inches of concrete atop 4 inches of compacted gravel, a few inches makes a big difference. Since we get lots of rain here (newsflash: it rains in western Oregon), we felt it was very important for the floor to be above grade by at least an inch at the most uphill point, or the western edge. This meant that the soil at the most downhill only really needed excavation for the gravel, leaving most of the concrete above grade. Since I will be hauling / pushing inoperable vehicles into that garage, we elected to set aside a meaningful pile of extracted dirt for leveling in front of the garage after the concrete sets. I recognize that I will probably need to pour a concrete ramp eventually, but that is not on the permitted plan. At this point, we talked about digging a little bit extra on the west (highest) edge so after the concrete is in I could put in a french drain, routed over to the downspout plumbing and on to the storm outflow.
 
storm outflow site
The storm outflow also needed some thought. Recall, the storm outflow was required by Clean Water Services so storm water run-off from the roof doesn't become a water management problem for our (slightly) down-grade neighbors. The minimum size for a storm outflow is 4 feet by 8 feet by 18 inches deep, and they get larger as your building footprint grows. I don't know the rate of growth, but our 720 square foot building is still well below that threshold, so we get a minimum. Regardless of its size, it needs to be at least 15 feet (5 meters) from any neighboring property line. I had added it to my site drawing at the point closest to the southeast corner, 15 feet away from the lines. When I went to that location, I decided that it was too close to the large black walnut tree and digging there could damage the roots. So, we moved it 3 meters north, further into the property. This is still well within the property line proximity specification, and I will learn if the inspector cares about the storm outflow location accuracy regarding the site drawing or not when s/he/they inspect the site. In the image on the right, the outflow is marked with yellow tape. This is the new location. The tree in the right rear of the picture is the black walnut I am trying to protect.
 
Wrapping Up
We will be signing the agreement before the weekend, and with a gap in the concrete contractor's schedule, the excavation could start next week. This weekend, in order to make room, I will be pushing Nina (new-to-me yard-find 1964 VW Beetle, in the image above) out of the path to the build site and whatever else is necessary to make the job site as accessible as possible. Before you ask, no those are not US-spec tail lights, they are the euro-spec tail-lights with the yellow turn signal section. There are a few not-original-spec or missing-original items on this car, like the bumpers, but that's part of the discovery fun.
 
Boo and I are stunned that this is happening so quickly. If he hadn't had a gap in his schedule, we would probably be looking at 3 or 4 weeks. Those were the timelines I was getting from the other contractors and those schedules were filling. It seems that when the rain stops, pouring concrete is a nearly round-the-clock business, until it starts raining again. I recall the painting business was the same way back in the day when I did that.
 
After the job site is accessible, I will be trying to get Hapy to start again, with a 4th starter replacement. This time, I got a new Valeo starter as directed by TDI guru and great guy Justin. I hope this one will last longer than a few hours. For everyone's knowledge, I tried and got burned by...
(1) a rebuilt Bosch starter from a reputable online vendor, 
(2) a brand new "SEG" starter, apparently a rebrand of a good starter manufacturing company, from a different reputable online vendor and then 
(3) I had my original VW starter rebuilt by a highly regarded alternator and starter rebuilder in Portland's east side who has now retired.
All 3 failed within a few hours of installing. Since I used to be able to move Hapy around the driveway just by using his starter (yeah, I know. Don't do that kids), this is not a case of "it's Hapy's fault". No, there are just that many poorly built starters and these TDI engines need reliable hi-torque.
 
Thanks, as always, for following along.