Showing posts with label barn. Show all posts

Thursday, May 14, 2026

Building a Shop - Construction Permit Complete

For a project that started in December of 2024, I am surprised it took so long for the shop to reach "complete" for it's initial build permit. Today, I'll review some highlights and touch on a Hapy adventure.
 
The Doors
shop permitted
I had an entire post about the doors (See Building a Shop - Doors) where I detailed almost buying the wrong size big door. Then, we got things right. That big door faces north. Next to it, our contractor guy Ray installed a basic HomeDepot-special 36" (1 meter) wide person door. That door is the only door with an external-facing lock. Moving around to the west side, we have a 10-foot (3.3m) wide opening. In the Ghost of GoRo post, I mentioned the west-facing barn doors that Ray built. I will give them more detail below. The southern opening also got a barn-door style install, though the actual doors are a little different.
 
Ray's Custom Doors
barn doors by seating area
I'll start with the west-facing big barn doors. First, we sourced an external barn door rail system (~$300US) capable of supporting a few hundred pounds. The opening had a double header, so most of the rail was mounted to that, through the exterior skin. In order to create sufficient space for a door to hang, the rail install includes a small block of 2x4 between the rail and the outer skin at each bolt-point. The header only spanned the opening, so on either side, from the inside, Ray added a 2x4 on the inside for the mounting to attach to. The south-facing smaller doors had a similar barn rail system installed. We followed the pattern of using 2x4 blocks to create the offset, and using 2x4 planks inside for the mount to attach to. Unlike the west-facing door, the south-facing did not have a double header, so the entire rail needed the 2x4's installed.

southern doors
With the rails in, Ray shifted to construction of the doors. All 4 doors were framed with Sun-wood. This is exterior-qualified wood, but lighter than cedar and not chem-y like pressure treated. Because the west-facing doors are bigger, they were assembled with brackets to hold them square. And, they had angled planks added for strength against twisting or flexing. The south-facing doors were joined with biscuits, and did not have the angled planks added. Once the frames were ready and test fit, the west-side doors had siding attached so they match the building. The southern doors were skinned with clear plexiglass. This will allow the little bit of winter light we get from the southern sky to leak into the shop.

Once the doors were assembled, Ray re-hung them, and installed interior grab handles to operate them. On both sets of doors, we added guides into the concrete so the doors would not move away from the building while in place or traveling. Last, I added a lock to each door so they could not be opened from the outside. I need to prime and paint the south-facing doors, but they are operational as-is.
 
Inspected
southern doors
When I had the building inspected in August of 2025, the inspector asked for 2 things: install the doors and add a landing for the person-door. With the doors now complete, and the landing added in September (See Building a Shop - Steel Building Erected), I was ready for an inspection. So, on Monday I ordered the inspection. The inspector checked the boxes on Tuesday and now I have an officially completed building (per drawings, spec's and inspections). What does this really mean? Well, in terms of the permit and inspections, it means I get to pay taxes on the land improvement, and my home owner's insurance just went up. It also means that anything contained within that shop is now covered under my home-owner's insurance and if something catastrophic happens to the building, I'm covered insurance-wise.
 
What does this mean in terms of my personal use of it? Very little, frankly. I needed the doors so I could lock it. Once lockable, I can start storing tools out there, so I can work on a car in the shop and not walk the 40 meters from the shop to my tools in the garage and then the 40 meters back again. I have already repaired 3 cars in that shop with a 4th (Astra needs her alternator replaced) heading in on Friday. having a lockable shop means I can do that work that much faster because my tools will be right there.
 
Retrospective
where we began
Being an advocate of both Agile and Continuous Process Improvement (CPI), I believe that some kind of look-back when a project reaches its end is healthy and helps you and others make better decisions in the future. So, with that in mind, what did I learn that I haven't already mentioned?
 
     Permits: I covered most of the discoveries along the way in the linked permits post. Get Clean Water Services involved early and make sure you manage both erosion during the construction as well as any mud getting tracked into the street. Either can got your job flagged and then things get much harder.
 
    Survey: The "106" inspection is all about proper placement of the building relative to your plan and the property lines. If you don't know where your lines are and can't figure it out, you will need a survey, or you may not pass the first inspection. I split this inspection into 2 visits, with the first being informal wholly focused on the site location. This was Vai-the-concrete-guy's idea and he was 100% right.
 
excavated
    
Bidding: get lots of bids. I had 3 and had I gone with one of them, it would have cost me ~$5k more for the flatwork. Part of every conversation about the flatwork included a conversation about the excavation. For every bid, the excavation was a meaningful amount, even though it's not terribly time consuming, especially for out project. This might be something we could have done ourselves, but the schedule worked out better having Vai do it all. Last, make sure every bidder fully understands all of the parts of the plan. Vai had a brain-fade about the carve-outs for the lift and had I not asked about it after they ran the compactor, there could have been an issue. This served as a reminder that without a designated general contractor, YOU are the GC.
 
    Inspections: While Clean Water Services did verify that the erosion control measures were in place, and made sure that the storm outflow was planned for, the adherence to that plan was not in any inspection.Does this mean it isn't needed? No, nor does it mean that it won't be part of your project, it just wasn't part of mine and I managed the storm water with french drains once I was unable to attach gutters. So, I have a rock pit in my yard without purpose. The inspector can be your friend. Case-in-point, I would not have even known about an "Ufer" if the inspector had not mentioned it and then approved it. I now have a passing-electrical ground because of the inspector.
 
cleared and framed for concrete
    Concrete: I asked the concrete contractor specifically what, if anything, I needed to do once the concrete was poured. He said "nothing", and I got surface cracks because it did not cure uniformly. The correct answer is "try to keep the surface wet with a garden hose for a couple of days". Then, the top does not dry too fast relative to the concrete beneath. 
 
    Oregon Carports: these folks were great from start to finish. They were easy to work with, the plans were spot-on for the permits and inspections and the installers were fast and nice guys. It would have been nice to know that a gutter could not be installed without retro-fitting, but at this point we have weathered a full wet season easily.
 
    Driveway: When I planned the shop, I knew that the ground sloped downhill south to north but I did not account for the west-to-east down slope. Topology matters. After the steel building was up, I had over 1/3m (an American foot) drop off at the southeast corner. This led to many hours of hauling and spreading rock. Since my labor is free, this did not factor into final costs, but it may factor into your plans.
 
    Overhead Doors of Portland: Similar to Oregon Carports, the overhead guys were great to work with. They found us a door that just smashes for less than half of what I would have paid for new. They stopped by late last week to install a header board over the door and install the weather seals. Both after my check had long cleared. We will be using these guys again.
steel skeleton
 
    Ray: Ray is a star. He has been a contractor building things since he was a teenager. Now, he's getting near retirement and is not taking on any new customers. So, those of us lucky to have worked with him in the past are blessed to still have him, at least for a little while. One of Ray's greatest strengths is looking at a project without filters. He can imagine what you are looking to do and make it happen. He built the barn doors, yes, but he also built our kitchen with salvaged cabinets. 
 
Timeline
For history's sake, and in response to my "how did this take so long?" question above, here's the time line for the build, start to end. There was a break in the action over the winter Oct2025-Mar2026 while we financially recovered a little bit from the costs incurred so far. We needed to get onto Ray's calendar and figure out the doors a bit too.
 
2024-August: Boo and I decide to build a shop and figure out about where we want it
2024-December: steel building ordered from Oregon Carports
2025-January: permit started with Washington County (WC) ($700)
2025-March: Clean Water Services (CWS) involvement in plan
2025-April: permit accepted, initial payment of ~$1k
2025-May: self-performed survey, soliciting concrete bids; locating and placing "straw wattle"
2025-June: CWS inspection, excavation, WC site inspection, concrete poured, WC "106" inspection 
2025-July: steel building installed on foundation
2025-August: french drain install around foundation, WC "199" inspection fail
2025-September: rock and gravel of drain, north-side access
2025-October: move 4 cars before rains hit
-- work suspended to save some money -- 
2026-March: west-side barn doors, north-side person door installed
2026-April: north-side overhead door installed
2026-May: south-side barn doors installed, WC "199" inspection pass
 
Costs
Similar to the timeline, I'll detail the costs as I can find them. Of course these were all in as-of-that-day US$. With TrumpTarrifs and trumpflation, your numbers may vary widely from these.
        0: Advise from WashCo, inspectors and Clean Water Services
  1800: Permits with Washington County
23000: steel building from Oregon Carports
15500: excavation, framing, concrete pouring, incl $500 for the concrete pump rental
  7500: north-facing big door from Overhead Door of Portland, incl install and opener
  4800: all other doors, incl hardware, custom build, installs
    800: french drain materials, gravel
    500: large rocks for storm outflow
53900: TOTAL
 
From these numbers, I conclude that when you think about building a shop, the cost of the building itself could be less than half the overall costs. I paid more for permits than I did for rock and gravel, which is also interesting. The 4 doors cost almost half of what the overall building cost too. I could have had fewer openings, or installed a solid overhead door to lower costs, but I'm glad I didn't. Also it is worth noting that this shop has no electrical yet. I expect that will be a 5-figure as well since I will need a trench to run power, a panel, and then lots of cabling contained in conduit. Eek. I do not expect that work to take place any time soon. Instead, I will operate with a long extension cord from the house for as long as I can manage.
 
Hapy Shifting
In my last post, I celebrated Hapy shifting so well. That turned out to be premature. The next day, I lost the ability to put Hapy into gear and had to limp home in rush hour from around the corner.. in 3rd gear. One hot clutch later I was back in front of the garage and there he sat for a few days until I could get a look at him. Of all the things that could come apart, I did not expect the bolt going through the pin in the shift linkage at the front of the transaxle. In the image on the right, it's the screw in sub-component "P". I expected the grub-screw ("R" in the image) to have fallen out because I could not remember if I had run the bailing wire through or not. Turned out I did, and the grub screw was doing fine.
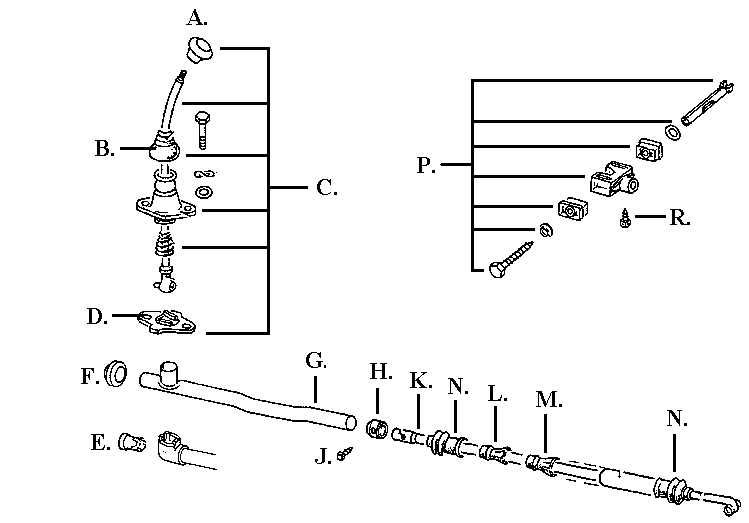
 
shifter diagram
I pulled the pin out and rummaged through my drawers of fasteners and found a 11mm bolt that fit. After around 20 minutes of wrestling, which consists of slightly moving the shifter in the cab, getting back under the bus, test fitting and repeating until you can muscle the pin through the hard plastic bits in the cage AND through the end of the linkage running from the front. This time, I put blue thread-lock on the bolt added a washer and sent it into the pin. I torqued it down as best I could considering my body position and the lack of something firm to grab on the opposite end. I used a pair of pliers to hold it.
 
Hapy is back to shifting normally again.
 
Wrap Up
After Ray finished the doors and I had locks on them all, I sat in one of the rear seats from C's new mini-van / stealth-camper we set in the shop as a seating area. I took a moment to just absorb. We so often will not take those minutes, choosing instead to rush off to the next thing. I sat for a few minutes, radio playing softly in the background and simply looked around at my shop. I really can't believe it. After so many years of lying in puddles, sliding on my back on wood chips or just outside in the rain, I cannot imagine what it will be like to work inside, on a hard dry surface come winter. Even now, as we head into summer, I will be working in the shade, on cool concrete, not hot tarmac. Of course, between then and now, I have a great deal of stuff to move and organize, but as of today, the shop is open and I can't wait to get out there.
Thanks, as always, for following along- 

Thursday, March 26, 2026

The Ghost of GoRo

I have been coming off of an illness, having been sick for almost a month. Yeah, whatever that thing is going around got me good. In the meantime, we have gotten some headway on the shop doors and I got to start thinking about what's next on Oliver to get him on the road for the Summer. Today, though, is a cautionary tale about selling a car, no matter who you sell it to.
 
What's GoRo
GoRo
I'll back up a little bit first. Back in June of 2023, in my "Small Fence, Big Difference" post (link here) I mentioned in passing that we had sold GoRo, our 2009 Audi A4 to a guy down the street. We told him multiple times prior to closing the sale that he really did not want the car, that there were weird issues with the transmission, interior plastic bits were breaking off and that it was a generally crappy car. He would not heed our concerns, saying it was for his daughter, he could get the mechanicals fixed up fine, etc. There was still a couple of months left on the existing registration, and he was going to have to drive it to his mechanic, and then over to Department of Environmental Quality (DEQ) to get registered. So, Boo with her ever generous heart, let him take the car with the tags on it. We went inside and recorded the sale with the state of Oregon immediately.
 
Sales Daisy Chain
Of course, we were right. He took the car and within a couple of weeks he had sold it. But, he didn't tell us, nor did he remove the tags that we had left on there for him. In Oregon, you have a month after buying a car to change the registration. Since he hadn't had the car for a full month, he was officially in the clear, but whoever he sold it to also sold it within a few days, and we lost the handle on the ownership after that. 
 
Ticket Parade 
Why is all of this important? Within a few days after our
barn door
neighbor sold the car, we got our first of many speeding or other moving violation caught-on-camera ticket, followed by parking tickets and toll-lane charges. We got tickets from Montana, Texas, California and Colorado. In each case, we sent copies of proof that we no longer owned the car. For the tickets which came from legitimate state, county or city governments, the tickets were waived. In the case where the ticket was for not paying a toll on a "private road", the charging entity did not care that were were not the owners and could prove that we were not even in the state at the time of the violation. Instead, they sent the ticket to collections, dinging our credit. To prevent further damage to our credit, we paid that one. Most of these tickets arrived within the first 6 months after the car was sold.
 
Final Straw
This week, we got what we believe to be the final ticket. GoRo had been impounded in the City of Merced and would remain in their custody until we came down to their office and paid the bail on parking tickets. We don't care and after a while they will put the car up for auction, and it will be someone else's problem. I just hope the auction house or the City of Merced removes the license plates before handing it off to another sucker.
 
Buh Bye GoRo
barn door, inside
By the time we sold off GoRo, Boo and I pretty much hated the car. The seats were stiff like bleachers, increasing internal switches were failing, plastic bits were falling off, the transmission shifted funny, etc. It outside looked great, but wow, what a lemon of a car. The lesson here for us and for you: even if you're selling the car to your friend, remove the tags. If you are all down for the sale and want to be generous, drive over to DMV and remove the tags while your friend is getting temporary plates. Once that car leaves your possession, there is no telling what will happen to that car. You could find yourself with a big pile of tickets from uninterested parties who only want money, and are willing to hammer your credit to get it.
 
Car and Shop Stuff
I mentioned at the top that we have made headway on the doors on the shop. Recall, I have 4 openings which need closings. Over the past month, our friend Ray has built barn doors for the large opening facing west using extra siding I had added to the order for the shop so those doors could get made. It is a 10 foot wide opening, so the doors are each just over 5 feet wide. They totally look the part and glide open/shut easily. We also installed a "people door" on the north elevation or facing the farm house. This leaves a 8 foot wide doorway on the backside and the main large garage door next to the people door. I have been saving for the big door. While that doorway is a standard 16' wide, it is 10' high (just in case someone comes along with something really big, I guess). So, it is a semi-standard door.
 
On cars, I have Hapy about as ready to visit Justin as I can make him. Since he hasn't really driven since I put him back together, I really would have liked to have driven him a little more. With Diesel hitting $6/gallon around here, I all the more do not want to be driving with a fuel leak. So, his next drive will be to Justin's place.
 
voltage gauge upper right
To keep my hands busy, I have been looking at Oliver, the 1978 MGB. I couldn't get him to start when I went to move him into the shop and I didn't really look into why at the time, I just hauled him. I slid under the rear end and discovered why: I had drained all of his fuel out the last time I parked him. If I remember right, I put that fuel into the lawn tractor and the rest into Astra. Antyway, I test-fired the fuel pump with 12V directly from the battery and the fuel pump works. So, if it does not come on with the ignition key-turn, it's a wiring issue. After messing with that, I removed the voltage gauge from the dash and will be sourcing switched power for that. I had simply used the always-hot 12V for the clock I had replaced, but that runs the battery down eventually. I hope to have some time this weekend to finish the voltage gauge, put some gas in and see if I can get him to run, and idle. Then maybe I'll back him out and give him a long overdue bath and a drive-around.
 
Well, that's it for today. Keep your license plates when you sell your cars, and thanks, as always, for following along-