Showing posts with label valve. Show all posts

Wednesday, November 22, 2023

Hapy Update

Today I could continue the dissertation on the effort to move the furnace in our 1948 farmhouse. Instead, I actually have something car related... the check-in on Hapy that I said I was going to do in a prior post and then flat-forgot. Remember Hapy? He's the 1972 VW camperbus that launched this blog. I meant to post this yesterday, time got away from me.

Hapy No Start Returns
A few weeks ago, as the weather turned cold, Hapy became increasingly difficult to start. Again. I figured it was the same issue as last time (See Hapy No Start Again), and started checking things with my multi-meter. I started where the old problem was: the main fuse for the glow plugs. Nope, there's a clean over-12V signal there. Then, I checked the voltage at the relay, and it was fine there too. Same for the resistance in the wire and the fuse.. no issues. So, I started thinking about the glow plugs themselves. I swapped this set in when I put in the chipped CPU and bigger nozzles, but not because there was anything wrong with the ones that were in there. I had this set of plugs that I had lying around for a few years, and I was selling Flash. Flash had failing glow plugs (resistance tests between the plugs were not within a few ohms of each other). So, rather than put the new set into Flash, I got selfish and put Hapy's nothing-wrong-with-them plugs into Flash and installed the new-never-opened plugs into Hapy. Looking back, I don't think these plugs were nearly as good. I think we have had starting-while-cool problems from the beginning, but it was Summer when I did the swap and never thought about it. Until now.

I pulled the rear-most plug (#4?) and tested it by resting the glow plug threads against a grounded bit of steel on the engine and triggering the ignition to "run". After a 3 count, the tip of the plug started to glow orange. After another 3 count, I could hear the relay click off, and the tip returned to black. I did this a few times and each time it took a few seconds for the plug to respond and even then it was only the very tip. Based on some internet imagery, I concluded that those plugs were insufficient and bought a fresh set.

A few days prior to installing the new set, I started hitting the in-engine plugs with some Kroil penetrating oil at dinnertime. I did not want a plug to break off or damage the head during removal. Whether it was necessary or not, the plugs removed relatively easily. All of them had soot on them when they were removed. Into the trash they went. For each of the new ones, I applied some anti-seize onto the threads prior to installing and then only snugged them down (did not torque the snot out of them).

Unfortunately, my efforts to start Hapy when the glow plugs were not working did a number on the starter. Again. So, my attempt to start him after replacing the glow plugs was not fruitful. Since I did the glow plug swap around the furnace work, and the furnace still is not operational, I self-limited my time to just swapping the plugs and then getting back under the house. I returned the following weekend (bumming rides and car-sharing with Boo the week between) to remove and inspect the starter.

should be 1 part, not 2
I admit, I expected the starter to just need a remove / re-install cycle. I was wrong. This rebuilt starter was installed in June 2023. After a summer of being my "daily driver", the starter was cycled well less than 500 times. I guess rebuilt Bosch starters are not all the same. Maybe the starter was a Bosch but the rebuild was done with cheap-o parts, leaving just the case as a Bosch unit. Regardless, it did not take very long to notice that the seal on the end (which is supposed to go around the shaft which juts out when 12V is applied) wasn't there anymore. It had potato-chipped inside the little pocket where the nose of the starter goes. Neat! So, off to the internets I went looking for a suitable replacement. I decided to get a new one from MetalManParts. Run by MetalNerd, his site only sells things that he personally fabricated or installed into his own vehicle. I have purchased both types of things from him before and have no regrets. Since Bosch was sold off to Seg Automotive, he now supplies new starters from them. I trust that if he is selling them, he is using them.

Sadly, the install of a starter has become fairly rote, since I've done it so many times. I simply put a 19mm socket, 13mm socket, a ratchet and a couple extensions into my pocket, slide under the bus with the starter and it's installed in less than 15 minutes now. If the rear sway bar were not there, I could probably have it done half that time. Of course, I ran the battery down with all my glow plug testing, so it got a spell on the battery charger before I could test my handiwork. Once that was resolved, I turned the key to "run", counted to 6 (for the glow plugs, it's 45*F here) and returned the key to "off". I repeated and then tried to start. Fired right up! I let him run a few minutes to top off the battery and now he is back to being my daily driver.

Hapy Heat Not Heat
Remember all that effort I went through to install the Vanagon rear heater under the bus for some heat? While that was fun, the result is not much heat. I described the lack of warm on the drive to and from the Cascade Equinox festival. Beyond the lack of detectable warmth, opening the valve to try to get heat has resulted in a coolant leak. I can attribute no other source for why Hapy's coolant level is suddenly not holding. So, I turned the valve back off and will be replacing the Vanagon rear seat heater with something else: a Maradyne Fans Stoker heater.
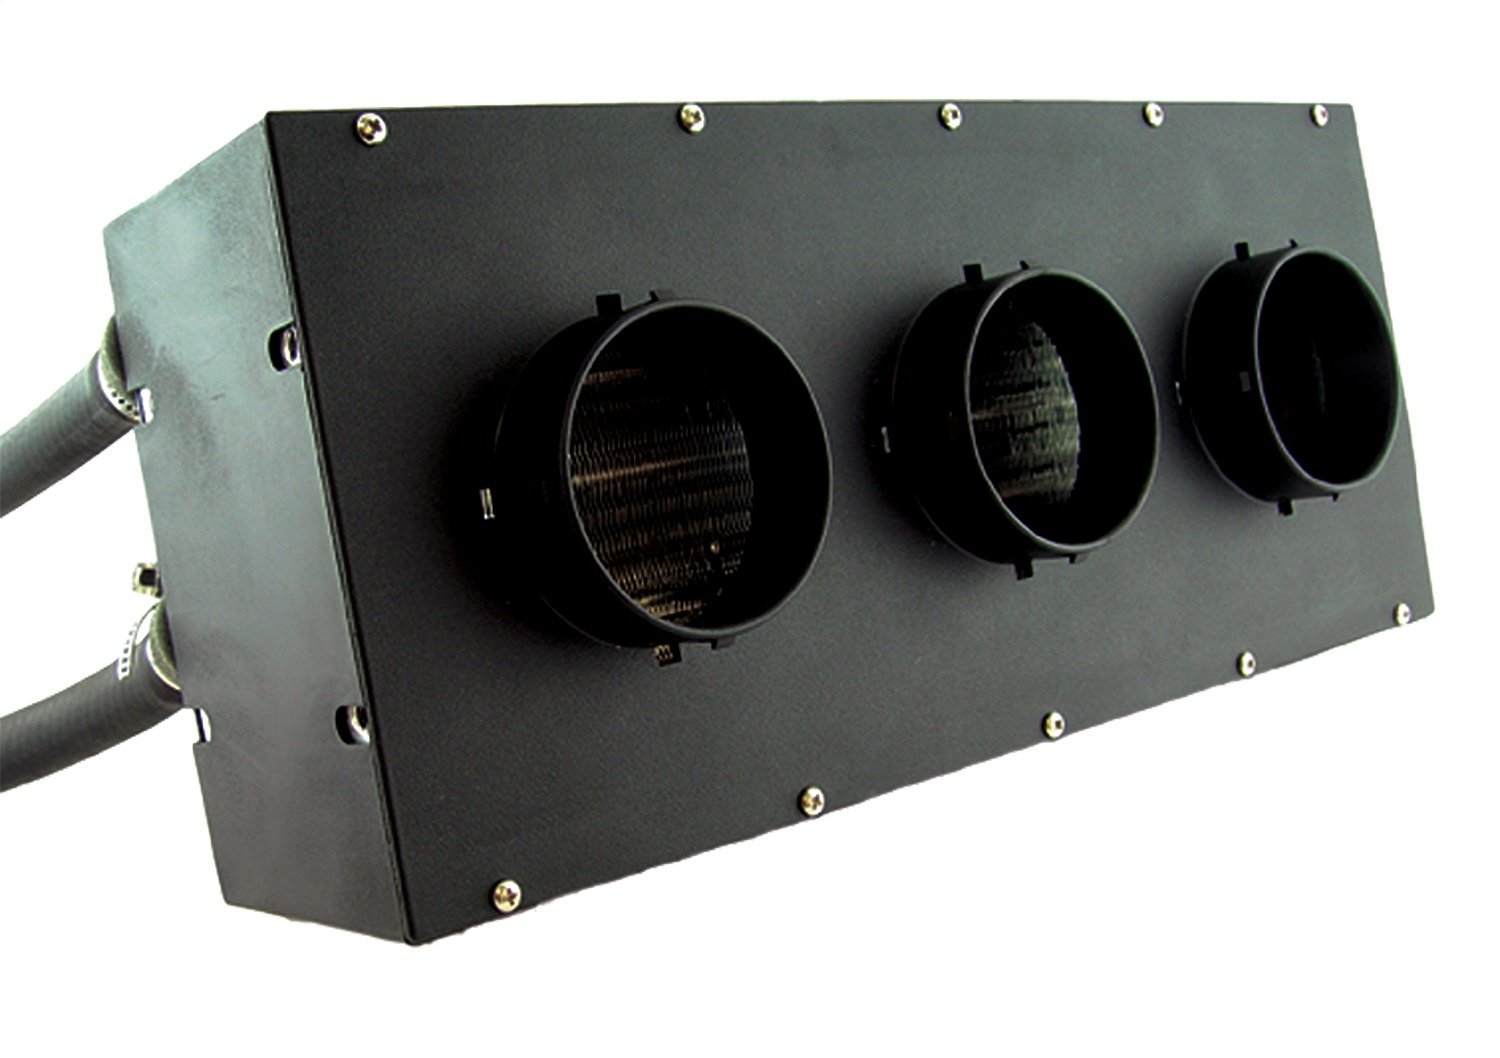
Maradyne, but could be any
There are lots of auxiliary fans which all look the same and have the same spec's (300cfm, 40k BTU - airflow and heating capacity, respectively). JEGS has their own, for example, that looks identical. Since I am unsure who is the originator, I went with a manufacturer with a known, solid reputation. There is little documentation and hardly any photos of this particular unit on the interwebs, making this choice perhaps a little more risky. I find the 40k BTU number everyone is using to be gross hyperbole, but I don't know how to test that nor the 300cfm number. I will bench test to get some amp-draw numbers before I install it. The amp-draw might be useful information for the next person since even Maradyne doesn't list this detail on their product page. And, it could be one more thing that is exactly the same on all of these units. For future reference, the JEGS unit draws 5.5, 7.1 and 11.6 amps (for low, medium and high settings respectively). I had relays in-place for the medium and high draw switch positions for the Vanagon unit. I don't know if I  will re-use them. Perhaps the amp-draw numbers will help me decide.

One other thing to point out: none of these heaters ship with a coolant control valve. Since I was leveraging the valve in the Vanagon, I have to add one of these or the heat will be on maximum all the time. I included this "vintage" control valve in my order. I thought about going with an electric one, but decided that I would really like to re-use one of the big original heat-sliders on the dash to control the amount of coolant flowing into the heater core. That feels more authentic than another knob attached to the bottom of the dash. Of course, I haven't ever had that control cable, so I will be running this either full-on or full-off until I do.

For now, this means that trips in Hapy will be just like all the other trips I've ever made with him in the not-Summer. They will be cold. It will be like driving around in an ice-fishing shed, unless I can either install that heater soon-ish -OR- get the little Chinese diesel heater/furnace working.... or both. Since I do not have a garage and I barely have a 4-meter square piece of concrete to work on... and I have a house furnace to fix, I do not think Hapy's heat will get addressed terribly soon. At least I have the parts for when I do. Of course, now that he is my daily-driver again, I may decide another week without a furnace might be a fair trade for some heat, any heat, in Hapy.

That's it for today. Thanks, as always, for following along-

Monday, December 28, 2015

Vanagon Rear Heater Leak fix

No, I don't have a Vanagon. But, I do use the rear heater for my main heater in the bus. In the Vanagon, these sit under the rear seat, and provide auxiliary heat for the passengers back there. I've heard that they do little more than provide a leak in the cooling system and a corresponding coolant smell in the passenger compartment. I don't know all the answers as to why these leak, but I did find one. Today's post is about that, furthering my winter break efforts (See: Planning Winter Break)

Heater Layout
Let's start with some orientation. The heater is a hard plastic shell that is relatively rectangular (approx 12" wide, 7" deep and 7-1/2" tall). There is a snorkel on the front (front is front) that directs the air out onto the floor. On the rearmost part of the right side there is a round hole (about 3" diameter) where the air is pulled in. Passing in front of the fresh air hole are the coolant inlet and outlet lines. The bottom line (return) leaves the heater core, turns 90* and runs rearward. The top (feed) line enters a valve and then turns 90* into the heater core. The core is held in place with 2 Phillips head screws. The valve is held together with 2 7mm-head bolts running front to back.

Possible Points of Failure
I first thought these heater units had all kinds of failure points, but there really aren't that many. There's the core. Sure, heater cores go bad. There are the points where the rubber hoses meet the bibs. There are the plastic 90* bends, but they hardly ever fail, and then there's the valve. Not too many opportunities for issues.

Look Around
If your unit is leaking, look around to see if you can tell where it is originating. Yeah, that sounds obvious, but if you clean it up and dry it off and then start adding distilled water to your system, you should be able to identify where the drips are starting. This is especially true of anything that isn't the heater core. If that's your cause, water will just start appearing underneath the unit. This is an easy fix: buy a new heater core, pull the old one (2 screws), slap in a new one. Still, I'd complete the rest of the post here, just in case.

Start with the Obvious
Okay, so you see some drips over by where the rubber lines meet the unit. Are the rubber lines in good shape? Any cracks or splits? Are they seated all the way on to the flat plastic stop? Are the hose clamps tight? My top coolant line wasn't all the way on, so I thought this was my cause. I loosened the clamp, pushed the hose all the way in and tightened it up. This slowed the leak, but it didn't stop.

Leaving the Valve
Van Cafe replacement valve
The valve attaches to the heater unit with 2 bolts, one above and one below the opening where the coolant passes. If you remove the bolts, you may see that there is no gasket between the two opposing faces. I think this is the spot where many of the Vanagon rear heater leaks originate. The coolant doesn't leak when these units leave the factory, but after years of jostling around, the lack of a gasket eventually takes it's toll and a tiny gap is created. If your valve has failed, and the leak is coming from the valve, (EDIT 2021-Jan-25) GoWesty has a replacement here. The image to the right is the old valve that Van Cafe used to sell. I am unable to find it on their site anymore.

Solved
In classic shade-tree fashion, I solved the problem with a rubber washer from my house plumbing supplies. I took a small dab of Form-a-Gasket to act as a temporary glue and smeared it on one side of the rubber washer. I place the washer on the tip of my pinky finger and stuck that finger into the valve, sliding the rubber washer into the flat face, goo-side first. This centered the washer on the hole. I held it there for a few seconds and carefully removed my finger. The washer stayed in place. I then set valve against heater unit taking care to not bump or in any way shift the washer. Once aligned, I ran the bolts through and tightened the bolts. Unlike when there wasn't a washer, the bolts are unable to mate the faces completely. There is a small gap through which I can see the washer. I initially thought this was not going t hold for that reason, but so far testing has shown that this is holding up okay. I need a longer at-temp road test, but the round-the-block tests have been very positive. Total cost: $0.

That's it for today. If you like throwing parts at a problem, (EDIT 2021-Jan-25) your options are not as plentiful as they were. Van Cafe no longer offers the "replace everything except the plastic" kit I referenced here. I looked on BusDepot and GoWesty as well; options have disappeared in the 5 years since I first posted this. As always, thanks for following along.

Tuesday, March 30, 2010

Bleeder done

Today's post is mostly to express thanks to one of our readers that offered a suggestion for the bleeder. I'll then cover the steps take to implement the suggestion. First off, I haven't been very good about thanking anyone and everyone that has posted comments or sent email about what I'm doing. The blog was hit by the spam-machines, so every posting has a bunch of junk responses / comments in various languages offering all kinds of opportunities for me to share my private information for a get-rich-quick scheme or another. It seems that the spam-machines have moved on to other blogs or sites, so I can now go through and read the comments. Please keep them coming, I appreciate the supportive words.

Bleeder
Reader payaso de la mar suggested trying
"a brass needle valve normally used for evap cooler or fridge icemaker tap....they have i think 1/8" pipe thread and taps that size are cheap, or you can 'make' threads with JB weld."
Most excellent idea! I had to stop at the Home Depot / Lowes anyway for some ant killer (nasty little buggers seem to be the bellwether of Spring) so I hit the brass / copper fittings section. I found this tiny brass valve that should work perfectly.

To the right, here, is the picture from the Home Depot website. The store SKU is 543241 (manufacturer's pn is PB9103-CP), and it retails for $5.30, which seems spendy. Still, the right part is always cheaper than wrong part after wrong part, which has been the story of this conversion, sometimes. This valve is maybe 3 inches from top to bottom and weighs less than 0.1 pounds. With the little nipple on the end, I'll be able to route the spill-off to the overflow bottle during bleeding. Sweet.

Install and Use
I had added a copper "T" in the lower radiator line for the install of the bleeder earlier. I had used the same copper "T" near the oil cooler, so I know the oil-cooler related hose would fit the smaller opening on the "T". I had some leftover donor hose from the oil-cooler circuit, so I took about 2" of rubber, and hose-clamped it to the "T". Into the other end, I inserted the old plastic nipple from the first replacement coolant flange (that goes on the front of the head). If you'll recall, I accidentally smashed one of these flanges trying to install the engine early on. From the pictures that have my shop in the background, you can tell I don't exactly throw much away, so I had that flange lying around. A quick cut with the saw and I have something to screw the valve into. It fits into the opening, albeit tightly, and it holds up to pressure.

Now, when I want to bleed the lower end of the system, I can connect a stretch of clear plastic tubing (so I can watch for bubbles) to the valve and run the other end into the overflow bottle. Simply run the engine a bit with the valve open slightly, and the air in the lower end should come out the bleeder. Perfect.

I'll add pictures of this later on, maybe when I'm working out the kinks of the bleeding. UPDATE: here it is in-situ. I was out working on theelectrical and snapped this yesterday.

pictures:
top - image taken from the Home Depot website of the valve
middle - my yellow Lab, completely wiped out from a day of playing
bottom - the bleeder in-place, hooked up to the lower radiator line