Showing posts with label park. Show all posts

Tuesday, March 26, 2024

Fixing Hapy Furnace (part 2)

Picking up where I left off the last post, Hapy has an operational furnace again.

Fuel Pump Swap
As I mentioned in my last post, the fuel pump which originally delivered with the heater/furnace would not work when I tried to bring things back to life. I splurged and bought a more expensive "quiet" model for $50US rather than another standard pump for $20US. I figured quieter or not, the more expensive pump may have better parts in it, and it may last longer whether it is quieter or not. Or it was just a marketing gimmick and I got took. Let's chalk it up to the cost of an experiment.

The old fuel line path was relatively simple. The "hard" (clear but firm plastic) lines that delivered with the furnace had short (50mm / 2-inch) stretches of fuel hose between them and the pump. The pump was suspended from a cross beam by the included rubber mount held in place by a single sheet metal screw. After a few turns with a screwdriver, the pump was on the ground. A few more and the fuel lines were removed from it. The supply fuel line started dripping fuel after a few seconds, so I caught it with a pan. The line on the pressurized side was completely empty, so no drips. I simply reversed the removal: added the rubber mount from the supply end of the pump, added the supply fuel line, suspended the pump from the cross beam and then added the pressurized-side line.

Prime and Fire Up
The Afterburner has a control page where you can direct only the fuel pump to fire up. This allows you to get fuel all the way to the furnace without the glow plug turning on (drawing the battery and maybe burning out the glow plug). I had not connected the pressure line to the furnace, but I wanted to clear the lines of any bad fuel, so I moved the pan under the dangling hardline and triggered the Afterburner to prime. Within a minute of the prime starting, fuel started spurting out the end of the line. It took longer than I expected it to, but perhaps that is an indication of how little fuel these units actually consume. Once the fuel leaving the pressure line looked like the fuel supplied at a filling station, I stopped the prime function and connected the hardline to the fuel hose dangling from the furnace.

While the pump was slightly larger than the original, it did not seem much quieter during the prime. Of course, I hadn't heard it pump in a couple of years, and memory is a funny thing. I do recall that when the furnace was running, I could hear the tick-tick-tick of the fuel pump over the whoosh of the furnace. With this in mind, I set the furnace to start. I did not want to consider the experiment with the new thicker, dedicated wiring yet, so I left the battery tender hooked up. At no point did the battery fall below 13.5V so either the tender was working hard, or the new wiring is a hit.

Regardless, the glow plug got lit, the fan started spinning and after 2 or 3 minutes the furnace ignited. This felt like a considerably longer period of time than before. Perhaps the priming was incomplete and I needed to prime again after connecting the hose to the furnace. Perhaps it took time to ignite simply because it had been so long. Once it ignited, a huge plume of smoke poured out of the little muffler. There was virtually no wind, so the cloud grew and sat slowly obscuring first the rear end of the bus and slowly 2/3 of the bus before a light breeze broke it up. After a few minutes, the cloud dissipated and the exhaust emission was reduced to nothing. All that remained was a light smokey haze inside the bus. I regret not taking a picture of that.

Noise Observations
While the temperature inside the bus slowly crept up from 55*F (13*C), I noted the noises. I could only hear the fuel pump ticking inside the cabinet where the furnace is located and even then, only when I stuck my head into the cabinet. I think the pressurized line is transmitting it. I stuck my head into the rock-n-roll cabinet above the spot where pump is actually installed and could not hear it. Maybe this new pump is quieter. Then, I moved outside where in the past I could clearly hear the pump from several feet away, even from the passenger-door side. I could not hear it, but I could hear the furnace whoosh. Of course, my muffler-ing of the furnace is different this time, having removed the second small rectangular muffler and the motorbike muffler. Perhaps the pump is no quieter, but the furnace is that much louder. To determine if the muffler configuration is a variable, I decided I will conduct another test at a different time, after re-attaching the other muffler bits. I had thought about bringing them along for while-parked use, and maybe I will need to, out of respect for our festival-going neighbors. In the past, I took decibel readings, but they were for while the furnace held a temperature, not during temp catch-up (full blast).

I will continue to experiment with noise readings and post if I find any readings are different than they were 4 years ago. I expect that once I put the extra rectangular and motorbike mufflers on, the readings will be what they were before. The only real mystery to me is whether the fuel pump can be heard over it. At this point, though, the pump seems significantly quieter.

Thanks, as always, for following along-

Tuesday, March 19, 2024

Fixing Hapy Furnace (part 1)

Having finally arrived at a place where we have some heat while we're moving, I felt motivated to fix the heat for when we are standing still. Today's post covers most of the saga of getting a Chinese diesel heater operational again. Spoiler alert: the heater isn't running by the end of this post.

Brief History
Back in the early days of CoViD, I installed one of those Chinese diesel parking heaters into Hapy (See Parking Heater 1, 2, 3, 4, 5 and Final for deep detail). While I was able to run it a few times, I found that the heater pulled the voltage way down on whichever battery was connected to it. I tried to solve by providing multiple batteries to source from: one to start, one to run, but switching from battery to battery seemed like a bad practice. I had other priorities, so I just let the furnace sit unused. When I did the sound deadening effort and the luxury electrical re-wire, I dismantled the cabinet which housed the furnace so I could get sound deadener underneath it and electrical cables through it. This meant dismantling part of the furnace too. Later, when the band wanted to use Hapy for the album cover, I removed the furnace exhaust so it would not appear in pictures. So, I had a furnace without an exhaust, and would draw way too much juice.

Electrical
Over time, and with more learning about electrical stuff, I have concluded that the wire used to convey electricity but perhaps more importantly the wire for a ground were far too thin. It was due to these thin wires that the voltage would drop so badly as the furnace attempted to compensate. Wires which would have been barely up to the job had the battery been sitting right on top of the heater will definitely NOT be up to the task once you move the battery a few feet away. This is exacerbated by running the ground to the body of the bus instead of back to the battery. The ground location should not matter as much, but I'm citing it as a participant cause anyway. So, addressing the electrical came first after removing the furnace from the bus.

A small harness of wires leaves the furnace body and enters a black plug (see picture on the right). The harness that ships with the furnace includes a pigtail that clicks into the furnace black plug. To my eye, the red and black wires in the pigtail are not nearly as thick as the wires leaving the furnace. This probably saved the manufacturer a few pennies, but the amp draw issue starts right there (and in my case got worse). So, I cut the main power and main ground wires from the furnace black plug and put male/female wire ends on them (12V/ground respectively). I made them different so I couldn't accidentally plug it in backwards. I then prepped a thick 2-wire black/red cable with matching wire ends, and routed it over to the luxury battery. At the battery end, I added a ring terminal for the ground and added a 20Amp fuse into the positive side before adding a ring terminal on that end. I left things detached as I switched to preparing for the exhaust.

Exhaust
From under the bus, it was clear that I had not made the hole(s) large enough for the exhaust, intake and fuel to be easily maintained. Quite the contrary, I had installed it such that once it was all together, it would have to all come apart to fix anything. Frowny-face. So, I started by cutting a 4-inch square hole into the lower belly pan. Many buses do not have these, but I got lucky. Anyway, with the hole cut I could see where the furnace sat, and noticed that the exhaust was getting pinched by the too-small hole in the floor as the exhaust left the furnace. So, I went topside and expanded the upper hole both in the floor of the cabinet and the steel floor of the bus. With the larger hole, the exhaust easily fits and things could be maintained from below. Still, I did what I could on the furnace itself before lowering it in: Connect a 6" long stretch of fuel line, attach a small circle of window screen to the intake (so bugs and pebbles don't get in) and then attach maybe a foot of heat-wrapped exhaust. I set the furnace in place and attached a small subset of the muffler arrangement I had used before: just one rectangular muffler. I may bring the expanded muffler set up for use when we are in tighter camping spots (like festivals), so we can bolt-on some extra quiet. I mounted the muffler to the underside of the frame rail, with the outlet pointing rearward and slightly away from center (picture on the right).

A keen eye can see some fresh Rustoleum primer + paint above the muffler where I discovered some rust had eaten all the way through the body. When I was working on the other stuff I ground the metal down, removing the rust, but exposing the holes. Sadness. That rust traces back to when this bus had a small vent window directly above this spot. That vent window was badly leaking and the rust had already been forming to the point of marring the paint when I bought this bus over 20 years ago. I eliminated the vent window in 2015 (See Calling "glass") with a window I purchased from BusBoys in Redding, CA in 2009. Some things move slower than others.

Fuel
I shifted over to fueling at this point. The fuel line that had been between the included "hard" line and the furnace had breeched, probably when I did the sound deadening. The fuel in the line looked dark, so I dropped the line into an empty pail, and figured I would prime the fuel system, and purge the bad fuel at the same time. Unfortunately, the fuel pump is no longer functional, so I am waiting on a replacement to finish this job.

Afterburner
Back when I first did this job, I bought an Afterburner from the guy who hand builds them in Australia. Apparently, there are people building knock-offs, eating into his business, since they basically have cloned his work. So, if you are looking at getting the much nicer controller for your parking heater, please connect with Mr. Jones in Australia and get the real deal. Anyway, with the Afterburner, I tried to prime the fuel system, but the fuel pump wouldn't respond. When I unplugged the pump, I got a code; I concluded the wiring to the pump was good but pump was bad. So I ordered a new, supposedly quieter, one. We'll see. While I was clowning around with the Afterburner, I got it onto my home network, downloaded the newest firmware and wandered around the new-to-me website that the Afterburner hosts. It's really cool. I am looking forward to triggering the furnace to warm the bus from inside. For reference, here is a link to the user manual.

This is as far as I've gotten. I am waiting for a new fuel pump to arrive. I need to purge the old lines of nasty fuel, and install that new pump. I expect there will be other discoveries, and I need to rebuild the cabinet innards. There's always opportunities to improve things. Anyway, thanks, as always, for following along-

Tuesday, March 28, 2023

4-Wheeled Friends to NewOldHouse

On it's surface, one would not think moving some cars from one house to another, especially when the move is less than 500 feet would warrant an entire post. Well, let's remember that Murphy's Law is always present and these are cars which have not moved maybe for months, maybe since last Summer.

Site Preparation
during site prep
Before I could move any more cars, I needed to set up a place for them to land, even temporarily. NewOldHouse doesn't really have a driveway other than a small concrete pad in front of the attached garage. A single car can fit on the pad, but if that car is any larger than a compact, the old-skool flip-up garage door would not open. Earlier in this NewOldHouse odyssey, ToyoTruck got stuck behind the house while we were spreading wood chips. So, absent a hard surface, and having a significant mud bog practically everywhere else, determining a viable spot posed it's own challenge.

Boo and I decided we would ignore the mud for a moment and consider where, ideally, the cars would sit. To reduce the tendency for the vehicles to sink into the ground, I measured, leveled and placed 4 larger patio blocks where the tires would go. Under the patio blocks, I added a thin layer of sand to reduce the risk of the block breaking. Last, to protect the underside of the older vehicles (Hapy, the 1972 VW camperbus, and Oliver, the 1978 MGB) I laid a tarp on the ground. This should reduce the moisture-effect which increases underside rust when you park on dirt.

To side-step the mud, we waited until we had a couple of dry days and moved the vehicles once it was clear that the ground was dry. And so the adventure begins.

GoRo Goes
rare March sunny day
I started with the car I thought would be the most troublesome: GoRo, the 2009 Audi A4. GoRo had a rough winter, like the rest of us. After one of the overnight freezes, the outer handle for the driver door broke. So, to get in, you need to either get in the passenger side and reach over or open the rear driver-side door and reach through. Either way, it is annoying, but workable. A couple of weeks later, the hood latch broke. Fortunately, it happened after it unlatched, but one should not drive with the hood unlatched for safety reasons and we don't want to latch the hood because then it's stuck closed. So, GoRo has sat for a couple of months waiting to get repair-attention around the move. While it sat, the battery ran down. I hooked up a trickle charger overnight the night before and then it started up the morning we wanted to move it. I moved GoRo into the street-adjacent spot next to the wood-chip driveway so once it is fixed it can easily come and go without interrupting the driveway flow. Our old friend Courtney, of MobilePDX, will be fixing the hood release and driver door latch so GoRo can be put back into regular service. I could do it, but I do not have the hours in the day to get it done remotely soon.

Hapy not Happy
flatbed again
The last time I drove Hapy, it was to Pizzario, a small wood-fired pizza place in downtown Hillsboro, to sit-in on a Wednesday-night jam. That was 2-November. If I remember correctly, he started and ran great, but inside was really cold. I contracted CoViD19 that night, so my memory of how he started is kind of fuzzy. Anyway, he had been sitting with a trickle charger on his battery so 4-1/2 months after he was last driven I expected him to start right up and we would have a heroic drive to NewOldHouse. Maybe we'd take a victory lap or pickup something to eat while we were savoring our success. Nope. Instead, his starter made a horrible loud grinding noise. I concluded that the starter failed, and the little gear in the starter was not protruding all the way into the bellhousing and therefore failing to mesh with the teeth on the flywheel. I was immediately reminded of when we moved into this/existing/old house from the rental next door, and ended up selling 2Dot0 because moving it was just one too many things to manage. Obviously, we are not selling Hapy. Instead, I got AAA to put him on a flatbed for the 500 foot move. The driver was a champ and did his best to get Hapy close to his prepared spot, but overhead wires limited him. So, with a come-along and 15+ meters of chain, our friend John and I moved Hapy into place. I may try hitting the starter with a hammer a couple of times to see if that re-enables the starter, but I vaguely remember some after-run from the starter last Summer indicating that it was starting to die. More than likely, I bought a lower-grade starter as the replacement, and it just failed prematurely as cheap parts do. Even if the hammer-trick works, it would just be delaying the inevitable and he is in a good spot to replace the starter, so now that I've typed all that, I bought a replacement, higher quality, starter and will swap it in.

Oliver Shifts
almost there
I have struggled with the idea of parking a convertible outside. After losing 4 canopies to wind and snow this winter, I felt my considerable fear was warranted. I moved forward with it for 2 reasons. First, I have no choice. We need to get out of the old house and the garage at NewOldHouse is full of kitchen cabinets. So, there is no room inside. Second, we have a neighbor around the corner who has parked his brand new Mazda Miata MX5 in his driveway all winter. His car is fine and arguably worth considerably more, at least in terms of replacement cost.

Similar to Hapy, Oliver has been on a trickle charger all winter, so I figured his battery was good and he would start up. At some point during the few days prior, someone had unplugged the trickle charger and his battery was completely flat when I went to move him. I put him on another charger, and put gas into his tank. The charger did not resolve his battery, and I had to replace it before turning the key wouldn't immediately flatten the battery. I got a group 24 Duralast battery from Autozone and learned that the old battery was actually a group 35. A group 35 is smaller. I figured the PO probably did that for easier install, but I have read that the group 35 does not have the same pop at start. I'm not sure that's actually true, but it is usually best to install the correct group battery for your car regardless of what the interweb experts say. Anyway, with the battery replaced and some gas in the tank, starting was still not immediate. The fuel I put in the tank needed to get pushed by the fuel pump up to the carb, and fill the bowl. I worked the butterfly at the carb to get some atomized fuel into the intake and with a billow of smoke he started up.

in place
I drove Oliver over the NewOldHouse, wishing his registration was updated so I could take a longer spin. He drove well with no noticeable exhaust, shifting easily. His throttle responded right away, implying the carb-leaning adjustments I did last summer to eliminate the bog worked. Perhaps he is ready for another run at Oregon DEQ. Since he still has a leak under the windscreen and the rains have not yet left for the summer, that run has to wait. I parked Oliver next to Zed, behind the house. All 4 of his tires are on patio blocks set on top of a tarp. I covered him with a "Gold Shield 5L" cover from CarCover.com to keep him dry.

The picture on the right was taken before I put the cover on, obviously, but you can see the tarp on the ground and the patio blocks. Now that the cover is on, it drops down almost all the way to the ground so the tarp and blocks are mostly not visible. Since he was moved and covered, we have had rain (because, of course, it's western Oregon) and the cover has kept Oliver dry and the cover did not appear to even look wet while it was raining. I'm not sure how that works.

That's it for today. While the effort to move these three was in some cases significant, and they all need some kind of repair, I am thrilled to have them home. Thanks, as always, for following along-

Tuesday, May 26, 2020

Parking Heater - Final

In March, I posted a series about installing one of those inexpensive Chinese Diesel Heaters into Hapy, the TDI-powered microbus (See Parking Heater 1, 2, 3, 4, and 5). I have completed the little things that I had left undone, so today's post takes a break from the oil temperature and pressure stuff and wraps up the heater.

Power Switch
I had left off with a power switch wired between the main (drive) battery and the heater. It was dangling around in the cabinet behind the old refrigerator-turned-cabinet. I added a wire to the luxury battery housed under the rock-n-roll bed through the fuse box I have controlling circuits to that battery. I also bored a hole into the wood support I have in that rear cabinet holding the old westy battery maintenance panel. I don't really use that panel, mostly because I haven't finished wiring up shore power to charge the luxury battery. Anyway, I punched a 5/8" hole through and fed the switch through, nutting it down. It looks fairly finished now; it just needs a label.

Cabinet a Cabinet Again
floor back in.
The heater sits on the floor of the old refer cabinet. I only need about 7 inches of clearance, but I gave it 8-1/2 so I could add a layer of insulation later. At the 8-1/2 inch point, I attached 2 wood supports running along the front and rear walls. On top of these, I put a thin run of foam to reduce any noise or rattling, and then settled a rectangular board for a cabinet floor. In the future, I will probably attach some kind of insulation to the bottom of that floor. For now, it is just a bare piece of wood.

The smaller cabinet can still hold quite a bit of stuff. I re-stowed the zombie-apocalypse Red Cross first aid duffel, some paper products, and a few other fairly important yet random things (playing cards and a cribbage board, for example).

Afterburner
Afterburner installed
Afterburner unpacked
The Australian guy (Ray Jones) who makes the Afterburner appears relatively unaffected by the CoVid-19 lockdown, so he was able to process my order and sent it to me. Bear in mind, he is a one-man operation, so the waiting list can be rather long. I let the package sit for a few days in quarantine (on concrete garage floor) before digging into it. The included install instructions are easy to follow, and all of the parts are easy to identify. I had it installed, complete with wire routing and final wall mounting in a couple of hours. I have only scratched the surface of what this thing can do, but I am very impressed with it so far. In my opinion, the white case and grey buttons looks great. Like so many other improvements, this shows me how much I can raise the aesthetic simply by adding carpeting to the wall cards. All of the scratches in the picture on the right, here, highlights how overdue this is.

Afterburner operating
Okay, today's post was a little light, but all combined, those short passages took me hours to complete. More important, the heater is complete. Once I have the Afterburner figured out, I'll be able to pre-heat the bus in the winter time, have the heater turn on based on a schedule, shut off based on temperature, etc. Basically, it will have the same capabilities as a home thermostat... but in a 50 year old VW bus. This heater install was originally so we could get warm during the summer solstice music festival in Bend (4Peaks) which would have been next month had the CoViD pandemic not happened. Assuming everything is back to normal in June 2021, we will use it there. Maybe, just maybe, next winter I will be able to achieve my old dream of taking Hapy to the mountains for some fun in the snow.... now that we have a way to get the cabin warm. Hmm.. maybe I need to figure out how to add a defroster first.

Thanks again for following along. More next time-

Tuesday, March 3, 2020

Parking Heater (Part 5)

How this concept took more posts to cover than the rebuilding of the front end of the MGB, I don't know. But, here we are, a fifth post about it. Wow. Let's start with re-capping what the prior 4 posts have covered.
Part 1 - why I'm doing this and what's in the box. Also some early, uninformed ideas about needed upgrades
Part 2 - planning, ripping up the old refer cabinet, placing the fuel line and fuel pump
Part 3 - planning a heat register, connecting the fuel line to the heater, sourcing the power and then an air filter boondoggle.
Part 4 - connecting the exhaust, installing the heater unit, completing the fuel system, completing the electrical and the heat register

So, what's left? Routing the exhaust, the inbound combustion air and running some tests.

Exhaust Wrap'd
fuel pump gets vertical
Until now, the exhaust has simply flopped on the ground. Obviously, that is not a viable long-term solution. So, after watching some interesting video footage of various muffler styles (courtesy of John McK), I made some decisions. JohnMcK stressed that the intake and exhaust must be left as open and clear as possible for long-term health of your heater. It was this advice that had me abandon any muffler wadding. He was also confirming what Hal said. JohnMcK was the source of the info to orient the pump as vertical as possible as well (see picture to see how mine is now oriented). I was going to conduct a bunch of noise experiments, but JohnMcK already did that for us. I encourage you to watch his videos; he is super-dedicated to these things.

So, post JohnMcK love-fest, I decided to use 2 of those little thought-they-were-garbage "muffler"s. Based on JohnMcK's findings, they each drop the dB by about 10% and when placed in series that continues (so 60dB drops to 54 which then drops to around 50). I had already acquired a flow-thru motorbike muffler, and John tested one of them also. They didn't seem as impressive as they looked, but I intend to use one anyway, since it will help to hide the others.

only shiny things in sight
The "muffler"s need to hang vertically because they each have a drain to let out moisture and/or unspent fuel. Unfortunately, they are hard to hide, especially since they are shiny and there's practically nothing shiny on this bus. The underside is particularly NOT shiny, so these "muffler"s will be very visible. Consider that the heater exhaust exits the bus a foot or so forward of the rear driver-side wheel, fairly close to the outer edge/lip along the side. Because of the short distance between the exit point and the wheel well, in order to route sound muffling, the pipe needs to run forward and then turn back on itself (exhaust must point rear and down or the air-flow from driving will create back-pressure). JohnMcK stresses the importance of having no more than 270* of bend in your exhaust or you may create too much back-pressure. So, this gets interesting. I planned the locations of the "muffler"s and pre-drilled holes in the belly pan to hold the "muffler" hangers. They are about 6 inches inboard of the outer lip.

wider context view
As the pipe leaves the bus, it turns 90* towards the front. I cut it off at that point with a hacksaw, cutting the heat sleeve with scissors first. With the help of a stainless steel reducer (3/4" to 1" with the 3/4 inch inside the cut pipe), I mated the cut-off pipe to 2 "mufflers" in series, connected by a cylinder of HVAC flashing held in place with pipe clamps. Yes, that sounds hinky, but it is actually quite solid. To the end of the second muffler, I slid on the clean end of the included exhaust pipe I had just cut off over the "muffler" end, leaving the ragged cut end free. I added more heat sleeve and another clamp at the "muffler". I then turned the pipe into a "J" so it faced more towards the rear and stopped to test, and to get noise readings. The pictures here paint a better picture than my prose.

Inbound Combustion Air
Apparently, these heaters don't need an air cleaner. I find that very hard to believe. Still, going with it, I decided to remove the air hose from the intake side of the heater, using the large cavity between the floor and the belly pan to act like an insulator against really bad stuff getting in there. I was having fit issues anyway, and this removed the thing that was in the way. I will be attaching a bit of window-screen to the intake, but for testing purposes, it currently has no filter. That's how JohnMcK does it without a filter, so I'll not argue. As it is, there are a few spots where air could get in, but only one 1" diameter opening so the route to the inside of the heater would require some form of intelligence to get there.

Testing
motorbike muffler added
With the exhaust completed enough for testing, I fired up the heater and let it run. I checked dB levels (reads as "quiet house" within a few feet of the exhaust, bouncing around 55dB) and wandered around for a sense of sound impact. I am unable to hear the fuel pump at all outside of 15 feet (5 meters) away. The sound of the heater running disappears into outside noise after another few feet. Within the bus, the pump cannot be heard over the sound of the fan except at the lowest setting. I let it run for about an hour and the temperature inside the bus climbed from 12C (about 54*F) to 20C (68*F), while at the 3 pulse-per-second setting, around the mid-point. I kept getting in and getting out, leaving the slider open sometimes, etc, so this is not scientific. Still, since the bus had not been over 60*F since last Summer, I consider a nearly 15*F increase a fairly significant feat. It will be interesting to see how effective it is when I really just let it be. One thing worth noting: the exhaust has no smell. None, and no smoke either. I cupped my hands at the exhaust outlet and breathed it in just to see if I could get any smell. Nope. That's efficient.

My last test was to fire up the engine of the bus to confirm that I did not interrupt the fuel supply to the engine. Obviously, that's kind of important and arguably could have been done sooner. Honestly, I wasn't sure he would fire up, but he did on the first try. Good boy, Hapy. I drove around the cul-de-sac but he dropped into that 1200RPM can't-read-the-throttle mode, so I parked him again. Looks like he's trying to tell me that the next thing needs to be resolving his electrical.


Well, I think that's enough talk of the Parking Heater. It really isn't completely done. I did the install of the motorbike muffler with exhaust hangers to help make the exhaust look nicer. It does end up a little quieter, now in the low 50's at the boost or high-power setting rather than low 50's at mid-power, so that's good. You can see how it appears in the picture to the side here. Not sure it actually looks that much better, but the cut off pipe looked pretty janky. I will be installing a false-floor in the cabinet so it can be used as a cabinet again. I will be attaching the power selector switch to the bus as well as running a power line from the luxury battery. I intend to put some kind of heat insulation on the register to retain heat, and might add some air baffles to direct the air flow a little. I don't think any of those warrant a 6th post, though. Then again, one or more might appear on their own if I have nothing else going on, or they become more involved than I thought. Oh, one last thing: I found a guy who makes an after-market thermostat/controller for these things, called Afterburner. I intend to experiment with one of those, if I can get my hands on one.

Thanks, as always, for following along. If you have more questions about these heaters, I fully endorse JohnMcK's videos. They are incredibly informative.

Tuesday, February 25, 2020

Parking Heater (Part 4)

Picking up where I left off last time, I was in the middle of the install of one of those cheap eBay parking heaters that are a rip-off of those $1000US jobs. I have a partially constructed custom heat register, the fuel line run from the engine compartment through the fuel pump to the heater unit. I have holes bored for the combustion air intake and exhaust. Last, I have the unit grounded and the 12V source almost together. So, while lots of things are not done, they are all just a few steps away. I didn't quite finish it today.

Exhausting
making register
I had already worked the combustion air intake hose up through the holes from under the bus. This took a few trips in and out of the bus to get the hose to bend and not hang up as it passed through. If you have a helper, even a reluctant one, this is where s/he would really give lots of help for very little effort. With sufficient hose pushed through to the inside of the cabin (I gave myself about 6"), I switched to the exhaust. First, I slid the bendy stainless steel hose into the heat sleeve. The sleeve is 3' long, and it is much longer than the stainless steel exhaust hose/pipe; I will have extra. I got the sleeve as tight around the pipe as I could and slid it up through the holes from under the bus. These holes were more aligned and a little larger than the intake, so it went through with little fanfare.

Once through, I could start connecting the air and exhaust to the heater. The air hose was more willing to be managed, and connected without much effort. The exhaust, however, took some doing, but I got it on, and the sleeve pulled all the way to the top, and then clamped the pipe and sleeve to the heater output with one clamp. In the process, the fuel line popped off, so it needed to be re-attached. For now, the exhaust and intake pipes are laying on top of a car-ramp so they aren't sitting on the pavement in the rain. I'll button them up to the underside once everything is working and after the noise experiments indicate what muffler solution to use.

Heater In
heater in
With the underside connections to the heater all buttoned up, I was ready to press the heater into place. First, I set the heater above the hole and pushed a little bit. Say, 10 pounds of pressure. Then, similar to the run-around I did for the air intake, I got under the bus and tugged on the hoses a little bit. Again 10 pounds of pressure or less. This took some of the excess bends out so I could then press the heater home from inside. I checked again from below just to be sure. I then attached the unit to the bottom of the cabinet with a pair of wood screws and then tried to shake the heater. It wouldn't budge.

Fueled
Next, I needed to complete the connections for the fuel. I had intended to locate the "T" close to the front (front is front) of the engine compartment, but once I got in a position to work on it, I made a small change. The large clear filter was already in a fairly good space, and I figured that I could fit the "T" just downstream of the filter without cutting any fuel hoses. I took the "T", pressed on a short (2" long) stretch of hose on one end, and a 2" stretch of 4mm hose on the small part of the "T". I clamped the other end of the 4mm hose to the trimmed end of the heater fuel line. Then, I squeeze-sealed-off the hose between the clear filter and the large filter with a vice-grip. I was now able to remove the line from the clear filter and then quickly connected the short stretch of hose from the "T" to it. To the other end of the "T" I connected the vice-gripped line. All clamps were snugged down and then I removed the vice-grip, but fuel didn't really move around. The net result has fuel leaving the small clear filter and immediately enter the "T" fitting. The large end of the "T" continues on to the Caterpillar filter while the small (4mm) end of the "T" routes to the heater.

Priming
foamed and screwed
I should note that the picture in the last post of the fuel pump needed to change. The directions give no indication of the fuel flow direction, and that pump is one-directional, pulling towards the end which shares the electrical plug. That's the case with mine and while they may not all be the same, my viewings on YouTube of the little heater professor (John McK) implies that they are all the same. I was also alerted (again by Hal) about the orientation of the fuel pump in my post a few weeks back. So, I re-checked it, and he was right, I had it practically horizontal, and they need to be approaching vertical for the fuel to lubricate the piston inside the pump and for the little bubbles created during the pumping to float up into the heater. I disconnected the heater-side from the pump, shifted things around, and re-connected.

I left the fuel line at the supply-side of the fuel pump disconnected, however. To this line, I connected the Mity-Vac to fill it with fuel. Once the Mity-Vac jar was steadily filling, I stopped the vacuum and quickly reconnected the line to the pump. I checked the clear filter in the engine bay and it was full, so we should have a nice tight system now.

Complete Heat Register
When I last touched the heat register, it was a box, but it needed to be sealed and it still needed a 3" pipe connection. I got a 4" connector from Home Depot, and cut it open. I could have probably used some basic flashing, but thought the dimples and wrinkles would help hold the air hose on. I fit the cut connector into the hose, marked with a pen and then cut the connector so it fit a 3" diameter hose. I also cut about 1-1/2 inches off the end to make more maneuvering room in the cabinet. I fit the connector into the register from the inside, and pushed the seating tabs down. Once set, I used metal HVAC tape on all of the seams on the register, including the connector. You can see the finished result in the top picture.

register completed
My rough forming of the register resulted in the outlet not being completely flat. I tweaked it for a few minutes and got it close, but I knew I couldn't get it perfectly flat. To resolve, I put a thin strip of foam along the edge which would be pressed against the cabinet. Then, I threaded one screw per side through the register edge to hold it to the cabinet. I took it out to the bus, and pressed it into service.

Last for the heat outlet, I needed to run the air hose from the heater to the register. This was relatively simple. I laid out the hose to check length, cut it with a pair of scissors, and clamped it in. It took some wrestling.

Finish Electrical
With the fuel ready and the heated air routed, all that was left was connecting the final electrical bits. First, I completed the wiring from the fuel pump. By now, the switch I had ordered had arrived, so the rest was just as easy. I connected the center post to the heater supply-side and the fused 12V from the main battery to one of the outer posts. Then, I plugged in the controller and the heater.

Tests
The moment had arrived. After charging the battery, I flipped the switch, and heard the fuel pump fire up. Then, the fan on the heater started. Cool air blew through the register and out onto my boots. I felt the air flow and there was positive, consistent air movement all along the grate. But, the air was not warming up. Huh. So, I tried to figure out the interface, and I really couldn't. I knew from John McK's videos that the way you changed the temperature was to increase the speed of the fuel pump, so I messed with that a little bit. Turned out, I was just impatient. Once the glow plug was up to temp and fuel had made it down that last stretch of hose from the pump, the diesel started to fire and I started to get heat. Curious about the noise, I checked the driver side of the bus. It sits below 65dB, floating up and down depending on the fuel pump speed. At the lowest setting, my little phone app decoded the dB to "quiet house". At the mid-setting (3.3 on the pump speed) is decoded to "quiet street". This is without a baffle on the air intake, and the exhaust without any muffling while I was standing, semi-stooped over with a phone a few feet away from the hose ends. More on how these ends are dealt with next time.

Thanks, as always, for following along--

Tuesday, February 4, 2020

Parking Heater (Part 2)

Today's post continues my process of introducing an experimental parking heater into the microbus. My main driver for this was our 4Peaks Music Festival experiences. Even though it is around the Summer Solstice, every year, the overnight temperature gets down into the mid-30F's (that's like 2*C for our non-US friends). That had caused us to us the Little Buddy heater a lot, heating up the tented-zone outside the bus while hanging out and then again inside the bus before going to bed. I figured if we had something dedicated to the bus, the little propane heater could just focus on keeping the hang-out zone tolerable. Aaand... the bus could be pre-warmed either while we were away at the stages or while we were sleeping.

Planning
blurry picture of test fit
It all starts with determining where you want to install it. I chose the old fridge cabinet because it had a false floor as well as a metal grate I could send the warmed air through. The air supply-side would just pull from under the cabinets and the bed; these are the coldest zones, so that should work great. The fuel and exhaust needed to get through the wood floor of the cabinet, the steel floor of the bus and the belly pan unique to the early 70's bus. I figured that I could source the combustion air from between the floor and the belly pan since there were multiple holes that would allow air to freely flow.

I will "T" off the diesel line from the main tank, and not use the kit-included second tank just for the heater. I figure I can introduce the "T" after the large clear filter so I won't need the tiny one shipped with the kit that does not look as hardy.

Preparation
Before I could start installing, I needed to remove the false-floor. I would have liked to reuse that floor, but the way it was installed made that impossible. So, with a 1" paddle bit on my drill, I bore multiple holes into the floor until I could smash it into pieces. Once the chunks were out, I cleaned up all the edges, removed the little bits of fasteners (staples and short wood screws) and shop-vac'd the thing out. Once it was gone, I could really evaluate my options. There were only so many ways the heater could go in, so I ended up with it just inside the outer wall and an inch or so in front of the rear wall (see blurry picture). This created the most room for the air intake while creating the least dramatic curve to the outlet hose. The picture doesn't really show it, but there are 1/2" gaps along the rear edge and a modest sized hole along the outer edge near the front. So, air will be able to enter without fighting a vacuum condition.

The outlet hose will still need to bend about 270* before entering a heat register that I will need to custom construct. For a mental picture, imagine a floor register in your house. It changes a 4" (or greater) diameter air hose into a rectangular shape. I could bore a 3" hole in the front of the cabinet, but I wanted this to be total stealth, and, honestly, this way was more fun. Most US housing is done with venting that is larger than 3" in diameter, so this would be a total fabrication.

Boring
fuel pump install
The heater unit delivers with a metal sheet that rests on the floor between the heater and whatever surface it is bolted to. I loosely taped the metal sheet to the heater and when I had set the heater where I wanted it, I pushed the metal sheet off, and I had a template for where the holes needed to go. I marked them with a pen, found the center-point of the holes and drilled a pilot hole in the wood cabinet floor at that center-point. I grabbed a hole-cutter for a 1-1/4" hole and drilled out the holes for the intake and exhaust. With a hand saw, I connected them together, making one single oval. I test fit the heater to make sure it dropped into the hole as intended.

With the same bit, I cut holes in the floor of the bus directly beneath the two I had just cut. The front hole went through beautifully. The rear hole, however, was partially blocked by a support running side to side. I'm a little concerned for how the air intake will need to adjust for that. With the holes in the floor, I could see one of the drain holes below and a little in front of the front hole I had just cut. So, I went underneath and bore a hole, using that drain as the center-point. I will route the exhaust out there.

Fuel
After a couple attempts, I arrived at routing the fuel from the front right corner of the engine compartment back along the stock fuel line path, then over the suspension support, along the emergency brake tube, past the nose of the transmission and then over to the passenger side along a cross support. To the rear side of this support nearest the passenger side frame rail, I attached the heater's fuel pump (see picture). The plastic fuel line would pass over the top of the frame rail and enter the space between the belly pan and the floor between the frame rail and the floor. Once I had the fuel line laid out and zip-tied in place, I installed the line to the pump with short sections of 4mm fuel line. I will caulk around where the fuel line passes into the belly pan space so vibrations do not slowly create a weakness in the line.

I figure I am maybe 1/3 done on this, so there's plenty left to do. I have the electrical, finishing the fuel, fabricating, installing and routing to a heat register, the air intake and exhaust. Then, I will test the heater, measuring the noise level and experiment with suppression ideas. I figure it'll be 2 more posts before it's all done at this rate.

As always, thanks for following along and more next time-

Tuesday, October 8, 2019

The Dog Days 333 (Part 2)

Continuing the story of the 333-mile loop we did in mid-August. In part 1, I explained the plan, and the longest leg of the trip, from home to just south of Florence. Today, I'll cover the journey from Florence to Newport, happenings at Newport and then the journey through Lincoln City and home again.

Florence
googleImage
I left off the last post with our departure from Honeyman State Park. We had a great time there, but it was approaching lunch time for most, and we had one rider who had skipped breakfast, so food was at the front of our minds. When we entered Florence on our way in a few nights earlier, we spotted a Dairy Queen, so we had a fail-safe. I wanted to see if there were better offerings before suffering the Brazier. Our patience was rewarded with an A and W car hop on the north end of Florence. We were fortunate to arrive just after someone else had left, so we could pull into a car-hop spot. I didn't think these things were still around, but not only is the place still standing, they still bring food out to you at your car on big platters that you can hang on your window. I wasn't sure that was a good idea with a nearly 50 year old bus, so we used the tray as a table inside it instead. They served the classic A/W root beer in heavy freezer-cold glass mugs, and the food arrived slightly wrapped in paper. Maybe it was because we hadn't eaten planned food in a week (no grocery store stops means you make up meals based on what you have, not from a plan) or maybe it was because we had worked a bit to get there, but those burgers and fries tasted fantastic. As we sat, we could better see just how busy they were. Inside the restaurant, there were no open tables and the line ran back to the door. Around the parking lot, there were no open spots, and there were motorists queued for the next open car-hop spot.

From Florence to Newport
looking South
Northward is just as amazing
Now fed, we could embark on the US-101 north to Newport. I hadn't driven this stretch of the US-101 in many years, but as much as other areas of Oregon have radically changed, this area is relatively static. The coastline is peppered with public beaches, but for the most part, the waterline is unreachable. The cliffs are too steep, or the terrain too rough for a road. Or, a path could be put in, but there's no place on the 101 to put a parking lot. As a result, there are long stretches of untouched coastline to enjoy out the window.

With all of the recreational vehicles on the road with us, there was little pressure to drive too terribly fast, making the drive all the more pleasant. The road is curvy, so even if the road had been empty, Hapy tips a little bit on corners anyway, so I wouldn't have been driving much faster than the current speed of traffic allowed. Hapy was running great. His temperatures would pop above 185*F for a quick second and then drop back down to 185*F as we climbed inclines or had to slow way down. Overall, though, his temperature issues of the past were quickly moving further into the back of my mind, as the scenery increasingly took over the front.

park, as it appears in googleImages
As I mentioned in the last post, we rented a house in Newport. Well, my sister Em did. We had her text the address to C, my navigator, so he could get us there. He had us take a left off of US-101 after we crossed the bay bridge into Newport and then he became confused. He asked me to pull over real quick and he asked a pedestrian "is there a skate park around here?". Hilarious. But, there was, and he had almost gotten us there. We were a block and a half away from it. We parked in front, nose pointing at the concrete bowls, and C jumped out, board in hand. K2 opened the slider, but remained on the lot couch while I wandered over to check it out.

Newport
725 NW High Street, Newport
This skate park looked like a combination of planned park and random construction. A few words from the older cat hanging out brought clarity: the city built it, and then the skaters added to it. For materials, they used whatever they could find plus concrete. Patio blocks? Check. Concrete slabs? Check. So.. that begs the followup question: how were the transitions? Well... you needed to plan for them. C worked the park, and while he did a car-load of locals arrived. Apparently, this was a super-hot day for Newport, so the locals would do a run and then pant in the limited shade. They all had an interesting style where they would look uncomfortable on their board, but then pop an amazing trick or fly out of the bowl and land it.. just to look unstable again after they had landed the trick and rolled a few feet. Maybe it was all of the home-made transitions. Regardless, I pulled up the address for the house, and it was about a half-mile away. We were early anyway, so C got his skate on. Once he was pouring sweat and ready to roll, we pointed south and within 10 minutes we were sitting across the street from the rental.

The rental was an odd, albeit large, 4 story house. The first floor was a separate apartment, but it was part of our rental. The upper 3 floors were, in order from bottom-to-top: more bedrooms with a bathroom, the main living space and a full-floor master bedroom. There was no yard, but there was a grassy park across the street with a big playground in it. It was perfect for the cousins, but no yard meant no tent for C and K2. Arrangements were resolved, and shifted each night as who was able to stay the night changed each day. Boo and I got a bed for one night, but honestly, we prefer Hapy so we stayed in the bus the other nights, and were grateful for it.

The family reunion was great. Boo and I had seen everyone within the last few years, but many family members hadn't seen each other in a very long time. For example, K2 had never met Chris, Rebecca's husband, and C hadn't seen him for close to 10 years. Lives get busy, and travel isn't the highest priority when there are colleges to pay for. Regardless, it was great to have that time, all in one place, for a few days so we could really re-connect.

Newport to Lincoln City
near Yachats
When it came time to leave, the plan was for the smaller, or more distant traveling families to pack and split, leaving the final walk-through for those who simply couldn't move fast. Boo and I were that last group, transporting the grandparents and teens. The plan didn't really work out that way, though, and we had all of the families all packing and leaving at about the same time. This made for a little extra chaos, but it also provided a little extra time to see each other. Ultimately, we were out by the appointed time, and the families went their separate ways... with Boo, K2 and the grandparents in K'Lack and me in Hapy with C, we headed north towards Lincoln City with hopes that this time Moe's wouldn't have a long line.

The drive to Lincoln City was as eventful as the drive from Florence to Newport. Hapy's temperatures stayed very level, he had plenty of power and the traffic didn't push faster than around 55mph anyway. We took the left to get to Moe's and could tell from the parking lot that things weren't looking very good. It was past noon, but still close enough to lunch time, even on a Wednesday, to create a crowd at Moe's. I found a spot near the door and C jumped out to find out how long the wait was... 40 minutes for a seating. Boo quick-conferred with the grandparents and we all decided to go to the McMenamin's Lighthouse Pub instead. Of course, McMenamin's isn't exactly known for fast service, but I figured that with the time to seat and then get food, we were still ahead versus Moe's.

Lincoln City no-start
After lunch, Hapy's now-typical 'starts the first time' didn't happen. I turned the key and nothing. I wiggled some wires behind the ignition switch and I could get the system to flip to "run", but "start" was still a no-go. Neat. With Boo, the grandparents, C and K2 watching, I simply pushed in the clutch, let off the brake, and roll-started by popping into reverse. Within a few seconds, I dropped into that 1200 rpm limp mode. Fun. I just puttered to an incline and roll-started him again. With concern about Hapy's limp mode issues and inability to start, we headed back to the US-101. He didn't drop into limp mode again, nor did we stop the engine again until we got home.

Homing
4!
We made one stop after Lincoln City. There was a pressing need for road-bev's and a restroom so at the north end of Dundee, we stopped at the Chevron. I stayed with Hapy as he idled and C dashed into the store for a couple drinks for us. Other than the no-start in Lincoln City, Hapy continued to run like a champ. It was a hot day, and he was staying nice and cool. He continued to have plenty of power as well, and he demonstrated both on the long uphill between Newburg and Sherwood. I described this climb, and it's significance in my recent post (See Now Water COOLed), but I'll stress it again. This is the ultimate test ground for the success of the cooling system. Hapy has struggled up this hill on the way home every time we've driven it. Part of that is because of the length and height of the incline, but part too is because by this point, he has run for multiple hours and is already plenty hot before we start. This time, though, his temperature peaked at 194*F as we took the hill in 4th gear. Boo and I parted ways in Sherwood. I took Roy Rogers into Beaverton and she continued on 99W into Portland to drop off the folks. Roy Rogers has gotten very built up now, making this less and less of a quality cut-through. I may need to work the maps for something more interesting for next festival season.

Anyway.... 4 successful round trips, To celebrate, here's a clip from Sesame Street back when the painter was still part of the show. Yeah, showing my age here a little bit, but I liked this guy, back when the Count was spooky, the parents didn't know about Mr. Snuffalupagus, etc. Once they started PC-ifying all that stuff, they took some of the special with it. Anyway, 4 successful 300+ mile trips, totaling over 1200 miles without the support of a towing company nor AAA. Hazah!

By the way, the starter no-op was solved once I emptied the back of the bus and disconnected / reconnected the wires going into the TDI ignition switch. Something shook loose on the drive. Another argument to spend time this winter getting after the electrical: solving the 1200rpm issue with the accelerator pedal, the occasional issues with the engine not starting and maybe even organizing some of that wiring in the tire well. Nah... that's crazy talk :)

That's it for today. Thanks, as always, for following along-

Tuesday, October 1, 2019

The Dog Days 333 (Part 1)

2 weeks after the Newberry Event, we had a family trip planned. With the fuel and cooling issues presumably solved, we embarked on a 333? mile loop through Eugene, Florence, Newport and Lincoln City. Gmaps thinks it was 333 miles; so, we'll assume that's correct and that should explain the title. Anyway, today's post covers that late summer run, or should I say, the first half of it. As usual, I'll mask the names of minors with a single letter and the * when I mention speed or distance refers to my inaccurate speedometer (See the "Clock Turns" section within the 4Peaks 2019 - Road Report).

The Plan
Maybe I should start with some context. I have 2 sisters; neither live in Oregon. Both were coming to visit, though, so the greater family saw opportunity for something big. My brother Rob and his wife started the fun with a 3-day weekend (Fri-Sun) camping reservation at Honeyman State Park. Rob's wife Kirst camped there many times as a kid, so this was a throw-back for her. They reserved a bunch of sites all backed up on one another for whichever family units among family and friends wanted to join. My younger sister Em, her husband Sun and her two kids (I and K3) were in, as were we. The rest of the spots filled with Rob and Kirst's kids' (A and N) friends' families. Once we had our spot assigned, I reserved the night before so we could arrive whenever we wanted to after 4PM on Thursday.

Following 3 (or 4) days of coastal camping, the families moseyed up the coast to a rented house in Newport. We would be joined by T, my parents, my brother Eric with his 2 daughters (K4 and K5 - yes we have that many kids whose name starts with K) and my sister Rebecca with her husband Chris. All in, we would peak at around 17 people for one night to celebrate Dad's birthday, but I'll get to the Newport stuff in another post.

Drive at Night
This trip starts like so many: at night. Boo and I worked our regular jobs on departure day, so we weren't really getting things going until Hapy Hour, 530PM local time. We had loosely packed Hapy the days and nights before, and most of the regular gear had been left in there from the Newberry run. We added the washtubs forgotten on that trip, as well as clothing bags, sleeping bags, an extra tent for the boys (K2 and C were joining us) and a pair of large foam mats for the boys to use to cushion their sleep. We had been delaying a grocery store trip, and still hadn't gotten around to it, so we just went through the cupboards and fridge, grabbing anything and everything that looked edible, tossing it into one of the three coolers (one cold, one not-so-cold and one for beverages). I had hoped to leave by 10:PM, and we were pulling out of the driveway, caravan-style (Boo driving the JettaWagon named K'Lack with K2, and me driving Hapy w/C) around 9.

Privacy Screen for Honeyman
By 9:PM on a Thursday, the streets and highways in suburban Portland are fairly empty. We filled fuel tanks and got ice at the corner store before heading to the highway. The evening air was cool, and Hapy hummed along, seeming to enjoy the deserted highway. Unlike our last trip down OR217 / I-5 for Newberry (See Newberry 2019 - Getting There), there were no crowds, no crawling traffic through Wilsonville. Quite the contrary, we were able to run at over 60mph* and cleared the greater Portland area easily. As we passed the Wilsonville exit, Boo called from the lead car, recommending road-snax. We pulled off at the Aurora truck stop, Hapy's temperature rarely getting above 185*F (peaked at 188*F for a moment as we pulled off the Interstate). We split Popeye's Chicken and a plastic-sealed chef's salad. With some form of energy drink in everyone's hand, we set back out to the freeway, this time with Hapy leading.

It is interesting how 15 years of driving the bus without music tends to continue even after a nice stereo is installed. Almost the entire drive to and from Newberry was without music, choosing to listen to Hapy's engine and just think. Now, on this trip, C and I talked without the radio on. C and I haven't really seen each other much over the last few years, so having him on this trip, sitting beside me for all of the driving meant a lot to me. Based on the fact that he didn't have ear buds in, I think the same could be said for him. To be fair, C started living with us nearly full time shortly after school let out in June, so, while we hadn't seen him much before that, we have been treated (and I mean that genuinely) to sharing a home with him for a few months now.
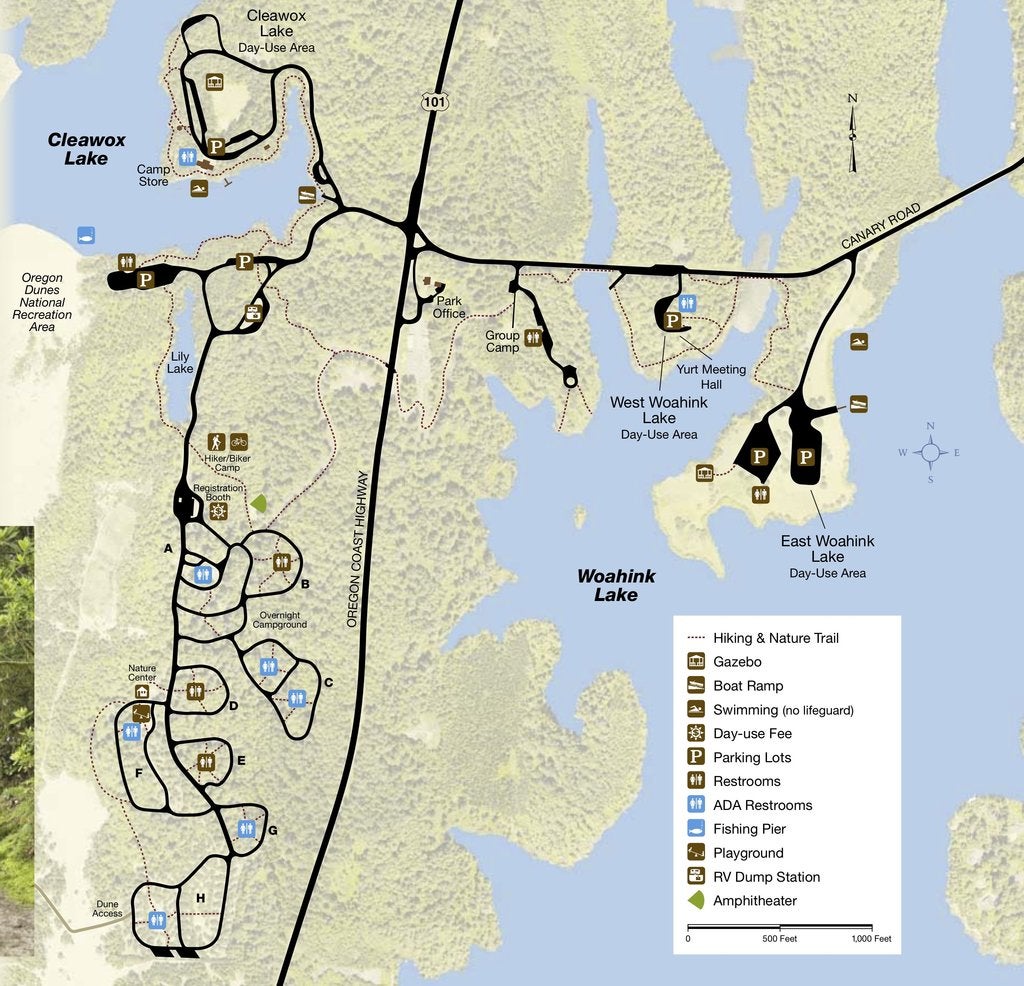
Honeyman SP map
We passed through some clouds at road-level south of Albany and through the interchange in Eugene from I-5 thru OR-569 to OR-126, adding damp to the windscreen. I call it "clouds at road-level" because it wasn't actually raining, and it wasn't fog. I believe it was actually clouds down to the earth. It was quite surreal, especially alone on the freeway passing through nowhere land mid-Willamette valley farm country. OR-126 had a short delay due to some flagger-protected construction, but even the ensuing drive through the coast range was an easy run for Hapy. The route only had a handful of short inclines, with most of the driving being downhill. Still, Hapy's temperature didn't get above 190*F as we cleared the range and hit the coastline in Florence. We turned south on US-101 and within minutes, we were pulling into Honeyman State Park and backing into our (reserved) campsite. It was now 2:AM.

Honeyman State Park
above us, only sky
That first night was actually one of the most efficient load-in efforts I can remember with 2 kids. We started with setting up the the 10x10 EZ-up canopy over the large thick-topped picnic table. Then, Boo and K2 set up the massive tent for the boys while C and I unloaded the bus onto the picnic table, under the canopy. We unloaded just enough for Boo and I to get into the rock-n-roll bed (so we could sleep), making sure everything was under cover in case of rain or heavy dew.

I was the first one up a few hours later that morning, so I cleared out some space on the table, set up the stove and made french-press coffee. I puttered around, coffee in one hand, some piece of gear in the other, slowly making our space work until Boo awoke. Between us, we set up the rest of the space: bus canopy, new area rug, the kitchen, even a drying line and hammock between a pair of nearby trees.

Hammock'd Boo
I had visited Honeyman State Park many years earlier with Hapy and the boys, but they were much younger then. I rooted around the blog for a post about that trip, but didn't find one. Odd, I know some of the first pictures I took while driving Hapy were on that trip. Perhaps that trip pre-dated the blog and it's in my old paper log. Anyway, Honeyman is on the northern-most edge of a, maybe, 50 mile long section of the Oregon Coast that is covered in massive sand dunes. By massive, I mean like upwards of 100 feet high and they run from the water's edge at least a mile or more inland. This is an ATV'ers paradise, and on my last visit to Honeyman, that was very clear. The sound of ATV's being cleaned, tuned, ridden and repaired echoed through the campground then. Not this time, though. New rules prohibit all ATV activity inside the campground. One unique upside to Honeyman I had completely forgotten about was the complete lack of wind. Yes, there's a spot on the Oregon Coast where there isn't wind; it is blocked by those massive sand dunes. You would think that no wind means lots of insects (like the Carolina outer banks), but that's not the case. Still, virtually no biting bugs. Love Oregon.

There were other upgrades. For example, the park rents out sandboards for sliding on the dunes. Boo and K2 tried it, and had a fun time of it. Unlike snowboarding, though, there were no lifts so the better the run, the longer the subsequent climb back up. When we visited before, the park rented paddleboats for use on the freshwater lake. Those were still available, but now there were 1 and 2-person kayaks available as well. Boo and I tried a 2-person while K2 took another.

C, N and K3 playing
C has been spending most of his free time working on skate-boarding. So, while he didn't try the sandboards or kayaks, he did find the tarmac'd roads in the park suitable for skating. He even found a small spot where the pavement was pushed up by a tree-trunk, forming a small ramp so he could bang some aerial trick-work. In each of the 3 days he would put in at least five 20-minute sweat-producing sessions working his board. When he wasn't doing that, he was playing with the camp kid cousins who have evolved from make-believe to throwing a football. Everyone grows up, I guess. K3 and N would come over as soon as they saw C arise from his tent asking him to play football. C never said "no", but at least once gave them a "gimme a few minutes". Seeing that he was barely vertical, and only awake for a couple of minutes, that was quite a civil response. Even then, he would be playing with them within 10 minutes. He just needed his morning Yerba Mate.

Two weeks earlier it was the new moon, so this weekend was the full moon. Boo and I took full advantage and took a moonlit walk on the dunes. The white sand glowed, illuminating everything into a semi-daylight. If you looked away from the moon and the sand long enough, you could see thousands of stars as well.

Pack Out
Our visit ended too soon, though. Just as we were getting comfortable with the camp set up, the location of the flush-bathrooms and showers and the beautiful surroundings, it was Sunday, and our reservations concluded. Boo got up extra early, and grabbed a few things that we wouldn't need in Newport, but were not actively in use... like the hibachi and the empty cooler, and took off for Portland to pick up "the folks" to take them to Newport. I watched her go, and then started slowly breaking camp.

By the time C and K2 awoke, everything was taken down and stowed except their tent, their things inside it, the coolers of food and a few odds and ends. I encouraged them to grab something to eat and then pack up, and that was met with varied enthusiasm. Their things found their way into the bus, and the tent was packed away, but K2 had decided not to eat, and after some activity, he was unable to participate any longer because of that choice. We parked him in the bus next to the coolers and packed around him until it was time for our farewells.

I'll cut the story here and pick up next week with the trip to Newport, happenings there, and the drive back home. Thanks, as always, for following along-