Showing posts with label line. Show all posts

Tuesday, April 7, 2026

Oliver Fuel Fun

Boo had to work on Easter, so I had a Sunday to work with. Knowing others around the neighborhood were celebrating Easter with their families, I wanted to keep my noise and smoke to a minimum. So, I started slow, throwing Oliver onto a charger and then doing inside stuff. By 11, I was mowing the front lawn with the electric mower. With hand tools, I fixed the gates to the fence by lowering the little swivel wheels and re-setting the patio block they set on. Now, the gates sit mostly level and mostly vertical. By 2PM, most of the family gatherings were breaking up, so I felt I could make engine noises and such. So, I headed out to the shop. Engine noises. Ha. Such optimism.
 
No Start
fuel works
I am sure this comes as no surprise, but my first attempt to start Oliver was not successful. I really didn't expect it to, tho. I had a little over a gallon of gas in a jug that I poured into the tank, but I noticed that the fuel pump noise never lessened. So, as I walked to the rear of the car, I expected there would be no fuel in the filter. And there wasn't. The series of things the fuel needs to pass through before arriving at the pump is: fuel level sender / pick up tube -> flexible fuel line -> clear plastic fuel filter -> flexible fuel line -> fuel pump. From there, it travels, at pressure, thru another flexible line, through a short section of 90* hard line, more flexible line and then to the hard line that runs along the frame to the engine compartment. That's a lot of junctions. I started at the pump, testing with a MityVac vacuum pump, working my way back towards the tank. In retrospect, it would have been smarter to work my way forward from the tank all the way to the carb. Lesson learned.
 
Fuel Shower
upper one is bad
One of the short hoses was bad, but there was nothing visibly wrong with it. The picture on the right here is of those 2 lines. The top one cannot hold vacuum; the lower one can. This serves as a great reminder for those driving gravity-fed fuel system'd vehicles like the old VW bus. Fuel lines fail, sometimes not that long after you've installed it and sometimes you can't tell from looking at them. For a gravity feed system, you discover the leak after you've filled your tank, and it gushes onto the ground it you're lucky. Onto your hot exhaust if you're not.
 
While looking for the cause, I cracked the fuel level sender on the tank to confirm that I had enough fuel. I did. Once the one short line was replaced, I went up front, turned the key and started looking for another leak. I did not have to look very far. Immediately forward of the fuel pump, I had fuel going everywhere, running down the rear differential.
 
I concluded that it was another short hose, but noticed that the combination of short hose, weird 90* hard line, longer hose made little sense. I think I did that when I installed the fuel pump because the outlet of the new fuel pump was not clocked the same as the original and I didn't want a kink in the hose. If I remember correctly, I had already cut that longer hose, and solved the wrong problem. Or solved the right problem the wrong way. I think, that 90* bend was from the original system to go from the sender to the pump, and in this installation, I have a clear plastic fuel filter serving that function. Regardless, I corrected this time with a longer hose that runs from the pump to the long hard line. The longer hose was long enough to have a gentle arc, preventing a pinch in the line I was probably trying to avoid with the weird combo of parts. In the bottom picture, you can see that I have a small fuse for the fuel pump. This was not there stock, but I felt that with so many things living on the switched circuit, having a fuse around the fuel pump was probably a good idea.
 
Still No Start 
fuel pump
With the rear end lines set, I turned the key again, and the fuel pump quieted down after a few seconds. I looked under the car and no puddle was forming. There was not a drip at all. I went to the engine compartment, and there were no leaks there either. So, I tried to start it. No love. By now, it was approaching 5PM, and I had to get dinner started. But first, I wanted to know if the hard line was blocked or if there was fuel at the inlet on the carb. I removed the fuel line and gasoline dribbled out. Win. We have fuel at the carb. I put everything back together. Before heading inside, I checked the lights and hazards to give myself a little "well that works" energy before calling it a day.
 
Wrap Up
That's as far as I got on Sunday. After the random home-repairs, I had left myself more than enough time, had Oliver actually started, to give him a deep cleaning. That still needs doing, but first I need for him to run. I rebuilt the carb a couple of years ago, and the engine ran with it on there, so I don't think the issue is fueling, but it still could be. I will start with the spark plugs next time, and confirm I have spark. It is absolutely possible that something worked free during the move into the shop. If that does not bring me the start I am seeking then I will re-examine the carb. Maybe some gas residue became a thin varnish holding the bowl float, or is clogging a jet or something. 
 
That's all for now. Thanks, as always, for following along- 

Tuesday, November 26, 2019

TDI install retrospective: Vacuum System

Continuing the process of back-documenting what I did to put a TDI engine into an old (1972) air-cooled VW bus. Today's post is all about the vacuum system. It is super short, because there really wasn't much to it. Before I start, Hapy ThanksGiving and White Friday to my US readers.

Bus Needs
The TDI has a few things that require vacuum, and the bus has one: the brake booster. The original engine supplied vacuum from the manifold through a pipe that runs along the driver side to the brake booster underneath and behind the driver seat (under the bus). Fortunately, 30 years of engineering marvels later, the brake booster in the modern car is supported by a very similar vacuum. It is so similar, in fact, I just needed to plumb the brake booster outlet on the vacuum pump to that pipe and that need was solved. Power brakes? Check.

TDI Needs
from TDIClub
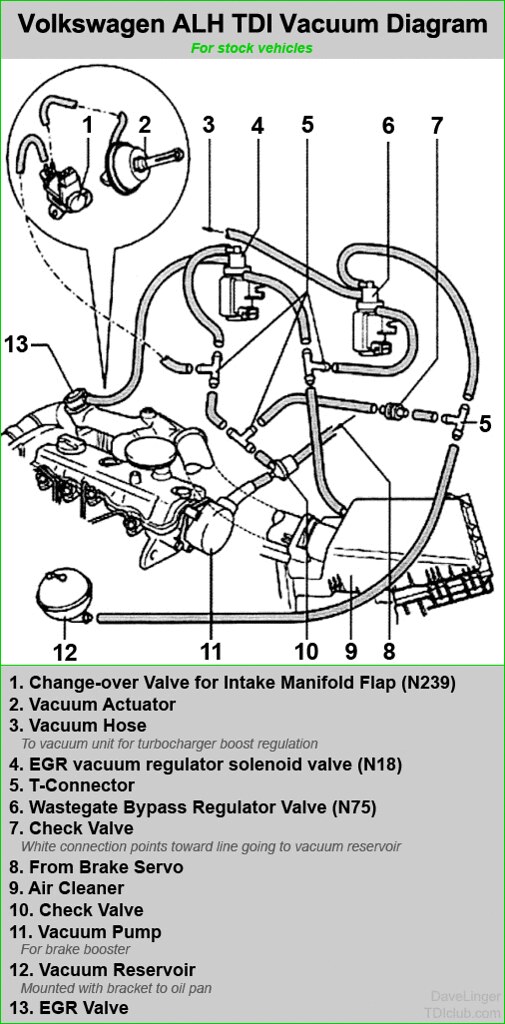
The TDI engine has it's own needs. The turbo needs a signal to dump boost. That actuator is vacuum powered. The EGR is vacuum signaled as well. Each of these have a different valve triggered by a signal from the computer (the N75 and N18 respectively). Since I pulled my EGR equipment, I simply blocked the signal line leaving the N18 and left everything else in tact. I mounted the control valves to the floor support that runs just to the inside of the spare tire well. The system needs the vacuum ball, the pump, of course, a bunch of T fittings and a source of clean air. I source the clean air from the main air intake. I will get to the air system later, but simply put, I took an old air-flow metering (MAF) housing and replaced the sensor with a simple vacuum nipple. This air flow metering housing was the same size as the rest of the fresh air intake, so it was just one of the components that were strung together after the air filter.

I spent a great deal of time drawing and diagramming before I did this. Ultimately, that was unnecessary; I was working from fear. So many systems work the other way: air pressure, water pressure.. the direction of the media is the same as the force, so when you look at a vacuum diagram, its all upside down. Air goes one way, the force of the air used to open and close things goes the opposite direction. Basic vacuum versus pressure, like the switch on your MityVac. It is the media (air) leaving that is the force, not it arriving.

With that perspective, I could made a plan. Ultimately, all I was doing was changing the lengths of the hoses, so this turned out to be pretty easy. I set the pieces out and started replacing lines with new vacuum hose. In many cases, I cut a different length than what was originally in-place because my placement required it. I retained all pieces of the system with the sole exception of the EGR (which I may re-introduce). The hose that would have gone to the EGR was simply terminated with a cap.

Prior related posts:
Preparation
Fuel System
Physical Mounting

Next related posts:
Air, Intercooler and Exhaust
Primary Electrical
Cooling
Secondary Electrical
ECU, dashpod and Sensors

Wednesday, April 19, 2017

MGB brake job

Continuing the journey of discovery within my new project, a 1978 MGB. Today, I cover the brakes.

Symptoms
Like any older car that hasn't seen recent maintenance, the brakes were spongy. The pedal didn't depress firmly, but it returned relatively quickly, so I concluded it wasn't a matter of failing lines, it was a case of poor hydraulics at the wheels, possibly at the master cylinder. I took a look at the pads on the front driver wheel and concluded that routine brake service was due. I couldn't know the condition of the rest of the system without tearing each wheel apart, but I didn't want the little car in pieces in my driveway while I did my discovery and then ordered parts. So, I just ordered all 4 wheels worth of complete replacements. With Hapy, this would have been $500 or more. For the MG, it was under $300 including new drums, wheel cylinders, rear mechanicals, rubber hoses and upgraded rotors / pads for the front. The only thing I didn't get in that package was a new or rebuilt master cylinder.

Front
Like everything on the MGB, the wheel is smaller than the VW bus. In one way this presents itself is in how the wheel assembly is put together. The front rotor for the bus sits on the outside of the wheel hub. So, when you want to replace the rotors, its a fairly easy job: remove the wheel, remove the calipers and the rotor is right there looking at you. On the MGB, it goes: wheel/rim, hub, calipers, rotor. What makes this important is that the hub needs to be removed from the rotor (and from the car) for the rotor to be replaced. In the picture on the right, here, you can see the hub to the outside of the new rotor. This install gets messy. Grease can get everywhere. I replaced the rotors, pads and brake lines, and spent a bunch of brake cleaner to keep everything nice and clean.

Rear
The MGB has drum brakes on the rear, much like the old bus. Also like my old bus, removing the drum off the mechanicals was not like opening a present. That is, unless you like spider eggs and brake dust... and rust. I had expected this, so I'd ordered a complete rear replacement, including the drums. The original drums might have been re-used, but I don't have the equipment to check. Replacement original equipment manufacturer (OEM) sourced drums were not expensive and there's a confidence created when the entire set up has been replaced at the same time. The original shoes hadn't been wearing evenly. It looked like someone drove it around with the handbrake on. It happens; no big deal. Once the drum is free, getting the rest of the old stuff off is pretty quick, but take pictures because putting it back together is like an industrial puzzle. Without a target picture, it gets tricky your first time. The picture to the right here is an "after" picture. Like the bus drums, check the adjustment by spinning the wheel and tightening / loosening until you have just a little drag on the spinning wheel. Of course, this can only be done once the drums and rims are back on.

Rubber lines
The MGB has only one rear rubber brake line. It is accessible through the rear passenger tire well, I like the simplicity of the engineering: hard lines run down either side of the rear axle, joining at the rubber line. These short hard lines should reduce the opportunity for pressure to fall out of balance between the two sides. From the rubber line, a single hard line runs from back to front and up to the master cylinder In the front, there are separate hard lines from the master cylinder to each wheel. The last foot or so is the replaceable rubber line.
Remember to wrap the threaded lines with plumbers tape prior to mating the rubber lines to the hard lines or you'll get leaks. Replacing the rubber brake lines is super important. These lines fail from the inside, so if you don't know how old yours are, definitely replace them. Of course, any time the hydraulic system is opened (other than to fill fluid), you need to bleed.

Bleeding and bleeding
pic swiped from Eastwood
Once the system is physically back together, it needs to be filled with brake fluid. Unlike oil, you don't just pour it in the top and wait for it to work its way down. The fluid needs to be pushed or pulled (bled) to the edges of the system. Which wheel to bleed first, second, etc seems to be quite the debate on the internet. Just my opinion, but I think doing the lines in order of shortest to longest makes the most sense. My thinking: once the shortest run is full of fluid, that line won't factor into the bleeding of the others. I guess, if the system is closed except for the cap on the master cylinder reservoir and bleed bolt on the wheel you're working, it really doesn't matter. So, pick a side in the debate and go at it. Since I was on my own for this effort, I used my MityVac at each wheel rather than the pumping-the-pedal method.

Bleeding the front end was relatively quick... once I re-did the rubber hoses with plumbers tape. The rear, though, was a challenge. No matter how much I worked both wheels, I couldn't stop the bubbles from forming. Then... nothing. No more fluid passed through. There was fluid in the reservoir, but nothing passed through to the rear. Pumping the brakes didn't affect it either. I started to think that my spongy brakes cause was the master cylinder. The brake master cylinder had lots of rust on it, but costs had me on the fence to replace it. I disconnected the master cylinder and put my MityVac onto the hard line that went back to the rear end. It held vacuum. So, I concluded that it was the master cylinder that was unable to hold vacuum or pass fluid so I ordered a replacement. I'll get into the master cylinder replacement another time.

As always, thanks for following along...