Showing posts with label fuel filter. Show all posts

Tuesday, October 29, 2019

TDI install retrospective: Fuel System

Continuing the process of back-documenting what I did to put a TDI engine into an old (1972) air-cooled VW bus. Today's post is all about the fuel system. There was very little that needed to be changed with the TDI. Most of the work was on the bus side.

Tank Preparation
Because the coolant outlet flange and the vacuum pump on the TDI hang over the top of the transmission bell-housing, the TDI cannot be installed without modifying the fuel tank. OR, you will need to change how the coolant flows (super hard to get right) and the source of vacuum. For vacuum, there are belt-driven systems and electric pumps, but the coolant exits the head right there, so there are only so many ways around that. I looked into a custom flange that would route the coolant elsewhere, and even cut up a plastic one in an attempt to make one. I was, and remain concerned about fluid dynamics and whether I would create a situation where the coolant could not escape the engine at the right speed, causing overheating. So, I cut the tank instead. Well, I had someone cut and weld it. I didn't want to blow up.

The cut is 8-sided: straight across (left-to-right) on the top and bottom, straight up-down on either side and then 4 diagonals to join the other cuts. The measurements are at the bottom of the post. Once cut, a new piece of thin steel was welded in to close it off, leaving a depression into which the vacuum pump and outlet flange could nestle. I set the depression deep enough so that my hand could reach between the coolant flange and the fuel tank, so maintenance on the flange or the coolant sensor could take place without dropping the engine. This proved very fortuitous later. Since the old fill-vent is part of the sacrificed part of the tank, be sure to have a new one added.

After a failed attempt at lining the tank myself, I had the tank stripped, steamed and lined by Mac's Radiator. I think it cost me $100US, and it was returned painted with primer. I shot it with "Tank Tone" silver.

After the fuel tank is cut, welded, cleaned, painted and lined, it can be re-installed. The fuel tank install is fairly straightforward. Put the filler hose on the tank before you try to put it in the bus, but omit the clamp. Once the tank is settled in place, strap it down and then connect the fuel level sender and connect the other end of the filler hose. Clamp both ends.

Vent and Fuel Lines
I used Viton fuel lines from the get-go so I could handle BioDiesel. I encourage you to consider the same. The early bus was not shipped with fuel injection, so there was no facility for a return line. I didn't get one installed when I had the tank cut, mostly because I wasn't 100% sure where to put it. I'm still not 100% sure where I'd want it. Instead, I used the passenger side tank vent line for returning unused fuel from the injection pump. If you are similarly converting a non-fuel-injected bus, only re-connect the left side tank vent to the old vent system.

To the bottom of the tank, a nipple is threaded into the lowest point on the tank. The original nipple is quite small. I upgraded to a wider metal pipe insert so it did not limit the fuel flow. To this, I connected a fuel line and routed it along the original fuel line path back to the engine compartment. I was unable to find any pictures of the larger metal pipe; my apologies.

The low pressure lines between the injectors should be considered. If you don't know how old they are, replace them now. I used Viton for all but the stubby on the end which for some reason wasn't available in Viton. Not that it matters, it basically acts like a plug anyway.

Filtration
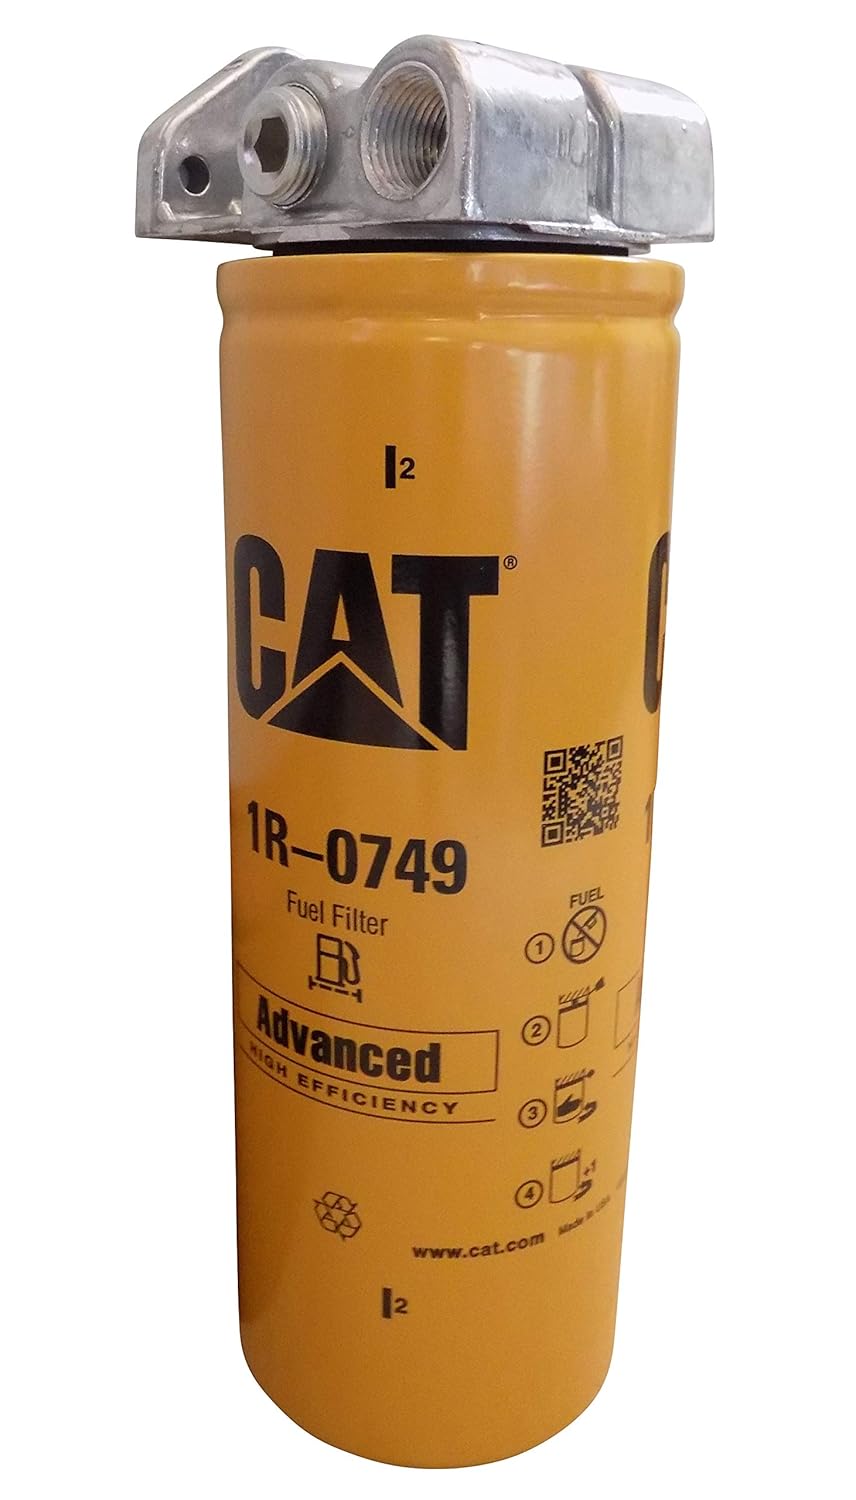
When I first did the conversion, I connected a clear plastic filter to the hose leading from the tank, and routed the output from the filter to the original fuel filter. Since then, I have replaced the little clear plastic filter with one that is diesel fuel rated and replaced the original TDI filter with a Caterpillar upgrade (See Green Diesel isn't BioDiesel). The original TDI routes unspent fuel back through the filter, increasing the fuel temperature along the way. Depending on your intended use, this could be a good thing. I have routed the unspent fuel directly back to the tank instead, in hopes of keeping the engine and fuel-related parts that little bit cooler.

That's it for the fuel system. It's actually very simple: tank to fuel line to cheap plastic filter to fuel line to big filter to injection pump. The biggest deal is/was removing, cutting and re-installing the tank. It is worth noting that after the cutout, the tank still holds 15 US gallons of fuel. At 30+ miles to the gallon, that is an effective range of 450+ miles per tank.

Tank cutout measurements:
across the top (and bottom) : 9"
top-to-bottom on the left and right sides: 7"
distance from right edge to right-side vertical cut:12-1/2"

Prior related post: Preparation

Next related posts:
Physical Mounting
Vacuum System
Air, Intercooler and Exhaust
Primary Electrical
Cooling
Secondary Electrical
ECU, dashpod and Sensors

Tuesday, September 10, 2019

Green Diesel isn't BioDiesel

In my last post, about getting home from the Newberry Event (See Newberry 2019 - Getting Home), I described my stop for fuel and that Hapy started acting funny within 20 minutes of that fill up. Today's post covers my investigation into the acting funny. I now had 4 codes getting thrown by the computer. I was getting just one code before (P0121), so with the extra codes, I feared I had bigger problems.
Before I start, today is C's 18th birthday.... C, it has been an honor being part of your life, and I greatly look forward to our years together as our relationship shifts, grows and deepens; you truly are an amazing person.

For posterity, the codes were:
p0121 - accelerator pedal position sensor getting funny readings. Causing a version of limp mode where we lock in at 1200 rpms
p1562 - injector pump quantity adjuster. Could be caused by the bad fuel, could be my timing is suddenly off
p1550 - discharge pressure is off. This is usually caused by a leak in the charged air system or in the vacuum lines.
p1403 - EGR malfunction. My vacuum for the EGR is closed off, since I removed the EGR for a straight pipe.
Remember, this is a '72 bus so emission control devices are not required. Before my fellow tree-huggers get all spun up, recognize that I run B20 so mathematically my emissions without the EGR are cleaner now than this bus was with the original gasoline engine. So... back off! Still, could be a loose vacuum hose.

Tank Blockage
I figured I would approach the fuel system from front to back, meaning from the supply hose through to the injection pump. So, my first stop was the supply line coming out of the tank. Remember, back in 2011 on my drive home from Further, I was stopped by a blockage in my fuel tank (See Further - the Return), so I'm fairly familiar with this experience.. First, I put vice grips on the fuel lines to prevent fuel from going everywhere. Then, I disconnected the line from the clear filter and pointed the line at a fuel can. I removed the vice-grip from that line and fuel flowed easily out of the tank into the can. Gravity-feed tank checks out.

Check the Filters
While I was re-connecting things, I took a look at the clear filter. It was still clear-ish. Well, there weren't any cloggy-bits in it. So, with the fuel lines reconnected, I removed the feed line from the injection pump, leading from the "original" fuel filter. With the MityVac, I checked the fuel flow. Again, the fuel came out with very little vacuum applied. So, we have fuel making it to the injector pump easily. Hmm... So if the fuel filters are clear, and everything was running great up until it suddenly wasn't, I had to conclude that the fuel I got in Oakridge was the problem.

Drain the Tank
I raised the rear end of the bus enough to fit a 5 gallon bucket in front of the right rear axle (and under the fuel lines). I disconnected the supply fuel line at the "original" fuel filter, and routed the fuel into the bucket. While the bucket slowly filled, I removed the "original" fuel filter and drained it into the bucket as well. Once full, I clamped off the line, and swapped a second bucket underneath. I filled that bucket as the tank ran dry. I moved the buckets into the sun, and you could see the first bucket had cloudy green fuel in it. The second bucket was much more clear and less green. I interpreted this as the bad fuel settled to the bottom of the tank, leaving the older-to-me fuel floating on top.

So, what's this green fuel? I think it took this fuel those 20 minutes to settle to the bottom of the tank and then feed into the injection pump. I ran on that fuel for the remaining 150+/- miles home. By why green? Well, an underground tank can get water in it, either through condensation or seepage. If this happens for a long enough period of time, algae, fungus or other microbes can form. This usually happens at fuel stations with little traffic. I had ruled this out initially because this was a busy fueling station and there was someone getting diesel right next to me. Clearly, that doesn't matter. Whether this fuel simply had lots of water in it, causing the cloudy, or also had other matter in it, causing the color change, it had to go. The 2 buckets have been securely lid'd and will be taken to the toxic's section at the waste transfer station. I'm sorry I don't have a picture of the green fuel; I put the tamper-proof lids on before I thought to take a picture.

Current ongoing cost: $28 for the full-up. The toxic dump will be another $27. Replacing the fuel will be another $30.

New Filtering
Since the "original" fuel filter is quite literally the original fuel filter that delivered with this engine over 10 years ago, this filter was long overdue for replacement. Yeah, bad owner. I had a pre-filter on there to help it last longer, but still... So, I looked around for a replacement, and noticed that all of the replacements needed one of those plastic thermotatic "tees". These things will re-route unused fuel from the injector pump back into the tank until the fuel reached 85* and then it sends it back to the fuel tank. My "original" always routed it back into the filter. This is to help the engine warm up in cold weather, and since I don't drive Hapy in cold weather, I decided I could look at the thermostatic "tee" style. For the filter plus the tee, it was around $70US. Or, I could upgrade the whole thing.

Upgrade? The standard filter filters down to 10-15 microns. That's great for most applications. If you drive in lots of dust (read: central Oregon where 4Peaks is), that may not keep everything out. For bulldozers and large construction diesels, they have filters that go down to 2 microns. Something that fine would protect the injectors from getting destroyed by particles in the fuel. Particles of, oh I don't know... algae or water or fungus? Anyway, I looked at a combination filter housing and filter, and I was able to upgrade for $75US, so $5US more. And, it's all made in the US. Of course, it's mustard yellow has this big CAT symbol on it, but it's hidden so I don't really care. For those shopping, the extra $5 was for the little barb/nipples that the hose fits onto. They are not included in the $70 kit.

The housing has dual source options, and a feed/return configuration. I went with the most simple: one feed, no return, and routed the injection pump overflow straight back to the tank. If the day comes that we want to drive Hapy in cold enough conditions where having the fuel get warmed up is necessary, I'll deal with that then. We will need to solve for his got-no-cabin-heat challenge before that.

Resolved
While I was in the engine bay, I noticed that the straight pipe which replaced the EGR had an issue. The pipe came with a nipple for attaching a gauge, and the little rubber stopper had split. This was letting out charged air, a potential source of the p1550. I replaced that stopper. After a few hundred miles of driving since, the code has not returned.

I expect the p1403 may reappear. I thought one of the vacuum lines around the "N18" vacuum valve / box came loose, but I didn't notice anything around the vacuum valves. I removed and re-connected the vacuum lines just to be safe. The p1403 code has not returned.

Now, with everything hooked back up, I cleared the codes and started up the engine. After some rough running, it settled down within a couple of minutes and sat idling at 900rpm. After a few minutes I got the check engine flash, but there is only one code (the one I had before): p0121 - the persistent accelerator pedal issue. I think it is a wiring issue where one of my splices is becoming inconsistent. I'll deal with that another time. The p1562 code has not returned.

So, that's it for the fuel system / bad fuel issue. Total cost: $165, but one of those fills should be considered part of just driving, so it's really $135. Since bad diesel can destroy injectors and injector pumps, the $135 is nothing compared to what it could have been. For example, a single injector could cost that much and a new pump could be up to 10 times that much. Of course, if the only damage was the injector nozzles, I could use this as an excuse to upgrade to bigger tips (like these) for around $180US. I'll be watching the engine behavior, regardless. There still could be an issue lurking.

Thanks again for following along-

Tuesday, June 11, 2019

JRAD - Eugene Road Report

The first of the usual 2-part post when we go on a trip to see something interesting, this post covers the travel to and from, how the bus behaved, etc. JRAD (Joe Russo's Almost Dead) played the Cuthbert Amphitheater in Eugere, so this trip the down-and-back for that show.

Getting Out
We have gotten our packing and departure steps down to a fairly good science. Our gear is stored all together on a pair of racks in the garage next to Oliver (the MG) so loading up is fairly fast. We replaced our 10x10 again; it seems these things only last a single season anymore. The new one was the exact duplicate of the one we had last year, only not constructed as well. Regardless, it went into the bus with the low-back concert chairs, classic camping chairs, folding table, cooler, sleeping bags, etc. Once ready to go, I turned the key on the new ignition to start... and nothing. Great. The test drive a week ago didn't shake out whatever spirit was preventing us from leaving. Quick time-check... if I can't solve it in an hour, we're taking another car and solving later.

With Boo near the rear bumper, I tried turning the key a few times. We could hear a click, so there was hope. After a couple more tries, we could determine that it was coming from the electric bundle in the spare tire well: my wiring. Fun. So, we switched spots, and I could tell the clicking was one of the relays that linked the ignition from the front of the bus to the TDI ignition switch in the spare tire well. I disconnected and then reconnected all of the wires going in and out of that relay and verified that the grounding wire was grounded. Tested the key again, and he fired right up. I concluded that the signal wire leaving the relay had loosened itself, so the disconnect-reconnect solved the problem.

We drove to the corner fueling station and tried to add some fuel. I say tried because the tank was nearly full from last June when we had the ignition fire on the way home from 4Peaks. One more thing to remember next Fall for winterizing: drain the tank. So, we had a tank of year-old fuel and no time to deal with it. So, with a thought about old fuel, we headed for the highway.

On the Road
After a few initial studders, Hapy drove through the local highways well. The "studders" were just that: momentary engine stammer followed by normal running after that. He idled steady at the traffic lights, so we decided we would keep going. We hit some getting-out-of-town traffic as we left the greater Portland area on I-5 South, but it had cleared by Wilsonville (like it usually does), and we were cruising at 60mph. Once past Wilsonville, the speed limit goes up to 65mph, but most traffic accelerates well past that. I drive as fast as Hapy's temperature will allow. Since it was an 80*F+ day, the air temp didn't really factor in, but I could tell that the more I tried to stay at 60mph, the more his temperature would hover at 192*F. If I dropped down to 55mph, his temp would sit at 185*F. Since his normal operating temperature (NOT) is 190*F, I figured I could stay just under 60mph and he'd run well. I was right, and left his speed hovering between 58 and 60 the rest of the way. After Wilsonville, an early bay appeared in front of us. We paced with them until they got off at Woodburn. We flashed lights, exchanged peace signs and continued on our respective journeys. Love bus folks.

We stopped at the Flying J truck stop near Aurora for travel snacks and beverages, and found ourselves behind an RV running the same 58mph pace once we got back on the I-5. That RV set our pace until we were well past Covallis, The drive itself was fairly uneventful. The wheels held the road well, and I didn't have to fight Hapy for control the whole way like I used to. The only times of trouble were when a semi-truck passed us, and created wind turbulence. Fortunately, that didn't happen very often; I think the road was kind of quiet, actually. Another advantage to leaving town in the early afternoon instead of at rush hour.

Armitage Park
We pulled off at Coburg, thinking we would grab a camping spot at Armitage County Park. This is the same campground Hapy, Boo and I used when we came down to Further in September 2011 (See Furthur - To Eugene). The campground this time was very different from when we were there almost 8 years earlier. For one, it was practically full and second, there weren't any fellow concert-goers. The sign out front said there were 2 RV spots: #13 and #17, so we backed into #17. While I set up the little tent (shed), Boo headed to the front desk to check us in. She returned displeased. While the site was marked as open, the camp people decided that we should move to a tent spot instead. Okay... So, we moved, and saved $10US for the trouble. Turned out both #13 and #17 went unused that night, so the camp lost out on $10. Meanwhile, the tent spot was bigger and more shaded, so it worked out better for us anyway. We just didn't have an electrical post on our site. Fortunately, the group-sire next to us (also empty) had one, so we charged phones there in the morning.

Allergies
For that past few years, my allergies have been effectively stopped by acupuncture. I realize that's hard to believe, but I used to take multiple medicines every day, year round. At least 3 years ago, I started getting pins stuck in me and that's made medicines a very rare thing. I have had to take something maybe once or twice in the spring since I started with the pins. Unfortunately, that all became unraveled in the parking lot at the Cuthbert.

After we set up the shed, and loaded it with whatever we didn't need in the lot, we drove the short stretch down Coberg Road into Eugene and to the venue. We were parked on the opposite side from where we usually parked (near the disc golf), over by the Science Center. This was a very small lot, but many VW's, and it was the open-early lot, so there were folks BBQ'ing, and such. My allergies kicked in almost immediately. They didn't meaningfully affect the show, but they did impact the next day or three.

Getting Home
I'll post about the show in another post. The drive from the show back to the campground was as uneventful as the drive to the show earlier. Temps stayed predictable, steering was predictable, traffic was non-existent. We fell asleep fairly quickly after 3+ hours of dancing and awoke the next morning to the crashing of the dumpster. Ah well. We dragged ourselves up, used the free hot showers, made coffee and oatmeal, and considered the day. The shower helped wash off pollen, etc, but the residual histamines from my allergies were still a problem. We decided that lingering another day was probably not a good idea, rather, it made better sense to start heading home. We took in the river for a morning meditation before we broke camp, and packed Hapy.

We headed north on I-5, but found that the traffic was very different from the traffic we enjoyed on the way down. There were many semi-trucks and they were all moving very fast. At 58mph, the trucks were blowing past us, buffeting the bus, and causing all kinds of steering difficulties. By the time we were approaching the Halsey/Brownsville exit (216), I needed to get off the freeway. So, we took the scenic route home. From Halsey, we took 99E up to Tangent and then OR35 to Corvallis. We picked up 99W there and took it through the sleepy country towns of Polk county. Somewhere before Tangent, I started to notice that our top speed was getting artificially limited. Our acceleration in first and second was pretty good, and I could feel the turbo kick in, but I couldn't feel the turbo in 3rd or fourth, and fourth gear was just a dog. Feeling glad again for not being on the interstate. I concluded that the cheap clear fuel filter had gunked up from the old fuel and that was limiting our speed. Would have been an easy fix if I had a spare onboard. I used to keep one in the tool box and another under the rock-n-roll bed, but I appear to have stopped doing that. Note to self: keep spare filters, just like you keep spare fluids, onboard.

rear driver window dolled up for JRAD


By the time we hit Monmouth, we were ready to eat. So, we hit the local Burgerville. I can't remember a nicer fast-ish food place. A fellow patron held the door open for us on our way in (and her way out). The restaurant, though fairly full, was quiet. There was a large family sitting in the center, taking up 3 tables, celebrating someone's birthday, and even they barely made more than low-conversation noise. The service was fantastic and food delivered to the table much faster than I remember Burgerville to be. Boo and I split a 1/4 pound burger and a salad. Back on the road, we stayed on 99W to outside McMinnville which we avoided on the OR18 bypass before re-joining 99W through Dundee and Newburg. In Sherwood, we hopped onto the familiar Roy Rogers Road to cut over to Beaverton, avoiding Tigard and more traffic.

Needs
old fuel filter after removal
It was a great trip, and overall Hapy performed very very well. I know there are a few things that need to be addressed before our next trip (listed below). The fuel, fuel filter and the rear brake adjustment are the most pressing.

+ still need to clean up the wiring in the spare tire well. Maybe it's time to use the plastic relay holder thing that the TDI-engine relays are in for my custom relays
+ drain the tank of the old fuel OR add some fuel stabilizer / diesel fuel stuff that the boaters use
+ replace the cheap clear fuel filter. Get a few spares.
+ adjust the rear brakes a little tighter. Not sure they are really doing anything.
+ get front end alignment done by a shop. Steering was way better, but there could be improvement.

Thanks, as always, for following along. I'll post on the JRAD show soon.

Friday, June 30, 2017

4Peaks 2017 Road Report

So I understand that this blog is supposed to be about my bus and my travels in him. And I realize that the last bunch of posts have had nothing to do with the bus. I'm taking a break from the MGB front end rebuild set of posts to hit a couple bus-related ones (pause for applause). For starters, I'm starting with a classic road report, detailing our annual trip to Bend for the 4Peaks music festival with our good friend Grateful Ed in his trusty '73 VW Riviera Poptop, Belle.

Not Really Prepped
In prior years, I've used a local music festival as a way to knock the kinks out of the systems before taking the 4-hour drive to Bend for 4Peaks. Since the Hootenanny isn't held anymore, I don't have that built-in system. So, my road-ready testing isn't quite as, uh.. exhaustive. I made sure Hapy could start, he was clean and empty of not-camping stuff. I verified his oil and coolant levels were right. He was ready enough to drive around town, I figured. I did replace the front door seals, though. I remembered from the year before how cold the bus was on the drive because the seals were gone. I bought the really nice grey ones through CIP1, replacing the black Brasil-sourced ones I had been wrestling with for years.

Tank Fill
About a week before we were supposed to leave, I fired up Hapy and drove to the corner fueling station to fill it up. I took Boo and K2 with me, and thought I'd show off just how much better Hapy's off-the-line acceleration is. Well... he wasn't as snappy as he was before I ran him out of fuel, but he left the stop line pretty quickly. We got to the gas station, and got the diesel flowing while I washed the windshield a couple of times. Once filled, I turned the key... and nothing. I figured I did something electrical, so we pushed the bus into a parking space. Boo and K2 walked home for another car to give me a jump while I started diagnosing things. I was fully stymied until Boo got back and we started with her at the wheel trying the key while I wiggled wires and re-set relays. I went to the battery and was messing with the thick cables and Hapy started acting like he had the right voltages. During my efforts, I moved the battery ever-so-slightly forward, and then Hapy fired right up like nothing happened. I remembered that the battery sliding back into the rear tail light housing causes this problem for some reason. Grr.. I really need to solve that permanently.

After that, Hapy drove great the rest of the week. I didn't try to show off his acceleration again, nor did I really stress him, but I got him up to temperature, and puttered around town.

Drive There
The night before we left, Boo accepted a new job. In order to keep things moving forward, she needed to fill out a bunch of paperwork and take a pee test before we left town. So, we fit all that around our exit. We had initially intended to meet Ed at his place south of Portland around 10AM, but we ended up leaving closer to 11:30. We were still well out of heavy traffic periods and headed south on I-5 towards Salem. With Belle leading, Hapy drove great. His temps stayed down, and it wasn't long before we had turned onto OR-22 heading east off the plain and into the forest. Belle was driving without windshield wipers, but the Rain-X was pushing the sprinkles out of Ed's line of sight. We visited the Maples Rest Area in Gates, checked Belle's oil and took a brief break. It was after we passed through Idanha that Hapy started to have speed issues. I wasn't able to get the throttle to respond on hills. While it wasn't a huge deal, it started to weigh on me as we worked our way up and down and up and down through the Cascades and over the Santiam Pass on US20. Still, the drive was beautiful and the new front door seals really held out the cold draft and rain. The little heater produced a little heat, so while Boo had a blanket on her lap, I was perfectly comfortable in little more than a jerga.

We hit Sisters before 3, and we were feeling really good about our progress. For the first time I can remember, we made it from end-to-end through Sisters without coming to a complete stop.

The venue for 4Peaks was moved this year. Until this year, it was held in Tumalo, NorthWest of Bend at the Rockin A Ranch. This year, it was held South and East of Bend at Stevenson's Ranch so we had an extra 10 miles or so to travel, but through the city. We stopped at a gas station near the ranch for Ed to fill Belle with petrol and I got ice.

I'll have a separate post about the festival entry, the location, the scene, the people, the music, etc. Suffice to say, it was awesome. We drew the conclusion that the sluggish accelerator pedal was because of gunk getting into the fuel filter when I ran the bus out of fuel. Not having a spare fuel filter (bad bus owner), nor access to a parts store meant I was driving home with a restrictor in my fuel system.

Getting Home
We didn't really want to leave, but Ed had to be at work on Monday, and the festival, though open longer than past years, still closed at 4. And, of course, we had a 4 hour drive home to do. While the weather on the way out was a test of our buses against wind and rain, the drive home was a test against a summer solstice sun and desert heat. We left the festival around noon and hit a filling station before doing anything else. Since we had traveled over 200 miles since the no-start fill a week before, I concluded I would need fuel before leaving civilization and entering the central Oregon desert. I bought just over 6-1/2 gallons, recording 32mpg on the drive out plus the around-town driving the week before. Ed joked about how you can't burn too much fuel if you can't get it to your engine. Good one, Ed.

We had decided before we left for the festival that we would drive home a different way to change the scenery. After the sluggish hills on the way out, we thought that driving US26 through Government Camp might not have as many ups and downs as US20. We hadn't considered that the US26 route left us in the desert for far longer, and that the temperatures were in the 90's compared to the 50's on the way out. This created a different stress... on the cooling system.

Hot Stop Hot Again
The drive north on US97 was steady going. Redmond had some traffic, but Metolius and Madras were mostly unpopulated. Actually, when I consider how large an event is coming to Madras for the total eclipse in August, the town appeared largely for sale. Many store fronts and undeveloped lots had for sale signs on them. That's not a very positive statement for the health of Madras. It is in Madras that we left the US97 for the US26 and our flat uneventful drive changed. The road out of Madras starts with a long uphill pull. Hapy didn't have that lack of acceleration, but his temperatures started to climb. When he reached 195* I pulled over and let him cool back down. More hills, more desert heat and more altitude meant that his temps would rise again, and again. I started letting his temps run up to 202* before pulling over to cool him down. Each time, Ed would pull over with us, or somewhere ahead of us so we could continue our carabus. That is, until finally, we had to let Ed go while we let Hapy cool way down. Boo and I had a roadside picnic in the middle of the Warm Springs Reservation and Hapy's temperature dropped down into the low 170's. Still, it didn't take long before we were climbing again, and his temps were high again. All told, we stopped 6 or 7 times including the picnic stop between Madras and Government Camp.

SkiBowl
I've mentioned SkiBowl a number of times. I love playing in the snow there. After such a hard climb up the east side of Mt. Hood, Boo and I decided Hapy needed a longer rest, and we could use a beer so we stopped at SkiBowl West. The bar (Beer Stube) isn't open during non-ski season, but the cafe is, and they sell beer in cans, so we split a tallboy on the back porch. As we sat, we could see that there is still snow at the top of upper bowl, even though it was over 85* at the lodge. SkiBowl is in the process of switching over from winter to summer sports, where they leverage their ski lifts to enable mountain bikers the ultimate: a lift to the top so you only have to ride downhill. Although it was Sunday, we only saw 2 cyclists the entire time we were there. We will be back, with as many boys as we can muster, to play on that hill. That's just too fun.

Home At Last
The drive from SkiBowl on home was completely non-eventful. The accelerator was responsive and the engine temp never climbed above 192*. I don't know if it was the desert, the higher altitudes or what, but once back on the west side of the Cascades, Hapy drove like a champ. We drove US26 to OR212 through Boring and then connected with I-205 around to I-5 and finally onto OR217 home. He even handled the interstate traffic easily. Still, I need to look at the coolant. I think the coolant / distilled water mixture is off, and that caused the radiator to be unable to manage the engine heat.

I haven't filled up since we got home, and I know I need to soon. Overall, Hapy was great. As a camping vessel, he was a pleasure. I'll get into that in another post, but simply as transportation I know I need to do a better job of getting him ready before taking him out of round-town puttering or he'll leave me stranded. And it will be completely my fault.

That's it for this time. Thanks, as always, for following along. I'll post about the festival, and a new bus-change I did to improve the camping experience soon.

Wednesday, March 1, 2017

Running on Empty

Following the new pedal install, I took a few victory laps. I took each of the kids who were still living with me on small trips to demonstrate the new-found speed. In every  case, we would howl with laughter as I stomped on the accelerator and Hapy leaped to life. Hapy became my daily driver for the rest of the Summer, and I was having so much fun I forgot about one kinda sorta really important thing: the fuel gauge still doesn't work.

That Dreaded Feeling
pretty day to run out of fuel
You know that moment. The engine misses just once, and your conscious mind doesn't even register it. But your sub-conscious does. In that moment, your sub-conscious screams, awakens your conscious mind and you think to yourself "I wonder when I last put fuel in the tank". That was me on a mid-October morning as I was making my way to work in the AM northbound rush on 170th approaching the light-rail crossing. Then it skipped again. I threw Hapy into neutral, and hoped the traffic gods would permit me to not break down straddling the crossing. They did. Turns out the traffic gods found it to be more funny for me to run dry in the intersection between 170th and Baseline.

When Push Comes To Shove
For those who don't know that intersection, it is in an area of northwest Beaverton where growth has been exploding. As is the case elsewhere, infrastructure lags construction booms, so these are heavily-traffic'd 2-lane roads. I popped on the flashers, and started pushing. As I started to cut across a lane, I noticed that Hapy was moving much easier than I thought he should be almost like he was rolling downhill and then noted that a fellow motorist had put his car in the dirt and had joined my morning workout. We got Hapy along the curb on Walker facing east just barely outside the white sideline. In typical Oregon fashion, there were no horns sounded nor obscene gestures but there were many dirty looks... until we were off the road then passing motorists returned to smiling and waving at the little microbus.

Diagnosis
in a weird twist, the power grid failed too
The verification process for running out of fuel is especially easy if you have one of those $1 clear plastic pre-filters. I put one in to extend the life of the stock TDI filter, so this was easy. Empy clear filter means I ran the tank dry. Neat. At this point, the guy who helped push went even further beyond normal and offered to drive my to a gas station. Being a diesel (and diesel isn't sold at over 1/2 the stations here), this was a more generous offer than I think he realized. I explained the situation, but he wouldn't relent, so I jumped into his mini Toyota pickup and we sped off to the Fred Meyer on 152nd.

Can't Prime
For many cars, getting a car to run after you've run it dry is somewhat obvious: you put fuel in the tank and keep the key turned to run while the fuel pump fills the lines. Or, you just sit on the starter and the mechanical fuel pump plus engine draw get it started. I've actually had success getting Hapy started this way before. Not this time. I could not get the fuel system to prime from the key. For what seems to be far too often an experience, I had to get Hapy towed home. Now, I thought I had already posted the process for how to get your fuel lines re-primed after running dry, but a search didn't bring one up. So... I guess that's today's post. Note that picture of the intersection. It was mid-morning (post-rush) and the powergrid in the surrounding area had gone down too. The signals weren't working and I snapped a picture at a rare moment when there was virtually no one around. For the most part, there were long lines going in every direction, but I digress...

Fuel First
This is obvious, but its still the first step. Grab your yellow oh-shit can. In Oregon, it must be yellow for diesel or the station attendants get wigged. I'm pretty sure its the law, kinda like you're not allowed to pump your own gasoline here, but you can pump diesel. Weird. Anyway, get it filled with a couple gallons of diesel and dump it into the tank. This should be the easy part. In my case, I spilled a bunch down the side of the bus, but that's a "me" issue.

Mity-Vac
not my engine. I swiped the image from the 'net
Next, pop the hood and find the stock (not clear) fuel filter. The rubber line that leaves the filter and heads for the supply side of the injection pump (IP) is your target. In the picture on the right, I circled it in red. Disconnect that hose at the IP (the light grey thing right next to the red circle) and attach it to the reservoir end of the mity-vac. Apply vacuum until fuel starts to appear in the reservoir. You should be able to watch the fuel first fill the clear filter and then you need to work the stock fuel filter full. Since you ran your tank dry, it is possible that there's crap in your fuel filter. If you have one of those cheapo clear filters, this is a $1 problem and takes a couple minutes to resolve. Generally speaking, if you ran dry and you have one of these, just spend the $1 and move on. If you don't have one, now is a good time to consider adding one. Once the reservoir is getting fuel, re-connect it to the IP.

Hard Lines
At this point, you have fuel in the system from the tank through to the IP. In some cases, this could be all you need to do. Have a partner jump behind the wheel and try starting (obey the glow plug idiot light). After about 15 seconds of cranking, if it doesn't start, your hard lines are not priming. Bummer. Grab a spanner (can't remember the size) and crack open the connection between the hard line and each injector while your friend hangs out in your driver seat. In the picture above, I circled the injector -to- hardline connections in blue. When you have them loose, have your partner crank the engine. One by one, each loose injector connection will bubble first air, then fuel. Once you have fuel at your first injector, your partner can stop cranking. Tighten that connection with your spanner and have your partner crank again. Like before, once the second injector connection is bubbling fuel, your partner can stop cranking, you tighten the connection and move on. By your last injector, the engine will be running.

Now make sure you have torqued the lines down according to spec. If you don't, and just tighten them enough to stop the leaking, you will lose prime again and have to do this all over again the next time you come out to start the engine. That's what happened to me....

That's it for today. It's been a busy last few months, so I've got lots of stories to tell. Not many about driving the bus, sadly, with the weather as rough as it's been in the Pacific NorthWest this winter, but there's a bunch going on. Thanks for tuning in-

Saturday, January 25, 2014

Flash Lives again

Well, that was interesting.  Two days after that last post, Flash the Jetta broke.  I'll cover that today, more than anything else.

Putter... sputter... sput
It's funny.  I was looking back on a posting from about a year ago (How Diesel Gets Expensive) when Flash stopped working because of a dangerously low coolant level which led to rebuilding injectors, the IP and a timing belt change.  Back then, the driver of the Jetta was my step-son, and oddly enough when Flash suddenly stopped running on Allen Blvd, it was him again, but again, not his fault.  For the third time in a year, I had to have the Jetta towed home.  Enter a plug for AAA.

Attempts to start the engine were not fruitful.  I checked for codes, and got a P1248 (Injection Start Control Deviation).  Concluding there was a fuel delivery problem, I checked the case relief valve in the IP first.  Since the pump was just done, I didn't expect anything unusual, and it was all together like it should have been.  Sometimes, those valves get gummed up and slip out so the pump can't create pressure.  Not the problem.  Then, I swapped out the fuel filter.  After priming the lines and the filter, it still wouldn't start.  I concluded the timing of the IP was off, like the code was saying.  Enter Justin.

Diagnosis Negative
Justin stopped by mid-week after a regular workday to just peek into the situation.  Inside a minute, he spotted a flash of copper/bronze behind the timing belt tensioner, telling him that the tensioner was trash.  Concerns about the timing were spot on, but the timing of the IP was the least of our immediate concerns; one of the valves could have been struck by a piston, turning my TDI engine into a paperweight.  We got the valve cover off, and after a careful inspection, Justin concluded the valve train and pistons were probably okay.  Still, we needed to do a timing belt job.  He ran that through today.

Belt and Suspenders
Turns out the effort to pull off the old belt, replace the tensioner and put a new belt on is pretty much the same as doing a complete job.  So, while Justin started tearing down Flash, I went digging through my deep files to see what parts were replaced when Johnny did the belt as part of the IP swap-out.  I remember the receipt had all kinds of tings on it, but I never found it.  I did find the receipt for when I got towed into Bay City (Bay City Blues).  Ha.  So, in the interest of being safe, Justin and I agreed that a complete timing belt change was the best plan.  As Justin removed rollers and the coolant pump, it became increasing clear that we'd made the right decision.  Even though we only put 10k miles on the belt, an incorrectly installed belt will prematurely wear the parts it touches.  In a few hours, the belt was on, the timing was set and we'd taken a test drive to set it in.  Flash Lives.

Daily Driving
The broken Flash created a force to try driving Hapy to work.  After suffering a dead battery on the attempt on the first day, he responded very well every day after that.  I even ran errands in him one day this week.  He's been starting right up, idling a little high on the colder days, but settling down into the low 900's for idle after a few minutes.  It has been a great pleasure.  I do need to adjust the shifter a little to left to improve the gear selection in/out of 1st and 2nd.  I hope to find time to do that Sunday (tomorrow).

I think that's it for today.  We now have more working cars than drivers for the first time in months.  So, as I look forward to Monday, I have to make a decision about which TDI to drive to work.  Ha!  Thanks for following along, and for those who like the pictures, I'm sorry I didn't take any photos of Justin's labors.  I'll take pictures of the removed parts and update this posting later.

Saturday, November 26, 2011

Tank's Giving

Okay, horrible pun.  Guilty.  Still, I hope you all had a pleasant ThanksGiving holiday.  For those blessed with a 4 day work-stoppage weekend, I hope you were able to make the most of it.  I was able to celebrate White Friday with a large group of fellow non-consumers.  I'll talk about that another time so I can talk through how to put a fuel tank back into an early bay-window bus today.

Clearance
Before you do anything, you need to verify that there's nothing between the rear hatch and the tank compartment.  This sounds obvious, but the tank is deeper than you may think, so you need a clear shot through.  The stock wiring harness shouldn't get in the way, but if you have any customization (like, oh, I don't know... a TDI engine instead of he flat-four), you may have some wire-dangle issues.  Solve those.  Zip-ties are your friend.  Also, if your stock engine is still in, you can slip the tank around it, but everything above the heads must come off first.  That includes the intake, carb (or FI), filters (air & fuel), etc.  Its actually easier just lowering it out of the way like I described in an earlier post.  The actual removal of the stock engine is very well covered in the Idot's Guide.  If the engine is on the shop floor, make sure you have at least 1/2 of the left-to-right space clear from the floor to ceiling of the tank compartment back to the rear hatch.

slide along right side and rotate into place
Vector
Steering the tank through the rear hatch and into place is an exercise in patience.  Enter this step knowing you will have to do it many times, and you will not be unpleasantly surprised with an entire afternoon lost to wrestling your tank in.  Before you start, set the foam seal back into position.  On my TDI-powered bus, I needed to raise the right side (using my BusDepot bus jack) so I could get past the engine on the floor.
I sent the left edge in first and routed it around the engine into place.  Get the tank partway into the tank compartment and attach the level sender wire and the ground wire.  Then, the tank can settle into place with wiggling.  Slide underneath and check that you can't see the foam seal.  If you can, you can try to move it with your fingers from below, or re-set the tank.  Neither are fun, but both work.  Using fingers from below is faster, though.  You can feel when the tank is settled into place.

Assembly
Now, you can start re-connecting things.  I did them in this order: fuel filler hose, fuel vent line, fuel return line (mine re-uses one of the original vent lines), fuel feed line.  As I mentioned in an earlier post, I replaced my fuel filler hose with a bent section of steel pipe from the muffler shop.  I was able to find the right size Viton hose at CarQuest, but only in straight sections.  So, I cut 2 3" collars from the hose, and I use them to abut the tank to the bent-pipe and from the bent-pipe to the filler on the side of the bus.
wire it up before final placement
Re-use your clamps only if they were in nearly-new condition.  Otherwise, they aren't that expensive, but its better that than have one fail and cause leaks.  It is a major pain swapping those clamps after everything is back in place.  Last, the hold-down straps are cinched into place.  This is a little challenging if the engine is in the engine bay, but on the floor.  Since I put a heating unit in my engine compartment, and ran the air hose forward along the left side, it really gets in the way.  Still, there's a washer and a 13mm nut (you need both).  Use a deep socket and put a vice grip on the strap so it doesn't torque as you tighten.

That's it for today.  We had a great White Friday, and I'll post about that soon, as well as the engine install headway.  Thanks for following along!

Monday, January 10, 2011

running again

Ok, so it's halftime during the college football national championship game, so this will be brief. My friend Justin stopped over on Sunday afternoon, and we got the engine running again. For the second time, we needed to fake the clutch pedal switch. The jumper we did before either fell out or I knocked it out. Regardless, once we jumpered that switch, the starter would engage again.

Fuel System Alteration
we removed the one-way valve from the fuel feed line, believing it was restricting the fuel flow. I'm still concerned that we won't get sufficient prime after sitting overnight, but I'll be able to test that theory tomorrow night. In its place, we put a Mercedes secondary (clear) filter. We should be able to see if there is prime in the fuel line just by looking at that.

Battery suck-eth
The battery I nabbed from the old Mercedes was pretty much drained by the time we got to being able to test-fire, it wasn't able to turn the engine. We tried the Harbor Freight battery charger/jumper, but that didn't have the juice. Then, we charged the battery a bit, tried again... no avail. Finally, charging through jumpers running off of Justin's Golf was the winner. Regardless, the engine is running again, and the battery is sitting on the slow-charge. I'll fire that engine up again to drive to the muffler shop hopefully this week.

Justin's Discoveries
In looking at and poking at the engine, Justin noticed a few things. Some items, we were able to fix on the spot, like a loose fuel pressure sensor on the IP, but others may need future attention. The VNT actuator was not responding very well. We think that may self-correct just from use - remember the engine has only run a handful of times in the past 3 years. While we were banging away, Justin re-checked my accelerator switch, and it runs from 0% to 77% now. I need to extend the throw of the pedal somehow, but that can wait. Also, he verified the IP timing, and the flow of the injectors - all good. We're ready for test flights.

That's it for tonight. The game is coming back on. If we don't get snow, I'll be taking a test flight tomorrow night. I hope to get into the Meineke shop around the corner between Wednesday and Friday so I'm road-able. Then, it is just a matter of increased length test fights, minor tweaks and cosmetics. Unbelievable. As an Oregonian, I say "Go DUCKS".

Saturday, October 30, 2010

Baby Steps

Well, I haven't been able to get any real traction lately. I have made a couple of minor improvements, but I haven't had the engine running, and work has been very taxing.

Blue Thermometer
I have identified the missing plug for the coolant bottle. It turns out I was a little over-aggressive when I cut the harness apart and I cut that sensor out with a bunch of things I didn't need. I was able to find the brown/white ground wire and the red/purple send wire in the mass of clipped wires. I extended these two around the front side of the engine compartment to the overflow bottle, and its hooked up. Unfortunately, I am still getting a flashing blue thermometer signal on the dashpod. I tested the continuity of the bottle sensor wires all the way to the dashpod, and they are strong, so that sensor is not the problem.
After investigating this symptom a little bit on TDIClub, it appears that the ECU thinks this means there isn't any coolant or its too cold to start the engine, so it won't let me. This tells me the problem is in the coolant sensor, the wiring for that sensor or engine harness again. If time allows, I'll remove and re-seat the sensor to see if that does the trick.

Fuel Priming
In my post earlier this month (Won't Get Fueled Again) I mentioned that I had another one-way valve coming. I have added it into the mix and the fuel system seems to retain its prime now. I have tested with the MityVac, and I can get a solid flow of fuel even after it has sat for a week. The resolution: one-way valve between the tank and the fuel filter on both the supply and return sides, only allowing fuel (or air) flow in the correct direction.

Registration
In a swift move of optimism, I registered the bus. I haven't put the stickers on the tags, but I'll now be able to legally test drive it. Though a very minor thing, it feels like a diamond on the project plan - a big milestone. The possibility of actually driving it seems more real when the DMV says its legal.


That's all I have for now. Work has been very busy, and soccer season is just finishing up. When we reset our clocks next weekend, finding daylight for working on this project will be isolated to weekend days. To accommodate this, I'll be doing as many inside chores as possible during the week, to free that time. Hopefully, I'll still be able to keep some traction on this. I believe, once I have the blue light resolved, I will be able to consistently start the engine. Then, its getting the heat (read:defrost) working, getting Justin over to set the injector timing, and planning some short test drives. Thanks for following along, and for your positive words and ideas along the way.

Tuesday, October 12, 2010

Won't Get Fueled Again

In my last post, I said I finally figured out what was going on with my fuel system. I'll explain that today, though I won't have pictures of the fix as I'm still waiting for a part. Also, the vacuum system is finally finished, marking one more completed subsystem. Queue the Who: "Yeah!"

Fuel Me Once, Shame On, Shame On Me
So, I tested and re-tested trying to get fuel to travel through the lines up to the injection pump. I determined that if I put a one-way valve into the vent / return line from the filter to the tank, fuel would travel up the feed line. This was true, so I put a valve in, and I was able to get the engine to run once I primed the lines. The problem is, once the engine shuts off, and the operation sits for a while, the Injection Pump loses its prime. Huh? Wha' Happen'd?

Fuel Me Twice, Um... Uh... Won't Get Fueled Again
The fuel slowly trickles back into the tank via the feed line. I hit TDIClub, and found that the stock TDI placement has a one-way valve at the tank to prevent a loss of prime. Dumbly, I took the one-way valve from the return line and put it into the feed line. Well, this didn't work, since the return line was now plling air again. Grr... ordered another one-way valve. It'll arrive i na couple of days, and I'll slap it into place and re-prime the lines.

Fresh Air, Sucka
The last bit I completed was getting the vacuum system all sealed up. I had a posting a while back that traced the vacuum system. At that time, I didn't have the turbo line in, nor the filtered air tap. I completed the turbo line when I got the intake work done a couple of months ago, but it wasn't until this past weekend that I got the filtered air tap done. In the bits and pieces that make up my filter -to- intake, I have an AMSOIL air filter connected to a MAF body. This MAF body is connected to a short flexi-hose which connects to a second MAF body. This second body has the actual sensor in it. This real MAF is connected to a rubber 135* switchback sleeve which connects to the stock intake. The first MAF body has a diamond-shaped blockoff plate on it, and it is into this block-off plate that the vacuum nipple was inserted. The vacuum line fit easily, and is routed behind the filter -to- intake chain I just described. I don't have a good picture of this (it is under the rear cabinet), but it fits well, even with the wiring mess in that corner of the engine compartment.

I'll touch on my efforts with the heat later on. Thanks for following along-

Sunday, September 26, 2010

Battery of Tests

Well, its been too long since my last post, but I didn't want to post anything until I got a breakthrough. Unfortunately, I haven't had one, but I figured I'd left the blog out in the cold too long. Speaking of "out in the cold"... the weather has been a regular topic in this blog, and in conversations with fellow Pacific North-westerners all Summer. Now that Fall is officially here, most folks are expecting the rains to set in. My wife and a few of her friends are trying to stay optimistic, but I'm not betting on any more warm, dry days. This makes for a very unpleasant effort on the bus project, exacerbating my current frustrations.

Feeling Fuelly
After getting the engine to run for a few seconds here and there, I thought my troubles were to be quickly resolved. I felt that if I could get the air bubbles out of the fuel system, I could get the engine to run reliably. I moved the large stock fuel filter operation from where Hal had installed it (you can see the mount holes in the top picture there), up to near the top-hatch (see bottom picture). I figured part of the problem was that the Injection Pump was the high point of the system, so air bubbles were getting trapped in the pump. I checked my Jetta and noticed that the fuel filter was right next to the coolant bottle, so I thought, "maybe the height matters". There's a picture here to the right. I don't know if it does at this point, because the engine still doesn't start. I pulled the clear filter I put in between the tank and the stick filter as well. I thought maybe this was allowing air in, or at least giving it a place to collect. This didn't help either.

Battery of testing
With all of the attempts to start the engine, the battery keeps running down. I find that the quick 10Amp charge doesn't actually work, and I need to charge the battery on the slower 2Amp cycle. This introduces a considerable amount of lag between starts. As I write this, the battery is getting charged again. I have noticed that the primary cable running from the battery to the starter gets warm at one of the splices. I am a little concerned about that. Of course, the engine should start quite quickly under most conditions, and little current runs through there other than to start the engine.

My latest attempts have been surrounding the fuel supply again. I have routed the return line from the injection pump to a jar that's 1/2 full of diesel. As the engine start attempts are run, I can watch the fuel level move up and down, as well as watch the air bubbles appear. I'm hoping this is helping to bleed the air out. The port on the fuel filter that the return line connects to has been closed off, so no new source of air is introduced. I have not had much luck with this arrangement yet. I am starting to worry that I messed something up the last time I had it running and it got a little rough-sounding. To me, it sounded like it was running out of fuel, so I shut it off. Maybe something more worrisome happened. :(

That's it for now. If you have any ideas for why its not catching, I'd love your input. They say insanity is repeating an action with a different result expectation. With that, I'll keep trying to start this thing while trying to think of what could be the cause other than air in the fuel system.

Pictures:
top - where the fuel filter was mounted before. Note the clear plastic filter has some air in it.
middle - fuel filter in the Jetta.
bottom - new fuel filter location to mimic the height of the filter in the Jetta