Showing posts with label visor. Show all posts

Tuesday, June 21, 2022

Interior Carded

Once the headbanger was installed, getting the interior to a usable state was a downhill run. This post is really more a collection of all the little things that got done so we could hit the road. So, for today, "complete" means "good enough for this Summer"; it does not mean we're done. I will be picking this up once camping season comes to an end in October. Before I begin, Hapy Summer Solstice.

Cab Floor Complete
I had left some of the MLV splits un-taped. So, I started with that. I discovered that the Jute and MLV was too wide between the outer edges of the seat rails and the doors to allow them to close easily, so I trimmed them down. Then, the edges were taped down.

Sun Visors
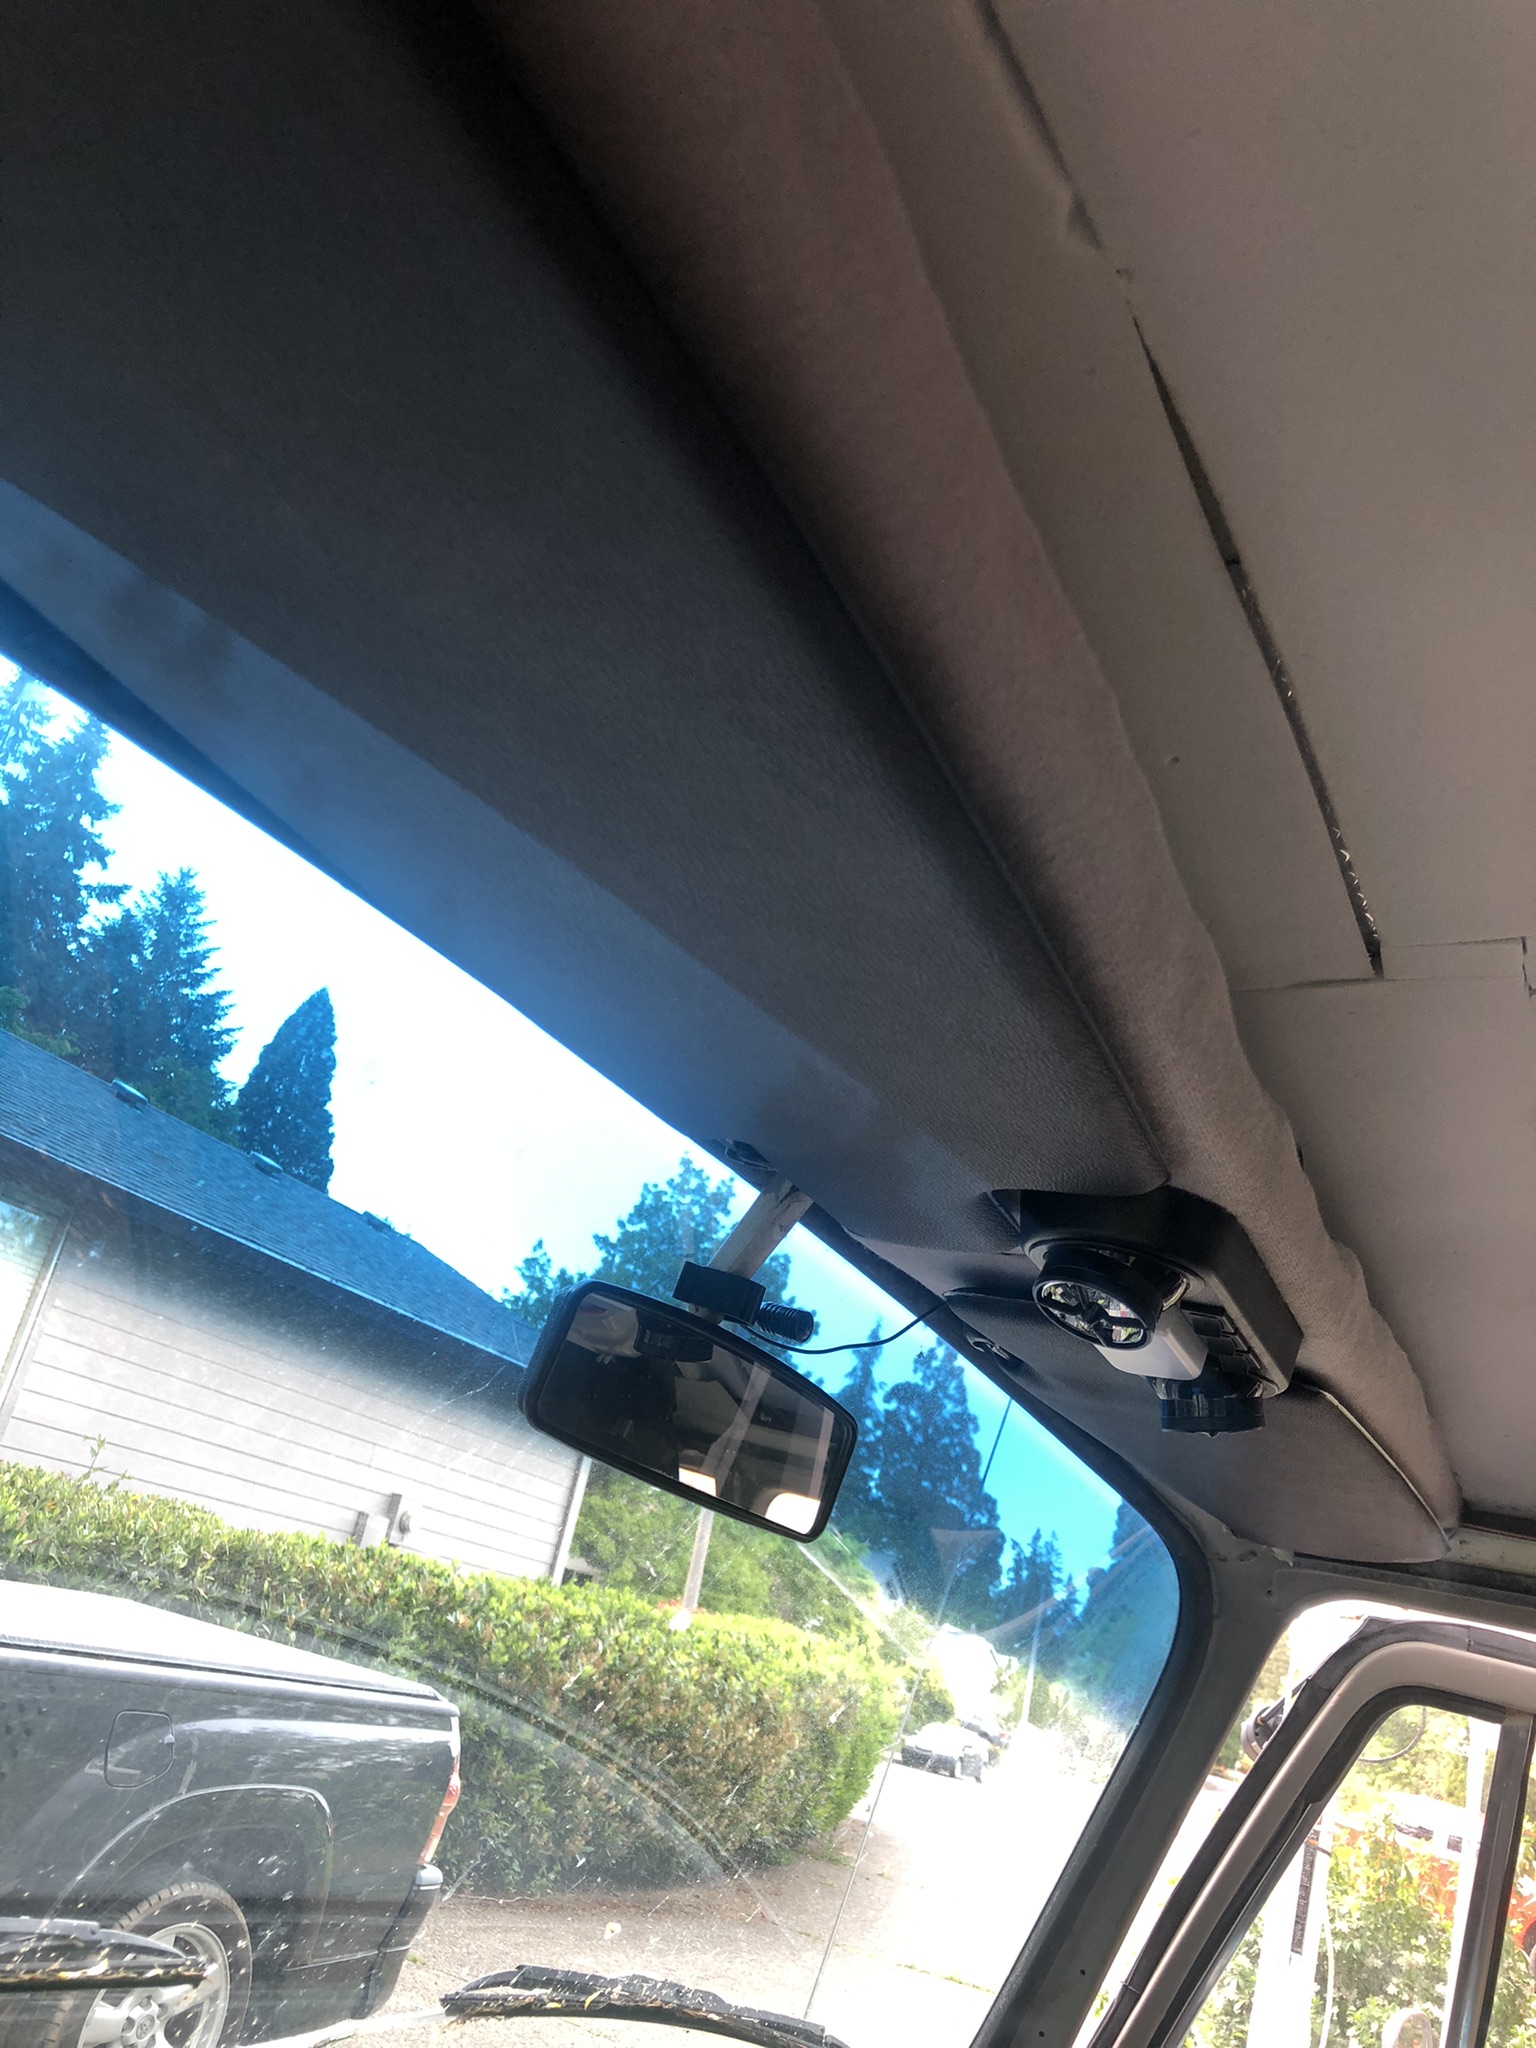
sun visors in
One of the upsides to the new shelf was the potential addition of sun-visors. The visors that are on the market these days are not the same as the ones I removed; that could be a reflection of my old visors, however. These new ones are shaped differently, with a pop-out on the end that is designed to go behind / around the mirror, and the little stick on the end that is supposed to go into the little keeper near the mirror is therefore much shorter. So, if I was looking for a direct-replacement, these would NOT have fit properly, but, again, it is entirely possible that the PO installed bug visors or something way back when. The mounting base near the A-pillar is the same. I re-tapped the holes, knowing at least one, if not all of them, had metal screws instead of bolts at one time before. I threaded M4 Phillips bolts in to hold the visors. I attached the little keeper thing to the underside of the shelf. So, the visor, when not in use, tucks flat to the underside of the shelf. It turned out that the weird shape of the visor allowed it to almost wrap around the light fixture, looking like it was designed for that install. Sometimes, its just better to be lucky than good.

Cab Door Cards
cab cards nearly complete
Recall, my old door cards were falling apart cardboard. There's a cat in Arizona named Werksberg who makes door cards out of PVC, and I ordered a set last Fall (his TheSamba ad). Apparently, his costs are skyrocketing so if you want some of these and have been sitting on the fence, you might get priced out if you don't make a decision soon. Anyway, I was finally ready to install the fronts. Unlike the original cards which need to be installed with metal clips into little rubber boots, these cards deliver with small plastic molly's which press through the card into the original holes. They appear re-usable. We'll see. The driver door card is not staying put, even after adding double-sided tape so I may need to add screws.

When I removed the original-to-me cards, I removed the little door vent things. I set them in my trove of parts and did not install them when I put on the cardboard cards. I put them on this time. The door looks much more finished now, as you can see in the picture above-right, here. The rest of the card install is the same as original. The window crank removes / installs with a Phillips screwdriver. As does the chrome door latch mechanism and the door pull strap. Once installed, the door looks so much better than it did. I have not decided if I will apply the thin closed cell foam or not, but I am not doing it for now.

Kicks
partitions and mid-walls carded
The last thing I got after in the cab was the re-install of the kick panels. With the new flooring and 4-1/2" speakers, this was not as simple as before. Still, I found by setting the outer edge and then bending the card, I could get it pretty much where I wanted it. I pulled the jute and MLV up, allowing the card to sit on the floor. I could remove them, and cut off the lower 1/2" so they sit on top instead. Meh. Something to think about as we drive around this summer.

Slider Door
Moving rearward, I pulled the middle row seat out and the original-to-me slider door card. The slider had not gotten much treatment over the years, so it got CLD and 2 layers of Mega Zorbe. I thought the extra layer might reduce the racket when the door opens. It didn't at first. I spent some time with oil & grease cleaner working on the door runners, and that actually helped a little bit. The lower door roller is the source of the lion's share of the noise and noticed that the outer edge of the runner was a simple 1/4" tall thin bit of steel. So, I ran some leftover white "U" seal I had from doing the luggage rack to see if that would help. Nope. It effectively pressed the wheel against the inner steel track edge, causing it to make a different, but equally unpleasant, noise. I concluded the wheel was the noise-creator, and I ordered a replacement lower guide with a vinyl wheel, instead of steel.
rear tail gate carded

There are 2 bolts and one Allen-screw holding the guide to the door. The bolts on the old guide were so rusted, they broke off, leaving me with just an Allen-bolt holding the guide in place. I will periodically shoot those rusted bolts with penetrant, and when I am able to remove them, I will use M6 bolts in their place. I will apply anti-seize, though. With the new lower guide in, the door was quieter, and operated more smoothly, but the upper guide was making noticeable noise now. So, I removed it, and improved it with penetrating oil until the guide-wheel would easily spin between my fingers. I re-installed it, and now the door was as quiet as a modern slider.

More Cards
I had some daylight remaining, so I grabbed the door card for the slider, and installed it. I also installed the card for the wall opposite the slider, and installed it. I did the rear tail gate and the extra cards for the rear-facing partitions behind the front seats. Each of these took some fiddling to get right, but that was on account of Hapy, not because of the cards. These things are great; the holes are mostly in the exactly right spots and the bag of Mollys had more than enough fasteners for me to damage a bunch of them and still not run out. I believe I can fit more sound deadener between the partition cards and the partition, and I may need some foam to reduce vibration noise, but right now, the interior of the bus looks really good. Removing those cards to add noise deadener will be simple when /if  I choose to do it.

I have a couple of cards remaining to be installed along the seat pedestals and I'll do them as the mood strikes / time permits. For those keeping track at home, I have installed the panels which sit at either end of the rock-n-roll bed, arching over the rear wheel wells, and have I attached the panels that cover the bare steel in the sleeping area. Because the sleeping area cards abut the rear-wheel cards, I needed to do them in the right order. As you can see in the image on the right, here, these cards, when used together, make a nearly seamless span. Boo and I will especially appreciate the sleeping area cards when we're camping. There are few things as jar-awake as having some bare skin touch up against the metal side after it has cooled down overnight. That is some quick-awakening. While this plastic / PVC will not be a great deal better, it does create a foundation for some foam and then some fabric later.

At this point, I felt ready for a test flight. I'll post on that next time. Thanks, as always, for following along-

Monday, April 18, 2016

Sunshade to Shelf

All bus content today, covering a little experiment I've been working on over the last few months, around my various travels.

How it started
Last Spring/Summer, I stripped the interior of the bus, pulled the glass, etc for painting. The result was pretty fantastic, with a mellow gray interior and bright white upper 1/3 exterior. The main 2/3 lower body is still primer, but that's another story. Part of the tear-down for paint included removing the sun-shades from the front ceiling of the cab. As it was, they weren't stock bus visors; they were from a beetle. One of them was broken, half of the fasteners weren't stock... they simply looked junky. But they worked, mostly. With an intention to buy replacements, I junked them. I never bought the replacements, and then lost the few fasteners which were stock. So, I've been driving around without sun shade/visors. In the winter, when the sun hangs low, that's kind of a problem, but mostly, it created a much brighter view.

Basic Idea
view of top before shelf liner
I started shopping for visors. They are not inexpensive. While I was trolling the various sites (BusDepot, Cip1, etc), I would see these "parcel shelves" that were designed to fit under the dashboard around knee level. I've never traveled with a set of those, but it prompted thinking. First, I wondered if your legs ever bumped into them, and whether things would fall off them onto your feet. Neither thought was very appealing. They weren't inexpensive either. But, the idea of more storage in the cab was appealing. Looking at my cab, I had installed a double accessory plug near the right edge of the passenger (right) front ceiling. This was to power a Garmin and allow my passenger to charge her phone. I thought: could I put a shelf above the rear-view mirror?

Starting Simple
finished. view from bottom
The short answer is "yes, you can put a shelf above the rear-view mirror".
When I stripped out the interior, I decided to junk the old wood floor, and leaned it against my shop bench. I decided to use it to try to fabricate a shelf. It is 3/8" thick plywood. Working in an Agile manner, I tested the idea first with newspaper, cutting and taping a mock shelf until I had a rough shape for the front (nearest the windscreen). I transferred the line onto cardboard for a more firm example which I taped into place so I could observe it from lots of angles. This model included a cut-out for the rear view mirror mount so it could slide into place as a single piece. Last, I transferred the cardboard line to plywood and started cutting. With each iteration, from paper to cardboard to wood the front line shifted a little bit. i shaped the rear edge of the shelf to taper at the ends, running straight lines from the tapered end to about 3/8 of the way towards the middle. This left a section in the center that was straight across, parallel to the dashboard.

Mounts
cutting and shaping
Once I had the shelf cut, I started thinking about how I could best mount this shelf to the bus, and concluded that re-using existing holes is better than drilling new ones, if possible. Similar to the evolution of the shelf, the mounts evolved as well. I started with 1x3" wood scrap. This proved to be too hard to work with, since the angles needed to be precise (where the bus angels aren't), and wood isn't flexible in such a small size, so the body roll during driving could cause problems. I resolved to using sheet metal cut with tin snips and then shaped to fit the lines of the bus. The result was a more forgiving mount that could leverage the original holes and fasteners.

Get Stiff
I wanted the front edge of the shelf to have a finished look, and for there to be a lip to prevent things from flopping off the shelf into either my or my passenger's face. I went looking for simple 1/4-round at the home supply store, but their offerings of millwork has really dropped off. I found 90* angle aluminum in 4' sections, though. After a quick cleaning of sticker residue with peanut butter, I cut the angle aluminum to length, drilled holes every 3 inches and bottom-mounted the lip to the shelf. This stiffened the shelf considerably, making the concept seem much more plausible.

Front or Back
installed.
Ignore the mess in the background :)
After I had the front lip, I test fit and confirmed my thinking that I needed something on the "back" of the shelf to stop things from falling out the back/front and either into the windshield or onto the dashboard. Staying with the make-it-cheap mantra, I pulled some roofing paper out of a supply heap, and cut 2 curved sections, one for each side of the rear view mirror. Using a staple gun, I attached these two sections. I added a third much shorter piece to go into the rear-view mirror cut-out. I test fit again. This time, no daylight appeared over or around the shelf. Sweet.

Testing
Before I mounted the finished work, I shot the topside with spray epoxy and applied a rubber shelf liner. Just one more level of protection against parcel shelf contents going flying. The install now was more involved. First, the mounts are installed to the bus body. Then, the shelf is lifted into place, leading with the front (windscreen) edge. I press the roofing paper against the bus body while rotating the shelf flat and aligning the mounts to the holes in the shelf. The mounts are bolted to the mounts from below, using washers both above and below the shelf. Just as I finished this initial install, I got a call that one of the kids needed to be picked up from a couple miles away. "Perfect test," I thought. "That run has lots of turns and speed bumps". So, I placed my cell phone on the shelf and did a 4 mile loop of kid collection, hitting turns and speed bumps with abandon. The phone didn't move.

Reflections
installed
The shelf is a complete success. Out of curiosity, I put an old car stereo on there, and it didn't waver. I still need to really stress test it, but for now, I'm going to drive around with my prototype. OVer time, I could improve the design with thicker mounts or something, but I think for now, in this form, I could install a small car stereo, like the one I put in Flash (See: Flash Gets Sounds) or some down-lighting for reading a map. As it is, Boo and I can put our phones up there when we're travelling and have them on the charger without wires hanging everywhere. Very nice.

Thanks for following along. Lots of personal stuff happening over the next couple of weeks, so you know what that means: few to no new posts, but lots of content getting created in the form of adventures.