Showing posts with label sun. Show all posts

Tuesday, June 21, 2022

Interior Carded

Once the headbanger was installed, getting the interior to a usable state was a downhill run. This post is really more a collection of all the little things that got done so we could hit the road. So, for today, "complete" means "good enough for this Summer"; it does not mean we're done. I will be picking this up once camping season comes to an end in October. Before I begin, Hapy Summer Solstice.

Cab Floor Complete
I had left some of the MLV splits un-taped. So, I started with that. I discovered that the Jute and MLV was too wide between the outer edges of the seat rails and the doors to allow them to close easily, so I trimmed them down. Then, the edges were taped down.

Sun Visors
sun visors in
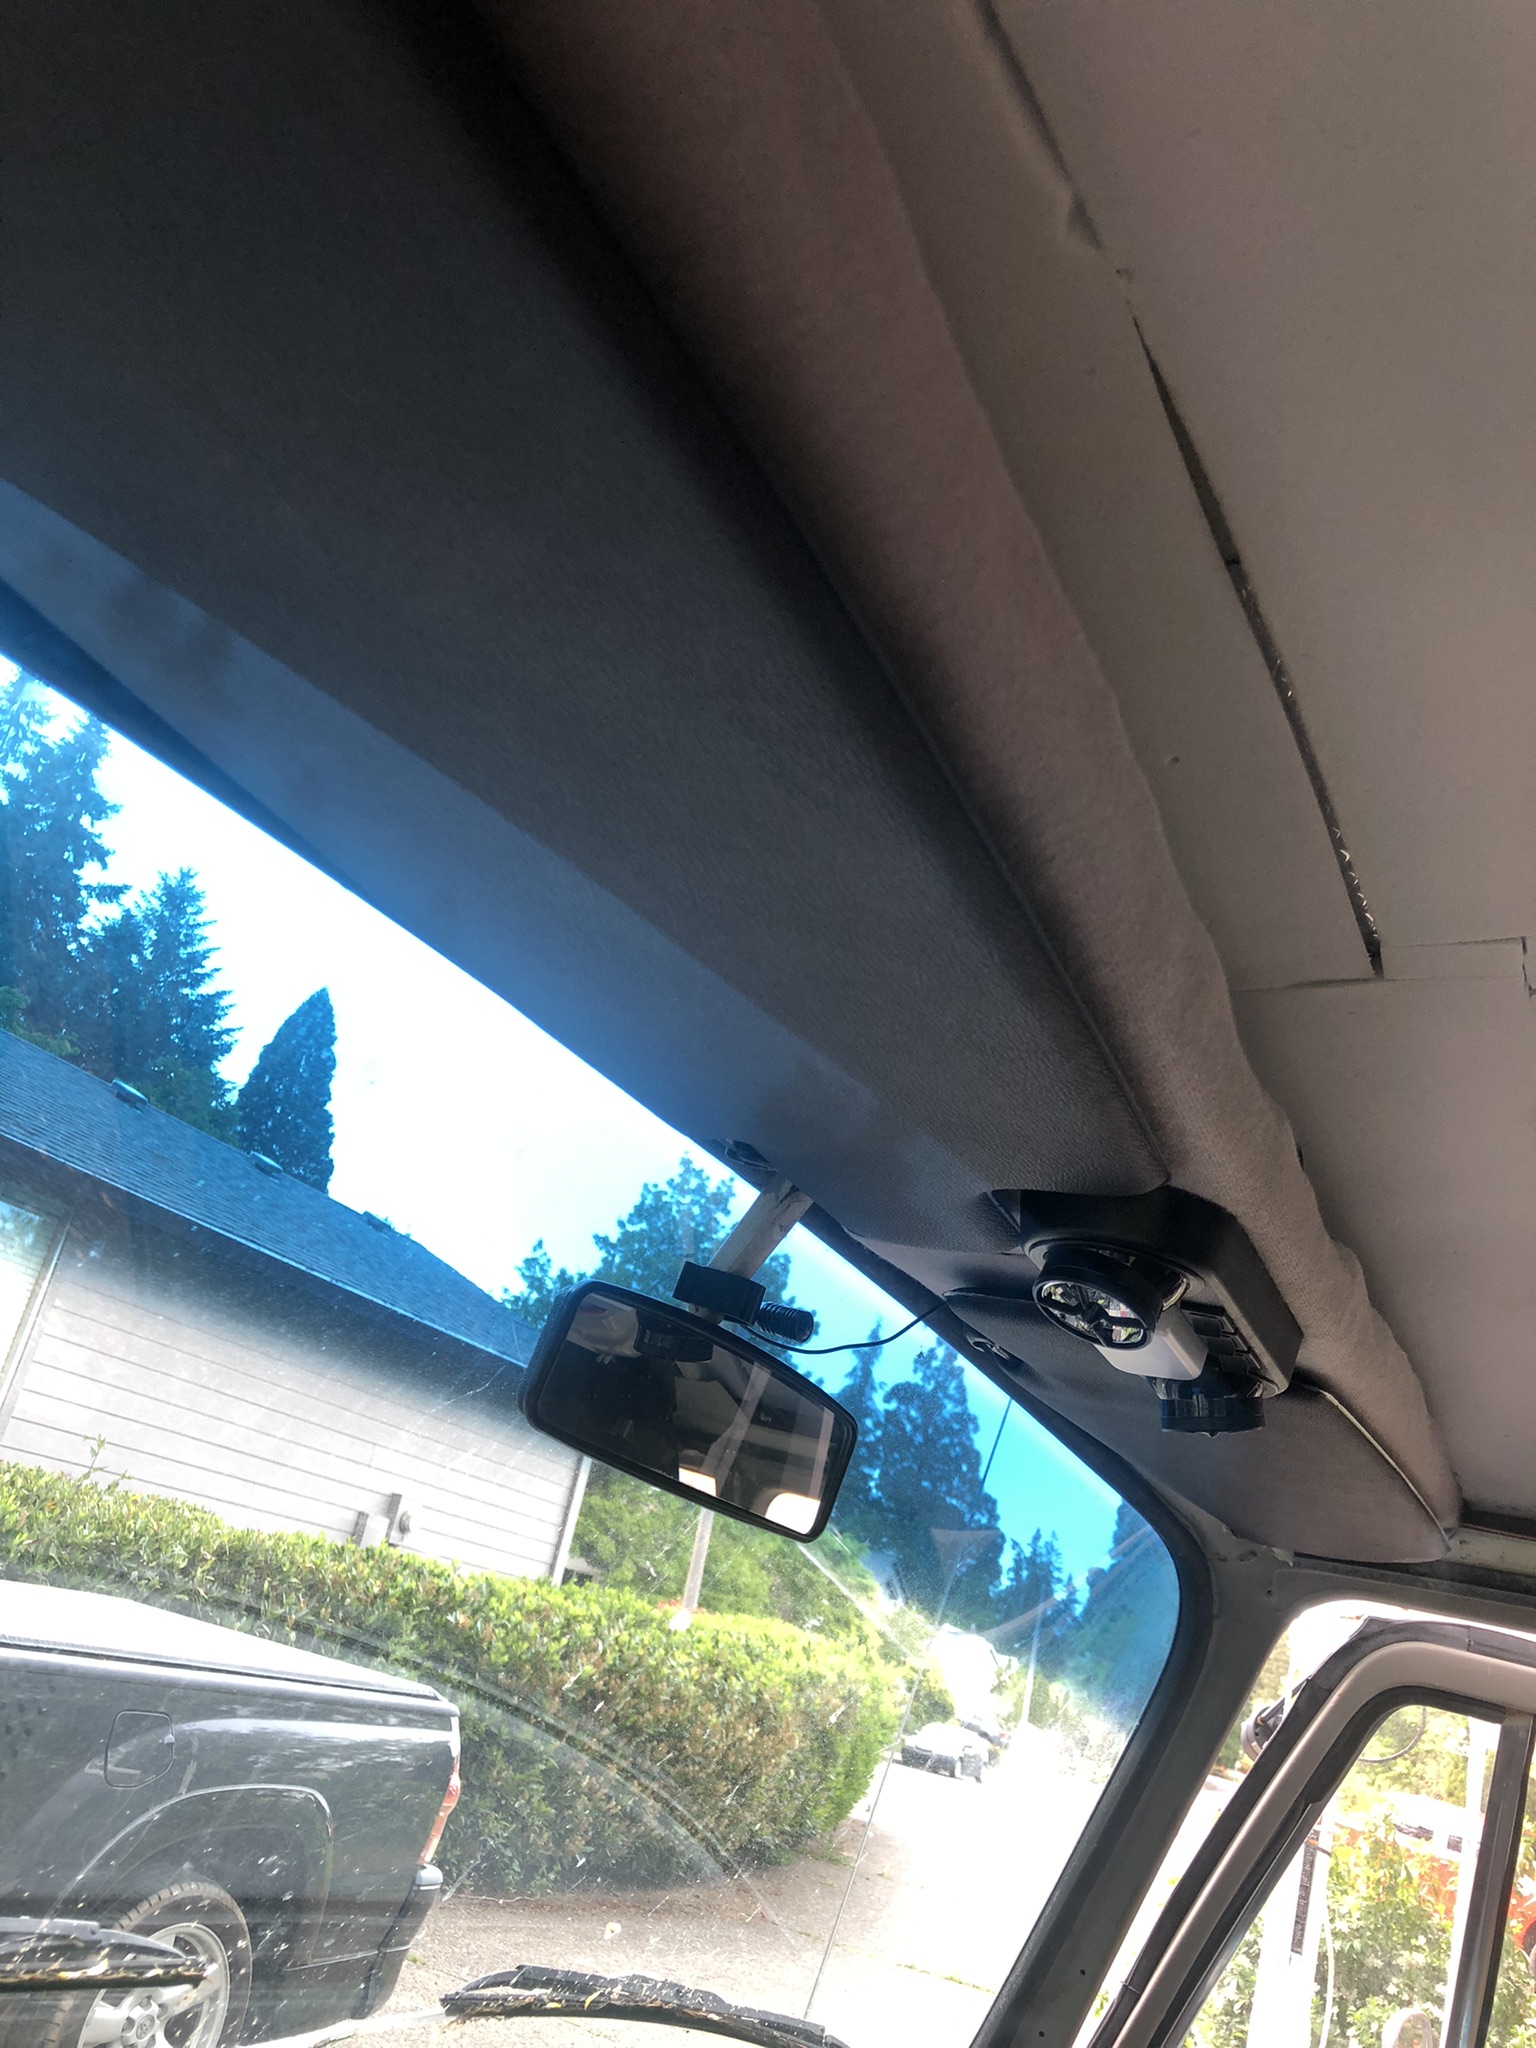
One of the upsides to the new shelf was the potential addition of sun-visors. The visors that are on the market these days are not the same as the ones I removed; that could be a reflection of my old visors, however. These new ones are shaped differently, with a pop-out on the end that is designed to go behind / around the mirror, and the little stick on the end that is supposed to go into the little keeper near the mirror is therefore much shorter. So, if I was looking for a direct-replacement, these would NOT have fit properly, but, again, it is entirely possible that the PO installed bug visors or something way back when. The mounting base near the A-pillar is the same. I re-tapped the holes, knowing at least one, if not all of them, had metal screws instead of bolts at one time before. I threaded M4 Phillips bolts in to hold the visors. I attached the little keeper thing to the underside of the shelf. So, the visor, when not in use, tucks flat to the underside of the shelf. It turned out that the weird shape of the visor allowed it to almost wrap around the light fixture, looking like it was designed for that install. Sometimes, its just better to be lucky than good.

Cab Door Cards
cab cards nearly complete
Recall, my old door cards were falling apart cardboard. There's a cat in Arizona named Werksberg who makes door cards out of PVC, and I ordered a set last Fall (his TheSamba ad). Apparently, his costs are skyrocketing so if you want some of these and have been sitting on the fence, you might get priced out if you don't make a decision soon. Anyway, I was finally ready to install the fronts. Unlike the original cards which need to be installed with metal clips into little rubber boots, these cards deliver with small plastic molly's which press through the card into the original holes. They appear re-usable. We'll see. The driver door card is not staying put, even after adding double-sided tape so I may need to add screws.

When I removed the original-to-me cards, I removed the little door vent things. I set them in my trove of parts and did not install them when I put on the cardboard cards. I put them on this time. The door looks much more finished now, as you can see in the picture above-right, here. The rest of the card install is the same as original. The window crank removes / installs with a Phillips screwdriver. As does the chrome door latch mechanism and the door pull strap. Once installed, the door looks so much better than it did. I have not decided if I will apply the thin closed cell foam or not, but I am not doing it for now.

Kicks
partitions and mid-walls carded
The last thing I got after in the cab was the re-install of the kick panels. With the new flooring and 4-1/2" speakers, this was not as simple as before. Still, I found by setting the outer edge and then bending the card, I could get it pretty much where I wanted it. I pulled the jute and MLV up, allowing the card to sit on the floor. I could remove them, and cut off the lower 1/2" so they sit on top instead. Meh. Something to think about as we drive around this summer.

Slider Door
Moving rearward, I pulled the middle row seat out and the original-to-me slider door card. The slider had not gotten much treatment over the years, so it got CLD and 2 layers of Mega Zorbe. I thought the extra layer might reduce the racket when the door opens. It didn't at first. I spent some time with oil & grease cleaner working on the door runners, and that actually helped a little bit. The lower door roller is the source of the lion's share of the noise and noticed that the outer edge of the runner was a simple 1/4" tall thin bit of steel. So, I ran some leftover white "U" seal I had from doing the luggage rack to see if that would help. Nope. It effectively pressed the wheel against the inner steel track edge, causing it to make a different, but equally unpleasant, noise. I concluded the wheel was the noise-creator, and I ordered a replacement lower guide with a vinyl wheel, instead of steel.
rear tail gate carded

There are 2 bolts and one Allen-screw holding the guide to the door. The bolts on the old guide were so rusted, they broke off, leaving me with just an Allen-bolt holding the guide in place. I will periodically shoot those rusted bolts with penetrant, and when I am able to remove them, I will use M6 bolts in their place. I will apply anti-seize, though. With the new lower guide in, the door was quieter, and operated more smoothly, but the upper guide was making noticeable noise now. So, I removed it, and improved it with penetrating oil until the guide-wheel would easily spin between my fingers. I re-installed it, and now the door was as quiet as a modern slider.

More Cards
I had some daylight remaining, so I grabbed the door card for the slider, and installed it. I also installed the card for the wall opposite the slider, and installed it. I did the rear tail gate and the extra cards for the rear-facing partitions behind the front seats. Each of these took some fiddling to get right, but that was on account of Hapy, not because of the cards. These things are great; the holes are mostly in the exactly right spots and the bag of Mollys had more than enough fasteners for me to damage a bunch of them and still not run out. I believe I can fit more sound deadener between the partition cards and the partition, and I may need some foam to reduce vibration noise, but right now, the interior of the bus looks really good. Removing those cards to add noise deadener will be simple when /if  I choose to do it.

I have a couple of cards remaining to be installed along the seat pedestals and I'll do them as the mood strikes / time permits. For those keeping track at home, I have installed the panels which sit at either end of the rock-n-roll bed, arching over the rear wheel wells, and have I attached the panels that cover the bare steel in the sleeping area. Because the sleeping area cards abut the rear-wheel cards, I needed to do them in the right order. As you can see in the image on the right, here, these cards, when used together, make a nearly seamless span. Boo and I will especially appreciate the sleeping area cards when we're camping. There are few things as jar-awake as having some bare skin touch up against the metal side after it has cooled down overnight. That is some quick-awakening. While this plastic / PVC will not be a great deal better, it does create a foundation for some foam and then some fabric later.

At this point, I felt ready for a test flight. I'll post on that next time. Thanks, as always, for following along-

Tuesday, September 8, 2020

A4-ward Progress

Apologies for the late publish. Not sure what happened; I'll chalk it up to user error. Anyway, a few weeks ago, I mentioned that in a charitable move, I bought Nemo (the 1997 A4 1.8Turbo) from T (See If You Love...). Today, I go through the fixes I have done to get Nemo ready for someone to proudly drive, while avoiding work on Zed, the 280ZX. In an earlier post (See Dust Dodging), I mentioned the replacement of the window and the front side marker. I did a few less obvious things that I'll cover today. Before I begin, Hapy belated Labor Day to my US readers. Traditionally, this is the start of the most productive period in our calendar year: from Labor Day to Thanksgiving. So, if you feel like you're working a ton over the next couple of months, it's probably because you are.

Oil Leaks
Old Volksies like to mark their spot with a little oil. Old buses and bugs do it. Now that Jettas and Passats have been around long enough, they do it too. It seems that VW's German brethren, Audi's, mark their spot as well. For Nemo, there are a few sources. I focused first on the leaking motor oil. I slid under the front end, and after having sat for a few days, the oil that had been flung up from below during a drive had dripped away, leaving fresh oil only where it was actually leaking out. There was a nice big droplet at the oil drain, so I checked the torque on that bolt. It was a little loose. Next, I could see fresh drops on the cross member under the oil filter. It was hand-loose. As in, I was able to twist it tighter with 2 fingers. I think we found our main culprit. With oil filter pliers, I tightened the filter snug.

The power steering rack has a leak, and before I do another steering rack removal and re-install, I am trying the Lucas Power Steering Stop Leak first. This has been leaking since T bought Nemo, and T had been managing the level regularly with just topping it off with regular fluid. I intend to eliminate the leak. The steering is still really good and tight, though I expect the upgraded suspension helps with the road grip and cornering on rails. I looked back through my blog and I can't believe that I never posted on the steering rack remove/replacement I did on Flash, maybe 4 years ago. I think my dislike of the banjo may have started with those banjo bolts. It was a really tough job, so I'm all the more puzzled that I didn't post on it. Weird.

Dented Front Fender
With increased confidence from my efforts on Zed, I wanted to tackle the dent in the passenger fender. I pulled the front side marker, following the process I described in Dust Dodging. Through the hole presented when the light was removed, I fed a pry-bar. I did NOT leverage against anything, I just pushed/pulled outward and the dent popped out. My efforts left a small convex ding, but it is much better than the cereal-bowl sized dent that was there.

Under-Dash Panel
this is from an auto-trans, but similar
With the outside looking fairly good, but needing a wash, I started looking at the interior. There are a few things that need improvement, but I'll really only get after a subset. I started with the under-dash panel. T had removed this panel to replace the clutch master cylinder and had not re-installed it yet. We had the panel, but lost the fasteners. I made-do with things I found in the garage. During the install, I discovered that the remote trunk opener button was faulty, so I will need to replace that. Otherwise, the install was about what you would expect. The panel should be held on with 3 bolts, 2 through the front and one from the side, near the fusebox. Threading the bolts from the front is a great opportunity to practice patience. Gravity is working against you, and you can't see where the bolt needs to go once the panel is in place, so breathe deep and expect it to take many attempts. Once bolted into place, these panels are supposed to have 2 pop-in covers which fit over the bolt holes. I only found one so I'll add one of those covers to the junk-yard list.

Passenger Sunshade
The last thing I got after in this car-fix session was the passenger-side sun-shade. This was sitting on the floor since T bought Nemo. It looks fairly simple to mount. The plastic hook-looking thing goes in with the hook facing towards the rear, and you press up and back until it rotates flat, leaving the mounting hole near the hole in the steel above. At least, that's the theory. The prior owner had replaced the headliner and when he did, he mis-routed the wire for the light on the mirror. Instead of routing the wire through the hole in the steel where the mirror "hook" goes, it was left just dangling below that steel. So, the options were: don't hook up the wires to run the lights, return the route of the wires so it passes it through the steel from above -or- hack something. I didn't want to not hook up the light. I tried to figure out how to re-run the wires, but it appeared to require removing a considerable section of headliner because of the shape of the steel ceiling, so that left me with some kind of hack.

I took my hacksaw (aptly named) to the sunshade housing that, when installed, disappears into the ceiling. I cut a channel for the wire to slide down, reducing the mount of wire that would be pressed between the plastic and the steel ceiling. This actually worked, and I apologize for not taking a picture. Hopefully, you can see the shape of the mount from the picture on the right, here. With the wire pushed into the channel, I plugged the wire into the plug hanging from the hole in the ceiling. I pushed the rest of the wire into the headliner, and then followed the "theory" I described above. It pressed into place with not nearly as much effort as I expected. Once rotated around, I threaded a bolt through, and the sunshade is not in-place and operable.

The other bits of the interior that need to be resolved include fixing the cover on the driver seat cushion, and replacing some of the brittle plastic bits. I may not get to those items, but I think I will try to get the AC working; it probably just needs a charge. The next most important thing to resolve is the trunk is stuck closed. I'll get after that the next time I choose to focus on Nemo.

Thanks, as always, for following along.

Friday, March 13, 2015

Hopping and Skipping through SF

NO BUS CONTENT today. Instead, I'm going to cover a whirlwind trip to the San Francisco Bay area. In some ways, this may feel like a re-tread of HNY from 2013 (link here). That's not just a coincidence; we tried to eek out a little honeymoon flashback out of this trip. This got really long. Sorry. While I recognize this is public, in a way this is how I record things for my own memory, so, details are important. :)

Departure
In looking back through my posts from last year, I realized that I never posted about a trip I took last Winter to San Diego. My sister and her family were thinking about moving to SF from SD, so Boo and I thought we ought to go visit and help them decide while soaking up some needed sun. Last Winter was a typical dreary, but less snow on the mountain than usual (but still more than this year), so we were in need of an adventure. Unlike our trip to SF described in the link above, the departure to SD was very smooth. The exodus from Oregon to SF was almost equally smooth this past week. Rather than a crack-of-dawn departure, we flew out around 7, so we both ducked out of work a little early and cut across town catching rush-hour traffic heading east out of Portland. It wasn't nearly as bad as it might have been, though. Even after missing the economy lot on the first try, we still had time to nab a sit-down bite to eat after cruising through security before our plane boarded.

BART It On Down the Line
SFO BART entrance
We picked SFO rather than Oakland because of the direct integration with the BART. Apparently, Oakland now has a $6 one-way people-mover from the airport to the totally-doesn't-feel-safe O.com stadium BART stop. Yeah... even with the people-mover, standing on that platform at 10 o'clock at night sounds awfully, uh... exposed. I'll take the direct step-onto-the-train deal at SFO, though the walk to the station was quite long. Our flight terminal'd about as far away from the main terminal as seemed possible. Maybe it was having full day-packs on our backs that made it feel so long. Maybe it was just the drain from flight. Regardless, SFO has all kinds of interesting things to look at, and I don't mean the people. Newark Airport is best for that. SFO has museum pieces strewn about in display clusters throughout the airport. We looked at a couple which had just concert posters from the 60's and 70's for venues in the Bay Area. Very cool. BART was a key component through our 4-day stay in the Bay Area. We love BART.

No Renoir and that's no Monet
The place we had honeymooned (Renoir Hotel) has been shut down for a while. Maybe that issue with not having heat during the cold snap did it. Maybe it was just time to renovate. Boo and I walked by it on our first full day in SF, and it has been gutted. It looks like they removed every bit of reusable material, from the marble to the chandeliers and the wood trim on the windows, it has been picked clean. The first floor has been stripped to studs. We wondered if the building was going to get razed, and replaced with some fancy new tower like the Twitter headquarters down the street. That would be very sad. Based on internet news, it looks like it there was a plan to go boutique and then there was a fire. Not sure what the plan is now.

5th floor hallway mirror selfie
Since they weren't open for business, we got a one-night room at the Hotel Whitcomb just down the street. With out late arrival time, we ducked into the bar before last call for a quick taste before checking in. The bar-tender was really annoying, acting the braggart buffoon to maximize tips from better dressed patrons, leaving we travel worn to fend for ourselves. At least he didn't hassle us like the others, so maybe we got off with the better experience. One short pour and an unsatisfying bottled beer later, Boo and I left unimpressed. The front clerk was efficient, and we were checked-in and in our 5th floor room quickly. The room was small, but effective. No coffee maker nor mini-fridge, but we were just looking for a safe bed. The fact that we were the room at the end of the hall next to the fire escape (the homicide room) wasn't lost on me, but I kept the "homicide" part to myself.

Thai Re-try
We didn't stay in the room very long. We were both more interested in getting some food and a better drink, so we hit the streets of Tenderloin. After a little walking about, we found Lers Ros again. Like the first time, it was sooo tasty. The management had added more tables, and the place was much busier than the last time, but the food and service was just as memorable. We'll go there every time we visit SF, so long as they're open.

5 Mile
The following day, we re-traced some other steps we had taken 2 years earlier after checking out. We visited some old Grateful Dead haunts (the Bill Graham, Warfield Theater, Great American Music Hall and the Fillmore), hit JapanTown for some incense and then BART'd to Berkeley to meet up with my brothers, sisters, their families and my folks at a rented house to celebrate my parents 50th wedding anniversary. All told, we clocked over 6 miles with 20 pounds of day-pack on our backs. Bed, when it came, was welcomed. In a stark difference from the last time we walked through Tenderloin 2 years ago, the city smelled different. Two years ago, it was during a cold snap, and the homeless were in shelters, leaving just the skunky smell of cannabis. This time, it was sunny, warm and smelled of old urine. It was so bad that it clung to our clothes and we had to throw everything we were wearing into an immediate wash cycle at the rental house. Yuck.

50 Years
Friday was anniversary day. 50 years. We celebrated with a renewing of vows, led by my brother-in-law. There's a ton of back story on him, but for now, let's just say he's an Episcopal minister working with the SF youth through his Braid Mission. Through his contacts, we were granted access to Grace Cathedral on top of Nob Hill for the vow renewal.

Now, old couples are cute. They just are. When you put them in a big cathedral, surrounded by family while they repeat wedding vows, its all the cuter. The ceremony was little-kid-friendly short, creating time for the little kids to play on the playground in the park across the street (see picture). We picnic'd and then hit China Town. I had expected more culture and less kitsch, but it was nice to walk the street with my brother and sister. We joined the mass quitting-time exodus from downtown SF across the Bay via BART. The underground station and packed train were very different from the trips we'd had thus far, but everyone was polite, and went about their business.

Ca me plaƮt
My brother-in-law and sister hired a French chef to cater a celebration dinner at their house in Berkeley. Having never really had French food, I didn't really know what to expect. Wow. I've been ruined for red meat now. I don't know what it was called or how it was prepared, but we were cutting through rare steak with butter knives, the flavor popping and the meat melting in our mouths. Absolutely incredible. It was paired with simple vegetables and tiny potatoes, seeming almost like a simple country dish. Fantastique!

Walkabout
After eating far too well the night before, Boo and I chose to double-down and hit a local brunch place for breakfast the following morning. Unlike all of the storefronts along Market Street, none the handful of cafe's along Solano Avenue in Albany CA claimed to have the city's best breakfast. Yelp led to Bistro 1491 and Sunny Side Up. The Bistro didn't seem casual enough, so we slid into a window-side table at Sunny Side Up. We could have split a single breakfast, the portions were so big, but they were good. It felt very Portland; very chill and real with a mix of folks ranging in age and demographic. We routed my out-of-town sister and brother to go the following morning and they loved it too. Boo and I spent the rest of our final full day in the Bay walking the shops along Solano Ave, enjoying the sunshine and the sense of real free time.

Homeward
Our final day started with a flurry of get-out-of-the-house activity. With so many folks sharing one house, it was actually less chaotic than it could have been. Still, we had time for 3 pots of coffee, and conversation before we checked out. We ended our stay back at my sister's house on her sunny back deck listening to the birds before grabbing a final ice cream at iScream. Yummy.

The drive to SFO was longer and more heavily traffic'd than expected, including the "departure" curb at the airport. So, we arrived at the terminal a little more stressed than we'd like. Unlike the flight down, Boo and I were helping my folks get home too, so that added some pressure too. Once their bags were checked and my mom in an airport-approved wheelchair, they whistled through security. Boo and I made it through okay, but not nearly as easily as our last few flights. We dashed for the gate and bought some plastic-sealed sandwiches for dinner on the flight home.

PDX airport was its typical smooth go. We left the folks at baggage claim while we shuttled to the economy lot. By the time we got back, they had their bags and were ready at the curb. Home bound within 30 minutes after the plane touched down and walking in our front door 60 minutes later (after routing through the close-in East side) was way better than I could have expected. Overall, it was a great trip. Boo and I are already planning our next one, but it may happen before the Hootenanny.

That's it for today. Thanks for following along. More sanding and paint-related tales next time-