Showing posts with label card. Show all posts

Tuesday, June 21, 2022

Interior Carded

Once the headbanger was installed, getting the interior to a usable state was a downhill run. This post is really more a collection of all the little things that got done so we could hit the road. So, for today, "complete" means "good enough for this Summer"; it does not mean we're done. I will be picking this up once camping season comes to an end in October. Before I begin, Hapy Summer Solstice.

Cab Floor Complete
I had left some of the MLV splits un-taped. So, I started with that. I discovered that the Jute and MLV was too wide between the outer edges of the seat rails and the doors to allow them to close easily, so I trimmed them down. Then, the edges were taped down.

Sun Visors
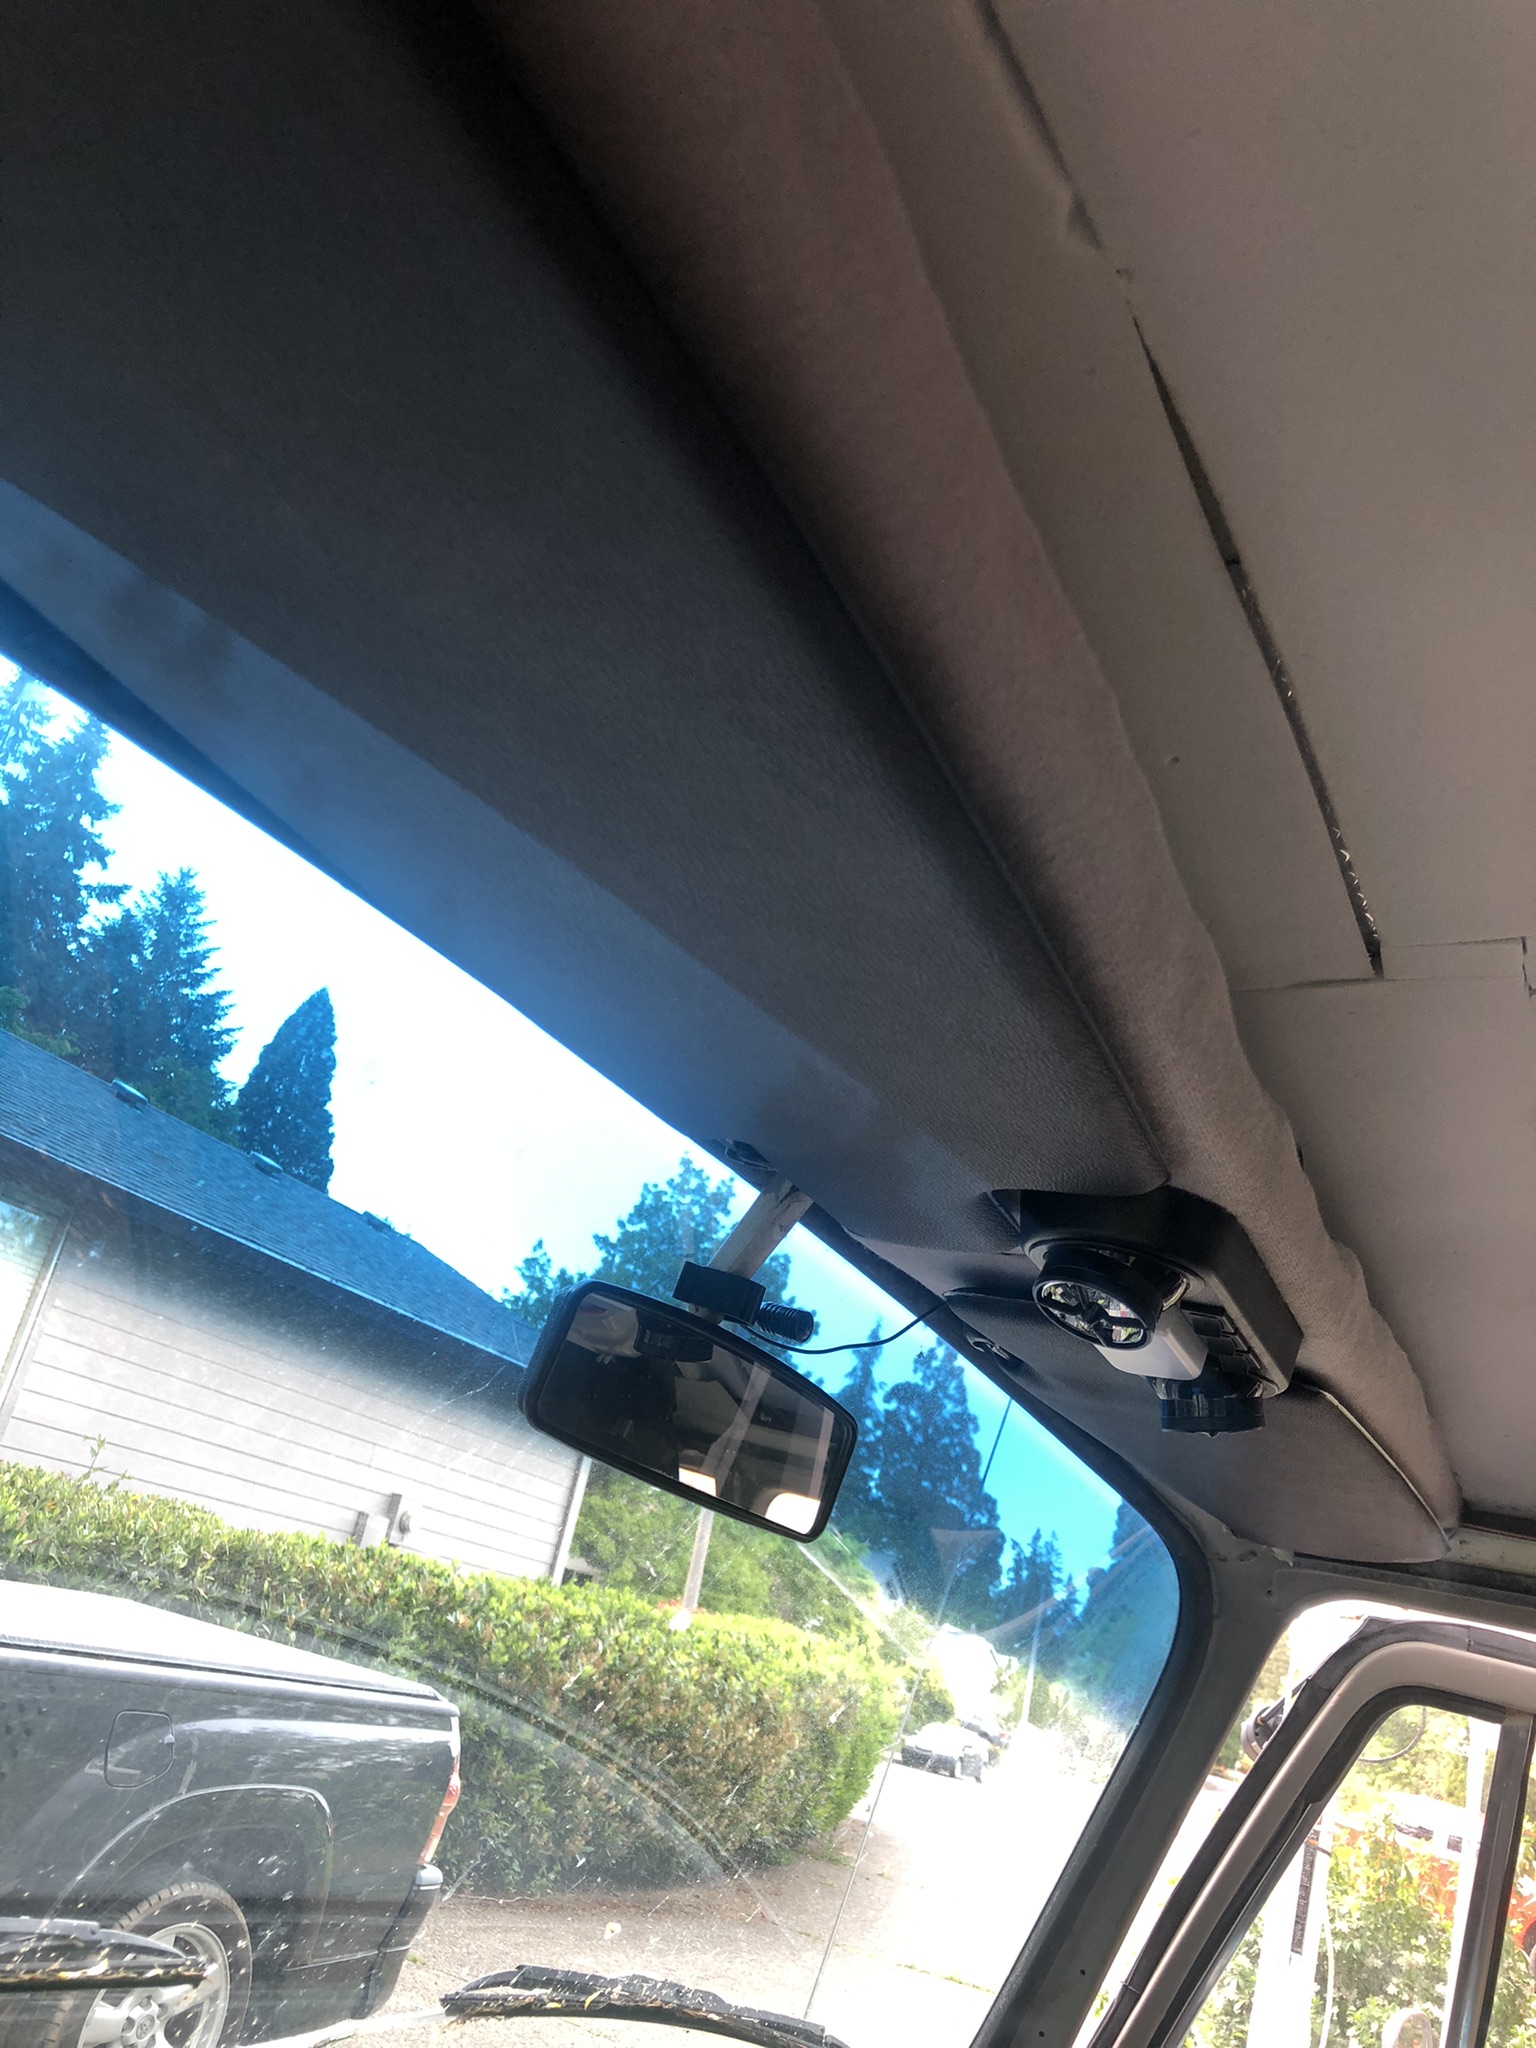
sun visors in
One of the upsides to the new shelf was the potential addition of sun-visors. The visors that are on the market these days are not the same as the ones I removed; that could be a reflection of my old visors, however. These new ones are shaped differently, with a pop-out on the end that is designed to go behind / around the mirror, and the little stick on the end that is supposed to go into the little keeper near the mirror is therefore much shorter. So, if I was looking for a direct-replacement, these would NOT have fit properly, but, again, it is entirely possible that the PO installed bug visors or something way back when. The mounting base near the A-pillar is the same. I re-tapped the holes, knowing at least one, if not all of them, had metal screws instead of bolts at one time before. I threaded M4 Phillips bolts in to hold the visors. I attached the little keeper thing to the underside of the shelf. So, the visor, when not in use, tucks flat to the underside of the shelf. It turned out that the weird shape of the visor allowed it to almost wrap around the light fixture, looking like it was designed for that install. Sometimes, its just better to be lucky than good.

Cab Door Cards
cab cards nearly complete
Recall, my old door cards were falling apart cardboard. There's a cat in Arizona named Werksberg who makes door cards out of PVC, and I ordered a set last Fall (his TheSamba ad). Apparently, his costs are skyrocketing so if you want some of these and have been sitting on the fence, you might get priced out if you don't make a decision soon. Anyway, I was finally ready to install the fronts. Unlike the original cards which need to be installed with metal clips into little rubber boots, these cards deliver with small plastic molly's which press through the card into the original holes. They appear re-usable. We'll see. The driver door card is not staying put, even after adding double-sided tape so I may need to add screws.

When I removed the original-to-me cards, I removed the little door vent things. I set them in my trove of parts and did not install them when I put on the cardboard cards. I put them on this time. The door looks much more finished now, as you can see in the picture above-right, here. The rest of the card install is the same as original. The window crank removes / installs with a Phillips screwdriver. As does the chrome door latch mechanism and the door pull strap. Once installed, the door looks so much better than it did. I have not decided if I will apply the thin closed cell foam or not, but I am not doing it for now.

Kicks
partitions and mid-walls carded
The last thing I got after in the cab was the re-install of the kick panels. With the new flooring and 4-1/2" speakers, this was not as simple as before. Still, I found by setting the outer edge and then bending the card, I could get it pretty much where I wanted it. I pulled the jute and MLV up, allowing the card to sit on the floor. I could remove them, and cut off the lower 1/2" so they sit on top instead. Meh. Something to think about as we drive around this summer.

Slider Door
Moving rearward, I pulled the middle row seat out and the original-to-me slider door card. The slider had not gotten much treatment over the years, so it got CLD and 2 layers of Mega Zorbe. I thought the extra layer might reduce the racket when the door opens. It didn't at first. I spent some time with oil & grease cleaner working on the door runners, and that actually helped a little bit. The lower door roller is the source of the lion's share of the noise and noticed that the outer edge of the runner was a simple 1/4" tall thin bit of steel. So, I ran some leftover white "U" seal I had from doing the luggage rack to see if that would help. Nope. It effectively pressed the wheel against the inner steel track edge, causing it to make a different, but equally unpleasant, noise. I concluded the wheel was the noise-creator, and I ordered a replacement lower guide with a vinyl wheel, instead of steel.
rear tail gate carded

There are 2 bolts and one Allen-screw holding the guide to the door. The bolts on the old guide were so rusted, they broke off, leaving me with just an Allen-bolt holding the guide in place. I will periodically shoot those rusted bolts with penetrant, and when I am able to remove them, I will use M6 bolts in their place. I will apply anti-seize, though. With the new lower guide in, the door was quieter, and operated more smoothly, but the upper guide was making noticeable noise now. So, I removed it, and improved it with penetrating oil until the guide-wheel would easily spin between my fingers. I re-installed it, and now the door was as quiet as a modern slider.

More Cards
I had some daylight remaining, so I grabbed the door card for the slider, and installed it. I also installed the card for the wall opposite the slider, and installed it. I did the rear tail gate and the extra cards for the rear-facing partitions behind the front seats. Each of these took some fiddling to get right, but that was on account of Hapy, not because of the cards. These things are great; the holes are mostly in the exactly right spots and the bag of Mollys had more than enough fasteners for me to damage a bunch of them and still not run out. I believe I can fit more sound deadener between the partition cards and the partition, and I may need some foam to reduce vibration noise, but right now, the interior of the bus looks really good. Removing those cards to add noise deadener will be simple when /if  I choose to do it.

I have a couple of cards remaining to be installed along the seat pedestals and I'll do them as the mood strikes / time permits. For those keeping track at home, I have installed the panels which sit at either end of the rock-n-roll bed, arching over the rear wheel wells, and have I attached the panels that cover the bare steel in the sleeping area. Because the sleeping area cards abut the rear-wheel cards, I needed to do them in the right order. As you can see in the image on the right, here, these cards, when used together, make a nearly seamless span. Boo and I will especially appreciate the sleeping area cards when we're camping. There are few things as jar-awake as having some bare skin touch up against the metal side after it has cooled down overnight. That is some quick-awakening. While this plastic / PVC will not be a great deal better, it does create a foundation for some foam and then some fabric later.

At this point, I felt ready for a test flight. I'll post on that next time. Thanks, as always, for following along-

Tuesday, March 2, 2021

MGB Interior Panels - Part 2

Today, I continue on Oliver's (the MGB) interior because the weather remained a preventative from getting to the cars outside. Darn, have to work in the semi-heated garage.

High-Level Door Card
black door now out of place
By now, the door cards were looking completely out of place, as the only remaining all-black panels. These are a little more complicated than the front kick and rear quarter panels. First, there is a top padded section which holds the top of the door card in place. The padded section is held on by 4 screws (2 each front and rear) and is wrapped with black vinyl. The interior kit delivers with a section of cream-colored vinyl to replace it. Additionally complicating things, there are the window crank, and the door latch pull and lock. In my case, I removed the armrests shortly after buying Oliver, but there is the old blown speaker. Last, each door card is held to the door with 13 plastic clips. Since these are original 1978 plastic, I suggest having replacements on hand. The interior kit did not include these, but they are, like $0.50 each or less online.
 
I didn't take a picture of the driver card before I started, so here's a picture of the passenger side, from the open driver door. I leave that towel on the driver seat so I don't accidentally get grease or anything on there while I work on him. You may also notice I have omitted the center console. I think the interior looks less complicated this way and the console acts like a little wall between the driver and passenger, which neither Boo nor I liked. Either way, there's no place to put a beverage. I may solve for that one day.
 
Padded Section Reuse
after polishing
I considered re-covering the padded section along the top, but after removing it (4 Phillips screws), I decided not to. First, the wood inside the padding is starting to fail (see picture below). It's not totally bad, but bad enough to warrant replacing eventually. I figured that if I used the cream on that now, I would not have it when I replaced the wood. Second, the black vinyl, while also not perfect, could get cleaned up with some leather cleaner. Last, I already had a cream and black contracting interior so retaining the black long the top would help underscore that. Ultimately, I believe retaining the black just for that contrast reason was plenty of justification. I think it looks really good.

So, I cleaned the rust off the chrome ends with some Goof-Off, and polished the vinyl with leather cleaner. The window felt was fairly worm out, so I removed it with a slotted screw-driver. Rather than use a staple gun to install the new one, I used 5/8 inch #18 brads. When installing these, you will notice that the chrome/felt does not go all the way from the front rubber seal (sealing the flip-out window) to the rear-most point on the window. I taped the felt to the padded section with painter tape and held the unit against the door, shifting the felt side to side until it was where I liked it. Then, I sent half a dozen brads in to hold it firm.
 
Removing Rusted On Window Crank
backside of padded section
As easy as it was to remove the padded section, removing the window crank was the opposite. The Phillips head screw had fully rusted to the mechanism. I applied Kroil and let it set, but it couldn't effectively penetrate past the window crank. I had to resort to my set of "easy out's". I find these are neither easy, nor do they really get the stuck bolt out (could be user-error), but in this case they did what I needed. After stepping up the drill bit size a few times, the head of the bolt fell off and the window crank handle could be removed. Once out of the way, I just needed to pull the plastic retainers from around the door handle and the door card came right off. I removed the remainder of the bolt from the window crank with a big set of lock-pliers. While I had the Kroil in-hand, I lubricated the various moving parts of the window: the window control joints and the spring. Surprisingly, this reduced some of the clank-clank-clank noise when the window is raised and lowered.
 
Outer Scraper
torn down
The last bit of demo was removing the old outer scraper. This is that supposed-to-be pliable rubber that presses against the outside of your window, stripping off water, mist or fog when you roll down the window. More importantly, it reduces rain water from running to trickling into your door. My scrapers were hard and chipped, so they needed replacing. They are held to the inside of the door with 7 rivets. I set a slotted screw-driver blade against the rivet and smacked the handle with a hammer. The rivets pop right off, but the bits fall inside your door. Once free, the new scraper lines right up with the original holes, though on the very end there are a few different mounting holes, probably for use on different models. I needed to open the holes a little bit with a rat-tail file in order for the new rivet to easily fit through.

To mount, I set all of the rivets through the scraper and loosely set them into the holes in the door. With my riveter, I started on the ends, working my way towards the center. With each rivet, I would make sure that the rubber set up on top of the door, and did not disappear underneath / inside. I found that I had to press the riveter and the scraper hard against the door when pulling the trigger. With the scraper riveted in place, I checked the window action.
 
Noise Muffler
window crank and spring
With the scraper in, I cleaned up the inside of the door first with the shop-vac and then with spray cleaner. With the door cavity relatively clean, I applied some noise deadener. I realize this is a convertible, so there will always be noise. The door application is really about making the door sound solid when it closes rather than tiny and clanky. It doesn't take much to make a difference. I have read that as little as 50% steel coverage is sufficient. I am not sure I even got that much covered, though the door has a satisfying, solid "chunk" when it closes now. I ran a 4-inch tall strip from the outer rear view mirror to the door handle above the belt line (inside the door cavity, of course, but against the outer skin). Below, there are 2 front-to-back channels to which I applied 1-inch strips from the window regulator to the rear edge of the window. Below the channels, I applied a rectangle along the lower rear section. I found that the spring clank-clank-clank could be felt most on the steel directly beneath it on the inner skin, so I put a 4-inch square inside the door cavity on that section of steel. All sections were pressed down with the little roller application tool for a solid bond.
 
Plastic Sheeting
Originally, these doors had a vapor barrier. This door, however, did not, except for the small sections around the door handle and window crank. So, I made one out of a kitchen garbage bag. If I had thicker-mil plastic, I would have used that, but these bags are hard to cut, so I don't expect this to fail. I cut the bag so I could completely cover the door, and taped it in place with painter tape. With a Sharpie, I marked where I wanted the vapor barrier and then cut along the line. Since my furnace is in my garage, my options for adhesive were limited. I would have used spray adhesive or the brush-able epoxy, but both need ventilation and are explosive hazards. So, instead, I used Elmers Wood Glue. Yes, that's right: wood glue. It took longer to dry, but it held the plastic firm during the panel install. While it dried, I cut holes for the door latch and the window crank. I have found that applying adhesive on vertical angles creates a path for water droplets to follow if/when it gets between the plastic and the steel. On other words, don't apply adhesive straight across: it will only trap moisture against the door.

Panel Install
home-made vapor barrier
I could feel the end approaching. With the holes cut in the sheet, it was time to prepare the panel with the 13 clips. The card has 13 very obvious spots for the clips. They are shaped like a classic 2-ball snowman: large circle on top of a smaller circle. The clip slips into the larger circle and is then pressed into the smaller one. I could have re-used some of the clips from the original door, but after over 40 years, I was not sure they would not break during install, or shortly thereafter. With the clips in, the hole for the window crank needs to be cut next. Similar to the rear-quarter panels, the door card shows exactly where the hole needs to be. Unlike the holes for the rear quarter panel, though, the window crank hole needs to be cut almost all the way out to the hard-board edged circle. Also, the leather/vinyl has a padded backing that needs to be cut through.

I decided to not include the arm rest / door pull and I am not putting speakers back into the doors so this one hole was the only one I needed to cut. This greatly simplifies the look of the door card (see picture below), and even with the extra bounce from the thicker card, I can pull the door firmly shut simply from pulling on the padded section. The card did arrive with indications for both the arm rest and the speaker mounting locations, though.

With the hole cut and the clips in, I was ready to press it in. I started by aligning the bottom clips with the holes along the bottom of the door. Then, I clicked in the clip nearest the rear view mirror and then worked my way around, snapping the card into place. I trimmed and cleaned up the hole for the window crank (I had cut too conservatively beforehand) and then installed the crank. I again tested the window action.

Padded Section Install
so pretty
Last, the padded top goes back on. The new cards are more stiff and thicker than the ones that were just removed. It will be some time before these new cards settle in, and the original screws for the padded section were not long enough to bridge the gap, initially. So, I found a screw in my drawers that matched the thickness of the original screws, but was about 3/4-inch long. I set it aside for a moment and attached the front-edge of the padded section with the original (smaller pair) screws. I left them plenty loose so I could adjust and then grabbed that long screw. I sent it through the lower of the 2 holes in the rear mount and tightened until I could send one of the original rear screws into the door and have it grab. I checked the alignment and then snugged that original bolt. I pulled the long screw and sent the other original rear screw in. Last, I tightened the front mount screws.

Feeling quite satisfied, I shut the door... and it bounced back open. Ah yes, the cards are thicker. I closed the door hard and it held. I figure it will take some time for the rubber in the weather-seal and the door card to come to terms with one another. To help speed that, I will leave the door shut tight. Of course, the not-dry-nor-warm weather outside will help that door stay shut for a while.

Well, that's it for today. I need to do the other door, of course, but with the passenger door so close to the shelves in the garage, it will wait. Until then, well, I'll have to find other things to fix on the fleet. Like the clutch on Gramps, the rear wheel bearings on Nemo or maybe something I haven't discovered yet. We will see. As always, thanks for following along-

******

surround bits
UPDATE: I did the passenger door this past weekend (5-June), following these instructions. I had 2 additional observations. First, the replacement inner door felt scraper is about 1/2" shorter than the original. The missing 1/2" on my original did not have any felt left, and it was the section closest to the door handle, up against the chrome end. Second, I omitted the last step in the instruction above regarding the 2-piece plastic rounded-cornered rectangle that goes around the inner door pull. These are thin, and could be damaged upon removal. Fortunately, my old vinyl cards were not holding on too tightly, and they removed with ease. The top part slid right off, simply by pulling up. Once removed, the bottom came out easily.

Installing the Plastic Inner Door Pull Surround
I found the install to be much more difficult. The new vinyl has much more grip than the old vinyl. Also, the card wants to be flat, so there is natural pressure away from the curvature of the door. The plastic bits had 4 little bumps (one on each short side and 2 along the longer side) that need to get under the door pull. After multiple failed attempts, I found success. Starting with the bottom piece, I got the plastic wet. I set the 2 short sides on either side, below the pull, and while pressing against the card with one hand, pressed upwards on the corresponding corner of the surround. I moved from side to side, moving it a little at a time until the bottom edge clicked in.

halfway there
The top piece was harder to manage, in part because my card has a piping strip that runs right along the spot where the plastic bit needs to sit in order to install it using the same method. So, again, I got it wet (reducing friction) and rather than start at the uppermost corner, I lowered the plastic piece so it was just below the piping, with the leading edges on either side of the surround. This placed pressure on the piece, and this is where an original piece could break. With one hand pushing the card against the door, I pressed the little bump under the inner door pull. This was a little scary, but once the second side snapped in, I followed a similar effort of sliding it down a little bit at a time on either side. Eventually, the top and bottom pieces meet, and the cards are complete.

Again, thanks for following along. I hope this last bit helps you out. I found following these instructions really helped me out when I went after the second door.
Tuesday, February 23, 2021

MGB Interior Panels - Part 1

I spent a great deal of time working on Zed's body. Before and after that, I spent even more time on Hapy, with the wiring (both the re-wire and the P0121 code), the furnace and the heater. Around those efforts, I picked up and improved upon T's old Audi, Nemo. Today, I took a break from those other cars to return to Oliver, the 1978 MGB, to complete some interior things I had left undone. I was going to get after Nemo's rear wheel bearings, but honestly, I just want something in the warm garage and Oliver is the only car in a garage, so... off we go into another multi-part post.

Where Were We
Recall that I blew some manna-from-heaven on an interior refresh for Oliver two years ago (See New Seat, What a Treat Parts 1, 2, 3 and headrests). I completely restored his seats, replacing all of the foam and the covers. Out with the old black vinyl and in with new cream with black piping leather. The lighter color is really nice when the sun is super intense, like in the early Summer here. I put in seat-heating elements, but haven't wired them in yet. Instead, I focused on summer-supporting stuff, like the new stereo. This new stereo included front speakers attached to contoured plastic boxes mounted to the outer footwell sidewall (See MGB Gets Sound, Version 2), but the kick panels were not there, so I started with those.

Kick Panels
creating kick-panel pattern
The kick panels compliment the seats in that they are the same cream color. When I ordered these, I appear to have selected the option to include map pockets, which I guess are okay, but with the little speaker boxes, will not be terribly useful. Anyway, in order to pierce the kick panels in the exact right spot so I can mount the speaker boxes, I pulled a paper shopping bag and some cardboard out of the recycling. I traced the kick panel onto the paper and cut out the pattern. I removed the speaker box from the driver-side sidewall, set the paper against in it's place and found the mounting holes with a small nail. I transferred the holes onto cardboard to test the location, and they were a little off. So, I pushed the nails around until they were in the holes well and tried again. They were still a little off, but the third time they were perfect. I transferred the holes onto the rear of the kick panel and drove the nails through from behind with a framing hammer. I set the soft cream material onto a shop towel and set that on top of an old kitchen cabinet door so the nail could pierce without damaging the panel.

speaker box
attached to p-side panel
After presenting the speaker box to the panel, and pressing the mounting screws into their respective holes, I drove the screws into the panel and then held the pair against the side of the car. I needed to position the panel around things, so this actually happened more along the lines of... in, then out, then in then out a few times until the panel was tight against the leading edge of the door weather stripping, the holes were aligned and the screws were lightly threaded in. I verified the routing of the speaker wire and then set the screws all the way in into the speaker box was snug, but not overly compressing the panel. I re-mounted the speaker and turned to the passenger side. I followed was the same process, down to the multiple sheets of cardboard. Since there are fewer obstacles on the passenger side, it was easier, but only barely because I did the whole thing leaning across the transmission tunnel from the driver seat. I could still feel my ribs 2 days later, but they really look good. Pain is temporary; beautiful clean kick panels... well, they're kind of temporary too. Just not quite as temporary, I hope.

Rear Quarters
With the kick panels in, the door panels look that much more black. And wrong. So, I really needed to keep going, but I thought I would do the doors themselves last. There are 2 triangular-ish panels that sit just aft of the seats with the rear-most edge following the contour of the front of the rear tire well. So, I call these quarter panels; I'm sure they have another name, though. I thought they would be easier than the door cards, and with the location of the car so close to the wall on the passenger side, I'm not sure how I will get to the passenger door anyway.

ideal top orientation
to hit all 3 bolt heads
These need to fit under the convertible top mounts, but otherwise their positioning is fairly straightforward. The 3 bolt/screws are partially obstructed by the convertible top frame. So you cannot just lower the convertible top to remove the 3 bolts that hold the mount to the car. You can remove one, but to get to the other 2, the top needs to be partly open. This is where an extra hand is very helpful. I didn't have one, so I tried doing just the driver side first. I started by opening the top so it was sticking almost straight up. This exposed or unobstructed all 3 bolt heads.

When I removed the the rear-most bolt/screw on the driver side, the capture-nut inside the B-pillar fell off (30 year old weld failed). Also, one of the hinge-points on the passenger-side of my convertible top frame separated. The capture nut is easy: they are sold on Moss for around $18US. For the hinge-split, I literally held the pin where it was supposed to go and forced the pieces back together with channel-lock pliers. I looked around for repair kits or something, but I was unable to find anything. At this point, though, it is working.

To get a sense of the work, I did complete both sides (using only 2 screws/bolts on the driver side), one at a time, leaving the other side firmly attached. With the convertible top frame up, just like it is pictured above, remove the 3 bolts/screws. I completely removed one, and then moved back and forth on the other two, slowly removing them. With the frame lightly held in place, I shifted focus onto the panels.
 
The Doing
I tried 2 different approaches, and found the second approach works better. First, I tried to poke a tiny hole in the panel for each of the 3 bolts to pass through and then widened the hole with something so the screw/bolt can thread in without catching vinyl/leather on its way. Take care not to make it so large, however, that it is larger than the frame hole supports. On the passenger side, I used a razor knife to cut a small "X" for each of the 3 holes. Either way, set the panel nearby, and get yourself seated on the parcel shelf at the rear of the passenger area.

I completed the removing of the 2 final bolts while holding the frame steady with my head. Yeah, that's right. This is where having a helper would be very helpful. With the frame held steady (either with your head or by a helper), lift the mount up just enough to get the card in place. I set the rear-most corner in first, and then flexed the card to press the leading edge behind the weatherstripping. The holes for the frame will line right up, but I checked with a bolt to make sure first. Then, I lowered the frame down into place (optional tonneau cover mount held firmly against the top frame), and sent a bolt through, threading into the nut. With one fingered in, I sent the other two in, and then moved from bolt to bolt until they were all snug.

At this point, I have both of the front panels and both of the rear panels in. The doors are a little more complicated since the glass-scrapers need to be replaced, and the old cards are still in. Since the weather around here has been below freezing and wet (ice, freezing rain, sleet and snow), I will be continuing to play with Oliver since he is in the semi-heated garage until the weather changes.This means that my next post will probably include some work on the driver-side door card. The passenger side is trapped against a shelving unit, so I probably will not be getting to it for a while.
 
As always, thanks for following along-