Showing posts with label speed sensor. Show all posts

Tuesday, January 14, 2020

TDI install retrospective: Secondary Electrical

Continuing the process of back-documenting what I did to put a TDI engine into an old (1972) air-cooled VW bus. Today I cover what I call the "secondary electrical". This includes everything that isn't responsible for the alternator:battery:starter system. So, this is the radiator fans, the accelerator pedal, the OBD-II plug by the driver seat and any other miscellaneous stuff I can think of.

This is the first post following the announcement of Neil Peart's death, and I can't let it pass without expressing my heart-felt loss. I love Rush and wish Getty and Alex my deepest condolences. With 2112 blasting in my ears, and "with hungry mind and open eyes"... we return to the TDI retrospective.

Random Cables
Beyond the core primary cables, there are a few thicker wires that need to be run between the relay bank and the battery-top fuses. For these, I found wire of the same thickness, and ran them through the hole in the spare tire well, along the top of the rear engine hatch to the battery-top fuse box. This pathway became fairly well used for sending wiring from the computer to the sensors and senders around the engine. To enable that, I expanded the hole from a tiny drip opening to a 1 inch by 2 inch rectangle.

Cooling Fans Circuit
old NB pedal on left, brake switch on right
I had originally tried to re-use the TDI-stock thick relay and control module to control the radiator fans. That was a mess, and didn't work, so I ripped it all out. Instead, I used one of the small battery-top fused circuits for a power source and a switch on the dash to trigger the fans. The switch went into a hole in the metal dashboard that had not been exposed through the vinyl cover, right next to the ashtray. It receives power from an always-on source so I can cool the radiator even when the engine is off. It triggers a standard relay mounted next to the radiator on the passenger side. When triggered, the 12V from the battery-top fused circuit sends 12V to the radiator fans and the little fan on the inter-cooler. This is a simple circuit, but I have found that long bumpy road trips cause the clips to slowly shake off the relay. So, I may need to put a dab of threadlock on there to stop that.

Accelerator Pedal
new pedal
I originally used the accelerator pedal from the NewBeetle (NB). This was a one-year-only part, so when it eventually failed I had to either pay a few hundred dollars for a replacement or swap it out for the more common pedal. The challenge with the more common pedal was that the rheostat was integrated into the pedal body, so I couldn't hide it like I had hidden the NB pedal. The NB pedal had been stowed inside the belly pan, and allowed me to continue to use the original bus pedal. The integrated housing style pedal meant that the entire pedal would be changed, and it would need a support. I still don't like the final look, but it places the pedal in the right spot for my foot, and it drives correctly. The wiring was fairly easy. There are 6 wires attached to a flat pigtail. I extended the wires and ran the 6-wire bundle under the bus from front-to-back, arriving in the spare tire well, and wired into the computer where the pedal originally wired in. I believe I used wires that were just a bit too thin, because I get sporadic limp-mode issues from lack of signal from the accelerator pedal. See Pedal on the Right for details on the install.

Brake Pedal
NOT USED. If you intend to use cruise control, the computer needs to know when the brake pedal has been depressed. I thought about tying into the brake warning system or putting the sensor on the master cylinder. Ultimately, I made a little bracket on the arm of the brake pedal and the switch triggers when I step on the brake. I don't use cruise control, so I've kind of forgotten about this pedal. 10 years later, this may not work at all, so be advised, this may not be a viable solution. You can see a picture of my switch above. No, it isn't pretty, but at the time it was functional.

Fuel Level
NOT DONE. The range of allowed values for the fuel level gauge in the bus is quite different from the range for the TDI. If you want to swap out the original sender, I found one that would work at Summit Racing. I had thought about building a circuit which would translate the reading on the stock sender into the range accepted by the TDI computer, but I shifted onto other things. My thought was that the original gauge could still work, or I could reference what the computer thinks. I may still do this, or just buy something that does it, like the SN34 from Classic Instruments. For now, I am using the stock level sender and gauge; the computer has no idea how much fuel we have. Most of the time, I don't either.

Speed Sensor
NOT DONE. There are a few ways to go after this. I started down a few paths and decided that I didn't need for the computer to know how fast I was going, so I stopped working on it. My first stop was to try to adapt the vehicle speed sensor (VSS) from the TDI. I couldn't figure that out. So, then I looked into getting something that fit between the dash and the speedometer cable. This looks especially promising as there is a company in Britain (RJ Engineered Solutions, VSS link here) that makes a thread-in plug that fits into the back of the speedometer that the cable threads into. It produces a square wave the computer can understand. While writing this post, I ordered one so I could complete the experiment later. I'll post about my findings once I have some. Since I first investigated this, there are more plug-in options (like Dakota Digital), so you may find something that better suits your project than the RJES solution. The last option is to build your own Hall Effect (or other) sensor. Whichever way you go, Dakota Digital also offers a small magic box (SGI-5E Universal Signal Interface Unit) that can adjust the signal from the sensor to the ECU so you can account for a signal mismatch or simply because you got bigger tires... like I did.

OBD-II
UltraGauge
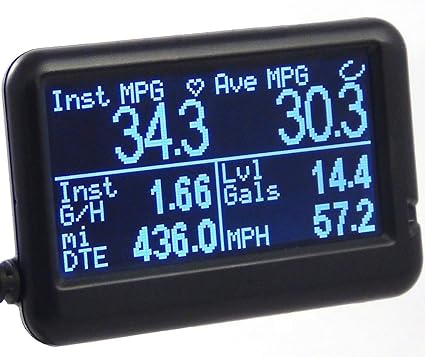
Since I decided against retrofitting the Beetle dash-pod into the dash of the bus, I still needed some engine monitoring. The old bus had 2 lights for monitoring: one to tell you you're out of oil so your engine is toasted and the other to tell you your electrical is shot. Ultimately, your warning system is your ears. Good thing the radio is so lousy, or not there, so you can hear the clamor from the engine bay. That model doesn't work for the TDI: you can't hear a coolant leak or overheating, and by the time you hear the result of the failure, it's too late. So, I extended the signal wire from the OBD-II plug from the rear of the bus to the front by the gearshift. I got a generic OBD-II plug off eBay (it's new, I just avoid Azn) that only had 3 wires: 12V power, ground and signal. The first 2 were easy, wired the 12V to a switched circuit (15) and grounded against the dash. For the signal, I traced the signal wire on the generic and determined which wire from the stock plug matched it. I know that sounds improbable, but it totally worked. Back then, there weren't the BlueTooth OBD-II readers around today. I got a wired one (UltraGauge) for around $80US that's about 1.5 inches tall and maybe 2.5 inches wide that I have jammed into the corner where the dash meets the driver-side A-pillar. I set the screen to show me engine temp and RPM's so I can watch the 2 things I care most about. I love/hate that thing. The longer I go without a coolant temperature issue, the more I realize just how much that $80 gadget saved my engine.

Along the way, I got a ScanTool OBDLink LX thinking I would integrate a more sophisticated graphical dashboard. It is pretty clever, and with a small tablet, a fuller engine monitoring capability is there for the taking. For me, it doesn't make sense until I have the fuel level and speed getting sent to the computer, so the tablet dash will wait.

Heater Fan
I had heat, but when I had my ignition fire, I removed the electrical parts to reduce the load on the circuits up front. If you intend to wire fans for heat, I suggest you find a strong source of 12V power and use an isolated circuit for it. I would just check the power draw for your fans and plan accordingly. You don't want to blow an important fuse because you kicked the fans onto high. I know I will be doing something to restore a defroster at least. I will probably source power from the battery-top fuses rather than the original bus fuse box and then use a new switch rather than the original Vanagon rear-seat heater switch. Because I already have it in-hand, I will probably re-use the Vanagon rear-seat heater unit, though. I'll just need to figure out where to locate it closer to the front of the bus without appearing in the passenger compartment.

Un-Rat-Nest Wiring
I have done this a few times and still need to do more. Unlike all of the other things on this project, this one is most like cleaning your shop or going to the dentist: you never feel like it, but you're so grateful you did afterwards. The original harnesses are not length-appropriate for this application. Along the way, we extended the ones we needed to extend. This step is about shortening all the others so you don't have a big old rat's nest of wire. I have sourced a relay block to re-route all of the relays, and I will be mounting the TDI fusebox as well as tidying up the wiring so it looks like it was all done on purpose. As of now, however, I have only removed the extra wires that were not needed.

There are quite a few wires running from the engine or computer to the front of the bus, but they can be isolated into clumps based on purpose. Accelerator pedal (6), brake pedal (2), ignition (2), OBD-II (1) and the fan switch (1)... so 12 wires. All of them are relatively thin, like 18ga or smaller, because they just send signals, and don't push power. Arguably, all of them could run through one cable of multi-colored wires (like this). If I were to start from scratch, that's probably how I would do it. In fact, I may re-do it anyway and eliminate the occasional signal loss from the accelerator pedal to ECU. If you include the speed sensor and fuel level sender, you will need more than 12 wires, so maybe something like this instead.

Prior related posts:
Preparation
Fuel System
Physical Mounting
Vacuum System
Air, Inter-cooler and Exhaust
Primary Electrical
Cooling

Next related posts:
ECU, dashpod and Sensors

Tuesday, December 19, 2017

Dashing Thoughts

Today's post is just musings about how to improve my visibility into the health / well being of the diesel engine pushing the VW bus without retrofitting a NewBeetle or MK-IV Jetta instrument panel into the spot where the current original dash lives. This is actually all related, though it may seem a little scattered. I blame the holiday season.

Speed
With a planned change in tire size, the speedometer will no longer be accurate. It's really more of a guide as it is. I know there are converter bits that can be attached to the cable to gear up and down, but I'm not really sure how well those work. There's the option of doing surgery on the speedo, like this page here suggests, but that's a little scary. Still, if I want the original speedo to show the right speed after putting larger tires on, is does read like a viable alternative.

I could figure out a means of getting the speed from a Hall-effect sender. These are basically a magnet on the rotating wheel and a magnet sensor picking up the magnetic field as it passes. This signal is effectively a square wave that an electronic speedo can interpret. OR, the computer could know how fast I'm going, if I route the signal to the ECU. But, I'd still see the old needle on the original dash, showing the wrong speed. I like the idea of being able to keep the original dash operational so I may need to do something to the original speedo no matter what I do about the ECU.

Fuel
I am currently unable to determine how much fuel is in the tank. I tried swapping out the fuel gauge when I thought I had confirmed the sender was good, but that didn't work. So, I have to consider that the fuel sender has failed. If replaced with a ALH-ranging sender, the computer would know the fuel level. But, that would also mean that the fuel gauge on the original instrument panel wouldn't work. So, maybe I could figure out a way of installing an original sensor in the tank and then splicing a second signal from that, but shift the signal in the second signal to match the modern sensor.
Original VW Bus sensor       TDI
10ohms (full)                          35ohms
75ohms (empty)                    285ohms

If the bus range is 65ohms and the TDI computer expects a 250ohm range. For each ohm change in the sender, I'd need .26 ohms of change. Plus, the floor resistance would need to be increased by 25ohms. I haven't done electrical work like this since high school, but I'm not sure how this would work. In the table below, I've split the target ohm values into 13 5ohm increments from the original bus side. The diff column represents the difference between what the sender would provide and what the TDI gauge would expect. The step increase is the additional amount of resistance needed from the more-full to less-full increment. Nothing is simple.
Bus diff step increase TDI
full 10 25 25 35
15 39.23077 14.23077 54.23077
20 53.46154 39.23077 73.46154
25 67.69231 28.46154 92.69231
30 81.92308 53.46154 111.9231
35 96.15385 42.69231 131.1538
40 110.3846 67.69231 150.3846
45 124.6154 56.92308 169.6154
50 138.8462 81.92308 188.8462
55 153.0769 71.15385 208.0769
60 167.3077 96.15385 227.3077
65 181.5385 85.38462 246.5385
70 195.7692 110.3846 265.7692
empty 75 210 285

Maybe, I could get a converter like the Fuel Gauge Wizard. These are designed to meet this problem for any gauge/sender pair which provides less resistance the fuller the tank and is empty at 500ohms or less. I could splice it in to the original wires so the stock signal is untouched while the new signal goes to the ECU.... hmm... Then, the stock gauge could still read while also informing the ECU to support the digital gauge.

Back to Dashing

If I had solved the fuel and the speed, only the turn signals would remain from the original dash that I'd need to retain. I wonder if there's a way of telling the computer that the turn signal is on....

Continuing down this mental thread, the space available for dash concepts: 13 or 14" across. 5" high. So, fitting a Jetta IV instrument panel (even if I wanted to) wouldn't fit. The one that came from the donor Beetle definitely wouldn't fit. Maybe a tablet could. A typical 7" Android is 19.2cm x 12cm -or- 7.559055" x 4.72441"

Perhaps, if oriented such that the thick "bottom" (or the far right end in the picture here) were set on the outer edges, we could support two screens for a dash.

Seeing that there really isn't an iOS comparable, I looked around for a cheap tablet. $40 gets you a bluetooth enabled, 4GB tablet (link). I couldn't use two of them without modifications to either the vent / heat controls or something else more drastic. Still, its an interesting mental exercise. Maybe it's worth only doing one, covering the blank spot where a tachometer should have been installed stock from the factory (Really VW?, Really?) and most of the speedometer, leaving the cluster with the fuel gauge, turn signals and idiot lights still visible. If the tablet can be easily removed and installed, I could pull the tablet out of the way at will, leaving the stock dash in place. I got one of these tablets just for laughs and the low price comes from the weak battery. Still, this is an interesting idea.

So, assuming the tablet isn't unattractive, how to get the engine computer to tell the tablet what's up? There are a surprising number of tools out there for this, actually. I went and bought this one from scantool. It came with free software for the tablet which I played around with a little bit.

For now, this stuff is sitting in a heap while I consider how I want to address the fuel tank level sender. Ultimately, the sender needs to be replaced, and it makes the most sense to just replace it with an original ohm-range sender. If I want to go further with the ECU stuff, I can do the fuel gauge wizard, build a hall-effect speed sensor and really jump into the electronic dash all while keeping the original functionality.

That's it for this week. Thanks, as always, for following along. With the holidays upon us, and family descending upon us, I may not have much time to post. I am taking some time off, so I'll have some time to generate content of course. I just may not get to telling the stories until some time in January. I appreciate your following, rare comments and more regular emailed thoughts and ideas. Please keep sharing.
Last, if you're in the Portland area and need a place to fix your daily, I'd be hapy to help. You can even use my driveway. Hapy Holidays and Hapy New Year-

Saturday, October 17, 2009

tower finished, enter electrical

Today's post will cover our visit to the Oregon Historical Society's Native Oregonians exhibit, finishing the engine mount tower and some new discoveries on the electrical side. I usually do a couple of hours on Thursdays, but this Thursday I was totally beat, so I swapped this afternoon instead. Here's a picture of the bus with that fancy cover from BusDepot I mentioned in the last post. It has zippered doors for both front doors and on both sides for a slider (UK model has it on the other side). It works great so far. No musty smell, no water. Dandy.

Oregon Historical Society
I had a couple of hours today after returning from checking out the Oregon Historical Society's new Native Oregonians exhibit. The exhibit just opened, and there were native artists on-hand to talk about their work with museum visitors. It was very cool. We learned about how the ceremonial drums are made, and how cooking baskets are used. Of course, there was a large collection of bead work and costuming.

Finishing the Tower
When we got home from the Oregon Historical Society, I got to work on the engine mount tower that Hal has been working on. We agreed that I'd hit it with the grinder the next time I got some time. So, I ground down the "cap" that he welded on at the end of the day last Sunday. I filed on the insides of the uprights where they meet the top and bottom. Finally, I shot it with some blue paint. It should be ready for install tomorrow.

Drive-by-Wire
I mentioned that Hal and I got started on the drive-by-wire last week. I attached a couple of photos of the big resistor. The picture on the right is positioned as if you were looking down through the floor at the top of it. The picture on the left is how it will look from below. It is important to note that we removed more material than we had originally anticipated, so I'm not sure if there's enough left for drilling the holes for mounting. We may have to extend those small silver pieces so we have do. The thing pointing towards the top of the left-hand picture is the "rubber bit" that the accelerator pedal will connect to.

VSS - Vehicle Speed Sensor
I was fortunate enough to find a VSS manufacturer in the Netherlands that was willing to ship one to me here in the states. I got a model 391. Unfortunately, these sensors have the push-on connector and the 1972 VW Transporter has the screw-on kind. I'll be looking into replacing Hapy's speedo cable with one that has a push-on connector -or- figuring out a way of getting the screw-on bit to mate with the push-on VSS. The push-on connector was available in 1981 on the air-cooled vanagon, so it might fit the bus wheel and be long enough to get behind the dash. Time for research.

More after tomorrow's work with Hal. I'm not sure what we'll be working on, but we have the dog bone and the cooling system as well as electrical bits to deal with. I suspect we'll get the engine mount in, and then get the drive-by-wire isntalled. What comes next?