Wednesday, September 9, 2026

Shop Grey Water

Before I get after today's post, I would like to wish my US readers a happy belated Labor Day. I recognize the value our labor unions and those who fought for worker rights have provided those of us who came after. Ironically, I spent Labor Day and the days before shoveling dirt, but that's what today's post is all about. One last thing: Thursday is my son Cedar's 25th birthday. While most folks are looking at Friday to consider the implications of 9/11, 25 years ago, I will be considering the implications of his arrival just a few hours prior (1130PM on 9/10). Happy Birthday, C. 
 
Some History 
ready for the rains
Back when I started my concepts for this shop, I did not have much of a plan other than a spot to put and work on cars. During the initial permitting process (See Building a Shop - Permits), I did not have a plan for water use or even a plan to make a plan for water use like a bathroom or whatever. After the plans got started, and the metal building ordered, I thought about how nice it would be to wash my hands before crossing the yard into the house. And then I thought about how nice it would be to take a leak without tracking whatever was on my boots and then whatever my boots picked up in the yard into the house. I started first with looking at what was possible in terms of tying into existing sewer systems.
 
The shop is a good 35 meters from the back of the house. So, if the main sewer pipe under the house is less than a foot below ground in the crawlspace and the crawlspace is barely below grade overall, I only have less than 50 feet before I run out of elevation. I determine this using the basic formula for waste water management: a pipe must have a pitch of at least 1/4" drop per foot, or 1 inch per 4 feet. If we extrapolate that out to one foot of descent, that's 48 feet before the waste pipe is lying on the ground or being suspended above ground. So, that doesn't work.
 
2 foot deep 2 foot wide channel
Next, I looked at connecting to the sewer running along the adjacent street on the other side of my neighbors. While it is downhill, it would still be a couple hundred feet, and either through one of their yards or right on the property line. Either way, that would require an easement that one or both of them would need to approve and it would tie into the city waste system while my property is not. After all that, I was unable to determine how far underground the city sewer is. I decided it was all just too legally perilous and dropped the while thing.
 
Since these musings were taking place while the permits were getting finalized, I drew in a 2 meter square in the southwest corner where we would not put concrete, and just leave gravel. My thought was we would have a wet room or something if I could figure out the waste management side.
 
Storm Outflow to Bio Swale
trenching
As part of the excavation work for the foundation, I had the Clean Water Services -required storm outflow and a channel from the rear of the building to the outflow dug out. This cost me a few extra hundred bucks and a cherry tree. I then located and had delivered large rocks of the specified size (the finding was NOT easy). This cost me another $1000US. Ultimately, this shop cannot support rain gutters, so I spent multiple weekends last summer digging out and installing French drains to manage the rain water. That system has been working really well, by the way. Anyway, a year later, the permit has been long closed, and I still had a 2 foot deep 2 foot wide channel from the rear of the building to the hole with rocks in it. It can be seen in the foreground of the second picture from the top. When I had the trencher, I took a stab at putting a more direct trench from the hole to the backside of the building where the wet room square was located. This trench was only 4 inches wide, mostly 2 feet deep, but it did not go the full distance due to soft soil gumming up the wheels. The new plan was to put in a floor drain in the "wet room" and run that grey water into the storm outflow, and maybe, eventually, purposefully add plants designed to thrive in a bio swale.
 
More Trenching
bored through
All of this backstory leads me to the antics of this past weekend. I started with a shovel and soon had small hand tools, a post-hole digger and a hoe to work the trench. Unlike the major trench I did for the electrical feed, this 25 foot trench encountered a half dozen large roots. I was able to hand-dig around either side but to get underneath, I used a framing hammer and a steel rod to bore a hole and then used a hand digger to clear it out.
 
I knew that the foundation for the steel building included a 1-foot by 1-foot curb. The rest of the floor was reinforced 4" concrete. The 1-foot, however, set the high-point for the top of the grey water pipe at the edge of the building. Every 4 feet closer to the hole I got, the trench needed to be another inch deeper until at the end, I was 18 inches below level. To determine a consistent relative point from which to measure progress, I laid out a stretch of pipe and used a level, propping up the hole-end to get level. Then, I measured distance and depth from the pipe. It took me a day and a half, but I got the trench dug out, with large openings under the roots through which I could pass a 2" pipe.
 
Surge Tank
surge tank
With the trench set, I wanted to complete the outside steps. I figured I could leave most of the indoors work until after the rains start. Even with a system as tiny as this with such low input (a rarely-used floor drain and maybe a couple of dry sinks), it is advisable to include a surge tank. This is so when a large wave of water enters the system it does not instantly propagate down to the bio swale. This also serves as a place to clean out stuff that made it's way into the drain that you may not want further downstream. I used a 5 gallon bucket for my "tank". Oh, by "dry sink" I mean a sink that does not have any water fed to it. We do not have a county-supplied water source out there, and no plan for one. We could harvest rainwater, but anything like that would not be pressurized water, it would be pure gravity feed, so a "trickle" of water. Alternatively, we could do something with 5 gallon buckets, but, again, it would be a gravity feed trickle.
 
layin pipe
Immediately outside the foundation, I dug a hole large enough to fit the 5 gallon bucket and then realized that I can't just stop there. The pipe that feeds from the shop side needs to be in place too. So, I measured to find the spot where the pipe needed to pass and dug about 18 inches down, and about a foot across inside the shop gravel at the spot I had measured. Then, I tunneled under the foundation with the hand digger. Once I was able to pass a short stretch (about a meter) of 2" pipe between the holes, I located and drilled holes in the bucket for the 2" pipe to enter/exit the bucket. At some point, I figured I would put a bucket on the shop side similar to the surge tank, but this bucket would be intended dry. Inside, would be where I would add a pee-trap, but I'm not sure if this little system would necessarily need one. Something to think about while it's raining.

Piping and Filling
I hit the local home improvement store for a collection of 2" pipe bits, but only really needed another 10' of pipe, a butt joint, something to put on the pipe ends to fill the space between the pipe and the bucket and some pipe cement. With the goodies in hand, I joined together the pipes with cement and after they set (10 minutes), I sent the completed 25' of pipe from the hole up the trench to the bucket outside the shop. I added a collar to that pipe, with cement, and then fit it into the hole in the bucket. To test the system, I poured a gallon of water into the pipe at the bucket and quickly walked down to the other end. Most of the water had already left the pipe by the time I got there, so I took that as success.
 
draining

The rest of Sunday, and part of Monday was spent shoveling dirt from the mound at the foot of the black walnut tree into the grey water trench and the 2 foot deep 2 foot wide channel. With the trenches filled in, the rains can begin and we can feel comfortable that neither we, nor our friends nor our pets will trip and fall into one of the open trenches. We still don't know what we are going to do back there. Maybe we'll let it get overtaken by wild flowers or we'll seed it for grass or we'll put a food producing garden back there or it will just get wood chips. At this point, since it is space we have never used before, we haven't a preconceived notion.

Wrap Up 
As you can see from the image at the top, as compared to some of the others, what was once a hazardous place to walk around has become relatively flat and hazard-free. As I figure out how to make something work inside the shop in terms of a floor drain or a dry sink, I'll post on it. Long term, it would be really nice to have, like, a composting toilet and some low pressure water for washing hands out there. Even that would be pure luxury.
 
That's it for now. Thanks, as always, for following along- 

Thursday, September 3, 2026

A Tale of Two Astras

In my last post, I said I had a relatively long story about a pair of Astras. Today, I'll tell that, and provide an update on K'Lack. I don't have pictures, because, honestly, most of this story isn't mine, and Ang didn't take pictures. She really does not "live thru her phone" like most people. Meaning, she doesn't take and share pictures as she trips through life. She experiences the moment at that moment and then moves on to the next one, living in the now. On to the tale-
 
Astras
I have mentioned Astra a few times. I provided some backstory to how we found her and why the Astra is so important to Ang here (See Moving into Shop). Basically, a Saturn Astra is an Opel Kadett with a new name and Ang's first car was an Opel Kadett. When we were having to use the jump box often, she started to get down on it. Then K'Lack broke and Krista needed a car, so Ang lent her Astra while Ang drove the truck (and I drove Hapy). Krista didn't like Astra very much, and Ang got to thinking about buying a new car that didn't have all of these problems. So, I dipped into craiglist and found... another Astra. This time, it was the top-of-the-line model which had been driven / cared for by someone who really loved this car. Everything worked on it. It had less than 60k miles on it, and then it was ours. I think Ang drove it for about a week before she let Krista borrow it. We had it just long enough to name it Frankie.
 
Astra Heads North
It was around this time that a friend of Angela's (they have known each other since 3rd grade) found herself in a bit of a bind. Her housing of over 25 years was being sold out from under her and she needed to solve for housing in rural western Canada without a car. And so started an odyssey. Ang resolved to getting Astra as functional as possible. That meant getting the alignment done, the tires rotated, the oil changed, filters etc. with a plan to drive to Canada to help her friend. She got a full read-out of everything that was done and every minor thing the tech's found and added that to the file she took to Canada. Soon, her plan to drive there became a plan to drive there and give Astra to her friend. So, in her limited spare time in the evenings she learned how to export a car from the US and did all that paperwork.
 
Ang finished her usual workweek on a Tuesday evening and left from there northward on I-5. Astra drove great and she landed just outside Olympia at a Super8/Motel6 for the night. The following morning, she drove up the Olympic Peninsula and hopped the ferry from Port Angeles to Victoria BC. Prior to leaving, Ang had done all of the vehicle export steps and had her paperwork in order. Unfortunately, her friend had not completed the import paperwork and was not at the border to meet her with that paperwork. So, the importing would need to take place in Nanaimo. Apparently because her paperwork was not in order, Ang was waved into the deep customs inspection area where they disassembled parts of the car and re-installed things. This included, for some reason, removing the wheels and putting them back on. Undeterred, Ang drove north on the Canada1, finding a motel just outside Victoria. The next day, she completed the drive north past Nanaimo to Courtenay where her friend lives.
 
Oh Canada
Importing a vehicle into Canada requires the vehicle passes an inspection. That seems totally reasonable as it prevents Americans (and others) from using Canada as a vehicle dumping ground. During inspection, they identified 2 lugs which were striped. Since the wheels had just been rotated and the tech's found nothing interesting, we have concluded that the customs folks jacked up the lugs during re-install of the wheels. For this reason, and the horn not working (it had been temperamental) caused the car to fail inspection. Angela's friend had 30 days to get the car fixed and re-inspected in Nanaimo or the car could not be imported. Since the car was officially exported from the US, she also couldn't come home. It was get fixed or get crushed time.
 
To Vancouver
Ang helped her friend look at some places to live and then Ang needed to get home. The original plan included her friend driving Ang at least as far as Nanaimo to catch the ferry over to Vancouver where Ang would catch the Amtrak to Portland. Instead, Ang bought a flight home, flying out of Comox (neighboring town to Courtaney. At this point, we learned that the passport id card is only valid for land travel across a border. If you want to fly, you must use the booklet, which Angela left here. While they let her board the flight from Comox, her flight from Vancouver to Portland was canceled. Instead, she would have to take a bus from Vancouver to Seattle where they rebooked her to fly home to Portland.
 
This travel all happened on the Sunday that one of the larger regional Canadian airlines went on strike. So, while her flight from Comox to Vancouver was relatively calm, the scene in the Vancouver airport was bordering on chaos. And, land travel options were disappearing fast as those with canceled flights because of the strike were vying for whatever they could find. This included bus and trains into the US.
 
Angela grabbed a Lyft to the train/bus station, ticket in hand, and talked to the ticket person at the counter. The computers were down because of course but the ticket counter person said that while her in-hand ticket was for tomorrow, the driver would let her ride today. That proved incorrect as the unpleasant driver had no interest in talking to anyone about anything other than accepting a ticket for that specific bus ride. So, now Ang found herself in a not-too-safe part of Vancouver, the afternoon turning to evening, no ride across the border, no personal transportation, a dead cell phone and no housing plan. As her phone charged at the nearest bar, we talked about options. That weekend there were multiple events taking place in Vancouver (the annual Pride parade and ComiCon, eg) so options were slim and expensive. Most options were far away from where she was and where she needed to be to board the morning bus to Seattle. The place we thought we found had no front desk and everything was done virtually. As she tried to book, the price kept going up. While wrestling with their booking site, she befriended someone who walked her to a place with an actual front desk and an available room. It wasn't big. It didnt have it's own bathroom, but it was expensive and had a lock on the door. It's funny how far down the bar goes as evening turns dark.
 
Thru Seattle 
Early the next morning, Ang caught another Lyft to the train/bus station and was through customs before 7AM. She hopped the bus, driven by the same unpleasant guy who wouldn't talk to her the night before. The bus was delayed passing through northern Washington to the point where she missed her original flight. I swear, you can't make this stuff up. Ang got a hold of the folks at United before the gate closed and got moved to another flight, freeing up her seat for a stand-by person. Her later flight was 4 hours later, but that provided time to unwind, and decompress a little bit before the final legs of her journey home. Still, spending 4 hours in the busy SEA/TAC airport is not remotely 'unwindy'. It is not comfortable, nor quiet, nor without lurkers so those 4 hours felt longer than the 8 hours we were stuck at Portland International Airport (PDX) last June.
 
And Home 
Fortunately, the flight was uneventful, boarding, leaving and arriving on time. Since she was now arriving at rush hour, she insisted I not drive the 60+ minute drive to PDX and instead meet her at a Tri-Met light-rail stop. The light rail from PDX is actually very easy. The train line ends there, so there is usually a train sitting there waiting for you to get onto. She had about 15 minutes of sitting before the train pulled out and then about an hour on the train. Then, at the stop one before the one I was meeting her at, all the westbound trains were held for 20 minutes because of an issue on the line well west of where she was getting off. Seriously, you just can't make this stuff up. I literally teared up when I saw her get off the train, so grateful her perilous adventure had come to and end. We hit one of our favorite local Japanese restaurants on the way home.
 
We learned last week that Astra has passed inspection, and she is wearing new Canadian license plates.
 
K'Lack Update
Ian found the issue that was causing us continued issues. He has lots of diagnostic tools and he found that the voltage range being sent from the crank position sensor was below the minimum for the computer to have a reliable reading. The part was new, and I installed it.... lying on the ground on top of wood chips. Apparently I did not seat the sensor exactly square in the hole. So, the sensor was pointing at a slight angle. When he removed the sensor to see what was going on, he saw the o-ring was pinched more on one side than the other, adding credence to the theory. He replaced the o-ring, cleaned out the hole and the edge before re-installing the same sensor. He was able to gain a better angle on the part and was able to seat it squarely. After multiple tests runs, he handed it over to me. Ang and I drove K'Lack exclusively for a few days, putting nearly 150 miles on it. K'Lack drove great, no codes were thrown, so Ang took it through DEQ (Department of Environmental Quality) / smog testing. It passed, and with new stickers applied, we traded cars with Krista, putting Frankie back in our driveway.
 
I admit that at least part of the problem with getting K'Lack running was my long-lived dislike for the car. It has been the problem-child since it first arrived from Kai. Did I rush the sensor install? I don't think so, but I was lying in wood chips in the sun on a hot day. Perhaps, if I had had room in the shop to to the work, or made the room to do the work, we could have avoided some unpleasantness this summer.

Thursday, August 20, 2026

Catching Up on Cars

It has been a busy Summer of car stuff. Some wrenching, some otherwise. In today's post, I will not try to cover everything, but there has been a lot. 
 
Oliver freshly cleaned
Before I begin, you may have noticed a new sticker on the right-hand side called "Electoral-Vote". If you aren't familiar, that is a site run by 2 history professors who started a site initially, I think, to analyze polls. I have been reading their page for well over a decade; maybe 2 decades at this point. From humble beginnings that aimed to provide insights into political polls, they are a daily site that examines the (mostly) US political theater. As the national political disposition has shifted right-ward, their political position has remained around or just left of where the political middle was during the Bush years. Now, that position is left-of-center (because, again, of the national shift) in the continuum of US national politics. As the primary season has ended, they are returning to their roots, looking at polls and providing the kinds of insights only 2 life-time history and statistic's nerds could provide. If you find that stuff interesting, check them out. Neither they nor I get anything money-wise out of my putting that sticker on my blog. They get clicks, I literally get nothing. Back to cars.
 
K'Lack
P0726 re-appearing
We will start with my nemesis car: K'Lack, the 2004 Jetta TDI Wagon that previously belonged to our son K. After driving it for years and logging thousands of miles, he needed to sell it off and get something that was newer? broke down less often? I'm not really sure, but at the end he was having transmission issues. Regardless, the trade-in amount he was offered was pennies-to-dollar value. So, we bought it for Kelley Blue Book value at the time (around $4500US) and took it directly to a transmission shop who was qualified to do transmission work on these 2000's-era automatic transmissions appearing in VW's and Audi's. Through the benefits of successful aging and poor record-keeping, I don't remember how much we paid them to rebuild the transmission, but it took literally months. If I remember correctly, it went into the shop in December and we got it back in March. It was around this time that our niece (another K, so I think maybe since all these "kids" are adults now, maybe I'll just start using their names), Krista needed a car. Her former car failed in some way I don't remember. We intended to sell her Flash. Remember Flash? He was a great 2001 VW Jetta TDI sedan, but he had a manual transmission. Loved that car, but a different niece needed a car, so when Krista was unable to drive a stick, Flash went to the other niece and K'Lack went to Krista.
 
replacing K'Lack rear caliper
Now, years later, and many repairs ranging from replacing the oil pan to a timing belt and camshaft replacement, K'Lack is currently having issues I cannot track down. It is throwing a P0726 code and after tracing wires and replacing the crankshaft position sensor, the issue persists. The code means a check-engine-light is lit which means the car will not pass emissions. It is also virtually un-driveable. It barely starts and at any point during a drive the car may suddenly shift into a too-low gear, causing it to buck. It is quite alarming and dangerous. I have date with a mobile mechanic, Ian, who has helped on some of Cedar's (that's "C" in all prior posts) cars. I hope very much that we can resolve this and get Krista back on the road with K'Lack. In the meantime, it is parked under a plum tree in the back near the shop and Krista is driving Boo's (okay, her name is Angela and I'll refer to her as Ang from now on) Ang's Astra.
 
Oliver
In the interest of getting Oliver, the 1978 MGB, out of the shop so I could move things onto shelves, I got Oliver running well enough to back out and idle-drive under a tree. I say idle-drive because the throttle cable had seized. Fortunately, parts for an old MG are not nearly as expensive as parts for new cars, so a after few bucks and about 15 minutes, the throttle cable was replaced, and Oliver could start and move around. Thrilled, I drove him out to the front and gave him a long overdue bath. His brakes were still a little squishy, so I moved him to the other side of that plum tree in the back and put his cover back on. I have to do a system-wide look at the brakes. They have been acting like they needed a bleed for a long time, no matter how much I bleed them. I think I must have a loose fitting somewhere that lets air in. I still intend to get him out and around, even with squishy brakes, before the Summer is over.
  
Hapy
cursed outlet flange
Earlier this year, I got Hapy put back together. I drove him out to Sheridan where Justin could do the injection pump re-seal. On the drive home, I popped the boosted air pipe and sorta limped home. But, after that, I took him on around-town outings and he ran great. He would start right up, have lots of pep, moved through the gears well. For almost all of the month of July, he was set up festival-style in the back, providing music, a hang-out spot and a groovy vibe. This past weekend, Ang and I had 2 different events. First, we had tickets to Joe Russo's Almost Dead (JRAD) in Eugene. JRAD brings the energy of the early 1970's versions of the Grateful Dead while performing everything and anything across their song catalog. I highly recommend to my DeadHead friends. The next day, I had an early-afternoon show in Rockway Beach, playing the NCAM benefit festival. I'll post on the festival later, but our adventure started and ended Thursday night, heading south to Eugene.
 
As I've mentioned before, Ang and I like to leave for events the night before, getting as far as we can in the cool dark and then vagabonding (boon-docking to some) in a random parking lot or on the side of the road to catch a sleep before completing the journey in the morning. Hapy likes the cool air and we really like awakening that morning most, or all, of the way there. The drive was relatively uneventful until after we got south of Wilsonville. I noticed that the rear window was getting blurry, and I had just washed it when we filled up. Growing concerned, I pulled off into the Charbonneau rest area near Aurora and glided into a parking spot. I went around back, opened the rear engine hatch and could see that the coolant bottle was empty, and I could hear steam. After moving the bedding out of the way, I could get the top hatch open and could see that the coolant was escaping from the cursed coolant outlet flange. I would later discover that the c-clip or "U" clip that holds the coolant sensor in place had a broken leg (so, really a "J-clip). If you look at the picture on the right, there ought to be a little plastic tab thing sticking downward from the bottom of that dark channel on the right side of the outlet flange. That would be the end of the "U" that's not there. Our trip to Eugene was over and I called for a tow.
 
trench filled
We waited for about an hour, and the truck operator seemed fine enough. He was nice, albeit quiet. In retrospect, he seemed less comfortable with Hapy not having a parking brake but Hapy has been on a flatbed lots of times without an issue. Until this time. I believe he did not strap the wheels down as tightly as prior truck operators had. I say that because Hapy seemed to move front-to back a little bit as he backed the truck into the driveway. I had not noticed that when he was loaded onto the flat bed in the parking lot. We rolled Hapy into place, and Ang and I called it a day, returning to Hapy the next day... when we discovered that putting Hapy in gear was not enough to hold him in place. Since it was enough to hold him in place on the flatbed, at least while he was getting strapped in, and this was over an hour after we had overheated, I conclude that the tow somehow messed up the transmission-to-engine connection (read: clutch). I wanted to see if the engine was locked up, so I put a 19mm socket on the crank end-bolt and gave the engine a short turn (like 15*). The timing belt moved, the camshaft moved with it, so I concluded no major engine damage was done. Or, at least, it's not frozen in place. That's huge, but I think I will need to pull the engine and transmission apart to fix whatever went wrong in between. With this knowledge, we called it a day on Friday and spent a lovely day at the beach on Saturday.
 
trench filled
Since I still had a trench running the length of the lane-way, I spent Sunday morning filling the trench. By the end of the day, Ang and I had flat-towed Hapy back to the shop with the X-Runner and 20' of trucker's chain, parking him out front. I need to clear some space inside the shop to put him, and get him in there. Then, I have the equivalent of a clutch job ahead. The last time I had to remove, separate, re-acquaint and re-install the engine and transmission, I vowed that I would cut a rear apron into the back so I could just remove the engine. Looks like that time is now. Regardless, Hapy will probably not make it back out on the streets this summer. Could I get it done before Summer ends? Maybe, but we have lots of things going on and I don't know if I have a weekend to dedicate to that right now. Besides, if I am going to cut, I want it well planned with a means of fastening what I have removed before I pick up an angle grinder.
 
EDIT: I was trolling through some of my old posts yesterday when I came upon Front is Front which clearly describes this same coolant sensor leak recurring, until I put the clip in from below. Over 15 years later, and I'm repeating myself. Had I remembered, or read, we would not have lost coolant, broken down, etc. There's a lesson in there somewhere.
 
Wrap
With Hapy's catastrophic failure, we are down to one operable car: The Toyota X-Runner, which Ang drives to work. She has a lingering bad shoulder from a skiing crash a dozen years ago, so driving a 6-speed in rush-hour traffic is really taking a toll. If Ian and I can't get K'Lack fixed, we are going to need to re-po the Astra and have Krista solve her car need another way. Generosity reaches a limit when another's convenience is literally causing you pain.
 
Well, that's where those 3 cars are at. I have a long tale of 2 Astra's to share another time. We have lots of active construction Ang and I are doing with our friend Ray, so I'll update on that, the Astra's and whatever else happens around here as things roll. I hope the reference to the electoral vote guys doesn't cross some no-politics line for you. I generally don't bring that noise in here, but elections are coming, and we all need to be as well informed as we can be.
 
Thanks as always, for following along. Until next time-

Tuesday, August 11, 2026

Entrenched

It's been a couple of months, and busy ones at that, so today's post will be a bit of a mish-mash covering the highlights.
 
Farm House Fireplace
fireplace surround primed
First, I am realizing that I never posted on our idea to change a blank wall in our living room to have a fireplace. We live on a street with overhead power lines, and we lose power once or twice a winter to ice and wind. We sourced a (Valon H5) gas fireplace and had it installed against and in the middle of that wall in March or April. Being near the end of the cold season, we only fired it up a couple of times. It does not have a fan, so we will be covered in an electrical outage, but we were impressed with how much heat it produces at a low setting and how far from the unit you can feel the warmth.
 
After absorbing that cost, we got our contractor friend, Ray, to do the side job of putting some kind of built-in around it. He did that work a day here and a day there, ultimately finishing at the end of July. I spent this last weekend doing the paint prep and brushing on a coat of primer. I expect to return to that work in a couple of weeks, sanding the primer fixing all the little holes and such that I missed and then applying more paint.
 
Shop Progress
closest thing to "before" image
In an inspired moment in late-July, I emptied the black rolling tool cabinet, pulled it across my hard-as-a-rock clay backyard and into the shop. Once there, I vacuumed it out, Armor-All cleaned it, set it in place and then returned its contents. That represented the last of the things that needed to move. I since have worked through most of the heap, putting like things together on shelving.
 
Electric Hum
While Ray was working on the built in, we noticed that our main electrical panel would hum when his air compressor fired up. We thought that was probably not good and showed him. He agreed and soon we had his go-to electricians over to see what we had going on. The humming breaker ought to have flipped, not hummed. So, soon we were getting the main panel replaced and some outlets fixed and some other lighting things solved. Once we were in that deep, Boo asked them what the incremental cost would be to running electricity out to the shop. Love her. They made us a great deal ($1600US for an active circuit, 60-amp sub-panel wired from the main through conduit in the trench), but the numbers hinged on the trench being dug, and the work starting about a week later.
 
Trenching
cave-in at the turn
This is the lead-in that found me running a 24" trencher on a Monday morning. The weekend before I had cleared all the mulch and other undergrowth, shrubs, etc along the approximate 100' path. I also needed to hand-trench around the french drain I had installed around the shop last summer. Once cleared, I marked the future trench line with spray paint. I rented a trencher from HomeDespot, not because I love that store, but because they had the best-by-far price (like half what everyone else offered) and they would deliver /pick up. So, with that trencher, I dug 100' of 24" deep trench. Considering how many Holly trees, wild roses and other things we have found in this yard, I was prepared for a long difficult day.
 
The trenching started difficult enough. I thought I would do the line from the garage down to the 90* turn south first. That meant starting the trench up against the garage where I found the first foot below the surface was bricks and chunks of concrete. Fortunately, once I was able to get that cleared, the rest of that east-running line was uneventful. I got as far east as I could go, setting my back up to the neighbor's fence and then wrestled the machine to face north. These trenchers do not turn at all easily, you have to muscle them by lifting and shoving. So, once facing north, I started trenching southward, leaning and pushing west to offset the slight pitch of the yard.
 
future trench line
The next 40 or so feet (almost 15 meters) were efficient. I did not hit big roots until I got to the apple tree just outside the shop's main door. Even then, I only need the sawzall to cut a pair of thick roots. The trencher took care of the rest. Once I got to the 90* turn west to get to the shop wall, I wrestled the machine so I was facing west, moved it up to hand-trenched section and ran it east until I hit the fence. Similar to the other end of the long trench, I could not connect the big trench with the shorter sections without trenching in both directions. This meant wresting the machine over a trench at some point. Inevitably, those moves caused cave-ins. Still, the main trench work was completed, so I ran the trencher out to where it was dropped off at the start of the rental and hosed it off.
 
After work on Tuesday, I was out at the trench with a disposable plastic "go food" container, hand scooping out the cave-ins. I discovered that my last "cave in" was actually an incomplete trench where it turned 90* south near the garage (see 3rd picture from the top). I had to finish that trench by hand. It was at that point that I really appreciated the trencher. The clay soil in the backyard is as hard as a rock at this time of year. So just clearing less than a foot deep, maybe 18" long trench was a considerable effort. I was already beat-to-shit from wrestling a trencher in nearly 90*F (32*C) heat the day before and Tuesday was just as hot.
 
black "rollie" in the shop
We passed inspection for the trench this week. So, I will be filling the trench back in and then I will be able to move cars in and out of the shop again. While I did not plan to lose access to the shop this summer, I am so grateful for having electricity, even if it is just a sub-panel with no outlets nor circuits. We will be that much closer to having lights without depending on a partially buried 100 foot extension cord running from the old garage. And, once the trench is filled back in, I only would have had the path blocked for maybe a month.
 
We had a different inspector than we have had with our other inspections. This guy was a bit of a hard-ass relative to the others and inauthentic. I only bring that up because what he said to me and what he put into his report were not the same. He said everything was good except he needed some detail around a ground for the water heater (which wasn't in the scope of the work, but whatever). The report identified a bunch of other things that he never mentioned and were also outside the scope of the work performed. Needless to say, I'm unimpressed and hope he doesn't inspect anything around here again. I would have no reason to trust what he says, and expect him to add things to his report after leaving, including things which may have nothing to do with what's within the scope of the permit. Inauthentic sucks.
 
Wrap 
This got long, and I never got to any car stories. There are a few. I'll post on them, and whatever new ones happen, next time. Thanks, as always, for following along-

Wednesday, June 3, 2026

More Moving

Today's post follows the last one, sort of. Today I focus on moving stuff basically from one storage location (the attached carriage-house-sized one-car garage) to another (the tool shed or the shop floor). In re-reading it, there is really a lot of history context with some moving stuff mixed in.
 
But First 
most empty since 2022
Before I get into it, I understand that a blog about fixing cars really ought to, you know, talk about fixing cars sometimes. I get it. I really do. I like working on cars, and when I have time, space and a car that needs fixing, that's how I prefer to spend time. Over the past 2 years, I have spent a great deal of time focusing on creating the space for that to happen. In light of that, I think it is worth noting that I understand the economic space many of us are in. Costs for everything seem to climb more every day while our respective salaries and wages are flat. Affordability may be a catch-phrase for politicians, but for the rest of us its a daily life reality.
 
When I look back on the last year of posts talking about getting a shop built, I recognize how tone-deaf much of that must feel to those in real financial difficulty. I totally understand that. Please consider that I started this before the election in November of 2024 and had committed to $22k of steel building before the tariff wars started in 2025 and had the concrete poured, building installed and the doors started before trump attacked Iran this year, sending our fragile economy skidding into the ditch. I had already started down a path which could not be easily changed before things got really bad.
 
Now, Boo and I are in the same financial binds as most of the US: income flat, outflow increasing. Accordingly, I will not be getting any new-to-me cars/projects nor really invest much in fancy new after-market parts to install on any of the ones I have. What does this mean for a blog about fixing cars? Well, it kinda means that I won't be posting as often and when I do it will be more about repairs than about some new thing except for the parts and bits I collected before we bought the farmhouse in 2022. I have boxes of interesting things that I never got to, like a 2-1/2" universal exhaust kit for the bus, a 3rd brake light idea for the bus (from junkyard parts), a trailer wiring package to go with the tow hitch, etc. So, there will be things. And, of course, I still have the locked up engine on Nina ('64/'65 Beetle) to free, a bunch of little things to finish on Oliver ('78 MGB) and a disassembled '79 280zx (Zed) to put together. Most of that work would require very little in terms of parts.
 
Garage
acquisition day 2022
This 1948 farmhouse has what I would call a carriage-house style attached garage. I say that because only the smallest of cars could possibly fit with the door closed. Oliver, the MGB, could fit. Astra and Nina could fit. That's the end of the list. Hapy is too tall and probably too long. The XRunner is definitely too long. I think even Zed is too long. Further complicating the garage is a fixed work bench along the rear wall that protrudes almost a full meter off the wall and the laundry machines near the front, narrowing at least the feel of the width of the space. I think Astra will still fit, but it will need to be mostly empty.
 
Shortly after we bought the house, before we had meaningfully cleaned anything, Boo and I scored a solid wood, full kitchen's worth of era-correct cabinets from the rebuilding center for $420US. The rebuilding center is not a store room; quite the opposite. Everything you buy must leave the store that day or it's theirs again. So, we lasso'd Boo's ex-husband (and his mini van) and some helpers (our local kids) and ran all of the cabinets over to the farmhouse. And slammed them into the garage on top of one another. The fate of that garage had been written the day we bought it: it would be the staging area for building supplies until the house was livable. Those cabinets were the first but far from the last. And then it continued to be the store room for all kinds of things. Until now.
 
farmhouse at winter solstice
With the shop taking all car-related stuff and car-related tools, almost a third of the stuff in the garage was moved. Over the last weekend in May, I moved everything home-repair related out to the now empty and clean tool shed. That represented almost another third of the stuff that used to be in the garage. As I cleared an area of things, I shop-vac'd all the dust bunnies and old cobwebby string-things. What remains in the garage are camping gear, ski gear, holiday decorations and household goods storage. The rafters are still full of lumber. So, I have to clear that to somewhere and then there is a bunch more vacuuming of ick. I have a couple of extra kitchen cabinets which need to move to the shop and I still have the big black rolling cabinet that needs to move too. Once those three big items move, we can park Astra in there. Boo had been gone for the weekend, baby-sitting our little grand-niece (A) while her mama was at a wedding. When she returned and saw the garage space, she immediately started envisioning a project space for herself. I love that, and if we do it right, we can still move things around and park her car in there between projects.
 
Car Stuff
There has been some car stuff, though. Hapy is my "daily driver" again, getting me to and from a show with Brenda on Sunday. Astra, now that her alternator is keeping her all charged and start-able has started complaining about her power steering. It is making a low hum most of the time and actual turning has gotten harder at the extreme edges of the range. I checked fluid (nothing on the stick: that's bad) and topped it off. I expect one of the rubber hoses is failing so I will need to do a deeper diagnosis this weekend. For now, though, the added fluid appeared to quiet the hum a little bit and the steering is better until the last bit. It could resolve as the air works its way out the hoses, but I think there is an active leak so it will only get worse before I find and fix. Work on Saturday! Yeay!
 
Wrap up
Yep, that was an unusual post. There is a considerable amount of economic uncertainty around us. For some, it is the loss of discretionary spending while others are dealing with food or even housing scarcity. We all can feel some foundational insecurity, maybe while filling your tank or grocery cart, paying utility bills or thinking about how to keep your kids safe this summer. I see it in faces. Fewer smiles, more worry-lines. It is a hard time for most of us. So please, let that person pull in front of you, give everyone a little grace. Grace is free. So are hugs and smiles and waves. Everything else seems to be more expensive than it was yesterday and the shorter-term future looks like it will be more of the same.

Thanks, as always, for following along-

Friday, May 29, 2026

Moving Into Shop

It has been a busy couple of weeks spent mostly moving stuff from the tool shed into a big heap at the front of the shop. I did get to wrench on Boo's car, Astra, though. Today's post is mostly about Astra, but the pictures show the move of stuff as I didn't get my phone out to take pictures of Astra's alternator replacement.
 
Weather the Weather
shop heap
One of the best parts about living in the Pacific Northwest are these incredible spring days. When I first moved here decades ago, we would enjoy what I called "the weather donut hole" in April. It was a short, maybe 2 week period, when the rains stopped and we got these just gorgeous sunny days. Then, we would descend into another 2-1/2 months of rain until July 5th. Through the wonder of climate change, our spring weather donut hole has grown. Maybe 10 years ago, it would last most of April. As recently as 2 years ago, the donut hole never closed, and we did not get much more than 2 or 3 days of rain a few times before the summer dry season hit. This year is looking more like 2 years ago did, with mostly clear and dry days with a few passing rains to knock the pollen out of the air. While I worry about summer fire season, we make the most of these below 25*C (80*F) sunny days with daylight lasting until 9PM.
 
So, with that backdrop, I had a meaningful car repair to get after.
 
Astra's Backstory
Boo replacing Dude's starter
Well before I met her, Boo used to drive an Opel Kadett. Always generous, she let some friend use it and never saw it again. Years later, when I met her, she was driving a gold Saturn sedan (named "Dude"). She loved that car, doing everything she could to keep it on the road. Again, a friend of my dad needed a car for a while. This friend was running errands for the less-physically able in my parent's building, so she loaned him Dude. It was stolen, and when it was recovered by the police, the ignition and steering column were destroyed. With considerable sadness, she let the car go to police impound auction. She had owned Dude for 18 years.
 
Fast forward a few years and I'm driving along and find myself behind a 4 door hatchback with a Saturn symbol on it. At the next red light, I snapped a picture of it and sent it to her. We were in the market for a new car after the GoRo disaster and had been talking about a Mazda3 or maybe a small SUV. The Saturn appeared to be an intersection of her appreciation of the looks, lines, mileage and size of the Mazda3 with her love for Saturn. I started investigating and learned that the Astra was built with Stellantis/Vauxhall, owner of Opel and original manufacturer of the Kadett. In fact, the Kadett evolved into the Astra. So, the Astra was really an intersection of her beloved Saturn, her equally beloved Opel Kadett and her appreciation of the Mazda3. Of course, now I had to find one. The Saturn Astra was only available in the states for 2 years (2008 and 2009), and not many were sold. We lucked into one outside Salem for literally $2kUS and after applying another $1k of repairs and tires, it has been a fantastic family member.
 
tool shed "empty"
She is not without her issues, though. Sometimes she does not want to downshift and just groans in a too-high gear. This is reset with a restart, but that's not easy in traffic. Over the last 18 months, though, the battery had been not charging enough on shorter drives to start again. She priced having someone replace the alternator, after having it checked, and the $800 price tag lead us instead to get a jump pack to jump start her when she didn't want to start on her own. This lasted over a year until a couple of weeks ago I took on the task of replacing the alternator. By the time I got to step 3 or 4 in reading the online "how to", I understood why shops were giving her a "go away" price.
 
Alternating Astra
In January, Boo and I planned for a trip to the east coast the week before Memorial Day. We were going to visit my sister and her family and then see our son K2 (currently serving in the US Navy at Quantico). Then the trump administration decided to pick a war with Iran, airline prices spiked and our plan was scrapped. Thanks trump. Nature hates a vacuum, so what would have been a trip to the east coast became an opportunity for me to spend up to a week fixing her car with no drive-to-work pressure.
 
shelving starts
The challenge with removing and re-installing an alternator on the Astra is that the alternator only fits out the left front (passenger-side) tire well. Even then, it doesn't fit easily. So, the process is you get the car up on a jack, remove the wheel and the inner wheel well just so you can approach the serpentine belt and alternator. Disconnect the battery. I put the battery onto a charger while I did the rest of the job. I found removing tension on the belt tensioner especially difficult because of the required body positioning to access it and the steel supports blocking direct access. I used a spanner-on-a-spanner (yes, it's cringe-y) for sufficient leverage. If you reuse the belt, mark the belt direction. With the belt off, you can get at the 2 alternator bolts. With the alternator loose, reach around the rear and unplug the 2-pin socket. It has a latch holding it on. I palmed a small bladed screwdriver around everything and got the latch to release without breaking it. Then, remove the nut holding the main cable to the rear of the alternator. At this point, some folks have posted that they have been able to worm the alternator through the wheelwell. They must have a different engine than we do (2.0L). I needed to remove the air box and then the engine mount bolts underneath it, so the engine on the left side was no longer attached. I did set up the TravisJack under the engine so it didn't lower at all. Then, the engine itself needs to move as far forward as you can manage it. I just grabbed onto it from over the radiator and pulled. The alternator drops down and out behind the engine and out the rearward end of the wheelwell opening. I found that if the alternator is in the same orientation as it was when installed, it does come right out. Any other orientation and it will get stuck. Yes, this happened to me many times until I figured it out.
 
end of day 1
With the old alternator out, the install is mostly the reverse. Alternator enters the wheelwell oriented as it will be installed. I plugged in the socket and nutted on the thick cable before then attaching the alternator to the engine. Next, I put the serpentine belt back on. It has maybe 20k miles on it since it was replaced by the yard we bought the car from. With the belt tension restored, I moved the engine back into place and re-connected the mount. Then, I put the airbox back in and returned under the car to put the inner wheel well back on. I finished up with putting the wheel back on and the battery back in.
 
I had read online that this was a 8+ hour job, so I had set aside 2 days, hoping that I'd be done by Sunday in time to see our friend Maldarine play a show. It took me 6 hours, start to finish, backing her out of the shop and the lane way back into the front well before dark on Saturday. 
 
Moving In
With all the extra time I now had, I decided that I would get as much of our summer project done as I possibly could. I figured that it wasn't raining and every nice summer day I could save by doing things now, would make for a better summer. This year's project is getting everything car-related into the shop and everything home-repair related into the tiny shop (tool shed). Then, the only stuff in the garage is camping and ski gear, leaving plenty of room for Boo to park Astra when the fall rains return.
 
partway day 2
I had started with the garage, moving the red rolling tool cabinet before I even had the doors installed. This renewed effort was about getting anything else car or tool-related from the garage into the shop. This included my jacks and stands, the hypersonic-cleaner and lots of random parts. All that remains is my big black rolling tool cabinet. I hope to move that this week.
 
Next, was the tool shed. I regret not taking a genuine before picture. The shed was so full, the back half was out of reach, blocked by stuff. So, those large items blocking the floor were first, rooting through them a little bit looking for junk before moving the keeper-bits to the front of the shop floor. I noted that there was evidence of rodents, so I spent the next few days wearing a dust mask, shop-vacuuming a lot, and generally moving at a slower-than-hoped pace. I would vacate a shelving unit, dismantle and wash it, move it, and finally re-assemble it inside the rear of the shop. Most of the stuff that were on the shelves ended up in a heap at the front of the shop, or a heap for the dump. The exceptions to this were solvents and cleaners, which went onto freshly cleaned shelving, and everything painting related, which went into an old kitchen upper cabinet the kids used to use for skate and snow gear repairs and parts.
 
Those with a keen eye will see (in the shed heap picture at the top) that I put Zed on furniture dollies so I could move him around a little bit. These dollies are the $30, 1000# max variety found at Harbor Freight. The genuine car dollies I've seen cost up to 10x that much. Are they 10x better? Unlikely, except they work on heavier cars. I was able to move Zed by myself, one end at a time, so I could fit a shelving unit against the wall beside him. I used another pair of those same dollies under the paint cabinet.
 
paint cabinet on wheels
Boo and I agreed that the Tetris I did to get Zed's entire interior onto the high shelf in the tool shed could not be easily repeated (see the upper deck in the tool shed "empty" picture above), so that stuff stayed. Otherwise, the tool shed is clear of car stuff, the shed is cleared of all evidence of rodents and the shop vac has been emptied and washed. Next, I will be moving home-repair stuff from the garage.
 
Wrap Up
This got really long, but a lot gets done on a full week stay-cation. I hope to get after the big black rollie cabinet and the garage-to-tool-shed over the next couple of weeks. Then, our summer project will have been completed before summer even arrives. We all know nature hates a vacuum, so that time will be filled by something. And that something will probably be either home improvement or car-related. Once that happens, I'm sure I'll post about it. Until next time, thanks, as always for following along-

Thursday, May 14, 2026

Building a Shop - Construction Permit Complete

For a project that started in December of 2024, I am surprised it took so long for the shop to reach "complete" for it's initial build permit. Today, I'll review some highlights and touch on a Hapy adventure.
 
The Doors
shop permitted
I had an entire post about the doors (See Building a Shop - Doors) where I detailed almost buying the wrong size big door. Then, we got things right. That big door faces north. Next to it, our contractor guy Ray installed a basic HomeDepot-special 36" (1 meter) wide person door. That door is the only door with an external-facing lock. Moving around to the west side, we have a 10-foot (3.3m) wide opening. In the Ghost of GoRo post, I mentioned the west-facing barn doors that Ray built. I will give them more detail below. The southern opening also got a barn-door style install, though the actual doors are a little different.
 
Ray's Custom Doors
barn doors by seating area
I'll start with the west-facing big barn doors. First, we sourced an external barn door rail system (~$300US) capable of supporting a few hundred pounds. The opening had a double header, so most of the rail was mounted to that, through the exterior skin. In order to create sufficient space for a door to hang, the rail install includes a small block of 2x4 between the rail and the outer skin at each bolt-point. The header only spanned the opening, so on either side, from the inside, Ray added a 2x4 on the inside for the mounting to attach to. The south-facing smaller doors had a similar barn rail system installed. We followed the pattern of using 2x4 blocks to create the offset, and using 2x4 planks inside for the mount to attach to. Unlike the west-facing door, the south-facing did not have a double header, so the entire rail needed the 2x4's installed.

southern doors
With the rails in, Ray shifted to construction of the doors. All 4 doors were framed with Sun-wood. This is exterior-qualified wood, but lighter than cedar and not chem-y like pressure treated. Because the west-facing doors are bigger, they were assembled with brackets to hold them square. And, they had angled planks added for strength against twisting or flexing. The south-facing doors were joined with biscuits, and did not have the angled planks added. Once the frames were ready and test fit, the west-side doors had siding attached so they match the building. The southern doors were skinned with clear plexiglass. This will allow the little bit of winter light we get from the southern sky to leak into the shop.

Once the doors were assembled, Ray re-hung them, and installed interior grab handles to operate them. On both sets of doors, we added guides into the concrete so the doors would not move away from the building while in place or traveling. Last, I added a lock to each door so they could not be opened from the outside. I need to prime and paint the south-facing doors, but they are operational as-is.
 
Inspected
southern doors
When I had the building inspected in August of 2025, the inspector asked for 2 things: install the doors and add a landing for the person-door. With the doors now complete, and the landing added in September (See Building a Shop - Steel Building Erected), I was ready for an inspection. So, on Monday I ordered the inspection. The inspector checked the boxes on Tuesday and now I have an officially completed building (per drawings, spec's and inspections). What does this really mean? Well, in terms of the permit and inspections, it means I get to pay taxes on the land improvement, and my home owner's insurance just went up. It also means that anything contained within that shop is now covered under my home-owner's insurance and if something catastrophic happens to the building, I'm covered insurance-wise.
 
What does this mean in terms of my personal use of it? Very little, frankly. I needed the doors so I could lock it. Once lockable, I can start storing tools out there, so I can work on a car in the shop and not walk the 40 meters from the shop to my tools in the garage and then the 40 meters back again. I have already repaired 3 cars in that shop with a 4th (Astra needs her alternator replaced) heading in on Friday. having a lockable shop means I can do that work that much faster because my tools will be right there.
 
Retrospective
where we began
Being an advocate of both Agile and Continuous Process Improvement (CPI), I believe that some kind of look-back when a project reaches its end is healthy and helps you and others make better decisions in the future. So, with that in mind, what did I learn that I haven't already mentioned?
 
     Permits: I covered most of the discoveries along the way in the linked permits post. Get Clean Water Services involved early and make sure you manage both erosion during the construction as well as any mud getting tracked into the street. Either can got your job flagged and then things get much harder.
 
    Survey: The "106" inspection is all about proper placement of the building relative to your plan and the property lines. If you don't know where your lines are and can't figure it out, you will need a survey, or you may not pass the first inspection. I split this inspection into 2 visits, with the first being informal wholly focused on the site location. This was Vai-the-concrete-guy's idea and he was 100% right.
 
excavated
    
Bidding: get lots of bids. I had 3 and had I gone with one of them, it would have cost me ~$5k more for the flatwork. Part of every conversation about the flatwork included a conversation about the excavation. For every bid, the excavation was a meaningful amount, even though it's not terribly time consuming, especially for out project. This might be something we could have done ourselves, but the schedule worked out better having Vai do it all. Last, make sure every bidder fully understands all of the parts of the plan. Vai had a brain-fade about the carve-outs for the lift and had I not asked about it after they ran the compactor, there could have been an issue. This served as a reminder that without a designated general contractor, YOU are the GC.
 
    Inspections: While Clean Water Services did verify that the erosion control measures were in place, and made sure that the storm outflow was planned for, the adherence to that plan was not in any inspection.Does this mean it isn't needed? No, nor does it mean that it won't be part of your project, it just wasn't part of mine and I managed the storm water with french drains once I was unable to attach gutters. So, I have a rock pit in my yard without purpose. The inspector can be your friend. Case-in-point, I would not have even known about an "Ufer" if the inspector had not mentioned it and then approved it. I now have a passing-electrical ground because of the inspector.
 
cleared and framed for concrete
    Concrete: I asked the concrete contractor specifically what, if anything, I needed to do once the concrete was poured. He said "nothing", and I got surface cracks because it did not cure uniformly. The correct answer is "try to keep the surface wet with a garden hose for a couple of days". Then, the top does not dry too fast relative to the concrete beneath. 
 
    Oregon Carports: these folks were great from start to finish. They were easy to work with, the plans were spot-on for the permits and inspections and the installers were fast and nice guys. It would have been nice to know that a gutter could not be installed without retro-fitting, but at this point we have weathered a full wet season easily.
 
    Driveway: When I planned the shop, I knew that the ground sloped downhill south to north but I did not account for the west-to-east down slope. Topology matters. After the steel building was up, I had over 1/3m (an American foot) drop off at the southeast corner. This led to many hours of hauling and spreading rock. Since my labor is free, this did not factor into final costs, but it may factor into your plans.
 
    Overhead Doors of Portland: Similar to Oregon Carports, the overhead guys were great to work with. They found us a door that just smashes for less than half of what I would have paid for new. They stopped by late last week to install a header board over the door and install the weather seals. Both after my check had long cleared. We will be using these guys again.
steel skeleton
 
    Ray: Ray is a star. He has been a contractor building things since he was a teenager. Now, he's getting near retirement and is not taking on any new customers. So, those of us lucky to have worked with him in the past are blessed to still have him, at least for a little while. One of Ray's greatest strengths is looking at a project without filters. He can imagine what you are looking to do and make it happen. He built the barn doors, yes, but he also built our kitchen with salvaged cabinets. 
 
Timeline
For history's sake, and in response to my "how did this take so long?" question above, here's the time line for the build, start to end. There was a break in the action over the winter Oct2025-Mar2026 while we financially recovered a little bit from the costs incurred so far. We needed to get onto Ray's calendar and figure out the doors a bit too.
 
2024-AugustBoo and I decide to build a shop and figure out about where we want it
2024-December: steel building ordered from Oregon Carports
2025-January: permit started with Washington County (WC) ($700)
2025-March: Clean Water Services (CWS) involvement in plan
2025-April: permit accepted, initial payment of ~$1k
2025-May: self-performed survey, soliciting concrete bids; locating and placing "straw wattle"
2025-June: CWS inspection, excavation, WC site inspection, concrete poured, WC "106" inspection 
2025-July: steel building installed on foundation
2025-August: french drain install around foundation, WC "199" inspection fail
2025-September: rock and gravel of drain, north-side access
2025-October: move 4 cars before rains hit
-- work suspended to save some money -- 
2026-March: west-side barn doors, north-side person door installed
2026-April: north-side overhead door installed
2026-May: south-side barn doors installed, WC "199" inspection pass
 
Costs
Similar to the timeline, I'll detail the costs as I can find them. Of course these were all in as-of-that-day US$. With TrumpTarrifs and trumpflation, your numbers may vary widely from these.
        0: Advise from WashCo, inspectors and Clean Water Services
  1800: Permits with Washington County
23000: steel building from Oregon Carports
15500: excavation, framing, concrete pouring, incl $500 for the concrete pump rental
  7500: north-facing big door from Overhead Door of Portland, incl install and opener
  4800: all other doors, incl hardware, custom build, installs
    800: french drain materials, gravel
    500: large rocks for storm outflow
53900: TOTAL
 
From these numbers, I conclude that when you think about building a shop, the cost of the building itself could be less than half the overall costs. I paid more for permits than I did for rock and gravel, which is also interesting. The 4 doors cost almost half of what the overall building cost too. I could have had fewer openings, or installed a solid overhead door to lower costs, but I'm glad I didn't. Also it is worth noting that this shop has no electrical yet. I expect that will be a 5-figure as well since I will need a trench to run power, a panel, and then lots of cabling contained in conduit. Eek. I do not expect that work to take place any time soon. Instead, I will operate with a long extension cord from the house for as long as I can manage.
 
Hapy Shifting
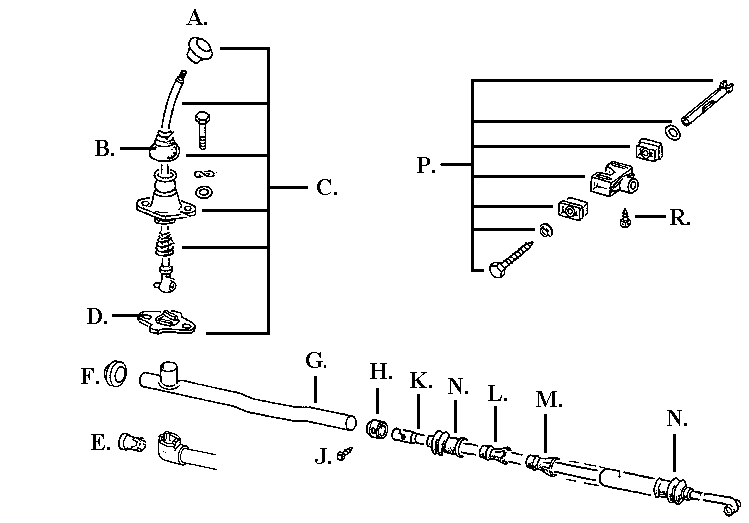
In my last post, I celebrated Hapy shifting so well. That turned out to be premature. The next day, I lost the ability to put Hapy into gear and had to limp home in rush hour from around the corner.. in 3rd gear. One hot clutch later I was back in front of the garage and there he sat for a few days until I could get a look at him. Of all the things that could come apart, I did not expect the bolt going through the pin in the shift linkage at the front of the transaxle. In the image on the right, it's the screw in sub-component "P". I expected the grub-screw ("R" in the image) to have fallen out because I could not remember if I had run the bailing wire through or not. Turned out I did, and the grub screw was doing fine.
 
shifter diagram
I pulled the pin out and rummaged through my drawers of fasteners and found a 11mm bolt that fit. After around 20 minutes of wrestling, which consists of slightly moving the shifter in the cab, getting back under the bus, test fitting and repeating until you can muscle the pin through the hard plastic bits in the cage AND through the end of the linkage running from the front. This time, I put blue thread-lock on the bolt added a washer and sent it into the pin. I torqued it down as best I could considering my body position and the lack of something firm to grab on the opposite end. I used a pair of pliers to hold it.
 
Hapy is back to shifting normally again.
 
Wrap Up
After Ray finished the doors and I had locks on them all, I sat in one of the rear seats from C's new mini-van / stealth-camper we set in the shop as a seating area. I took a moment to just absorb. We so often will not take those minutes, choosing instead to rush off to the next thing. I sat for a few minutes, radio playing softly in the background and simply looked around at my shop. I really can't believe it. After so many years of lying in puddles, sliding on my back on wood chips or just outside in the rain, I cannot imagine what it will be like to work inside, on a hard dry surface come winter. Even now, as we head into summer, I will be working in the shade, on cool concrete, not hot tarmac. Of course, between then and now, I have a great deal of stuff to move and organize, but as of today, the shop is open and I can't wait to get out there.
Thanks, as always, for following along-