Tuesday, October 12, 2021

$50 tool chest

This Summer, I got an unsolicited offer for a massive tool chest/cabinet for around 6% of something smaller at Harbor Freight (like this base and this topper ~$850US as of this writing). Curious as to what $50US can actually buy in terms of a new tool chest/cabinet, I ordered one. This post covers that mini-adventure, as well as some thoughts on tool cabinets, now that this adventure has me thinking about it.

What They Said
Let's start with the product description. They said a lot, but the key points were
Milwaukee 56 top
and bottom cabinets
  • Ship within 24 hours after payment, Free Worldwide Shipping
  • Assembled in La Palma, California, USA
  • 150 lbs. rated drawers
  • 2-deep bottom cabinet drawers have double drawer slides, offering a 300 lbs. load capacity
  • 18-Gauge steel frame and drawers with reinforced 6-Gauge angle iron cabinet base finished with rust-resistant red and black powder-coat finish
  • digital locking system, no need for keys
  • 6-outlet/2USB power strip mounted inside chest till and on exterior cabinet side wall, cord hooks included to wrap the power cords for storage
  • Assembled dimensions with casters installed (approximate): 56 in. W x 22 in. D x 64 in. H and weighs 643.8 lbs.
Company Policies
First, it should be noted that on the anthead.club (seller) website, it is indicated that all shipping is done through 4PX, order processing can take 3-10 days (as opposed to within 24 hours as mentioned above) and delivery time is 3-4 weeks. I translate the 3-4 weeks to 21-28 days from their warehouse to my driveway. Last, it says worldwide shipping is free.

So, all of that sounds really great, right? Like, within 38 days after placing an order, you get this massive tool cabinet/chest combo for $50US. But, of course, how could this possibly be? And, free shipping on almost 650 pounds? This can't possibly be right. For just $50US, though, seemed like it was worth spending the money just to see what would happen. Besides, I figured this might make a good post. So, I ordered one.

Tracking
The timeline for my order is below. We should probably start with the fact that the website said that this was "Assembled in La Palma, California, USA". Not sure how that works if it is shipping from Guangzhou, China. For the benefit of the doubt, let's pretend that it ships as a pile of bits to an assembly space in La Palma where it is assembled into this final shape before continuing on its way. As I document this, it would not be fair to at least recognize that supply chains are a mess around the world. So, delays could be attributed to that. Still, the data is the data:

12-Aug: ordered, paid for
20-Aug: (8 days later) order accepted and shipped out of warehouse in Guangzhou City, China by China-Post (not 4PX). This is within the policy time window, just not the designated carrier.
23-Aug: arrived / departed Chinese port (Shenzhen) on a ship
 5-Sept: (13 days at sea) arrived in USA. Port unclear, but let's assume Los Angeles, since they're the biggest US port for ships from China.
29-Sept: (24 days in US, 41 days since left china warehouse) Message from vendor rec'd. Cabinet still not arrived, current shipper unknown. Could be languishing in a warehouse, shipping container, customs, or maybe it's with USPS and they didn't know how to provide a tracking number to me. Yeah... right...
12-Oct: (54 days since left China warehouse) posting published. No further updates from vendor nor on the trackers.

Learnings
After over 40 days days of waiting and multiple requests-for-update, I finally heard from the vendor. They indicated that there was a "problem with logistics" and that they would cancel my order, returning my $50. I wonder if it will be another 40 days before I see my $50, if ever. So, what did we learn from this? Well, I learned how to track a shipment from China using AfterShip and Track17. I think we all also learned that no, you cannot get a 56"W x 22"D x 64"H, 645 pound tool chest shipped to you from "La Palma, CA" (read: China) for $50.

Husky 52 top
and bottom cabinets
I do wonder what was actually shipped from China, where it US-landed on 5-September, and what its final destination was / will be. I mean, the tracking number was valid for something leaving China for the US. I suspect, whatever was sent will not go back to China. Instead, will end up in a LA-area warehouse for local sale, covering the real cost of manufacture and shipping with some profit cooked in. Maybe it was pre-arranged swiped off the dock a-la the second season of HBO's "The Wire". But, why the internet ruse for $50? Perhaps there are import limits placed on the local-to-LA-area seller, and this is an end-run around that? Maybe what was shipped was something else entirely, and they just needed a cover story for customs. I don't know, but there is a reason the too-good-to-be-true tool cabinet/chest combo experienced a "problem with logistics" when I have never had that experience with Alibaba or other clearly-direct-from-China orders from, like, eBay or whatever. I did discover, however, that this exact tool chest set up is available from Home Depot for $1500, and most of the images on the 2 websites are identical. Before you ask, yes I have been watching the account I used to place this order, looking for suspicious activity, and no, there has not been any.

Cabinet Options
Husky 41 bottom
I realize that I will have to break down and buy a real tool cabinet (maybe a topper chest too) if I intend to get my tools in order. The combo bottom/top "red rollie" I have now is too small (27" wide), to the point where I have tools sitting on storage shelves.... or worse, sitting in a pile on the crowded garage floor. In short, the current-state is not sustainable. I learned that too: thinking about tool storage opened my eyes to one of the underlying factors to my garage disarray. So, what are the real options out there?

Like I said, Home Depot has this exact unit for $1500. Home Depot has a Husky (this, pictured alongside "Learnings" above) that's 2/3 the price (at $1000US) of the Milwaukee brand, but 52" wide rather than 56. Of course, for 1/2 of that, I could just get the bottom 44" deal from Harbor Freight I linked at the beginning, and get the upper later, if I feel the need for more. For that matter, I could look at Husky's 41" (picture on the right) for about the same price. The Home Depot models have things like integrated power strips, a bottle opener and soft-close drawers. I figure you're paying for those, so if the prices are otherwise close, where is that difference getting made up?
 
US General "44" bottom
I have been unable to find drawer spec's on these US General "44" cabinets. So, I went to Harbor Freight with a measuring tape. The cabinet is genuinely 22 inches deep but only 42" wide, not 44. I know. It puzzled me too, so I measured twice. The image on the right here has the measurements I took. The drawer width measurements are the inside space, between the sidewalls. For height, I measured the distance from the deck with the rubber mat installed to the bottom edge of whatever is above it, be it another drawer or part of the cabinet. By measuring the actual usable space, I hope these measurements help others. I expect that as I plan my shop tool storage upgrade, these will be useful.

Comparing
As a way to consider the various options, I took the published "cubic inches" of storage and divided that by the price to get square inches or storage space per $1US. In all cases, when just the lower cabinets are considered, the square inch per dollar is lower/worse than when the top is added. For example, the upper for the US General "44" costs $330, but adds 11700 cubic inches of storage space (35.45 square inches per $1US). Since I don't know if I need an upper, I just considered lowers. In order of most to least (square inches per $1US) with some other data bits:
  1. Husky 52           - 22934 cu in -  9   drawers (35.28)  - $1000US
  2. Husky 41           - 17221 cu in - 11  drawers (34.44)  - $500US
  3. US General 44   - 14000 cu in - 13* drawers (28)       - $500US <- $600 as of 6-Nov
  4. Milwaukee 56    - 23583 cu in - 10  drawers (26.2)    - $900US
  5. US General 56   - 21500 cu in - 11  drawers (25.3)    - $850US
Unless you are just going to throw everything in your cabinet with no organizational thought, overall capacity is not terribly informative. The number and shapes/sizes of the drawers really speak to use more than an overall number. So, I need to consider that against what I need. For me, overall footprint and how well it will compliment my existing "red rollie" are also factors. I intend put hands on examples of the Home Depot offerings before making a decision, but I am leaning towards the US General 44 (asterisked) because of the 2-3/4" most-shallow drawers compared to the 2" most-shallow from Husky and Milwaukee. And because there are more of them. Impact drivers and some larger wrenches would not fit the smaller 2" clearance without laying them down, defeating some of the storage "gain". Also, those other cabinets offer a few large drawers that the US General does not. For me, those big drawers may not be very useful, or space-wasteful, attracting something that could just as easily sit on a shelf (like my MityVac or Dremel, still in their plastic carrying cases). Last, I have seen negative reviews about the plastic bits in the soft-close drawers breaking in a couple years, so that might be influencing my thinking too.

That's it for today. When I get to solving my tool storage, and sorting the garage, I'll post on it. I do have to spend some weekends organizing in there. You'll know when that's happened by the lack of interesting car-related posts... like this one. Hahaha. Thanks, as always, for following along-

Tuesday, October 5, 2021

Resolving the Stammer

In the 2 major trips I took this Summer (2021), my road reports focused mostly Hapy's handling, the wind and the traffic or road conditions. I mentioned, sort of in passing, about the engine stumbling or stammering, having an error code thrown, and the occasional blanket of smoke. Today's post covers how I resolved this condition.

I should call out that the last trip of the season (for Hapy's birthday) did not include a code being thrown. He struggled into the headwind on the way there, but cruised with a tailwind on the way back. In neither direction did he throw a code nor dump smoke, but there were bumbles. So, I did this maintenance so the next trip would not be wanting for power.

P1550
Let's start with the code that was getting thrown: P1550. This indicates: Solenoid Valve for Boost Pressure Control (N75) - Control Deviation. in short, the thing that controls the turbo is not behaving consistently. So, the turbo is dumping boost to protect the engine. The result is a loss in power, sometimes a considerable loss. When I first noted the stumbling engine, I assumed it was fuel related. I replaced the clear fuel filter, because it had some stuff in it, but while that may have helped with consistent fuel delivery, it did not meaningfully address the engine stammering.

As I reflect back on the drives, we should have had WAY more power. I just got bigger nozzles and had the computer chipped. We should have been flying down OR-22, limited solely by the completely soft setting on the adjustable shocks. Instead, I was back to climbing hills in 3rd. It didn't register while we were driving, but it is now. Since we were sporadically getting a P1550 code, the turbo was sometimes dumping boost on the ground.... and creating a nice smoke blanket in the process.

Vacuum Lines First
stock hoses
Throwing parts at a problem is one way to solve it. Most people don't like resolving that way, though. When you have vacuum issues, which a P1550 error code usually means, there are some parts you kind of need to throw at it. If you only want to change the one thing that's wrong, you need to check all of the vacuum lines and appliances (turbo wastegate, N75, N18, EGR, ASV, vacuum ball, brake line, etc) and replace the one that is not holding pressure. The least expensive solution is to disconnect and re-connect all of the hoses. Sometimes they work themselves loose, and when you put things back together again, they just work. While cheapest and least guaranteed, this is also the least satisfying path.

If your vacuum lines are over 10 years old, like the ones on Hapy are, then you are due for replacing the lines anyway. Many of Hapy's hoses removed with little effort, almost falling off. Others were brittle and baked on and some others looked like they could have been replaced a couple of years ago. My hoses were following the stock pattern, but the other 2 valves (for Exhaust Gas Recirculation - EGR and Anti-Shudder Valve - ASV) were just blocked off. So, I switched to the simplified version (image below, courtesy of DaveLinger of TDIClub), leaving the unused valves in-place and wired, but without a vacuum source. This should reduce the opportunities for vacuum leaks to appear in the future.

There are kits on the 'net for a couple of meters of 3mm hose and a couple of meters of 5mm hose. The 5mm is for the line from the N75 to the bottom of the turbo and from the N75 to the air cleaner. The rest on Hapy are 3mm, but from looking at the diagram, I would expect that the line from the "T" to the N18 should also be 5mm. All of the lines I removed from Hapy were 3mm: I didn't have any 5mm when I did these 10 years ago. I am sure the VW engineers used the bigger diameter hose for a reason, though, so I installed 5mm hose to/from the N75. Anyway, replace one hose at a time, cutting the old hose off by slicing along the plastic nipple (to avoid breaking it). This will cost, like $30US, in hoses and in about an hour your hoses will be good as new. Possibly better. P1550 possibly fixed.

Brake Booster Line
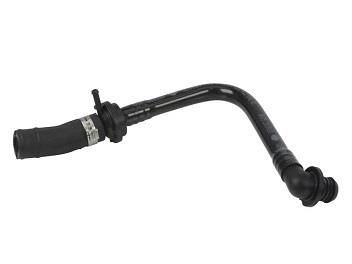
So, you still have a code or lack of power? Next, I would replace that big vacuum line from the vacuum pump to the power brake. These age and crack like the others, but the replacement is not in the hose kits. For another $30US, you can replace this. I was about at this point when I kinda remembered that my brakes were not as responsive, and I had to push harder to get the bus to stop. Sometimes. I had thought it was weight-related and even hit a trucker scale on the way beck from 4Peaks to see if I was especially heavy (4400 pounds, btw). I wasn't. Perhaps I was stopping with only partial vacuum boost or even power boost free. Hoping the power booster on the brake was not the cause, I continued down the path of parts I had on hand. My hose was original, and while there was a little cracking at the vacuum-pump end, it looked pretty good. Still.. you can't tell if a hose is failing by looking at it. Glad I replaced it.

Replace the N75
no EGR, no ASV
Last "inexpensive" thing to look at is the N75. I put quotes around it because it is still $70US. I suppose the vacuum ball or the little grey/white check valve could be the issue and these are fairly inexpensive. If you are still getting the p1550 after all the replacements above and the N75, you may have an issue with the wastegate actuator, or your brake booster. Remember the booster failure on Oliver, the MGB? For reference, here are the links for the finding and the fixing posts. 

Replacing the N75 is usually as easy as replacing the hoses. 3 hoses and a 2-pin plug-on-a-cable connect to it. It is held to the firewall with a couple 10mm bolts. I ordered both the hose kit and the brake booster line as well as a N75 when I attacked this problem. Since my engine is a first-year ALH, the 2-pin plug is different from most others, so the N75 on-market does not direct swap in. The plug needs to be re-wired or the pins pushed out of the old / into the new. I left the N75 in my supply heap and just did the lines. I figured that if I need to cut some wires or play with the pins, I want to be sure that it will actually solve a problem, rather than just create work. I had to remove the air intake to get to the vacuum lines so I cleaned the air filter while it was in-hand.

Test Drive
With the vacuum lines replaced and simplified, I was ready to see if the stammering issue had resolved. Prior to doing this work, I was still driving Hapy around as my "daily" driver (quoted because with the pandemic I don't actually drive everyday. Maybe I should say my "weekly" driver), and I was still getting sporadic stammering issues. So, I figured if I could just drive to my favorite burrito place (Taqueria El Gordo) without a stammer, I'd have solved the problem, and gotten dinner. I say that because it is just far enough away for the stammering to appear. Even if it didn't solve, I would still have a killer burrito. It was on a drive to Gordo's that I could easily re-create the stammer problem within a short trip, so I figured it was a decent test-track.

What's that saying about "the best laid plans"? Well, instead of going to the burrito place, Boo and I drove right past it and out to Cornelius (west of Hillsboro) to see some live music. Hapy suffered no stammering, and he had plenty of power. I didn't really put my foot into it, but he popped off the stop lines well. At no point on the drive there and back did he stammer, nor lay down smoke. I am calling this solved: failing vacuum lines. 

That's it for today. Thanks, as always, for following along-

Tuesday, September 28, 2021

Zed's Slow Crawl into Fall

It's time for another update on the slow-moving restoration effort on the 1979 Datsun 280ZX lovingly called "Zed". Completely unrelated to Zed, Nemo, the 1997 Audi A4 was sold to a family friend. While he is no longer a permanent resident of our driveway, I expect there will be some ShadeTree adventures as he is improved upon.

Where Were We
p-side front fender gap
We entered the Summer with the goal of having Zed painted before the weather changed from warm-dry to cold-wet. Some years, that change happens as late as Halloween. Other years, like 2019, we lose the end of August to things like wildfires or an early rainstorm. With such a wide range for when the end date might hit, I worked a bunch in the early Summer to set myself up for paint. This year, we have had multiple "false-fall" weather periods, and this week looks like solid rain, leading me to believe that the goal will not be reached.

Recall, we hit a snag with CoViD-19 related manufacturing delays on the body kit. I ordered the kit in May, and it delivered in August. During the delay, I perfected the body as best I could, got the final primer shot and clowned on other cars while I waited. Once the kit arrived, I let it sit in the sun on my deck for a couple of weeks to complete the off-gassing while I took a few camping trips. Of course, sitting outside like that allowed the various pieces to get dirty and have nature fall on then, so they are not as pristine-looking as they were on delivery day. Regardless, they need to be sanded, and primed at minimum before painting, so this just added a cleaning step before the sanding.

Front Bumper
d-side front fender gap
To prepare for the front fiberglass bumper install, I first needed to expose the steel bar wrapped inside the chrome and rubber bumper originally installed on Zed. I had removed the bumper, brackets and all, earlier for access to the radiator supports for primer shooting. The bracket-to-body bolts are 17mm, and there are 4 per side. The bracket-to-bumper nuts are 14mm, and, again, there are 4 per side. I addressed the surface rust on the brackets, shot them with the same finish primer and set them aside.

The original / stock bumper cover is held on with a myriad of bolts and screws. The (10mm?) bolts removed easily. The screws were so rusted on, I had to cut them off with a grinder. Once the steel bar was exposed, I could start test fitting the bumper. I spent a while just fiddling with it: setting it on, tilting it at various angles, etc until I could see how I wanted it. I temporarily mounted the front bumper brackets and the steel bar next, and sat the bumper cover on top. The original location of the bar was 1.5" too far forward.

To recess the front bumper, the gas in the mounts needs to be released, and then the bracket pushed backwards into itself. To release the gas, the steel bar needs to be removed and then a Phillips bolt head is exposed. Remove the bolt, and the gas is released. Then, push the end in. I measured the 1.5" and marked it so I knew when I had it in the right spot. At first, the brackets did not want to compress, even with the gas gone. I encouraged them with a rubber mallet and pushed until the bracket compressed to my mark.

Once compressed, I re-attached the steel bar, and then set the new bumper cover on the bar. This time, it set exactly right, though the ends initially appeared much wider than the fenders want to sit (witness the top two pictures). After about an hour of fiddling with it I found that when the ends of the fender rotated upwards (and the fiberglass shifted left-right a little bit, the steel bar readjusted, etc), they were much closer. Still, actual mounting to the fenders will wait until I have the fenders secured firmly. The fender bolts, like most of the others, have disappeared. The internet thinks these bolts should be M6x1, but I could not even start threading that size. They are also not M5x.8 as those fall right through. I tried generic slotted #12-24 machine bolts next since they are effectively "M5.5", though they also fell straight through. I will return to the M6 bolts and see if I just gunked up the threads with primer. Anyway, with the bumper in place, I can see that I will need to open up the turn signal indicator holes a little bit to allow for the lenses and bulbs to be maintained without removing the bumper. Also, I expect there will be some shaping needed where the hood opens since the bumper is 1.5" deeper.

Rear Bumper
The original rear bumper was the only real rust on this car, which is why we tossed it. I sourced a replacement bar and rear mounts from our friend in Hillsboro. After addressing the surface rust on the brackets similar to the front brackets, I acquired nuts to mount the brackets to the rear (M10x1.25) and attached them. I needed a washer between each of the outer holes on the mounts and the body to angle the mounts inward enough to fit the rear bumper. Onto the brackets, I set the steel bar and test fit the rear bumper. Again, the bracket pushed the bumper out too far to fit. So, I repeated the gas-out process, pushing the rear bumper in an inch. Unlike the front, the rear bumper does not provide an easy means of getting your fingers on the mounting nuts and studs. But, with some perseverance, I got one nut on each side so I could see how it set. As good as the front looked, the rear looked even better. The kit snugged into the body contours, as you can see in the picture below.

Setting the Gaps
p-side rear alignment
When C bought this car, it had been messed up by the prior owner in 2 ways. First, he stripped the interior in the interest of saving a few pounds because he wanted a drift car. Second, he drifted the car into something or someone, damaging the driver door and front fender. We replaced the front door with a donor from WA, but tried to straighten the fender. Off the car after many days of working on it, the fender looked great. Once I re-mounted the doors, hood and rear tailgate, however, the gap between the leading edge of the driver door and the trailing edge of the fender could not be resolved. The edge along the front valence (in front of the windscreen) and above the door also did not line up well. The fold in the driver-side fender had erased the trailing edge and attempts to re-establish it by my amateur hands did not get it there. The image below shows how far off the fender-to-door gap is; the misaligned edge above the door is slightly visible. The passenger side, however, gapped perfectly, with about 1/4" along all of the seams of both the door and the fender so I have a target for the driver side. I spent a couple of hours shifting the door around and improved the gap at the top, but the long edge between the fender and the door could not be resolved. I did not reproduce that edge on the fender quite right.

The efforts to straighten the driver fender has been instructive, but, I will be replacing it. Unfortunately, these panels have not been produced in years, so I needed to find one from a donor car and the one I found is not dent-free. Fortunately, the edges are perfect and it aligns properly with the hood, bumper and driver door. So, once the dents above the wheel well are coerced back into place, the panels will be right. I will then set the driver-side gaps so we have a solid base for the kit. Then, I'll finalize the placement of the bumpers.

Bumper Plan
Both the front and the rear bumper will require a little bit of fit and finish. The rear aligns very well, with only some small smoothing needed to achieve the line I am looking for. The front may require more, even after the fender fit has improved, the gaps are larger. I will see how much this gap closes once I send a couple of screws through. I expect I will need to add material to the inner edges of the bumper along the fenders to make it look right. Once I have the front and rear looking as I would like, I will shift to the two side panels that run under the doors between the wheel wells and then priming the kit.

I do not intend to seal the seams between the fender/quarter panels and the front/rear bumpers. Instead, I intend to have a clean, visible, seam line. This way if there is some kind of damage to the fiberglass from parking curbs or a small accident, the repair will not have to extend past that seal line. This also gives me the opportunity to try mixing flex additive into the fiberglass bumper paint. The "flex additive" increases the paint's willingness to bend without cracking. If I sealed the seam and painted the body as a whole, that flexing additive would need to be part of the paint on the seal or further up fender/quarter panel paint. Otherwise, there could be cracking at the seam, forcing the repair into the steel. This way, the bumper can be removed, repaired/replaced, painted and installed.

What's Next
The ultimate question remains: will the car get through paint before the weather changes? No, but I would rather have it look right than be hurriedly finished. First, I need to get the driver fender replacement undented and prepped. Then, I will get the body kit fitting completed with mounting holes drilled, etc. This would allow me to finish the kit separately (clean, sand, Bondo, sand, clean, possibly high-build primer, sand, clean, finish primer, sand, clean, paint) and then mount it when it's ready. I don't expect a weather miracle that would allow me to get all the way to the end of that task list, though. I expect the weather will turn for good before I'm through primer. Actual paint on the body and the kit will have to wait until next year.

Thanks, as always, for following along-