Showing posts with label cover. Show all posts

Tuesday, October 13, 2020

Enter Rainman

In much the same way Metallica describes the arrival of Sandman, we in the great Pacific Northwest greet the seasonal rains. Today, I describe alternatives to prevent the rain putting a hard stop on all of our projects.

Tarp
We start with the most obvious water protection: the basic tarp. I tuck you in, keep you free from sin... til the (Rainman) he comes. A tarp thrown over your made-of-steel project works great if you are trying to hide it from the neighbors. The benefits end there, however. No matter how awesome-fantastic your tarp is, it will capture / trap / hold moisture.. against that made-of-steel project. Your best-case outcome is that you have lots of mold or moss growing under there come spring when the rains stop. Your worst-case scenario is your project acquired a new rusty patina or one or more of your seals leaked and now you have mildew inside or rust inside. In the end, I think throwing a tarp over your project is possibly worse than nothing at all. At least when it is uncovered you will feel motivated to do something about it. A tarp just hides the truth from you.... until you remove it. All winter you're sleeping with one eye open.

Car Cover
I got one of those fancy $200+US bus covers from BusDepot a few years ago. It worked great the first year or two. After that, the UV light or something caused it to not work so well anymore. Last year, when I pulled the cover off, there was moisture all over the inside of it, mold on the fiberglass poptop, and a slime on the rest of the bus. Yuck. I know my seals are good, so this year, he is going without a cover, and I'll just cycle the cabin furnace (See Parking Heater 1, 2, 3, 4, 5, final) more frequently to keep him dry inside. Recall from Seasonal Cleaning, I use a desiccant as well. In the end, a car cover is little more than a collection of tarps that have been sewn into the shape of your car. They may last a little longer than a single season, but for the price, it just makes more sense to invest in something more.

Instant Canopy / Sun Shade
So, we can't have some plastic sheet draped over a car for 7 months and expect the car to be better for it. Who knew? So, we try one of those $99 pop-up canopy things. These are great in the summer when you're working in an otherwise sunny spot. They go up in minutes and you can do it by yourself. Most excellent. Of course, they are only 10 feet square, so the only kind of vehicle that could completely fit underneath it would be a motorcycle. Not even Oliver, the MGB, or the old corvette pictured here can completely fit under one. But it's close. So, you move it around to create shade where you're working. Enter Rainman. These things cannot withstand rain. I mean 0 rain. They are not designed for water to run off the edges. If you look at the picture on the right, you can imagine this scene: it pools up along the lower edge, slowly stretching the top until you have these large pools of water suspended over your project. At $99, the structure is not terribly strong, so something bends and then another thing breaks and suddenly, you have gallons of water dropping onto your project all at once. And, your canopy is trash.

Farmer Market Canopy
How about an upgrade? The canopies that the vendors use at farmer's markets and music festivals, for example, are great. They can withstand some wind, and some rain. They come with detachable sides. So far so good, except they cost about 3x an instant canopy. Of course, they are also 10 feet square, so no normal car can fit inside, just like the $99 deal above. I got one of these a while back, and I am using it for now, while I await my next solution. I have removed the front clip (front fenders and hood) from Zed, so the rear 2/3 are covered by the canopy, and put a tarp (yes, I know they are not great) over the engine compartment. No pooling water. The wind doesn't seem to touch it. Still, the 10 feet deep part makes it fairly unusable for working on a car in the rain, unless you don't mind either having half of the car sticking out into the rain while you and one end are dry or having the other end nice and dry while you and the thing you're working on out in the rain. The latter of those seems silly, especially since you just spent $300US on a rain-capable covering.

Temporary Carport
My last effort to foil the Rainman is a Harbor Freight temporary carport. These are 20 feet long by 10 feet wide, have no sides, but appear to be able to withstand rain. I don't know about wind. The videos I have seen online are unclear since most of them show a carport that is mostly protected on the sides by trees and/or shrubs or by a more permanent structure like a shed, garage or house.

Unfortunately, getting one of these things is becoming quite an undertaking. It seems that every restaurant that wishes to remain viable during the rainy season has concluded that these are the best way to keep their patrons dry during the CoViD no-inside-seating thing. As a result, as soon as a truck arrives in the greater Portland area with some, they are gone. So, I went online and ordered from their website. In a normal world, delivery is about a week. In this modern dysfunctional dystopia, I can't get an estimated delivery date. Why? Between COViD and the wild/forest fires, FedEx has effectively ground to a halt in the Portland area. For example: I ordered primer for Zed in early September. It took 2 weeks for it to get to a Portland FedEx warehouse, and it has sat there since. I called FedEx and asked about it. The response? Forest fires. They could have said "sunspots" for as helpful as that was. We still have no idea when it will move out of the warehouse. I may have to take a Saturday and drive out to the airport to collect it in person.

Temporary Garage
Similar to the carport, this is a Harbor Freight item which costs more ($170US versus $120US), but it includes sides and a roll-up door. Based on what I can see in the videos, however, you can't assemble them without the sides, so that reduced flexibility turned me off to them. Recognizing that I could roll up the sides, I looked for them at the big Harbor Freight in Tigard, and they were out of them just like the carports. So, either the restaurants are getting desperate or lots of folks decided that it was time to fight off the Rainman this year. Or, maybe, the supply chain issues we are all experiencing with seemingly everything has hit Harbor Freight as well. Regardless, I will wait for FedEx to get their act together since I'm already into this solve with an order, and my packages will eventually all be at the airport, waiting. I suspect these garages are fairly good, though the reviews indicate that they are not as weather resistant as their carport brothers. Maybe the sides catch more air, causing the structure to fail.

Car Content
After the last post about Zed's Bondo (See Bondo Zed), I continued to perfect his body with cycles of Bondo aplication and sanding for another couple of weeks. I found a technique that worked very well for getting the patch fairly perfect: on my sanding block, I had an old 320 grit paper. I held some some 80-grit onto the sanding surface and sanded down until I got to where I wanted to evaluate it. I then set the 80-grit aside and did a quick cuff with the 320 already on the block. This got the Bondo as smooth as the body so I could check for dips without getting false feels from the rough Bondo. And, this allowed me to use one block with 2 different grits, speeding the process.

I guess that's it for today. I have some winterization for Hapy to do: pulling the luxury battery, removing the cushions and fabrics, etc. Of course, that's hardly post-worthy stuff. There are things that need doing on Nemo, the A4, and Oliver. I just need to create a workspace that will keep me and the projects out of the rain first. I helped T load out of one garage bay, leaving just a few of K's belongings blocking up Oliver's spot. When the carports arrive, I'll get those up and get the projects moving again. Until then, we sit and watch Rainman have his day. Thanks, as always, for following along-

Tuesday, March 5, 2019

New Seat, What a Treat - Headrests

This is the final installment of the seat reupholstering effort. I have stripped down, sanded, rust-treated and painted the original seat frames (in Part 1). Onto those frames, I have installed the seat webbing (Part 3), new hard-backs (Part 2), foams and covers (Parts 2 and 3). The seats have been installed back into the little car, with head rests, but I have not yet talked about that upholstery effort for those. I will cover that today.

Headrest Extraction
First, you need to separate the headrest from the seat. Obviously, but it's not that easy. With a convertible, moisture gets everywhere. In the Pacific Northwest, moisture gets everywhere. Add those together, and moisture truly gets everywhere. Even into the headrest tube, and enough of it to rust through chrome. My driver seat was easy, but I had to resort to these more drastic measures for the passenger seat: with the top down and the seat still bolted to the floor, stand behind the seat, place one hand on either side and lift as hard as you can. If you are lucky, it will come flying out, bang against the ceiling and not hit you in the head on the way down. If you are unlucky, you may just hurt your back, and the head rest is still stuck. Seriously, these buggers can be that stubborn. Use your best judgement, but it needs to come out to do the seats at all, so if you cannot get it free, forget about recovering your seats.

Old Cover Off
Once in hand, look at the underside of the headrest. There is a plastic strip that runs along the bottom which is held on with 2 Phillips head screws. Mine were really rusty (so I ultimately replaced them) so I needed to take care coaxing them out. If you keep yours, it may be worth soaking them in vinegar to get them rust-free Set the plastic strip aside for cleaning with dish soap and grab a thin slotted screw driver and a pair of needle-nose pliers. The plastic strip covers up staples which hold the cover on. With the screwdriver, work the staples free enough for you to grab with the needle-nose pliers and then pull the staples out. If you are not concerned about the old cover, you can tear the cover off and pull the staples afterwards. I prefer to not destroy things, but everyone is different.

With the staples out, the cover is only holding on through friction. Pull the cover and the foam off of the head rest stem. Do this whether you are reusing the foam or not. If it is original foam, I strongly encourage replacing it, though it can be hard to locate for some cars. I found the MGB headrest foams at Mirror Trim in the UK, and while the cost is a little high, it was worth not having the old foam disintegrate while installing.

Repair and Rust Treat
In my case, there was rust on the square metal head rest "head" as well as down near the bottom of the chrome post. The wood into which the staples were driven was shattered in the driver-side headrest (passenger side wood was in great shape). So, there was some repair and rust treatment needed. First, I taped off the top 3 inches of the chrome post with painters tape. This part of the post on both headrests was in decent shape, and I was opposed to painting them. Once taped, I sanded the "head" thoroughly and scuffed the rust off the chrome below the taped off section. I felt this chrome would not be seen, but needed to be clean for the head rest to work better. Then, I shot the "head" with some gloss-black Rustoleum and removed the tape. The wood strips in the driver head rest needed to be replaced, so I took one piece that was still intact and used it as a pattern. From my woodpile I found a strip of cabinet edging that was the right height and width, and cut two pieces to length. Before I started re-assembling, I cleaned the plastic strips with dish soap and found 4 Phillips head wood screws which would fit through the holes, sit flush once installed and were about the same length as the originals. I used "size 6" thickness, 3/4 inch long wood screws.

Re-Assemble
The headrest foam and cover are not uniform. Both are side specific (front and rear). The nicely tailored edge is on the edge from the front while the un-hemmed edge runs from the rear, and under the front, hemmed edge. The foam is thicker in the front than the rear, but that part is a little more obvious. Similar to stuffing a pillow into a pillowcase, stuff the foam into the cover, making sure that the corners are in the corners and the edges align with the edges. The foam is way bigger than the cover, so I used my thighs, arms, and abdomen to get the foam into the cover. Then, it was a considerable finger exercise to get everything aligned. Once set, though, you will see a slot in the foam for the "head" of the headrest to slide into. With the glossy paint, it slides right in. On the passenger head rest, I found I spent more time fiddling with the head rest post to get it at a depth I liked, but you may not have that issue, as I did not with the driver side. Shrug,

Staple and Screw
Before you grab your staple gun, I suggest that you take your nice and clean plastic strips and test fit them. Similar to the foams, the strips are not mirror-images, the rear side is thicker, but the distance from the post to the screw hole is the same on either side. So, consider where the screws will go, and then plan your staples. Remove the plastic strip, pull the rear flap forward, and under the front (hemmed) flap and hold it in place with your finger. I held it in place where the screw hole was so I would not lose track of it while stapling. Check that you are centering over the wood and place at least 1 staple on either side of the screw hole. There were 2 per side originally, so I did the same, making sure that the amount of stretch across the headrest was uniform as I did. There is a lot to keep track of in order to make it look good and lots of ways you can lose focus so it looks bad. Just do not staple until you are sure.

Once the staples are in, the hard part is over. Slide the plastic strip back into place and screw it to the "head" with rust-free screws. If you ever wanted one of those seat belt keepers (like these in the picture), now would be the time to install them. I do not like losing my seat belt, reaching around for it nor having it bang against the car when I take it off. These little plastic keepers really help, though getting access to a parcel stowed behind the seat is not as easy.

Re-Install
This should be straightforward. In my case, the seat foams were manufactured without holes for the head rests. Perhaps the seat foams were developed to span many years, including years without head rests. Regardless, If you did all-new foams like I did, you will need to find the rectangular hole with your fingers and cut the foam. Take care as you align the cover, the foam and the head rest post. Do not simply grab the chrome lip on the seat cover and push/pull. The chrome lip will easily separate from the cover if you do that. Once you find alignment, trim what little foam you need to and slide the head rest into the seat. I took an extra minute and applied some PB-Blaster brand white lithium grease to the post so it would move more freely in the future. I also applied this grease to the cleaned-to-the-steel seat rails and workings so the seat would slide forward and aft more easily. These little final touches really made a difference in the usability and perception of the seats once you were sitting down in them. I highly recommend taking the extra few minutes to apply the lithium grease.

So that's it. Over the course of about 2 days per seat, they are completely renewed. New foams, new webbing, new covers from top to bottom. The headrests are more functional, the seats tilt and move more freely. Most importantly, they are comfortable. Now that they are installed, I will either finish the wiring of the seat heat, put some effort into the amplifier for the speaker box or carpet the trunk. I will see how I feel when I get to the garage.

Thanks, as always, for following along.

Tuesday, February 19, 2019

New Seat, What a Treat - Part 3

Today, I'll complete the story of getting the driver seat stripped, recovered and installed. When we left off (See New Seat, What a Treat - Part 1 and Part 2) , the old covers had been removed and set aside with the old padding, hog rings and ratty hard-back. The upper seat had been re-foamed with a heat unit, and recovered with a new hard-back. Now held in place with hog rings, it is a completed unit.

Back to One Frame
Before getting to the lower seat, the upper and lower halves need to be put back together. This is quick work with a couple of 1/2" spanners per side. Over each of the hinge points, a plastic protective cover is installed. These keep fingers, cover material and grime from getting into the hinges. They are held on with a single Phillips screw each and are side specific. I had washed these with dish soap, removing 30 years of gross beforehand. At this point, I tested the action of the seat release lever and the movement of the hinge to make sure nothing was binding and that it had a smooth movement. Check.

Lower Seat - Webbing
The upper cover was similar to a pillowcase, with an opening at one end (the bottom). The lower cover only has 4 sides: top, front, left and right. So, it is more like a fitted table cloth. No forceful stuffing to get everything to fit this time. While that sounds easier, the material does not stay put as easily, so I found myself double and triple checking everything at each step.

First, we start with the webbing. I found little advice for how to do this, and based my entire plan on pictures I found on the internet (like this one on the right from MGExperience). The webbing has 4 straps which run left-right and 2 straps which run front to back. These straps are loosely threaded onto a thin, 3-sided, u-shaped metal bar (I'll refer to as the U-bar). The replacement kit arrives with 12 little hooks which hold the webbing contraption to the lower seat frame. The frame has 16 little holes: 2 along the front, 2 along the rear, 5 along each side... and one in each front corner. Apparently, those corner 2 are unnecessary and there is an extra pair along the sides for personal comfort configuration. The bottom of the "U" faces the front of the seat, so the 2 holes in the rear of the frame are for floppy straps that are not dire-connected to the thin metal U-bar. I started at the front, threading one hook each through the gap at the end of the strap, around the U-bar and then into the hole in the frame. With the front done, I worked my way down to the rear, doing holes a strap at a time, one side, then the other. I left the last pair, closest to the rear unused, choosing for the more forward pair thinking it would be more supportive. Last, the rear-end of the straps are hooked into the frame. To help prevent the straps from cutting through the foam, I put a small thin white hand towel on top of the webbing. Others use burlap or canvas. The hand towel was available, free, fit, and will do the job at least as well. There was nothing between the foam and the webbing when I tore the seats down.

Foaming
Unlike the upper seat covers, the lower seat covers and foams are side specific. On the underside of the foam, you will find either LH or RH embossed into the foam. This is because the little notch-outs nearest the seat hinge are not the same. Also, the seat edge along the transmission tunnel is more straight and narrow than the seat edge which runs along the door sill. This allows the seat to move forward and aft on the seat guides much more easily, without hanging up on the transmission tunnel. Since your backside sits in the wide center anyway, you may not really notice. The covers are cut differently, just as the foams are, so match them carefully or you'll be re-doing part of the job. Ask me how I know :)

Lower Seat - Covering
With the webbing in, I pushed the lower seat foam onto the frame and took a seat. Wow. It was like the difference between an old saggy couch and a nice new desk chair. Firm, but totally comfortable; I felt I could sit in it for hours. Those few minutes were inspiring. I pulled the foam and attached the other seat heat unit to it. Similar to the upper, I didn't cut the heater. Instead, I ran it from just behind the front edge all the way to the front edge of the upper cushion. I'll have warmth from the back of my knees to the top of my shoulders. Ha! Once I got the double-sided tape figured out, it attached and held well through the process. For more wiggle room, I tilted the seat upper slightly forward. I took out the new cover, oriented it where it belonged on the foam/heat unit pair and pressed it onto the frame. I say "pressed" because with the seat upper, it took more than just setting it. There was resistance to my getting it all the way back in place. Again, there were many cycles of fitting, adjusting and re-fitting to get the foam aligned with the seams. Minutes taken here are where you'll see the difference in the finished product.

Ring It Up
With the seat bottom where I wanted it, I tested it again (Ohh.. soo nice). If you are following this as a how-to, I strongly encourage you to try this in-the-car! You may find the seat too high. I, regrettably, didn't do this test. Instead, I started on the hog rings. I made sure the heat unit wiring was on the transmission tunnel side, like the upper. With the seat upper helping hold the rear in place, I started there (along the rear) with the rings. Like the upper, I pulled the material until it was well aligned and put 2 rings about a fist apart in the center. Again, following the pattern from before, I did each side of the rear, checking for alignment. Then, I switched to the front, and followed the same pattern: center first, then outer edge, checking for alignment, no wrinkles, etc. Last, I did the rings along the sides, starting with the edge nearest the transmission tunnel. Since the hog ring pliers I got at Harbor Freight were useless, I used my fingers to get them in place (not easy) and channel-lock pliers to snug them down.

Install
So, there were things I did, and things I would encourage others to do differently. I changed my disposable gloves often so I would keep the seat clean. I covered the seat with a large trash bag for the same purpose. One of the things I had failed to do was test out the seat in the car before hog-ringing the lower cushion. Had I done that, perhaps I may have omitted one or more of the webbing straps. I say that because with all of the straps in, and the seat tilted fairly straight up, my line-of-sight out the windscreen is too high. Since the straps are what hold the foam up, I could have tested, removed one, tested again, etc before putting on the cover.

Instead, I carried the finished light-cream-colored seat into my cramped, filthy garage. I held it overhead and found that getting it into the car with the top up was simply frustrating. So, the seat went onto the dinner table while I lowered the top. Take 2: carry the seat high overhead, lowering into the cockpit. For some reason, all of the challenges I expected when I put in the old seats on top of the new carpet happened this time. I couldn't find the holes, then, when I found them, I couldn't get the bolts to thread. Then, once they were finally threaded, I realized that the seat runner was oriented incorrectly.... Last, one of the worst things happened: the front outer bolt and captive nut pairing got stripped.

Fix It
The bolt wouldn't come out of the captive nut, so the captive nut had to be separated from the new floor.... while holding my light-cream-colored seat loosely on top of it. I went the brute-strength method and used a pry bar. In retrospect, this was a great test of the welding of the floor we had done; the welds held better than the sheet metal. The nut released from the floor, the seat was returned to the table and I went looking for a replacement nut. I found one, and, with the welder I had used 18 months earlier to install the floor, I welded that nut into the hole created by the removal of the old one. I covered everything with canvas painting tarps before I welded so any possible errant spark would not land on my new top or new carpet. Since the top of the new nut didn't sit exactly flush with the floor, I slid a washer on top of the other front seat-mount hole to level the front of the seat. I left it alone overnight and the next day the seat went in easily.

I fiddled with the seat incline and found a spot that, while tilted a little further back than I usually drive other cars, the angle totally suits the MGB. This little car has a deep foot well and a short reach of the steering wheel, so it is almost designed for someone who has long legs and a short torso and arms... until you tilt the seat back a little bit. Now, instead of having the steering wheel nearly against your chest, you have some living space... and the angle lowers your line-of-sight through the windscreen such that your eyes are below the sun visors.

That's it for today. I will wrap up with a post about the head rests. Thanks, as always, for following along-

Tuesday, February 12, 2019

New Seat, What a Treat - Part 2

When I last posted about Oliver's seat (See New Seat, What a Treat - Part 1), I had completed the tear down. The old covers were sitting in a pile with the nasty foam and rusted up hog rings. The seat frames and head-rest metal were painted with black Rustoleum and hanging from the beam on the front porch. Today, I start the re-assembly process.

The new covers are a leather / vinyl blend where the part that you sit against is leather but the back of the seat upper and the edges which hang down from the seat are an advanced vinyl that feels leather-ish. This vinyl is fairly durable. The blend reduces the overall cost of the cover by a couple hundred dollars US versus all-leather. The leather is backed with some thin foam padding.

Seat Gets Heat
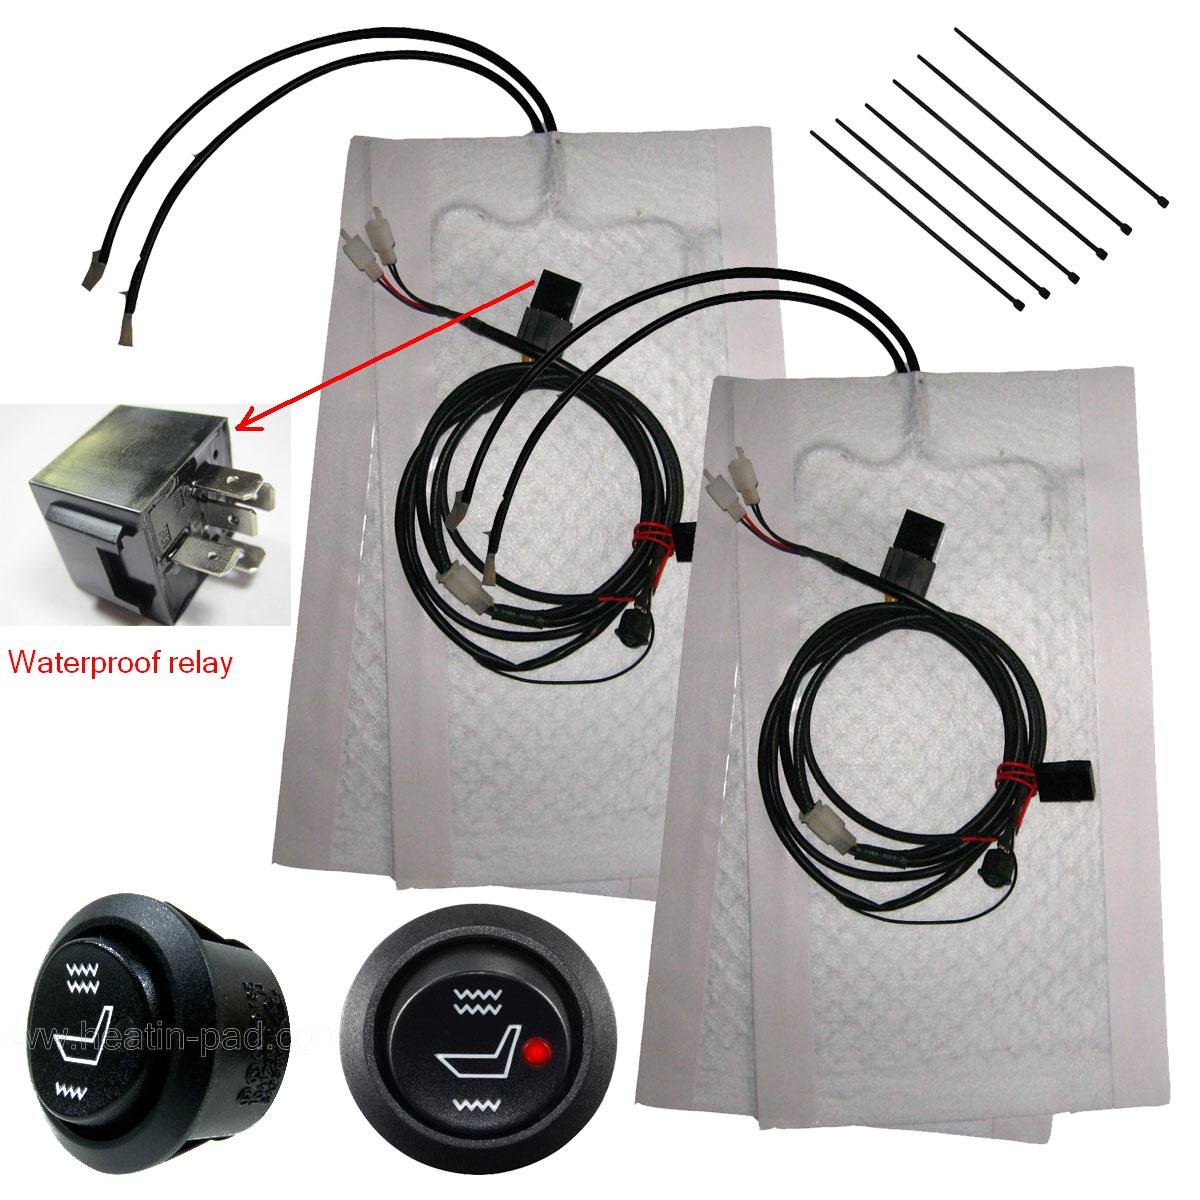
I decided that going through all the trouble of redoing the seats would be even better if I had seat warmers when I was done. While our Pacific Northwest is well known for it's long periods of rain, we actually do get stretches of sunshine, and not just between July 4th and October 15th. We get some nice fall and spring days. Every once in a while, we will get a few days of dry, but cold weather in the dead of winter. On those days I would like the choice of putting the top down and driving in the sun. Actually, having warm seats when it is cold nasty would be super welcomed too. So, as I acquired the foams, seat backing, webbing, hog rings and all the other bits needed to rebuild the seats, I bought a universal seat warming kit for 2 seats. I got a very simple kit with a 3 position switch for each seat that I could install into a fairly small hole. The heating part is a simple white rectangle that rests between the seat foam and the new cover. The base and the back have separate heating elements. While the instructions indicate that the pad can be cut to fit, I chose not to, recognizing that I could render it useless by cutting it incorrectly. Besides, the pad covered the entire seat back and the entire seat base, so we will be getting warmed from the back of our knees to our necks. Yeah.. that is going to be sweet.

These attach to the foams with basic 2-sided tape that runs the length of the rectangle along each edge. The instructions say to tape the pad to the foam before putting on the cover. Cool. Finding the edge of the 2-sided tape was the hardest part.

Upper First
So, with the heating elements figured out, and taped to the face of the upper seat foam, I started with the upper section or the seat back. I had read different techniques, but tried my own. First, I took the new seat hard-back and worked it into the lip around the rear side of the foam. The seat frame will later fit into this groove. With the foam and the hard-back as a unit, I fit the seat cover over the top and stuffed the corners of the foam into the corners of the cover. This is similar to putting a duvet cover on a big old comforter. The corners need to fit right first. Once the corners were in, I set the seam edges of the foam and then the seat back so the lines ran along the edges of each. Now that the foam, back and cover were aligned, I slid the seat frame between the foam and the hard-back. I did this slowly so the foam did not shift inside the cover. The result was exactly what I had hoped. The lines were right on the foam where they should have been. I realize that most auto upholstery is done by setting the foam onto the frame, turning the cover inside-out and slowly rolling the cover onto the foam while applying glue. It did not occur to me that I had missed the glue because the old covers slid right off the old foams, leading me to believe that maybe they weren't glued on before. I should note that after everything was assembled, I have seriously considered removing the upper cover and re-installing it the auto-upholstery standard way.

Ring the Back
With the cover in place, I grabbed at the bag of hog rings and the hog ring pliers I had purchased at Harbor Freight. The pliers were useless, so I chose not to use them. The hog rings that were supplied as the hog ring kit for this seat only had one size of hog ring, but the front edge of the seat back cover needed a larger size if it was going to be mounted the original way. So, I had to solve for clamping down the front edge different than how it had been or find a different set of rings. I decided to mull that over while I did the back. First, I needed to route the cable for the seat heat to the inside edge, so the wiring for activating the seat heat will run along the transmission tunnel rather than along the door sills. The rear side of the cover is held onto the frame with 4 square clips. I pulled the seat back as tight as I could while still retaining the shape and straight lines. Starting in the middle, I pushed on the inner 2 clips. These held the cover in place so I could do each outer clip with just a little tension. The seat back looked really good, so I started looking at options for the front edge.

Ring the Front
The front edge had been held on by 4 larger hog rings clipping to the large tube across the bottom of the back. Next to that large tube is a small tube through which the seat release is controlled. I decided to use the one-size rings on that smaller tube, and, after compressing the rings a little bit with my channel-lock pliers, I was able to use them. Similar to the rear, I pulled the material as tight as I could without distorting the lines (but centering the pleats) and did the 2 center rings first. I did the outer 2 rings one at a time similarly holding the material firm. Ideally, the large pipe would have been used. It occurred to me afterwards that as the seat back incline angle changes, the tension on the cover will vary because of the tube I used. If I am able to source an 8-piece set of larger hog rings, I may change these out without removing the seats.

Outer and Inner Edges
With the cover held on, I considered how to address the lower outer and inner edges which had been held in place with Phillips screws. I did not mention these in the tear down post, mostly because at the time they were a non-story. Down at the bottom, there is one screw on each side that passes through the cover, through a semi-circular, heavy, flat cardboard and then into the frame. You can see the screw head in the picture on the right. The cardboard fits into a little pocket on each side of the cover. I have been unable to find a source for a replacement. So, I put the old flat cardboard bits into the respective sleeves in the new cover, thinking that they, at the very least, would help the cover retain its shape. I chose to not re-install these screws since I could not determine how to best identify where the hole in the frame was without boring exploratory holes. I may come back to this later, though.

That's it for today. I will post about the lower seat, and the big fun of re-installing a light colored seat in a dirty garage later. Thanks, as always, for following along.

Tuesday, January 22, 2019

New Seat, What a Treat - Part 1

I had a few days off, so rather than spend them playing in the snow or taking a personal trip, I stayed home, and re-upholstered the driver seat of Oliver, the MG. Today's post covers the start of that journey. Sorry today's post is a few hours late.

Old Seat Out
Remember when I installed the old seats on top of the new carpet (See MGB - carpeting (part 2))? Even with the nuts jammed under the seat rails, the seats placed the driver kind of low in the car. Sure, it is a little British car, so you're supposed to sit low. But, there are limits. I figure my eyes should be about 2/3 of the way up the windscreen, and I was around halfway. It felt like I was sitting a hair over the floor, suspended by the vinyl seat cover and little else. I had planned to replace the seat covers, foams, etc last Spring when I had the small win-fall that netted me the new carpet. I just hadn't gotten to the work because I had other things going on, and I wanted to drive the car. So, with this small break, I had my chance. Starting with a basic 7/16" spanner, I removed the 4 bolts which held the driver seat to the floor and removed the driver seat.

I moved the seat upstairs to the shedroom. That room is clean, and all of the interior bits are stored there, so it made more sense than trying to do it in the packed garage or in one of the general living spaces. First, the headrest needs to come off. With the seat on the floor, I stood on the seat bottom and whip-sawed the headrest: pushing it all the way down and then yanking it back up. This violent push/shove blend actually worked, freeing the headrest in a handful of reps. I set the headrest aside, and moved to the Lower Cover.

Old Lower Cover Off
The lower cover is held on with 4 sets of 4 hog rings: one set along each of the sides. I was able to work them free with a small slotted screw driver, exposing the padding underneath. The padding was orange and tattered near the edges. When originally constructed, this foam would sit on top of a 3-sided metal hoop to which 6 rubber straps are attached. This webbing creates a little give to the seat, and provides the lift from underneath. On this seat, the webbing was in disarray. Most of the ends were disconnected and tattered. Fortunately, I had a replacement set for the refresh effort. The pad, cover and webbing were tossed towards the shedroom door and I shifted to the Upper Cover.

Old Upper Cover Off
The upper cover is held on with 4 square clips along the back and 4 hog rings below that, holding the front down. The hog rings flew off with a little pressure with a slotted screwdriver. I did my best to not damage the cover. The square clips needed more coaxing, and since I did not know about them, I had not ordered replacements, so I needed to be careful with the originals. Before the cover will slide off, the seat-angle arm needs to be removed. It is held on with a Phillps head bolt. Once the 2 sets of clips and the angle arm were removed, the cover slid right off the top.

Within the cover, I could see a few interesting things. First, the original foam was orange, and had tattered along the edges. The "hard back" was cardboard that appeared to not be original, nor standard-issue. It looked like a square of cardboard had been cut from a shoe box, or something. It had been taped, with duct tape, to the orange foam. Cool. The tape, cardboard and foam fell apart without much prompting. I think the cover was holding everything together. I tossed the mess atop the Lower Cover mess.

Separate
Now, I was down to the metal. I could see the rust spots, and recognized the need to address the frame. There are 2 plastic hinge covers that protect fingers and the covers from the seat hinge. These remove with a Phillips screwdriver. With the plastic covers set aside, the bolts that represent the hinge can be removed with 1/2 inch spanners. Before I could deal with the rust, though, I removed the seat runners from the bottom of the seat. Moving the seat forward and backward had become difficult, so I wanted to get all that nasty grease and grit out of the runners. I took the seat frame and the runners downstairs, and then focused on the head rest.

Headrest
The seam for the headrest cover is on the bottom, hidden by a small plastic strip, held in place by 2 Phillips screws. With the plastic strip removed, the staples which hold the cover on can be addressed. I used a small slotted screw driver to loosen them, and finished the job with a pair of needle-nose pliers. The cover slides off fairly easily at this point, taking the old foam with it. I had new covers and new foam, but I hadn't anticipated small wood slats along the bottom edge. It is to these slats that the staples and Phillips screws attach. Not all of the wood was bad, but the bottom-most pieces were. I took one good sample from each side and cut pieces that would fit from some scrap wood I had lying around. In a pinch, you could cut up a paint stir-stick: it is the right thickness. The key is finding something thin enough to fit in the channel along the underside of he headrest.

The headrest steel was in a similar state to the rest of the seat frame: some surface rust spots, but no rust-through. I brought it downstairs as well, and moved all 3 pieces to the front porch.

Rust Treatment
Some aspects of working on cars does not change no matter what you are working on: dealing with rust. I attacked the rusty areas with 60-grit sandpaper and then sanded the whole thing with 100-grit. This left a decent edge for paint to bite into. I painted all surfaces with Permatex Rust Treatment, and let them dry overnight. The following morning, I shot them with some black Rustoleum I had in the garage, and hung everything to cure on the front porch with bailing wire.

All of the random other bits got the cleaning treatment. The seat runners, for example, were soaked in de-greaser and cleaned up. All of the little plastic bits and handles were deep cleaned as well. Even the fasteners which I intended to reuse were cleaned up and scrubbed.

I was feeling pretty good at this point. The tear down was easy, the rust invasion was not too bad. I figured the easy part was over, though. Turned out, I was right, but I'll get into that next time. Thanks, as always, for following along-