Showing posts with label padding. Show all posts

Tuesday, February 12, 2019

New Seat, What a Treat - Part 2

When I last posted about Oliver's seat (See New Seat, What a Treat - Part 1), I had completed the tear down. The old covers were sitting in a pile with the nasty foam and rusted up hog rings. The seat frames and head-rest metal were painted with black Rustoleum and hanging from the beam on the front porch. Today, I start the re-assembly process.

The new covers are a leather / vinyl blend where the part that you sit against is leather but the back of the seat upper and the edges which hang down from the seat are an advanced vinyl that feels leather-ish. This vinyl is fairly durable. The blend reduces the overall cost of the cover by a couple hundred dollars US versus all-leather. The leather is backed with some thin foam padding.

Seat Gets Heat
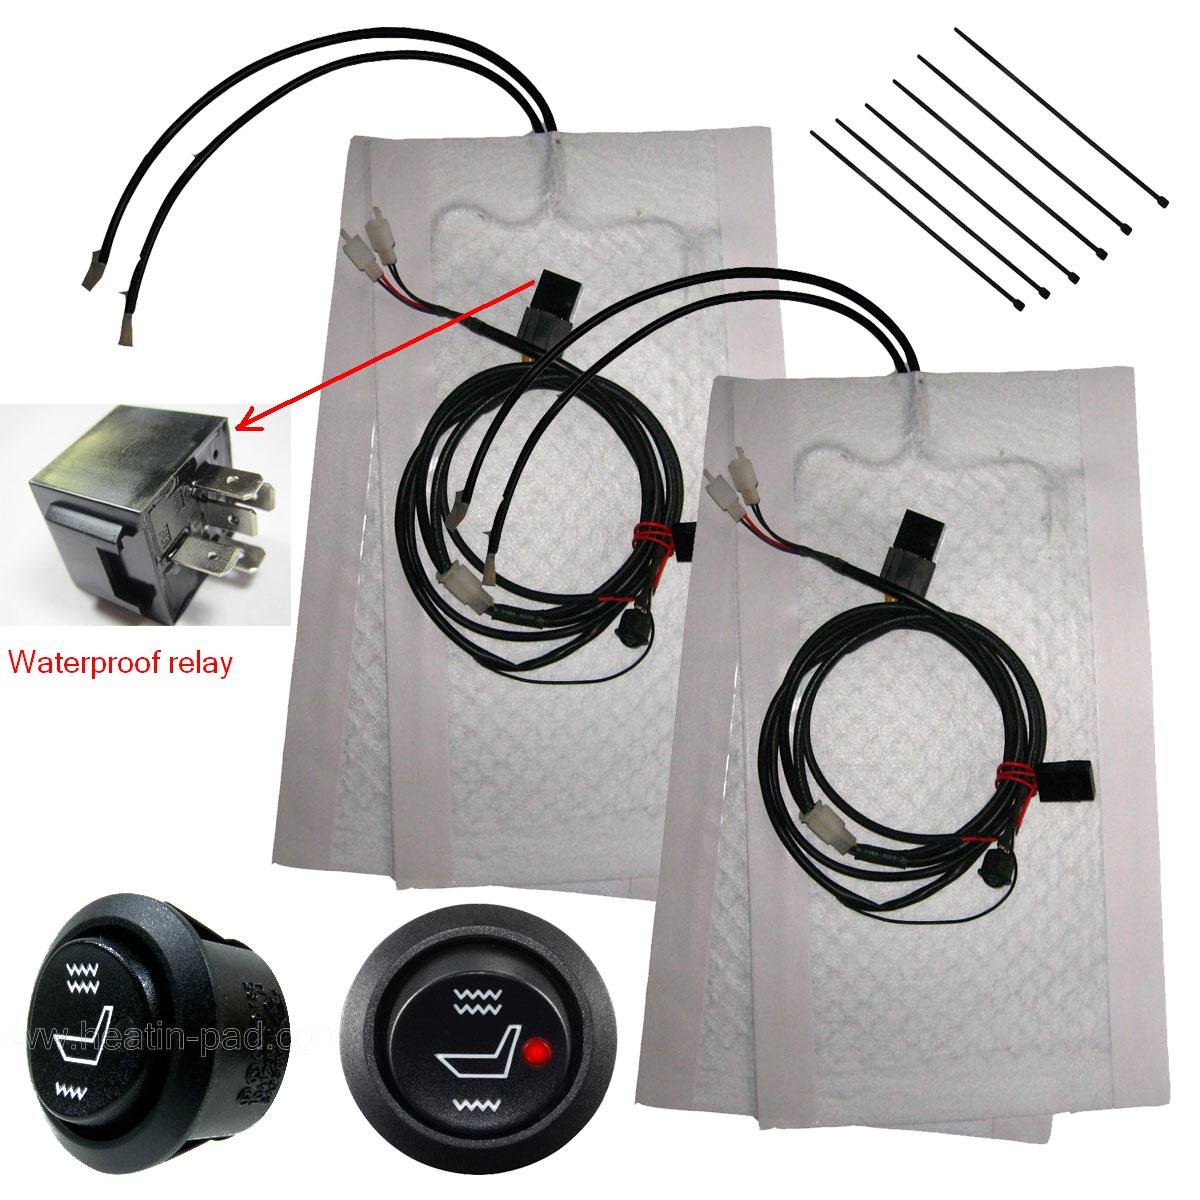
I decided that going through all the trouble of redoing the seats would be even better if I had seat warmers when I was done. While our Pacific Northwest is well known for it's long periods of rain, we actually do get stretches of sunshine, and not just between July 4th and October 15th. We get some nice fall and spring days. Every once in a while, we will get a few days of dry, but cold weather in the dead of winter. On those days I would like the choice of putting the top down and driving in the sun. Actually, having warm seats when it is cold nasty would be super welcomed too. So, as I acquired the foams, seat backing, webbing, hog rings and all the other bits needed to rebuild the seats, I bought a universal seat warming kit for 2 seats. I got a very simple kit with a 3 position switch for each seat that I could install into a fairly small hole. The heating part is a simple white rectangle that rests between the seat foam and the new cover. The base and the back have separate heating elements. While the instructions indicate that the pad can be cut to fit, I chose not to, recognizing that I could render it useless by cutting it incorrectly. Besides, the pad covered the entire seat back and the entire seat base, so we will be getting warmed from the back of our knees to our necks. Yeah.. that is going to be sweet.

These attach to the foams with basic 2-sided tape that runs the length of the rectangle along each edge. The instructions say to tape the pad to the foam before putting on the cover. Cool. Finding the edge of the 2-sided tape was the hardest part.

Upper First
So, with the heating elements figured out, and taped to the face of the upper seat foam, I started with the upper section or the seat back. I had read different techniques, but tried my own. First, I took the new seat hard-back and worked it into the lip around the rear side of the foam. The seat frame will later fit into this groove. With the foam and the hard-back as a unit, I fit the seat cover over the top and stuffed the corners of the foam into the corners of the cover. This is similar to putting a duvet cover on a big old comforter. The corners need to fit right first. Once the corners were in, I set the seam edges of the foam and then the seat back so the lines ran along the edges of each. Now that the foam, back and cover were aligned, I slid the seat frame between the foam and the hard-back. I did this slowly so the foam did not shift inside the cover. The result was exactly what I had hoped. The lines were right on the foam where they should have been. I realize that most auto upholstery is done by setting the foam onto the frame, turning the cover inside-out and slowly rolling the cover onto the foam while applying glue. It did not occur to me that I had missed the glue because the old covers slid right off the old foams, leading me to believe that maybe they weren't glued on before. I should note that after everything was assembled, I have seriously considered removing the upper cover and re-installing it the auto-upholstery standard way.

Ring the Back
With the cover in place, I grabbed at the bag of hog rings and the hog ring pliers I had purchased at Harbor Freight. The pliers were useless, so I chose not to use them. The hog rings that were supplied as the hog ring kit for this seat only had one size of hog ring, but the front edge of the seat back cover needed a larger size if it was going to be mounted the original way. So, I had to solve for clamping down the front edge different than how it had been or find a different set of rings. I decided to mull that over while I did the back. First, I needed to route the cable for the seat heat to the inside edge, so the wiring for activating the seat heat will run along the transmission tunnel rather than along the door sills. The rear side of the cover is held onto the frame with 4 square clips. I pulled the seat back as tight as I could while still retaining the shape and straight lines. Starting in the middle, I pushed on the inner 2 clips. These held the cover in place so I could do each outer clip with just a little tension. The seat back looked really good, so I started looking at options for the front edge.

Ring the Front
The front edge had been held on by 4 larger hog rings clipping to the large tube across the bottom of the back. Next to that large tube is a small tube through which the seat release is controlled. I decided to use the one-size rings on that smaller tube, and, after compressing the rings a little bit with my channel-lock pliers, I was able to use them. Similar to the rear, I pulled the material as tight as I could without distorting the lines (but centering the pleats) and did the 2 center rings first. I did the outer 2 rings one at a time similarly holding the material firm. Ideally, the large pipe would have been used. It occurred to me afterwards that as the seat back incline angle changes, the tension on the cover will vary because of the tube I used. If I am able to source an 8-piece set of larger hog rings, I may change these out without removing the seats.

Outer and Inner Edges
With the cover held on, I considered how to address the lower outer and inner edges which had been held in place with Phillips screws. I did not mention these in the tear down post, mostly because at the time they were a non-story. Down at the bottom, there is one screw on each side that passes through the cover, through a semi-circular, heavy, flat cardboard and then into the frame. You can see the screw head in the picture on the right. The cardboard fits into a little pocket on each side of the cover. I have been unable to find a source for a replacement. So, I put the old flat cardboard bits into the respective sleeves in the new cover, thinking that they, at the very least, would help the cover retain its shape. I chose to not re-install these screws since I could not determine how to best identify where the hole in the frame was without boring exploratory holes. I may come back to this later, though.

That's it for today. I will post about the lower seat, and the big fun of re-installing a light colored seat in a dirty garage later. Thanks, as always, for following along.

Tuesday, January 22, 2019

New Seat, What a Treat - Part 1

I had a few days off, so rather than spend them playing in the snow or taking a personal trip, I stayed home, and re-upholstered the driver seat of Oliver, the MG. Today's post covers the start of that journey. Sorry today's post is a few hours late.

Old Seat Out
Remember when I installed the old seats on top of the new carpet (See MGB - carpeting (part 2))? Even with the nuts jammed under the seat rails, the seats placed the driver kind of low in the car. Sure, it is a little British car, so you're supposed to sit low. But, there are limits. I figure my eyes should be about 2/3 of the way up the windscreen, and I was around halfway. It felt like I was sitting a hair over the floor, suspended by the vinyl seat cover and little else. I had planned to replace the seat covers, foams, etc last Spring when I had the small win-fall that netted me the new carpet. I just hadn't gotten to the work because I had other things going on, and I wanted to drive the car. So, with this small break, I had my chance. Starting with a basic 7/16" spanner, I removed the 4 bolts which held the driver seat to the floor and removed the driver seat.

I moved the seat upstairs to the shedroom. That room is clean, and all of the interior bits are stored there, so it made more sense than trying to do it in the packed garage or in one of the general living spaces. First, the headrest needs to come off. With the seat on the floor, I stood on the seat bottom and whip-sawed the headrest: pushing it all the way down and then yanking it back up. This violent push/shove blend actually worked, freeing the headrest in a handful of reps. I set the headrest aside, and moved to the Lower Cover.

Old Lower Cover Off
The lower cover is held on with 4 sets of 4 hog rings: one set along each of the sides. I was able to work them free with a small slotted screw driver, exposing the padding underneath. The padding was orange and tattered near the edges. When originally constructed, this foam would sit on top of a 3-sided metal hoop to which 6 rubber straps are attached. This webbing creates a little give to the seat, and provides the lift from underneath. On this seat, the webbing was in disarray. Most of the ends were disconnected and tattered. Fortunately, I had a replacement set for the refresh effort. The pad, cover and webbing were tossed towards the shedroom door and I shifted to the Upper Cover.

Old Upper Cover Off
The upper cover is held on with 4 square clips along the back and 4 hog rings below that, holding the front down. The hog rings flew off with a little pressure with a slotted screwdriver. I did my best to not damage the cover. The square clips needed more coaxing, and since I did not know about them, I had not ordered replacements, so I needed to be careful with the originals. Before the cover will slide off, the seat-angle arm needs to be removed. It is held on with a Phillps head bolt. Once the 2 sets of clips and the angle arm were removed, the cover slid right off the top.

Within the cover, I could see a few interesting things. First, the original foam was orange, and had tattered along the edges. The "hard back" was cardboard that appeared to not be original, nor standard-issue. It looked like a square of cardboard had been cut from a shoe box, or something. It had been taped, with duct tape, to the orange foam. Cool. The tape, cardboard and foam fell apart without much prompting. I think the cover was holding everything together. I tossed the mess atop the Lower Cover mess.

Separate
Now, I was down to the metal. I could see the rust spots, and recognized the need to address the frame. There are 2 plastic hinge covers that protect fingers and the covers from the seat hinge. These remove with a Phillips screwdriver. With the plastic covers set aside, the bolts that represent the hinge can be removed with 1/2 inch spanners. Before I could deal with the rust, though, I removed the seat runners from the bottom of the seat. Moving the seat forward and backward had become difficult, so I wanted to get all that nasty grease and grit out of the runners. I took the seat frame and the runners downstairs, and then focused on the head rest.

Headrest
The seam for the headrest cover is on the bottom, hidden by a small plastic strip, held in place by 2 Phillips screws. With the plastic strip removed, the staples which hold the cover on can be addressed. I used a small slotted screw driver to loosen them, and finished the job with a pair of needle-nose pliers. The cover slides off fairly easily at this point, taking the old foam with it. I had new covers and new foam, but I hadn't anticipated small wood slats along the bottom edge. It is to these slats that the staples and Phillips screws attach. Not all of the wood was bad, but the bottom-most pieces were. I took one good sample from each side and cut pieces that would fit from some scrap wood I had lying around. In a pinch, you could cut up a paint stir-stick: it is the right thickness. The key is finding something thin enough to fit in the channel along the underside of he headrest.

The headrest steel was in a similar state to the rest of the seat frame: some surface rust spots, but no rust-through. I brought it downstairs as well, and moved all 3 pieces to the front porch.

Rust Treatment
Some aspects of working on cars does not change no matter what you are working on: dealing with rust. I attacked the rusty areas with 60-grit sandpaper and then sanded the whole thing with 100-grit. This left a decent edge for paint to bite into. I painted all surfaces with Permatex Rust Treatment, and let them dry overnight. The following morning, I shot them with some black Rustoleum I had in the garage, and hung everything to cure on the front porch with bailing wire.

All of the random other bits got the cleaning treatment. The seat runners, for example, were soaked in de-greaser and cleaned up. All of the little plastic bits and handles were deep cleaned as well. Even the fasteners which I intended to reuse were cleaned up and scrubbed.

I was feeling pretty good at this point. The tear down was easy, the rust invasion was not too bad. I figured the easy part was over, though. Turned out, I was right, but I'll get into that next time. Thanks, as always, for following along-