Thursday, May 22, 2025

Building a Shop - Execution Planning

I get that the topic of building a shop/garage may not be terribly applicable to many folks. There are whole chat rooms and websites dedicated to the topic, so what do I know. I accept that for most people you probably only ever build one, if that. So, for those who are thinking about it, maybe these posts are useful since I am a total noob documenting what I am learning as I go. There wasn't much to take pictures of so I included a shot I took from the roof of the house we rented in Mexico and one of Nina, showing the license plate registration year.
 
Survey?
sunset in Mexico
I mentioned in the last post about permitting that I talked to a senior inspector and he indicated that having clarity in the property line was important for a swift inspection prior to pouring concrete. I started pricing a general survey of the "back 50" and the numbers I was getting were disturbing: high 4 figures to find and mark the monuments (corner medallion perched atop a 3' long iron bar driven into the ground) and lines. I discovered that one of the guys I bang around on guitars with is a surveyor. He hit the county website and identified when the monuments were installed (1950) according to county records. Since this is the back of a few different peoples' properties, one would presume they had not been disturbed. So, he lent to us one of his metal detectors to find the iron bars.
 
When he offered a detector, I had a mental image of a speedo-wearing dude walking around the beach with one of those things with a big disc at the end of a stick, getting waved across the sand as he shuffled past, plucking up lost jewelry. Yeah, that's not a surveyor's detector. A surveyor's detector is purely magnetic, and only registers iron. So, since most of the fences around that part of the yard are wood, I was able to find most of the markers very quickly. The marker in the southwest corner, however, was buried by whoever put the wooden fence in, and that fence intersects an old cyclone fence made back when they had higher grade steel than the ones built today. So, that fence made the readings a little less clear, but I felt confident of what I identified as the corner pin.
 
For each marker that I found, I took one of the many white 10x20 canopy posts I have from the failed canopies and drove it over/around the marker. From these markers we could determine measurements. I could also assess the neighbor's fences and determined that the fence installers who buried the monuments also did not follow a straight line and the fence bows into our property by a couple of inches. Is what is, but it challenged our stringing a line between the posts. I was able to find monuments along all 3 of the sides of the back 50, however, so we can determine the positions for the excavation.
 
Concrete Bids
Nina
I also mentioned at the end of the prior post that we were soliciting bids for the concrete. I was not happy with the 3 bids we had, so I hit Yelp, looking for another one. Yelp has that little checkbox asking to include others, and I hit that too. After clicking send, I had second thoughts, full of visions of getting overwhelmed with spam, my phone blowing up, etc. Those were unfounded, though. I did find myself juggling 6 more concrete companies, but this allowed me to get far more competitive bids. All but one company made a site visit and had a conversation about the work, the distance from the street, and options for various aspects of the work. Including excavation, it will still run us in the neighborhood of $15k, though, so our vision of a concrete slab with a steel building sitting on it has a growing price tag approaching $40k... and it doesn't have a garage door nor lights nor gutters and downspouts yet. I did not account for any of the costs other than the building when I started this. I am learning that while the building is the largest single cost, it might only represent half of the overall cost once complete.
 
Ultimately, we went with one of the companies who did a site visit, and the company was on the lower end of the bid spectrum. Their bid was so competitive, we decided to have them do the excavation as well. We had intended to have our friend Glenn do the machine work while we helped with site lines, laser-level depth determination, etc. When I shared the bid with Glenn, he was very direct: have them do it.
 
Excavation Planning
future shop location
Even though we are hiring out the dig, there are a few things we need to have sorted before the machine shows up. The pitch of the site is only a few inches from west to east, but when the spec for the footer is 1 foot and for the floor to be 4 inches of concrete atop 4 inches of compacted gravel, a few inches makes a big difference. Since we get lots of rain here (newsflash: it rains in western Oregon), we felt it was very important for the floor to be above grade by at least an inch at the most uphill point, or the western edge. This meant that the soil at the most downhill only really needed excavation for the gravel, leaving most of the concrete above grade. Since I will be hauling / pushing inoperable vehicles into that garage, we elected to set aside a meaningful pile of extracted dirt for leveling in front of the garage after the concrete sets. I recognize that I will probably need to pour a concrete ramp eventually, but that is not on the permitted plan. At this point, we talked about digging a little bit extra on the west (highest) edge so after the concrete is in I could put in a french drain, routed over to the downspout plumbing and on to the storm outflow.
 
storm outflow site
The storm outflow also needed some thought. Recall, the storm outflow was required by Clean Water Services so storm water run-off from the roof doesn't become a water management problem for our (slightly) down-grade neighbors. The minimum size for a storm outflow is 4 feet by 8 feet by 18 inches deep, and they get larger as your building footprint grows. I don't know the rate of growth, but our 720 square foot building is still well below that threshold, so we get a minimum. Regardless of its size, it needs to be at least 15 feet (5 meters) from any neighboring property line. I had added it to my site drawing at the point closest to the southeast corner, 15 feet away from the lines. When I went to that location, I decided that it was too close to the large black walnut tree and digging there could damage the roots. So, we moved it 3 meters north, further into the property. This is still well within the property line proximity specification, and I will learn if the inspector cares about the storm outflow location accuracy regarding the site drawing or not when s/he/they inspect the site. In the image on the right, the outflow is marked with yellow tape. This is the new location. The tree in the right rear of the picture is the black walnut I am trying to protect.
 
Wrapping Up
We will be signing the agreement before the weekend, and with a gap in the concrete contractor's schedule, the excavation could start next week. This weekend, in order to make room, I will be pushing Nina (new-to-me yard-find 1964 VW Beetle, in the image above) out of the path to the build site and whatever else is necessary to make the job site as accessible as possible. Before you ask, no those are not US-spec tail lights, they are the euro-spec tail-lights with the yellow turn signal section. There are a few not-original-spec or missing-original items on this car, like the bumpers, but that's part of the discovery fun.
 
Boo and I are stunned that this is happening so quickly. If he hadn't had a gap in his schedule, we would probably be looking at 3 or 4 weeks. Those were the timelines I was getting from the other contractors and those schedules were filling. It seems that when the rain stops, pouring concrete is a nearly round-the-clock business, until it starts raining again. I recall the painting business was the same way back in the day when I did that.
 
After the job site is accessible, I will be trying to get Hapy to start again, with a 4th starter replacement. This time, I got a new Valeo starter as directed by TDI guru and great guy Justin. I hope this one will last longer than a few hours. For everyone's knowledge, I tried and got burned by...
(1) a rebuilt Bosch starter from a reputable online vendor, 
(2) a brand new "SEG" starter, apparently a rebrand of a good starter manufacturing company, from a different reputable online vendor and then 
(3) I had my original VW starter rebuilt by a highly regarded alternator and starter rebuilder in Portland's east side who has now retired.
All 3 failed within a few hours of installing. Since I used to be able to move Hapy around the driveway just by using his starter (yeah, I know. Don't do that kids), this is not a case of "it's Hapy's fault". No, there are just that many poorly built starters and these TDI engines need reliable hi-torque.
 
Thanks, as always, for following along.

Tuesday, May 6, 2025

Building a Shop - Permits

In my last post which was my first in, like, 6 months, I mentioned that I had been working on getting a 2 car garage / shop built on the back of this property. Today, I will go through some of the steps and offer them up in an order that would be the path of quickest completion versus the order in which I took them which was "taken as discovered". It is probably important to point out that this is for Unincorporated Washington County in Oregon. If you are legally within city limits, you will probably have their permitting department to work with. Regardless, I suspect many of these same steps will be needed, though the specifics may differ a little bit.

Where to Begin
The first step, of course, is to decide what you want, but the very next step will be figuring out if you are allowed to do that in your space. For example, we originally wanted a much larger building. In retrospect, it really would have been overwhelming the space, but anyway, we start with finding out what the zoning will allow from the interactive map at the county website (link here). From the map, there are a few useful links, including the "District Overlay" which includes your zoning and setback (how far from property lines the structure can be) requirements. If you click on the little "additional information" blue text, the information rectangle on the left unfolds to show the lot size in square feet at the bottom with a "Shape.STArea()" label. For overall building size, you need to consult building code 430-1.1B (link here). Using the lot area size and the % allowed from the code, you arrive at the size building you can add to your lot. We arrived at 800 square feet, and planned for a 24' x 30' relatively standard oversized 2-car garage.

Build or Buy
While not exactly part of the getting-a-permit process, this decision definitely influences all of your future steps. You could order plans and have a structure built either by you or by a contractor. If you go the contractor route, you may still need to do the permits. I thought about going the stick-built route and concluded that there would be much more permitting and inspecting if I did. Instead, I ordered a pre-fab steel building that is assembled on-site by the manufacturer. At the time of the order, they provide engineering plans for permitting purposes that have your building's specifics already included. Since our shop/garage is a standard size and shape, special engineering was not needed. We did request for extra strength to be added to the roof so we would have the long-term option of adding solar panels. The current canopy is prohibitive right now, but not all of the trees creating that shade are healthy, so the situation may change. Better to have the stronger roof and not need it, I figured.

Draw Your Site Plan
Because of when and how I did my plan, I literally had to do this 4 times. I started with a screen grab of my site map from the county website that included the map scale, pasting it into MS Paint. For my final site map, I then stretched the image so it nearly filled an 11x17 tabloid piece of paper - set landscape (so 17" side wide, 11" tall). I pasted a sanitized version to the left, here. Include all measurements and the reference numbers as well as a short description of anything which might create confusion. The planners need to see the setbacks, zoning "R" number and the height of the building. The Site Plan must be in landscape form saved as a PDF to be accepted.

Water Planning
Next, we have to consult with 2 different departments within the greater permitting group at the county: Grading and Clean Water Services. The first group (Grading) considers whether your planned structure meets zoning code, whether you need a grading permit and how you are managing stormwater. As an output from their review, I needed to add a stormwater outfall to catch the downspouts to my site plan. This is required for basically every structure which requires a permit in Washington County now, and the outfall location guidelines are more restrictive than the building. For example, the building can be 5 feet from a side property line, but the stormwater outfall cannot be within 15 feet of any line.

Next, we consult with Clean Water Services. They consider your water sourcing, water waste and erosion implications. Since this is a garage without plan to build a bathroom, water sourcing and water waste were not a concern. Erosion control during construction, however, was of interest. This lot is virtually flat, with a slight west-to-east pitch. So, Clean Water Services indicated that we need to have those long hay bale/tube things (called "straw wattle") running along the eastern fence to prevent any erosion or water runoff to impact the neighbors during construction.

It is important to note that the soil CANNOT be disturbed prior to sign off from Clean Water Services. This includes stump grinding, but obviously also includes use of any moderately heavy equipment or excavation. I had been told that the permit was only needed for the building and not the flat-work. This is absolutely false. If you start preparing the ground for concrete before Clean Water Services issues their permit, things will be much more difficult and you will be on the permit folks radar for the rest of your project.

File Permit Request
In an ideal process, you would not even file for a permit until you have had consultations and site plan modifications to reflect those consultations. I was not following ideal, but I didn't know I needed those things until the permit process started and I was informed. Now you know better than I did. Anyway, filing for a permit to start is easy: go to the website, fill in the one-page form and pay the initial fee (there are multiple fees with more later). The process will start and you will learn all the forms you need to create including a checklist which identifies the things above.

I used the provided checklist to make sure I had everything before I started uploading documents and then uploaded them in a big bunch. Again, I did this 4 times. There are 2 folders, one for documents and one for plans. While I don't know for sure, the impression I got from my fumbling and re-uploading was that the engineers look at the "plans" folder and the process/zoning people look at the documents folder. With that perspective, I put the document index (numbered 001 per their instructions) into both folders. I also put the site plan into both folders, though I wasn't sure at the time whether that was a good idea, once I received my approval from Grading (meets zone and water management requirements) I concluded it was probably not a bad idea. I included the email from Grading indicating that a Grading permit was not required (adhere to the numbering scheme for all uploads), thinking that if I could provide every relevant scrap there would be fewer hang-ups and delays.

On the engineering side, because it is a pre-fab, mass-engineered building, I thought I could simply upload what was sent to me as-is. That was not correct. The engineering plans need to be individual pages, with their own 0-leading numbers, identified individually on the page index, and each saved as an individual PDF.

If you mess something up, the permitting system will be updated by the person handling that portion of the permit and mark the task incomplete and give you some indication of what is wrong. I found that the closer I was to having it right, the more detailed the "what's wrong" statement was. Like, when I just uploaded the engineering plans as one big PDF all I got was essentially "plans not meet convention" or something. Not terribly helpful, but I guess I figured it out because...

Current State
In March, I got the permit approval, pending paying the final fees. I think overall I paid close to $2k just in permit fees for a building without electrical nor plumbing. Since these are mass-engineered plans, I did not expect an issue, especially since the wind and snow load specifications are clearly on the front page. Also, since we requested the roof to be able to support more-than-typical weight, the extra support throughout the building should more than meet code. Once I understood what they were asking for, most of my work was actually at the front end, drawing the site plan and including all the little detail bits about the property that they need to triangulate into their various systems.

To prepare for the next steps, Boo got us 3 of those 25-foot-long straw wattles. It should be worth noting that these things, once abundant in the big home improvement stores, are for the most part no longer sold there. I say that because no one stocks them except Lowes and they charge 4x what they used to cost. We found them at United Rentals for the used-to-be-typical price of $30 each. Lowes is charging $120. Seriously. Bite me, Lowes; this is exactly why I never shop there. I set the wattles in place last weekend. Next, I will get Clean Water Services to come back and approve us for soil disturbance. Then the stump grinding will start, followed by excavation.
 
We have 2 concrete bids and we are waiting on a third. The first 2 were so different price-wise, I think Foundations First (the outrageously high one) was just giving us a go-away price. Once we have the 3rd bid we will start the excavation.
 
Closing Thoughts
I spoke with the county about inspections. I mean, what's the point of a permit if they don't circle back on the work, and the detail about when to contact for inspections was unclear. After talking to a senior inspector, I learned that for a pre-fab building without water nor electrical I need 2 inspections: one right before the concrete is poured ("a 106") and the "final" after the metal building is in place (but prior to any wall coverings). I do understand now why oftentimes folks will hire someone to do the whole thing, including the interactions with the county. There are so many details, it is easy to miss one and if you miss the wrong one, like getting the property surveyed before you start digging, you may have to at least suspend the work and at worst do it over again.
 
Obligatory car content
Hapy - currently not running. I believe I messed up the IP seal replacement and after replacing his starter multiple times he still won't start
Oliver - sits covered and untouched. I think I will be selling him next Spring (or earlier if someone offers)
Zed - sits covered and untouched. I pulled the cover this weekend looking for my feeler gauges and got me all excited to work on him again
Nina - did I mention that a 1964 VW Beetle fell into my lap? Yeah, so named after Nina Simone cuz it was built the same month as one of her albums dropped (can't find the reference I used to determine that), this car has not been licensed since the late 90's. Total yard find. Lots of work ahead to get it road-ready
ToyoTruck - daily driver, running like a champ. Still needs to get painted after the body repair a few years ago
Astra - Boo's daily driver, this Saturn just runs. Change the oil on schedule, and otherwise point and shoot

I know it has been a while. Work has been consuming most of my focus since my team lost a couple of my peers to lateral moves within the company. The back-fills have been slow to get up to speed. So, I have been doing the work of at least 2 people since November. Is what is. Thanks for tuning back in. I don't know when I'll have time to post, much less do stuff that's post-worthy. I started this one in February. LOL.

Tuesday, February 18, 2025

MGB carb circle-back

So yeah.. it has been a long time since I've posted much. Life has been full. Today, I will just close the loop on the carb deep cleaning and re-gasketing. I will try to get back here relatively soon with some other goings on. I thought I posted this update last Fall when it happened, but I clearly didn't.

Just a reminder, Oliver (1978 MGB) has a SK Racing or OER Racing side-draft carburetor. These look very much like the DCOE Weber and even can use some of the jets from a Weber. The accelerator pump and float level can be adjusted from the outside and the main jets can be accessed through a cover on the top. So, very few of the changes one usually makes to a carb requires the carb to be removed from the engine. The inlet pattern matches the Weber DCOE, so you can use a more readily available intake from Weber. Even the 4 bolts on the bottom are the same so you can use a Weber-intended heat shield like I did. Curious about getting one? Here is a source in Japan (these are a go-to carb among Nissan/Datsun enthusiasts I am told). Those who have them rave about them. Except me, so far. I hope to be among the celebrating majority soon.

Almost a Test Start
Setting the stage, I had a crisp fall day to take a look at Oliver, the 1978 MGB. I wanted to see if the carb work was the winner for his bogging down when I hit the accelerator pedal. I pulled his cover off, hooked up the battery and added some fresh fuel. I had pumped the tank dry when I removed the carb; not sure if I mentioned that last time. Anyway, I turned the key to run. I got the satisfying sound of the fuel pump running and then that not-so-satisfying gasoline smell. I went around to the right fender and could see fuel shooting out towards the radiator. Eeek. I turned off the key and then spotted a failing fuel hose. After a brief rummage through some boxes in the "tool shed" I found some suitable hose and had the system buttoned back up relatively quickly. This is as good a time as any to remind all my fellow old-car owners to replace your fuel hoses.

Actual Test Start
With the new hose in place, I returned to the driver seat, turned the key to run and waited for the fuel pump sound to change, letting me know that it had established pressure. With the earlier fuel line failure, the smell of gas was still present, so I walked around to the front to inspect for leaks. Nope. So, I turned the key to run and he started pretty fast. It was rough, but I could keep him idling at the carb by pulling on the accelerator cable.

Fiddling with it
I focused first on getting the idle jets set. I followed the basic set-up rule of turn all the way in, then back out 2 turns when I did the reassemble. In theory, you should be close at that point. I did not notice much difference when I moved the screws in and out more than 1/2 a turn. I think I eventually settled on them being out just past 2 turns. I expect when fully warmed up and in an expert tuner's hands a different setting will be found.

Then I shifted to the idle speed screw. Doing this on your own without a hand-held tach is kind of comical. You walk to the driver door and look at the tach. Note the speed and if it needs to be faster, go to the carb and adjust. Then walk back and see if you hit your target. If not, wash-rinse-repeat. I am sure there are much more experienced mechs out there who can hear the right speed or have a hand-held tool so you aren't getting your day's steps in 2 steps at a time like that.

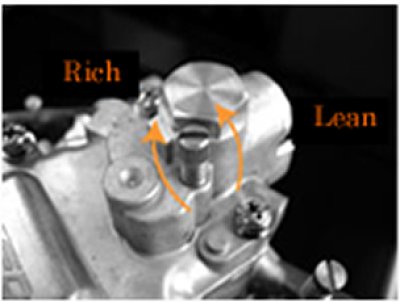
Last, I wanted to see if I had solved the bog-on-accelerate. So, I yanked on the accelerator cable at the carb and.. bog. Sadness. In my time during the rebuild, I spent more time looking at the exploded diagram than I had before. I remembered there was an accelerator circuit, and located the screw on the top of the carb. In the image on the left, here, the screw is the big one on the furthest left, near the intake-side of the carb.

When I dismantled the carb, that screw was nutted all the way down snug. So, either the prior owner had torqued it down or I did at a time I don't remember. Regardless, I started loosening that screw (lefty-loosey) while I rev'd the engine. And the bog started to fall away. I was able to rev it fairly quickly without the engine starting to die on me. I stopped loosening it before I was able to yank on the cable as if I was going from foot-off-pedal to pedal-on-floor. I believe what had been happening was that the accelerator circuit had been flooding the engine with too much fuel when I pushed on it. Now, it was getting the right amount of fuel to account for the big burst of air from the opening of the butterfly without overcompensating. Looking back, this has probably been the issue all along and the cleaning/resealing may not have been necessary. In the end, I don't care, and cleaning the carb will only pay more dividends anyway.

Wrap Up
So, did I go for a test drive? No. Why? The brake bleed attempts that I have done since I replaced the master cylinder have not gotten the brake pedal predictable. Rather than have a spirited drive to celebrate, I waited for the tailpipe to cool down and put Oliver's cover back on (queue the sad trombone). One of the first things I will be doing this spring is another brake-bleed attempt. I may just hobble over to the local Firestone and have them do it. I just want to drive this guy now and his spongey brakes have been a blocker for too long.

Also on the list are changing the 12V source for the voltage gauge from the purple circuit which used to power the clock to the switched and fused green circuit. I have a few other odds and ends I need to complete before Oliver is "finished", the largest of which is replacing the body-to-windshield seal so he can be driven in rainy weather. There is always something with these old cars and I really wouldn't want it any other way.... so long as the something doesn't leave me stranded on the side of the road outside cell range.

Well, that's it for this time. Sorry it has been so long. Life gets busy and I have not been able to play with my cars much. I am working through the permitting process to get a garage built so there will be posts about that, and then playing on cars (and blogging about it) can return to a year-round sport. Thanks for tuning back in, and I hope to be more frequent in 2025-