Showing posts with label rubber. Show all posts

Tuesday, November 15, 2022

If It Doesn't Move, Paint It (Final)

After weeks of spackle, caulk and masking, we were finally ready to shoot the interior of NewOldHouse. We would have arrived here earlier had we not digressed outdoors, but when the rains come, you need to have already gotten your wet/dry solved, or you will be doing it in the rain while everything gets wet. Anyway, today's post covers the final adventure in paint, and a few other things that happened along the way because.. of course.

Just as I completed the work described in this post, I tested positive for CoViD. I am living proof that living a hermit lifestyle is not a guarantee that you won't get CoViD. I have been going to a pizza place in Hillsboro for an open jam on Wednesdays as my only outing, so at least I know where it happened. I've been down nearly 10 days with it now, so progress on cars, the house, even my job is, obviously, halted. Good times.

The Walls Came Down
thar's a furnace in thar
For some reason, when the prior owners installed the gas furnace, they put it into the main living space. I thought it was because of the proximity to the chimney, but from the garage, there is a straight path to the chimney as well, and popping an exhaust through the roof would not have been that difficult. Instead, they put it into the dining area, and then... built walls around it. The new walls were, probably, a foot away from the furnace while the furnace was located 6 inches or so from the original wall. We couldn't figure out the thinking, but we didn't like the furnace location, nor the walls. With a plan to eventually move the furnace into the garage, I tore down the walls around it.

I took the time to remove the baseboards, the door trim, door frames and the doors. I removed the trim nails and collected these reusable bits onto the garage rafters. I then went after the drywall with a rubber mallet. I didn't want to make a huge mess, I just wanted the walls down. So, I loosened the drywall from behind and then pulled sections off with gloved hands. The refuse went out to the dump pile, and I turned to the framing. This was fun. I smacked the inner wall framing a couple of times with the long-handle sledge until the bottom came free. Then, I wrenched the 2x4 back and forth to remove it from the upper. One by one the inner pieces were removed, leaving the corner and the door frames. For the door frame-framing (the 2x4's that create the rough door opening to which the door frame is attached), I removed the header first, and then the side pieces could remove in a similar fashion to the middle framing bits. Then, I took out the corner. Again, this was simply smashing with a sledge and prying with a wrecking bar until they gave way. Most of the corner came out in one large section. The ends nearest the original walls were next, and the top plate came down with those, leaving the footer. the footers were set into the original hardwood floor with 3-inch-long nails. To get to those, I carved out the top of the 2x4 with a screwdriver and then leveraged the top of the nail enough to fit the wrecking bar underneath. Some subtle pressure later and the nails were out, and the footer was out. The space seemed much larger.
 
More Masking
walls? what walls?
With the furnace now exposed, I could paint those original walls, but I did not want paint on the furnace or the nicely finished original wood floors around it. So, I spent a couple of hours with paper, plastic and tape covering everything except the venting on the front of the furnace and the exhaust to the chimney. I left those for actual paint-time because I want to keep running the furnace until then.  I know that the exhaust would meld or burn anything I wrapped it with and the front of the furnace needs to be open when in service. On paint day, I turned the furnace off for the shoot, and covered the exhaust with film, the front of the furnace with a sheet of waste cardboard.

Prime Time
Nemo at NewOldHouse
After the walls were washed and I had checked and rechecked that everything had been masked, I had considered priming everything. I decided that it was probably excessive, especially considering how clean the walls were once Boo was done with them. Still, there were some stains, so we got some some Kilz2 to cover them. The Kilz2 does not cover odors, and there were still some remaining cat smells. So, I thought about getting some original oil-based Kilz and shooting the lower 3 feet of all the walls to try to contain that. Again, overkill. I concluded that the cat urine smell was probably not in the plaster, it is probably coming from that space between the hardwood floor and the baseboards. So, I decided that after we stripped the masking out, I would shoot that space with some enzyme-based cleaner (like this).

While I did not prime everything, I did prime the popcorn ceilings in the "new addition" bedrooms (built in early 60's) out of concern for how much paint they would suck up. I shot the stains as well as the original pink paint that appeared where I removed the walls around the furnace, and the area in one of the addition bedrooms where a shelving unit had been removed. Most of these areas were reachable without having to move the sprayer. I needed to move it once, from the rear of the house to where the furnace is. Before I cleaned up the equipment and put everything away, though, I took the operation out to the now-clean future tool/parts shed and shot that entire interior with the Kilz2. It was bare wood, and I figured painting it white would help illuminate the space once filled with shelves and some lighting. The shed has a high shelf/storage area so unlike my spray adventures so far, I needed to work from a ladder to hit the shelf and ceiling well. Even still, this spray was fast, and since I had started early in the day, I felt confident that I could get most of the interior spray done.

Shooting for Good... Enough
tool shed primed
Our original plan was to buy really good white exterior paint. At $300US per 5 gallons, we changed our minds, and bought generic indoor/outdoor eggshell white paint. The house is still white, but we may need to paint again sooner. So what? There is quite a bit of siding that needs replacing, so little harm done. Fast-forward a few weeks and Boo and I got to a similar conversation about the interior paint. I painted our current house interior with an eggshell "Brazilian Tan", which is beautiful, but the house was already dark and even though the Brazilian Tan was lighter than the paint it went on top of, it's still pretty dark in there. Even in the summer. NewOldHouse is not in perma-shade like the current place it, but we decided we want it to be super bright.

We talked about painting the walls with some color, but the main rooms have coved ceilings, making it difficult to draw a line where the colored wall would meet a white ceiling. Many older houses have a picture rail that will draw that line for you. Since we don't, and we were not sure what to do color-wise AND draw-the-line-wise, we went with.... generic indoor/outdoor eggshell white paint. Sound familiar? Yep, it's the exact same paint. Why keep all these tins of touch-up paint when you can keep only one? LOL. I'm sure this paint will be acting as a primer for the next coat (that has a color), it's just a question of when. For now, white walls go with any decor... well... they will go with ours anyway.

Paint On!
furthest room shot
With the stains and popcorn ceilings primed, I switched over from the Kilz2 to the eggshell and grabbed a quick bite. My time shooting Zed taught me that once you start, you really can't stop unless there is a clear line where the painting can stop. I also remembered that ventilation is super important, so I set a box fan in the open front door (blowing out), and had the kitchen windows wide open. I wasn't sure how long the Kilz2 had been drying on the ceilings in the back bedrooms, so I started with the shed. This gave Boo the most time remaining to clean whatever walls or ceilings we had not yet cleaned. By doing the shed first, I also took advantage of the little daylight Oregon has at this time of year. The shed painted like it primed, though I fogged (light passes at a greater distance) some of the wood panels after I completed the shoot, trying to get consistent coverage. In the end, most of the walls will be covered with shelves, so the handiwork won't really show, but I have a hard time half-assing things.

Once the tool shed was painted, I moved the sprayer into the furthest new-addition bedroom, and shot it completely. I started with the closet and then the ceiling. Then, I shot the window frames and finally the walls and baseboard, working my way towards the doorway. This kept the paint hose from hitting freshly painted walls or trim, and the sprayer in one spot for the duration of that room. Once the rest of the room was done, I moved the sprayer into the next bedroom and shot the doorway and the door. Last, I cracked the large window to let some fresh air in.
 
front living room shot
I sprayed the next bedroom following the same pattern: closet, ceiling, window frames, walls and baseboards. Again, I backed my way out of the room, moved the sprayer and then shot the doorway and the door. I continued this pattern, backing down the rear hallway, shooting the ceiling, then walls before moving the sprayer into the one original bedroom. Unlike the other 2 bedrooms, I decided that shooting the window frames early effectively restricted the amount of light I had to work with. So, I shot the window frame after I did the baseboards. Similar to the other rooms, though, I left the space around the doorway for after I moved the sprayer, and shot that area last. After cracking the window, I hit the hallway, turned off the furnace, removed the thermostat and then shot the hallway, avoiding the cold air intake.
 
At this point, it was past 430PM, so twilight was setting in. Without meaningful light, my shoot was done for the day. So, I popped the thermostat back in, turned the furnace on and cleaned up the sprayer for the night.
 
Second Verse, Same as the First
main room, start of day 2
When I returned the following morning, I walked the area which needed to be painted. The furnace was not 100% covered yet and in the middle of the main space Boo and I had set out all of the built-in drawers and the pieces of my desk to get painted with the rest of the house. Navigating these items while shooting the ceiling was not a good idea. So, I moved the drawers, desk cabinets and shelving into the front bedroom to get shot. Next, I looked at the ceilings; we had not quite finished washing all of it, so I TSP'd a section. Last, the doorway into the partially demolished kitchen was unimpeded. Everything that had been setting in the main room for our workday comforts (camping chairs, snack cooler, etc) were in the kitchen too. So, I added overlapping plastic sheeting over the doorway, so overspray would not blow onto our creature comforts.

Ready for another shoot, I donned the old white overalls, wrapped my head with a white T-shirt, set up the sprayer and got after it. I started with the walls around the furnace, so I could unmask and re-start it at the earliest moment. I moved through the space anti-clockwise, shooting the eating nook first, then the main living space and finally the den-like area directly rear of the living room. Satisfied, I moved the sprayer into the front hall and shot the drawers, etc set up in the front bedroom, completing the spray. End-to-end, it was probably around 6 hours of shooting plus a few hours of cleaning / prep on the second shoot day.
 
Clean Your Tools
main living space complete
To clean the sprayer, I put about 2 gallons of water into a clean 5 gallon bucket. Before I dropped the sprayer pickup tune into it, I hosed the pickup tube off with the garden hose. Now somewhat clean, I put the pickup tube into the water and the priming hose back into the paint. I primed the machine until water was coming out the priming hose, and then I shifted that hose into a recently emptied 5 gallon now-slop bucket. I continued to prime until the priming hose was running clear. Then, I switched over to "sprayer" from "prime" and did the same thing: shot into the paint (reversed the tip) until it started to get watery, then switched over to the slop bucket. Once the gun was shooting mostly clear, I shut things down, released the pressure and took the pieces into the garage sink for cleaning. Since most of the paint was already run out, cleaning with running water and soap was relatively quick. Paint needs warm air, so I set the furnace to run the fan all night and I left the box fan running as well, to help speed the drying.
 
Strip, Lights
further room done
Boo and I returned the following day and started pulling the masking off. For me, the most important thing was that we didn't have many thin or bare spots. I only found one 2-foot by 3-foot bare spot on one ceiling, and I decided to fix it with a flat-nap roller rather than pull out the sprayer. Otherwise, the coverage looked good. Sure, there were some heavy spots, and I attribute that to the hard-to-see from lack of light. Regardless, we pulled the paper and film from the windows, light fixtures and floors, rolling it into a big puffy pile as we went. We discovered some spots where the tape did not hold, allowing for paint to get on the floors, but overall, the finished product looks really good. Once the paper was up, I cleaned each light fixture and mounted it, with bulbs.

This was a huge milestone. With the interior of both the house and the tool/parts shed painted, we can start moving non-essential things (like Nemo, the Audi A4 B5) over to the NewOldHouse. Nemo drove over with no issues, by the way. We need to source, paint, measure, cut and install 1-inch quarter round pretty much everywhere the new painted baseboard approaches the wood floor, though. If you look at these couple of pictures, you can see the gap. I expect we will be doing the 1/4-round a room at a time so it doesn't become a huge undertaking. Of course, at one room at a time, it could take quite a while to complete. Once we do it, I'll post on how we went after it.
 
Because moving is really only interesting to the person who is moving, I won't post on it. If something else happens that might actually be interesting, I'll post on it. Otherwise, until after the move, thanks, as always, for following along-

Tuesday, March 29, 2022

Refresh the Luggage Tub

Over ten years ago, I purchased and installed the Riviera pop top, bed and luggage tub. In an Agile-like spirit, some of the steps I took were good enough to demonstrate the feature, but not great for the long haul. Today, I re-approach the luggage tub.
 
Why Now?
finished work
A logical question to ask when you take apart something that is functioning is why now? This is an especially good question since I am in the midst of a significant noise control effort already. Well, it was the noise control effort that brought this to my attention. When I was working on the cab ceiling, I discovered that some of the original 1972 Westfalia stuff was not keeping the ceiling sealed. To access the leaks, I had to remove the luggage tub, and things kind of grew from there.

Ceiling Repairs
I mentioned that there were ceiling seal issues. Consider that the hinges and the front-center latch for the original 1972 Westfalia pop-top attach to the top of the bus above the front seats. These are mounted by passing bolts through the ceiling and then threading into some flashing which have embedded nuts. The bolts had been removed, or broke off, but the leaks were coming from where the flashing/nut bit touched the ceiling. These had broken down over the last 10 years and were weeping. So, I removed the flashing, the nuts, and anything else remaining related to the old pop top mechanisms, leaving six holes.
 
cleaning under the luggage tub
In an ideal world, I would have used no-longer-with-us Travis' welder and repaired the holes the correct way with replacement steel cut into small circles. Unfortunately, when Travis passed, a grave-robbing vulture (Bob) swooped in, claimed he and Travis were "like brothers" (say it all deep and blubbery to get the effect), and took everything he could fit into his truck and trailer over multiple trips while my sister-in-law worked through her grief. Bob the vulture took all 4 of Travis' welders. Yes, that's right; all 4 of them (Travis was a pipe-fitter by trade so welded pretty much anything) and a TON of other things, like all of Travis' other tools, for example. Like the Grinch, Bob disappeared as quickly as he had appeared and cleaned out all of Travis' valuables. Just as he was a non-entity before Travis passed, no one has heard from him since. May you die alone, Bob; you are the worst. I was suspicious of you then, and deeply regret not honoring Travis' memory as you cleaned out his legacy. I digress, but suffice to say I do not have access to a welder anymore, so I solved in a more ShadeTree way.
 
heat shrink before/after
First, I closed up the holes from below with the Constrained Layered Dampener (CLD) since I was applying it anyway. This left small, shallow, circular indentations, about the size of a US dime (in diameter) in the top. I filled the indentations with FlexSeal. Once dry, I painted over the FlexSeal and the rest of the top with the same white Rustoleum. Of course, around this work, I removed the tub, cleaned the top (picture above-right shows how filthy it was), and addressed the surface rust with converter and then encapsulator, both from Eastwood. With the tin-top good enough for another 10 years, I shifted to the luggage tub.

Tub Cleanup
The luggage tub needed it's own help. The rack bars were starting to show some rust, and one of them had become disconnected at one end. 10 years ago, when I initially installed the tub, I quick painted it with the white Rustoleum and attached it to the top with 4 long wood-screws. I had completely forgotten I had done that, but it had held on without issue. To my surprise, all 4 screws threaded right out of the metal top when I went to remove the tub. These holes served as the starting point for the more robust mounting I did later.

doing the doing
With the tub now on the floor of my garage, I drilled out the rivets holding the bars to the fiberglass. Over the course of many hours, I sanded them down to bare metal, and got off most of the rust. What remained got the converter/encapsulator treatment and then some white Rustoleum. Unlike the bars, the metal supports that run from side-to-side were in perfect rust-free condition, after sanding off the paint. I chose to leave them unpainted, and polished them with steel-wool before shooting them with clear-coat instead. When I purchased the top and tub, one of the luggage cleats was missing. I chose to replace all of them with stainless steel cleats (footman loops) which I bolted (M3 Allen bolts) instead of rivet'd in place. Incredibly, the footman loops that I used to mount the big speaker box into Oliver, the 1978 MGB, were a perfect fit. While everything was apart, I hauled the tub outside and applied a fresh coat of white Rustoleum to the fiberglass tub. Once the paint was dry, I set the tub on some old carpet bits to protect the finish a little bit.
 
Before I bolted (rather than rivet'd) the now-rust-protected-and-white bars back to the tub (M4 hex bolts), I tried 3/4" inner-diameter clear PVC/Vinyl tubing onto the round part of the bar. I thought this might help the paint last a little longer as well as soften the rack for things placed onto it. Unfortunately, the tube is just a shade too loose. I did not want moisture to wick underneath, and the gaps at the ends just didn't look that great. So, I pulled that off and used 3/4" inner-diameter clear heat-shrink instead. I warmed it carefully with a propane torch, just enough to engage the shrink and have it snug up on the bar. The picture above on the right shows how well the heat shrink sealed the bars. Honestly, FlexSeal probably could have done the same thing.
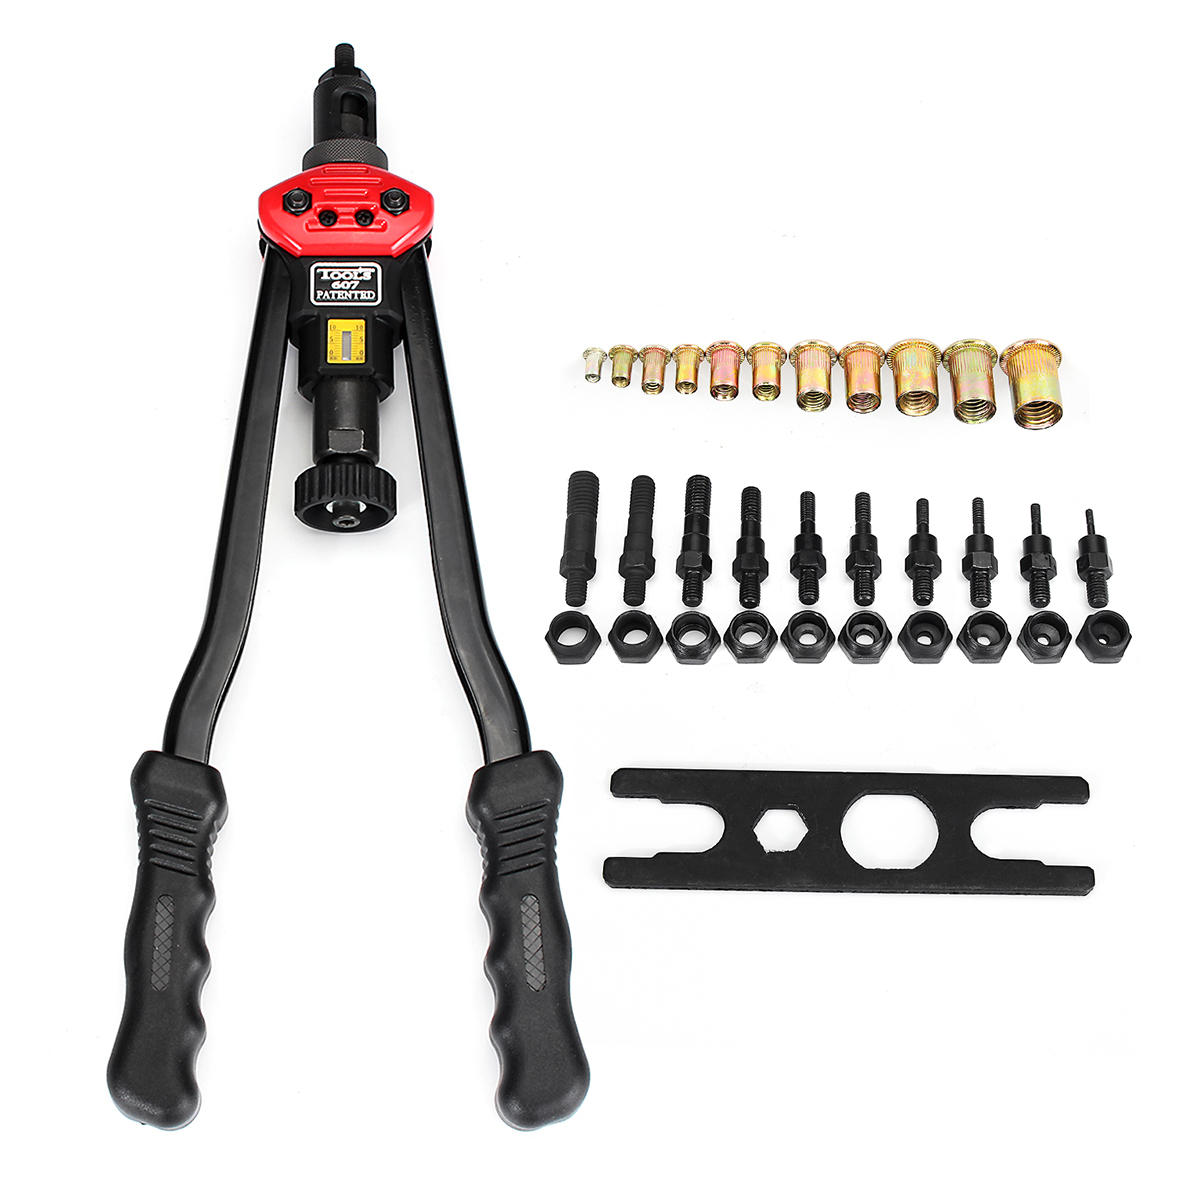
riv-nut tool set

Keeping with the whole noise reduction thing, I added some Noico to the hidden inside of the tub. I figured that it would reduce the vibration noise a little bit. Similar to the effect of adding this stuff to metal, the sound from tapping on the fiberglass changed to a much deeper note after the Noico was added. There is no way to know if this helped at all, but it seemed at least a little logical. The addition of the Noico added maybe a couple of pounds to the luggage tub, but if the noise on the highway is meaningfully reduced, this could be a contributing factor. Something is increasing the noise once we get up above 50mph, and since the luggage tub is right above our heads, it is a reasonably assumed source.

The last thing I did before installing the tub, I added a white pinch-edging around the outer edge. Originally, the Riviera pop-top shipped with a white edging like this. When I purchased this top, it did not have one. I don't think it really does much other than dress the edge a little bit. I could reduce some vibration transmission into the roof from the wind-whip at higher speeds, though. Again, like with the addition of the Noico on the underside of the tub, I'll take every fraction of a decibel reduction I can get. For those thinking of doing this to their luggage tub, it took 15 feet of piping. I had purchased 30 feet, thinking that woudl be enough to do the luggage tub and the pop-top. Clearly my guestimates were way off. I'll need to get more to do the pop-top, and I have enough left over for someone else to do just their tub. 

Tub Install
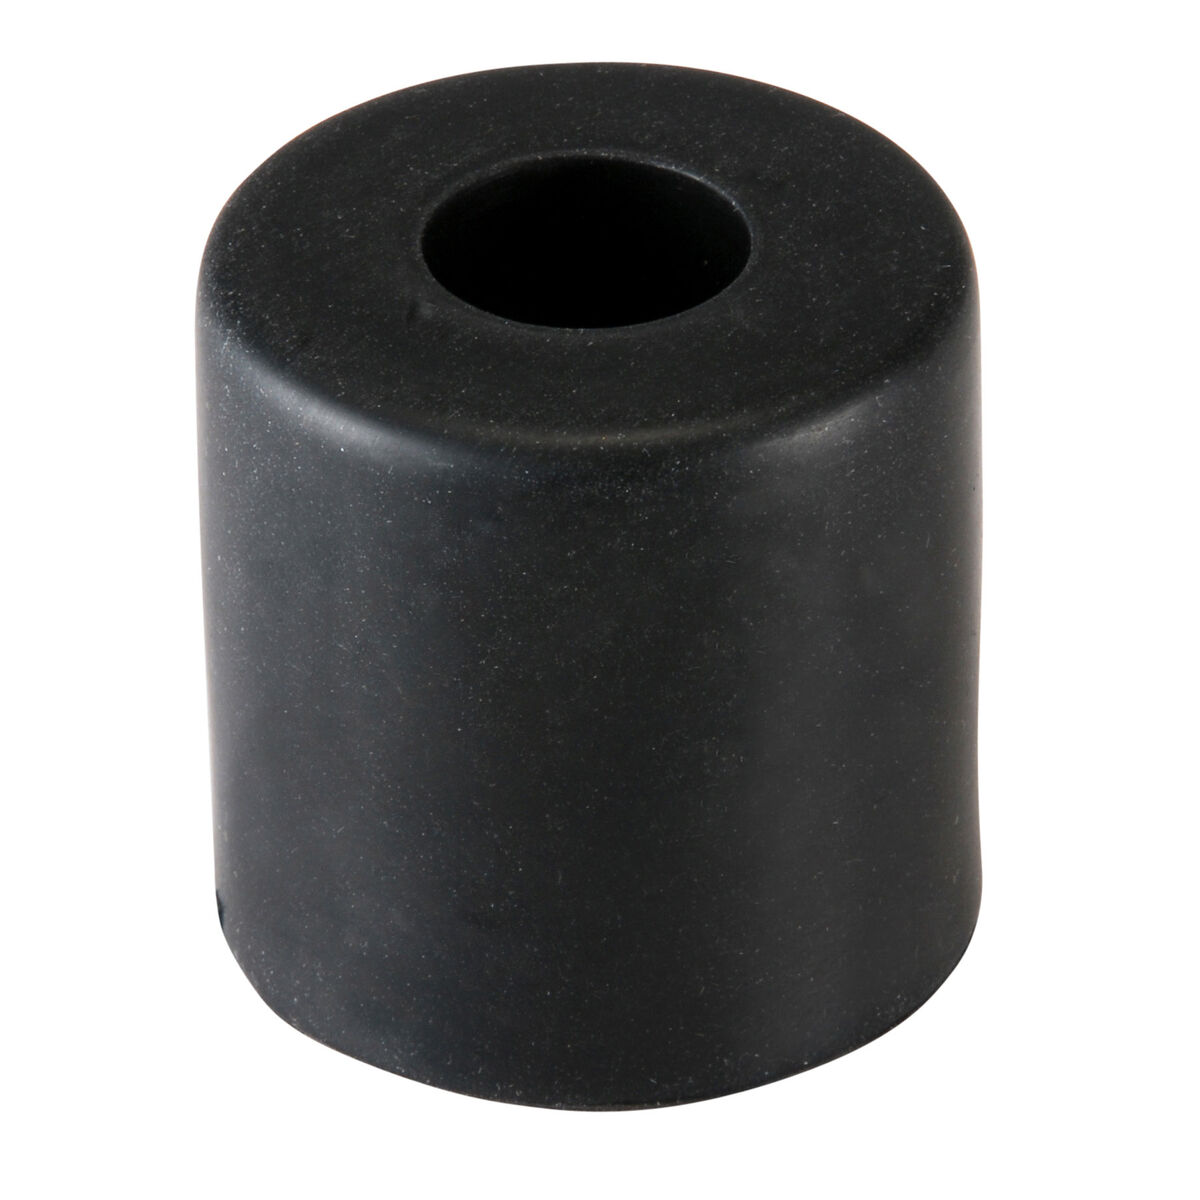
parts-express foot
Of course, I did not want to return to 4 long wood-screws holding the top on. While that appeared to work for 10 years, I did not want to press my luck. In a traditional install, the ASI/Riviera folks would bore 4 holes into the top and weld nuts in place from the underside. The top install would consist of 1 bolt per corner from above, passing through a thick rubber puck into the welded-on nut. Again, I do not have access to a welder, so I could not exactly repeat the original design. I could, however, pop in riv-nuts. A riv-nut installs like a pop-rivet: using a squeeze gun that has a mandrel and riv-nut sized for the job, you put the riv-nut on the installed mandrel, set it through the hole and pop it like a rivet. For the rubber puck, I found 4 rubber feet at a stereo-supply place (parts-express) that are 1-1/2" tall by 1-1/2" across. These feet have a central hole through the center.
 
I drilled out the old mounting holes large enough for the M5 riv-nut to fit. I applied the riv-nut from below: Since the riv-nut has a flush side (side where it is installed from) and a sticks-out side, it would be better for the sticks-out side not to be pointing down towards my head. As you can see from the stock picture of the foot, one end is wide, allowing the sticks-out side of the riv-nut a ready-made home inside.
 
view with the edging
I thought I could counter the Riviera install, and I run M5 stainless steel bolts from inside the cab up through the stereo-supply feet. This did not work for a reason I could not determine. So, I followed the original model with the bolts heading down from above instead: bolt through a fender washer, then the tub, through the rubber foot and into the riv-nut. Fortunately, the bolts I had were long enough to reach the riv-nuts but not so long that they protrude past the flush-side.

This whole affair became an incredible time consumer that I did not plan for. Once I saw the holes, I had to solve. Of course, I did not have to repaint the tub/top, nor swap out the cleats, replace the pop-rivets with stainless hardware, etc. This finished product looks better, will work better and is set up for seasonal maintenance. Which prompts me to encourage you to consider when was the last time you removed any of the plastic bits off your ride to clean up accumulated organic material. Your paint, and perhaps the integrity of your ride, will thank you.

Well, that's it for today. Thanks, as always, for following along-

Tuesday, June 20, 2017

MGB - Front Suspension Refresh (Part 3)

I'm continuing the front end rebuild I started in Parts 1 (See MGB - Front Suspension Refresh Part 1) and 2 (See MGB - Front Suspension Refresh Part 2). At this point, the front beam is stripped and removed from the car. We've evaluated the parts, and made determinations about which to keep and which to replace. Today starts the work of putting it all back together again. WooHoo!

Pivot on the Swivels
There some things really are best left to a shop. I want to do as much as I possibly can myself, but it's not a religion. It's just a strong preference because I want to learn and because I find it fun. I read through the process for removing and replacing the king pins and bushings within the swivels (wheel assemblies). This requires a shop press, which I don't have nor do I have the space for, and a trained eye for determining the viability of the wheel assembly as a whole. So, I contracted the fine folks at British Auto Works to do it. Like so many things, I expanded the job from just swapping the king pins and bushings to also include replacing and grease-packing the wheel bearings. Doing the wheel bearings didn't really increase the cost, and it gave me the peace of mind that the entire front end had been updated. British Auto Works completely strips, and then chem-tanks all of the wheel assembly. after testing and measuring everything, they assemble the wheel and finishes the job with fresh paint. All told, it took them three days, and most of that was because they wanted extra time in the chem-tank. The finished product looks fantastic and delivered that piece-of-mind that they were properly done.

Paint
While the swivels were at British Auto Works, I started working on the beam. For being exposed to the elements, and road debris for almost 40 years, I would have expected more damage or rust. In truth, it was in pretty good shape. So, I cleaned it up, first with a power washer, then by hand with Simple Green. Once cleaned, I could see a few scratches, but it was in really fine shape. I threaded the rusty old bolts which held the front shocks back in. I did that so paint wouldn't gum up the threads. Then I sanded it, wiped it down with mineral spirits and shot it with high-gloss black paint. Since I had the time, I let the paint cure for a week, light sanded it, wiped it down and shot another coat. At this point, I removed the old shock bolts so the paint would cure without them. While I had the materials out, I cleaned up the spring pans and springs, sanded and painted them too. Truth be told, I had lots of other parts around that I intend to re-install, so I cleaned them up, sanded, wiped and shot them too. I'll share some of the tear-down and re-assembly of those things in other posts. Everything got high-gloss black except the springs. Those I shot burnt orange which from afar looks like the vermilion on the body, but its not an exact match. I decided it wasn't a deal-breaker so I also sanded, wiped and shot the underside of the frame where the front beam mounts to it. I figured I wouldn't have that exposed again any time soon so why not?

Beam Me Up
Once the paint has been shot and cured, I was able to start assembling things. First, was the re-install of the bare beam. Since I was working on this by myself, this was a great deal harder than the removal. Why? The beam is held on with 4 bolts. Each bolt has a nut on both ends, and it passes through 2 poly/graphite (or rubber of simply poly) bushings, one on either side of the beam. The drawing on the side, here, with parts labelled 1 through 7 show the front bolt. The rear is similar. Note the orientation of the bolt in the drawing: the lump is on the bottom. This is important since the thinner stretch of the bolt runs up into the frame. If you try to send the lump up, it will not make it through the frame. Yes, I did try it that way. If you're doing this on your own, I fumbled my way into a process that works:

Get the beam onto your jack, and roll it under your front bumper. Looking from above, roughly align the rear of the beam with the rear frame holes, but still a few inches below it.
Pick a side. It doesn't matter which. Take the shorter, rear bolt, and load the bolt, stacking from the bottom: nut, plate, bushing. twist the nut onto the bolt a few turns. Slide the bolt up through the rear hole from the bottom of the beam, placing the top bushing onto the bolt. I found that these bushings sort of held the bolt in place.

With the bolt held in with friction, get more precise with your alignment, but just worry about that one hole and bolt. Raise the jack and re-check. Repeat until you have the bolt and hole lined up. Then, while holding the bolt to the beam, raise the jack, pressing the bolt into the frame. Once the bolt peers through the top of the frame, put the top nut on. Again, thread the nut on just a few turns so the bolt can hold the beam, but there is still a couple of inches between the top of the beam and the bottom of the frame.
The one bolt creates a pivot point so you can align another hole. I did the other rear bolt, following the same routine. With the rear bolts loosely in, the fronts are much easier. Stack the front bolts again from the bottom: nut, plate and bushing. Set the upper bushing, and set the bolt through the frame hole. Thread on the top bolt.
Now you can start tightening the nuts. On all 8 nuts you want some threads to peek out from the nut. If you don't see threads, you may not have enough bite on the nut to withstand the pressures during intense driving. Then, torque to spec (54 to 56 ft/lbs).

Shock Me
Once I had the beam in, I shifted to installing the front shocks. If you remember, the removal was only difficult for the rear bolts because of how close they are to the wheel well. The install is also challenged by this. If you painted your beam, did you paint with the bolts out? I accidentally left one out: the one I took to the hardware store. That bolt hole was a real pain to get a bolt into at this stage. The others just took a little windex on the bolt, and it threaded right in. Once finger tight, it doesn't take much to torque it down... except getting a torque wrench in there is impossible. You'll need to feel it, as you're aiming for 43 to 45 ft/lbs. I actually came back and torqued after I did the lower control arms because the torque settings are so close, I got a good feel for what 45ft/lbs is supposed to feel like.

Lower Control Arm
Now for the fun part. Whether you bought new arms or cleaned up your originals, there are two different arm shapes: one for the rear and one for the front. The "front" has a hole specifically for the sway bar that's reinforced. Pick a side. Grab a spring pan, three sets of spring pan fasteners (1/2" nut-washer-bolt combinations) and your lower control arm bushings. If you got the fender washers like I did, grab them too. You don't need the lower trunnion kit nor the spring yet. On each arm, press in the bushing. If you got the poly bushings, this may require a press. The rubber and poly/graphite fit in without much difficulty.

Slide a fender washer onto each front-back side of the pivot (the thing on the beam that the lower arms attach to). Then fit the rear and front arms on that same side, making sure to have them pointing towards each other and making sure you're using a front and a rear arm in the right spots (rear on rear, front on front). Yeah, that sounds obvious and all, but once you get on the ground all those arms start to look the same. Consider that the flat side on the arm faces the pan (see the picture).

Let the arms hang down and grab the spring pan and one set of fasteners. Holding the pan with the dish facing towards you, lightly thread the bolt through from the outside of the arm through to the pan. Set a washer on the bolt and then finger a nut onto the bolt. Do not tighten yet. Do the other 2 fastener set the same way: 2 on the rear, one on the front. With the spring pan loosely held to the arms, slide the other fender washers on and follow with the castle nuts. Once everything is on, but loose, start tightening things, moving from castle nuts to spring pan fasteners so no bolt gets hung up because it has been left untouched for too long. When everything is snug, torque to spec: 22 ft/lbs for the spring pan fasteners and 45 ft/lbs for the castle nuts.

For the castle nuts, align the castle with the cotter-pin hole and put in the cotter pin (or bailing wire, if you're like me). Better to torque a little too much than not enough, IMHO, but you shouldn't need to go higher than 50 ft/lbs. If you do, re-check your work. Maybe something is hanging up.

That's it for this time. I should be able to finish this up in just one more post. I'll get the swivels and springs on, and then the major efforts are completed. Thanks for following along. This has been an incredibly rewarding effort.

Tuesday, June 13, 2017

MGB - Front Suspension Refresh (Part 2)

Continuing from my last post, I'm focusing this group of posts on the rebuild of the MGB front end. Today, we get down to the beam, and get it removed from the car. I'll evaluate parts, and talk about replacement bushing options. Part I can be found here.

Shocking
While the beam is in, and you have access to your front shocks is the best time to evaluate them. On the right side, the shock responded relatively well to my efforts to move the arm up and down. It resisted in both directions, but not as much as I would have liked. Still, I probably could have left it alone. The shock on the left (driver) side, however, offered virtually no resistance to my attempts to move it. In fact, I could push it to the top of it's motion and it would slowly drop down. That shock is shot. Suspension shops usually recommend replacing both fronts and/or both rears at the same time. For a front-end like this one, where the shock absorber is also playing the part of the upper control arm, it is all the more important. These are held in place by 4 bolts. The two against the inner wheel well can be difficult to get to, but you can address them with the most basic spanners and ratchet/sockets. Similar to the engine mount replacement (see MGB - engine mounts), a good supply patience is welcomed here.

Set the shocks aside with the lower arms and pans. To protect the threaded holes, finger the old bolts back into the holes. I took one with me to Orchards and found replacement grade 8 stainless steel ones for the reassembly. I strongly recommend replacing fasteners with stainless steel or zinc coated to reduce the rusted-on effect.

Beam Down
image swiped from 'net,
but that's a stock beam
Now, the front beam should only be connected to the car by 4 bolts. Nothing else should be tying them together. No brake lines, steering bits, etc. but it never hurts to stupid-check (so-called for those moments when you don't check, something bad happens and call yourself stupid for not checking).

I used an ATV / transmission jack, but a more standard wheeled floor jack should work; it will just take more patience with balance. The ATV / transmission jack is nice in that it has two long arms to spread the weight, and improve the balance. Still, with the front end way in the air, and the rear on the ground, the bottom of the beam is not parallel to the floor. So, I slid a 2x4 under the front of the beam when the ATV / transmission jack reached the underside of the beam to make uniform contact. Raise the jack until it is holding some weight, but not much. You want the car stable on it's jack stands.

Relieve the torque on the 4 bolts by cracking the 4 bolts on top. you shouldn't need to hold the bottom nuts at all for this. I used the breaker bar with an assortment of extensions. Once cracked, do the same on the bottom nuts, just so they are not rusted in place. Whether you remove the nuts on top or the bottom or a mixture doesn't really matter. In the end, all 4 bolts need to be un-nutted on both ends. You would think that once the nuts have been removed from the bolts, they would just fall out. Fat chance. How about lowering the jack a little bit? Nope. To free the bolts, the top nut needs to be removed. Then, using a socket extension so you can address the bolt, rap the bolt from above with a rubber mallet. When this doesn't work, use a framing hammer, but be very careful with those bolts. They are not normal and if the threads are damaged, you'll need to order new ones.

Once the bolts fall out, either through banging or playing with your jack or maybe you got lucky and they just fell out... you'll see that these bolts are 2 different lengths and that the longer bolts (that fell out of the front) have a lump in the middle like a poorly rolled spliff. I retained all of this hardware, choosing to not try to find replacements, though I thought about it. Simply lower the jack, and the beam will lower with it. Pull out the front under the radiator and bumper.

Parts and More Parts
At this point, I was pretty spent. From the start of the prior posting to the beam on the ground was at least 2 days. Now that I've done it once, though, I could do it again in 1/3 of the time or faster. As I set with a beer, I looked at the pile of parts and the zip-lock baggies of fasteners. The fasteners were all bare steel, and they had plenty of rust on them. I chose to replace all of them except the beam-to-frame nuts and bolts. I added 4 fender washers to fit between the beam and the lower control arms. I felt this would help the bushings last longer. The fasteners probably put me back $50. Then, I turned to the pile of parts:

front shock absorber /
upper control arm
Front Shock Absorbers (2) New, these are crazy expensive. Moss has them for over $330 each. Instead, I found World Wide Auto Parts in Madison, WI who rebuilds originals. After some research I bought a pair from them at $99 each plus core which was returned when I sent my old ones back to them. They really look great, and if they work as well as they look, I just may go back for replacements of the rears instead of doing the swap-out for non-MGB rear shocks that so many folks do. The paint chips off without much effort, so if you're going for a show-car experience, I'd recommend repainting them.

Lower Control Arms (4) These looked okay, but without tight tolerance measuring tools, I couldn't tell if any of the important holes on the ends were out of round. Replacements for all 4 was $70 with OEM British steel, and the originals could have been worn from the bad seals, so I coughed up the $70.

lower control arms
Spring Pans (2) Like the arms, I couldn't tell for sure if the mounting holes were out of round, but on very close examination none of the holes looked oval. Since no pivoting happens with these pan holes, even a little out of round probably wouldn't matter so I chose to keep the spring pans, and just clean them up instead. New-steel replacements are $32 each at Moss, so they're a little steep cost-wise compared to some of the other bits. Still, if the spring pan won't firmly attach to the arms, your suspension won't be safe, so spend the $64. In the end, there was 0 play after everything was put back together, so my assessment was correct.

Front End Rebuild Kit (1) This was the whole point of this work. I found a few different suppliers for this kit, and resolved to buy from British Parts Northwest for $120. While their return policy is crap, their price is $35 less than Moss. These kits include:
- king-pin set and bushings. These run vertically between the arms and through your swivels
- upper control arm nut/bolts. They call them "fulcrum pin and hardware" and they attach the top of the swivel to the control arm / front shock absorber.
- upper control arm bushings (rubber or all-poly). These pair with the upper control arm nut/bolts to complete the set. I ended up swapping out the kit-supplied ones with some Poly/Graphite bushings I got from a new friend, Basil, in California ($6)

- lower control arm to swivel bolt/nut and bushings. They call these "Lower Trunnion Kits".
- lower control arm to beam ("A-Arm") bushings and bolts (rubber or all-poly). Again, I went with Poly/Graphite ($20) from Basil instead of the kit-supplied ones.

To do the front end rebuild, that's really all you need. I decided, though, that as long as its open, replace the beam-to-frame bushings.... and the sway bar bushings. Again, I sourced these from my friend in California. frame bushings ran $23 and the sway bar bushes were $10. When I consider there was no extra labor for the beam bushings, and very little on the sway bars, this was a very low cost to get the front end as rock-solid stable as possible.

Rubber, Poly and Poly/Graphite
Just for an aside, I wanted to touch on the differences between these three types of bushing. As a general rule, it's best that you pick one and stick with it through the front end. Since they behave a little differently from each other, the front end could be less predictable if your lowers and uppers are not the same material and respond to stresses differently.

Rubber - this is what you had originally. When squeezed between two pieces of steel which want to twist, the rubber twists with it. This smooths out the twisting motion, giving an easy, forgiving ride. For a cruiser, this is great material.


beam to frame bushings
Poly - this is the more common "upgraded" bushing. Unlike the rubber, the poly does not twist with the steel; it resists the twisting motion. This resistance reduces the degree of the twist, allowing more of the force through to the ride. This is a much less forgiving ride, but gives you a much stronger "sense of the road". Installing these bushings can be very difficult, requiring water-based lube or other tricks, maybe the use of a shop press. Once installed, most owners report loving them.

Poly/Graphite - this is in-between the Poly and Rubber in terms of road feel and difficulty of install. Basil described this far better than I could, so I will quote: They look like black plastic that has some give to them. You can put one between your thumb and forefinger and feel it give a little. The polyurethane matrix has a slippery substance called "graphite" (a crystalline form of carbon) in the polymer matrix so a slippery bit is always exposed and thus self-lubricating the bushing. No special install efforts needed.

This post got long again, so I'll continue in another post. At this point, we have the front beam completely torn down, our parts are ordered, and fasteners sourced at the local hardware store. We'll start next time with some painting and then assembly. Thanks, as always, for following along...

Thursday, March 24, 2016

New Shoes!

All bus content today. Hapy gets new shoes!

Background
on the way home from
Black Sheep Family Reunion
If you've been reading this blog for a while, there are a couple of things that have probably popped out. First, I've been wanting to get bigger tires since I did the engine/tranny swap. Second, our cars appear to break down in bunches so we rely on the bus as a "life raft" when one of the regular use cars fails. Until last Summer, this had been a fine pattern: when emergency struck, I'd abandon whatever project I was working on and drove the bus while fixing whatever was wrong with whichever car was broken. Last Summer on our trip to Wheeler (see Santa Clara by way of Wheeler), we lost a tire. This forced a tire replacement decision. I chose not to decide, and to instead take my chances and drive the bus as little as possible.

Rubber Ages
Wheeler
The current set on the bus is over 10 years old, and they spent most of their life sitting still. The tread is awesome, but the rubber is starting to break down. This is normal. To the consumer, hearing a tire salesperson explain that "while the tread looks good, your tires are dangerous" rings hollow. Most folks have the same immediate reaction: you're just trying to sell me tires I don't need. I know I think it. In truth, the oxidation of the rubber does cause it to become less capable of holding air. Eventually they develop slow leaks. In some cases the sidewall can become unstable and rather than frustratingly running flat, it could blow out. Yikes.

Research Leads to Solutions
mid- paint job, winter 2014
Since I'd been wrestling with this problem for a while, I had lots of research to depend upon when I had to make decisions (see: Wheels, Studs, Chrome and Backspace). Decision time was now. With 2dot0 gone (see Oh SNAP), Boo and I had to re-possess her old Saturn named Dude from the person we had long-term-loaned the car to. I haven't blogged much about Dude, but that car has been the cause of a fair share of life-boat emergencies. With our stable reduced by one, I needed Hapy back road ready right away. So, I hit craigslist, hoping to find some old 15" Vanagon rims. Instead, I found a set of 16" x 7" wheels with some 50/50 rubber on them.

I ran the current size rim/tire combination (215/60R16) through my spreadsheet. According to my calculations, I had less than 8mm between the edge of the rear tire and the rear fender, but otherwise it easily fit: 14mm away from suspension, over 40mm between the edge of the tire and the front/rear fender edge of the front wheel. Comfortable that these would fit, I bought them.

Acquisitions
new shoes, p-side
It turned out that the seller (name withheld to protect the innocent) knows my old friend Justin. The seller has a stable of Vanagons, including a mid-80' Subaru-powered Westy, a TDI-powered single-cab and a regular '87 7 passenger. I totally drooled over the Westy and the single-cab. The Westy is his wife's daily-driver (very impressive). I could have talked VW's and crawled over his Vanagons all evening, but the weather was for rot and he and his wife had dinner on the stove, so we traded cash for wheels and I hit the trailing edge of rush-hour traffic home.

Install
Changing a tire isn't exactly hard. Block opposite side wheels. Crack lugs. Raise vehicle until rubber no longer touches the ground. If possible, put a jack stand under frame for extra safety. Remove lugs. Remove wheel. Install is reverse, with final torque performed when the tire is back on the ground, "jumping the center" as you go. Doing this 4 times can take some time and energy. I think it took me 2-1/2 hours to do all four. Along the way, I convinced myself that the rear end has too much float to it. I had to raise the rear end too high into the air, I almost ran out of threads on the BusDepot jack, and the tire still wasn't off the ground. I resorted to putting a small rolly jack under the lower shock mount to get the wheel up. I have to address this rear suspension.

new front rim
The wheels fit over the rear castle nuts and front grease caps. In fact, there is a hair of room to put little covers over them to clean up the look. The rims, though, only had one cover included, so I'll have to find some. The original lugs fit, though it was tight. I was able to get them on with the tips of my fingers, and had to use a 3/8" driver with a socket to set them. The old spare that was put on in Wheeler went back onto the nose, for now. I'll need to replace that soon too.

I haven't had a chance to take a test drive yet. I am mid-way through a few projects, but I may clear the bus of half completed work so I can take a spin tonight. The wheels look great, IMHO. K, my oldest, says it has a throw-back beach bum look. I'll take it. I'll be replacing these tires when the need arises, and then I expect to put on 215/70R16 for a slightly lower revs-per-mile than the current set.

Thanks, as always, for following along.

Thursday, February 26, 2015

Windscreen Removal

Well, the prep for painting has really gotten underway now. Today's brief post is about removing the windscreen and what lies beneath. Depending on your windscreen, you may be removing it to replace it. If that's the case, you may not need to take as much care as I did. My glass was perfect, but I needed to get a look at the metal surrounding it as well as get the paint underneath it. One more seal is worth the rust containment.

Cut
multiple passes
For tools, you only really need a box-cutter / X-Acto. Extend the blade halfway. Approach the bus from the front and go to the top corner of the passenger side first. Slide the side of the knife blade against the windscreen with the sharp side pointing down. Cut the rubber seal from top to bottom by sliding the side of the blade against the windscreen. It will resist, so that's why we're only using half of the blade edge. Don't press too hard; let the knife to the work. The harder you fight it, the more likely you will scratch your windscreen. Extend the blade to 3/4 length and run the same seal edge top to bottom. Extend the blade to full length and repeat. This time, you should hear that satisfying noise of the knife against the A-pillar. The rubber should separate from the glass and just hang there. If not, gently run the knife along the A-pillar being careful not to disturb the paint. It is possible a previous owner painted the seal on, ran caulk to try to stop a leak or glued it in. Glue is not necessary for this seal. Nor is caulk, but I've seen some crazy road-side repairs go untouched for years, and caulk is definitely one of them.

Repeat
Repeat the cuts for the driver side and then the top. By now, there should be rubber hanging off the bus, or sitting in strips by your feet. Nicely done. If its an old seal, some of those cuts were very difficult. If it was anything like my first seal replacement on my bus, there were a few spots where I was able to cut right through very easily. I discovered that those spots also aligned with rust. When I cut off the seal the other day, it was only a few years old, and held very well. I'll be getting another Bus-Depot seal for the re-install later.

Bottom Cut Last
Pulled away a little bit
The best is saved for last. When I did my first seal, I had to be careful while I cut the last section. It wasn't holding very well, so I had to keep one hand holding the windscreen while I finished the cut. The newer seal, though, held strong even after I cut off the bottom. The windscreen held to the bus. It held very firm, actually. Your experience may differ, and you may want a buddy around when you make your last cut (as I did a few years ago).

Pop It Out
Old seals don't hold well, so the windscreen may just fall out once you've made your last cut. In my case, I reached one hand through the front door and pushed towards the front while catching the edge out front. This freed the sides, but the center still held. I had to grip the windscreen from the bottom near first the driver side then the passenger side and gently pull forward. Slowly, the seal gave in and handed me my windscreen. I carefully set it where it wouldn't get scratched and pulled out the remains of the seal. If yours was glued in, this could take some time. You want to get back down to smooth metal.

Now What?
glass out. rust inspection
I looked at the rust treatment I did years ago with some POR15. I was impressed. From my memory, the rust had not meaningfully advanced. Still, I needed to sand the whole opening to make sure. It looked pretty good, so I decided I would just expose the rust (read: sand and Dremel) and re-treat it. Then, I'll just handle it like any other metal panel: prime and paint with lots of sanding mixed in. Since it lives under a seal, there's no point in adding Bondo to the rust pits except as practice for visible spots I need to do later. Still, I'm going to skip Bondo'ing here.

As always seems to happen, this small painting effort has grown into a pretty big deal. Next up, removing the dash-top, more rust inspecting and sanding. Apart from deciding how far to go with paint on the interior, I think I'm almost done with the initial prep work. I still have lots of sanding and such to do, though. Unfortunately, that doesn't lend itself to print very well, so it might be a little while before my next few posts appear after this. Thanks for following along.