Tuesday, November 28, 2023

Kitchen Planning

Around the furnace work and getting Hapy operational again, Boo and I have been trying to move forward on having a viable kitchen as well. Today, I will post briefly about that progress.

Cabinets
rough kitchen thought
It probably makes sense to start somewhere near the beginning. Shortly after getting this house, Boo and I hit the rebuilding center looking for all kinds of things. What we were NOT looking for were kitchen cabinets. The old ones were still in there, the kitchen needed serious cleaning and fixing, we didn't have a place to put new ones, etc. Well, there was a full set from an old house that had rounded corners and such that they looked perfect. At $420 for an entire kitchen's worth of cabinets (plus a bathroom vanity and a couple cabinets for a laundry, we think), we pulled the trigger. Through the help of Boo's ex-husband, and his minivan, we managed to fit all of them into the van and the pickup in 2 trips, and loaded them rather unceremoniously into the garage. Fast forward over a year and they were still there though the kitchen is now getting some focus. Still, they have been safe, undamaged and long-since paid for.

We recently engaged with a contractor to help get things moving more swiftly. Had we not done so, I suspect those cabinets would have sat in the garage for another 6 months while I finished the furnace work and then got going on some kitchen rough-in. Instead, I spent a few hours in the garage freeing the cabinets from the things that had been buried on top of them.

Cleanup
cleaning the line
The old kitchen was somewhere between a cold-room, a tool shed, building supply storage and the pass-through to the laundry and backyard. As a result, it was a mess. Oh, and I did tear down a bunch of drywall when the weather was warm so the whole area was cordoned off with a floor-to-ceiling plastic sheet. It was not exactly welcoming for the holidays. When I removed that non-supporting / secondary wall, I had left extra space below the ceiling. I wanted that line clean before I did anything else. So, I measured again the height of the passage I was mimicking (7'4") and sent in a screw to mark the spot. From beneath that screw, I pushed up with a long section of door trim (knowing it was straight). Atop the trim I set the level and then sent 2 screws through the trim into the drywall so I had a fence to cut along. With a handheld drywall saw I cut the line, knowing it was level. After the fact, I realized that having the cut leveled would have been best done after getting the floor perfectly level... which it isn't. We have moved the floor leveling to the front of this active list and that line will probably need to be fixed with a subsequent cleanup cut or some drywall repairs. Oh well. With the wall pushed up, we can better imagine the kitchen space, so it was not a total waste of effort.

With the line cut, my demo was done; the contractor will be handling the floor and anything else that pops up. So, I could clear everything out... the work table, construction material, the construction waste I just created, etc. leaving just an empty room. A couple hours of sweeping, vacuuming and mopping left us a room that was ready for some imagination. Before we could really do much else, though, the hole through which we lowered the furnace needed to be temporarily covered. Boo picked up a 4-foot-square sheet of 15/32" plywood that more than covered the hole. In fact, it helped us consider the swing-room for the door as we started plopping cabinets.

Try Before You Mount
sink thinking
Boo and I had her sister, her niece and their respective partners over to haul kitchen cabinets from the garage into the demo'd kitchen. One by one, we hauled a cabinet up the 2 steps and thru the doorway. Once the first end fit through, we slapped a moving dolly underneath it. When the other end made it through, it was placed onto another dolly. Once on dollies, the cabinets could roll around the floor. A few weeks ago, we bought a half-dozen moving dollies from Harbor Freight (they were on sale) for this purpose.

Most folks do this in a completely opposite way: hire someone, have that someone take measurements, with those measurements they plan a kitchen, cabinets are built to that plan, and then they are installed. We started with buying a rando-set, so in order to figure out how they could fit, we could have measured things, and gone virtual planning. This felt much more visceral. We moved them around and played house by pretend cooking a meal and using the sink to get a sense for how the space really works for us. 

While we did arrive at some ideas, and at least a couple cabinets set in their probable-permanent locations (sink base and pantry), we are left with unknowns. While the rest of us played with the cabinets, Boo's sister's partner Glenn measured and marked up a sheet of graph paper with the dimensions of the overall space. Boo and I will cut up little pieces of paper reflecting the remaining cabinets so we can arrive at the open working kitchen we are seeking. Ultimately, we will probably cut down at least one of the cabinets. Representing that is much easier by cutting a small piece of paper than actually taking saw-to-cabinet. It's obviously, much easier to undo as well. Before you ask, yes, we absolutely could do this with SketchUp or something similar. I started down that path and the amount of work necessary was considerable when compared to pencil, paper and scissors. While the paper plan is 2-dimensional (versus SketchUp or similar), we can arrive at a 3D experience simply by moving the cabinets around in the actual space. Or, at least, that's the current thinking.

Still Cold, Inside and Out
Progress on the furnace continues. I will post an update next time, but I will say that with every weekend spent working on HVAC, the $10K estimate seems more and more reasonable. Our overnight temperatures have been dipping below freezing with increasing frequency. When coupled with little-to-no insulation and an overtaxed electrical system, we have to pick which areas will have any heat, and those which do get some are not having it consistently. If fear is the ultimate motivator, I think wanting to be warm is a fairly close second. We are also realizing just how important it is to have a considerable part of the house electrical work done when Gary is here for the kitchen and hooking up the furnace. 

NewOldHouse is starting to feel like the house version of the old VW bus: there's always something to work on because there's always multiple things that need to be fixed. And, the answer to the question of "will it ever be done" is also the same: Probably not. Thanks as always, for following along-

Wednesday, November 22, 2023

Hapy Update

Today I could continue the dissertation on the effort to move the furnace in our 1948 farmhouse. Instead, I actually have something car related... the check-in on Hapy that I said I was going to do in a prior post and then flat-forgot. Remember Hapy? He's the 1972 VW camperbus that launched this blog. I meant to post this yesterday, time got away from me.

Hapy No Start Returns
A few weeks ago, as the weather turned cold, Hapy became increasingly difficult to start. Again. I figured it was the same issue as last time (See Hapy No Start Again), and started checking things with my multi-meter. I started where the old problem was: the main fuse for the glow plugs. Nope, there's a clean over-12V signal there. Then, I checked the voltage at the relay, and it was fine there too. Same for the resistance in the wire and the fuse.. no issues. So, I started thinking about the glow plugs themselves. I swapped this set in when I put in the chipped CPU and bigger nozzles, but not because there was anything wrong with the ones that were in there. I had this set of plugs that I had lying around for a few years, and I was selling Flash. Flash had failing glow plugs (resistance tests between the plugs were not within a few ohms of each other). So, rather than put the new set into Flash, I got selfish and put Hapy's nothing-wrong-with-them plugs into Flash and installed the new-never-opened plugs into Hapy. Looking back, I don't think these plugs were nearly as good. I think we have had starting-while-cool problems from the beginning, but it was Summer when I did the swap and never thought about it. Until now.

I pulled the rear-most plug (#4?) and tested it by resting the glow plug threads against a grounded bit of steel on the engine and triggering the ignition to "run". After a 3 count, the tip of the plug started to glow orange. After another 3 count, I could hear the relay click off, and the tip returned to black. I did this a few times and each time it took a few seconds for the plug to respond and even then it was only the very tip. Based on some internet imagery, I concluded that those plugs were insufficient and bought a fresh set.

A few days prior to installing the new set, I started hitting the in-engine plugs with some Kroil penetrating oil at dinnertime. I did not want a plug to break off or damage the head during removal. Whether it was necessary or not, the plugs removed relatively easily. All of them had soot on them when they were removed. Into the trash they went. For each of the new ones, I applied some anti-seize onto the threads prior to installing and then only snugged them down (did not torque the snot out of them).

Unfortunately, my efforts to start Hapy when the glow plugs were not working did a number on the starter. Again. So, my attempt to start him after replacing the glow plugs was not fruitful. Since I did the glow plug swap around the furnace work, and the furnace still is not operational, I self-limited my time to just swapping the plugs and then getting back under the house. I returned the following weekend (bumming rides and car-sharing with Boo the week between) to remove and inspect the starter.

should be 1 part, not 2
I admit, I expected the starter to just need a remove / re-install cycle. I was wrong. This rebuilt starter was installed in June 2023. After a summer of being my "daily driver", the starter was cycled well less than 500 times. I guess rebuilt Bosch starters are not all the same. Maybe the starter was a Bosch but the rebuild was done with cheap-o parts, leaving just the case as a Bosch unit. Regardless, it did not take very long to notice that the seal on the end (which is supposed to go around the shaft which juts out when 12V is applied) wasn't there anymore. It had potato-chipped inside the little pocket where the nose of the starter goes. Neat! So, off to the internets I went looking for a suitable replacement. I decided to get a new one from MetalManParts. Run by MetalNerd, his site only sells things that he personally fabricated or installed into his own vehicle. I have purchased both types of things from him before and have no regrets. Since Bosch was sold off to Seg Automotive, he now supplies new starters from them. I trust that if he is selling them, he is using them.

Sadly, the install of a starter has become fairly rote, since I've done it so many times. I simply put a 19mm socket, 13mm socket, a ratchet and a couple extensions into my pocket, slide under the bus with the starter and it's installed in less than 15 minutes now. If the rear sway bar were not there, I could probably have it done half that time. Of course, I ran the battery down with all my glow plug testing, so it got a spell on the battery charger before I could test my handiwork. Once that was resolved, I turned the key to "run", counted to 6 (for the glow plugs, it's 45*F here) and returned the key to "off". I repeated and then tried to start. Fired right up! I let him run a few minutes to top off the battery and now he is back to being my daily driver.

Hapy Heat Not Heat
Remember all that effort I went through to install the Vanagon rear heater under the bus for some heat? While that was fun, the result is not much heat. I described the lack of warm on the drive to and from the Cascade Equinox festival. Beyond the lack of detectable warmth, opening the valve to try to get heat has resulted in a coolant leak. I can attribute no other source for why Hapy's coolant level is suddenly not holding. So, I turned the valve back off and will be replacing the Vanagon rear seat heater with something else: a Maradyne Fans Stoker heater.

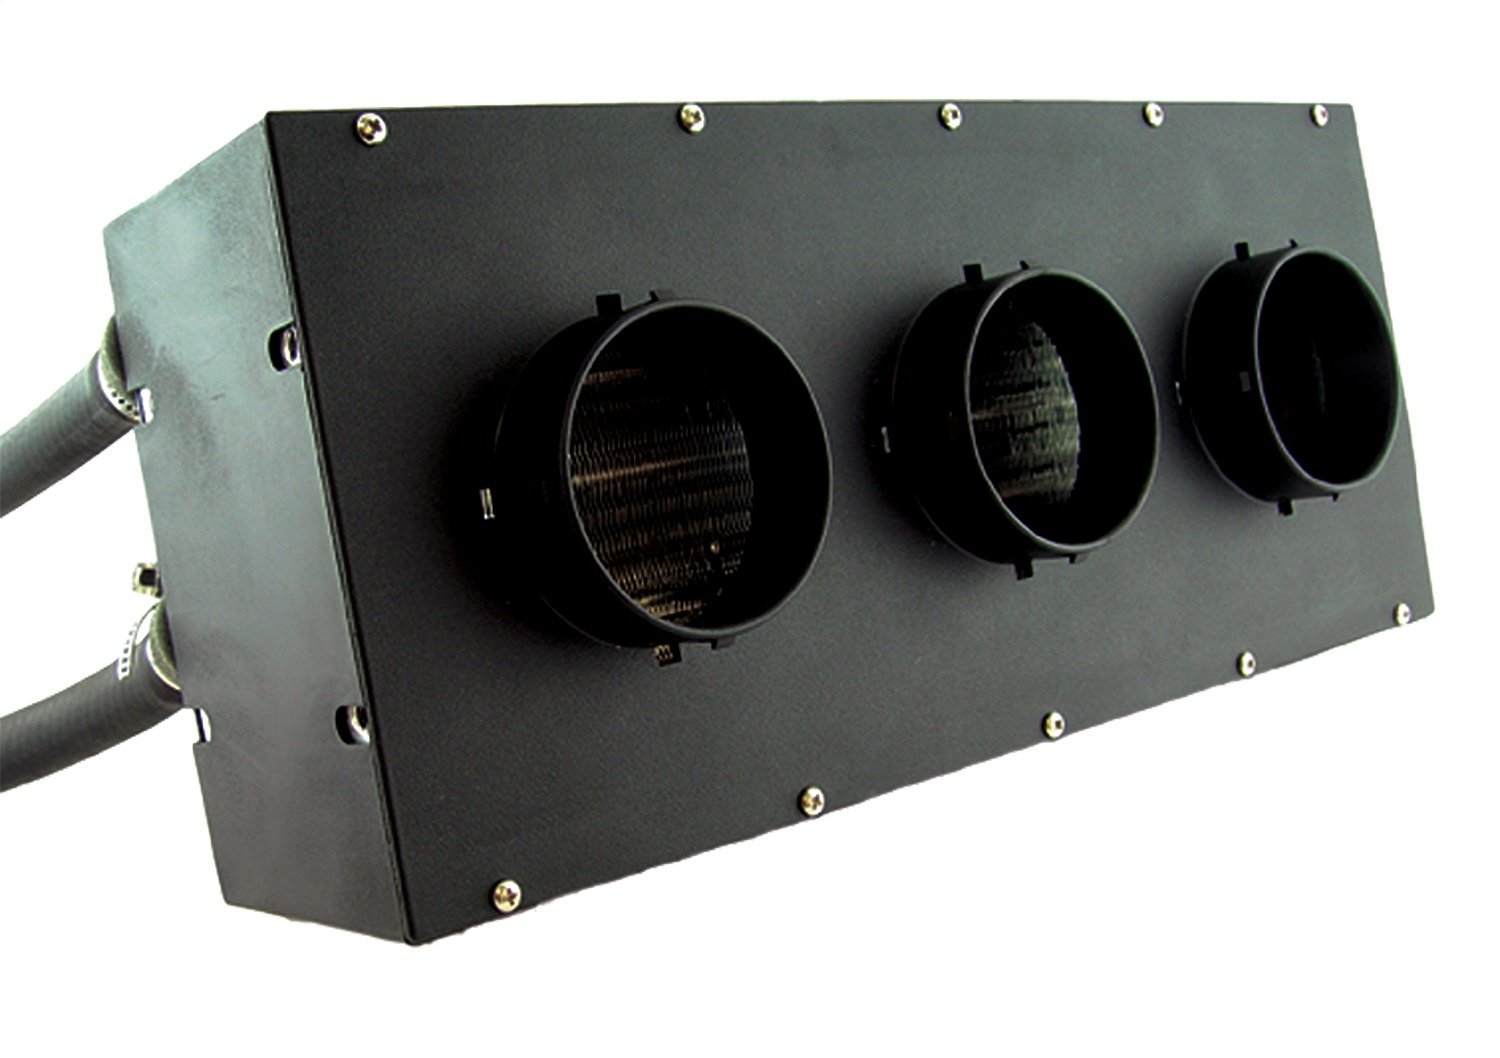
Maradyne, but could be any
There are lots of auxiliary fans which all look the same and have the same spec's (300cfm, 40k BTU - airflow and heating capacity, respectively). JEGS has their own, for example, that looks identical. Since I am unsure who is the originator, I went with a manufacturer with a known, solid reputation. There is little documentation and hardly any photos of this particular unit on the interwebs, making this choice perhaps a little more risky. I find the 40k BTU number everyone is using to be gross hyperbole, but I don't know how to test that nor the 300cfm number. I will bench test to get some amp-draw numbers before I install it. The amp-draw might be useful information for the next person since even Maradyne doesn't list this detail on their product page. And, it could be one more thing that is exactly the same on all of these units. For future reference, the JEGS unit draws 5.5, 7.1 and 11.6 amps (for low, medium and high settings respectively). I had relays in-place for the medium and high draw switch positions for the Vanagon unit. I don't know if I  will re-use them. Perhaps the amp-draw numbers will help me decide.

One other thing to point out: none of these heaters ship with a coolant control valve. Since I was leveraging the valve in the Vanagon, I have to add one of these or the heat will be on maximum all the time. I included this "vintage" control valve in my order. I thought about going with an electric one, but decided that I would really like to re-use one of the big original heat-sliders on the dash to control the amount of coolant flowing into the heater core. That feels more authentic than another knob attached to the bottom of the dash. Of course, I haven't ever had that control cable, so I will be running this either full-on or full-off until I do.

For now, this means that trips in Hapy will be just like all the other trips I've ever made with him in the not-Summer. They will be cold. It will be like driving around in an ice-fishing shed, unless I can either install that heater soon-ish -OR- get the little Chinese diesel heater/furnace working.... or both. Since I do not have a garage and I barely have a 4-meter square piece of concrete to work on... and I have a house furnace to fix, I do not think Hapy's heat will get addressed terribly soon. At least I have the parts for when I do. Of course, now that he is my daily-driver again, I may decide another week without a furnace might be a fair trade for some heat, any heat, in Hapy.

That's it for today. Thanks, as always, for following along-

Tuesday, November 7, 2023

Setting the Furnace

Continuing the fun with the furnace today. It being October, of course we had another issue with Hapy not starting so I'll touch on that as well. EDIT: oops. Didn't post on Hapy. Next time, I swear!

Plan and Plan Again
today's end-state
Recall our plan to move the furnace into the crawlspace. We had the work bid by a furnace company and they quoted us $12kUS; we recognized that as a "go away" price and chose to do it ourselves. My biggest considerations are around the combustion exhaust, so I spent some time researching this. According to multiple sources, an 80% efficient furnace needs a double-walled exhaust (check) and it must have an upward pitch of no less than .25" per foot. I thought that was fairly flat, so checked other sources. From this data point, I collected others, like how far from the ground is the bottom/top of the exhaust pipe heading into the chimney, where the exhaust exists the furnace, etc. With these numbers in mind, I set to planning where to set the furnace.

planning a hole
Initially, I planned to put it directly beneath where it had previously been. This would have changed the routing of the conditioned air, gas line, cold intake and exhaust the least. Unfortunately, this would have put the furnace right against a main beam running the width of the house, making seasonal maintenance impossible. Additionally, that spot under the furnace had an unexpected rectangular concrete curb that was smaller than the space we needed cleared. So, the furnace is going to be adjacent to that curb'd rectangle, but because the distance to the chimney is around 3 feet, and I would like an angle of assent that is greater than the minimum, the furnace will need to be almost on the ground. So, a plan that wound have suspended the furnace from the floor joists will be replaced with a plan that has the furnace a-fixed to the ground instead.

Dig Another Hole
hole dug
Obviously, I am not going to simply set the furnace on the vapor barrier on the ground. Beyond the fact that there are safety issues, the furnace needs to be up off the ground height-wise to get the exhaust angle I want and to minimize both the conditioned air and gas line routing. Instead, I decided to dig a foundation and set the furnace on a stand. That sounds so simple until you get down to trying to dig a hole when the headroom between the dirt and the bottom of the floor joists is less than 2 feet. Starting with my tools, I had a 5 gallon bucket for removing dirt, a small-bladed shovel with a broken-off handle, a crescent-moon scraper thing and a 4-prong hoe. I cut 3 sides of a rectangle into the vapor barrier with scissors and peeled it away, leaving a 2 foot by 3 foot rectangle of rough dirt. With the tools I mentioned, I removed probably 60 gallons of dirt, leaving a 2 foot by 3 foot hole nearly a foot deep. This took almost 3 hours since the whole thing was done on my belly.

gravelling
After taking a break for a few days, I returned and repaired the vapor barrier with thick black garbage bags. Along the cut edges, I made sure the plastic overlapped more than a handful of inches, and I lined the hole with sufficient slack so the additional layers of material would not cause gaps to form. Once satisfied, I added a 1/2 yard of gravel and moved it flat with a garden rake and then my gloved hands. On top of the gravel, I set 6 1-foot-square patio blocks. For each block, I made sure it was flat, and then flat to the adjacent block. As you can imagine for each block, this required multiple install-remove-install cycles and then additional ones to get the overall 6-block space flat. Between the gravel and the blocks, I probably spent 2 hours getting it level. This crawlspace patio will serve as a foundation for a stand upon which the furnace will rest.

Rack It
crawlspace patio
I initially thought I would simply use a pair of hot water heater stands for the furnace. I figured, they could withstand the weight of a full hot water heater so they could definitely hold a 70# furnace. I priced them but the cost and availability was not good. While searching, I found air conditioner stands designed to hold up to 400#. While local availability was again nil, the price was the same as for one hot water heater stand, and they are height adjustable. The rack I ordered was lost in shipping, so I switched the plan again. This time, I ordered a non-adjustable storage rack capable of holding 1000#. While I won't need anything that strong, this rack is also 2 foot by 3 foot in dimensions so it will fit into the hole, and potentially support the furnace better. When the rack arrived, I took the pieces into the crawlspace to consider my options. The rack is only "adjustable" by cutting legs to the height I need them to be. So.. adjust once, really.

prepping the legs
Accordingly, I wanted to be sure of my height, so I considered the exhaust run from where I expected the furnace to be over to the chimney. By suspending a long exhaust run, I could consider the angle of assent and the final destination for that edge of the furnace. From this, I could measure and math to the needed length for the furnace stand legs. You may notice from the pictures that I needed to move a couple of the blocks around too. Once satisfied, I took the rack back out from the crawlspace and cut the legs. Since the stand is really just unbraced legs, I added angle-irons at the bottom so I could mount the stand to the patio block. I then took the pieces to the crawlspace and re-assembled the stand. I set the stand where I planned, marked the holes on the patio blocks and took the stand apart again. Now, I could drill holes and mount the legs to the blocks. With the legs attached to the patio block, but not torqued down, I could set the stand top on, and then torque the concrete screws. I checked level along the way, pleased that all of this amateur work is level. Last, I bolted the legs to the top, using blue locktite so they would not work themselves loose from furnace vibration.

With the rack assembled, I was ready to move the furnace onto the stand. The gas line and the electrical will both enter the furnace from the bottom, and these will need to be routed so the "front" cover can be removed for seasonal servicing. The electrical entry has some wiggle room, but the gas line does not. I needed to account for these as I considered where on the stand the furnace would be placed. The stand is more than large enough to account for that adjustment and the space beneath it has ample room to run gas and electric.

rack installed
The furnace is heavy and the ceiling in the crawlspace is limited. I had feared that pushing and lifting it would be quite the undertaking for me (Boo had to work). My fears were not warranted, it turned out. To prevent the furnace from getting scratched up, I left in place the moving blanket in which we had moved it around under the house. This also reduced the friction as I moved it around. I set the furnace rear-ward of center on the stand, further from the chimney. This aligned with where I had expected it to go, mostly, leaving me with an exhaust run of around 3 feet along the plane, with a slight diagonal turn in it.. when I install it. The picture at the top of the post shows how it is right now, and no, the end furthest away is not touching the ground; it just kinda looks that way.

Exhausting
Once the furnace was in, I spent some time rough-assembling the exhaust. This consisted of taking the old exhaust down to it's most basic pieces and assembling a path that had the correct angles and took a slightly indirect route so I could route the cold air intake without interference. Once roughed-in, I took it back apart so I could easily get to the other side of the furnace. I have a great deal of "conditioned" air work to do, and having the fuller access will make that work easier.

This has gotten super long, and it has covered a few weeks of work. I was able to get another few hours in, but I'll couple that with whatever I get done next weekend into my next post. The calendar says 7-November, so, clearly, the weather is starting to get cold. We were fairly motivated when the daily high temperatures dropped into Autumn temps. We are getting overnight lows below freezing now, so there is no lack of motivation nor pressure. Still, I want to do it right and have a safe space once it is completed. Since I am doing it mostly by myself, it will only go so fast. At this point, I hope to have an operational furnace by the Winter Solstice.

Thanks, as always, for following along-