Showing posts with label chimney. Show all posts

Tuesday, December 5, 2023

Starting to Solve for the Furnace Conditioned Air

If it feels like this furnace saga is unending, it definitely feels that way on my end. Every passing day, the weather gets colder, but I will not short-cut this work. It being correct is too important for health and safety. I do want to stress that our electrician, Gary, owned an HVAC company and did hundreds of furnace installs. He consulted on the plan and will be reviewing my work / confirming everything when he connects the electrical at the end. So, we keep going. Honestly, the hardest part is putting on cold clothes in a cold house to get into an even colder (and, frankly, filthy) crawlspace.

Anyway, today, I am focusing on what I refer to as the "conditioned" air. This is the air that is leaving the furnace, presumably warmer, but on those days we are only running the fan, it will just be filtered. For simplicity, and since this was the way I did it, we are working from the furnace exit to the floor vents. Sadly nothing was as easy as it seemed in my head, resulting in this expanding to cover many weekends. This is just the first part of it.

Furnace Mounted
checking pitch
Before I shift to the new topic, I had a couple of final things I needed to do with the furnace: confirm the pitch and attaching it to the stand. To confirm the pitch, I found a straight bit of hard plastic tubing that was over a meter long. At exactly 1 yard (36 inches or 3 feet), I attached a 1 inch thick piece of scrap wood. Recall the minimum pitch for the exhaust from a furnace installed on it's side is 1/4 inch of rise per foot (or 1 inch of rise per 4 feet). I figured that if I made sure my work was at 1 inch per 3 feet I would have exceeded the minimum and have some wiggle room for the furnace or the ground shifting. I set the plastic tube jig on top of the furnace and set the level on top of that. Bubble between the lines? Yes, so somewhere along the way between my level crawlspace patio and the top of my furnace the world tilted. Glad it pitched the right way for me. I had planned to shim the exhaust-exiting end. Do I want to know why it shifted? Yes, but I think because the furnace is offset rearward (you can see the stand in the lower right corner of the picture), the weight of the burner is causing the tilt.

Feeling fortunate, I grabbed a longer run of that plastic tubing to simulate the exhaust from the furnace to the chimney and set the jig on that. We have good angles, though I will need to add a brace near the chimney end to make sure it doesn't relax downward over time because the exhaust needs to enter the chimney near the top of the hole. To make sure the rest of my efforts don't cause the furnace to move, I sent sheet metal screws through the now-bottom of the furnace into the stand so it is fixed-in-place. I re-checked the pitch, and it is still 1 inch for 3 feet even after sending screws through. On to the conditioned air!

Plenum Pablum
building a plenum
The first thing the conditioned air enters is a box called a "plenum". It acts as a singular junction box for all of the conditioned air, but it does more than that. Consider what happens when your furnace kicks on. The fan starts and very quickly air pressure increases at the furnace outlet. To cushion the system from that large pressure increase, there is the big box (plenum). Secondarily, this box allows the air to flow smoothly and evenly into the ducts. If the box is too small, or nonexistent, the air would not enter all of the vents evenly, leaving some spaces with too much airflow and others getting an old microbus heating system experience (virtually nothing). I am over-simplifying it as there are air dynamics about back pressure from the branch lines, etc. that I really don't understand.

The original plenum to this house was just that. The original plenum, as in it was the plenum when the heat source was something other than gas, we believe. I think it may have been coal based on the soot we have found and then oil since there's an old oil-tank shed in the back of the house. Still, airflow is airflow and if the thing that is pushing the air is heated by coal or wood or geo-thermal fanciness, and the venting beyond the plenum is the same, I would expect the plenum should be relatively the same. Of course, 15 years after the house was built they added 2 rooms to the back, so maybe the plenum has been the wrong size since. I suppose, this could be a recently-added bit, but none of the other metal venting looks remotely new.

furnace entry
The plenum was almost a meter tall and about 2 feet square. From my research, this is excessive, but was unable to arrive at a clear answer as to what size it should be, like with a calculator or simple rubric. The most basic advice seemed to be "make it a little bigger than the outlet of your furnace". I am fairly sure that would lead you to a too-small plenum and poor circulation impacts, but I defer to experts. Regardless, I took all of this and decided that I needed the plenum to fit in the space I had, so if it was smaller, well... we'll just deal with it and worst case I'll make another one later. I simply built what would fit in the space without digging again. 

Plenum Fab-lum?
So, what did I do? The original plenum had the air enter from above and then it routed air sideways out 2 rectangular vents and one round one. In order to keep the orientation of the rectangular outlets, I needed the top covered and a new entry added on one of the other "horizontal" sides. In order for the 1-meter-tall plenum to fit into my not-quite2-feet-high crawlspace, I needed to shorten it too. So, I measured and then cut (with the death wheel) 9 inches down from the top in each of the 4 corners. Then, I folded the sides in like a cardboard box. With a hammer and dolly, I squared the newly folded lines. Content with the shape, I drilled and then pop-riveted the new top in place (upper image). Last, I sealed all of the edges with high-end foil tape.

Plenum added
So, I have a box, but no entry for the furnace. Onto the side which had a circle-vent, I applied blue tape and then measured the dimensions of the furnace exit. Half an inch inside this rectangle I marked the actual cut line. That extra 1/2" will be the lip which will press against the exit "flange" on the furnace. I cut the hole with the death wheel, turned the lip with some pliers and cleaned up the fold with the hammer and dolly again. The circle-vent used to feed the bathroom, which does not currently have a vent. If we re-introduce a vent into that bathroom, I can re-integrate it into the system.

I lowered this new plenum into the crawlspace, army-crawled it past the furnace and attached it to the furnace. It barely fits between the ground and the floor joists, but it does and it did not disturb the angle of the furnace. Once it was in place and the edges sealed, I was ready to look back at the main trunk / vent lines (the big rectangular ones).

As often happens when I get to posting about something, this got very long. This feels like a logical transition point so, I am going to stop here, and pick it up next time. Thanks, as always, for following along-

Tuesday, October 17, 2023

Chimney Repaired

In my last post about the NewOldHouse work, I described the efforts by the chimney guys. Today, I get after repairing the chimney and then sending a liner down through. I didn't take pictures when I was up on the roof, nor did I appear to get any after I removed all the failed-mortar ones. Oh well, there are a couple shots after the chimney after mortaring.

Out with the Bad
liner in, cap placed
This was actually very straight-forward and simple. With a framing hammer and an empty 5 gallon bucket, I climbed onto the roof. I set the ladder into an inner turn of the roof line so it could set against the gutter in the corner. This made getting on/off the ladder easier. It's funny how fglat a roof looks from the ground and how not-flat it feels once you're on it. Anyway, I carried the bucket and hammer over to the chimney to see what the chimney guys described. Sure enough, the mortar holding the bricks together at the top of the chimney was failing. After initially thinking I would just remove the loose bricks and clean them up on the ground, I fell into a different pattern.

As I removed each brick, I smacked the mortar that still clung to the brick with the hammer, directing the crumble into the 5 gallon bucket. Once the brick was unwilling to release any more mortar, I set it on the roof and moved on to the next one. Once the top course was clear, I swept the crumbling mortar into the bucket. I repeated this process for the 2nd course and found that the corner facing south west had additional loose bricks, so I took 3 or 4 out of the 3rd course and 2 out of the 4th course. Once they were all cleaned of mortar (and in some cases what looked like silicone), I swept up the roof into the bucket and climbed off the roof.

In with the Good
The next time I was able to get on the roof was the following weekend. Fortunately, even after the cold and wet weather initially arrives, we will often get some nice weather patches before the cold wet really sets in for the winter. This week and weekend were like that. So, leveraging a 5 gallon bucket as the means of mixing and transporting mixed mortar, I returned to the chimney work.

joiner for brick mortaring
The instructions on the bag and on the internet agreed that for 17 bricks, I needed to mix up 1/2 of a 80# bag of type N mortar. I had almost half of the mortar left when I was finished, so I think everyone overestimates how much product is wasted or lost in the process. Anyway, I put about a quart of water in the bottom of a clean 5 gallon bucket and then added around half the bag of mortar in. On top of that, I added water and mixed with a drill-attached mixer I got at harbor freight for mixing paint. It worked perfectly, getting the mortar evenly mixed. To test the water:mortar concentration, I learned that if you can scoop some onto a trowel and hold it vertically... and the mortar doesn't slide off... it's right. If it slides off, it's too loose. On my first go, it was too loose so I added some more mortar and mixed again. This time, it held to the trowel. Winner! Next, the mortar needs to rest for 10 minutes before use, so I set up the ladder and hauled tools up to the roof. The bucket of mixed mortar was last. This is some heavy stuff, so I pushed it up rung-by-rung ahead of me.

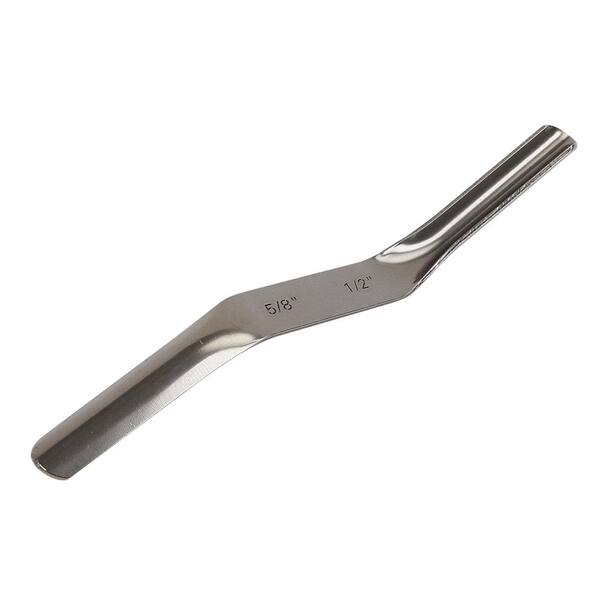
Once on the roof, I set to learning how to mortar bricks by doing. I'd watched a few videos, so I knew the basics, and after a few bricks, I actually got the hang of it. My process was to slap a blob down first, then butter the adjoining short end before setting the brick in place. I then pressed it down, squeezing a little of the mortar out the sides, but eliminating air pockets in the process. Then, I would peanut butter spread mortar along the outer and inner seams. Last, I would use the brick joiner tool (image above until HomeDepot changes the URL) to clean up the outer seam. Using this process, I set 17 bricks in just under 2 hours (the use-life of mortar is 2 hours after the 10 minute rest period).

Liner In
mortar fixed, no cap
With the chimney repaired on Saturday, I returned on Sunday to confirm the work. Things looked great, so I shifted to installing the chimney liner. I ordered a replacement liner to run the full length. I could have found a short section and abutted it to the end of the original liner, but finding a 3 meter (9 foot) length was a challenge. So, I removed the original liner from the cap and attached the new liner in it's place. The new liner arrived all compressed so I had to stretch it to the needed length. I set it on the ground alongside the old one and measured another 10 feet beyond that point. I then stretched out the new liner to that 10 foot point.

I hauled this bundle up onto the roof and slowly passed the liner down through the chimney until it hit bottom. Boo had been my on-the-roof witness (strongly advise you have a partner around when you are on the roof. One good wind and you could be on the ground. Without someone there, that could be life-altering... or -ending). At this point, though, we needed someone in the crawlspace so she got down in there. We lifted the liner up a touch so she could grab hold and then she simply pulled it through the hole. As she pulled, I pushed down on the chimney cap, until the ap was settled and the liner jutted out from the chimney by about 6 inches. Once the cap settled onto the chimney top, I could apply construction adhesive and fix the cap to the chimney. I chose to leave it until the furnace work is complete, though, in case we need to move things. Down in the crawlspace, Boo added the stiff adapter tube to the end of the flexible liner, reflecting the original install, and providing a firm surface to attach the furnace exhaust / flue.

I chose not to do anything more with the liner at this point, preferring to let the furnace work dictate where and when the liner would be cut in the crawlspace. I expect it will be cut similarly to how it was before: right at the chimney wall where a transition to a hard exhaust will appear. With the chimney  and liner solved, all of the outside work is complete. Next, I will be cleaning up the other rectangular ducting and then we can start to fix the furnace either to the ground or suspended from the floor joists.

That's it for now. Thanks, as always, for following along-

Tuesday, September 26, 2023

Down in the Hole

Today's post is continuing the fun with the furnace. We took a weekend off for a family wedding and all the events around it. So, when we returned, we had a hole cut in the floor, a dozen 5-gallon buckets worth of dirt removed from beneath it, and the furnace slid over to the edge of the hole.

Chimney Cleared
placed for now
Before Boo and I got after moving the furnace, we felt that getting the chimney liner removed and the blockage between the floors removed needed to happen first. Also, by keeping the furnace out of the way, the chimney folks would have the most space available. We hired a father son team (DGC Chimney Service) to do the dirty business we were unable to complete ourselves. This also created an opportunity to have this chimney inspected and repaired, if necessary. They started by removing the aluminum sleeve out the top of the chimney. It is in re-usable shape, so we just need to add about 8 feet to it and re-feed it down the chimney to vent the new furnace location. Once it was out, they cleared the mortar plug that had been placed between the floors and then swept out the remaining soot. After an inspection and read-out, they were done. All-in, they were here for 2 hours.

lowered
During the read-out, they shared that the top 2 courses of the chimney needed to be repaired. These are not structural, so they insisted a homeowner could do it. Otherwise, the chimney is in incredibly good shape. The age of this house pre-dates the building code requiring the terra-cotta tile liner. Prior to that code change, masons would apply a thin layer of mortar by hand inside the chimney as it was being constructed. Once complete, there would be an uninterrupted skin from bottom to top. While cohesive, this was a great liner of a chimney. Unfortunately, this mortar is more sensitive to the acidic emissions which pass through a chimney. When the residue on the mortar skin is met with rainwater, the mortar is slowly eaten away. So, ordinarily a house this old would have some areas of the mortar liner, especially nearest the top, compromised. That is not the case here, so somehow we're lucky. Perhaps the chimney was cleaned annually. Regardless, I need to repair the top 2 courses and re-introduce a liner down through to the crawlspace.

Furnace Lowered
rotated 90*
With DGC's work complete, Boo and I could return to moving the furnace. As I mentioned, it was on the edge of the hole in the floor and I had dug out a bunch of dirt below. To keep things clean, we set out a blue tarp over the dug-out hole. Then, we wrapped the furnace with a pair of load straps, tying the ends so the furnace had 2 long canvas straps around it. Boo and I used those straps as handles, shifting the furnace first over and then through the hole in the floor. The hole was cut exactly right for the size of the furnace, but it di not account for the machine screw heads sticking out from the sides. So, the furnace would hang up on the screwheads on the floor joists. We encouraged the furnace to pass with a booted foot and once the screwheads passed the top edge they dug into the joist just enough to prevent the furnace from falling through. A couple of centimeters after the top edge of the furnace passed the bottom of the floor joist, the furnace rested on the blue tarp.

Once on the ground, Boo ducked through the hole where the furnace used to be and returned the furnace from the crawlspace. Then, as I lifted up on the straps, Boo pulled the bottom edge towards her, tilting the top away. The furnace rotated on it's horizontal axis until it had turned 90*. At this point, I climbed down behind the furnace and Boo and I wrapped it with a moving blanket. Then, as Boo pulled, I pushed the furnace over the plastic vapor barrier over to the base of the chimney (to be fair, Boo pulled more than I pushed). We left the furnace like that, wrapped in a moving blanket, and not quite where it's going, but fairly close.

More Vent Fun
insulation stripped
With the furnace somewhat settled, I took a closer look at the rectangular vent/ducting we had taken down for the furnace removal. It looked awful. The ducts had been wrapped with open-cell pink fiberglass insulation. On surface, that sounds like a great idea, but this crawlspace had been inhabited by rodents. So, the fiberglass was, uh.. let's just say guh-nasty, gross, disgusting. Wearing a respirator (of course), I removed the insulation from the larger run and carefully swept up the droppings and dust into a plastic garbage bag and removed the bags from the crawlspace. The other duct needs to have a similar treatment, but the one which was stripped of insulation now looks brand new. We had feared that they would need to be replaced, but now, we will simply clean the insides with a vacuum and long-handled brush. Of course, with the furnace re-location, the venting will need some re-orientation, but we may be able to escape with only a few small pieces rather than a full vent replacement.

This is where we're at. For Pacific Northwesterners, you are well aware of how our weather has shifted from summer to autumn-ish over the past few weeks. Overnight low temperatures have dropped into single-digit C (below 50*F) and daytime highs are barely breaking 20C (68*F). Not having an operational furnace nor a meaningful alternative heat source may very well become an issue before we get the furnace operational, based solely on the speed at which we have gotten to this point. Fear is the ultimate motivator; we will have heat this winter. It will be interesting to see if we have heat by Halloween, though.

Thanks, as always, for following along-
Tuesday, September 12, 2023

Digging a Hole Where the Furnace Gets In

Kindly forgive the Beatles song stretch. Today is a brief post covering a considerable amount of sweat and effort: getting the furnace moved into the crawlspace.

Can You Dig It?
dig hole
In my last post, we cut a hole in the old kitchen floor just inside the door to the garage. The hole is one floor joist wide, allowing the most narrow dimension of the furnace (~11cm or just over 14inches) to pass through. We decided that the height (depth?) of the other side of the hole would be the largest of the 2 remaining dimensions of the furnace. We could have used the next-smallest. We figured that whichever dimension remained would need to be available between the bottom of the floor joist and the ground. Since the plastic-sheet covered dirt floor was 2 feet (60cm) +/- from the bottom of the joist, we would need to dig. The furnace has one side that's about 28-1/2 inches (72cm) and it stands 33-1/2 (85cm) tall in it's original alignment. Our choice was to dig down 4 inches or so for the size of the hole or dig down almost a foot (25cm plus wiggle room). I suppose the mount of dirt to move is the same, its just a question of depth versus width. Still, it just seemed like digging shallow and wide felt like less dirt.

With the hole cut in the floor, I grabbed a 5 gallon bucket and the post-hole digger. I filled a bucket, hauled it up and outside and spread the dirt around a low spot on our lawn. I did that at least a dozen times. Once the main rectangle was dug, I considered that once the furnace was in the hole, we needed to tip it one way or the other to get it flat so it could slide around. So, the edge of the rectangle that faced towards the furnace final destination was cut down on an angle so we could pull that bottom edge up and away from the hole. I figured that if I had 28 inches from the bottom of the hole to the top of the dirt as measured from the inner edge of that floor joist, it could effectively hinge. By the nature of how this tip, though, that front edge will come up between the joists and not have an issue. It wasn't until after completing the dig, that I pieced that together and determined that I dug out more than I needed to. Ultimately, it is better to have too much room than not enough.

Venting Some Venting
venting set aside
With direct access into the crawlspace, Boo and I looked towards the location where the furnace would ultimately reside. Our view was impeded by supply venting routed all over. There are 2 main runs, heading in opposite directions: one towards the hole we just dug and the other going away. From these main trunk vents, the smaller round vents are attached. Where the 2 main runs come together is a large box (plenum?) where the conditioned air leaves the furnace and enters the system. All of this stuff needed to get shifted out of the way before we could bring the furnace down.

We started with the vent that ran from the box towards the hole. This system is old, and held together mostly by faith and tape. Boo removed the tape at the box, and the vent detached easily. She cut down the cloth webbing that suspended the vent from the floor joists and the whole thing dropped to the floor. She slid it to the side. I followed suit, removing the vent running the other way by the same steps. This left the big box.

the box
The box was simply hung from the floor by a lip that was less than 1/2". I lifted the edge of the lip with a bladed screwdriver, pressing the lip up and inward while sliding the screwdriver along the edge. The lip simply folded under the floor. Once the final side of the box's lip was so treated, the box fell to the floor of the crawlspace. I was (and still am) amazed that a heat system constructed in the late 1940's was held together without any fasteners. I removed the connectors attached to the box that allowed the vents to connect and then lifted the box out through the hole.

Sooty
blocked with soot
The last thing I tried to complete before lowering the furnace was removing all the soot from the clear-out. I foolishly thought that I could dig out the soot that was at the clear out down in the crawlspace. Well, it looked like the clear out had maybe never been cleared out. I was able to remove a full trashbag of soot and was unable to reach any further up into the chimney. Looking down from above (through the original oil? wood? coal? furnace-to-chimney access, I could tell there was at least another foot of solid soot I could not reach. So, Boo and I decided that we would bring in a professional. Many years ago, I had used British Brush to clean and repair chimneys at various houses. Well, they are out of business so we hit Yelp / the Yellow pages and solicited bids. In the end, we have some chimney repair from when the furnace was in the dining room, probably a new liner from the cap to the clear-out and then a safe connection to which we can attach the furnace. My biggest concern about this whole furnace move was to safely manage the exhaust and not accidentally create a CO or CO2 issue inside the house. Having a professional will help.

This is where we are left off. We have the venting removed, the furnace freed, an access hatch built and the hole dug for moving the furnace. We decided to leave everything just like this until after the chimney folks do their thing so they have the greatest mobility. We have some family events coming up, so the work needed to come to a stand-still anyway. We will pick this up after that.

As always, thanks for following along-