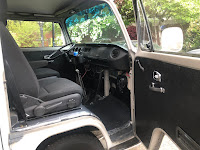
Once the headbanger was installed, getting the interior to a usable state was a downhill run. This post is really more a collection of all the little things that got done so we could hit the road. So, for today, "complete" means "good enough for this Summer"; it does not mean we're done. I will be picking this up once camping season comes to an end in October. Before I begin, Hapy Summer Solstice.
Cab Floor Complete
I had left some of the MLV splits un-taped. So, I started with that. I discovered that the Jute and MLV was too wide between the outer edges of the seat rails and the doors to allow them to close easily, so I trimmed them down. Then, the edges were taped down.
Sun Visors
 |
| sun visors in |
Cab Door Cards
 |
| cab cards nearly complete |
When I removed the original-to-me cards, I removed the little door vent things. I set them in my trove of parts and did not install them when I put on the cardboard cards. I put them on this time. The door looks much more finished now, as you can see in the picture above-right, here. The rest of the card install is the same as original. The window crank removes / installs with a Phillips screwdriver. As does the chrome door latch mechanism and the door pull strap. Once installed, the door looks so much better than it did. I have not decided if I will apply the thin closed cell foam or not, but I am not doing it for now.
Kicks
 |
| partitions and mid-walls carded |
Slider Door
Moving rearward, I pulled the middle row seat out and the original-to-me slider door card. The slider had not gotten much treatment over the years, so it got CLD and 2 layers of Mega Zorbe. I thought the extra layer might reduce the racket when the door opens. It didn't at first. I spent some time with oil & grease cleaner working on the door runners, and that actually helped a little bit. The lower door roller is the source of the lion's share of the noise and noticed that the outer edge of the runner was a simple 1/4" tall thin bit of steel. So, I ran some leftover white "U" seal I had from doing the luggage rack to see if that would help. Nope. It effectively pressed the wheel against the inner steel track edge, causing it to make a different, but equally unpleasant, noise. I concluded the wheel was the noise-creator, and I ordered a replacement lower guide with a vinyl wheel, instead of steel.
 |
| rear tail gate carded |
There are 2 bolts and one Allen-screw holding the guide to the door. The bolts on the old guide were so rusted, they broke off, leaving me with just an Allen-bolt holding the guide in place. I will periodically shoot those rusted bolts with penetrant, and when I am able to remove them, I will use M6 bolts in their place. I will apply anti-seize, though. With the new lower guide in, the door was quieter, and operated more smoothly, but the upper guide was making noticeable noise now. So, I removed it, and improved it with penetrating oil until the guide-wheel would easily spin between my fingers. I re-installed it, and now the door was as quiet as a modern slider.
More Cards
I had some daylight remaining, so I grabbed the door card for the slider, and installed it. I also installed the card for the wall opposite the slider, and installed it. I did the rear tail gate and the extra cards for the rear-facing partitions behind the front seats. Each of these took some fiddling to get right, but that was on account of Hapy, not because of the cards. These things are great; the holes are mostly in the exactly right spots and the bag of Mollys had more than enough fasteners for me to damage a bunch of them and still not run out. I believe I can fit more sound deadener between the partition cards and the partition, and I may need some foam to reduce vibration noise, but right now, the interior of the bus looks really good. Removing those cards to add noise deadener will be simple when /if I choose to do it.
I have a couple of cards remaining to be installed along the seat pedestals and I'll do them as the mood strikes / time permits. For those keeping track at home, I have installed the panels which sit at either end of the rock-n-roll bed, arching over the rear wheel wells, and have I attached the panels that cover the bare steel in the sleeping area. Because the sleeping area cards abut the rear-wheel cards, I needed to do them in the right order. As you can see in the image on the right, here, these cards, when used together, make a nearly seamless span. Boo and I will especially appreciate the sleeping area cards when we're camping. There are few things as jar-awake as having some bare skin touch up against the metal side after it has cooled down overnight. That is some quick-awakening. While this plastic / PVC will not be a great deal better, it does create a foundation for some foam and then some fabric later.
At this point, I felt ready for a test flight. I'll post on that next time. Thanks, as always, for following along-

No comments:
Post a Comment