When I last posted about Oliver's seat (See
New Seat, What a Treat - Part 1), I had completed the tear down. The old covers were sitting in a pile with the nasty foam and rusted up hog rings. The seat frames and head-rest metal were painted with black Rustoleum and hanging from the beam on the front porch. Today, I start the re-assembly process.
The new covers are a leather / vinyl blend where the part that you sit against is leather but the back of the seat upper and the edges which hang down from the seat are an advanced vinyl that feels leather-ish. This vinyl is fairly durable. The blend reduces the overall cost of the cover by a couple hundred dollars US versus all-leather. The leather is backed with some thin foam padding.
Seat Gets Heat
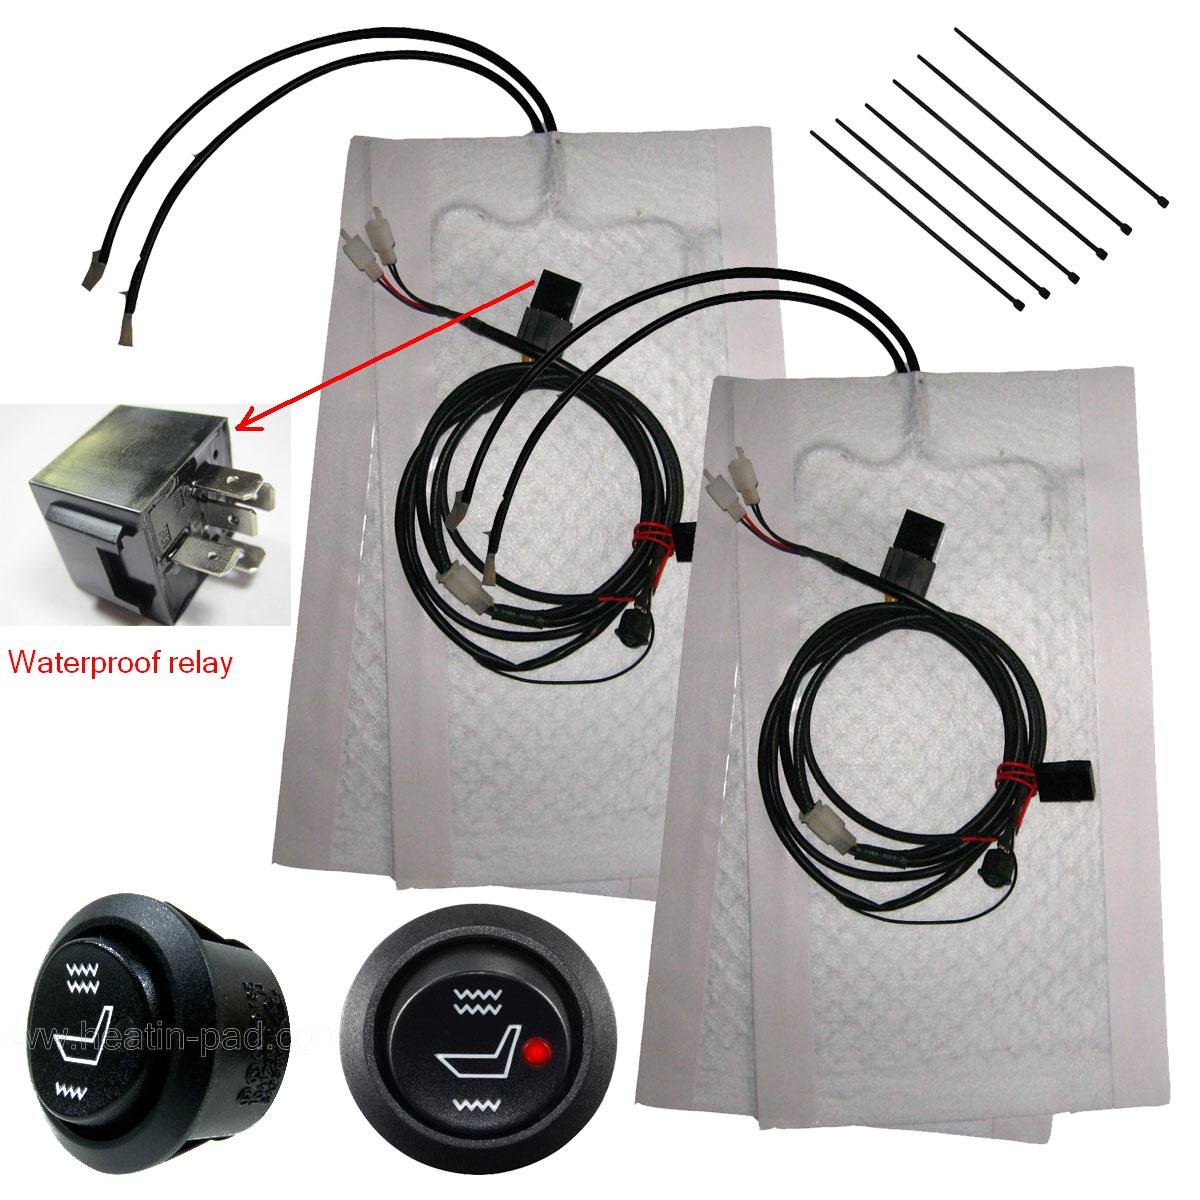
I decided that going through all the trouble of redoing the seats would be even better if I had seat warmers when I was done. While our Pacific Northwest is well known for it's long periods of rain, we actually do get stretches of sunshine, and not just between July 4th and October 15th. We get some nice fall and spring days. Every once in a while, we will get a few days of dry, but cold weather in the dead of winter. On those days I would like the choice of putting the top down and driving in the sun. Actually, having warm seats when it is cold nasty would be super welcomed too. So, as I acquired the foams, seat backing, webbing, hog rings and all the other bits needed to rebuild the seats, I bought a
universal seat warming kit for 2 seats. I got a very simple kit with a 3 position switch for each seat that I could install into a fairly small hole. The heating part is a simple white rectangle that rests between the seat foam and the new cover. The base and the back have separate heating elements. While the instructions indicate that the pad can be cut to fit, I chose not to, recognizing that I could render it useless by cutting it incorrectly. Besides, the pad covered the entire seat back and the entire seat base, so we will be getting warmed from the back of our knees to our necks. Yeah.. that is going to be sweet.
These attach to the foams with basic 2-sided tape that runs the length of the rectangle along each edge. The instructions say to tape the pad to the foam before putting on the cover. Cool. Finding the edge of the 2-sided tape was the hardest part.
Upper First

So, with the heating elements figured out, and taped to the face of the upper seat foam, I started with the upper section or the seat back. I had read different techniques, but tried my own. First, I took the new seat hard-back and worked it into the lip around the rear side of the foam. The seat frame will later fit into this groove. With the foam and the hard-back as a unit, I fit the seat cover over the top and stuffed the corners of the foam into the corners of the cover. This is similar to putting a duvet cover on a big old comforter. The corners need to fit right first. Once the corners were in, I set the seam edges of the foam and then the seat back so the lines ran along the edges of each. Now that the foam, back and cover were aligned, I slid the seat frame between the foam and the hard-back. I did this slowly so the foam did not shift inside the cover. The result was exactly what I had hoped. The lines were right on the foam where they should have been. I realize that most auto upholstery is done by setting the foam onto the frame, turning the cover inside-out and slowly rolling the cover onto the foam while applying glue. It did not occur to me that I had missed the glue because the old covers slid right off the old foams, leading me to believe that maybe they weren't glued on before. I should note that after everything was assembled, I have seriously considered removing the upper cover and re-installing it the auto-upholstery standard way.
Ring the Back
With the cover in place, I grabbed at the bag of hog rings and the hog ring pliers I had purchased at Harbor Freight. The pliers were useless, so I chose not to use them. The hog rings that were supplied as the hog ring kit for this seat only had one size of hog ring, but the front edge of the seat back cover needed a larger size if it was going to be mounted the original way. So, I had to solve for clamping down the front edge different than how it had been or find a different set of rings. I decided to mull that over while I did the back. First, I needed to route the cable for the seat heat to the inside edge, so the wiring for activating the seat heat will run along the transmission tunnel rather than along the door sills. The rear side of the cover is held onto the frame with 4 square clips. I pulled the seat back as tight as I could while still retaining the shape and straight lines. Starting in the middle, I pushed on the inner 2 clips. These held the cover in place so I could do each outer clip with just a little tension. The seat back looked really good, so I started looking at options for the front edge.
Ring the Front
The front edge had been held on by 4 larger hog rings clipping to the large tube across the bottom of the back. Next to that large tube is a small tube through which the seat release is controlled. I decided to use the one-size rings on that smaller tube, and, after compressing the rings a little bit with my channel-lock pliers, I was able to use them. Similar to the rear, I pulled the material as tight as I could without distorting the lines (but centering the pleats) and did the 2 center rings first. I did the outer 2 rings one at a time similarly holding the material firm. Ideally, the large pipe would have been used. It occurred to me afterwards that as the seat back incline angle changes, the tension on the cover will vary because of the tube I used. If I am able to source an 8-piece set of larger hog rings, I may change these out without removing the seats.
Outer and Inner Edges
With the cover held on, I considered how to address the lower outer and inner edges which had been held in place with Phillips screws. I did not mention these in the tear down post, mostly because at the time they were a non-story. Down at the bottom, there is one screw on each side that passes through the cover, through a semi-circular, heavy, flat cardboard and then into the frame. You can see the screw head in the picture on the right. The cardboard fits into a little pocket on each side of the cover. I have been unable to find a source for a replacement. So, I put the old flat cardboard bits into the respective sleeves in the new cover, thinking that they, at the very least, would help the cover retain its shape. I chose to not re-install these screws since I could not determine how to best identify where the hole in the frame was without boring exploratory holes. I may come back to this later, though.
That's it for today. I will post about the lower seat, and the big fun of re-installing a light colored seat in a dirty garage later. Thanks, as always, for following along.


No comments:
Post a Comment